Auriol H13726 Operation and Safety Notes
- Kategoria
- Stacje pogodowe
- Typ
- Operation and Safety Notes

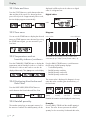
IAN 92027
PREMIUM WEATHER STATION
PREMIUM-WETTERSTATION
Bedienungs- und Sicherheitshinweise
PREMIUM WEATHER STATION
Operation and Safety Notes
STACJA METEOROLOGICZNA PREMIUM
Wskazówki dotyczące obsługi i bezpieczeństwa
PREMIUM VREMENSKA POSTAJA
Navodila za upravljanje in varnostna opozorila
METEOSTANICE
Pokyny pro obsluhu a bezpečnostní pokyny
PRÉMIOVÁ METEOSTANICA
Pokyny pre obsluhu a bezpečnostné pokyny
PRÉMIUM IDŐJÁRÁSÁLLOMÁS
Kezelési és biztonsági utalások

GB Operation and Safety Notes Page 3
PL Wskazówki dotyczące obsługi i bezpieczeństwa Strona 22
HU Kezelési és biztonsági utalások Oldal 43
SI Navodila za upravljanje in varnostna opozorila Stran 62
CZ Pokyny pro obsluhu a bezpečnostní pokyny Strana 82
SK Pokyny pre obsluhu a bezpečnostné pokyny Strana 101
DE / AT / CH Bedienungs- und Sicherheitshinweise Seite 121

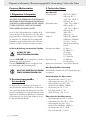
3 GB
1. General information ...............................................................................................................Page 4
2. Intended use ............................................................................................................................Page 4
3. Technical data .........................................................................................................................Page 4
4. Safety information ..................................................................................................................Page 5
5. Scope of delivery ....................................................................................................................Page 5
6. Definition of terms ...................................................................................................................Page 6
7. Functions ..................................................................................................................................Page 6
8. Commissioning ........................................................................................................................Page 7
9. Inserting and replacing batteries...........................................................................................Page 9
10. Device overview ......................................................................................................................Page 10
11. Preparing the wind gauge and rain gauge and registering on the weather station .........Page 12
11.1 Calibrating the wind gauge ...................................................................................................Page 12
11.2 Preparing the rain gauge .......................................................................................................Page 12
11.3 Automatic wind gauge and rain gauge registration on the weather station .....................Page 12
11.4 Manual wind gauge and rain gauge registration on the weather station .........................Page 12
12. Weather station basic settings ...............................................................................................Page 13
12.1 Setting ......................................................................................................................................Page 13
12.2 DCF-77 synchronisation .........................................................................................................Page 14
12.3 Setting the time zone ..............................................................................................................Page 14
13. Alarm function .........................................................................................................................Page 15
14. Setting the air pressure unit ....................................................................................................Page 15
15. Air pressure adjustment ..........................................................................................................Page 15
16. Setting the wind speed unit ....................................................................................................Page 16
17. Setting the wind alarm ...........................................................................................................Page 16
18. Setting the wind chill alarm ....................................................................................................Page 16
19. Switching the Wind Alarm and the Wind Chill Alarm on and off ......................................Page 17
20. Setting the rain gauge unit .....................................................................................................Page 17
21. Setting the temperature unit ...................................................................................................Page 17
22. Display .....................................................................................................................................Page 17
22.1 Date and time ..........................................................................................................................Page 18
22.2 Time zone ................................................................................................................................Page 18
22.3 Temperature and air humidity indoors / outdoors ................................................................Page 18
22.4 Displaying Heat Index and Dew Point ..................................................................................Page 18
22.5 Rainfall quantity ......................................................................................................................Page 18
22.6 Ice / frost alarm .......................................................................................................................Page 19
22.7 Wind direction ........................................................................................................................Page 19
22.8 Wind speed .............................................................................................................................Page 19
22.9 Air pressure change ................................................................................................................Page 20
22.10 Minimum and maximum values .............................................................................................Page 20
22.11 Weather forecast ....................................................................................................................Page 20
22.12 Weather trend .........................................................................................................................Page 20
23. Maintenance ...........................................................................................................................Page 20
23.1 Battery charge indicator .......................................................................................................Page 20
23.2 Rain gauge leaf filter ..............................................................................................................Page 21
24. Troubleshooting errors in the measuring results ...................................................................Page 21
25. Cleaning ..................................................................................................................................Page 21
26. Disposal ...................................................................................................................................Page 21
Table of Contents

4 GB
General information / Intended use / Technical data
Premium weather station
1. General information
ATTENTION! READ OPERATING INSTRUCTIONS
BEFORE USE! KEEP OPERATING INSTRUCTIONS
IN A SAFE PLACE! THIS PRODUCT IS NOT A
TOY! KEEP OUT OF REACH OF CHILDREN.
Read the operating instructions carefully and use
the product as described in the instructions to avoid
injury and damage. We accept no responsibility for
damage resulting from inappropriate use and fail-
ure to comply with the safety instructions.
Symbols used in these instructions:
WARNS OF RISK OF INJURY!
The word DANGER warns of possible risks of
severe or fatal injury.
The word CAUTION warns of possible risks of
minor injury or damage.
POINTS TO FURTHER
INFORMATION!
2. Intended use
The weather station informs you of the current
weather conditions and provides a weather forecast.
The weather station is equipped with a rain gauge,
wind gauge, barometer, radio clock and calendar.
Only for personal use. Not for commercial use.
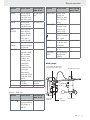
3. Technical data
Measuring Range:
Room Temperature: 0.0 °C to +50.0 °C,
Resolution: 0.1 °C
32.0 °F to 122.0 °F,
Resolution: 0.1 °F
Outside Temperature: –20.0 °C to +60.0 °C
Resolution: 0.1 °C
–4.0 °F to +140.0 °F
Resolution: 0.1 °F
Air humidity: 20 to 99 %
Resolution 1 %
Air pressure: 850 mb to 1050 mb
850 hPa to 1050 hPa
25.1 inHg to 31 inHg
(mercury column in inches)
Wind speed: 0–30 m / s
0–108 km / h
0–67 mph
0–58.3 knot
0–11 Beaufort
Rainfall measurement: 0–9999 mm
0–393.66 inch
Outdoor sensor range: 25 m (open area)
Exceeded range of measurement:
The following displays can be expected outside of
the range of measurement:
Readings below the measurement val-
ues:
– Room temperature below 0 °C: LL.L
– Outdoor temperature below –50 °C: LL.L
– Air humidity below 20 %: 20 %
– Air pressure below 850 hPa: 850 hPa
– Heat Index below 14 °C: LL.L
– Dew Point below 0 °C: LL.L
– Wind Chill below –90 °C: LL.L
Values above the measurement values:
– Room temperature above 50 °C: HH.H
– Outdoor temperature above 70 °C: HH.H
– Air humidity above 99 %: 99 %
– Air pressure above 1050 hPa: 1050 hPa
– Heat Index above 60 °C: HH.H
– Dew Point above 60 °C: HH.H
– Wind Chill above 60 °C: HH.H
– Rainfall quantity above 9999 mm: HHH
– Wind speed above 50 m / s: 50 m / s
WARNING!
The display becomes increasingly less clear in tem-
peratures under approximately –20 °C. Depending

5 GB
Technical data / Safety information / Scope of delivery
on the type of battery, power limitations are to be
expected at low temperatures (normally as of
–20 °C). Do not place the weather station or the
external sensor in direct sunlight.
CAUTION!
At temperatures above 60 °C (also depending on
the type of battery), the battery acid may leak.
Power Supply:
Weather station: 6 x 1.5 V battery, type AA
Wind gauge: 2 x 1.5 V battery, type AA
Rain gauge: 2 x 1.5 V battery, type AA
Operating life with full batteries: approx. 90 operat-
ing days.
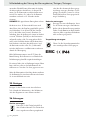
WARNING!
Herewith OWIM GmbH & Co. KG, Stiftsbergstraße
1, D-74167 Neckarsulm, declares that the article
Premium weather station · model number: H13726
Version: 07 / 2013 fulfills the basic requirement
and the other relevant requirements of 1999 / 5 / EC.
The declaration of conformity can be found under
www.owim.com.
4. Safety information
DANGER FOR CHILDREN!
Swallowing batteries could be fatal. Keep batteries
and the weather station out of the reach of children.
Consult a doctor immediately if a battery is swal-
lowed.
DANGER OF INJURY!
Remove the batteries from the device when empty.
Never short-circuit the connection poles.
This appliance can be used by children aged
from 8years and above and persons with re-
duced physical, sensoryor mental capabilities
or lack of experience and knowledge if they
have been given supervision or instruction con-
cerning use of the appliance in a safe way and
understand the hazards involved. Children shall
not play with the appliance. Cleaning and user
maintenance shall not be made by children
without supervision.
CAUTION - MATERIAL DAMAGE!
Only use the specified battery type.
Ensure correct polarity.
Check the batteries regularly for leaks.
If the device is not used for long periods of
time, remove the batteries.
Do not immerse the weather station or the
external sensor in water or other liquids.
Follow the instructions for cleaning and storage
in this manual.
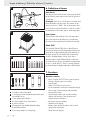
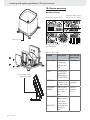
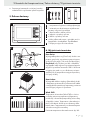
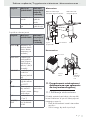
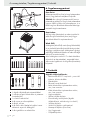
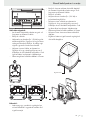
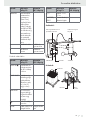
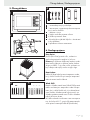
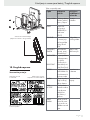
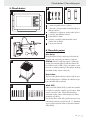
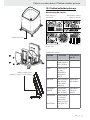
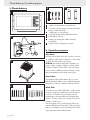
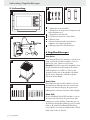
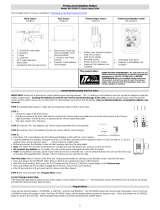
5. Scope of delivery
1

6 GB
Scope of delivery / Definition of terms / Functions
2
3
4
5
6
7
1
1 weather station with stand
2
1 wind gauge with integrated temperature and
air humidity sensor
3
1 rain gauge with leaf filter
4
6 screws suitable for ø 5 mm dowels
5
6 dowels ø 5 mm
6
4 hexagonal socket head bolt M6 including
4 nuts and 8 washers
7
2 mounting clamps for wind gauge
6. Definition of terms
Dew Point:
The dew point (Dew Point) refers to the point at which
the air releases water vapour in the form of fog and / or
condensate.
Example: if the air is cooled down constantly and
the air humidity stays the same, the relative air hu-
midity increases to 100 %. This means that the dew
point has been reached and the cooled air contains
the maximum possible water vapour at this temperature.
Heat Index:
The heat index (Heat Index) is the air temperature
felt on the human body taking into consideration
the measured air temperature and the air humidity.
Wind Chill:
The wind chill (Wind Chill) refers to the difference
between the measured (air temperature) and the tem-
perature felt on the human body, which depends on
the wind speed. The wind chill is the measurement
used for wind-dependant cooling of an object.
Humans feel this wind chill particularly on the face.
As wind chill can only be calculated for temperatures
close to or under the 0 °C limit, it is mostly replaced
by the heat index for higher temperatures (Heat Index).
7. Functions
Weather station:
– Radio-controlled DCF-77 time signal reception
with time display, time-zone setting
– Date display
– Alarm clock with snooze function
– Room temperature and interior humidity display
with storage of the minimum and maximum
measurement values
– Outside temperature and outside humidity
display with storage of the minimum and
maximum measured values
– Barometric pressure display
– Weather trend display
– Battery status display (weather station, wind
gauge and rain gauge)
– Wind direction display

7 GB
Functions /Commissioning
– Wind speed with wind alarm
– Dew point display (Dew Point)
– Ice/frost alert
– Precipitation display
– Wind speed and wind direction display
– Wind chill display (Wind Chill)
– Can be mounted standing or hanging
– For indoor use only
Wind gauge:
– Transmits the wind speed, temperature and humid-
ity to the weather station on 434 MHz frequency
– Assembled on a mast of approx. ø 25–31 mm
– Can only be assembled in areas free from
buildings, walls or other obstructions, as the
measurement values will otherwise be impaired.
Rain gauge:
– Transmits rainfall quantity to the weather station
on 434 MHz frequency
– Easy to stand or mount with screws on an even
surface
– It is best to stand or mount the rain gauge in an
areas which are not protected from rain.
CAUTION!
Comply with the following safety in-
structions when using the wind gauge
and rain gauge:
– Never immerse the measuring devices in water
or other liquids
– Never place the measuring devices in ovens or
microwaves
– Never expose the measuring devices to temper-
atures below –20 °C or above 60 °C
– Keep the measuring device away from chemicals
8. Commissioning
WARNING!
Familiarize yourself with the weather station, wind
gauge and rain gauge before assembly. The operating
instructions are easier to understand if you are hold-
ing the devices in your hand while reading them.
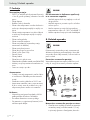
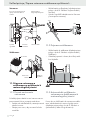
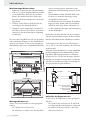
Setting up the weather station:
The weather station comes with a pre-assembled
stand, making it easy to set up the weather station
in the desired position.
1
PH0 0.5 x 3
ø 5 mm 5 mm
10 mm
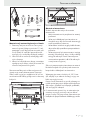
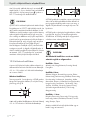
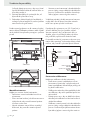
Weather station – wall mounting:
1. Mark the drill holes (horizontal distance approxi-
mately 11.3 cm) for the weather station and
make sure that no electrical or water lines will be
damaged before drilling the holes (ø 5 mm).
2. Push the dowel into the drilled hole until it is
flush with the wall.
3. Screw the supplied screws into the dowels,
allowing them to protrude slightly for the weather
station to be hung on.
The pre-assembled stand can be removed from the
weather station. Fold the stand downwards and pull
it out of the slot. To attach again, follow the same
procedure in reverse order.

8 GB
Commissioning
Hanger
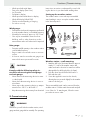
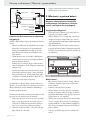
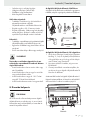
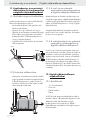
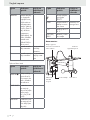
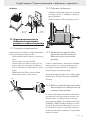
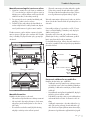
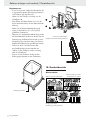
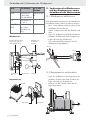
Wind gauge assembly:
Choose a suitable location for your wind gauge.
– The wind gauge must be set up outdoors.
– The wind must be able to access the wind
gauge from all sides to enable the wind force
and wind direction to be measured accurately.
– Ensure that the vane and the wind wheel are not
blocked to guarantee accurate measurements.
– The wind gauge must be assembled within the
signal transmission range. Walls reduce the
transmission range. Check the signal reception
on the weather station before final assembly.
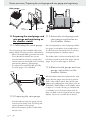
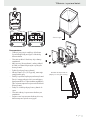
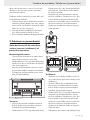
Ideally, the wind gauge should be mounted on a
mast or roof of a house, where the wind can act
directly on the wind gauge.
A mast is required with a diameter of approx.
25–31 mm (not included) which stands stable and
vertical. Mount the wind gauge as shown below
with the hexagonal socket head bolt, washers,
mounting screws and nuts provided. After assembly,
ensure that the wind gauge is positioned horizontal-
ly with a stable hold.
The wind gauge must be positioned horizontally to
guarantee accurate measurements.
Mounting clamp
Washer
Washer
Nut
Wind
wheel
Hexagonal socket head bolt
Mast
Vane
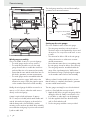
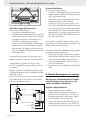
Setting up the rain gauge:
Choose a suitable location for the rain gauge.
– The rain gauge must be positioned outdoors.
The device must not be impaired by objects and
obstructions. Do not position under trees or next
to walls.
– The rain must be able to fall on the rain gauge
without obstructions to achieve an accurate
rainfall measurement.
– Ensure that rain water does not accumulate under
the rain gauge. It must be able to flow off freely.
– The rain gauge must be assembled within the
range of the signal transmission. Walls reduce
the transmission range. Check the signal reception
on the weather station before final assembly.
When you have found a suitable position, ensure
that the surface is completely horizontal to guarantee
accurate rainfall measurement.
The rain gauge can simply be stood in the desired
position or fixed with the screws provided.
1. Mark the drill holes using the rain gauge before
drilling the holes (ø 5 mm), ensure that no elec-
trical cables or water pipes can be damaged.
2. Push the supplied dowel into the drilled hole
until it is flush with the wall.
3. Fix the rain gauge with the screws provided.

9 GB
Inserting and replacing batteries
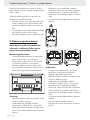
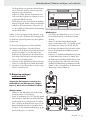
9. Inserting and replacing batteries
Put the batteries first into the outdoor
sensor (wind gauge / rain gauge), then
into the weather station.
Weather station:
– Open the battery compartment on the rear of
the weather station in the direction of the arrow.
– Insert the batteries (6 x 1.5 V type AA) ensuring
correct polarity. When one of the two battery
rows is full, a beep sounds.
– Place the battery compartment cover on the
battery compartment to close. Push the battery
compartment cover in the opposite direction to
the arrows until it engages.
Wind gauge:
– To open the battery compartment, loosen the
4 cross-head screws on the battery compartment
cover.
– Lift off the battery compartment cover.
– Insert the batteries (2 x 1.5 V type AA) ensuring
correct polarity. Ensure that the black strap lies
under the batteries. This strap can be used to
remove the batteries when they need to be re-
placed.
– Place the battery compartment lid on the bat-
tery compartment again. Ensure that the sealing
ring on the battery compartment is positioned
correctly in the recess. Only then is the battery
compartment waterproof.
– Tighten the 4 screws on the battery compart-
ment cover again.
Rain gauge:
– Use a slotted screwdriver to loosen the 2 adja-
cent fastening screws on the housing of the rain
gauge.
– Lift the housing carefully off the base of the device.
– To open the battery compartment, loosen the
4 cross-head screws on the battery compart-
ment cover.
– Lift off the battery compartment cover.
– Insert the batteries (2 x 1.5 V type AA) ensuring
correct polarity.
– Place the battery compartment lid on the battery
compartment again. Ensure that the sealing ring
on the battery compartment is positioned cor-
rectly in the recess. Only then is the battery
compartment waterproof.
– Tighten the 4 screws on the battery compart-
ment cover again.
– Place the housing carefully over the base of the
device.
– Fix the housing onto the base of the device
again with fastening screws.

10 GB
Inserting and replacing batteries / Device overview
Fastening screw
Socket for 6V DC adaptor
(adaptor not included)
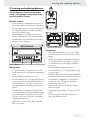
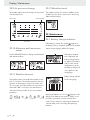
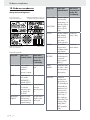
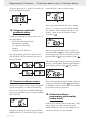
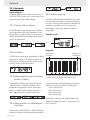
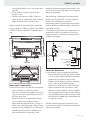
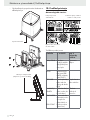
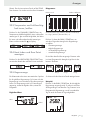
10. Device overview
Weather Station:
Weather forecast and air pressure
Temperature display and air
humidity indoors / outdoors
Wind speed, wind direction
and rainfall quantity
Time and alarm
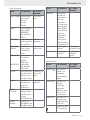
Buttons – front side
Button Press once Press for ap-
prox. 3 sec.
RAIN/CLEAR Precipitation
quantity day/
week/month/
total
Delete data
WIND Average wind
speed (AVER-
AGE) and gusts
of wind (GUST)
PRESSURE Air pressure unit
modification (in
Hg, mb or hPa)
Air pressure
adjustment
CHANNEL /
SEARCH
Channel selec-
tion (inside, out-
side or alter-
nate)
Search for
transmitter
sensors
HEAT INDEX
DEW POINT
Switch display
between temper-
ature felt by
humans (Heat
Index) and dew
point (Dew
Point)

11 GB
Device overview
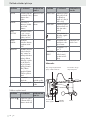
Button Press once Press for ap-
prox. 3 sec.
CLOCK Switch display
between local
time, date and
day of the week
Set date and
time
ALARM Display and
active / deacti-
vate alarm time
Set alarm time
RAIN
HISTORY
Current precipi-
tation display
and precipitation
display for the
last 6 days /
weeks / months
WIND
ALARM
Display of Wind
Alarm and Wind
Chill Alarm
MEMORY Display of auto-
matically saved
min. and max.
values for tem-
perature, air
humidity, dew
temperature
(Dew Point),
temperature felt
by humans
(Heat Index),
wind chill (Wind
Chill) and wind
speed
▲ Settings
forwards
Settings fast-
forwards
▼ Settings back Settings rewind
Buttons – back side
Button Press once Press for ap-
prox. 3 sec
WIND AL
Switch the Wind
Alarm and Wind
Chill Alarm on
and off
Button Press once Press for ap-
prox. 3 sec.
WIND UNIT Set the wind
speed unit
(Beaufort, mph,
m / s, km / h or
knots)
RAIN UNIT Set the rainfall
quantity meas-
urement unit
(mm or inch)
Search for the
DCF-77 transmis-
sion signal
ZONE Switch between
local time and
world time
Set world time
C/F Switch from °C
to °F
SNOOZE /
LIGHT
Snooze function /
background
lighting
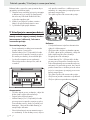
Wind gauge:
Vane with built-in compas
Wind wheel
Battery
compartment
Housing with built-in temperature
gauge and air humidity gauge
Transmission
signal LED

12 GB
Device overview / Preparing the wind gauge and rain gauge and registering ...
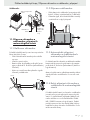
Rain gauge:
Rain rockerBattery
compartment
Leaf filter
11. Preparing the wind gauge and
rain gauge and registering on
the weather station
11.1 Calibrating the wind gauge
The wind gauge must be recalibrated after every
battery change. Follow the procedure outlined below:
– Before inserting the battery, point the vane north.
– Ensure that the wind wheel does not turn.
– Insert the batteries, ensuring correct polarity
(see the instructions listed under Point 9. Inserting
and replacing batteries / Wind gauge).
– The transmission signal LED lights up briefly.
The wind gauge is now calibrated.
North
MAST
11.2 Preparing the rain gauge
– Insert the batteries in the rain gauge (see the
instructions listed under Point 9. Inserting and
replacing batteries / Rain gauge).
– Remove the transport protection which holds
the rain rocker.
11.3 Automatic wind gauge and
rain gauge registration on
the weather station
After inserting batteries in the wind gauge and the
rain gauge, insert batteries in the weather station
(see the instructions listed under Point 9. Inserting
and replacing batteries / Weather station).
The weather station searches automatically for the
transmission signals from the wind gauge and rain
gauge. The process takes approx. 4 minutes.
11.4 Manual wind gauge and rain
gauge registration on the
weather station
After the batteries have been replaced in the wind
gauge and rain gauges, they must be registered
again on the weather station. After replacing the
batteries and calibrating the wind gauge, press the
CHANNEL / SEARCH button on the weather station
for approx. 5 seconds. The entry is confirmed with
a confirmation tone. The measurement value dis-
plays now flash on the wind gauge and rain gauge
displays. The process can take up to 4 minutes

13 GB
Weather station basic settings
12. Weather station basic settings
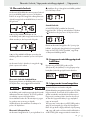
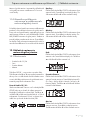
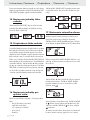
12.1 Setting
– 12 / 24 hour format
– Time
– Date format
– Date
Jump to the next menu item with the CLOCK button.
Press ▲ and ▼ to make the settings. If none of the set-
ting buttons has been pressed for approx. 60 seconds,
the weather station returns automatically to the time
display.
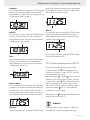
12/24 hour format:
While in the time display, press the CLOCK button for
approximately 3 seconds to access the setting mode.
24 h flashes on the display. Press ▲ and ▼ to switch
between 24 h and 12 h display. AM / PM is displayed
to the left of the time in 12 h display mode.
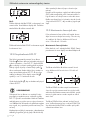
Hours:
Press the CLOCK button to set the hour. The hours
now flash on the display. Use ▲ and ▼ to set the hour.
Minutes:
Press the CLOCK button again to set the minutes.
The minutes now flash on the display. Use ▲ and ▼
to set the minutes.
Year:
Press the CLOCK button a second time to set the
year. The year now appears on the display. Use ▲
and ▼ to set the year.
Date format:
Press the CLOCK button again to set the month for-
mat. The letters D (D = Day) and M (M = Month)
flash in the date on the display. Use ▲ and ▼ to set
the date format.
Month:
Press the CLOCK button again to set the month. The
month now flashes on the display. Press ▲ and ▼ to
set the month.
Day:
Press the CLOCK button again to set the day. The
date now flashes on the display. Press ▲ and ▼ to
set the day.
Press the CLOCK button again to return to the time
display.

14 GB
Weather station basic settings
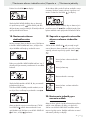
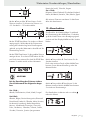
12.2 DCF-77 synchronisation
This functions sets the time and date automatically.
Press
to activate the synchronisation for radio-
controlled DCF-77 time information.
Press
and the symbol appears on the display.
When the transmission signal is received, a
symbol
appears. If no radio waves appear, no DCF 77
reception is available in this location. If the reception
is stable, the
symbol is shown continuously on the
display after approx. 3–5 minutes.
Press
again to deactivate the DCF-77 synchroni-
sation.
WARNING!
The displays for time and date in Central Europe are
transferred via DCF-77 radio signals. The transmitter
is close to Frankfurt and transmits on a transmission
radius of approximately 1500 km. If your weather
station receives this signal, it is not necessary to
switch to and from daylight savings time.
The reception quality can be restricted by the geo-
graphical location (e.g. deep valleys) or structural
conditions (e.g. behind concrete walls).
Electromagnetic fields can also have a negative in-
fluence on signal (DCF) reception. Position the
weather station and the external sensor in a suitable
location. Follow the instructions listed under “DCF-77
synchronisation” to switch on the transmission signal
again.
12.3 Setting the time zone
You can switch between local time and the selected
zone time while the time is displayed. The time zones
are divided into 24 zones. You can select a time
zone from +12 hours to –12 hours.
Setting the time zone:
Press and hold the ZONE button for approximately
3 seconds. A confirmation signal sounds and 0 flashes
on the display.
Press ▲ and ▼ to set the time zone. You can select
a time zone from +12 hours to –12 hours.
Press the ZONE button to return to the time display.
If no setting button is pressed for 60 seconds while
in the time zone setting mode, the weather station
automatically returns to the time display.
You can use the ZONE button to display the selected
time zone. ZONE appears next to the time. By pressing
the ZONE button again, you are returned to your
local time.
WARNING!
When setting the time zone, use the
following specifications:
Set -1 Hr.:
Atlantic, Great Britain, Ireland, Iceland, Portugal
Set 0 Hrs.:
Albania, Belgium, Bosnia-Herzegovina, Denmark,
Germany, France, Gibraltar, Italy, Croatia, Liechtenstein,
Luxemburg, Malta, Macedonia, Monaco, The Neth-
erlands, Norway, Austria, Poland, San Marino, Sweden,
Switzerland, Serbia, Slovakia, Slovenia, Spain (with
the exception of the Canary Islands), Czech Republic,
Hungary

15 GB
… / Alarm function / Setting the air pressure unit / Air pressure adjustment
Set +1 Hr.:
Bulgaria, Estonia, Finland, Greece, Latvia, Lithuania,
Moldova, Romania, Turkey, Ukraine, Cyprus
All other time zones can be found in your Atlas or
on the Internet.
13. Alarm function
To set the alarm time, press and hold the ALARM
button for 3 seconds while the time is displayed.
When the confirmation signal has sounded, ALARM
appears on the display and the hours flash.
Use ▲ and ▼ to set the hours.
Press the ALARM button again to jump to the min-
ute setting. The minutes flash in the display.
Use ▲ and ▼ to set the minutes. Press the ALARM
button to return to the time display.
The alarm function is activated and
appears next
to the time.
Deactivating the alarm function:
Press the ALARM button twice while the time is dis-
played until
disappears.
Press the ALARM button again to reactivate the alarm
function. Press the CLOCK button to return to the
time display.
If no button is pressed for approximately 20 seconds
while the switch is being made, the weather station
automatically returns to the time display.
Switching the alarm signal off:
The alarm signal sounds for approx. 2 minutes and
flashes on the display. The alarm can be turned
off prematurely by pressing the ALARM button.
Snooze function:
Press the SNOOZE / LIGHT button to pause the alarm
signal for approx. 10 minutes. During this period,
flashes above the time display.
The alarm signal then sounds again for approximately
2 minutes. You can interrupt the alarm signal again
with the SNOOZE / LIGHT button or switch it off
with the ALARM button.
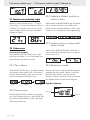
14. Setting the air pressure unit
Press the PRESSURE button to switch between the
units hPA (Hectopascal), mb (Millibar) and inHg
(Mercury column in inches).
15. Air pressure adjustment
When batteries have been inserted in the weather
station, an air pressure of 1013 hPa appears on the
display. This value is pre-set. You can adjust the air
pressure to suit your current location. First find out

16 GB
... / Setting the wind speed ... / Setting the Wind Alarm / Setting the Wind Chill Alarm
the current air pressure value, e.g. from the newspaper
or Internet.
Hold the PRESSURE button down for approx. 3 seconds
until you hear a confirmation tone. The air pressure
value now flashes on the display. Use ▲ or ▼ to set
the desired value. Press the PRESSURE button to return
to the standard display. The standard display will
also appear automatically if no setting button is
pressed for approx. 1 minute.
16. Setting the wind speed unit
The wind speed can be displayed in 5 different units.
– km / h (kilometres per hour)
– mph (miles per hour)
– m / s (meters per second)
– knots
– Beaufort
Press the WIND UNIT button on the rear side of the
weather station to switch between the different units.
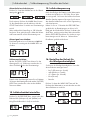
17. Setting the wind alarm
A wind alarm can be set for gusts (maximum speed
for the last 10 minutes). Press the WIND ALARM
button until ALARM and GUST appears on the display.
Hold the WIND ALARM button down for approx.
3 seconds until a confirmation tone sounds and the
value flashes.
Use ▲ or ▼ to set the desired value. Press the
WIND ALARM button to confirm the entry and
appears on left next to the wind speed.
The wind alarm is now activated. Press WIND AL
to deactivate the wind alarm again. Press WIND AL
until disappears.
If a gust of wind reaches or exceeds the set value,
a warning signal sounds for approx. 1 minute and
flashes in the display.
Press WIND ALARM to stop the alarm tone prema-
turely.
flashes until the gusts of wind (over the
last 10 minutes) fall below the set limit value again.
18. Setting the wind chill alarm
A Wind Chill Alarm can also be set. Press the
WIND ALARM button until ALARM appears next
to the Wind Chill temperature.

17 GB
... / Switching the Wind ... / Setting the rain ... / Setting the temperature ... / Display
Hold the WIND ALARM button down for approx.
3 seconds until a confirmation tone sounds and the
value flashes.
Use ▲ or ▼ to set the desired value. Press the WIND
ALARM to confirm the entry, which then appears on
left next to the Wind Chill temperature
The Wind Chill Alarm is now activated. Press the
WIND AL
button to deactivate the Wind Chill
Alarm. Press WIND AL
until disappears.
If the Wind Chill Temperature reaches or falls below
the set value, a warning signal sounds for approx.
1 minute and
flashes in the display.
Press WIND ALARM to stop the alarm tone prema-
turely.
flashes until the Wind Chill Temperature
rises above the limit value again.
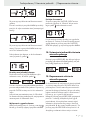
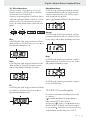
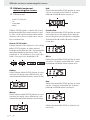
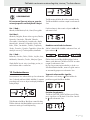
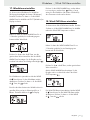
19. Switching the Wind Alarm and
the Wind Chill Alarm on and off
Press the WIND AL button to switch the wind alarm
and Wind Chill Alarm on and off. If the alarm is
switched on, the relevant alarm symbol
/
appears.
Wind and Wind Chill Alarm off
Wind Alarm on
Wind Chill Alarm on
Wind and Wind Chill Alarm on
20. Setting the rain gauge unit
You can choose between displaying the rainfall
quantity in mm (millimetres) or in (inches). Press the
RAIN UNIT button on the rear side of the weather
station. Each time the button is pressed, the unit on
the display changes.
21. Setting the temperature unit
The temperatures can be displayed in °C (Grad
Celsius) or in °F (Grad Fahrenheit). Press the C / F
button on the rear of the weather station to switch
between the two units. Each time the button is
pressed, the unit on the display changes.
22. Display
Background illumination:
Press the SNOOZE / LIGHT button to switch on the
background illumination. After approx. 10 seconds,
the background illumination switches off automatically.

18 GB
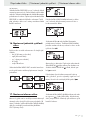
Display
22.1 Date and time
Press the CLOCK button to switch between the time,
date and day of the week. If no button has been
pressed for a period of approximately 20 seconds,
the time display appears automatically.
Time Date Day of the week
22.2 Time zone
You can use the ZONE button to display the selected
time zone. ZONE appears next to the time. By pressing
the ZONE button again, you are returned to your
local time.
22.3 Temperature and air
humidity indoors / outdoors
Press the CHANNEL / SEARCH button to display the
temperature and air humidity for indoors or outdoors.
The values for indoors and outdoors can also be
displayed alternately. Then,
appears on the display.
22.4 Displaying Heat Index and
Dew Point
Press the HEAT INDEX; DEW POINT button to
switch between the Heat Index and Dew Point.
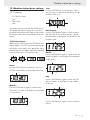
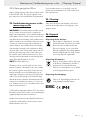
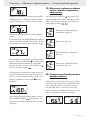
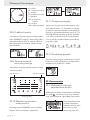
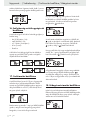
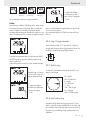
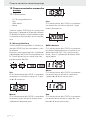
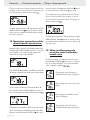
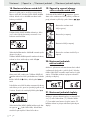
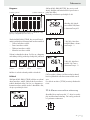
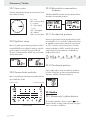
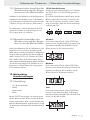
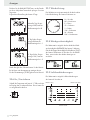
22.5 Rainfall quantity
The weather station has an automatic memory for
the amount of rainfall. The rainfall quantity can be
displayed in different chronicles either as a digital
value or in diagram form:
Digital value:
Value
Unit
Diagram:
Unit in inches Unit in millimetres
The rainfall over the past days / weeks / months from the
current time (0) up to 6 days / weeks / months earlier (–6)
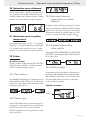
Press the RAIN / CLEAR button to switch between
the following rainfall quantity displays:
– Total rainfall quantity
– Rainfall quantity each day
– Rainfall quantity each week
– Rainfall quantity each month
The current value is displayed. A diagram is shown
under this value containing the relevant history of
the last 6 units.
Overall
quantity
Quantity
each day
Quantity
each week
Quantity
each month
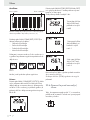
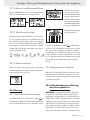
Detailed information can be displayed on the history.
Example:
Press the RAIN / CLEAR until the rainfall quantity is
shown. The value shown represents the rainfall
quantity for the current day. Underneath this value,

19 GB
Display
a diagram is shown containing the rainfall quantity
for the current day and the past 6 days.
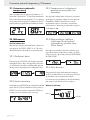
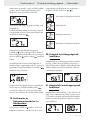
Press the RAIN HISTORY button to view the details.
Every time the button is pressed, the display moves
forward by one day.
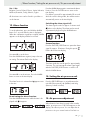
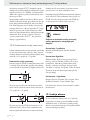
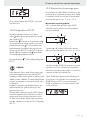
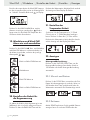
Below, you will find a display for the past 2 days:
Current day: rainfall
quantity 250.2 mm
with bar display at 0
1 day earlier: rainfall
quantity 0.0 mm with
bar display at –1
2 days earlier: rainfall
quantity 156.7 mm
with bar display at –2
You can display the history for weekly and monthly
quantities using the same procedure.
There is no history for the total amount (TOTAL).
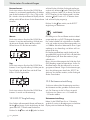
22.6 Ice / frost alarm
As soon as the outdoor temperature falls below
4 °C, the frost alarm symbol appears on the display.
This warns of possible ground frost.
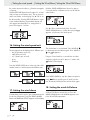
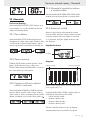
22.7 Wind direction
The wind gauge automatically shows the average
wind direction for the last 2 minutes.
N = North
NE = North East
E = East
SE = South East
S = South
SW = South West
W = West
NW = North West
22.8 Wind speed
The weather station shows the average wind speed
(AVERAGE) for the last 2 minutes and the maximum
speed for gusts of wind (GUST) in the last 10 minutes.
Press the WIND button to switch between the two
displays.

20 GB
Display / Maintenance
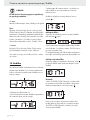
22.9 Air pressure change
The weather station shows the changes in air pressure
over the last 6 hours.
Unit in inHg
Hour trend
Unit in hPa (mb)
22.10 Minimum and maximum
values
Use the MEMORY button to display saved minimum
and maximum values.
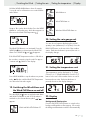
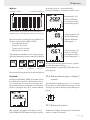
22.11 Weather forecast
The weather station can predict the weather for the
next 12–24 hours. The weather prediction function
is based on the change in air pressure and is up to
75 % accurate. Since the weather can never be pre-
dicted with 100 % correctness, the manufacturer
cannot be held responsible for incorrect weather
predictions.
Sunny Mainly sunny Rain StormsCloudy
22.12 Weather trend
The weather trend is also shown in addition to the
weather forecast. There is an arrow for increasing,
stable and decreasing.
23. Maintenance
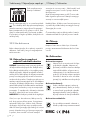
23.1 Battery charge indicator
If the battery is empty, the symbol appears in
the display. There is a separate symbol for the weather
station, the wind gauge and the rain gauge.
If the indoors tempera-
ture is displayed, the
battery charge indica-
tor applies for weather
station. If the outside
temperature is shown,
the battery charge indi-
cator applies for the
wind gauge.
Battery charge indicator
for the rain gauge
Replace the batteries as soon as
appears in the
display. If the batteries are weak or empty, it is im-
possible to guarantee accurate measurement
results. The procedure for replacing the batteries is
outlined under point 9. Inserting and replacing
batteries.
Strona jest ładowana ...
Strona jest ładowana ...
Strona jest ładowana ...
Strona jest ładowana ...
Strona jest ładowana ...
Strona jest ładowana ...
Strona jest ładowana ...
Strona jest ładowana ...
Strona jest ładowana ...
Strona jest ładowana ...
Strona jest ładowana ...
Strona jest ładowana ...
Strona jest ładowana ...
Strona jest ładowana ...
Strona jest ładowana ...
Strona jest ładowana ...
Strona jest ładowana ...
Strona jest ładowana ...
Strona jest ładowana ...
Strona jest ładowana ...
Strona jest ładowana ...
Strona jest ładowana ...
Strona jest ładowana ...
Strona jest ładowana ...
Strona jest ładowana ...
Strona jest ładowana ...
Strona jest ładowana ...
Strona jest ładowana ...
Strona jest ładowana ...
Strona jest ładowana ...
Strona jest ładowana ...
Strona jest ładowana ...
Strona jest ładowana ...
Strona jest ładowana ...
Strona jest ładowana ...
Strona jest ładowana ...
Strona jest ładowana ...
Strona jest ładowana ...
Strona jest ładowana ...
Strona jest ładowana ...
Strona jest ładowana ...
Strona jest ładowana ...
Strona jest ładowana ...
Strona jest ładowana ...
Strona jest ładowana ...
Strona jest ładowana ...
Strona jest ładowana ...
Strona jest ładowana ...
Strona jest ładowana ...
Strona jest ładowana ...
Strona jest ładowana ...
Strona jest ładowana ...
Strona jest ładowana ...
Strona jest ładowana ...
Strona jest ładowana ...
Strona jest ładowana ...
Strona jest ładowana ...
Strona jest ładowana ...
Strona jest ładowana ...
Strona jest ładowana ...
Strona jest ładowana ...
Strona jest ładowana ...
Strona jest ładowana ...
Strona jest ładowana ...
Strona jest ładowana ...
Strona jest ładowana ...
Strona jest ładowana ...
Strona jest ładowana ...
Strona jest ładowana ...
Strona jest ładowana ...
Strona jest ładowana ...
Strona jest ładowana ...
Strona jest ładowana ...
Strona jest ładowana ...
Strona jest ładowana ...
Strona jest ładowana ...
Strona jest ładowana ...
Strona jest ładowana ...
Strona jest ładowana ...
Strona jest ładowana ...
Strona jest ładowana ...
Strona jest ładowana ...
Strona jest ładowana ...
Strona jest ładowana ...
Strona jest ładowana ...
Strona jest ładowana ...
Strona jest ładowana ...
Strona jest ładowana ...
Strona jest ładowana ...
Strona jest ładowana ...
Strona jest ładowana ...
Strona jest ładowana ...
Strona jest ładowana ...
Strona jest ładowana ...
Strona jest ładowana ...
Strona jest ładowana ...
Strona jest ładowana ...
Strona jest ładowana ...
Strona jest ładowana ...
Strona jest ładowana ...
Strona jest ładowana ...
Strona jest ładowana ...
Strona jest ładowana ...
Strona jest ładowana ...
Strona jest ładowana ...
Strona jest ładowana ...
Strona jest ładowana ...
Strona jest ładowana ...
Strona jest ładowana ...
Strona jest ładowana ...
Strona jest ładowana ...
Strona jest ładowana ...
Strona jest ładowana ...
Strona jest ładowana ...
Strona jest ładowana ...
Strona jest ładowana ...
Strona jest ładowana ...
Strona jest ładowana ...
Strona jest ładowana ...
Strona jest ładowana ...
Strona jest ładowana ...
-
 1
1
-
 2
2
-
 3
3
-
 4
4
-
 5
5
-
 6
6
-
 7
7
-
 8
8
-
 9
9
-
 10
10
-
 11
11
-
 12
12
-
 13
13
-
 14
14
-
 15
15
-
 16
16
-
 17
17
-
 18
18
-
 19
19
-
 20
20
-
 21
21
-
 22
22
-
 23
23
-
 24
24
-
 25
25
-
 26
26
-
 27
27
-
 28
28
-
 29
29
-
 30
30
-
 31
31
-
 32
32
-
 33
33
-
 34
34
-
 35
35
-
 36
36
-
 37
37
-
 38
38
-
 39
39
-
 40
40
-
 41
41
-
 42
42
-
 43
43
-
 44
44
-
 45
45
-
 46
46
-
 47
47
-
 48
48
-
 49
49
-
 50
50
-
 51
51
-
 52
52
-
 53
53
-
 54
54
-
 55
55
-
 56
56
-
 57
57
-
 58
58
-
 59
59
-
 60
60
-
 61
61
-
 62
62
-
 63
63
-
 64
64
-
 65
65
-
 66
66
-
 67
67
-
 68
68
-
 69
69
-
 70
70
-
 71
71
-
 72
72
-
 73
73
-
 74
74
-
 75
75
-
 76
76
-
 77
77
-
 78
78
-
 79
79
-
 80
80
-
 81
81
-
 82
82
-
 83
83
-
 84
84
-
 85
85
-
 86
86
-
 87
87
-
 88
88
-
 89
89
-
 90
90
-
 91
91
-
 92
92
-
 93
93
-
 94
94
-
 95
95
-
 96
96
-
 97
97
-
 98
98
-
 99
99
-
 100
100
-
 101
101
-
 102
102
-
 103
103
-
 104
104
-
 105
105
-
 106
106
-
 107
107
-
 108
108
-
 109
109
-
 110
110
-
 111
111
-
 112
112
-
 113
113
-
 114
114
-
 115
115
-
 116
116
-
 117
117
-
 118
118
-
 119
119
-
 120
120
-
 121
121
-
 122
122
-
 123
123
-
 124
124
-
 125
125
-
 126
126
-
 127
127
-
 128
128
-
 129
129
-
 130
130
-
 131
131
-
 132
132
-
 133
133
-
 134
134
-
 135
135
-
 136
136
-
 137
137
-
 138
138
-
 139
139
-
 140
140
-
 141
141


Auriol H13726 Operation and Safety Notes
- Kategoria
- Stacje pogodowe
- Typ
- Operation and Safety Notes
w innych językach
- slovenčina: Auriol H13726
Powiązane dokumenty
-
Auriol IAN 270302 Operation and Safety Notes
-
-
Auriol Z29962B Operation and Safety Notes
-
Auriol Z29962D Operation and Safety Notes
-
-
-
-
-
Inne dokumenty
-
Hama 00087673 Instrukcja obsługi
-
Hyundai WS 2077 R WIND Instrukcja obsługi
-
Hama 00186369 Instrukcja obsługi
-
 La Crosse Technology WS-1516U-IT Quick Setup Manual
-
-
Perel WC224 Instrukcja obsługi
-
-
 2measure 270208 Instrukcja obsługi
-
Technoline Model Instrukcja obsługi
-

