Silvercrest SKR 800 B2 Operating Instructions And Safety Instructions
- Typ
- Operating Instructions And Safety Instructions

IAN 279238
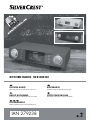
KITCHEN RADIO SKR 800 B2
KITCHEN RADIO
Operating instructions and safety instructions
KÖKSRADIO
Bruksanvisning och säkerhetsanvisningar
KÜCHENRADIO
Bedienungsanleitung und Sicherheitshinweise
VIRTUVINIS RADIJAS
Naudojimo instrukcija ir saugos nurodymai
RADIO KUCHENNE
Instrukcja obsługi i wskazówki bezpieczeństwa

GB Operating instructions and safety instructions Page 1
SE Bruksanvisning och säkerhetsanvisningar Sidan 23
PL Instrukcja obsługi i wskazówki bezpieczeństwa Strona 45
LT Naudojimo instrukcija ir saugos nurodymai Puslapis 67
DE / AT / CH Bedienungsanleitung und Sicherheitshinweise Seite 89
Before reading, unfold the page containing the illustrations and familiarise yourself with all functions of
the device.
Vik ut bildsidan och ha den till hands när du läser igenom anvisningarna och gör dig bekant med
apparatens / maskinens funktioner.
Przed przeczytaniem proszę rozłożyć stronę z ilustracjami, a następnie proszę zapoznać się z wszystkimi
funkcjami urządzenia.
Prieš skaitydami atsiverskite lapą su paveikslėliais ir susipažinkite su visomis prietaiso funkcijomis.
Klappen Sie vor dem Lesen die Seite mit den Abbildungen aus und machen Sie sich anschließend mit allen
Funktionen des Gerätes vertraut.


GB │ 1 ■
SKR 800 B2
Contents
Introduction ................................................... 3
Information about these operating instructions ...................................3
Copyright ................................................................3
Proper use ...............................................................3
Warning notices ...........................................................3
Safety. . . . . . . . . . . . . . . . . . . . . . . . . . . . . . . . . . . . . . . . . . . . . . . . . . . . . . . . 4
Hazard from electrical current ................................................4
Notes on batteries .........................................................5
Basic safety instructions .....................................................5
Description of components ....................................... 7
Operation .................................................... 8
Package contents and transport inspection ......................................8
Disposal of packaging ......................................................8
Requirements for the set-up location ...........................................9
Installation under a wall cupboard ............................................9
Dismantling .............................................................10
Setting up the device ......................................................10
Connecting to a power supply. . . . . . . . . . . . . . . . . . . . . . . . . . . . . . . . . . . . . . . . . . . . . . .11
Inserting batteries. . . . . . . . . . . . . . . . . . . . . . . . . . . . . . . . . . . . . . . . . . . . . . . . . . . . . . . . .11
FM wire aerial ...........................................................11
Handling and use .............................................12
Making basic settings .....................................................12
Setting the alarm time and alarm type .........................................13
Switching off the alarm ....................................................14
Switching the radio mode on/off .............................................14
Adjusting the volume ......................................................14
Search for a station .......................................................14
Adjusting stations manually .................................................15
Storing stations manually ...................................................15
Calling up preset radio stations ..............................................15
Automatic station search (AMS function) .......................................15
Receiving stations in mono ..................................................16
Kitchen timer ............................................................16
Switching the display dimmer on/off ..........................................17
Switching the LED light on/off ..............................................17

■ 2 │ GB
SKR 800 B2
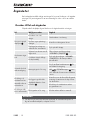
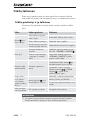
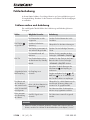
Troubleshooting ..............................................18
Fault causes and remedies ..................................................18
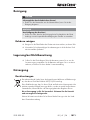
Cleaning .....................................................19
Cleaning the housing ......................................................19
Storage when not in use .......................................19
Disposal .....................................................19
Disposal of the device .....................................................19
Battery disposal ..........................................................20
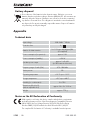
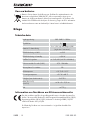
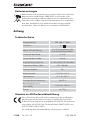
Appendix ....................................................20
Technical data ...........................................................20
Notes on the EU Declaration of Conformity ....................................20
Kompernass Handels GmbH warranty ........................................21
Service .................................................................22
Importer ................................................................22

GB │ 3 ■
SKR 800 B2
Introduction
Information about these operating instructions
Congratulations on the purchase of your new device.
You have selected a high-quality product. The operating instructions are part of this
product. They contain important information about safety, usage and disposal.
Before using the product, please familiarise yourself with all operating and safety
instructions. Use the product only as described and for the range of applications
specified. Retain these instructions for future reference. Please also pass these
operating instructions on to any future owner.
Copyright
This documentation is protected by copyright. Any copying or reproduction, in-
cluding in the form of extracts, or any reproduction of images (even in a modified
state), is permitted only with the written authorisation of the manufacturer. The
SilverCrest trademark and the retail name are the property of their respective
owners.
Proper use
This device is a consumer electronics device designed for the reception of FM
radio programmes, as a kitchen timer and as an alarm by means of an alarm
tone or radio. It is intended only for indoor use. The device is intended to be set
up as a free-standing unit or to be installed under a wall cupboard. To do so,
the integrated adjustable foot or the mounting plate must be used. The device
is not intended for any other purpose, nor for use beyond the scope described.
The device is not intended for use in commercial or industrial environments. The
manufacturer accepts no responsibility for damage caused by failure to observe
these instructions, improper use or repairs, unauthorised modifications or the use
of unapproved replacement parts. The risk is borne solely by the user.
Warning notices
The following warning notices are used in these operating instructions:
DANGER
A warning notice of this hazard level indicates an imminently
hazardous situation.
Failure to avoid this hazardous situation could result in serious injuries or even
death.
► Follow the instructions in this warning notice to avoid the risk of serious
injuries or death.

■ 4 │ GB
SKR 800 B2
CAUTION
A warning notice of this hazard level indicates a risk of
property damage.
Failure to avoid this situation could result in property damage.
► Follow the instructions in this warning notice to prevent property damage.
NOTE
► A note provides additional information that makes handling the device
easier for you.
Safety
This section contains important safety instructions for handling the device.
This device complies with statutory safety regulations. Improper use may result in
personal injury and property damage.
Hazard from electrical current
DANGER
Danger to life from electrical current!
Contact with live cables or components can is a danger to life!
Comply with the following safety information in order to avoid the hazard from
electrical current:
► Do not use the device if the mains power plug or the mains cable is damaged.
► When disconnecting the device from the mains supply, always pull on the
plug and never on the cable.
► Never touch the mains plug or the device with wet hands.
► The device housing must not be opened under any circumstances. Touching
live connections or making modifications to the electrical or mechanical
assembly can lead to a risk of electrocution and fire.
► Do not insert any objects into the ventilation slots or other openings on the
device.
► The device consumes power in standby mode. To disconnect the device
completely from the mains supply, remove the power plug from the mains
socket. The device must be positioned so that you have unrestricted access
to the mains socket at all times and can pull out the plug immediately in an
emergency.

GB │ 5 ■
SKR 800 B2
Notes on batteries
DANGER
Risk of injury caused by incorrect handling of batteries!
► Keep batteries out of the reach of children. Children might put batteries
into their mouths and swallow them. If a battery has been swallowed,
seek medical assistance immediately.
► Do not throw batteries into a fire. Never subject batteries to high temperatures.
► Explosion hazard! Do not charge batteries unless they are explicitly
labelled as "rechargeable".
► Do not open the batteries or short-circuit them.
► Do not mix different types of batteries. Empty batteries should be removed
because of the increased risk of leakage. The batteries should also be
removed from the device if it is not being used for long periods.
► Battery acid leaking from a battery can cause skin irritation. If it contacts
your skin, rinse off with plenty of water. If the liquid comes into contact with
your eyes, rinse thoroughly with plenty of water, do not rub and consult a
doctor immediately.
► The section entitled "Inserting batteries" describes how to insert and remove
batteries correctly.
Basic safety instructions
To ensure safe operation of the device, follow the safety guidelines set out below:
■ This device may be used by children aged 8 years and above and by
persons with limited physical, sensory or mental capabilities, or lack of ex-
perience and knowledge, provided that they are under supervision or have
been told how to use the device safely and are aware of the potential risks.
Children must not play with the device. Cleaning and maintenance conduct-
ed by user must not be carried out by children unless they are supervised.
■
DANGER! Do not allow children to play with the packaging material!
Keep all packaging materials away from children.
There is a risk of suffocation!
■ Check the device for visible external damage before use. Do not operate an
device that has been damaged or dropped.
■ If the cables or connections are damaged, have them replaced by authorised
specialists or Customer Service.
■ Protect the connection cable from hot surfaces and sharp edges. Ensure that
the power cable is not stretched tightly or kinked. Do not allow the cable to
dangle over edges (tripwire effect).

■ 6 │ GB
SKR 800 B2
■ All repairs must be carried out by authorised specialist companies or
Customer Service. Improper repairs may put the user at risk. It will also
invalidate any warranty claims.
■ Defective components must always be replaced with original replacement
parts. It is ensured only for these parts that they fulfil the safety requirements.
■ Do not make any unauthorised modifications or alterations to the device.
■ Always place the device on a stable and level surface. It can be damaged if
dropped.
■ Do not expose the device to direct sunlight or high temperatures.
Otherwise it may overheat and be irreparably damaged.
■ Be sure to provide sufficient air circulation to avoid a heat build-up.
Never cover the device. There is a fire hazard!
■ Do not place the product near heat sources such as radiators or other
heat-generating devices.
■ Keep the device away from open flames (e.g. candles) at all times.
■ The device is not designed for use in rooms with high temperature or humidity
(e.g. bathrooms) or excessive dust.
■ Protect the device from spray or dripping water. Never submerge the device
in water, do not place the device near water and do not place any object
filled with liquid (e.g. vases) on top of the device.
■ If you notice a burning smell or smoke, pull out the plug from the mains
socket immediately and remove the batteries.
■ In the event of malfunctions and thunderstorms, disconnect the plug from the
mains socket.

GB │ 7 ■
SKR 800 B2
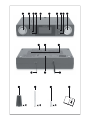
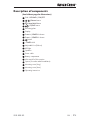
Description of components
(See fold-out page for illustrations)
Dial −VOLUME+ | ON/OFF
| Dimmer button
| Mem/AMS button
| ST/MO button
Mounting plate
Display
Preset + | SEARCH + button
Preset − | SEARCH − button
button
−TIMER+ dial
Adjustable foot (fold-out)
LED light
Speakers
Power cable
Battery compartment
Wire aerial for FM reception
Spacer (for under-cabinet installation)
Mounting screw (long)
Mounting screw (short)
Operating instructions

■ 8 │ GB
SKR 800 B2
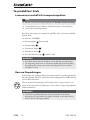
Operation
Package contents and transport inspection
DANGER
► Do not allow children to play with packaging materials.
There is a risk of suffocation.
♦ Remove all parts of the device and the operating instructions from the box.
♦ Remove all packaging materials from the device.
Please check the contents of the package (see fold-out page).
The product includes the following components:
▯ Kitchen radio SKR 800 B2
▯ Mounting plate
(pre-assembled)
▯ 4 spacers
▯ 4 mounting screws (long)
▯ 4 mounting screws (short)
▯ These operating instructions (symbol)
NOTE
► Check the package for completeness and signs of visible damage.
► If any items are missing or damaged as a result of defective packaging
or transportation, contact the Service Hotline (see section "Service").
Disposal of packaging
The packaging protects the device from damage during transport. The packaging
materials have been selected for aspects of environmental friendliness and
disposal, and they are therefore recyclable.
Returning the packaging to the material cycle conserves raw materials and
reduces the amount of waste that is generated. Dispose of packaging materials
that are no longer needed in accordance with applicable local regulations.
NOTE
► If possible, keep the original packaging for the complete warranty period
of the device so that the device can be packaged properly for return ship-
ment in the event of a warranty claim.

GB │ 9 ■
SKR 800 B2
Requirements for the set-up location
For the safe and trouble-free operation of the device, the set-up location must
fulfil the following requirements:
■ When setting up the device, place it on a firm, flat and horizontal surface.
Use the fold-out adjustable foot
.
■ The surfaces of some items of furniture might contain components that can
corrode and soften the rubber feet of the device. If necessary, place a mat
under the device’s rubber feet.
■ Set up or mount the device in such a way that the provided ventilation
openings and speakers
are not covered.
■ Do not operate the device in a hot, wet or extremely damp environment or
near flammable materials.
■ The mounting location must be selected so that the device is not exposed to
vapours. Do not install the device directly over a hotplate.
■ The mains socket must be easily accessible so that the plug can be easily
pulled out in an emergency.
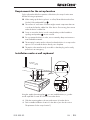
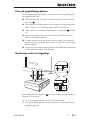
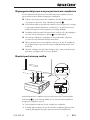
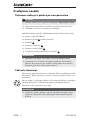
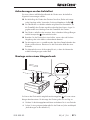
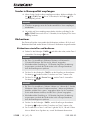
Installation under a wall cupboard
3,1 cm
6,3 cm
Using the supplied mounting plate , you can install the device, e.g. under
a wall cupboard. Proceed as follows to mount the device:
♦ Slide the mounting plate to the rear and remove it from the device.
♦ Find a suitable installation location for the device (see also the section
"Requirements for the set-up location").

■ 10 │ GB
SKR 800 B2
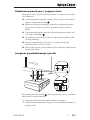
♦ Hold the mounting plate under the installation location. Ensure that the front
edge of the mounting plate is approx. 3.1cm behind the front of the cup-
board so that the device is connects flush with the cupboard after instal-
lation. The side edges of the mounting plate must spaced approx. 6.3cm
away from adjacent cabinets or walls.
♦ Mark the 4 mounting points with a pencil.
♦ Using a pin or nail, make a small depression at the respective marking
points.
♦ If required, place the supplied spacers
between the cupboard and the
mounting plate. If you are using the spacers, you will need the long mount-
ing screws
.
♦ Screw the mounting plate tight using the mounting screws provided (
or ).
♦ With the top of the device against the mounting plate, push the device back
until it clicks into place.
♦ Check to ensure that the device is firmly in position and safely route the
power cable
and the wire aerial .
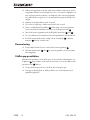
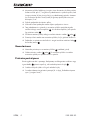
Dismantling
♦ Pull the device forwards off the mounting plate .
♦ Unscrew the screws (
or ) on the mounting plate and remove the
mounting plate from the wall cupboard.
Setting up the device
You can also set up the device on a level surface. So not to cover the ventilation
slots and speakers
on the bottom of the device, you must fold out the adjusta-
ble foot
of the device:
♦ Reach into the recess on the side of the adjustable foot and pull it out as far
as it will go.
♦ Select a suitable location for the device (also see the section "Set-up location
requirements").

GB │ 11 ■
SKR 800 B2
Connecting to a power supply
CAUTION
► Before connecting the device, compare the connection data of the device
(voltage and frequency) on the rating plate with that of your electrical
supply. This data must match so that the device is not damaged.
♦ Insert the power plug into a mains socket. The device starts an automatic
station search and saves the stations that can be received in the max. 20
preset slots. (RDS (radio data system)) flashes briefly on the display. If
there is a suitably strong RDS signal, the time and date will be set automat-
ically. If the RDS signal is too weak, the time display ( ) appears on the
display
and the time and date must be set manually.
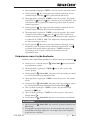
Inserting batteries
You can prevent the programmed time or preset stations from being lost in the
event of a power outage by inserting 2 x 1.5V batteries (type AA/Mignon/LR6).
The batteries ensure that the internal clock continues to run even during a power
outage. The display
will go out, however. When power is restored, the correct
time automatically appears on the display.
NOTE
► The device can also be operated without batteries. The display, radio and
alarm do not function in emergency mode.
► In the event of a power failure, all settings will be lost.
♦ Open the cover of the battery compartment
on the bottom of the device.
♦ Insert 2 x 1.5V batteries of the type AA/Mignon/LR6 (not included in the
product) into the battery compartment. Insert the batteries in the battery
compartment as shown on the polarity diagram.
♦ Then close the battery compartment by replacing the cover and clicking it
into place.
FM wire aerial
♦ Completely unwind the wire aerial for FM radio reception.

■ 12 │ GB
SKR 800 B2
Handling and use
Making basic settings
Requirement: The device is in clock/standby mode.
NOTE
► If there is a suitably strong RDS signal (radio data system), the time and
date will be set automatically. Neither an adjustment of summer/winter time
is made automatically by the RDS nor does the station name appear on the
display
.
► Make the settings quickly. If you do not press a button for 15 seconds, the
entry is cancelled. All settings made up to this point are saved automatically.
♦ Press the
button for about 2 seconds. The symbol for the 24-hour
format ( ) flashes on the display.
♦ Turn the −TIMER+ dial
to switch between 24-hour ( ) and 12-hour
format ( ).
NOTE
► If the 12-hour format (
) is set, PM appears in the upper left of the display
from 12:00 PM until 11:59 PM. From 12:00 AM to 11:59 AM, nothing
appears on the display.
♦ Press the
button to accept the setting. The hours flash on the display.
♦ Turn the −TIMER+ dial left or right to set the hours.
♦ Press the button to accept the setting. The minutes flash on the display.
♦ Turn the −TIMER+ dial left or right to set the minutes.
♦ Press the
button to accept the setting. The year flashes on the display.
♦ Turn the −TIMER+ dial left or right to set the year.
♦ Press the
button to accept the setting. The month flashes on the display.
♦ Turn the −TIMER+ dial left or right to set the month.
♦ Press the
button to accept the setting. The date flashes on the display.
♦ Turn the −TIMER+ dial left or right to set the date.
♦ Press the button to accept the setting. (RDS (radio data system))
flashes on the display.
♦ Turn the −TIMER+ dial left or right to turn the RDS function
(On) or
(Off). When the RDS function is turned on the signal is strong enough, the
time and date is corrected automatically if necessary.

GB │ 13 ■
SKR 800 B2
♦ Press the button to accept the setting. DT (display dimmer) flashes on the
display.
♦ Turn the −TIMER+ dial left or right to turn the display dimmer
(Off) or
(On). When the display dimmer is turned on, the display illumination
is deactivated between 11:00 PM and 5:00 AM. This switch-off time is
programmed permanently and cannot be changed.
♦ Press the
button to accept the setting. The time, date and, if applicable,
DT and appear on the display. Push the −TIMER+ dial to show the year
on the display. Press it again to return to the time display.
Setting the alarm time and alarm type
The alarm time and alarm type are shown below left on the display .
♦ Press the
| Mem/AMS button for about 2 seconds. The hours flash
on the display.
♦ Turn the −TIMER+
dial left or right to set the hours.
♦ Press | Mem/AMS button to accept the setting. The minutes flash on the
display.
♦ Turn the −TIMER+ dial left or right to set the minutes.
♦ Press
| Mem/AMS button to accept the setting. The alarm type radio
flashes on the display.
♦ Turn the −TIMER+ dial once to the right to set the alarm type .
♦ Turn the −TIMER+ dial again to the right to set the alarm type
.
♦ Press | Mem/AMS button to accept the selected alarm type.
NOTE
► Press
| Mem/AMS button for a few seconds to display the alarm time.
► In the event of a power outage, any programmed alarm times will be deac-
tivated and not reactivated when the power comes back.

■ 14 │ GB
SKR 800 B2
Switching off the alarm
♦ While the alarm is sounding, press the | Mem/AMS button or the
−VOLUME+ | ON/OFF
dial to switch off the alarm for 24hours.
If the alarm is not manually deactivated, the device will switch off the alarm
automatically after 1 hour.
Switching the radio mode on/off
NOTE
► The technical features of this device enable an adjustable reception capa-
bility that exceeds the permitted FM frequency range of 87.5–108MHz.
In some countries, different national regulations may apply to the assigned
radio frequency ranges. Please note that information received outside of the
assigned radio frequency ranges may not be exploited, passed on to third
parties or otherwise misused.
♦ Turn the −VOLUME+ | ON/OFF
dial to turn on the radio mode.
♦ Press the −VOLUME+ | ON/OFF dial again to switch off the radio mode
and to switch the device back into the clock/standby mode.
Adjusting the volume
♦ Turn the −VOLUME+ | ON/OFF dial to the right to increase the volume.
♦ Turn the −VOLUME+ | ON/OFF dial to the left to decrease the volume.
The set volume will be shown on the display
as a value between (mute)
and .
Search for a station
♦ Press the Preset + | SEARCH + button for 2 seconds to jump to the next
station that can be received with a higher frequency.
♦ Press the Preset − | SEARCH − button
for 2 seconds to jump to the next
station that can be received with a lower frequency.
The station frequency is shown on the display
and the speakers are switched
off during the station search. If a station broadcasting in stereo is being received,
ST appears on the display.

GB │ 15 ■
SKR 800 B2
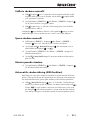
Adjusting stations manually
♦ Press the button for 2 seconds and the frequency display flashes.
You must make your setting within 5 seconds otherwise you will have to
press the button again for 2 seconds.
♦ Press the Preset + | SEARCH +
or the Preset − | SEARCH − button
to search for a frequency in steps of 0.1MHz.
♦ Press the button for 2 seconds and the frequency display stops flashing
and the station is saved.
The station frequency is shown on the display
and the speakers are
switched off during the station search. If a station broadcasting in stereo is being
received, ST appears on the display.
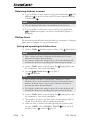
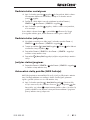
Storing stations manually
♦ Press the Preset + | SEARCH + or the Preset − | SEARCH − button
for about 2 seconds to search for a frequency.
♦ Press the
| Mem/AMS button briefly. The current preset number
flashes on the display
, e.g. .
♦ Press the Preset + | SEARCH + or the Preset − | SEARCH − button to
search for a frequency.
♦ Press the
| Mem/AMS button to save the station in the selected preset.
Calling up preset radio stations
♦ Press the Preset + | SEARCH + or the Preset − | SEARCH − button
to call up the saved radio station.
Automatic station search (AMS function)
The device uses the AMS function to automatically search for stations and
saves them in the 20 preset slots of the device. The device starts at the lowest
frequency. Depending on reception, it is possible that not all 20 presets can be
assigned.
♦ Press the
| Mem/AMS button for about 2 seconds. The device
begins the station search and allocates the stations found to the preset slots
from to max. . Every time a station is saved, the frequency remains
briefly on the display
. Once all the station presets are filled, if receivable,
the search is terminated and the station saved in the first preset is played.

■ 16 │ GB
SKR 800 B2
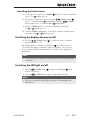
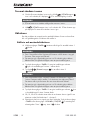
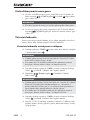
Receiving stations in mono
♦ If you would like to receive a station in mono, press and hold the | ST/
MO button
for about 2seconds until ST (for stereo display) disappears
from the display
.
NOTE
► ST is only displayed if the station can actually be received in stereo.
♦ If you would like to switch back to stereo reception, press and hold the
| ST/MO button again for around 2 seconds until ST appears on
the display.
Kitchen timer
The device has a practical kitchen timer with which you can monitor cooking and
baking times, for example. You can set 2 kitchen timers.
Setting and operating the kitchen timer
♦ Turn the −TIMER+ dial left or right to set Timer 1. The display flashes.
NOTE
► Timer 1 can be set in steps of 5 minutes from 5 minutes up to 3 hours
55 minutes. The time is given as "hh:mm".
► If no change is made to the setting for about 15 seconds, the device will
switch back to the previous operating mode without saving the settings.
♦ Turn the −TIMER+ dial to accept the setting. The
display lights up and
the countdown for Timer 1 starts immediately.
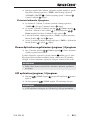
♦ Press the
| Dimmer button to set Timer 2.
The display flashes.
NOTE
► Timer 2 can be set in steps of 1 minute from 1 minute up to 3 hours
59 minutes. If you set the countdown to between 1 minute and 4 minutes,
the time is shown as "mm:ss". If you set the countdown to 5 minutes or
more, the time will be shown as "hh:mm".
► If no change is made to the setting for about 15 seconds, the device will
switch back to the previous operating mode without saving the settings.
♦ Turn the −TIMER+ dial to accept the setting. The
display lights up and
the countdown for Timer 2 starts immediately.
♦ The countdown for Timer 1 and Timer 2 gives a warning beep at 30, 15,
10 and 5 seconds before expiry to indicate the alarm time.
♦ At the end of the countdown, an alarm signal with rising volume sounds.
Press the −TIMER+ or the −VOLUME+ | ON/OFF
dial to switch off
the alarm. Timer 1 or Timer 2 goes off.

GB │ 17 ■
SKR 800 B2
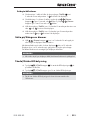
Cancelling the kitchen timer
♦ If only Timer 1 is set, press the −TIMER+ dial for 2 seconds to cancel the
Timer 1. The display goes out.
♦ If both Timer 1 and Timer 2 are set, press the
| Dimmer button .
Timer 1 is selected and the
display flashes. Press the | Dimmer
button again. Timer 2 is selected and the
display flashes.
♦ Push the −TIMER+ dial for 2 seconds to cancel the selected timer.
The
or display goes out.
♦ Push the −TIMER+ dial again for 2 seconds to cancel the remaining timer
countdown. The or display goes out.
Switching the display dimmer on/off
♦ Press the | Dimmer button for 2 about seconds to switch the
display dimmer on or off.
If the display dimmer is switched on, the display
goes off after around
15 seconds. The display on the device lights up for approx. 15 seconds on
every operation. When the display dimmer is switched off, the display is lit
permanently.
NOTE
► In the radio mode, the display is lit permanently even if the display dimmer
is activated.
Switching the LED light on/off
♦ Press the | ST/MO button to switch on the LED light on the
bottom of the device.
♦ Press the | ST/MO button again to switch off the LED light.
NOTE
► If you do not switch off the LED light, it switches off automatically after
120 minutes.
Strona się ładuje...
Strona się ładuje...
Strona się ładuje...
Strona się ładuje...
Strona się ładuje...
Strona się ładuje...
Strona się ładuje...
Strona się ładuje...
Strona się ładuje...
Strona się ładuje...
Strona się ładuje...
Strona się ładuje...
Strona się ładuje...
Strona się ładuje...
Strona się ładuje...
Strona się ładuje...
Strona się ładuje...
Strona się ładuje...
Strona się ładuje...
Strona się ładuje...
Strona się ładuje...
Strona się ładuje...
Strona się ładuje...
Strona się ładuje...
Strona się ładuje...
Strona się ładuje...
Strona się ładuje...
Strona się ładuje...
Strona się ładuje...
Strona się ładuje...
Strona się ładuje...
Strona się ładuje...
Strona się ładuje...
Strona się ładuje...
Strona się ładuje...
Strona się ładuje...
Strona się ładuje...
Strona się ładuje...
Strona się ładuje...
Strona się ładuje...
Strona się ładuje...
Strona się ładuje...
Strona się ładuje...
Strona się ładuje...
Strona się ładuje...
Strona się ładuje...
Strona się ładuje...
Strona się ładuje...
Strona się ładuje...
Strona się ładuje...
Strona się ładuje...
Strona się ładuje...
Strona się ładuje...
Strona się ładuje...
Strona się ładuje...
Strona się ładuje...
Strona się ładuje...
Strona się ładuje...
Strona się ładuje...
Strona się ładuje...
Strona się ładuje...
Strona się ładuje...
Strona się ładuje...
Strona się ładuje...
Strona się ładuje...
Strona się ładuje...
Strona się ładuje...
Strona się ładuje...
Strona się ładuje...
Strona się ładuje...
Strona się ładuje...
Strona się ładuje...
Strona się ładuje...
Strona się ładuje...
Strona się ładuje...
Strona się ładuje...
Strona się ładuje...
Strona się ładuje...
Strona się ładuje...
Strona się ładuje...
Strona się ładuje...
Strona się ładuje...
Strona się ładuje...
Strona się ładuje...
Strona się ładuje...
Strona się ładuje...
Strona się ładuje...
Strona się ładuje...
Strona się ładuje...
Strona się ładuje...
Strona się ładuje...
Strona się ładuje...
Strona się ładuje...
Strona się ładuje...
-
 1
1
-
 2
2
-
 3
3
-
 4
4
-
 5
5
-
 6
6
-
 7
7
-
 8
8
-
 9
9
-
 10
10
-
 11
11
-
 12
12
-
 13
13
-
 14
14
-
 15
15
-
 16
16
-
 17
17
-
 18
18
-
 19
19
-
 20
20
-
 21
21
-
 22
22
-
 23
23
-
 24
24
-
 25
25
-
 26
26
-
 27
27
-
 28
28
-
 29
29
-
 30
30
-
 31
31
-
 32
32
-
 33
33
-
 34
34
-
 35
35
-
 36
36
-
 37
37
-
 38
38
-
 39
39
-
 40
40
-
 41
41
-
 42
42
-
 43
43
-
 44
44
-
 45
45
-
 46
46
-
 47
47
-
 48
48
-
 49
49
-
 50
50
-
 51
51
-
 52
52
-
 53
53
-
 54
54
-
 55
55
-
 56
56
-
 57
57
-
 58
58
-
 59
59
-
 60
60
-
 61
61
-
 62
62
-
 63
63
-
 64
64
-
 65
65
-
 66
66
-
 67
67
-
 68
68
-
 69
69
-
 70
70
-
 71
71
-
 72
72
-
 73
73
-
 74
74
-
 75
75
-
 76
76
-
 77
77
-
 78
78
-
 79
79
-
 80
80
-
 81
81
-
 82
82
-
 83
83
-
 84
84
-
 85
85
-
 86
86
-
 87
87
-
 88
88
-
 89
89
-
 90
90
-
 91
91
-
 92
92
-
 93
93
-
 94
94
-
 95
95
-
 96
96
-
 97
97
-
 98
98
-
 99
99
-
 100
100
-
 101
101
-
 102
102
-
 103
103
-
 104
104
-
 105
105
-
 106
106
-
 107
107
-
 108
108
-
 109
109
-
 110
110
-
 111
111
-
 112
112
-
 113
113
-
 114
114


Silvercrest SKR 800 B2 Operating Instructions And Safety Instructions
- Typ
- Operating Instructions And Safety Instructions
w innych językach
- Deutsch: Silvercrest SKR 800 B2
- svenska: Silvercrest SKR 800 B2
- English: Silvercrest SKR 800 B2
Powiązane artykuły
-
Silvercrest SKR 800 A1 Operating Instructions Manual
-
-
-
Silvercrest KH 2299 Instrukcja obsługi
-
Silvercrest SKRD 30 A1 Operating Instructions Manual
-
Silvercrest KH2281-08-V1 Instrukcja obsługi
-
Silvercrest KH 2281 Operating Instructions Manual
-
-
