Strona się ładuje...

Digital Blood Pressure Monitor
Instruction Manual
Ciśnieniomierz elektroniczny
automatyczny LD
do pomiaru ciśnienia tętniczego krwi i pulsu
Instrukcja Obsługi
LD51, LD51A, LD51U
ENGPOL

2
ENG
TABLE OF CONTENTS
PARTS AND COMPONENTS. . . . . . . . . . . . . . . . . . . . . . . . . . . . . . . . . . . . . . . . . . . . . 3
GENERAL INFORMATION . . . . . . . . . . . . . . . . . . . . . . . . . . . . . . . . . . . . . . . . . . . . . . . 4
INDICATIONS FOR USE . . . . . . . . . . . . . . . . . . . . . . . . . . . . . . . . . . . . . . . . . . . 4
OPERATION PRINCIPLE . . . . . . . . . . . . . . . . . . . . . . . . . . . . . . . . . . . . . . . . . . 4
APPLIED NEW TECHNOLOGIES LD . . . . . . . . . . . . . . . . . . . . . . . . . . . . . . . . 4
RECOMMENDATIONS ON CORRECT MEASUREMENTS . . . . . . . . . . . . . . . . . . 5
POWER SUPPLY . . . . . . . . . . . . . . . . . . . . . . . . . . . . . . . . . . . . . . . . . . . . . . . . . . . . . . . . 6
BATTERY INSTALLATION. . . . . . . . . . . . . . . . . . . . . . . . . . . . . . . . . . . . . . . . . . 6
USE OF THE DEVICE WITH THE POWER SOURCE . . . . . . . . . . . . . . . . . . . 7
SETTING OF DATE AND TIME . . . . . . . . . . . . . . . . . . . . . . . . . . . . . . . . . . . . . . . . . . . . 7
CORRECT POSITION DURING MEASUREMENT . . . . . . . . . . . . . . . . . . . . . . . . . . 7
CUFF PREPARATION. . . . . . . . . . . . . . . . . . . . . . . . . . . . . . . . . . . . . . . . . . . . . . . . . . . . 8
MEASUREMENT PROCEDURE. . . . . . . . . . . . . . . . . . . . . . . . . . . . . . . . . . . . . . . . . . . 9
MEMORY FUNCTION . . . . . . . . . . . . . . . . . . . . . . . . . . . . . . . . . . . . . . . . . . . . . . . . . . 10
MEMORY CLEARING . . . . . . . . . . . . . . . . . . . . . . . . . . . . . . . . . . . . . . . . . . . . 11
INFORMATION ABOUT ERRORS. . . . . . . . . . . . . . . . . . . . . . . . . . . . . . . . . . . . . . . . 11
CARE, STORAGE, REPAIR AND DISPOSAL. . . . . . . . . . . . . . . . . . . . . . . . . . . . . . . 12
TROUBLESHOOTING TIPS . . . . . . . . . . . . . . . . . . . . . . . . . . . . . . . . . . . . . . . . . . . . . 13
WARRANTY . . . . . . . . . . . . . . . . . . . . . . . . . . . . . . . . . . . . . . . . . . . . . . . . . . . . . . . . . . . 14
COMPLETNESS. . . . . . . . . . . . . . . . . . . . . . . . . . . . . . . . . . . . . . . . . . . . . . . . . . . . . . . . 14
TECHNICAL SPECIFICATIONS . . . . . . . . . . . . . . . . . . . . . . . . . . . . . . . . . . . . . . . . . . 14
CERTIFICATION AND STATE REGISTRATION . . . . . . . . . . . . . . . . . . . . . . . . . . . . 16

3
ENG
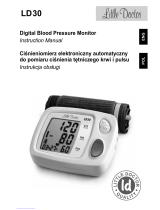
PARTS AND COMPONENTS
1. Electronic Unit.
2. LCD.
3. Arm cuff jack.
4.
Air Tube Plug
.
5. Air tube.
6. Arm cuff CUFF-LDA.
7. Power source Jack.
8.
Electrical power supply LD-N057
(
it is attached to modifi cation LD51A
and LD51U
).
9. M2 (memory 2).
10.
(Power ON/OFF).
11. M1 (memory 1).
12. Power elements.
13. Warranty card.
14. I nstruction Manual.
15. Storage Case.

4
ENG
GENERAL INFORMATION
This Instruction Manual is designed to assist the user with safe and eff ective
operation of the automatic digital Device for measurement of blood pressure
and heartbeat rate LD,
(
modifi cation LD51, LD51A, LD51U
)
(hereinafter – the
“Device”). Use this Device according to the rules described in this Manual.
Operate the Device only as intended. Do not use the Device for any other
purposes. Read and understand the whole Instruction Manual, in particular
“Recommendations on Correct Measurement”.
INDICATIONS FOR USE
Use this Device to measure your systolic and diastolic blood pressure and
heartbeat rate in patients aged from 15. This Device is recommended for use
by persons with unstable blood pressure or known arterial hypertension at
home as an addition to medical surveillance.
OPERATION PRINCIPLE
This Device uses the oscillometric method of blood pressure and pulse rate
measurement. Wrap the cuff around your upper arm and it starts to be infl ated
automatically. The sensitive element of the Device feels the weak pressure
oscillations in the cuff generated by widening and contraction of the brachial
artery in response to every heartbeat. Pumping in is ceased when cuff is adequately
pumped in to determine diastolic and systolic pressure
(t
he amplitude of the
pressure waves is measured, converted into millimeters Hg and shown on the
display as fi gures) after which air is released from cuff . The Device has 2 memories,
by 90 cells, for storage of measurement results. Remember that the Device will
not maintain the mentioned accuracy of a measurement if it is used or stored at
a temperature or humidity other than those specifi ed in Technical Specifi cations
of this Manual. We are warning about possibility of mistakes in blood pressure
measurement with this Device in persons with pronounced cardiac arrhythmia.
Consult the doctor concerning blood pressure measurement of your child
.
APPLIED NEW LD TECHNOLOGIES
Fuzzy Algorithm – algorithm for processing the measurement
values with regard to peculiarities of the man’s heartbeat, thus,
ensuring high measurement accuracy.
Scale WHO – classification of measurement results according to
recommendation of World Health Organization (WHO).
Indication of arrhythmia – special symbol
« »
on Device display
informs about availability of irregular pulse; in this case.
Electronic automatic pressure release valve out of the all-purpose cuff
of device LD51U ensures optimal pressure release rate on an arm of any
size corresponding to that cuff.
WARNING! This Device may be used only with cuff s:
- Cuff -LDA, size 25-36 cm (delivered in a set with the LD51 and LD51A),
- Cuff -LDU, size 22-42 cm (delivered in a set with the LD51U).
High
Norm
Low

5
ENG
RECOMMENDATIONS ON CORRECT MEASUREMENTS
1.
For correct measurement you should know that THE BLOOD PRESSURE IS
SUBJECT TO SHARP VARIATIONS EVEN WITHIN THE SHORT TIME INTERVALS.
The blood pressure depends on many factors. It is usually lower in summer and
higher in winter. The blood pressure varies together with the atmospheric pres-
sure, depends on physical loads, emotional excitement, stresses and dietary
regime. Drugs, drinking alcohol and smoking produce signifi cant eff ect. Even
the very procedure of blood pressure measurement in a polyclinic sends the
blood pressure high in many people, thus, the blood pressure measured at
home often diff ers from the values received in a polyclinic. As the blood pressure
tends to rise at low temperatures, make measurements at an indoor temperature
(approximately 20° C). If this Device stayed under a low temperature, keep it for
at least 1 hour at an indoor temperature before use, otherwise the measurement
result may be incorrect. During a day the diff erence in readings for healthy peo-
ple may be 30-50 mmHg of systolic pressure and to 10 mmHg of diastolic pres-
sure. The dependence of the blood pressure on various factors is individual for
each person. Accordingly, it is recommended to keep a special book with blood
pressure records. ONLY A CERTIFIED DOCTOR USING YOUR RECORDS IS CAPABLE
TO ANALYZE THE TENDENCY OF YOUR BLOOD PRESSURE VARIATIONS
.
2.
At cardiovascular and some other diseases requiring blood pressure
monitoring make measurements in the hours fi xed by your attending doctor.
REMEMBER THAT THE DIAGNOSTIC AND ANY TREATMENT OF HYPERTENSION
MAY BE CONDUCTED ONLY BY A CERTIFIED DOCTOR ON THE BASIS OF BLOOD
PRESSURE VALUES OBTAINED BY THIS DOCTOR. TAKING OF DRUGS AND THEIR
DOSES SHOULD BE PRESCRIBED ONLY BY YOUR ATTENDING DOCTOR
.
3.
At such disorders as deep vascular sclerosis, weak pulse wave and also in
patients with the prominent distortions of cardiac rhythm it may be diffi cult to
measure the blood pressure accurately. IN SUCH CASES CONSULT A CERTIFIED
DOCTOR ABOUT APPLICATION OF THE ELECTRONIC
DEVICE
.
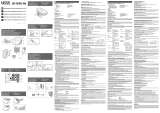
Fig.1

6
ENG
4.
KEEP QUIET DURING A
MEASUREMENT TO OBTAIN THE
ACCURATE VALUES OF YOUR
BLOOD PRESSURE WITH THE
ELECTRONIC
DEVICE
. Measure your
blood pressure in the calm and
comfortable conditions at the indoor
temperature. No eating an hour
before measurement; no smoking,
taking tonic agents, alcohol 1.5-2
hours before measurement
.
5.
The accuracy of blood pressure
measurement depends on whether the
cuff matches the size of your arm. THE CUFF SHOULD NOT BE TOO SMALL OR TOO
LARGE
.
6.
Wait 3 minutes between measurements for the blood to restore its circula-
tion. However, the persons with prominent atherosclerosis due to consider-
able loss of vascular elasticity may need to increase the wait time between
measurements (10-15 minutes). This also refers to the patients suff ering for
long from diabetes
.
For more accurate determination of blood pressure it is recommended to make
a series of 3 consecutive measurements and to use the average value.
POWER SUPPLY OF THE DEVICE
BATTERY INSTALLATION
1. Open the cover of the battery compartment
and install 4 “AA” size batteries according to
polarity marked inside the compartment. Do not
use much force to remove the cover of the battery
compartment (fi g. 3).
2.
Close the battery cover
.
•
Replace all batteries when the Low Battery Indicator
“
” appears on the screen or when there is no
any indication on the screen. The Low Battery
Indicator does not show the discharge level.
The batteries supplied with the Device are intended for check of the
Device performance at sale and their service life may be shorter than of the
recommended batteries
.
•
Replace all four batteries at the same time. Do not use the waste batteries
.
•
If the Device is unused for a long time, remove all batteries
.
•
Do not leave the waste batteries in the Device
.
Fig.3
Fig.2

7
ENG
USE OF THE DEVICE WITH THE POWER SOURCE
The manufacturer recommends application of the stabilized power source
LD-N057 (it is attached to modifi cation LD
51A и LD51U).
The jack for connection
of the power source is on the right side of the Device
.
To use the device with electric power source (EPS), connect plug connector of
EPS to the Device and insert plug of EPS into mains socket
, press .
Measurement over, switch off the Device having depressed button
кнопку
,
remove plug of EPS from mains socket and disconnect plug connector from
the Device
. To avoid resetting of date and time, do not remove the batteries
when using the device with power cells.
SETTING OF DATE AND TIME
1. To shift to mode of date and time setting, it is necessary to press and hold
for over 5 seconds.
2
. If mode of date and time setting is switch on, to set date and time it is
necessary, holding M1, depress button
.Parameter will blink. Change of
selected parameter toward increasing is taking place when depressing button
M2, towards decreasing – when depressing button M1. To shift to setting of
the next parameter, year/month/hours/min, it is necessary to depress
.
3. If no actions are done in mode of date and time setting for more than 1
minute, the Device is independently changed over to mode of date and time
indication. In this case, all the changes that have been already made will
come into eff ect.
4. To switch off mode of date and time setting, it is necessary to press and
hold
for over 5 seconds.
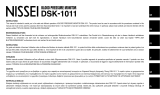
1. Sit at a table so that during blood pressure
measurement your hand rests on its surface. Be sure
that the cuff is placed approximately at the level of
your heart and that your arm lies freely on the table
and does not move.
After replacing the batteries the mode of date and time indication is always off .
The factory setting of the clock mode is OFF.
When power cells are replaced, date and time will zero, and measurement
results will be safe without date and time setting.
If the device does not take measurements while the date and time indication
mode is ON, the display will show current date and time.
CORRECT POSITION DURING MEASUREMENT
Fig.4

8
ENG
2. You can measure the blood pressure lying on
the back. Look at the ceiling, keep quiet and do
not move during measurement. Be sure that the
cuff is placed approximately at the level of your
heart.
1. I
nsert the cuff end for about 5 cm into a
metal ring as shown in the fi gure
.
Fig.6
2. Apply the cuff to your left upper arm so
that the air tube is directed to your palm. If the
measurement on your left arm is difficult, you
may use your right arm. In this case remember
that the readings may diff er by 5-10 mmHg and
even more.
Fig.7
3. Wrap the cuff around your upper arm so that
the bottom of the cuff is approximately 2-3 cm
above your elbow. The sign “ARTERY” should be
over the arm artery.
Fig.8
4.
Fix the cuff so that it fits tightly to the arm,
but see that it is not overtight. Too tight or too
free placement of the cuff may give inaccurate
readings.
Fig.9
5. On the fi xed cuff the sign «INDEX» should point
to the area «NORMAL (25-36 cm)».It means that the
cuff is chosen correctly and fi ts the size of your upper
arm. if the sign points to the area marked «
» the
cuff is too small and the readings will be higher. If
the sign points to the area marked «
» the cuff is
too large and the readings will be lower.
Fig.10
CUFF PREPARATION
Fig.5

9
ENG
6.
If the arm has a conic form, the cuff should be
put on with a spiral movement as shown in the
fi gure.
Fig.11
7. If the rolled-up sleeve squeezes the arm
interfering with free blood fl ow the Device may
give inaccurate figures not corresponding to
your actual blood pressure.
Fig.12
MEASUREMENT PROCEDURE
1. Insert the Air Tube Plug into the Cuff Jack. Make 3-5
deep inhales and exhales before taking a measurement
and relax. Do not move, do not speak and do not
toughen your arm.
2.
Press
.
3.
All symbols will appear on the display screen for a
short time, two short sound signals will be given and
the Device will infl ate automatically the air into the cuff
(fi g. 13). At fi rst the infl ation will stop at the level of 190
mmHg (fi g. 14)
.
4.
After reaching the level of 190 mmHg the cuff will
gradually deflate. The figures on the screen will count
back.
The pulse symbol “ ” will start fl ickering.
As the blood pressure and pulse are measured during air
defl ation from the arm cuff keep quiet and do not move
your arm and do not toughen your arm muscles.
5.
When the measurement is complete the sound signal
is given, the arm cuff completely deflates and your
measurement results fl ash on the screen
and Indicator
« »
will blink, reminding that to retain results, it is necessary
to choose memory 1 or 2, having depressed M1 or M2, respectively.
The
result may be saved before the beginning of the next measurement or before
turning the device OFF.
M
D
Fig.13
Fig.14

10
ENG
If irregular pulse rhythm is detected during measurement, symbol of arrhythmia
“
”, will appear upon measurement end. Appearance of arrhythmia indicator
may also be caused by body movement during measurement. During
periodical appearance of this indication apply to You attending doctor.
Apart from numerical value of pressure, result is also
displayed on scale WHO (Fig. 14).
Scale WHO – three-
color scale of classifi cation of received value of arterial
pressure, according to recommendation of World Health
Organization. The scale is available from the left.
6. Press
to switch off .
TO OBTAIN THE ACCURATE RESULT MAKE INTERVAL
BETWEEN MEASUREMENTS TO RESTORE THE BLOOD
CIRCULATION. WAIT FOR AT LEAST 3 MINUTES BEFORE
MAKING A NEW MEASUREMENT
.
THE DATA WILL BE KEPT IN THE MEMORY EVEN IF THE DEVICE IS STORED
WITHOUT BATTERIES. TO DELETE ALL VALUES STORED IN THE MEMORY YOU
SHOULD MAKE ACTIONS DESCRIBED IN “MEMORY FUNCTION”.
If no actions are done in mode of date and time setting for more than 3 minute,
the Device is independently changed over to mode of date and time indication.
AUTOMATIC RE-INFLATION
When during the fi rst blood pressure measurement the cuff infl ation to a
level of 190 mmHg is not suffi cient or you move your arm the Device stops
measurement and re-infl ates the cuff to the higher level. The Device has 4
fi xed levels of the arm cuff infl ation: 190, 230, 270 and 300 mmHg.
The automatic re-infl ation is repeated until the measurement is completed
successfully. This is not a defect.
FORCED DEFLATION FROM A CUFF
For rapid air release from of the arm cuff dur-
ing arm cuff infl ation or during a measurement
(slow defl ation) press the
Button. The device
will quickly release all air from cuff and will
switch off .
MEMORY FUNCTION
1.
Result of each measurement (pressure, pulse, time and date of measurement)
may be kept in the device memory. For this purpose, after measurement, within
not more than 3 minutes, memory M1 or M2 shall be selected for memory
storage.
IF THE NOTICE ON ERROR APPEARS THE MEASUREMENT RESULT WILL
NOT BE STORED
.
M
D
Fig.15
Fig.16

11
ENG
2.
Up to 90 measurement results and mean value of last
3 measurements may be kept in each device memory
.
When the number of measurements exceeds 90, the oldest
record is deleted to save the most recent values.
3.
Press the M1 (or M2) Button to see the fi gures stored
in the memory.At the fi rst depression of button M1
« »
(
or
М2
«
»
)
mean value of 3 last measurements, kept in
memory M1 (or M2), will appear on the screen
,
marked
by symbol«А»
(fi g. 17).
At repeated depression of button
M1 (or M2) indicator of selected
memory
М1 « » (или М2
«
»
)
and
number of memory cell will appear
on the screen, and in 1 second its
content is displayed
(fig. 18).
When
content of memory cell is displayed,
date and time of measurement
are displayed alternately in the
display lower line. Each depression
of button M1 (or M2) causes
shifting to the next memory cell
.
MEMORY CLEARING
To delete all values stored in the memory, press the
M1 (or M2)
Button and hold it down for more than 5 seconds. Symbols “Clr” will
appear on the screen and all values will be deleted from the memory
.
INFORMATION ABOUT ERRORS
Indication Likely cause Methods of correction
The arm cuff is applied
incorrectly or the air tube plus
is inserted not tightly enough.
Measurements cannot
be made due to hand
movement or talking during
measurements.
Be sure that the arm cuff is
applied correctly and the plug is
inserted tightly. Repeat the whole
measurement procedure.
Repeat the measurement
following strictly the
recommendations of this Manual.
Batteries are discharged. Replace the batteries for new
ones.
Fig.18
Fig.17

12
ENG
CARE, STORAGE, REPAIR AND DISPOSAL
1. Keep this Device from exposure to higher humidity, direct sunlight,
shocks, vibration. THIS DEVICE IS NOT WATERTIGHT!
2. Do not keep and use this Device near heating installations and open
fi re.
3.
If the Device was stored at a temperature below the freezing point, keep
it at least for 1 hour in some warm place before use
.
4. Remove the batteries if the Device will be unused for a long time. Battery
leaking may damage the Device. KEEP BATTERIES OUT OF REACH OF
CHILDREN!
5.
Keep the Device clean and protect it from dust. Use the dry soft cloth to
clean the Device
.
6. Keep the Device and its components away from water, solvents, spirit
and petrol.
7. Protect the arm cuff from contacting on sharp things; do not stretch or
fold tightly the arm cuff .
8. Do not subject the Device to strong shocks, such as dropping on the
fl oor.
9. This Device does not contain special controls to adjust the measurement
accuracy. It is prohibited to open individually the electronic block. Repair
the Device only in authorized organizations.
10. On expiration of the warranted service life apply from time to time to
authorized repair organizations to check the technical condition of the
Device.
11. Dispose of the Device and its components according to the application
local regulations. No special requirements to disposal of this Device are
defi ned by the manufacturer.
12. The arm cuff may withstand multiple sanitary treatments. The internal
tissue surface of the arm cuff (contacting on arm) may be cleaned with
cotton ball soaked in 3%-solution of hydrogen peroxide. At long use
the partial color fading of the tissue coating of the arm cuff is possible.
Washing and ironing of the arm cuff are not allowed.

13
ENG
TROUBLESHOOTING TIPS
PROBLEM LIKELY CAUSE
METHOD OF CORRECTION
After pressing the
Button no indication
on the display.
Discharge of batteries.
Polarity of batteries is not
observed.
Battery terminals are
contaminated
Power source not
plugged in an electrical
outlet.
Replace all batteries for
new ones.
Install batteries correctly.
Clean the terminals with
dry cloth.
Plug the power source into
an electrical outlet.
Infl ation is stopped
and resumed.
Automatic re-infl ation
to obtain correct
measurements.
Perhaps you talk or move
your arm during the
measurement?
See MEASUREMENT
PROCEDURE
Calm down and repeat
the measurement.
Every time the blood
pressure is diff erent.
Measurements are
too low/high.
Check that the arm cuff is
level with your heart?
Check that the arm cuff is
applied correctly?
Perhaps your arm muscles
are tough?
Perhaps you talk or move
your arm during the
measurement?
Take the correct position
for measurement.
Take the correct position
for measurement.
Calm down, apply the
arm cuff correctly.
Keep silence and quiet
during measurement.
Measurements of
the pulse rate are
too high/low.
Perhaps you talk or move
your arm during the
measurement?
Perhaps you make
measurement directly after
physical load?
Keep silence and quiet
during measurement.
Repeat the measurement
at least in 5 min.
Impossibility
to make a large
of number of
measurements.
Application of poor
batteries.
Use only alkali batteries
of well-known
manufacturers.
If regardless of the above recommendation you are unable to get correct
measurement results, stop the use of this Device and apply to a maintenance
organization (addresses and telephones of authorized organizations may
be found in the warranty card). Do not try to adjust the internal mechanism
by yourself.

14
ENG
WARRANTY
1. The following LD product is covered by warranty for the period specifi ed
in the warranty card
.
2. The warranty liabilities are contained in the warranty card given at the
sale of this Device to a purchaser.
3.
The addresses of organizations for warranty maintenance are given in the
warranty card
.
COMPLETNESS
№ Name of part
LD51 LD51A LD51U
1
Electronic Unit
111
2
Arm cuff (with air tube and plug):
Cuff -LDA
(25-36 cm
)
Cuff -LDU
(22-42 cm
)
1
–
1
–
–
1
3
Electrical power supply LD-N057
–11
4
Power elements
AA
444
5
Instruction Manual
111
6
Warranty card
111
7
Storage Case
111
TECHNICAL SPECIFICATIONS
Measurement method
oscillometric with Fuzzy Algorithm
Display
LCD
Pressure indication range in an arm
cuff , mmHg
from 0 to 300
Measurement range:
pressure in an arm cuff , mmHg
pulse rate, 1/min
from 40 to 260
from 40 to 160
Range of admissible absolute
error at measurement of air pres-
sure in an arm cuff , mmHg
±3
Range of admissible relative error
at pulse rate measurement
, % ±5
Infl ation
automatic (air pump)
Defl ation
automatic

15
ENG
Date and time yes
Memory 2х90 recent measurements + average value
of the last three measurements
Power source, V
6
Type of power supply
4 “AA” size batteries (LR6) or adapter not
less than 600 mA
Max power intake, W
3,6
ADAPTER LDN057
( (
it is attached to modifi cation LD51A and LD51U
)
Output voltage
Max load current
Input voltage
Dimensions
Weight
Plug:
Polarity of terminals
Internal diameter, mm
External diameter, mm
Length of plug contact, mm
6V ± 5%
not less than 600 mA
~200-240 V, 50/60 Hz
64 x 70 x 43 mm
not more 0,3 kg
«–» internal
2.1 ± 0.1
5.5 ± 0.1
10 ± 0.5
Operation conditions:
Temperature, °C
Relative humidity, % Rh
from 10 to 40
85 and lower
Storage and transportation
conditions:
Temperature, °C
Relative humidity, % Rh
from -20 to 50
85 and lower
Dimensions:
Size (electronic block), mm
Weight (without package, case,
batteries and adapter), g
129 x 105 x 61
424 (LD51, LD51A) / 422 (LD51U)
Year of manufacture
year the manufacture is given in the
bottom of the Device body in a serial
number after symbols “AA”
.
Symbols
Type BF
Important: Read the instructions
Type II
Technical characteristics may be changed without preliminary notification to
improve the operation and quality of the product.

16
ENG
CERTIFICATION AND STATE REGISTRATION
This Device manufacturing is certifi ed according to international standard ISO
13485:2003.
Devices LD51, LD51A, LD51U comply with the requirements of European
Directive MDD 93/42/ЕЕС, international standards, EN980.
Power source LD-N057 complies with international standard EN 55022 Class A,
protection level against electric shock: Class II, Type BF.
Complaints and requests should be addressed to:
Little Doctor Europe Sp. z o.o.
57G Zawila Street, 30-390, Krakow, Poland
Service phone: +48 12 2684748, 2684749
Manufactured under control:
Little Doctor International (S) Pte. Ltd., 35 Selegie Road # 09-02 Parklane
Shopping Mall, Singapore 188307
Manufacturer:
Little Doctor Electronic (Nantong) Co. Ltd., No.8, Tongxing Road Economic &
Technical Development Area, Nantong 226010, Jiangsu, PEOPLE'S REPUBLIC
OF CHINA
Distributor in Europe:
Little Doctor Europe Sp. z o.o.
57G Zawila Street, 30-390, Kraków, Poland
Sales Offi ce phone: +48 12 2684746, 12 2684747, fax: +48 12 268 47 53
E-mail: biuro@littledoctor.pl
www.LittleDoctor.pl
Authorized Representative in the EU:
Shanghai International Holding Corp.GmbH
Eiff estrasse 80, 20537 Hamburg, Germany.

17
POL
SPIS TREŚCI
Podstawowe części i komponenty. . . . . . . . . . . . . . . . . . . . . . . . . . . . . . . . . . . . . . . . . 18
Informacje ogólne. . . . . . . . . . . . . . . . . . . . . . . . . . . . . . . . . . . . . . . . . . . . . . . . . . . . . . . . 19
Wskazania do stosowania. . . . . . . . . . . . . . . . . . . . . . . . . . . . . . . . . . . . . . . . . . . . . 19
Zasada działania. . . . . . . . . . . . . . . . . . . . . . . . . . . . . . . . . . . . . . . . . . . . . . . . . . . . . . 19
Zastosowanie nowych technologii LD . . . . . . . . . . . . . . . . . . . . . . . . . . . . . . . . . 19
Zalecenia dotyczące prawidłowego pomiaru . . . . . . . . . . . . . . . . . . . . . . . . . . . . . . 20
Zasilanie elektryczne urządzenia . . . . . . . . . . . . . . . . . . . . . . . . . . . . . . . . . . . . . . . . . . 21
Wymiana baterii . . . . . . . . . . . . . . . . . . . . . . . . . . . . . . . . . . . . . . . . . . . . . . . . . . . . . . 21
Stosowanie urządzenia zasilanego zasilaczem. . . . . . . . . . . . . . . . . . . . . . . . . 22
Ustawianie daty i godziny. . . . . . . . . . . . . . . . . . . . . . . . . . . . . . . . . . . . . . . . . . . . . . . . . 22
Przyjęcie pozycji umożliwiającej pomiar. . . . . . . . . . . . . . . . . . . . . . . . . . . . . . . . . . . 23
Zakładanie mankietu . . . . . . . . . . . . . . . . . . . . . . . . . . . . . . . . . . . . . . . . . . . . . . . . . . . . . 23
Procedura pomiaru . . . . . . . . . . . . . . . . . . . . . . . . . . . . . . . . . . . . . . . . . . . . . . . . . . . . . . . 24
Funkcja pamięci . . . . . . . . . . . . . . . . . . . . . . . . . . . . . . . . . . . . . . . . . . . . . . . . . . . . . . . . . . 26
Czyszczenie pamięci urządzenia. . . . . . . . . . . . . . . . . . . . . . . . . . . . . . . . . . . . . . . 27
Zawiadomienia o błędach . . . . . . . . . . . . . . . . . . . . . . . . . . . . . . . . . . . . . . . . . . . . . . . . 27
Konserwacja, przechowywanie, naprawa i utylizacja . . . . . . . . . . . . . . . . . . . . . . . 27
Wykrywanie usterek . . . . . . . . . . . . . . . . . . . . . . . . . . . . . . . . . . . . . . . . . . . . . . . . . . . . . . 28
Warunki gwarancji. . . . . . . . . . . . . . . . . . . . . . . . . . . . . . . . . . . . . . . . . . . . . . . . . . . . . . . . 29
Zawartość kompletu. . . . . . . . . . . . . . . . . . . . . . . . . . . . . . . . . . . . . . . . . . . . . . . . . . . . . . 29
Charakterystyki techniczne . . . . . . . . . . . . . . . . . . . . . . . . . . . . . . . . . . . . . . . . . . . . . . . 30
Certyfi kacja i rejestracja państwowa. . . . . . . . . . . . . . . . . . . . . . . . . . . . . . . . . . . . . . .
31

18
POL
PODSTAWOWE CZĘŚCI I KOMPONENTY
1. Blok elektroniczny urządzenia.
2. Wyświetlacz LCD.
3. Gniazdo do podłączenia mankietu.
4. Złącze do mankietu.
5. Wąż mankietu.
6. Mankiet.
7. Gniazdo do podłączenia zasilacza.
8.
Zasilacz LD-N057
(
w zawartości kompletu modelu
LD51A, LD51U).
9. Przycisk M2 (pamięć 2).
10. Przycisk
(włącznik/wyłącznik zasilania).
11. Przycisk M1 (pamięć 1).
12. Baterie.
13. Karta gwarancyjna.
14. Instrukcja obsługi.
15. Torba.

19
POL
INFORMACJE OGÓLNE
Niniejsza instrukcja ma służyć użytkownikom pomocą w bezpiecznym i
efektywnym posługiwaniu się automatycznym elektronicznym urządzeniem
do pomiaru ciśnienia tętniczego krwi i pulsu LD, model LD51, LD51A,
LD51U (dalej w tekście: URZĄDZENIE). Urządzenie powinno być stosowane
zgodnie z zasadami przedstawionymi w niniejszej instrukcji i nie należy
wykorzystywać go do celów innych, niż tu opisane. Należy przeczytać i
zrozumieć całą instrukcję obsługi, zwłaszcza rozdział “Zalecenia dotyczące
prawidłowego pomiaru”.
WSKAZANIA DO STOSOWANIA
Urządzenie przeznaczone jest do pomiaru skurczowego i rozkurczowego
ciśnienia tętniczego krwi oraz pulsu u pacjentów w wieku od 15 lat.
Ciśnieniomierz zalecany jest do stosowania u pacjentów z niestabilnym
ciśnieniem tętniczym krwi lub nadciśnieniem tętniczym w warunkach
domowych jako uzupełnienie nadzoru lekarskiego. Mankiet dostosowany jest
do ramion o obwodzie 25-36 cm.
ZASADA DZIAŁANIA
Urządzenie wykorzystuje oscylometryczną metodę pomiaru ciśnienia
tętniczego krwi. Mankiet jest owijany wokół ramienia i pompowany
automatycznie. Czujnik wychwytuje delikatne wahania zmiany ciśnienia w
mankiecie, powodowane rozszerzaniem się i kurczeniem się tętnicy ramiennej
odpowiednio do bicia serca. Mierzona amplituda fal ciśnienia przekładana
jest na wartość wysokości słupa rtęci, wyświetlaną na wyświetlaczu LCD.
Urządzenie posiada 90 komórek pamięci do przechowywania wyników
pomiarów. Należy pamiętać, że aby urządzenie wyświetlało poprawne
wyniki, musi ono być przechowywane i wykorzystywane w temperaturach i
przy wilgotności, nie odbiegających od opisanych w dziale ”Charakterystyki
techniczne” danej instrukcji. Uprzedzamy o możliwości przekłamania
pomiarów u osób z rozrusznikami serca, arytmią serca, zwężeniem naczyń,
zaburzeniami wątroby i cukrzycą. Przed pomiarem ciśnienia u dzieci
wskazane jest skonsultowanie się z lekarzem
.
ZASTOSOWANIE NOWYCH TECHNOLOGII
Identyfi kacja arytmii – specjalny znak « » na wyświetlaczu urzą-
dzenia, informujący o wykryciu nieregularnego pulsu.
Skala WHO – klasyfi kacja wyników pomiaru odpowiednio do zaleceń
Światowej Organizacji Zdrowia (WHO).
Fuzzy Algorithm – algorytm przetwarzania danych pomiarowych,
który pozwala dokładniej odzwierciedlić specyfi kę pracy ludzkiego
serca, co zapewnia wyższą dokładność danych.
High
Norm
Low

20
POL
Elektroniczny zawór automatycznego obniżania ciśnienia w uniwersalnym
mankiecie urządzenia LD51U zapewnia optymalną szybkość redukcji ciśnienia
na ręce każdego rozmiaru, odpowiadającego danemu mankietowi.
UWAGA! Niniejsze urządzenie może być wykorzystywane tylko z mankietami:
- Cuff -LDA, rozmiar 25-36 cm (dołączony do kompletu urządzenia LD51 i LD51A),
- Cuff -LDU, rozmiar 22-42 cm (dołączony do kompletu urządzenia LD51U).
ZALECENIA DOTYCZĄCE PRAWIDŁOWEGO POMIARU
1.
Dla przeprowadzenia prawidłowego pomiaru należy pamiętać, że CIŚNIENIE
TĘTNICZE PODLEGA SILNYM WAHANIOM NAWET W KRÓTKIM PRZEDZIALE
CZASOWYM. Wartość ciśnienia tętniczego krwi zależy od wielu czynników.
Zwykle jest ona niższa w okresie letnim i wyższa w okresie zimowym. Ciśnienie
krwi zależy od ciśnienia atmosferycznego, wysiłku fi zycznego, pobudliwości,
stresu, diety. Duży wpływ mają używki; narkotyki, alkohol i palenie tytoniu. U
wielu osób samo przeprowadzenie pomiaru ciśnienia w przychodni wywołuje
podniesienie wskaźników. Z tego powodu wyniki pomiarów ciśnienia tętniczego
przeprowadzonych w warunkach domowych często różnią się od wyników
pomiarów, przeprowadzonych w ośrodkach medycznych.
Z uwagi na fakt, że ciśnienie w niskiej temperaturze podwyższa się, należy je
mierzyć w temperaturze pokojowej (około 20° C). W przypadku, gdy urządzenie
było przechowywane w niskiej temperaturze, przed użyciem trzeba je
przynajmniej przez godzinę przetrzymać w temperaturze pokojowej, inaczej
wyniki pomiaru mogą być przekłamane. W ciągu doby wahania ciśnienia
u zdrowych ludzi mogą wynieść 30-50mmHg dla ciśnienia skurczowego
(górnego) i do 10 mmHg dla ciśnienia rozkurczowego (dolnego). Wahania
ciśnienia u różnych ludzi mogą mieć różne podstawy, dlatego zaleca się
prowadzenie dziennika pomiarów. TYLKO LEKARZ NA PODSTAWIE DANYCH Z
TAKIEGO DZIENNIKA MOŻE PRZEANALIZOWAĆ TENDENCJE ZMIAN I STWIERDZIĆ
EWENTUALNE PRZYCZYNY ZABURZEŃ CIŚNIENIA TĘTNICZEGO
.
Rys. 19
1/32