Nissei DSK-1011 Instrukcja obsługi
- Kategoria
- Jednostki ciśnienia krwi
- Typ
- Instrukcja obsługi

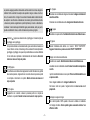
INSTRUCTIONS
This manual is intended to assist you in the safe and efficient operation of BLOOD PRESSURE MONITOR DSK-1011. The product must be used in accordance with the procedures contained in this
manual and must not be used for purposes other than those described herein. It is important to read and understand the entire manual. In particular, please read carefully and become familiar with the
section entitled “TIPS ON TAKING YOUR BLOOD PRESSURE”.
BEDIENUNGSANLEITUNG
Dieses Handbuch soll den Anwender bei der sicheren und wirkungsvollen Blutdruckmonitors DSK-1011 unterstützen. Das Produkt ist in Übereinstimmung mit den in diesem Handbuch enthaltenen
Verfahren zu verwenden und darf nicht für irgendwelche, in diesem Handbuch nicht beschriebenen Zwecke verwendet werden. Lesen Sie bitte vor allem das Kapitel “TIPPS ZUR
BLUTDRUCKMESSUNG” aufmerksam durch und machen Sie sich damit vertraut.
INSTRUCTIONS
Ce guide est destiné à favoriser l'utilisation sûre et efficace de Moniteur de tension artérielle DSK-1011. Le produit doit être utilisé conformément aux procédures contenues dans le présent guide et ne
doit pas être utilisé à d'autres fins que celles décrites ici. Il est important de lire et de comprendre le guide dans sa totalité. En particulier, veuillez lire attentivement et vous familiariser avec la section
intitulée “CONSEILS POUR MESURER VOTRE TENSION ARTÉRIELLE”.
ISTRUZIONI
Questo manuale assiste l'utilizzatore nell'uso efficiente e sicuro dello Sfigmomanometro DSK-1011. Usare il prodotto seguendo le procedure specificate nel presente manuale. Il prodotto non deve
essere usato per scopi diversi da quelli indicati. Si raccomanda di leggere attentamente tutto il manuale. In particolare, si raccomanda di leggere e seguire attentamente le informazioni riportate nella
sezione “CONSIGLI SULLA MISURAZIONE DELLA PRESSIONE SANGUIGNA”.
ΟΔΗΓΙΕΣ
Το εγχειρίδιο αυτό προορίζεται για να βοηθήσει το χρήστη στην ασφαλή και αποτελεσματική λειτουργία του Ψηφιακού Μετρητή Αρτηριακής Πίεσης DSK-1011. Το προϊόν πρέπει να χρησιμοποιείται
σύμφωνα με τις διαδικασίες που περιλαμβάνονται στο παρόν εγχειρίδιο και δεν πρέπει να χρησιμοποιείται για σκοπούς διαφορετικούς από εκείνους που περιγράφονται στο παρόν. Είναι σημαντικό
να διαβάσετε και να κατανοήσετε το εγχειρίδιο εξ ολοκλήρου. Ειδικότερα, διαβάστε προσεκτικά και εξοικειωθείτε με την ενότητα “ΣΥΜΒΟΥΛΕΣ ΓΙΑ ΤΗ ΜΕΤΡΗΣΗ ΤΗΣ ΑΡΤΗΡΙΑΚΗΣ ΣΑΣ ΠΙΕΣΗΣ”.
INSTRUKCJA OBSŁUGI
Niniejsza instrukcja użytkowania ma na celu pomóc użytkownikowi w bezpiecznym i sprawnym korzystaniu z elektronicznego ciśnieniomierza krwi DSK-1011. Aparat winien być używany zgodnie z
zaleceniami niniejszej instrukcji i nie może być wykorzystywany do innych celów niż wymienione poniżej. Istotne jest, aby użytkownik przeczytał dokładnie i zrozumiał niniejszą instrukcję. W
szczególności prosimy o uważne zapoznanie się z działem zatytułowanym “UWAGI DOTYCZĄCE POMIARÓW CIŚNIENIA”.
BLOOD PRESSURE MONITOR
GB
DE
FR
IT
GR
PL

-2-
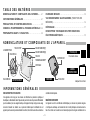
CONTENTS
PART NAMES AND PRODUCT COMPONENTS .............2
GENERAL INFORMATION ................................2
PRECAUTIONS AND CONTRAINDICATIONS ..............5
TIPS ON TAKING YOUR BLOOD PRESSURE ..............6
PREPARATION BEFORE USE .............................7
MAKING A MEASUREMENT ..............................8
VIEWING THE SAVED READINGS (MEMORY FUNCTION) .11
TROUBLESHOOTING ....................................12
TECHNICAL DESCRIPTION FOR ELECTROMAGNETIC
DISTURBANCES ........................................13
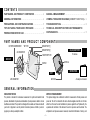
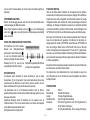
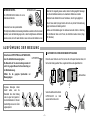
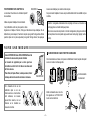
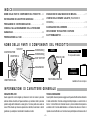
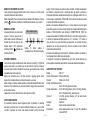
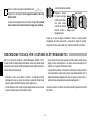
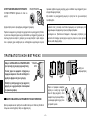
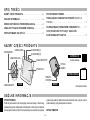
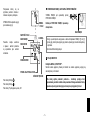
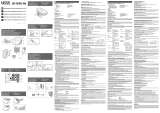
PART NAMES AND PRODUCT COMPONENTS
MAIN UNIT
CUFF
AA (LR6) BATTERIES
INSTRUCTIONS
BATTERY COMPARTMENT
AIR CONNECTOR
AC CONNECTOR
“SET” KEY MEMORY KEY [1]
MEMORY KEY [2]
“START/STOP” KEY For test use
AIR PLUG
AIR HOSE
DISPLAY
AC adaptor not included
GENERAL INFORMATION
INDICATIONS FOR USE
This product is intended for noninvasive measurement of systolic and diastolic blood
pressure, determination of pulse rate and calculation of pulse pressure in adults in a home
healthcare environment. The product is not designed for neonatal use. Please consult with
your doctor or physician to use this product to take blood pressure of child or person in
pregnancy or under pre-eclamptic condition.
METHOD OF MEASUREMENT
This product employs the oscillometric method for measurement of blood pressure and
pulse rate. The cuff is connected to the main unit and wrapped around the arm. Circuits
within the cuff sense the small oscillations in pressure against the cuff produced by the
expansion and contraction of the arteries in the arm in response to each heart beat. The
amplitude of each pressure waves is measured, converted to millimeters of mercury, and

-3-
displayed on the LCD as a digital value.
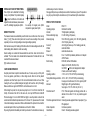
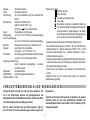
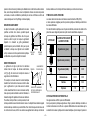
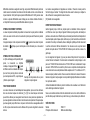
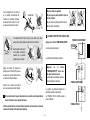
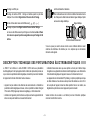
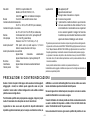
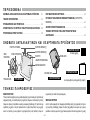
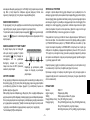
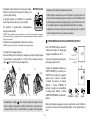
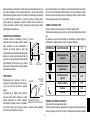
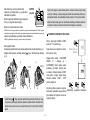
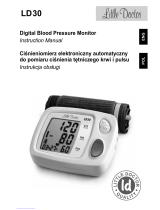
MEASUREMENT ON INFLATION
Initially the cuff is rapidly inated to the prescribed value at
the beginning of a measurement, during which the ination
mark is displayed. After the pressure reaches this point,
the ination mark disappears and the cuff is inated more
gradually, during which pulse wave is detected. As pulse
wave is detected, heart mark ashes with synchronizing
beep. Measurement ends when systolic blood pressure is
determined and air is exhausted from the cuff.
PERSONAL MODE
The ination is adjusted based on the latest three readings
in the selected bank, either [1] or [2], to shorten the
measurement time and to improve comfort.
For example, high diastolic blood pressure values from
past three measurements will lead to ination to higher
pressure value than the default value. In the event that this
value is too high for your current blood pressure, the cuff
will rapidly deate and measurement will restart.
To use the personal mode effectively, chose the memory bank before starting a measurement.
This monitor remembers the last memory bank that was displayed. To choose the memory
bank before starting a measurement, display a reading saved in the desired memory bank,
turn off the monitor once and then start measurement.
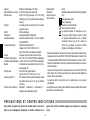
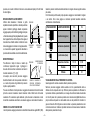
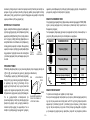
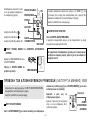
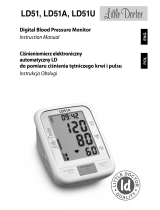
WHO CLASSIFICATION SYMBOL
easured blood pressure values are classied against WH guideline 1999.
The higher class applies when systolic and diastolic pressures fall into different classes.
For specic information on your blood pressure, contact your physician. Never make any
judgment on your own based on the classication indication only.
PRESSURE
TIME
RAPID
INFLATION
RAPID
EXHAUST
GRADUAL
INFLATION
PRESSURE
TIME
AN EXAMPLE OF PRESSURE
HANG DTIND WITH
“PERSONAL MODE”
INITIAL PRESSURE
CHANGE
SYS
>180
160-179
140-159
130-139
120-129
<120
DIA
>110
100-109
90-99
85-89
80-84
<80
WHO CLASSIFICATION
Hypertension (severe)
Hypertension (moderate)
Hypertension (mild)
High Normal
Normal
Optimal
DISPLAY
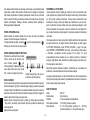
PULSE PRESSURE DISPLAY
This product calculates and displays pulse pressure.
While systolic blood pressure keeps increasing with age, diastolic blood pressure tends
to start decreasing at around age 50. Pulse pressure is value subtracting diastolic value
from systolic value and therefore pulse pressure tends to increase with age. Pulse pressure
has been considered to be related to stiffness of artery and has been studied as one of
circulatory risk factors. It is sometimes said that 45 mmHg of pulse pressure is normal value.
Pulse pressure only does not represent arterial sclerosis. However, observation of pulse
pressure in long term will be important.
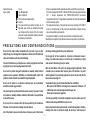
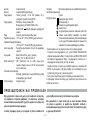
BODY MOTION SYMBOL
Blood pressure value taken while moving cannot be said to be the correct value because
body movement can affect blood pressure.
This product analyzes pulse wave and displays ] when body motion is detected.
[ ] indicates the results might be affected by body movement.

-4-
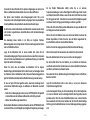
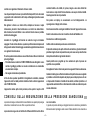
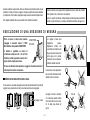
IRREGULAR PULSE RHYTHM SYMBOL
Pulse rhythm can be disturbed from talking,
moving or arrhythmias. This product displays
[] when the difference of shortest and
longest time intervals between pulse waves is
over 25%, indicating irregular pulse rhythm.
MEMORY FUNCTION
The measured values are automatically saved for later review in either one of two memory
banks, [1] or [2]. These two memory banks can be used to save readings of two persons
separately or to save morning readings and evening readings separately.
ach bank can save up to 60 readings. When the number of stored readings reaches 60, the
oldest reading will be deleted to record new reading.
Saved readings are recalled with measurement date and time when clock function is
activated. *The clock needs to be activated before measurement for date and time to be
saved with the measured valued.
[Err] results are not saved.
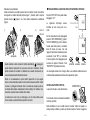
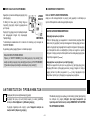
CARE AND MAINTENANCE
Keep the product clean. Inspect its cleanliness after use. To clean, use only a soft dry cloth.
Do not use gasoline, paint thinner, or other strong solvents. Since the cuff may absorb
perspiration and other uids, inspect it for stain and discoloration after each use. When
cleaning the cuff, use a synthetic detergent and gently rub the surface. Air dry thoroughly.
ake sure uid never gets in AI HS. Do not machine wash or scrub it.
When storing the product, do not place heavy objects on it. Do not fold or bend the cuff
forcibly. To disconnect the cuff from the main unit, do not pull AIR PLUG but hold AIR
PLUG and unplug it. Do not coil AIR HOSE too tightly. In case the product is stored in the
environment with ambient temperature above 0 or below 10, please leave it for at least
2 hours before taking a measurement. Remove the batteries if the product is to be stored for
an extended period of time. Keep the batteries out of reach of children.
Stop using the product immediately and contact your dealer or the manufacturer in case any
regular pulse rhythm
An example of irregular pulse rhythm
compared to regular pulse rhythm
visible damage is found on the device.
We suggest that you have your blood pressure monitor checked every 2 years. This operation
may only be performed by the manufacturer or by rms authorized by the manufacturer.
PRODUCT SPECIFICATIONS
Model : DSK-1011
Operating principle : Oscillometric method
Indicator : 15 digits liquid crystal display
Pressure indicating range : 0 to 300 mmHg cuff pressure
Measuring range : 50 to 250 mmHg systolic, 0 to 180 mmHg diastolic,
0 to 160 bpm pulse rate
Accuracy* : 3 mmHg cuff pressure, 5 of reading pulse rate
Ination :Automatic ination
Exhaust : Automatic exhaust valve
Power supply : Four 1.5 volt 6 AA alkaline batteries or A adaptor
AD-W5 series
Electric rating : D6V/W, with four 6 batteries
Adaptor A100-20V, 50-60Hz, 0.12A,
Unit; DC6V, 500mA, with designated AC adaptor
Memory : 2 banks, each stores 60 readings
Operating condition : 10 to 0, 15 to 85 H noncondensing
Transportation/storage condition : -20 to 60, 10 to 95 H noncondensing
Cuff :
Coverage arm circumference; 22 to 32 cm, applied part; BF
Main unit : Weight Appro. 250 g without batteries
Size Appro. 115 115 65.9 mm W D H
Protection class IP : IP 20: Protected against solid foreign particles with a
diameter of more than 12.5 mm, no protection against
water.
Protection against electric shock : Internally powered equipment/Class II equipment, Type
BF applied part
Mode of operation : Continuous operation
lassication : Class II / Internally powered equipment

-5-
Expected service life : 5 years
Key to symbols : Type BF applied part
: Class II equipment
: Refer to instruction manual/booklet.
: Keep dry
:The used electrical and electronic products are not
household waste. Follow your national/local recycling
rules to dispose of them properly. In the EU countries,
please refer to waste management symbols marked on
the package or the instrument.
*Accuracy is guaranteed with the measured values that are within the measuring range.
This device complies with N1060-1:1995A2:2009 Non-invasive sphygmomanometers
art 1: General reuirements and N1060-3:1997A2:2009 Non-invasive
sphygmomanometers Part 3: Supplementary requirements for electro-mechanical blood
pressure measuring system.
The measurement accuracy of the product has been proven according to IS 81060-2
protocol. In the clinical study, K5 was used for the determination of diastolic pressure
values at all auscultatory measurements.
• This product is intended for use in the environment with one atmospheric pressure.
Specications are subject to change without notice due to improvements in performance.
PRECAUTIONS AND CONTRAINDICATIONS
Do not use this product without consultation with your doctor if you are under
dialysis therapy or on anticoagulants, antiplatelets or steroids. Use of this instrument
under such conditions could cause internal bleeding.
For specic information on your blood pressure, contact your physician. Never make
any judgment on your own regarding measurement results.
Do not use this product along with implantable and wearable medical electrical
equipment such as pacemaker, debrillator, or electrocardiographic monitor. This
product is not also intended to be used with HF surgical equipment.
Do not use this product in an explosive environment such as near ammable
anesthetics or inside oxygen chamber.
The system may fail to yield specied measurement accuracy if operated or stored
in temperature or humidity conditions outside the limits stated in the specications
section of this manual.
Do not use cuffs or accessories other than those specied by the manufacturer.
Otherwise, correct measurement readings cannot be obtained.
Use of this product in areas near mobile phones, microwave ovens or other devices
with strong electromagnetic eld may cause malfunctions.
Do not apply the cuff over wounded arm, arm under an intravascular access or
therapy or an arterio-venous shunt, or arm on the side of a mastectomy or lymph
node clearance. Otherwise injury may be resulted.
Make sure that ination of the cuff is not causing prolonged impairment of blood
circulation. Also, be cautious about temporary loss of the functions of any other
medical equipment if any monitoring equipment is used on the same limb with the
blood pressure measuring cuff.
To avoid harmful injury due to interfered blood ow from cuff ination,
- Make sure that AIR HOSE is not kinking before measurement. Otherwise, cuff
ination may not be conducted properly and prolonged, and
- Do not make measurements repeatedly.
To avoid any possibility of accidental strangulation, keep this product away from
children and do not drape AIR HOSE around your neck.
Because the product includes precision parts, avoid extreme temperature variations,
humidity, shock, dust, lint, and direct sunlight. Do not drop or strike the product.

-6-
Make sure not to expose it to moisture. This product is not water resistant.
Do not press the display and operation keys or place the monitor with display face
down.
Do not take out batteries or unplug the AC adaptor when the monitor is turned on.
Make sure to switch off the monitor before removing batteries or AC adaptor.
Do not touch the output plug of AC adaptor during measurement.
Do not disassemble or modify the product.
Do not inate the cuff when it is not wrapped around your arm.
The device contains small parts and batteries which could be swallowed by children
or pets. They should therefore be kept out of the reach of children and pets at all
times.
This product is not designed for self-use by unspecied persons in public areas.
Do not apply the cuff on the limb which the intravenous drip infusion is implemented.
Any serious incident occurred in relation to the device should be reported to the
manufacturer and the competent authority in your country/area. If you have no contact
information of such authority, please contact the manufacturer or EU authorized
representative whose contact information is indicated in this instruction manual.
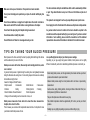
TIPS ON TAKING YOUR BLOOD PRESSURE
Blood pressure is the force exerted by the heart in pumping the blood through the arteries
and the resistance by the veins in this ow.
Blood pressure varies all the time, inuenced by mental and physical factors, and is
never constant.
In general, blood pressure is highest during the working hours and gradually decreases
during the afternoon and evening hours. It is low during sleep and increases at a relatively
fast rate after arising from bed.
Causes for Changes in Blood Pressure
• Body movement • Conversation • Mental Tension • Nervousness
• Emotions • Eating • Drinking Alcohol • Smoking
• Recent Urination or Bowel Movement • Room temperature
• Changes in the surroundings such as movement or noise, etc.
Blood pressure measured at home tends to be lower than when measured in a
hospital, clinic or doctor's ofce.
This is because you are tense at the hospital and relaxed at home. It is important to know
your stable normal blood pressure at home.
Let a qualied physician interpret your blood pressure readings.
Depending on your age, weight and general condition, blood pressure can be slightly
different. Consult with your doctor on determining what blood pressure is normal for you.
efore taking blood pressure, rest for approimately ve minutes and take your blood
pressure while relaxed in a quiet environment.
Measure blood pressure using the correct posture and do not move or speak during
measurement.
Avoid exercise, eating, drinking alcohol, smoking and other activities that affect your
blood pressure right before a measurement.
Take your blood pressure at the same time every day.
The ambient temperature should be approimately 20 when you take your blood
pressure.
Reading may vary slightly, depending on posture, whether sitting or lying.

-7-
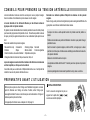
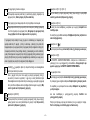
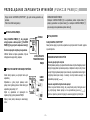
PREPARATION BEFORE USE
Install batteries and activate the clock before use. Measurement can be made with clock
being inactivated. However, activate the clock to save measurement date and time with
readings for better review. The clock is inactivated as the batteries are removed.
The product can be also operated with A adaptor. See page 8.
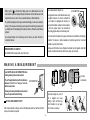
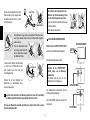
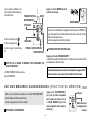
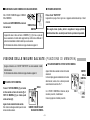
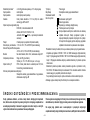
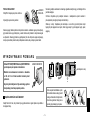
1 INSTALLING BATTERIES
Open the battery compartment cover, pressing
the projection between ] and [ ] at
the bottom of the main unit.
Install four “AA” type batteries into the
compartment.
Make sure that the polarities correspond to the
and marks inside the battery compartment.
Batteries can be easily installed or removed as
their - ends are pushed against the spring.
You may use nickel hydride rechargeable batteries.
NOTE: These batteries cannot be charged with this product. Use the designated battery charger. Also, for details regarding
use of rechargeable batteries, follow the directions accompanying them.
You will hear a beep as the batteries are installed.
NOTE: The beep will not sound if AC adaptor is connected.
Close the battery compartment cover.
Do not force the battery cover into position. Insert two tabs to the main unit rst, Fig.1. Then
AA (LR6)
BATTERIES
close the cover, pressing [ section Fig.2. lose the cover completely Fig.3.
1)
2) 3)
two tabs
PRESS click!
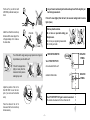
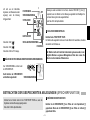
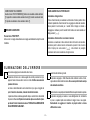
2 ADJUST DATE AND TIME AND ACTIVATE THE CLOCK
Touch ST K and keep your nger on the
key until 20 11 starts ashing.
Clock is set in the order of year, month, day,
hour and minute.
The ashing number increases with
KEY [1] and decreases with KEY [2]. The
number will be fast-forwarded if you keep your
nger on the key. Touching ST key will the
number and the net article will ash. Touching
“START/STOP” key will terminate the setting.
As the date and time are set, clock is activated.
Display of the clock while the device is turned
off indicates that the clock is activated.
Keep your nger
on the key.
conrm increase decrease

-8-
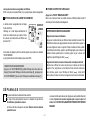
Battery symbol [ will ash when battery power is low. easurement can not be
made while the symbol is displayed. Replace the batteries. All four batteries need to be
replaced with new ones; do not mix new and old batteries or different batteries.
The symbol might appear only during measurement although you can review readings in
memory. This is because more battery power is required for conducting a measurement,
e.g. inating the cuff, than displaying the readings in memory. lease have the batteries
replaced.
The enclosed batteries are for monitoring, and their life may be shorter than that of
commercial batteries.
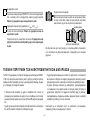
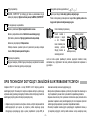
OPERATION WITH AC ADAPTOR
AC CONNECTOR is located at the side of the monitor.
MAKING A MEASUREMENT
Insert AIR PLUG into AIR CONNECTOR before
starting a blood pressure measurement.
The cuff is applicable to arm with circumference
between 22 and 32 cm. Take your arm size
before measurement.
Choose your memory bank before measurement
to use the personal mode effectively.
AIR CONNECTOR
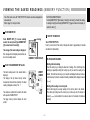
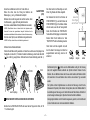
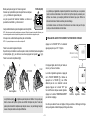
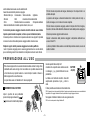
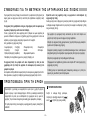
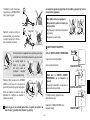
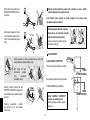
1 SIT ON A CHAIR AND APPLY CUFF.
Find a chair and a table so that you can be comfortably seated with your feet at on the oor
and your back and arm supported.
hook and
loop fastener
Inaccurate readings may result if
cuff is wrapped over heavy
clothing or tight shirt that may
restrict circulation in your upper
arm or if sleeve is rolled up.
Use the designated AC adaptor only.
It is suggested to take out the batteries when using
the adapter. However, the clock is inactivated as
the AC adaptor is unplugged and therefore you
may insert the batteries to keep the clock activated.
In such case, please make a few measurement
without plugging the adaptor to avoid battery leak.
Do not connect the AC adaptor to any power socket where accessibility is not satisfying.
Protection: This device is double insulated and protected against short circuit and
overload by a primary thermal fuse.
Enclosures and Protective Covers: Equipment enclosed to protect against contact with
live parts, and with parts which can become live nger, pin, hook test.
DC6V
AC CONNECTOR

-9-
Put the cuff on your left arm with
AIR HOSE positioned toward your
hand.
Attach the cuff with hook and loop
fastener with the lower edge of the
cuff approximately 2 to 3 cm above
the inner elbow.
The cuff should t snugly, leaving enough space for two ngers to
be put between your arm and the cuff.
If the cuff is wrapped more
tightly or loosely than this,
inaccurate blood pressure
readings may result.
Adjust the position of the cuff so
that AIR HOSE is over the inner
part of your arm over the brachial
artery.
Press the surface of the cuff to
make sure that the hook and loop
fastens securely.
ELBOW
2 to 3 cm
AIR HOSE
ARTERY
2 Let your forearm rest naturally on the table and keep the cuff at the height of your
heart during measurement.
If the cuff is lower (higher) than the heart, the measured reading tends to become
higher (lower).
Take deep breaths and relax.
Do not move or speak while taking your
blood pressure.
Do not cross your legs during measurement.
Do not hold your breath.
SDG!DFG
SGLKSJPREJ
DKLFJGS
OGJOIER;J
3 TURN ON THE MONITOR.
Touch “START/STOP” KEY.
Air is exhausted from the cuff.
Automatic ination starts.
START/STOP
DEFLATION
SYMBOL
INFLATION
SYMBOL
Touch “START/STOP” KEY again to cancel measurement.
The monitor will exhaust air from the cuff and turn off.

-10-
Ination symbol disappears and
ination becomes slow.
PULSE SYMBOL is displayed as
pulse is detected.
Air is released from the cuff and
measured values are displayed as
measurement completes.
Refer to page 3 for [ ].
Refer to page 4 for [ ].
Refer to page 12 for “Err” display.
PULSE
SYMBOL
TIME
PULSE RATE
MEMORY SYMBOL
SYSTOLIC
DIASTOLIC
WHO CLASSIFICATION SYMBOL
PULSE PRESSURE
4 SELECT MEMORY BANK TO SAVE THE MEASUREMENT RESULT.
MEMORY SYMBOL is displayed below MEMORY
KEY.
Touching MEMORY KEY will switch the bank.
Readings are automatically saved in the bank, either MEMORY [1] or [2], selected when
the monitor is turned off after measurement. ake sure to conrm the bank selected
after a measurement.
Refer to page 4 for memory function.
5 TURN OFF THE MONITOR.
Touch “START/STOP” KEY.
The monitor will be turned off. Even if you do not turn off the monitor, it turns off automatically
after 3 minutes.
Do not execute repeated measurements for congestion of blood could result in
false measurement. Let your arm rest for at least 5 minutes.
MEMORY SYMBOL

-11-
VIEWING THE SAVED READINGS (MEMORY FUNCTION)
Turn off the monitor once with “START/STOP” KEY when the results are displayed after
a measurement.
Refer to page 4 for memory function.
1 TOUCH MEMORY KEY.
Touch MEMORY KEY [1] to review readings
saved in the memory bank [1] and MEMORY KEY
[2] to review those in the bank [2].
The average of the saved readings is displayed.
Note: Average will not be displayed unless there are
two or more readings saved.
2 TOUCH THE SAME MEMORY KEY AGAIN.
The latest reading saved in the selected bank is
displayed.
The display at the top shows memory number,
measurement date and time alternately. The latest
reading is displayed as memory “No. 1”.
The results are recalled from the latest to the oldest
with operation of MEMORY KEY.
The bigger memory number indicates the older
number.
: Average
NUMBER OF SAVED RESULTS
MEMORY
NUMBER
DATE
TIME
SWITHING ANKS
Touching MEMORY KEY [2] at display of reading in the bank [1] will switch the display
to reading in bank [2] and touching MEMORY KEY [1] again will return to the display of
result in the bank [1].
3 TURN OFF THE MONITOR.
Touch “START/STOP” KEY.
Even if you do not turn off the monitor, it displays the result for approximately 30 seconds
and will turn off automatically.
DELETING SAVED READINGS
Deleting individual readings
Touch the memory key to display the latest set of readings. Then scroll through the
readings by repeatedly touching the memory key until you reach the reading to be
deleted. Then hold down memory key for seconds until display ashes and continue
to hold down key for about 4 seconds until reading is deleted and the display is cleared
[].
Deleting all the readings in a memory bank.
Select and display the average readings for the memory bank to be deleted.
Then delete by holding down the memory key continuously until the display is
cleared [ ] as described in the sentence above for the deletion of individual
readings.

-12-
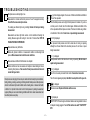
Blood pressure is extremely high or low.
Measurement is not taken with correct posture or the cuff is wrapped incorrectly.
Reconrm the measurement procedures.
The reading was effected by moving or talking. Remain still and quiet during
measurement.
easurement was taken right after eercise or other activities inuencing the
reading. Measure again after resting for more than 5 minutes. See TIPS ON
TAKING YOUR BLOOD PRESSURE.
Measured values vary all the time.
ental and physical condition or measurement condition is inuencing blood
pressure. Make measurement under the same conditions.
Measured value is different from that taken at a hospital.
Mental condition such as nervousness at a hospital or relaxed feeling at home is
inuencing blood pressure. Take records of blood pressure taken at home and
consult with your doctor.
Blood pressure is changing 24 hours a day in relation with mental and physical conditions.
Eating, drinking, smoking, exercising or bathing will alter blood pressure. Blood pressure
will also be inuenced by mental condition such as feeling tense or relieved and health
condition. It is important to know the trend of blood pressure by making measurement
regularly. Make your own rules including conditions and time to make measurement and
take blood pressure everyday.
???
???
???
[ symbol is displayed again in the course of ination and deation and ination
of the cuff are repeated.
When the initial pressure was too high for blood pressure to be taken or if you move
or strain your arm or hand, the cuff is inated again. Deation and ination of the
cuff are repeated until blood pressure is taken. This does not indicate any problem
or malfunction of the monitor. Do not move or speak during measurement.
[Err 300] is displayed.
Over pressure: blood pressure could not be taken due to moving or speaking
although the cuff was inated to the maimum pressure. Do not move or speak
during measurement.
[Err -1] is displayed.
Blood pressure could not be taken due to moving or speaking. Do not move or
speak during measurement.
[Err -2] is displayed.
The cuff is not securely connected to the monitor. Secure the air connector.
The cuff is not wrapped appropriately. Reconrm how to put the cuff on your arm.
[] is displayed.
Batteries are weak. Replace all batteries with new ones.
[0 0] is displayed.
“START/STOP” KEY was being touched when batteries are being installed or when
AC adaptor is being plugged in. Turn off the monitor once with “START/STOP”
KEY.
TROUBLESHOOTING

-13-
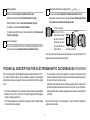
Nothing is displayed.
Batteries are depleted. Replace all batteries with new ones.
Batteries are inserted incorrectly. Reinsert the batteries correctly.
Battery terminals are not clean. Clean the terminals with dry cloth.
AC adaptor is not connected. Connect AC adaptor.
Touching the keys with tip of nger or nail is touching the key. Touch the key with
the plane of your nger.
Clock is not displayed.
The clock is inactivated. NOTE: Clock is inactivated when batteries and/or AC
adaptor are/is removed. Adjust date and time and activate the clock.
???
???
Measurement date and time are displayed with [ ] and [ ].
The clock is not activated. Adjust date and time and activate the clock.
Measurement was taken before the clock was activated. Measurement date and
time cannot be saved without clock being activated.
Cuff end is loosened.
Put the cuff with its
hook and loop fastener
side down. Put the cuff
end through the metal
ring. Fold back the cuff
at the metal ring.
If you cannot get correct measurement with the methods above, contact your dealer. Do not
disassemble or tamper with the internal mechanism.
???
metal ring
hook and loop fastener
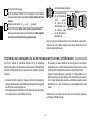
TECHNICAL DESCRIPTION FOR ELECTROMAGNETIC DISTURBANCES
DSK-1011 complies with the Electromagnetic Disturbances standard, IEC60601-1-2:2014.
As a medical electrical equipment, special precautions regarding the electromagnetic
disturbances shall be taken at usage of the device according to the information provided
below.
• The device is not intended for use in environments where the intensity of electromagnetic
disturbance is high, such as near active HF surgical euipment and I magnetic
resonance imaging euipment etc.
• se of the device adjacent to or stacked with other euipment must be avoided because
it could result in improper operation.
• se of accessories other than those specied or provided by the manufacturer could
result in increased electromagnetic emissions or decreased electromagnetic immunity of
the device and result in improper operation.
• ortable F communications euipment including peripherals such as antenna cables
and eternal antennas should be used at least 30cm away from any part of the device,
including specied cables. therwise, degradation of the performance of this euipment
could result.
lease contact your dealer or the manufacturer for specic information regarding the
compliance to the standard.

-14-
INHALT
TEILEBEZEICHNUNGEN UND PRODUKTKOMPONENTEN . .14
ALLGEMEINE INFORMATION .............................14
VORSICHTSMASSREGELN UND GEGENANZEIGEN ........17
TIPPS ZUR BLUTDRUCKMESSUNG .......................19
VORBEREITUNG VOR DER VERWENDUNG ...............19
AUSFÜHRUNG DER MESSUNG ...........................21
BETRACHTEN DER GESPEICHERTEN ABLESUNGEN
(SPEICHERFUNKTION) ..................................23
STÖRUNGSSUCHE ......................................24
TECHNISCHE ANGABEN ZU ELEKTROMAGNETISCHEN
STÖRUNGEN ............................................26
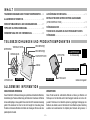
TEILEBEZEICHNUNGEN UND PRODUKTKOMPONENTEN
HAUPTGERÄT MANSCHETTE
AA-BATTERIEN (LR6)
BEDIENUNGSANLEITUNG
BATTERIEFACH
LUFTANSCHLUSS
NETZANSCHLUSS
“EINSTELLEN”-TASTE SPEICHERTASTE [1]
SPEICHERTASTE [2]
“START/STOPP”-TASTE Zur Testverwendung
LUFTSTOPFEN
LUFTSCHLAUCH
ANZEIGE
Netzteil nicht mitgeliefert
ALLGEMEINE INFORMATION
INDIKATIONEN ZUR VERWENDUNG
Dieses Produkt ist für nichtinvasive Messung des systolischen und diastolischen Blutdrucks,
die Bestimmung der Pulsrate und Berechnung des Pulsdrucks in Erwachsenen im Rahmen
der Gesundheitspege zu Hause gedacht. Dieses Gerät ist nicht für neonatale Verwendung
gedacht. itte konsultieren Sie Ihren Arzt oder Arzt bezüglich der Verwendung dieses
rodukts zum essen des lutdrucks bei Kindern oder schwangeren ersonen oder unter
präeklamptischem Zustand.
MESSMETHODEN
Dieses rodukt wendet die oszillometrische ethode zur essung von lutdruck und
ulsfreuenz an. Die anschette wird mit dem Hauptgerät verbunden und um den Arm
gewickelt. Stromkreise in der Manschette spüren die geringfügigen Schwingungen des
lutdrucks, die entstehen, wenn sich die Arterien im Arm als eaktion auf jeden Herzschlag
ausdehnen und zusammenziehen. Die Amplitude jeder Druckwelle wird gemessen, in

-15-
illimeter auf der uecksilbersäule umgewandelt und auf der Flüssigkristall-Anzeige D
als digitaler Wert angezeigt.
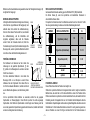
MESSUNG BEIM AUFPUMPEN
Anfänglich wird die anschette bei eginn einer essung
schnell auf den vorgeschriebenen Wert aufgepumpt, und
während dieser Zeit erscheint die Aufblasmarkierung.
Wenn der Druck diesen unkt erreicht hat, verschwindet
die Aufblasmarkierung, und die Manschette wird
langsamer aufgeblasen; dabei wird die Pulswelle
erkannt. Wenn die ulswelle erkannt wird, blinkt die
Herzmarkierung mit einem Synchronisationstonsignal. Die
Messung endet, wenn der systolische Blutdruck bestimmt
ist und die Luft aus der Manschette abgelassen wird.
PERSÖNLICHER MODUS
Der Aufblaswert wird basierend auf den letzten drei
Ablesungen in der gewählten Speicherbank, 1 oder
2, justiert um die essungszeit zu verkürzen und den
Komfort zu verbessern.
in hoher diastolischer lutdruck in den letzten drei
essungen führt so zum eispiel zu einem hhere
Aufblaswert als dem Vorgbewert. Wenn dieser Wert zu
hoch für Ihren aktuellen Blutdruck ist, wird die Luft schnell
aus der Manschette abgelassen, und die Messung startet
neu.
m den persnlichen odus effektiver zu verwenden, wählen Sie die geeignete
Speicherbank vor essungsbeginn. Dieser onitor speichert die letzte angezeigte
Speicherbank. Zum Wählen der Speicherbank vor dem eginn einer essung rufen Sie
einen in der gewünschten Speicherbank gespeicherten Messwert auf, schalten den Monitor
einmal ein und beginnen dann die Messung.
DRUCK
ZEIT
SCHNELLES
AUFBLASEN
SCHNELLES
ABLASSEN
ALLMÄHLICHES
AUFBLASEN
DRUCK
ZEIT
EIN BEISPIEL DER MIT
„PERSÖNLICHEM MODUS“
BESTIMMTEN DRUCKÄNDERUNG
ANFÄNGLICHE
DRUCKÄNDERUNG
WHO-KLASSIFIKATIONSSYMBOL
Gemessene luckdruckwerte werden gegen die ichtlinie WH 1999 klassiziert.
Die hhere Klasse gilt, wenn die systolischen und diastolischen Druckwerte in
unterschiedliche Klassen fallen.
Für spezische Informationen über Ihren lutdruck wenden Sie sich an Ihren Arzt. Treffen
Sie eine eigene eurteilung, die alleine auf den Klassikationsangaben beruht.
SYS
>180
160-179
140-159
130-139
120-129
<120
DIA
>110
100-109
90-99
85-89
80-84
<80
WHO-KLASSIFIKATION
Hypertonie (schwer)
Hypertonie (mittelschwer)
Hypertonie (leicht)
hoch normal
normal
optimal
ANZEIGE
PULSDRUCK-ANZEIGE
Dieses rodukt berechnet den ulsdruck und zeigt ihn an.
Während der systolische lutdruck mit steigendem Alter zunimmt, neigt der diastolische
lutdruck dazu, ab einem Alter von 50 ahren allmählich zu sinken. Der ulsdruck ist die
Differenz zwischen dem systolischen und dem diastolischen Druck, und deshalb nimmt der
ulsdruck generell mit steigendem Alter zu. Der ulsdruck liefert Anhaltspunkte über die
Dehnbarkeit der Hauptschlagader und der anderen groen lutgefäe und wird als einer der
isikofaktoren für Herz-Kreislauf-Krankheiten untersucht. s wird generell angenommen,
dass ein ulsdruck von etwa 5 mmHg ein normaler Wert ist. Der ulsdruck alleine ist

-16-
noch kein Indiz für Arterienverkalkung. s ist aber wichtig, den ulsdruck langfristig zu
beobachten.
KÖRPERBEWEGUNG-SYMBOL
Blutdruck, der bei Bewegung gemessen wurde, kann nicht als korrekt betrachtet werden,
weil Krperbewegung den lutdruck beeinusst.
Dieses rodukt analysiert die ulswelle und zeigt an, wenn Krperbewegung
erkannt wird. [ zeigt an, dass die rgebnisse von Krperbewegung beeinträchtigt
worden sein knnen.
SYMBOL FÜR UNREGELMÄSSIGEN PULSRHYTHMUS
Der Pulsrhythmus kann durch Sprechen,
ewegen oder Herzrhythmusstrungen
gestrt werden. Dieses rodukt zeigt ]
an, wenn der nterschied zwischen den
kürzesten und längsten Intervallen zwischen
Pulswellen über 25% ist, was auf einen
unregelmäigen ulsrhythmus hinweist.
SPEICHERFUNKTION
Die esswerte werden automatisch für spätere berprüfung in einer der beiden
Speicherbanken 1 oder 2 gespeichert. Diese beiden Speicherbanken knnen dazu
verwendet werden, die esswerte von zwei ersonen separat zu speichern, oder zum
eispiel umd esswerte für morgens und abends separat zu speichern.
ede Speicherbank kann bis zu 60 Ablesewerte aufnehmen. Wenn die Zahl der
gespeicherten Ablesewerte 60 erreicht, werden die ältesten Ablesungen gelscht, um neue
Ablesungen aufzunehmen.
Gespeicherte Ablesungen werden mit essdatum und -zeit aufgerufen, wenn die
Uhrfunktion aktiviert ist. *Die Uhr muss aktiviert werden, bevor Datums- und Zeitangaben
mit dem esswert gespeichert werden knnen.
[Err]-Ergebnisse werden nicht gespeichert.
egelmässiger ulsrhythmus
in eispiel für regelmäigen lusrhythmus
im Vergleich zu unregelmäigem
PFLEGE UND WARTUNG
Halten Sie das Produkt sauber. Kontrollieren Sie die Sauberkeit nach dem Gebrauch.
Verwenden Sie nur mit einem weichen, trockenen appen zur einigung. Ven Sie nicht enzin,
Terpentin oder andere starke sungsmittel. Da die anschette Schweiss oder sonstige
Flüssigkeiten absorbieren kann, überprüfen Sie sie nach jeder Anwendung auf Flecken und
Verfärbungen. Zur einigung der anschette verwenden Sie ein synthetisches Spülmittel
und wischen die beräche vorsichtig ab. Achten Sie darauf, dass keine Flüssigkeit in den
FTSHAH kommt. Nicht in einer Waschmaschine waschen oder mit ürste reinigen.
eim agern des rodukts legen Sie keine schweren Gegenstände darauf. Falten oder
biegen Sie die Manschette nicht gewaltsam. Zum Abtrennen der Manschette vom
Hauptgerät ziehen Sie nicht den FTSTFN, sondern halten den FTSTFN und
ziehen ihn vorsichtig ab. Wickeln Sie den FTSHAH nicht zu fest auf. Wenn das
Gerät in einer mgebung mit einer Temperatur über 0 oder unter 10 gelagert wurde,
lassen Sie es vor einer Messung mindestens 2 Stunden liegen. Entfernen Sie die Batterien,
wenn das Gerät über einen längeren Zeitraum gelagert werden soll. ewahren Sie atterien
für Kinder unzugänglich auf.
eenden Sie sofort die Verwendung des Geräts und wenden Sie sich an Ihren Händler oder
den Hersteller, wenn es sichtbare Schäden aufweist.
Wir empfehlen Ihnen, Ihren lutdruckmonitor alle 2 ahre überprüfen zu lassen. ine
solche berprüfung darf nur vom Hersteller oder einem Vertragshändler des Herstellers
durchgeführt werden.
SPEZIFIKATIONEN
Modell : DSK-1011
etriebsprinzip :szillometrische ethode
Anzeiger :15 stelllige Flüssigkristallanzeige
Messbereich Druck : 0 bis 300 mmHg anschettendruck
Messbereich : 50 bis 250 mmHg systolisch, 0 bis 10 mmHg diastolisch, 0
bis 160 uls/in. ulsfreuenz
Genaugikeit* : 3 mmHg anschettendruck, 5 der Anzeige ulsfreuenz

-17-
Aufpumpen : Automatisches Aufpumpen
Auslass : Automatisches Auslassventil
Stromversorgung : Vier 1,5 Volt AA-Alkalibatterien 6 oder ein Netzteil der Serie
AD-W5
lektrische Stärke :D6V/W, mit vier atterien Typ AA
Netzteil A100-20V, 50-60Hz, 0.12A,
Einheit; DC6V, 500mA, mit speziellem Netzteil
Speicher : 2 Speicherbanken, mit je 60 Ablesungen
Betriebumgebung : 10 bis 0, H 15 bis 85 ohne Kondensationsbildung
Transport-/Lagerbedingungen
:-20 bis 60, H 10 bis 95 ohne Kondensationsbildung
Manschette : Abdeckung und Umfang; 22 bis 32 cm, betreffender Teil; BF
Hauptgerät :Gewicht Appro. 250 g ohne atterien
Gre Appro. 115 115 65.9 mm T H
I-Schutzklasse :I20: Geschützt gegen feste Fremdkrper mit einem Durchmesser
von mehr als 12,5 mm, kein Schutz gegen Wasser.
Schutz gegen elektrischen Schlag
:Innerlich Angeschaltete Ausrüstung/Klasse II Ausrüstung,
betreffender Teil Typ BF
Betriebsmodus : Kontinuierlicher Betrieb
KLASSIFIKATION : Innerlich Angeschaltete Ausrüstung/Klasse II
Erwartete Lebensdauer : 5 ahre
Schlüssel zu den Symbolen
:betreffender Teil Typ BF
:Klasse II Ausrüstung
: Siehe Bedienungsanleitung/Broschüre.
: Trocken halten
:Die gebrauchten elektrischen und elektronischen Produkte sind
nicht Haushaltsmüll. efolgen Sie alle gültigen nationalen/rtlichen
ecycling-Vorschriften zur richtigen ntsorgung. In den ändern
der EU beachten Sie die Symbole für die Entsorgungsregelung, die
auf der Verpackung oder am Gerät selber angebracht sind.
*Genauigkeit ist bei Messwerten garantiert, die innerhalb des Messbereichs sind.
Dieses Gerät erfüllt die Anforderungen von N1060-1: 1995 A2: 2009 Nicht-invasive
lutdruckmessgeräte Teil 1: Allgemeine Anforderungen, N1060-3: 1997 A2: 2009
Nicht-invasive lutdruckmessgeräte Teil 3: Zusätzliche Anforderungen für elektro-
mechanische Blutdruckmesssysteme.
Die essgenauigkeit des Geräts wurde gemä dem IS-rotokoll 81060-2 nachgewiesen.
In der klinischen Studie wurde das K5 zur estimmung der diastolischen Druckwerte bei
allen auskultatorischen Messungen verwendet.
Dieses Gerät ist für die Anwendung in einer mgebung mit einer Atmosphäre Druck
bestimmt.
Spezikationen knnen sich ohne vorherigen Hinweis aufgrund von eistungs-und
ualitätsverbesserungen ändern.
VORSICHTSMASSREGELN UND GEGENANZEIGEN
Verwenden Sie dieses Gerät nicht ohne vorher Ihren Arzt zu konsultieren, wenn
Sie an einer Dialyse-Therapie teilnehmen oder gerinnungshemmende, anti-
blutplättchbildende oder Steroid- Medikamente einnehmen. Der Einsatz des Geräts
unter diesen Bedingungen kann innere Blutungen hervorrufen.
Wenn Sie spezielle Informationen über Ihren Blutdruck wünschen, fragen Sie
Ihren Arzt. Ziehen Sie niemals irgendwelche eigenen Schlüsse aufgrund Ihrer
Messergebnisse.
Verwenden Sie nicht dieses Produkt zusammen mit implantierten oder tragbaren
elektrischen Geräten wie etwa einem Herzschrittmacher, Debrillator oder
elektrokardiograschen Monitor. Dieses Produkt ist nicht zur Verwendung mit HF-
Chirurgiegeräten gedacht.

-18-
Verwenden Sie dieses Produkt nicht in explosiven Umgebungen wie solche in der
Nähe von entammbaren Narkosemitteln oder in einer Sauerstoffkammer.
Das System unter Umständen keine Messgenauigkeit erzielt, falls es bei
Temperaturen oder Luftfeuchtigkeit betrieben oder gelagert wird, die außerhalb des
in den Spezikationen dieses Handbuchs beschriebenen Bereichs liegen.
Es dürfen keine anderen Manschetten oder Zubehörteile verwendet werden als die
vom Hersteller vorgeschriebenen. Andernfalls können nicht korrekte Ablesungen
erzielt werden.
Die Anwendung dieses Gerätes in der Nähe von tragbaren Telefonen,
Mikrowellengeräten oder sonstiger Geräte mit starken elektromagnetischen Feldern
kann zu Fehlfunktionen führen.
Legen Sie die Manschette nicht an einem verletzten Arm, einem Arm mit
intravaskulärem Zugang oder Therapie oder einem arterio-venösen Shunt, oder einem
Arm auf der Seite einer Mastektomie oder Lymphknotenentfernung an. Andernfalls
besteht die Gefahr von Verletzungen.
Stellen Sie sicher, dass das Aufblasen der Manschette nicht zu längerer
Beeinträchtigung der Blutzirkulation führt. Achten Sie auch auf kurzzeitigen Verlust
der Funktionen anderer medizinischer Geräte, falls andere Überwachungsgeräte am
gleichen Gliedmaß wie die Manschette zur Blutdruckmessung verwendet werden.
Es muss auf jeden Fall darauf geachtet werden, dass keine Verletzungen durch
unterbrochene Blutzirkulation wegen des Aufblasens der Manschette verursacht
werden.
- Stellen Sie vor Messungsbeginn sicher, dass der LUFTSCHLAUCH nicht geknickt
ist. Andernfalls kann das Aufblasen der Manschette nicht richtig verlaufen.
- Nehmen Sie keine Messungen wiederholt vor.
Das Gerät außer Reichweite von Kindern aufbewahren und den LUFTSCHLAUCH nicht
um den Hals führen, um der Unfallgefahr einer möglichen Strangulierung vorzubeugen.
Da das Produkt Präzisionsteile enthält, sollten Sie es vor extremen
Temperaturschwankungen, hoher Luftfeuchtigkeit, Erschütterungen, Staub, Fusseln
und direktem Sonnenlicht schützen. Lassen Sie das Gerät nicht fallen bzw. stoßen
Sie nicht gegen das Gerät. Vermeiden Sie, dass das Gerät Feuchtigkeit ausgesetzt
wird. Dieses Gerät ist nicht gegen das Eindringen von Wasser geschützt.
Drücken Sie nicht auf das Display und die Bedientasten oder legen den Monitor mit
der Displayseite nach unten weisend hin.
Nehmen Sie nicht die Batterien heraus oder ziehen das Netzteil ab, während der
Monitor eingeschaltet ist. Stellen Sie sicher, dass der Monitor ausgeschaltet ist,
bevor Sie Batterien entfernen oder das Netzteil abziehen.
Berühren Sie nicht den Ausgangsstecker des Netzteils während der Messung.
Nehmen Sie das Gerät nicht auseinander, und verändern Sie nichts am Gerät.
Blasen Sie die Manschette nicht auf, wenn sie nicht um den Arm gelegt ist.
Das Gerät enthält kleine Teile und Batterien, die von Kindern oder Haustieren
verschluckt werden könnten. Deshalb müssen sie immer außerhalb der Reichweite
von Kindern und Haustieren aufbewahrt werden.
Dieses Gerät ist nicht zur Selbstbenutzung durch beliebige Personen in öffentlichen
Bereichen bestimmt.
Legen Sie die Manschette nicht an einem Arm an, an dem eine intravenöse
Tropnfusion durchgeführt wird.
Jede schwerwiegende Störung, die im Zusammenhang mit dem Gerät aufgetreten
ist, muss dem Hersteller und der zuständigen Behörde Ihrer Region/Ihres Landes
gemeldet werden. Wenn Sie keine Kontaktinformationen einer solchen Behörde
haben, wenden Sie sich bitte an den Hersteller oder die für die EU bevollmächtigte
Vertretung, deren Kontaktinformationen in dieser Bedienungsanleitung angegeben
sind.

-19-
TIPPS ZUR BLUTDRUCKMESSUNG
ei der lutdruckmessung wird die Kraft, mit der das Herz das lut durch die Arterien pumpt
und der dem lutu entgegenwirkende Widerstand der Venen gemessen.
Der Blutdruck wechselt aufgrund mentaler und körperlicher Faktoren ständig und ist
nie konstant.
Im allgemeinen ist der lutdruck tagsüber während der normalen Arbeitszeit am hchsten
und fällt im Verlauf des Nachmittags und Abends. Im Schlaf ist der lutdruck niedrig und
steigt nach dem Erheben vom Bett relativ schnell an.
Gründe für Veränderungen des lutdrucks
Krperbewegung nterhaltung entale Spannung Nervosität
Gefühle ahlzeiten Alkoholgenuss auchen
Kürzliche rination oder Stuhlgang aumtemperatur
nderungen in der mgebung wie ewegungen oder Geräusche usw.
Der zu Hause gemessene Blutdruck ist tendenziell niedriger als der im Krankenhaus
oder in der Arztpraxis gemessene Blutdruck.
Das liegt daran, dass Sie im Krankenhaus angespannt, zu Hause aber entspannt sind. s
ist wichtig, dass Sie Ihren stabilen normalen lutdruck zu Hause kennen.
Lassen Sie Ihre Blutdruckwerte von einem Arzt auswerten.
Der lutdruck kann sich in Abhängigkeit von Ihrem Alter, Gewicht und Allgemeinzustand
geringfügig unterscheiden. Ziehen Sie niemals irgendwelche eigenen Schlüsse aufgrund
Ihrer Messergebnisse.
Vorher etwa fünf Minuten ruhen und dann in ruhiger und entspannter Umgebung den
Blutdruck messen.
Den lutdruck bei korrekter Krperhaltung messen und während der essung nicht
sprechen und nicht bewegen.
Vermeiden Sie vor der essung des lutdrucks krperliche Anstrengung, ssen,
Alkoholkonsum, auchen und sonstige Aktivitäten, die den lutdruckwert beeinussen.
essen Sie täglich zur gleichen hrzeit.
Die Auentemperatur sollte während der lutdruckmessung etwa 20 betragen.
Die Ablesung kann leicht abweichen, je nach sitzender oder liegender Haltung.
VORBEREITUNG VOR DER VERWENDUNG
Setzen Sie vor der Verwendung atterien ein und schalten die hr ein. essungen sind
bei ausgeschalteter hr nicht mglich. Schalten Sie die hr aber ein, um essdaten
und die Zeit mit Ablesungen für leichtere berprüfung zu speichern. Die hr wird
deaktiviert, wenn die Batterien entfernt werden.
Das rodukt kann mit Netzteil betrieben werden. Siehe Seite 21.
1 EINSETZEN DER BATTERIEN
Öffnen Sie den Batteriefachdeckel und drücken
den Vorsprung zwischen ] und [ ]
an der nterseite des Hauptgeräts.

-20-
Setzen Sie vier atterien der Sorte AA in das Fach ein.
Stellen Sie sicher, dass die Polung der Batterien den
arkierungen und - im atteriefach entspricht.
atterien knnen leicht eingesetzt oder entfernt werden, indem
ihre inusseiten - gegen die Feder gedrückt werden.
Sie knnen wiederauadbare Nickelhydridbatterien verwenden.
HINWIS: Diese atterien knnen mit diesem rodukt nicht aufgeladen werden.
Verwenden Sie immer das vorgeschriebene adegerät. inzelheiten über die
verwendeten wiederauadbaren atterien entnehmen Sie deren Gebrauchsanweisung.
Sie hren einen iepton, wenn die atterien eingesetzt wurden.
HINWIS: Der iepton kommt nicht, wenn das Netzteil angeschlossen ist.
Schließen Sie den Batteriefachdeckel.
Drücken Sie die atterie nicht gewaltsam ein. Setzen Sie zuerst die zwei Vorsprünge in das
Hauptgerät ein, siehe Abb. 1. Schlieen Sie dann die Abdeckung, wobei Sie den Abschnitt
[ wie in Abb. 2 gezeigt drücken. Schlieen Sie den Deckel vollständig, siehe Abb. 3.
1)
2) 3)
zwei Vorsprünge
DRÜCKEN Klick!
2 DATUM UND ZEIT EINSTELLEN UND DIE UHR AKTIVIEREN
Berühren Sie die “EINSTELLEN”-TASTE und lassen Sie den Finger auf der Taste, bis “20
11 zu blinken beginnt.
AA-BATTERIEN
(LR6)
Die hrzeit wird in der eihenfolge von ahr,
Monat, Tag, Stunde und Minute eingestellt.
Die blinkende Zahl nimmt bei Drücken der
SIHTAST 1 zu und bei Drücken der
SPEICHERTASTE [2] ab. Die Zahlen schalten
schneller weiter, wenn Sie die Taste gedrückt
halten. Durch Berühren der “EINSTELLEN”-
Taste wird die Zahl festgelegt, und das nächste
Element blinkt. Durch Berühren der Taste
“START/STOPP” wird die Einstellung beendet.
Wenn Datum und Zeit eingestellt sind, wird
die hr aktiviert. Die Anzeige der hrzeit bei
ausgeschaltetem Gerät zeigt, dass die hr
aktiviert ist.
Das Batterie-Symbol [ blinkt, wenn die atteriestärke niedrig ist. Die essung
kann nicht ausgeführt werden, während das Symbol erscheint. rsetzen Sie die
atterien. Alle vier atterien müssen durch neue ersetzt werden alte atterien dürfen
nicht zusammen mit neuen atterien oder solchen eines anderen Typs verwendet
werden.
Das Symbol erscheint mglicherweise nur während der essung, obwohl Sie die
Ablesewerte im Speicher prüfen knnen. Das liegt daran, dass mehr atteriestärke für
die Ausführung einer essung, wie z.. beim Aufblasen der anschette, erforderlich ist
als zur Anzeige der Ablesungen im Speicher. rsetzen Sie bitte die atterien.
Die beigefügten Batterien sind für Aufzeichnungszwecke gedacht, und Ihre Haltbarkeit
ist unter Umständen kürzer als die handelsüblicher Batterien.
Lassen Sie
Ihren Finger
auf der Taste.
bestätigen steigern senken
Strona się ładuje...
Strona się ładuje...
Strona się ładuje...
Strona się ładuje...
Strona się ładuje...
Strona się ładuje...
Strona się ładuje...
Strona się ładuje...
Strona się ładuje...
Strona się ładuje...
Strona się ładuje...
Strona się ładuje...
Strona się ładuje...
Strona się ładuje...
Strona się ładuje...
Strona się ładuje...
Strona się ładuje...
Strona się ładuje...
Strona się ładuje...
Strona się ładuje...
Strona się ładuje...
Strona się ładuje...
Strona się ładuje...
Strona się ładuje...
Strona się ładuje...
Strona się ładuje...
Strona się ładuje...
Strona się ładuje...
Strona się ładuje...
Strona się ładuje...
Strona się ładuje...
Strona się ładuje...
Strona się ładuje...
Strona się ładuje...
Strona się ładuje...
Strona się ładuje...
Strona się ładuje...
Strona się ładuje...
Strona się ładuje...
Strona się ładuje...
Strona się ładuje...
Strona się ładuje...
Strona się ładuje...
Strona się ładuje...
Strona się ładuje...
Strona się ładuje...
Strona się ładuje...
Strona się ładuje...
Strona się ładuje...
Strona się ładuje...
Strona się ładuje...
Strona się ładuje...
Strona się ładuje...
Strona się ładuje...
Strona się ładuje...
Strona się ładuje...
Strona się ładuje...
Strona się ładuje...
Strona się ładuje...
Strona się ładuje...
-
 1
1
-
 2
2
-
 3
3
-
 4
4
-
 5
5
-
 6
6
-
 7
7
-
 8
8
-
 9
9
-
 10
10
-
 11
11
-
 12
12
-
 13
13
-
 14
14
-
 15
15
-
 16
16
-
 17
17
-
 18
18
-
 19
19
-
 20
20
-
 21
21
-
 22
22
-
 23
23
-
 24
24
-
 25
25
-
 26
26
-
 27
27
-
 28
28
-
 29
29
-
 30
30
-
 31
31
-
 32
32
-
 33
33
-
 34
34
-
 35
35
-
 36
36
-
 37
37
-
 38
38
-
 39
39
-
 40
40
-
 41
41
-
 42
42
-
 43
43
-
 44
44
-
 45
45
-
 46
46
-
 47
47
-
 48
48
-
 49
49
-
 50
50
-
 51
51
-
 52
52
-
 53
53
-
 54
54
-
 55
55
-
 56
56
-
 57
57
-
 58
58
-
 59
59
-
 60
60
-
 61
61
-
 62
62
-
 63
63
-
 64
64
-
 65
65
-
 66
66
-
 67
67
-
 68
68
-
 69
69
-
 70
70
-
 71
71
-
 72
72
-
 73
73
-
 74
74
-
 75
75
-
 76
76
-
 77
77
-
 78
78
-
 79
79
-
 80
80


Nissei DSK-1011 Instrukcja obsługi
- Kategoria
- Jednostki ciśnienia krwi
- Typ
- Instrukcja obsługi
w innych językach
- italiano: Nissei DSK-1011 Istruzioni per l'uso
- Deutsch: Nissei DSK-1011 Bedienungsanleitung
- français: Nissei DSK-1011 Mode d'emploi
Powiązane artykuły

Inne dokumenty
-
Hyundai BPM 700 Instrukcja obsługi
-
 Little Doctor LD30 Instrukcja obsługi
-
Panasonic EWBU30 Instrukcja obsługi
-
Microlife BP B2 Basic Instrukcja obsługi
-
 Little Doctor LD51A Instrukcja obsługi
-
Microlife BP B1 Classic Instrukcja obsługi
-
Microlife BP 3BU1-4 Instrukcja obsługi
-
Hyundai BMP 510 Instrukcja obsługi
-
 Little Doctor LD12 Instrukcja obsługi
-
Rossmax CH155f Instrukcja obsługi


