Little Doctor LD30 Instrukcja obsługi
- Kategoria
- Jednostki ciśnienia krwi
- Typ
- Instrukcja obsługi


2
ENG
TABLE OF CONTENTS
PARTS AND COMPONENTS. . . . . . . . . . . . . . . . . . . . . . . . . . . . . . . . . . . 3
GENERAL INFORMATION. . . . . . . . . . . . . . . . . . . . . . . . . . . . . . . . . . . . . 4
INDICATIONS FOR USE . . . . . . . . . . . . . . . . . . . . . . . . . . . . . . . . 4
OPERATION PRINCIPLE . . . . . . . . . . . . . . . . . . . . . . . . . . . . . . . 4
APPLIED NEW TECHNOLOGIES LD . . . . . . . . . . . . . . . . . . . . . . 4
RECOMMENDATIONS ON CORRECT MEASUREMENTS . . . . . . . . . . . 5
POWER SUPPLY. . . . . . . . . . . . . . . . . . . . . . . . . . . . . . . . . . . . . . . . . . . . 6
BATTERY INSTALLATION . . . . . . . . . . . . . . . . . . . . . . . . . . . . . . . 6
USE OF THE DEVICE WITH THE POWER SOURCE . . . . . . . . . . 6
CORRECT POSITION DURING MEASUREMENT . . . . . . . . . . . . . . . . . . 7
CUFF PREPARATION . . . . . . . . . . . . . . . . . . . . . . . . . . . . . . . . . . . . . . . . 7
SETTING OF DATE AND TIME . . . . . . . . . . . . . . . . . . . . . . . . . . . . . . . . . 8
MEASUREMENT PROCEDURE . . . . . . . . . . . . . . . . . . . . . . . . . . . . . . . . 8
AUTOMATIC RE-INFLATING . . . . . . . . . . . . . . . . . . . . . . . . . . . . . 9
FORCED DEFLATION FROM A CUFF. . . . . . . . . . . . . . . . . . . . . . 9
MEMORY FUNCTION . . . . . . . . . . . . . . . . . . . . . . . . . . . . . . . . . . . . . . . . 9
MEMORY CLEARING . . . . . . . . . . . . . . . . . . . . . . . . . . . . . . . . . . . . . . . 10
INFORMATION ABOUT ERRORS . . . . . . . . . . . . . . . . . . . . . . . . . . . . . . 10
CARE, STORAGE, REPAIR AND DISPOSAL . . . . . . . . . . . . . . . . . . . . . 10
TROUBLESHOOTING TIPS . . . . . . . . . . . . . . . . . . . . . . . . . . . . . . . . . . 11
WARRANTY . . . . . . . . . . . . . . . . . . . . . . . . . . . . . . . . . . . . . . . . . . . . . . . 12
TECHNICAL SPECIFICATIONS. . . . . . . . . . . . . . . . . . . . . . . . . . . . . . . . 12
CERTIFICATION AND STATE REGISTRATION . . . . . . . . . . . . . . . . . . . 14
INFORMATION IN ENGLISH . . . . . . . . . . . . . . . . . . . . . . . . . . . . . . . . . . . 2
INFORMATION IN POLISH . . . . . . . . . . . . . . . . . . . . . . . . . . . . . . . . . . . 15

3
ENG
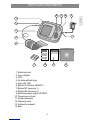
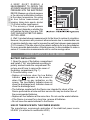
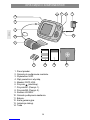
PARTS AND COMPONENTS
1. Electronic unit.
2. Arm cuff jack.
3. LCD.
4. Air tube with air plug.
5. Arm cuff. LDA
6. Button O/I (Power ON/OFF).
7. Button M1 (memory 1).
8. Button M2 (memory 2).
9.
Electrical power supply LD-N057.
10. Power source Jack .
11. Power elements.
12. Warranty card.
13. Instruction manual.
14. Bag.

4
ENG
GENERAL INFORMATION
This Instruction Manual is designed to assist the user with safe and effec-
tive operation of the automatic digital Device for measurement of blood
pressure and heartbeat rate LD, modifi cation LD30 (hereinafter – the
“Device”). Use this Device according to the rules described in this Manual.
Operate the Device only as intended. Do not use the Device for any other
purposes. Read and understand the whole Instruction Manual, in particular
“Recommendations on Correct Measurement”.
INDICATIONS FOR USE
Use this Device to measure your systolic and diastolic blood pressure and
heartbeat rate in patients aged from 15. This Device is recommended for
use by persons with unstable blood pressure or known arterial hypertension
at home as an addition to medical surveillance. The cuff is designed for the
upper arm with the circumference approximately from 25 to 36 cm.
OPERATION PRINCIPLE
This Device uses the oscillometric method of blood pressure and pulse
rate measurement. Wrap the cuff around your upper arm and it starts to be
infl ated automatically. The sensitive element of the Device feels the weak
pressure oscillations in the cuff generated by widening and contraction of
the brachial artery in response to every heartbeat. The amplitude of the
pressure waves is measured, converted into millimeters Hg and shown on
the display as fi gures. The device has 2 memories, by 60 cells, for storage
of measurement results. Remember that the Device will not maintain the
mentioned accuracy of a measurement if it is used or stored at a temperature
or humidity other than those specifi ed in Technical Specifi cations of this
Manual. We are warning about possibility of mistakes in blood pressure
measurement with this Device in persons with pronounced cardiac
arrhythmia. Consult the doctor concerning blood pressure measurement of
your child.
APPLIED NEW LD TECHNOLOGIES
Fuzzy Algorithm is the algorithm for processing the measurement
values with regard to peculiarities of the man’s heartbeat, thus,
ensuring high measurement accuracy.
WARNING! This Device may be used only with Cuff-LDA, size 25-36 cm
(delivered in a set with the Device).

5
ENG
RECOMMENDATIONS ON CORRECT MEASUREMENTS
1. For correct measurement you should know that THE BLOOD PRESSURE
IS SUBJECT TO SHARP VARIATIONS EVEN WITHIN THE SHORT TIME
INTERVALS. The blood pressure depends on many factors. It is usually lower in
summer and higher in winter. The blood pressure varies together with the atmo-
spheric pressure, depends on physical loads, emotional excitement, stresses
and dietary regime. Drugs, drinking alcohol and smoking produce signifi cant
effect. Even the very procedure of blood pressure measurement in a polyclinic
sends the blood pressure high in many people, thus, the blood pressure mea-
sured at home often differs from the values received in a polyclinic. As the blood
pressure tends to rise at low temperatures, make measurements at an indoor
temperature (approximately 20° C). If this Device stayed under a low tempera-
ture, keep it for at least 1 hour at an indoor temperature before use, otherwise
the measurement result may be incorrect. During a day the difference in read-
ings for healthy people may be 30-50 mmHg of systolic pressure and to 10
mmHg of diastolic pressure. The dependence of the blood pressure on various
factors is individual for each person. Accordingly, it is recommended to keep
a special book with blood pressure records. ONLY A CERTIFIED DOCTOR
USING YOUR RECORDS IS CAPABLE TO ANALYZE THE TENDENCY OF
YOUR BLOOD PRESSURE VARIATIONS.
2. At cardiovascular and some other diseases requiring blood pressure
monitoring make measurements in the hours fixed by your attending
doctor. REMEMBER THAT THE DIAGNOSTIC AND ANY TREATMENT OF
HYPERTENSION MAY BE CONDUCTED ONLY BY A CERTIFIED DOCTOR ON
THE BASIS OF BLOOD PRESSURE VALUES OBTAINED BY THIS DOCTOR.
TAKING OF DRUGS AND THEIR DOSES SHOULD BE PRESCRIBED ONLY
BY YOUR ATTENDING DOCTOR.
3. At such disorders as deep vascular sclerosis, weak pulse wave and also in
patients with the prominent distortions of cardiac rhythm it may be diffi cult to
measure the blood pressure accurately. IN SUCH CASES CONSULT A CERTIFIED
DOCTOR ABOUT APPLICATION OF THE ELECTRONIC DEVICE.

6
ENG
4. KEEP QUIET DURING A
MEASUREMENT TO OBTAIN THE
ACCURATE VALUES OF YOUR BLOOD
PRESSURE WITH THE ELECTRONIC
DEVICE.
Measure your blood pressure
in the calm and comfortable conditions
at the indoor temperature. No eating
an hour before measurement; no
smoking, taking tonic agents, alcohol
1.5-2 hours before measurement.
5. The accuracy of blood pressure
measurement depends on whether the
cuff matches the size of your arm. THE
CUFF SHOULD NOT BE TOO SMALL
OR TOO LARGE.
6. Wait 3 minutes between measurements for the blood to restore its circulation.
However, the persons with prominent atherosclerosis due to considerable loss
of vascular elasticity may need to increase the wait time between measurements
(10-15 minutes). This also refers to the patients suffering for long from diabetes.
For more accurate determination of blood pressure it is recommended to make a
series of 3 consecutive measurements and to use the average value.
POWER SUPPLY OF THE DEVICE
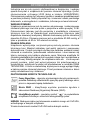
BATTERY INSTALLATION
1. Open the cover of the battery compartment
and install 4 “AA” size batteries according to
polarity marked inside the compartment. Do
not use much force to remove the cover of
the battery compartment (Fig. 1).
2. Close the battery cover.
Replace all batteries when the Low Battery • Indicator “ ”
appears on the screen or
when there is no any indication on the
screen. The Low Battery Indicator does not
show the discharge level. Indicator does not
show the discharge level.
The batteries supplied with the Device are intended for check of the • Device performance at sale and their service life may be shorter than of
the recommended batteries.
• Replace all four batteries at the same time. Do not use the waste batteries.
• If the Device is unused for a long time, remove all batteries.
• Do not leave the waste batteries in the Device.
USE OF THE DEVICE WITH THE POWER SOURCE
The manufacturer recommends application of the stabilized power source
LD-N057 (it is attached to modifi cation LD30).

7
ENG
The jack for connection of the power source is on the right side of the Device.
To use the device with electric power source (EPS), connect plug connector
of EPS to the device and insert plug of EPS into mains socket. .
Measurement over, switch off the device having depressed button, remove
plug of EPS from mains socket and disconnect plug connector from the
device. To avoid resetting of date and time settings when using the device
with electric power source, do not remove power cells.
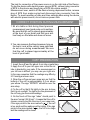
CORRECT POSITION DURING MEASUREMENT
1. Sit at a table so that during blood pressure
measurement your hand rests on its surface.
Be sure that the cuff is placed approximately
at the level of your heart and that your arm
lies freely on the table and does not move.
2. You can measure the blood pressure lying on
the back. Look at the ceiling, keep quiet and
do not move during measurement. Be sure
that the cuff is placed approximately at the
level of your heart.
CUFF PREPARATION
1. Insert the cuff end for about 5 cm into a metal ring.
2. Apply the cuff to your left upper arm so that the air
tube is directed to your palm. If the measurement on
your left arm is diffi cult, you may use your right arm.
In this case remember that the readings may differ by
5-10 mmHg and even more.
3.
Wrap the cuff around your upper arm so that the
bottom of the cuff is approximately 2-3 cm above
your elbow. The sign “ARTERY” should be over the
arm artery.
4. Fix the cuff so that it fi ts tightly to the arm, but see
that it is not overtight. Too tight or too free placement of
the cuff may give inaccurate readings.
5. On the fi xed cuff the sign “index” should point to
the area “normal (25-36 cm)”. it means that the cuff is
chosen correctly and fi ts the size of your upper arm.
if the sign points to the area marked « », the cuff
is too small and the readings will be higher. If the sign
points to the area marked « », the cuff is too large
and the readings will be lower.

8
ENG
6. If the arm has a conic form, the cuff should be put
on with a spiral movement as shown in the Figure.
7
. If the rolled-up sleeve squeezes the arm
interfering with free blood fl ow the Device may give
inaccurate fi gures not corresponding to your actual
blood pressure.
SETTING OF DATE AND TIME
To shift to mode of date and time setting, it is necessary, holding button
M1, depress button . Selected parameter will blink. Change of selected
parameter toward increasing is taking place when depressing button M2,
towards decreasing – when depressing button M1. To shift to setting of the
next parameter, year/month/hours/min, it is necessary to depress . If no
actions are done in mode of date and time setting for more than 1 minute, the
device is independently changed over to mode of date and time indication.
When power cells are replaced, date and time will zero. Measurement of
pressure and pulse is possible without date and time setting. Indication of
date and time is not switched off.
When device is used as clock, one set of
power cells will be enough approximately for 1 year.
MEASUREMENT PROCEDURE
1. Insert the Air Tube Plug into the Cuff Jack. Make 3-5 deep
inhales and exhales before taking a measurement and relax.
Do not move, do not speak and do not toughen your arm.
2.
Press button .
3.
All symbols will appear on the display screen for a
short time, two short sound signals will be given and the
Device will infl ate automatically the air into the cuff.
At fi rst the infl ation will stop at the level of 190 mmHg.
4. After reaching the level of 190 mmHg the cuff will
gradually deflate. The figures on the screen will count
back.
The pulse symbol “ ” will start fl ickering.
5. When the measurement is complete the sound signal
is given, the arm cuff completely deflates and your
measurement results fl ash on the screen and Indicator M1/
M2 will blink, reminding that to retain results, it is necessary
to choose memory 1 or 2, having depressed M1 or M2,
respectively. If memory is not chosen within 3 minutes, the
result is not memorized, and the device is automatically
changed over to mode of date and time indication.
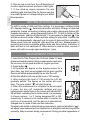
If irregular pulse rhythm is detected during measurement, symbol of arrhythmia “ ”,
will appear upon measurement end. Appearance of arrhythmia indicator may also be
caused by body movement during measurement. During periodical appearance of

9
ENG
this indication apply to You attending doctor. Apart
from numerical value of pressure, result is also
displayed on scale WHO (Fig. 14). Scale WHO –
three-color scale of classifi cation of received value
of arterial pressure, according to recommendation
of World Health Organization. The scale is
available from the left.
6
. Press button to shift to mode of date
and time setting.
TO OBTAIN THE ACCURATE RESULT MAKE
INTERVAL BETWEEN MEASUREMENTS TO RESTORE THE BLOOD
CIRCULATION. WAIT FOR AT LEAST 3 MINUTES BEFORE MAKING A NEW
MEASUREMENT.
THE DATA WILL BE KEPT IN THE MEMORY EVEN IF
THE
DEVICE
IS STORED WITHOUT BATTERIES. TO DELETE ALL VALUES
STORED IN THE MEMORY YOU SHOULD MAKE ACTIONS DESCRIBED IN
“MEMORY FUNCTION”
.
If no actions are done in mode of date and time setting for more than 3 minute,
the device is independently changed over to mode of date and time indication.
AUTOMATIC RE-INFLATION
When during the fi rst blood pressure measurement the cuff infl ation to a
level of 190 mmHg is not suffi cient or you move your arm the Device stops
measurement and re-infl ates the cuff to the higher level. The Device has 4
fi xed levels of the arm cuff infl ation: 190, 230, 270 and 300 mmHg.
The automatic re-infl ation is repeated until the measurement is completed
successfully. This is not a defect.
FORCED DEFLATION FROM A CUFF
For rapid air release from of the arm cuff during arm cuff infl ation or during a meas-
urement (slow defl ation) press the O/I Button. The device will quickly release all
air from cuff and will change over to mode of date and time indication.
MEMORY FUNCTION
1. Result of each measurement (pressure, pulse, time
and date of measurement) may be kept in the device
memory. For this purpose, after measurement, within
not more than 3 minutes, memory M1 or M2 shall be
selected for memory storage.
IF THE NOTICE ON
ERROR APPEARS THE MEASUREMENT RESULT
WILL NOT BE STORED
2. Up to 60 measurement results and mean value of last
3 measurements may be kept in each device memory.
When the number of measurements exceeds 60, the
oldest record is deleted to save the most recent values.

10
ENG
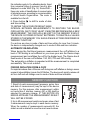
3. Press the M1 (or M2) Button to
see the fi gures stored in the memory.
At the first depression of button
M1 (or M2) mean value of 3 last
measurements, kept in memory M1
(or M2), will appear on the screen
(Fig. 6). At repeated depression
of button M1 (or M2) indicator of
selected memory M1 (or M2) and
number of memory cell will appear
on the screen, and in 1 second its content is displayed (Fig. 7). When content
of memory cell is displayed, date and time of measurement are displayed
alternately in the display lower line. Each depression of button M1 (or M2)
causes shifting to the next memory cell.
If there are no saved results in memory, at fi rst depression of button M1 (or
M2) current date and time are displayed on display Device.
MEMORY CLEARING
To delete all values stored in the memory, press the
M1 (or M2)
Button and
hold it down for more than 5 seconds. Symbols “Clr” will appear on the
screen and all values will be deleted from the memory.
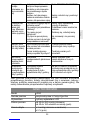
INFORMATION ABOUT ERRORS
Indication Likely cause Methods of correction
The arm cuff is applied
incorrectly or the air tube plus
is inserted not tightly enough.
Measurements cannot be made
due to hand movement or
talking during measurements.
Be sure that the arm cuff is
applied correctly and the plug
is inserted tightly. Repeat the
whole measurement procedure.
Repeat the measurement fol-
lowing strictly the recommen-
dations of this Manual.
Batteries are discharged.
Replace the batteries for
new ones
CARE, STORAGE, REPAIR AND DISPOSAL
1. Keep this Device from exposure to higher humidity, direct sunlight,
shocks, vibration. THIS
DEVICE
IS NOT WATERTIGHT.
2. Do not keep and use this Device near heating installations and open fi re.
3. If the Device was stored at a temperature below the freezing point, keep
it at least for 1 hour in some warm place before use.

11
ENG
4. Remove the batteries if the Device will be unused for a long time. Battery
leaking may damage the Device. KEEP BATTERIES OUT OF REACH
OF CHILDREN.
5.
Keep the Device clean and protect it from dust. Use the dry soft cloth to
clean the Device.
6. Keep the Device and its components away from water, solvents, spirit
and petrol.
7. Protect the arm cuff from contacting on sharp things; do not stretch or
fold tightly the arm cuff.
8. Do not subject the Device to strong shocks, such as dropping on the fl oor.
9. This Device does not contain special controls to adjust the measurement
accuracy. It is prohibited to open individually the electronic block. Repair
the Device only in authorized organizations.
10. On expiration of the warranted service life apply from time to time to
authorized repair organizations to check the technical condition of the
Device.
11. Dispose of the Device and its components according to the application
local regulations. No special requirements to disposal of this Device are
defi ned by the manufacturer.
12. The arm cuff may withstand multiple sanitary treatments. The internal
tissue surface of the arm cuff (contacting on arm) may be cleaned with
cotton ball soaked in 3%-solution of hydrogen peroxide. At long use
the partial color fading of the tissue coating of the arm cuff is possible.
Washing and ironing of the arm cuff are not allowed.
TROUBLESHOOTING TIPS
PROBLEM LIKELY CAUSE
METHOD OF CORRECTION
After pressing
the O/I Button no
indication on the
display.
Discharge of batteries.
Polarity of batteries is not
observed.
Battery terminals are
contaminated
Power source not
plugged in an electrical
outlet.
Replace all batteries for new ones.
Install batteries correctly.
Clean the terminals with dry cloth.
Plug the power source into an
electrical outlet.
Infl ation is stopped
and resumed. Automatic re-infl ation
to obtain correct
measurements.
Perhaps you talk or
move your arm during
the measurement?
See MEASUREMENT
PROCEDURE
Calm down and repeat the
measurement

12
ENG
Every time the
blood pressure is
different.
Measurements are
too low/high.
Check that the arm cuff
is level with your heart?
Check that the arm cuff
is applied correctly?
Perhaps your arm
muscles are tough
?
Perhaps you talk or
move your arm during
the measurement?
Take the correct position for
measurement.
Take the correct position for
measurement.
Apply the arm cuff correctly.
Keep silence and quiet during
measurement.
Measurements of
the pulse rate are
too high/low.
Perhaps you talk or
move your arm during
the measurement?
Perhaps you make
measurement directly
after physical load?
Keep silence and quiet during
measurement.
Repeat the measurement at least
in 5 min.
Impossibility to
make a large
of number of
measurements.
Application of poor
batteries.
Use only alkali batteries of well-
known manufacturers.
Independent
changing-over to
mode of date and
time indication.
System of automatic
change-over to mode of
date and time indication
operates
This is not a trouble. The device
is automatically changed over to
mode of date and time indication
in 3 minutes after use.
If regardless of the above recommendation you are unable to get correct
measurement results, stop the use of this Device and apply to a maintenance
organization (addresses and telephones of authorized organizations may be found
in the warranty card). Do not try to adjust the internal mechanism by yourself.
WARRANTY
1. The following LD product is covered by warranty for the period specifi ed
in the warranty card.
2. The warranty liabilities are contained in the warranty card given at the
sale of this Device to a purchaser.
3. The addresses of organizations for warranty maintenance are given in the
warranty card.
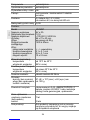
TECHNICAL SPECIFICATIONS
Measurement method
oscillometric with Fuzzy Algorithm
Display
LCD
Pressure indication range in
an arm cuff, mmHg
from 0 to 300

13
ENG
Measurement range:
pressure in an arm cuff, mmHg
pulse rate, 1/min from 40 to 260
from 40 to 160
Range of admissible abso-
lute error at measurement
of air pressure in an arm
cuff, mmHg
±3
Range of admissible
relative error at pulse rate
measurement
, % ±5
Infl ation
automatic (air pump)
Defl ation
automatic
Memory 2x60 recent measurements + average value of the
last three measurements
Type of power supply
4 “AA” size batteries (LR6) or adapter no less than
600 mA
Max power intake, W
3,6
Power source, V
6
ADAPTER LD-N057
Output voltage
Max load current
Input voltage
Dimensions
Weight
Length of connecting wire
Plug:
Polarity of terminals
Internal diameter, mm
External diameter, mm
Length of plug contact, mm
6 V ± 5%
1.0 A
~100-240 V, 50/60 Hz
64 x 70 x 43 mm
no more than 85 g
1500 ± 50 mm
«–» internal
2.1 ± 0.1
5.5 ± 0.1
10 ± 0.5
Date and time yes
Operation conditions:
Temperature, °C
Relative humidity, % Rh from 10 to 40
85 and lower
Storage and transportation
conditions:
Temperature, °C
Relative humidity, % Rh
from -20 to 50
85 and lower
Cuff size:
larger for adults (upper arm circumference 25-36 cm)
Dimensions:
Size (electronic block), mm
Weight (without package,
case, batteries and adapter), g
98x 128 x 51
376
Completeness
electronic block, Cuff-LDA (in a set with a tube and
plug), 4 batteries, power source LD-N057, bag,
instruction Manual, warranty card, package

14
ENG
Service life of the Device
(without cuff), lat
Service life of cuff, years 7
3
Year of manufacture
year the manufacture is given in the bottom of the
Device body in a serial number after symbols “AA”
Symbol defi nition
Type BF applied part.
Read Instruction Manual.
European Union Approval
.
Technical characteristics may be changed without preliminary notification to
improve the operation and quality of the product.
CERTIFICATION AND STATE REGISTRATION
This Device manufacturing is certifi ed according to international standard ISO
13485:2003. Devices LD30 comply with the comply with the requirements of
European Directive MDD 93/42/ЕЕС, international standards, EN980,
EN1041,
EN1060-1, EN1060-3, EN10601-1-2, ISO 14971, EMC (IEC 60601-1-
2:2001/A1:2004, CISPR 11:2003/A2:2006, GROUP 1, CLASS B, IEC 61000-
3-2:2005, IEC 61000-3-3:1994/A2:2005
.
Power source LD-N057 complies with international standard EN 55022 Class A
,
protection level against electric shock:
Class II, Type BF.
Product of the company: Little Doctor International (S) Pte. Ltd., 35 Selegie
Road #09-05 Parkline Shopping Centre, Singapore 188307.
Exporter: Little Doctor International (S) Pte. Ltd.
Manufacturer: Little Doctor Electronic (Nantong) Co. Ltd., No. 8, Tongxing
Road Economic & Technical Development Area, 226010 Nantong, Jiangsu,
PEOPLE'S REPUBLIC OF CHINA).
Complaints and requests should be addressed to:
Little Doctor Europe Sp. z o.o.
57G Zawila Street, 30-390, Krakow, Poland
Service phone: +48 12 2684748, 2684749
Manufactured under control: Little Doctor International (S) Pte. Ltd., 35
Selegie Road # 09-02 Parkline Shopping Centre, Singapore 188307
Manufacturer: Little Doctor Electronic (Nantong) Co. Ltd., No.8, Tongxing Road
Economic & Technical Development Area, Nantong 226010, Jiangsu, PEOPLE'S
REPUBLIC OF CHINA
Distributor in Europe:
Little Doctor Europe Sp. z o.o.
57G Zawila Street, 30-390, Kraków, Poland
Sales Offi ce phone: +48 12 2684746, 12 2684747, fax: +48 12 268 47 53
E-mail: biuro@littledoctor.pl
www.LittleDoctor.pl
Authorized Representative in the EU: Shanghai International Trading Corp.
GmbH, Eiffestrasse 80, 20537 Hamburg, Germany.

15
POL
SPIS TREŚCI
Opis części i komponentów . . . . . . . . . . . . . . . . . . . . . . . . . . . . . . . . . . . . . . .16
Informacje ogólne . . . . . . . . . . . . . . . . . . . . . . . . . . . . . . . . . . . . . . . . . . . . . .17
Informacje na temat ciśnienia . . . . . . . . . . . . . . . . . . . . . . . . . . . . . . . . . . . . .18
Zasilanie urządzenia . . . . . . . . . . . . . . . . . . . . . . . . . . . . . . . . . . . . . . . . . . . .19
Prawidłowa pozycja w trakcie pomiaru . . . . . . . . . . . . . . . . . . . . . . . . . . . . . .20
Zakładanie mankietu . . . . . . . . . . . . . . . . . . . . . . . . . . . . . . . . . . . . . . . . . . . .20
Ustawienie daty i godziny . . . . . . . . . . . . . . . . . . . . . . . . . . . . . . . . . . . . . . . .21
Procedura pomiaru . . . . . . . . . . . . . . . . . . . . . . . . . . . . . . . . . . . . . . . . . . . . .21
Pamięć. . . . . . . . . . . . . . . . . . . . . . . . . . . . . . . . . . . . . . . . . . . . . . . . . . . . . . .23
Informacje o błędach . . . . . . . . . . . . . . . . . . . . . . . . . . . . . . . . . . . . . . . . . . . .23
Konserwacja, przechowywanie, naprawa i utylizacja . . . . . . . . . . . . . . . . . . .24
Możliwe trudności . . . . . . . . . . . . . . . . . . . . . . . . . . . . . . . . . . . . . . . . . . . . . .24
Dane techniczne . . . . . . . . . . . . . . . . . . . . . . . . . . . . . . . . . . . . . . . . . . . . . . .25
Certyfi kacja . . . . . . . . . . . . . . . . . . . . . . . . . . . . . . . . . . . . . . . . . . . . . . . . . . .27
Gwarancja . . . . . . . . . . . . . . . . . . . . . . . . . . . . . . . . . . . . . . . . . . . . . . . . . . . .27

16
POL
OPIS CZĘŚCI I KOMPONENTÓW
1. Panel przedni.
2. Gniazdo do podłączenia mankietu.
3. Wyświetlacz LCD.
4. Wąż powietrza z wtyczką.
5. Mankiet CUFF-LDA.
6. Przycisk (start/stop).
7. Przycisk M1 (Pamięć 1).
8. Przycisk M2 (Pamięć 2).
9. Zasilacz LD-N057.
10. Gniazdo podłączenia zasilacza.
11. Baterie.
12. Karta gwarancyjna.
13. Instrukcja obsługi.
14. Torba

17
POL
INFORMACJE OGÓLNE
Instrukcja ma na celu pomóc użytkownikowi w bezpieczny i wydajny
sposób korzystać z urządzenia do pomiaru ciśnienia tętniczego i pulsu,
ciśnieniomierza cyfrowego LD30 (dalej w tekście: URZĄDZENIE).
Ciśnieniomierz powinien być używany zgodnie z zasadami przedstawionymi
w poniższej instrukcji. Należy zapoznać się i zrozumieć całość poniższego
dokumentu, w szczególności z rozdziałem „Informacje na temat ciśnienia”.
WARUNKI POMIARU
Urządzenie przeznaczone jest do pomiaru skurczowego i rozkurczowego
ciśnienia tętniczego krwi oraz pulsu u pacjentów w wieku powyżej 15 lat.
Ciśnieniomierz zalecany jest dla pacjentów z niestabilnym ciśnieniem
tętniczym krwi lub ze stwierdzonym nadciśnieniem tętniczym jako
dopełnienie obserwacji medycznej. Mankiet dostosowany jest do ramienia o
obwodzie 25-36cm. Ciśnienie mierzone jest w przedziale 40-260 mmHg, a
tętno w przedziale od 40 do 160 uderzeń na minutę.
ZASADA DZIAŁANIA
Urządzenie wykorzystuje oscylometryczną metodę pomiaru ciśnienia
tętniczego krwi. Mankiet zakładany jest wokół ramienia i pompowany
automatycznie. Czujnik przyrządu wychwytuje delikatne wahania zmiany
ciśnienia w mankiecie, powodowane rozszerzaniem i skurczaniem się
tętnicy ramiennej przy każdym uderzeniu serca. Mierzona amplituda fal
ciśnienia przekładana jest na wartość wysokości słupa rtęci i wyświetlana w
formie cyfrowej. Należy pamiętać, że urządzenie może nie zachowywać
precyzji pomiaru, jeżeli jest wykorzystywane lub przechowywane w
temperaturze i wilgotności wyższej niż przedstawione w rozdziale DANE
TECHNICZNE. U osób ze stwierdzoną arytmią serca mogą wystąpić błędy
w trakcie pomiaru ciśnienia tętniczego. Przed pomiarem ciśnienia u dzieci
należy skontaktować się z lekarzem.
ZASTOSOWANIE NOWYCH TECHNOLOGII LD
Fuzzy Algorithm – algorytm przetwarzania danych pomiarowych,
pozwala dokładniej odzwierciedlić specyfi kę pracy ludzkiego serca,
przez co zapewnia lepszą dokładność.
Skala WHO – klasyfikacja wyników pomiarów zgodnie z
zaleceniami Światowej Organizacji Zdrowia (WHO).
Identyfi kacja arytmii – specjalny symbol “ ” na wyświetlaczu
urządzenia informuje o obecności nieregularnego pulsu.
UWAGA! Niedopuszczalne jest stosowanie mankietu innego niż Cuff-LDA,
wchodzącego w komplet urządzenia.
W razie konieczności mankiet Cuff-LDA można dokupić osobno.
High
Norm
Low

18
POL
INFORMACJE NA TEMAT CIŚNIENIA
1. Ciśnienie tętnicze nie jest wartością stałą, podlega silnym wahaniom w
krótkim okresie czasu. Wartość ciśnienia tętniczego krwi zależy od wielu
czynników. Zwykle jest ona niższa w okresie letnim i wyższa w okresie zimowym.
Ciśnienie krwi zależy od ciśnienia atmosferycznego, wysiłku fizycznego,
pobudliwości, stresu, diety. Duży wpływ mają używki, narkotyki, alkohol i palenie
tytoniu. Z uwagi na fakt, że ciśnienie w niskiej temperaturze jest podwyższone,
należy je mierzyć w temperaturze pokojowej (około 20°C). W przypadku, gdy
urządzenie było przechowywane w niskiej temperaturze, przed jego użyciem
powinno się je na godzinę przetrzymać w temperaturze pokojowej. W ciągu doby
wahania ciśnienia u zdrowych ludzi mogą wynieść 30-50 mmHg dla ciśnienia
skurczowego i do 10 mmHg ciśnienia rozkurczowego. Wahania ciśnienia mogą
mieć różne przyczyny, dlatego zaleca się prowadzenie dziennika pomiarów.
TYLKO LEKARZ NA PODSTAWIE TAKICH DANYCH MOŻE STWIERDZIĆ
EWENTUALNE PRZYCZYNY ZABURZEŃ TĘTNA.
2. W chorobach układu
krążenia, jak i wielu innych,
które wymagają monitorowania
ciśnienia tętniczego, ważne
jest dokonywanie pomiarów
w porach zaleconych przez
lekarza. PAMIĘTAJ, ŻE
KAŻDA ZMIANA LECZENIA
NADCIŚNIENIA TĘTNICZEGO
MOŻE BYĆ DOKONANA TYLKO
NA POLECENIE LEKARZA.
3. Przy zaburzeniach takich jak: miażdżyca naczyń krwionośnych, słabe tętno,
pomiar ciśnienia tętniczego może być trudny. W TAKIM PRZYPADKU NALEŻY
SKONSULTOWAĆ SIĘ Z LEKARZEM W CELU OKREŚLENIA NAJLEPSZEJ
METODY POMIARU.
4. PODCZAS POMIARU NALEŻY ZACHOWAĆ
MILCZENIE. POMIAR CIŚNIENIA TĘTNICZEGO
POWINIEN BYĆ PRZEPROWADZONY W
POZYCJI WYGODNEJ DLA PACJENTA, W
TEMPERATURZE POKOJOWEJ. 30 MINUT
PRZED POMIAREM NIE POWINNO SIĘ
SPOŻYWAĆ POSIŁKU ORAZ NAPOJÓW
GAZOWANYCH, NALEŻY TAKŻE
ZREZYGNOWAĆ Z PALENIA TYTONIU.
ZALECANY JEST POMIAR CIŚNIENIA PRZY
OPRÓŻNIONYM PĘCHERZU MOCZOWYM
.
5. Dokładność pomiaru zależy również od prawidłowego dobrania rozmiaru do
wielkości ramienia oraz jego prawidłowego ułożenia.
MANKIET NIE POWINIEN
BYĆ ZBYT MAŁY, ANI TEŻ ZA DUŻY.
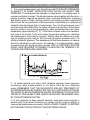
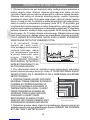
Ciśnienie tętnicze (mmHg)
Skurczowe
Rozkurczowe
Pora dnia
Wahania ciśnienia tętniczego w cyklu dobowym
Nadciśnienie
(ciężkie)
(umiarkowane)
(łagodne)
Rozkurczowe ciśnienie krwi (mmHg)
Klasyfikacja wyników pomiaru zgodnie z rekomendacjami
Światowej Organizacji Zdrowia (WHO)
Skurczowe ciśnienie krwi
Optymalne
Prawidłowe

19
POL
6. Powtórzenie pomiaru jest możliwe po upływie około 3 min. Po takim czasie
powraca normalne krążenie w ramieniu. W przypadku osób z miażdżycą i innymi
chorobami układu krążenia czas ten powinien być dłuższy, nawet do 10-15
min., dotyczy to również pacjentów z cukrzycą.
Określenie dokładnego ciśnienia
tętniczego krwi zaleca się na podstawie dokonania 3 pomiarów i wyciągnięcia średniej
z uzyskanych wyników.
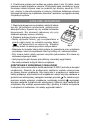
ZASILANIE URZĄDZENIA
1. Otworzyć pokrywę komory na baterię i włożyć 4 baterie
typu AA, jak pokazano na schemacie, umieszczonym
wewnątrz komory. Upewnić się, czy została zachowana
biegunowość. Nie stosować nadmiernej siły przy
otwieraniu pokrywy komory na baterię.
2. Zamknąć pokrywę komory na baterię.
•
Należy wymieniać baterię, gdy na wyświetlaczu w
sposób ciągły świeci się wskaźnik wymiany baterii
“ ”, lub wyświetlacz nie włącza się. Wskaźnik
wymiany baterii nie wskazuje poziomu zużycia baterii.
• Dołączone do kompletu baterie służą jedynie do sprawdzenia pracy urządzenia
przy zakupie i okres ich przydatności może być krótszy niż u zalecanych baterii.
• Przy zmianie baterii należy wymienić wszystkie jednocześnie. Nie zaleca się
stosowania używanych baterii.
• Jeśli przyrząd nie jest używany przez dłuższy czas należy wyjąć baterie.
• Nie należy zostawiać zużytych baterii w urządzeniu.
KORZYSTANIE Z URZĄDZENIA Z ZASILACZEM
Producent zaleca stosowanie źródła zasilania LD-N057 (wchodzi w komplet
urządzenia). Gniazdo do podłączenia zasilacza zostało umieszczone
po prawej stronie urządzenia. Aby skorzystać z urządzenia z zasilaczem
należy podłączyć wtyk zasilacza do urządzenia i włożyć wtyczkę zasilacza w
gniazdo sieci elektrycznej, następnie nacisnąć przycisk . Po zakończonym
pomiarze należy wyłączyć urządzenie, naciskając przycisk , wyciągnąć
wtyczkę zasilacza z gniazda sieci elektrycznej i odłączyć wtyk zasilacza od
urządzenia. Aby uniknąć wyzerowania daty i godziny, w trakcie korzystania
z urządzenia z zasilaczem, nie należy wyjmować baterii.
Rys.1

20
POL
PRAWIDŁOWA POZYCJA W TRAKCIE POMIARU
1. Usiąść przy stole tak, aby w trakcie pomiaru ciśnienia tęt-
niczego ręka opierała się o blat. Należy upewnić się, że
miejsce założenia mankietu znajduje się w przybliżeniu na
tej samej wysokości co serce, oraz że przedramię swo-
bodnie leży na stole i nie rusza się.
2. Pomiar można również przeprowadzać leżąc
na plecach. Należy patrzeć w sufit, zachować
spokój i nie ruszać się w trakcie pomiaru. Należy
się obowiązkowo upewnić, czy miejsce założenia
mankietu znajduje się mniej więcej na tym samym
poziomie co serce.
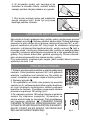
ZAKŁADANIE MANKIETU
1. Rozsuń mankiet tak, aby metalowy pierścień
był 5 cm od rzepu, tak jak pokazano na rysunku.
2. Wsuń lewe ramię tak, aby rurka była skiero-
wana w kierunku dłoni. Jeśli pomiar na lewej
ręce jest utrudniony, można przeprowadzić go
na prawej. Należy pamiętać, że wynik może się
różnić o 5-10 mmHg.
3. Wsuń mankiet tak, aby jego dolna krawędź
znajdowała się w odległości 2-3 cm od łokcia.
Rurka i napis ARTERY (TĘTNICA) powinny być
po stronie wewnętrznej. Zaciśnij mankiet tak,
aby dopasować go odpowiednio do ramienia.
Zbyt ciasne lub zbyt luźne dopasowanie man-
kietu może być przyczyną błędnych pomiarów.
5. Strzałka INDEX powinna wskazywać na napis
NORMAL (25-36 cm). Oznacza to, że mankiet
jest właściwy dla tej grubości ramienia. Jeżeli
strzałka wskazuje na obszar « » na lewo od
napisu – oznacza to, że mankiet jest za mały i
wyniki będą zawyżone. Jeżeli strzałka wskazuje
na obszar « » na prawo od napisu, oznacza to,
że mankiet jest za duży i wyniki będą zaniżone.
Strona się ładuje...
Strona się ładuje...
Strona się ładuje...
Strona się ładuje...
Strona się ładuje...
Strona się ładuje...
Strona się ładuje...
Strona się ładuje...
-
 1
1
-
 2
2
-
 3
3
-
 4
4
-
 5
5
-
 6
6
-
 7
7
-
 8
8
-
 9
9
-
 10
10
-
 11
11
-
 12
12
-
 13
13
-
 14
14
-
 15
15
-
 16
16
-
 17
17
-
 18
18
-
 19
19
-
 20
20
-
 21
21
-
 22
22
-
 23
23
-
 24
24
-
 25
25
-
 26
26
-
 27
27
-
 28
28


Little Doctor LD30 Instrukcja obsługi
- Kategoria
- Jednostki ciśnienia krwi
- Typ
- Instrukcja obsługi
w innych językach
- English: Little Doctor LD30 User manual
Powiązane artykuły
Inne dokumenty
-
 Nissei DS-A10(DS-10) Instrukcja obsługi
-
B.Well PRO-39 Instrukcja obsługi
-
Rossmax CH155f Instrukcja obsługi
-
Microlife BP B1 Classic Instrukcja obsługi
-
Microlife BP B2 Basic Instrukcja obsługi
-
-
-
-
Panasonic EWBU30 Instrukcja obsługi
-
 Nissei DSK-1011 Instrukcja obsługi

