Strona się ładuje...

1
89
5
6
7
2
3
4
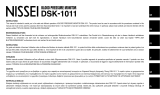
Fig.1
Rys.1
EN
1. NAMES OF PARTS AND COMPONENTS (Fig.1)
1. Electronic block 6. M2 button (MEMORY 2)
2. LCD display 7. START/STOP button
3. Battery compartment 8. Batteries
4. Cuff 9. Operations Manual
5. M1 button (MEMORY 1) 10. Carrying case
2. PURPOSE AND GENERAL DESCRIPTION
2.1 Purpose
The product is intended to measure systolic and diastolic arterial blood pressure and determine pulse
rate in patients aged 15 and over, with a cuff on the wrist. Coverage wrist circumference: 12.5 to 22.5 cm.
Measuring range: 50 to 250 mmHg (systolic), 40 to 180 mmHg (diastolic), 40 to 160 bpm (pulse rate). The
product is not to be used in newborns or babies. Moreover, the product’s eff ectiveness during pregnancy
(including preeclampsia) has not been established since the accuracy of measurements has not been
verifi ed. Persons who have any of these conditions or symptoms must consult with a physician before use.
The product is not to be used in the professional transport of patients outside the hospital.
2.2 Operating principle
The product is operated using an oscillometric method. The cuff is connected to the electronic block and
wraps around the wrist. When the START/STOP button is pressed, the instrument automatically infl ates
the cuff and measures the blood pressure. The sensor inside the instrument detects weak fl uctuations of
pressure in the cuff generated by the arteries’ expansion and contraction in response to each heartbeat.
After analyzing the data obtained using a software algorithm, blood pressure and pulse are calculated,
displayed on the LCD as digital values. The product has 2 memory blocks of 60 cells, each calculating the
average value for analyzing the data obtained at diff erent times of the day.
2.3 New NISSEI Technologies
TM HiRS™ (High Resolution Scanning) – is a high accuracy pulse wave interval measurement
system that acquires six times the volume of data during measurement compared with previous
NISSEI products. It facilitates better identifi cation of the irregular intervals of pulse waves than
ever before
Abnormal pulse rhythm* – when two symbols are indicated together, it means pos-
sibly higher degree of infl uence on the blood pressure measurement result due to the
occurrence of severer abnormal pulse rhythm.
Irregular pulse rhythm indication* – is a function showing that the pulse waves are not
appropriately detected during blood pressure measurement due to the occurrence of irregular
pulse rhythm.
M-Cuff – is a cuff shape uniquely designed and patented by NISSEI. The M-shaped cuff reliably
captures pressure waves from two arteries at once.
Measurement on infl ation – is a technology that detects the pressure during cuff infl ation.
Interference detection – is a symbol that informs about the presence of external noise that
could aff ect the measurement result.
Pulse pressure – is a symbol of high pulse pressure.
* ATTENTION! This instrument is not intended to diagnose a disease. DIAGNOSTICS AND ANY TREATMENT
CAN ONLY BE PRODUCED BY A PHYSICIAN BASED ON THE INDICATIONS OBTAINED BY THE PHYSICIAN.
3. PRECAUTIONS AND CONTRAINDICATIONS
ATTENTION!
Do not use this product for infants, young children, or disabled people. An injury or accident may occur.
Do not take this product into the examination room when performing MRI scans. Suction into the MRI
system, burn injuries, or other problems may occur.
Never use this product under a high oxygen concentration or in a high oxygen concentration atmo-
sphere such as near fl ammable gas, such as anesthetic gas, in a hyperbaric oxygen chamber or hyperbaric
oxygen therapy chamber, or in an oxygen tent.
When taking measurements yourself, do not use the measurement results for self-diagnosis and
self-treatment. Measure your blood pressure based on the instructions of your physician, follow your
physician’s instructions concerning taking medicine.
Do not wrap the cuff around an arm that is injured or still healing.
Do not wrap the cuff around an arm being used for an intravenous drip or a blood transfusion. An
injury or accident may occur.
Do not use the product past its service life. Correct measurement may not be possible. The service life
of the product is 5 years.
Do not use the product in a medical institutions or public location where it will be used for an
unspecifi ed large number of people.
Do not use this product without consultation with your doctor if you are under dialysis therapy or on anti-
coagulants, antiplatelets or steroids. Use of this instrument under such conditions could cause internal bleeding.
Do not use this product near equipment that generates electromagnetic waves (microwave oven,
induction cooker, etc.) or near equipment that generates radio waves (mobile phone, PHS, etc.). A
malfunction or failure may occur.
Do not use this product for a purpose other than measuring your blood pressure.
Do not use this instrument for measuring the blood pressure of a patient being transported in an
emergency. A malfunction or failure of the device may occur.
Do not allow children to use this product by themselves and do not store it within the reach of infants.
Persons who have any of the following conditions or symptoms or have received any of the following
treatments or surgeries in the past must consult with a physician before use:
• Pregnancy including preeclampsia • Diabetes • Liver disease • Arteriosclerosis • Hypertension •
Arrhythmia • Mastectomy • Endotracheal intubation • Endovascular treatment • Arteriovenous shunt •
Lymph node clearance.
Use only accessories designated by the manufacturer. Use of non-designated accessories will cause errors.
Measure the circumference of your wrist and then check that it is within the applicable range. Use
when it is outside of the applicable range will cause errors.
Do not drop or subject to a strong shock. A malfunction or failure may occur.
Correctly attach the cuff to the measurement area and keep it at the height of your heart during
measurement. Incorrect attachment or height off set will cause errors.
Note that the following will cause changes in blood pressure:
• Time and season • Medication for hypertension treatment and other conditions • Food and drink (includ-
ing alcohol) • Smoking • Body movement • Mental tension • Bathing • Urge to urinate • Conversation •
Other environmental conditions (e.g. undergoing a medical examination in a hospital) • Measurement
posture (including the height of the cuff in relation to the heart).
If abnormal infl ation occurs, press the START/STOP button to stop measurement. When the START/STOP
button is pressed during measurement, the air is exhausted quickly from the cuff and measurement stops.
Do not perform measurements more frequently than necessary.
If you touch the battery terminals when replacing the batteries, do not touch another person.
Do not use diff erent types of batteries or old and new batteries at the same time. A failure may occur
due to, for example, heat generation.
If the product will not be used for a long period of time, remove the batteries. If the batteries are left
inserted for a long period of time, battery fl uid may leak out, causing damage to the product.
Do not disassemble, repair, or modify the product. Device failure may occur.
When disposing of this product and used batteries, dispose of them appropriately in accordance with
the rules and regulations of the local government.
If the product does not work or is abnormal, stop use immediately and contact a specialized Service Center.
The instrument may fail to yield specifi ed measurement accuracy if operated or stored in temperature
or humidity conditions outside the limits stated under “14. SPECIFICATIONS” of this Manual.
The product contains small parts and batteries which could be swallowed by children or pets. They
should therefore be kept out of the reach of children and pets at all times.
4. PACKAGE CONTENTS
Check that the following items are included:
- electronic block with cuff – 1 pc.
- batteries – 2 pcs.
- carrying case – 1 pc.
- operation manual with warranty card – 1 pc.
- package – 1 pc.
Open the carrying case while gently pressing the recessed part on the side (Figure 1).
5. RECOMMENDATIONS FOR CORRECT MEASUREMENT
IMPORTANT!
For a correct assessment of the measurement results, you should know that the BLOOD PRESSURE IS
SUBJECT TO VIOLENT OSCILLATION, EVEN IN SHORT TIMES. Blood pressure levels depend on many factors.
It is usually lower in summer and higher in winter. Blood pressure changes with atmospheric pressure,
depending on physical activity, emotional excitability, stress and diet. Medications, alcoholic drinks
and smoking have a signifi cant infl uence. For many patients, even the procedure of measuring pressure
itself in outpatient settings causes an increase in values. Thus blood pressure measured at home is often
diff erent from that measured in a medical center. Since blood pressure rises at low temperatures, it is
recommended to perform measurements at room temperature (approx. 20 °C). If the product has been
stored at a low temperature, keep it at room temperature for at least 1 hour before use, otherwise the
measurement result may be wrong. During the day, the variation in readings in healthy people can be 30-
50 mmHg for systolic (upper) pressure and up to 10 mmHg for diastolic (lower) pressure. The dependence
of blood pressure on various factors is individual for each person. Therefore, keeping a special diary with
blood pressure readings is recommended. ONLY A PHYSICIAN CAN ANALYZE THE TENDENCY OF YOUR BLOOD
PRESSURE CHANGES BASED ON THE DIARY DATA.
For cardiovascular diseases and for many other conditions where blood pressure monitoring is neces-
sary, take measurements at the hours designated by your physician. REMEMBER THAT THE DIAGNOSTICS
AND ANY HYPERTENSION TREATMENT CAN BE PERFORMED BY A PROFESSIONAL, BASED ON THE BLOOD
PRESSURE DATA OBTAINED BY A PHYSICIAN ONLY. ADMINISTRATION OR DOSAGE MODIFICATION OF MEDICA-
TIONS USED SHOULD BE PRESCRIBED BY THE PHYSICIAN ONLY.
With such disorders as deep vascular sclerosis, weak pulse wave, and in patients with severe
abnormalities in the rhythm of cardiac contractions, the correct measurement of blood pressure may be
diffi cult. IN THESE CASES, IT IS NECESSARY TO OBTAIN PROFESSIONAL MEDICAL ADVICE ON THE USE OF THE
ELECTRONIC DEVICE.
FOR OBTAINING THE CORRECT BLOOD PRESSURE RESULTS USING AN ELECTRONIC DEVICE, IT IS NECES-
SARY TO BE SILENT DURING THE MEASUREMENT. Blood pressure measurements should be taken under
quiet, comfortable conditions at room temperature. Abstain from smoking, taking tonic drinks and alcohol
immediately before the measurement.
The accuracy of blood pressure measurements depends on the fi t of the cuff to your wrist circumfer-
ence. THE CUFF SHOULD NOT BE TIGHT OR VERY LOOSE.
Repeated measurements are taken at intervals of at least 1 minute to restore blood circulation.
For a more accurate blood pressure measurement, it is recommended to make a series of 3 consecutive
measurements and use the calculated mean. Consult your physician before taking a measurement.
6. INSERTING THE BATTERIES
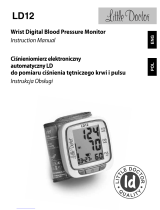
1) Remove the battery cover (Figure 2) by lightly pressing the cover as indicated by 1 in the fi gure and
moving the cover in the direction of the arrow indicated by 2.
2) Insert two “AAA” batteries in the compartment. Make sure the polarity matches the (+) and (-) mark
ings inside the compartment (Figure 3). Batteries can be inserted easily if you push their negative (-)
ends against the springs. When the batteries are inserted, M1 appears on the display.
3) Close the battery cover (Figure 4).
Battery replacement symbol
Replace all batteries when the battery replacement symbol fl ashes on display during measurement.
A fl ashing battery replacement symbol means that the battery charge is only enough for a few measure-
ments. If the symbol is continuously lit when the product is turned on, the measurement will not be pos-
sible until all batteries are replaced. The battery replacement symbol does not show the level of discharge.
Use alkaline batteries to extend the operating time of the device. Usual zinc-carbon batteries require more
frequent replacement. The supplied batteries are for testing the instrument on sale and may be shorter
than commercially available batteries. It is necessary to monitor the batteries’ shelf life, especially if the
product is used irregularly.
Since neither the instrument nor batteries are not household waste, follow your national/local
recycling rules to dispose of them properly.
ATTENTION! Do not use rechargeable batteries or batteries other than those specifi ed by the
manufacturer. In the case of using inappropriate batteries, the declared performance of the instrument
may decrease.
7. SETTING THE CLOCK
IMPORTANT! Setting the date and time ensures that the measurement results are saved with the
correct measurement date and time. The product can be used without setting the date and time.
1) Press and hold down the M2 button for about 3 seconds till year value starts to fl ash on the screen.
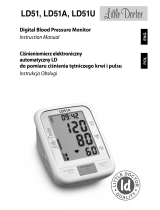
2) Set the date and time in the following order: [Year], [Month], [Day], [Hour] and [Minute] (Figure 5).
Pressing the M1 button increases a numerical value and pressing the M2 button decreases it. Pressing and
holding a button fast forwards through the numbers.
3)
Press the START/STOP button to confi rm the selected value and go to the next item. The clock display is in
24-hour format. After confi rming [Minute], the hour and date will be set, and the current time will
appear on the display.
4) To exit the clock mode, press and hold the START/STOP button for more than 2 seconds. When
switched off , the display shows the current time. When the batteries are replaced, the date and time
remain the same as when the batteries were removed. Therefore, after replacing the batteries, the date
and time values must be corrected.
IMPORTANT! If the date and time have been set, then the current time will be shown on the off display.
8. CORRECT POSTURE
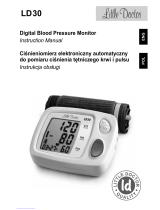
8.1 Measurement while sitting at a table
1) Sit on a chair with both of your feet placed on the fl oor without crossing your legs, with your back
placed against the back of the chair.
2) Gently open your hand with your palm up and place your elbow on the table.
3) Place a towel or similar item under your arm so that the cuff comes to the same height as your heart
(Figure 6).
8.2 When there is no table
1) Take a sitting position: put your feet on the fl oor, lean your elbows on the back of a chair.
2) Align the cuff at the height of your hear and support your left arm with your right hand during
measurement (Figure 7).
3) Gently support your left arm with your right hand during measurement.
8.3 When measuring while lying down
1) Lie on your back.
2) Use a case or folded towel to align the cuff so that it comes to the same position as the height of your
heart (Figure 8).
IMPORTANT! The measurement readings will diff er slightly depending on the measurement posture.
Try to measure on the same wrist and in the same posture. If the cuff is higher/lower than the heart, the
result may be incorrect (lower/higher).
9. MEASUREMENT PROCEDURE
9.1 Preparing the cuff
1) Place your left hand palm up, wrap the cuff on your wrist so that the display is on the side of your
palm. If the cuff cannot be fi tted on your left wrist, place it on your right wrist to measure.
2) Place the monitor in the center of your wrist (Figure 9). The edge of the cuff should be 5-10 mm from
the edge of the palm.
3) Wrap the cuff snugly so that there is no space between the cuff and your skin. The cuff should be
comfortable. Make sure that the cuff is not wrapped over the clothing. Examples of incorrectly attached
cuff are shown in Figure 10.
9.2 Measurement procedure
Before measurement, take a deep breath several times and relax. Make sure the cuff is properly attached
and at the same height as your heart. Do not talk or move your shoulder or arm during measurement.
1) Press START/STOP. On the display “0” will fl ash, and the product will begin to infl ate air into the cuff .
Note that the product measures during the cuff infl ating. Stay in a relaxed position during this time,
do not move or speak. During infl ation, the cuff symbol will appear on the display, which indicates
the correct position of the cuff on the wrist.
Interference detection symbol
If the symbol « »appears during the measurement, it is recommended to repeat the meas-
urement to obtain a correct result. Do not move and talk during the measurement.
To forcibly stop the measurement, press the START/STOP button; the instrument will stop infl ating and
quickly exhaust air.
2) The symbol «» will start fl ashing as soon as the sensor detects a pulse wave.
3) After the end of the measurement, the product exhausts air from the cuff , and the result of the
measurement is shown on the display: blood pressure value, pulse rate, measurement time, classifi cation
of the result according to the WHO classifi cation (Figure 11).
Reliability symbol
The reliability symbol appears on the screen if all the necessary conditions are met during the
measurement: the cuff is applied correctly, there is no movement or interference.
If you forget to turn the power off , the power turns off automatically after approximately 3 minutes.
ATTENTION! Do not take several measurements in a row. This will cause the hand to wither and not get the
correct value. Let your arm rest for at least 1 minute.
9.3 Symbols on the LCD display
Irregular pulse rhythm indication
The symbol shows that the pulse waves are not appropriately detected during blood pressure
measurement due to the occurrence of irregular pulse rhythm (Figure 12). Please take a
measurement again in a calm condition as the blood pressure measurement result may not be
accurate. In case the symbol is repeatedly indicated even though the measurements are taken in a calm
condition, please consult with your physician as the occurrence of disturbed pulse rhythm may constantly
aff ecting your blood pressure measurement result.
When two symbols are indicated together, it means possibly higher degree of infl uence
on the blood pressure measurement result due to the occurrence of severer abnormal
pulse rhythm.
Abnormal pulse rhythm can be caused by various factors: Pulse rhythm can be disturbed by talking, mov-
ing, breathing, or the health conditions etc. One of the health conditions causing the irregularity in pulse
rhythm is the cardiac arrhythmia. There are various kinds of cardiac arrhythmias, such as extrasystoles and
atrial fi brillation (AFIB) where the latter one normally has severer irregularity in pulse rhythm.
Pulse pressure symbol
If the diff erence between systolic and diastolic pressure values is 65 mmHg or higher, the symbol
appears. This value is considered to be closely related to arteriosclerosis, which was widely
studied once as one of the cardiovascular risk factors. The normal pulse pressure is about 45
mmHg. This number tends to increase with age. Do not try to interpret the results yourself, be sure to
consult your physician.
WHO classifi cation indications
In addition to the numerical value of pressure, the result is also displayed as a graphic scale with six
divisions located on the display’s left side (Figure 13). According to the World Health Organization, the
WHO tricolor scale identifi es the obtained value of arterial blood pressure. The scale allows you to evaluate
the obtained fi gures according to the classifi cation: the pressure is normal, high, or one of the degrees of
arterial hypertension.
WHO Classifi cation Results Table
Symbol WHO classifi cation SYS DIA
Grade 3 hypertension (severe) ≥180 ≥110
Grade 2 hypertension (moderate) 160-179 100-109
Grade 1 hypertension (mild) 140-159 90-99
High-normal 130-139 85-89
Normal 120-129 80-84
Optimal <120 <80
10. MEMORY FUNCTION
10.1 Saving results
The measurement results are stored in M1 or M2 memory. Each bank can store up to 60 measurement
results and several average values. The average value calculation function determines the average of no
more than three measurements taken in the last 10 minutes, so the function is only active after setting
the date and time.
If a measurement error (ERR) happens, the results are not saved.
10.2 Selection of a memory bank
To select a memory bank, press the M1 or M2 button. The selected bank will be indicated on the screen by
M1 or M2 symbol. You can select a memory bank both before measurement and after – before the instru-
ment turns off or starts a new measurement.
10.3 Display the average value
Press the button of the selected memory bank (M1 or M2). The screen will display the average value
indicated by index A (Figure 14). The average value is calculated from the results of measurements made
in the last 10 minutes (up to 3 measurements). The number of measurements from which the average has
been calculated is displayed next to the A symbol.
10.4 Display the morning average
Press the button of the selected memory bank (M1 or M2) one more time to display the morning average
value indicated by the symbol is displayed on the screen (Figure 15). The morning average indicates
the average of measurement results (max. 3 results) within 10 minutes from the last measurement
obtained in the time zone of 4:00 A.M. to 9:59 A.M. If no results have been obtained at this time, the
morning average will not be displayed.
10.5 Display the evening average
Press the button of the selected memory bank (M1 or M2) one more time to display the average evening
value indicated by the symbol (Figure 16). The evening average indicates the average of measurement
results (max. 3 results) within 10 minutes from the last measurement obtained in the time zone of 7:00
P.M. to 1:59 A.M. If no results have been obtained at this time, the evening average will not be displayed.
10.6 Display the saved results
Press the selected memory bank button (M1 or M2) one more time to display the saved result, indicated
by No. 1 (Figure 17). The product alternately shows the measurement number, measurement date, and
measurement time in the display’s upper left corner. The result displayed with No. 1 is the most recent
saved result in the selected memory bank. Each press of the M1 or M2 button causes the transition to the
previous measurement result.
10.7 Deleting the saved results
To delete the entire M1 (or M2) memory bank:
- Press the M1 (or M2) button to select the average value, indicated by A.
- Press and hold the М1 button for more than 4 seconds until the numbers on display start fl ashing and
then disappear (Figure 18).
To delete individual measurement result:
- Press the M1 (or M2) button to select the measurement result you want to clear.
- Press and hold the M1 button for more than 4 seconds until the numbers on display start fl ashing and
then disappear.
11. TROUBLESHOOTING
PROBLEM CAUSE SOLUTION
Blood pressure is too
low or too high.
The cuff is not at the height of your heart.
The cuff is wrapped incorrectly.
The cuff is worn over the clothing.
Talking or moving during the measurement.
Keep the cuff aligned to the height of your heart.
Check the cuff position on the arm.
Make sure the cuff is not wrapped around
the clothing.
Be calm and quiet while measuring.
The measurement
results are diff erent
each time.
Infl uence of the measurement conditions
or your physical or mental condition.
Take measurements under the same
conditions.
The measurement
results in a medical
center and at home
are diff erent.
Infl uence of the relaxed state at home and
tension in a medical center.
Show your blood pressure readings obtained
at home to your physician for advice.
There is no clock on
the display.
The clock has not been set.
Batteries are missing.
Set the date and time.
Insert the batteries.
The display is blank. The batteries are low.
The batteries are inserted incorrectly.
The power supply terminals are dirty.
Replace all the batteries with new ones.
Insert the batteries correctly.
Wipe the terminals with a dry cloth.
M1 or M2 symbol
does not disappear.
M1 or M2 symbols are displayed on the
screen even when the power is off .
Not an error, continue using the product.
The clock does not
disappear.
After setting the date and time, the clock
is shown on the display even when the
power is off .
When the clock is set, the clock is displayed
even when the power is off . Not an error,
continue using the product.
You moved or spoke during the
measurement.
Measurement readings are out of
measuring range.
Do not move or talk while measuring.
Receive instructions and consultation from
your physician.
The cuff is wrapped incorrectly.
The cuff is damaged.
Wrap the cuff correctly and repeat the
measurement.
If Err-2 is repeated, the cuff is damaged.
Contact your service center.
The cuff was infl ated to the maximum
pressure because you moved your hand or
arm or you talked during measurement.
Do not speak or move during the
measurement.
The batteries are low. Replace all the batteries with new ones.
“0” is displayed.
When installing the batteries, you pressed
the START/STOP button.
Press the START/STOP button to turn off the
power.
If, despite the above recommendations, you cannot obtain correct measurement results, stop using the
product and contact the manufacturer or an authorized representative whose contact information is given
in this Manual under “15. INFORMATION ON THE MANUFACTURER AND DISTRIBUTORS.” Do not try to repair
the internal mechanism of the instrument yourself.
12. WARRANTY
This product is guaranteed for the period of 5 years after the date of purchase, provided the user
follows the operation, transportation, and storage conditions during the warranty period. The warranty
period for the cuff is 12 months from the date of sale.
Warranty obligations shall be formalized with a warranty card when the product is sold to a customer.
The warranty is valid provided that the instrument has not been opened or damaged by the purchaser.
The addresses of organizations providing warranty service are indicated in this Manual under “15.
INFORMATION ON THE MANUFACTURER AND DISTRIBUTORS” or on the website www.nissei.pl.
13. MAINTENANCE, STORAGE, REPAIR, AND DISPOSAL
IMPORTANT!
The performance of a blood pressure monitor is infl uenced by the number of times used, operation
and storage procedures, and age, and will deteriorate accordingly. We suggest that you have your
blood pressure monitor checked every 2 years. This operation may only be performed by the manu-
facturer or by fi rms authorized by the manufacturer.
The carrying case may be used for securely storing the product.
Do not store or leave the product for a long time in places like the following.Doing so could cause a
failure or deterioration of the product.
- Location subject to direct sunlight
- Location with large diff erences in temperature and location with high temperatures and humidity
- Location with a lot of dust or lint
- Chest of drawers or other furniture containing mothballs
Be sure to turn off the power of the blood pressure monitor before removing the batteries. Otherwise,
a failure may occur.
Do not infl ate the cuff when it is not wrapped around a wrist. Deformation or a failure may occur.
Do not expose the product to moisture since it is not water resistant.
Do not dirty the product and protect it from dust. You can use a dry soft cloth to clean the instrument.
Contact of the product and its parts with water, solvents, alcohol, gasoline is not allowed.
Protect the cuff from sharp objects, and do not try to stretch it.
Keep the product out of strong shocks, do not throw it.
The product does not contain controls for setting the measurement accuracy. Opening the electronic
block by non-professionals is prohibited. If necessary, carry out repairs only with specialized contractors.
After the expiration of the specifi ed service life, it is necessary to periodically contact specialists
(specialized repair organizations) to check the instrument’s technical condition.
Follow the current local regulations during disposal. The manufacturer has not established any special
disposal conditions for this product.
Keep the instrument clean. Check that the product is not dirty after use. If the surfaces of the blood
pressure monitor main unit are dirty, thoroughly wipe the surfaces using a cloth dampened with luke-
warm water or soapy water and then wipe the surfaces with a soft dry cloth. Never use benzine, thinner,
gasoline, alcohol, or other solvents as they could cause damage to the product. For dirt on the cuff , remove
the dirt by using a neutral detergent and gently patting the surfaces. Do not use a washing machine or rub
on the cuff . If there is a problem with dirt on the cuff from the perspective of hygiene, ask your dealer or
the manufacturer to replace the cuff (a fee will be charged).
Stop using the product immediately and contact your dealer or manufacturer if you notice any visible
damage to the device.
Do not press the display; do not lay the product with the display down.
The instrument contains small parts. Children or pets can swallow a small part, so the product should
be kept out of the reach of children and pets.
This product is not intended for self-use by untrained persons in public places.
14. SPECIFICATIONS
Method of measurement Oscillometric
Indicator 15-digit LCD
Pressure indicating range:
pressure in the cuff , mmHg 0-300
Measuring range:
pressure in the cuff , mmHg
pulse rate, bpm
50-250 (systolic), 40-180 (diastolic)
30-199
Accuracy*:
pressure in the cuff , mmHg
pulse rate,%
±3
±5
Infl ation Automatic (air pump, Measurement on infl ation algorithm)
Exhaust Automatic (exhaust valve)
Power supply voltage, V 3
Power supply type 2 AAA cells (LR03)
Memory 2 memory banks, 60 results in each (pressure, pulse, date, time) + average
values
Operating conditions
temperature, °C
relative humidity, % Rh
10 to 40
15 - 85
Storage conditions
temperature, °C
relative humidity, % Rh
from minus 20 to 60
10 - 95
Coverage wrist circumference Adult (for wrist circumference 12.5-22.5 cm)
Overall dimensions:
Size (without cuff ), mm
Weight (without packaging, case and
batteries), g
64,0 х 88,0 х 26,4
~100
Year of manufacture: The year of manufacture is indicated on the product housing (in the battery
compartment) in the device serial number after the “SN” symbols
Protection class IP IP20: Protected against solid foreign particles with a diameter of more than
12.5 mm, no protection against water.
Protection against electric shock Internally powered equipment, Type BF applied part (cuff )
Mode of operation continuous operation
Classifi cation internally powered equipment
Expected service life 5 years
This instrument meets the requirements of EN1060-1:1995+A2:2009 Non-invasive sphygmomanometers,
Part 1: General requirements, EN1060-3:1997+A2:2009 Non-invasive sphygmomanometers, Part 3:
Additional requirements for an electromechanical blood pressure measurement system. The production is
certifi ed according to international standards ISO 9001, ISO 13485, ISO 14001. The instrument meets the
requirements of international standards IEC 60601-1:2005+A1:2012, IEC 60601-1-2:2014.
* The error value is declared for the measured values within the measuring range.
* The instrument’s accuracy of measurement has been confi rmed according to ISO 81060-2 protocol.
In the clinical study, K5 was used for the determination of diastolic pressure values at all auscultatory
measurements.
* This instrument is intended for use in the environment with one atmospheric pressure.
EN
INSTRUCTION MANUAL FOR DIGITAL BLOOD PRESSURE MONITOR WS-C2
PL
INSTRUKCJA OBSŁUGI CIŚNIENIOMIERZA CYFROWEGO WS-C2
WS-C2
PARTS AND COMPONENTS
PODSTAWOWE CZĘŚCI I KOMPONENTY
BATTERY INSTALLATION
INSTALACJA BATERII
Fig.2
Rys.2
Fig.3
Rys.3
Fig.4
Rys.4
SETTING OF DATE AND TIME
USTAWIANIE DATY I GODZINY
YEAR MONTH DAY HOUR MINUTE
Fig.5
Rys.5
CORRECT POSITION DURING MEASUREMENT
PRAWIDŁOWE POZYCJE W TRAKCIE POMIARU
Fig.6
Rys.6
Fig.7
Rys.7
Fig.8
Rys.8
MEASUREMENT PROCEDURE
PROCEDURA POMIARU
5-10 mm
Fig.9
Rys.9
Fig.10
Rys.10
Fig.11
Rys.11
Time
Czas
Systolic
Skurczowe
Diastolic
Rozkurczowe
Pulse rate
Tętno
WHO classication indicator
Wskazania wg. skali WHO
Fig.12
Rys.12
Fig.13
Rys.13
SYMBOLS ON THE LCD DISPLAY
WSKAŹNIKI NA WYŚWIETLACZU LCD
Fig.18
Rys.18
Fig.17
Rys.17
Normal pulse
Normalne tętno
Pulse with arrhythmia
Tętno z arytmią
Average mark
Wskaźnik średniej
Number of averaged
measurement results
Liczba uśrednionych
wyników pomiarów
Fig.14
Rys.14
Morning average mark
Wskaźnik średniej
wartości porannej
Fig.15
Rys.15
Evening average mark
Wskaźnik średniej
wartości wieczornej
Fig.16
Rys.16

SYMBOL EXPLANATION:
Indicates requirements that, if not
followed, could result in injury or
damage to the product
Indicates necessary actions that must
be strictly followed to ensure safe
operation
Important: Read the instructions
Compliance with Directive 93/42/EEC
Manufacturer
Type BF product
Follow the current local regulations during
disposal
Keep away from moisture
Serial number
40 Conditions for storage, transportation,
and use
Representative in the European Union
Specifi cations are subject to change without notice due to performance improvements. The revision date
of this Operation Manual is shown on the last page as EXXX/YYMM/NN, where YY is the year, MM is the
month, and NN is the revision number.
15. INFORMATION ON THE MANUFACTURER AND DISTRIBUTORS
Manufacturer: NIHON SEIMITSU SOKKI CO., LTD.
2508-13 Nakago Shibukawa Gunma 377-0293 Japan
EC-Representative: MDSS GmbH
Schiff graben 41, 30175 Hannover, Germany
Quality claims and wishes can be sent to:
Little Doctor Europe Sp. z o.o.
57G Zawila Street, 30-390, Krakow, Poland
Tel.: +48 (12) 268-47-46, (12) 268-47-47. Fax: +48 (12) 268-47-53
E-mail: biuro@littledoctor.pl
website: www.nissei.pl
16. TECHNICAL DESCRIPTION FOR ELECTROMAGNETIC DISTURBANCES
WS-C2 complies with the Electromagnetic Disturbances standard, IEC60601-1-2:2014.
As a medical electrical equipment, special precautions regarding the electromagnetic disturbances shall
be taken at usage of the device according to the information provided below.
The device is not intended for use in environments where the intensity of electromagnetic
disturbance is high, such as near active HF surgical equipment and MRI (magnetic resonance imaging)
equipment etc.
Use of the device adjacent to or stacked with other equipment must be avoided because it could
result in improper operation.
Use of accessories other than those specifi ed or provided by the manufacturer could result in
increased electromagnetic emissions or decreased electromagnetic immunity of the device and result in
improper operation.
Portable RF communications equipment (including peripherals such as antenna cables and external
antennas) should be used at least 30cm away from any part of the device. Otherwise, degradation of the
performance of this equipment could result.
Please contact your dealer or the manufacturer for specifi c information regarding the compliance to the
standard.
PL
1. CZĘŚCI I KOMPONENTY URZĄDZENIA (Rys.1)
1. Blok elektroniczny 6. Przycisk M2 (PAMIĘĆ 2)
2. Wyświetlacz LCD 7. Przycisk START/STOP (START/STOP)
3. Komora baterii 8. Baterie
4. Mankiet 9. Instrukcja obsługi
5. Przycisk M1 (PAMIĘĆ 1) 10. Etui do przechowywania
2. PRZEZNACZENIE I OPIS OGÓLNY
2.1 Przeznaczenie
Urządzenie przeznaczone jest do pomiaru skurczowego i rozkurczowego ciśnienia tętniczego krwi oraz
pulsu u pacjentów w wieku od 15 lat wzwyż. W celu dokonania pomiaru należy umieścić mankiet
urządzenia na nadgarstku. Mankiet przystosowany jest do nadgarstka o obwodzie od 12,5 do 22,5 cm.
Zakres pomiarowy ciśnienia: od 50 do 250 mmHg dla ciśnienia skurczowego i od 40 do 180 dla ciśnienia
rozkurczowego, zakres tętna wynosi od 40 do 160 uderzeń na minutę.
Urządzenie nie jest przeznaczone dla noworodków i niemowląt. Nie ustalono również efektów działania
urządzenia użytkowanego w czasie ciąży (w tym w stanie przedrzucawkowym), ponieważ nie zwery-
fi kowano dokładności pomiarów. Pacjenci, którzy należą do podanej wyżej grupy, przed rozpoczęciem
korzystania z danego urządzenia powinni skonsultować się z lekarzem. Urządzenie nie jest przeznaczone
do użytku podczas profesjonalnego transportu pacjenta poza placówką medyczną.
2.2 Zasada działania
Urządzenie wykorzystuje oscylometryczną metodę pomiaru ciśnienia.Mankiet, połączony z blokiem
elektronicznym, należy owinąć wokół nadgarstka. Po naciśnięciu przycisku START / STOP urządzenie
rozpoczyna automatyczne pompowanie mankietu i dokonuje pomiaru ciśnienia krwi. Czujnik wychwytuje
delikatne zmiany ciśnienia w mankiecie, powstające w wyniku rozszerzania się i kurczenia tętnic w
odpowiedzi na każde uderzenie serca. Po analizie danych uzyskanych za pomocą algorytmu oprogramo-
wania, obliczane jest ciśnienie krwi i tętno, a wyniki te pojawiają się na wyświetlaczu w postaci wartości
liczbowych. Urządzenie posiada 2 bloki pamięci po 60 komórek każdy z funkcją wyliczania średniej
wartości do analizy danych uzyskanych w różnych porach dnia.
2.3 Nowe technologie NISSEI
TM HiRS™ (skanowanie o wysokiej rozdzielczości) to bardzo dokładny system pomiaru interwału
fali tętna, który podczas pomiaru zbiera 6 razy więcej danych w porównaniu do poprzednich
produktów NISSEI. Ten system umożliwia bardziej dokładne wykrycie nieregularnych odstępów
pomiędzy falami tętna.
Zaburzone tętno* – dwa symbole jednocześnie; oznacza to, że wpływ na wynik
pomiaru ciśnienia jest większy z powodu występującego poważnego zaburzenia tętna.
Wskaźnik nieregularnego tętna* – funkcja, pokazująca, że nie ma możliwości należytego
wykrycia fal tętna podczas pomiaru ciśnienia z powodu wystąpienia nieregularnego tętna.
Mankiet M-Cuff – unikatowy kształt mankietu, opracowany i opatentowany przez fi rme NISSEI.
Mankiet w kształcie „M” niezawodnie wychwytuje fale ciśnienia z dwóch tętnic jednocześnie.
Pomiar podczas pompowania (Measurement on infl ation) – technologia umożliwiająca
określenie wartości ciśnienia podczas pompowania mankietu
Wykrywanie zakłóceń – wskaźnik, informujący o zakłóceniach zewnętrznych, które mogły
wpłynąć na poprawność wyniku.
Wartość tętna – wskaźnik wysokiego ciśnienia tętna.
*WAŻNE! To urządzenie nie jest przeznaczone do diagnozowania chorób. DIAGNOSTYKĘ I JAKIEKOLWIEK
LECZENIE MOŻE PROWADZIĆ TYLKO LEKARZ NA PODSTAWIE WYNIKÓW POMIARÓW CIŚNIENIA TĘTNICZEGO,
KTÓRE SAM UZYSKA.
3. ŚRODKI OSTROŻNOŚCI I PRZECIWWSKAZANIA
WAŻNE!
Nie należy używać tego urządzenia w przypadku niemowląt, małych dzieci lub osób niezdolnych do
samodzielnych działań. Może to grozić urazem, bądź też doprowadzić do wypadku.
Nie należy wnosić tego urządzenia do gabinetu MRI, by korzystać z niego podczas przeprowadzania
badania MRI. System MRI może przyciągnąć urządzenie do siebie, spowodować oparzenia lub inne
problemy.
Nie należy używać urządzenia w warunkach o wysokim stężeniu tlenu lub w atmosferze o wysokim
stężeniu tlenu, na przykład w pobliżu łatwopalnego gazu, takiego jak gaz anestetyczny, w komorze
ciśnieniowej z tlenem, w komorze hiperbarycznej do terapii tlenowej lub w namiocie tlenowym.
W przypadku samodzielnego wykonywania pomiarów ciśnienia, nie należy w oparciu o nie stawiać
sobie diagnozy lub podejmować leczenie bez uprzedniej konsultacji z lekarzem. Należy mierzyć ciśnienie
krwi oraz przyjmować leki zgodnie z zaleceniami lekarza.
Nie należy zakładać mankietu na rękę, na której jest uraz lub rana otwarta.
Nie należy zakładać mankietu na rękę, na której przeprowadzane są wlewy dożylne lub transfuzja
krwi. Może to grozić urazem, bądź też doprowadzić do wypadku.
Prosimy nie używać tego sprzętu po zakończeniu okresu eksploatacji. Uzyskanie prawidłowych
wyników pomiaru ciśnienia nie jest gwarantowane. Okres eksploatacji tego produktu wynosi 5 lat.
Nie należy korzystać z urządzenia w punktach medycznych ani w miejscach publicznych, w których
urządzenie będzie użytkowane przez dużą liczbę osób.
W przypadku dializ, stosowania leków przeciwzakrzepowych, przeciwpłytkowych lub sterydów, w
kwestii pomiaru ciśnienia tętniczego należy uprzednio skonsultować się z lekarzem. Używanie urządzenia
w takich przypadkach może spowodować krwawienie wewnętrzne.
Prosimy nie używać tego urządzenia w pobliżu innych sprzętów, generujących fale elektromagnetycz-
ne (takie jak mikrofalówka, płyta indukcyjna) i w pobliżu urządzeń, generujących fale radiowe (telefon
komórkowy, stacja bazowa PHS itd.). Możliwe są zakłócenia pracy urządzenia.
Nie należy używać tego urządzenia do innych celów niż do pomiaru ciśnienia krwi.
Nie należy używać tego urządzenia do pomiaru ciśnienia krwi u pacjentów przewożonych w nagłych
wypadkach. Może dojść do uszkodzenia lub awarii urządzenia.
Nie należy zezwalać dzieciom na samodzielne korzystanie z urządzenia. Urządzenie przechowywać
poza zasięgiem dzieci.
Osoby, u których wystąpił którykolwiek z poniższych stanów lub objawów lub które przeszły którykol-
wiek z poniższych zabiegów lub operacji, przed użyciem danego urządzenia powinny skonsultować się z
lekarzem:
• ciąża, w tym stan przedrzucawkowy • cukrzyca • choroba wątroby • stwardnienie tętnic• nadciśnienie•
arytmia • mastektomia • intubacja dotchawicza • leczenie wewnątrznaczyniowe • przeciek tętniczo-żylny •
oczyszczanie węzłów chłonnych.
Należy używać tylko akcesoriów wskazanych przez producenta. Stosowanie innych akcesoriów
doprowadzi do nieprawidłowego działania urządzenia.
Należy najpierw zmierzyć obwód nadgarstka, a następnie sprawdzić, czy wartość pomiaru mieści się
w dopuszczalnym zakresie wielkości mankietu. Używanie urządzenia w przypadku wymiarów nadgarstka,
wykraczających poza zakres rozmiaru mankietu będzie przyczyną błędnych pomiarów.
Nie upuszczaj i unikaj silnych wstrząsów. Możliwe są zakłócenia pracy urządzenia.
Należy prawidłowo założyć mankiet i trzymać go na wysokości serca podczas pomiaru. Nieprawidło-
we założenie mankietu lub niewłaściwe ustawienie ręki spowoduje błędy pomiaru.
Należy zwróć uwagę na następujące elementy, które mogą wpływać na poziom ciśnienia krwi:
• pora dnia i roku • leki stosowane w leczeniu nadciśnienia i innych schorzeń • jedzenie i napoje (w tym
alkohol) • palenie papierosów • ruch ciała • stres • kąpiel • potrzeba skorzystania z toalety • rozmowy •
inne warunki środowiskowe (np. badanie lekarskie w szpitalu) • pozycja pomiarowa (w tym wysokość
mankietu w stosunku do serca).
W przypadku nieprawidłowego pompowania naciśnij przycisk START / STOP w celu zatrzymania pomia-
ru. Po naciśnięciu przycisku START / STOP podczas pomiaru powietrze jest szybko odprowadzane z mankietu
i pomiar się zatrzymuje.
Pomiarów nie należy wykonywać częściej niż to konieczne.
Po dotknięciu styków baterii podczas ich wymiany, nie należy dotykać innych osób.
Nie instalować jednocześnie baterii różnych typów oraz starych i nowych baterii. Urządzenie może
działać nieprawidłowo, na przykład z powodu wydzielania ciepła.
Jeśli nie zamierzasz korzystać z urządzenia przez dłuższy czas, wyjmij z niego baterie. Jeśli baterie
pozostaną w środku na dłuższy czas, ciecz znajdująca się w środku baterii może się wylać i uszkodzić
urządzenie.
Nie należy demontować, naprawiać ani modyfi kować urządzenia. Może dojść do awarii urządzenia.
Zawsze przestrzegaj krajowych przepisów w zakresie utylizacji urządzeń i baterii.
Jeśli urządzenie nie działa lub jest wadliwe, należy natychmiast zaprzestać jego używania i skontak-
tować się ze specjalistycznym centrum serwisowym.
System nie gwarantuje precyzyjnego pomiaru w przypadku użytkowania lub przechowywania
urządzenia w temperaturze lub wilgotności, przekraczającej dopuszczalne zakresy, określone w rozdziale
“14. SPECYFIKACJA TECHNICZNA” niniejszej Instrukcji.
Urządzenie zawiera małe części i elementy, które mogłyby zostać połknięte przez dziecko lub zwierzę-
ta domowe. Aby uniknąć takiego zagrożenia, zawsze należy trzymać urządzenie poza ich zasięgiem.
4. ZAWARTOŚĆ OPAKOWANIA
Zestaw zawiera:
- blok elektroniczny z mankietem – 1 szt.
- baterie - 2 szt.
- etui do przechowywania - 1 szt.
- Instrukcja obsługi z kartą gwarancyjną - 1 szt.
- opakowanie – 1 szt.
Otwórz etui, ostrożnie naciskając na wklęsłą część z boku (Rysunek 1).
5. ZALECENIA DOTYCZĄCE PRAWIDŁOWEGO POMIARU
WAŻNE!
Aby prawidłowo dokonać pomiaru, należy pamiętać, że CIŚNIENIE TĘTNICZE PODLEGA GWAŁTOWNYM
WAHANIOM NAWET W KRÓTKICH ODSTĘPACH CZASOWYCH. Wysokość ciśnienia tętniczego zależy od wielu
czynników. Zazwyczaj jest ono niższe latem, a wyższe zimą. Ciśnienie tętnicze zmienia się wraz z ciśnie-
niem atmosferycznym, a na jego wartość wpływa również wysiłek fi zyczny, pobudliwość emocjonalna,
stres i dieta. Duży wpływ mają również przyjmowane leki, napoje alkoholowe oraz palenie papierosów.
W przypadku wielu osób nawet sam proces pomiaru ciśnienia w punktach medycznych powoduje
podwyższenie jego wartości. W związku z tym ciśnienie tętnicze mierzone w warunkach domowych często
różni się od ciśnienia mierzonego w punktach medycznych. W związku z tym, że w niskich temperaturach
ciśnienie krwi podnosi się, należy dokonywać pomiarów w temperaturze pokojowej (ok. 20°C). Jeśli
urządzenie było przechowywane w niskiej temperaturze, przed użyciem należy je przez co najmniej 1
godzinę przetrzymać w temperaturze pokojowej, w przeciwnym razie wynik pomiaru może być błędny. W
ciągu doby różnica między wynikami u osoby dorosłej może wynosić 30 - 50 mmHg w przypadku ciśnienia
skurczowego (górnego) i do 10 mmHg w przypadku ciśnienia rozkurczowego (dolnego). Wahania ciśnienia
u różnych osób mogą mieć różne podstawy. Z uwagi na to zaleca się prowadzenie dzienniczka pomiarów
ciśnienia krwi. NA POSTAWIE DANYCH Z DZIENNICZKA TYLKO LEKARZ MOŻE PRZEANALIZOWAĆ TENDENCJE
ZMIAN CIŚNIENIA TĘTNICZEGO PACJENTA.
Osoby cierpiące na choroby układu sercowo-naczyniowego i szereg innych, w przypadku których
konieczne jest monitorowanie ciśnienia tętniczego, powinny dokonywać pomiarów w godzinach
wskazanych przez lekarza prowadzącego.NALEŻY PRZY TYM PAMIĘTAĆ, ŻE DIAGNOSTYKĘ I JAKIEKOLWIEK
LECZENIE NADCIŚNIENIA MOŻE PROWADZIĆ TYLKO LEKARZ NA PODSTAWIE WYNIKÓW POMIARÓW CIŚNIE-
NIA TĘTNICZEGO, KTÓRE SAM UZYSKAŁ. ZMIANY DOTYCZĄCE PRZYJMOWANIA LUB DAWKOWANIA LEKÓW
MOGĄ ZOSTAĆ WPROWADZONE WYŁĄCZNIE ZA ZGODĄ LEKARZA.
W przypadku takich zaburzeń jak głębokie stwardnienie naczyń czy słaby puls, a także u pacjentów
z wyraźnymi zaburzeniami rytmu serca prawidłowe wykonanie pomiaru ciśnienia tętniczego może być
utrudnione. W TAKICH PRZYPADKACH NALEŻY SKONSULTOWAĆ SIĘ Z LEKARZEM W CELU OKREŚLENIA
NAJLEPSZEJ METODY POMIARU.
ABY UZYSKAĆ PRAWIDŁOWE WYNIKI POMIARU CIŚNIENIA TĘTNICZEGO PRZY WYKORZYSTANIU
URZĄDZENIA ELEKTRONICZNEGO, W TRAKCIE POMIARU NALEŻY ZACHOWAĆ CISZĘ. Pomiar powinien być
przeprowadzony w spokojnych, komfortowych warunkach, w temperaturze pokojowej. Bezpośrednio
przed pomiarem należy powstrzymać się od palenia papierosów, picia napojów gazowanych i alkoholu.
Dokładność pomiaru ciśnienia krwi zależy od dopasowania mankietu urządzenia do wymiarów ręki.
MANKIET NIE POWINIEN BYĆ ANI ZA MAŁY ANI ZA DUŻY.
Powtórnego pomiaru można dokonać po upływie co najmniej 1 minut, aby przywrócić krążenie krwi.
Aby dokładnie określić wartość ciśnienia tętniczego, zaleca się przeprowadzanie serii składających się z 3
kolejnych pomiarów i obliczanie średniej z uzyskiwanych wyników. Przed pomiarem należy skonsultować
się z lekarzem.
6. INSTALACJA BATERII
1) Zdjąć pokrywę komory baterii (rys. 2), lekko naciskając pokrywę, jak pokazano na rysunku 1 i
przesuwając ją w kierunku strzałki, jak pokazano na rysunku 2.
2) Włożyć dwie baterie typu „AAA” do komory.
Należy upewnić się, że polaryzacja jest prawidłowa, tj. odpowiada oznaczeniom (+) i (-)
wskazanym wewnątrz komory (rys. 3). Baterie można łatwo włożyć, naciskając końcówką “-” na
sprężynę. Po prawidłowym włożeniu baterii na wyświetlaczu pojawi się M1.
3) Zamknąć pokrywę komory (rys.4).
Wskaźnik wymiany baterii
Wszystkie baterie należy wymienić, kiedy w czasie pomiaru na wyświetlaczu miga wskaźnik
wymiany baterii. Migający wskaźnik wymiany baterii oznacza, że poziom naładowania baterii wystarczy
tylko na kilka pomiarów. Jeżeli po włączaniu urządzenia wskaźnik świeci się przez cały czas, pomiar
będzie możliwy dopiero po wymienieniu wszystkich baterii. Wskaźnik nie pokazuje, w jakim stopniu
baterie są rozładowane.
Aby wydłużyć czas pracy urządzenia, należy stosować baterie alkaliczne. Baterie cynkowo-węglowe
wymagają częstszej wymiany. Załączone baterie przeznaczone są do sprawdzania urządzenia podczas
sprzedaży i ich okres eksploatacji może być krótszy w stosunku do nowych. Konieczne jest monitorowanie
żywotności baterii, zwłaszcza jeśli urządzenie jest używane nieregularnie.
Jako że ani urządzenie, ani baterie nie są odpadami, które można utylizować w warunkach
domowych, należy postępować zgodnie z krajowymi/lokalnymi przepisami w zakresie przetwarzania
odpadów i oddawać je w odpowiednie miejsca zajmujące się utylizacją sprzętu elektronicznego.
WAŻNE! Należy używać baterii zalecanych przez producenta. W przypadku użycia nieodpowied-
nich baterii deklarowana wydajność urządzenia może ulec obniżeniu.
7. USTAWIANIE DATY I GODZINY
WAŻNE! Ustawienie daty i godziny gwarantuje zapisanie wyników wraz z prawidłową datą i
godziną danego pomiaru. Korzystanie z urządzenia możliwe jest bez ustawienia daty i godziny.
1) Należy nacisnąć i przytrzymać przycisk M2 przez około 3 sekundy, dopóki na wyświetlaczu nie zacznie
migać wskaźnik roku.
2) Należy ustawić datę i godzinę w następującej kolejności: [Rok], [Miesiąc], [Dzień], [Godzina] i [Minuty
(rys. 5). Naciśnięcie przycisku M1 zwiększa wartość liczbową, naciśnięcie przycisku M2- zmniejsza ją.
Długie przyciśnięcie przycisku M1 lub M2 umożliwia szybkie przewijanie wartości.
3) Aby potwierdzić wybór wartości i przejść do następnego kroku, należy nacisnąć przycisk START /
STOP. Zegar wykorzystuje 24-godzinny format czasu. Po potwierdzeniu wartości [Minuty], godzina i
data zostaną ustawione, a na wyświetlaczu pojawi się aktualna godzina.
4) Aby wyjść z trybu ustawiania daty i godziny, należy nacisnąć i przytrzymać przycisk START / STOP
przez ponad 2 sekundy. Po wyłączeniu wyświetlacz pokazuje aktualną godzinę. Po wymianie baterii data
i godzina pozostają takie same, jak w momencie wyjęcia baterii. Po wymianie baterii należy skorygować
wartości daty i godziny.
WAŻNE! Jeśli data i godzina zostały ustawione, to po wyłączeniu na wyświetlaczu urządzenia
będzie wyświetlona aktualna godzina.
8. PRAWIDŁOWA POZYCJA PRZY POMIARZE CIŚNIENIA
8.1 Pomiar podczas siedzenia przy stole
1) Usiądź wygodnie na krześle, stawiając obie stopy na podłogę. Nie krzyżuj nóg i oprzyj się na oparciu krzesła.
2) Następnie należy podnieś lekko lewą rękę dłonią do góry i położyć łokieć na stole.
3)
Następnie należy umieścić mankiet na wysokości serca, opierając rękę na etui lub złożonym ręczniku (rys. 7).
8.2 Pomiar ciśnienia bez użycia stołu
1) Należy usiąść wygodnie: postawić stopy na podłodze, oprzeć się swobodnie o oparcie krzesła.
2) Należy ustawić mankiet na wysokości serca, ręka ugięta w łokciu, zbliżona klatki piersiowej (rys. 6).
3) W trakcie pomiaru należy lewe przedramię lekko podpierać prawą/wolną ręką.
8.3 Pomiar ciśnienia w pozycji leżącej
1) Należy położyć się na plecach.
2) Mankiet należy umieścić na wysokości serca, używając w tym celu etui lub złożonego ręcznika (rys. 8).
WAŻNE! Wartości ciśnienia mogą się nieznacznie różnić w zależności od pozycji podczas pomi-
aru. Zaleca się wykonywanie pomiaru na tym samym nadgarstku i w tej samej pozycji. Jeśli mankiet
znajduje się wyżej / niżej serca, odczyt może być nieprawidłowy (niższy / wyższy).
9. PROCEDURA POMIARU
9.1 Przygotowanie mankietu
1) Należy ustawić lewą rękę dłonią skierowaną do góry, umieścić mankiet na nadgarstku, tak aby
wyświetlacz urządzenia znajdował się po wewnętrznej stronie dłoni. Jeśli mankietu nie można założyć na
lewy nadgarstek, należy umieścić go na prawym nadgarstku, aby dokonać pomiaru.
2) Należy umieścić urządzenie na środku nadgarstka (rys. 9). Krawędź mankietu powinna znajdować się
5-10 mm od krawędzi dłoni.
3) Należy założyć mankiet na nadgarstek w taki sposób, aby między mankietem a nadgarstkiem nie było
wolnego miejsca. Mankiet nie powinien powodować żadnego dyskomfortu. Ubranie nie może dostać się
pod mankiet. Na rys. 10 podano przykłady nieprawidłowo założonego mankietu
9.2 Procedura pomiaru
Przed pomiarem należy wykonać kilka wdechów i wydechów oraz się rozluźnić. Należy upewnić się, czy
mankiet jest prawidłowo założony i znajduje się na wysokości serca. Podczas pomiaru nie wolno rozmawiać
ani poruszać ramieniem i ręką.
1) Należy nacisnąć START / STOP. Na wyświetlaczu będzie migać „0”, a urządzenie zacznie pompować po-
wietrze do mankietu. Należy pamiętać, że urządzenie wykonuje pomiar podczas pompowania powietrza
do mankietu. W tym czasie pozostać należy w rozluźnionej pozycji, nie ruszać się ani nie mówić. Podczas
pompowania na wyświetlaczu pojawi się symbol kontrolny ułożenia mankietu który wskazuje na
prawidłowe umieszczenie mankietu na nadgarstku.
Wskaźnik ruchu ciała
Jeżeli w trakcie pomiaru pojawi się symbol « », zaleca się powtórzenie pomiaru w celu
uzyskania prawidłowego wyniku. Nie należy się ruszać ani mówić.
W przypadku konieczności przerwania pomiaru, należy nacisnąć przycisk START / STOP, wówczas
urządzenie zatrzyma pompowanie i szybko wypuści powietrze.
2) Symbol «» zacznie migać, gdy tylko czujnik wykryje ciśnienie tętna.
3) Po zakończeniu pomiaru urządzenie wypuszcza powietrze z mankietu, a wynik pomiaru wyświetlany jest
na wyświetlaczu: wartość ciśnienia krwi, tętno, czas pomiaru, klasyfi kacja wyniku według skali WHO (ryc. 11).
Wskaźnik wiarygodności
Symbol ten pojawia się, jeśli przestrzegano wszystkich elementów decydujących o prawidłowości
procesu pomiaru - prawidłowe założenie mankietu, brak ruchu i zakłóceń w czasie pomiaru.
Jeśli urządzenie nie zostanie wyłączone przez użytkownika, automatycznie wyłączy się po 3 minutach.
WAŻNE! Nie należy dokonywać kilku pomiarów pod rząd. Może to spowodować drętwienie ręki i
wpłynąć na wyniki pomiarów. Ręka powinna “odpoczywać” co najmniej 3 minuty.
9.3 Wskaźniki na wyświetlaczu LCD
Wskaźnik arytmii. Wskaźnik informuje, że podczas pomiaru ciśnienia nie wykryto w sposób
prawidłowy fal tętna z powodu nieregularnego tętna (Rysunek 12). Zrób pomiar jeszcze raz na
spokojnie, gdyż wynik pomiaru ciśnienia mógł nie być dokładny. Jeśli symbol wyświetla się
ponownie, a byłeś wyciszony i spokojny, skonsultuj się z lekarzem, gdyż zaburzenie tętna może trwale
zaburzać wynik pomiaru ciśnienia.
Dwa symbole wyświetlane są razem, gdy wpływ zaburzenia tętna na wyniki pomiaru
ciśnienia jest bardzo wysoki.
Nieregularne tętno może być spowodowane przez różne czynniki: np. przez rozmowę lub ruch, oddech lub
stan zdrowia itd. Jednym ze stanów, powodujących zaburzenie tętna, jest zaburzenie rytmu serca. Istnieją
różne rodzaje zaburzenia rytmu serca, takie jak przedwczesne skurcze i migotanie przedsionków (AFIB).
Zaburzenie tętna spowodowane migotaniem przedsionków jest bardziej poważne.
Wskaźnik ciśnienia tętna.Wskaźnik jest wyświetlany, jeśli różnica między wartościami ciśnienia
skurczowego i rozkurczowego jest większa niż 65 mm Hg. Uważa się, że wartość odbiegająca od
normy jest ściśle związana z miażdżycą tętnic i może stanowić jeden z czynników ryzyka chorób
układu sercowo-naczyniowego. Za normę przyjmuje się ciśnienie tętna około 45 mm Hg. Istnieje
tendencja do zwiększania się tej wartości wraz z wiekiem. Nie należy samodzielnie interpretować
wyników, w tym celu zaleca się konsultację z lekarzem.
Wskaźnik wartości pomiarów według skali WHO
Oprócz wartości liczbowej ciśnienia wynik wyświetla się również w postali skali grafi cznej z 6 - stopnio-
wym podziałem znajdującym się po lewej stronie wyświetlacza (rys. 13). Skala WHO - to trójkolorowa
skala klasyfi kacji uzyskanego wyniku pomiaru ciśnienia tętniczego zgodnie z zaleceniami Światowej Or-
ganizacji Zdrowia. Skala pozwala na ocenę uzyskanych wyników pomiaru zgodnie z klasyfi kacją: ciśnienie
normalne, podwyższone lub jeden ze stopni nadciśnienia.
Tabela wyników wg skali WHO
Wskaźnik Klasyfi kacja WHO SYS DIA
Nadciśnienie 3. stopnia (ciężkie) ≥180 ≥110
Nadciśnienie 2. stopnia (umiarkowane) 160-179 100-109
Nadciśnienie 1. stopnia (łagodne) 140-159 90-99
Podwyższone prawidłowe 130-139 85-89
Prawidłowe 120-129 80-84
Optymalne <120 <80
10. FUNKCJA PAMIĘCI
10.1 Zapisywanie wyników
Wyniki pomiaru są zapisywane w pamięci M1 lub M2. W każdym bloku można zapisać do 60 wyników
pomiarów i kilka wartości średnich. Funkcja obliczania średniej wartości - wskazuje na średnią wartość z
nie więcej niż 3 pomiarów wykonanych w ciągu ostatnich 10 minut, jest aktywna wyłącznie po ustawieniu
daty i godziny. W przypadku wystąpienia błędu pomiaru (ERR) – wyniki nie są zapisywane.
10.2 Wybór bloku pamięci
Aby wybrać blok pamięci, należy nacisnąć przycisk M1 lub M2. Wybrany blok zostanie oznaczony na
ekranie symbolem M1 lub M2. Blok pamięci można wybrać zarówno przed pomiarem, jak i po nim - zanim
urządzenie wyłączy się lub rozpocznie nowy pomiar.
10.3 Przeglądanie średniej wartości
Należy nacisnąć przycisk wybranego bloku pamięci (M1 lub M2). Na ekranie wyświetli się średnia wartość
oznaczona wskaźnikiem A (rys. 14). Wartość średnią oblicza się na podstawie wyników pomiarów wyko-
nanych w ciągu ostatnich 10 minut (do 3 pomiarów). Liczba pomiarów, na podstawie których obliczona
została średnia, jest wyświetlana obok symbolu A.
10.4 Przeglądanie średniej wartości porannej
Należy nacisnąć kilkakrotnie przycisk wybranego bloku pamięci (M1 lub M2), aż do wyświetlenia na
ekranie średniej porannej wartości oznaczonej wskaźnikiem (Rys. 15). Średnia wartość poranna jest
obliczana na podstawie wyników pomiarów (maksymalnie 3 pomiary) wykonanych jako ostatnie w go-
dzinach od 4:00 do 9:59, w ciągu czasu nie dłuższego niż 10 minut. Jeśli w tym czasie nie było ani jednego
pomiaru, średnia poranna nie zostanie wyświetlona.
10.5 Przeglądanie średniej wartości wieczornej
Należy kilkakrotnie nacisnąć przycisk wybranego bloku pamięci (M1 lub M2), aż na ekranie pojawi się
średnia wartość wieczorna oznaczona wskaźnikiem (Rys. 16). Średnia wartość wieczorna jest obliczana
na podstawie wyników pomiarów (maksymalnie 3 pomiary) wykonanych jako ostatnie w godzinach
od 19: 00 do 1:59, w ciągu okresu nie dłuższego niż 10 minut. Jeśli w tym czasie nie było ani jednego
pomiaru, średnia wieczorna nie zostanie wyświetlona.
10.6 Wyświetlanie zapisanych wyników
Naciśnij przycisk wybranej pamięci (M1 lub M2) jeszcze raz, aby wyświetlić zapisany wynik, oznaczony nu-
merem 1 (Rysunek 17). Urządzenie na przemian wyświetla numer, datę i czas pomiaru w lewym górnym
rogu wyświetlacza. Wynik oznaczony numerem 1 jest ostatnim zapisanym wynikiem w wybranej pamięci.
Każde kolejne wciśnięcie przycisku M1 lub M2 wyświetla poprzedni wynik pomiaru.
10.7 Usuwanie zapisanych danych
Aby wyczyścić cały blok pamięci M1 (lub M2), należy:
- Naciskając przycisk M1 (lub M2), wybrać średnią wartość, która będzie oznaczona wskaźnikiem A.
- Nacisnąć i przytrzymać przycisk М1 przez ponad 4 sekundy, aż cyfry na wyświetlaczu zaczną migać,
a następnie znikną (rys. 18).
Aby wyczyścić jedną komórkę pamięci należy:
- Po naciśnięciu przycisku M1 (lub M2) wybrać komórkę pamięci, która ma być wyczyszczona.
- Należy nacisnąć i przytrzymać przycisk M1 przez ponad 4 sekundy, aż cyfry na wyświetlaczu zaczną
migać, a następnie znikną.
11. ZAWIADOMIENIA O BŁĘDACH I SPOSOBACH ICH WYELIMINOWANIA
SYMBOL MOŻLIWA PRZYCZYNA SPOSÓB WYELIMINOWANIA
Ciśnienie tętnicze jest
zbyt wysokie lub zbyt
niskie.
Mankiet nie znajduje się na wysokości
serca.
Mankiet jest nieprawidłowo założony.
Mankiet został założony na ubranie.
Rozmowa lub poruszanie się podczas
pomiaru.
Należy umieścić mankiet na wysokości serca.
Należy sprawdzić ułożenie mankietu na ręku.
Należy upewnić się, czy odzież nie dostała
się pod mankiet.
W czasie pomiaru należy zachować ciszę
i spokój.
Wyniki pomiarów
za każdym razem są
różne.
Wpływ na pomiar warunków
zewnętrznych, stanu fi zycznego lub
psychicznego.
Należy dokonywać pomiarów w takich
samych warunkach.
Wyniki pomiarów
dokonanych w domu
różnią się od tych
dokonanych w szpitalu.
Stres związany z pomiarem w szpitalu lub
rozluźnienie podczas pomiaru w domu.
Należy skonsultować wyniki pomiarów
dokonanych w domu z lekarzem.
Na wyświetlaczu nie
ma wskaźnika czasu.
Zegar nie został ustawiony.
Brak baterii.
Należy ustawić datę i godzinę.
Należy zainstalować baterie.
Nic się nie wyświetla. Rozładowały się baterie.
Baterie zostały nieprawidłowo włożone.
Złącza stykowe baterii są zanieczyszczone.
Należy wymienić wszystkie baterie na nowe.
Baterie należy włożyć prawidłowo.
Należy przetrzeć styki suchą tkaniną.
Wskaźnik M1 lub
M2 nie znika.
Napis „M1” i „M2” pojawia się na
wyświetlaczu urządzenia nawet wtedy,
gdy zasilanie jest wyłączone.
To nie jest błąd, nadal korzystaj z urządzenia.
Wskaźnik godziny nie
znika.
Po ustawieniu daty i godziny na
wyświetlaczu urządzenia pojawia się
zegar nawet wtedy, gdy zasilanie jest
wyłączone.
Po ustawieniu zegara godzina jest
wyświetlana nawet przy wyłączonym
zasilaniu. To nie jest błąd, nadal korzystaj z
urządzenia.
Poruszanie się lub mówienie podczas
pomiaru.
Odczyt pomiaru wychodzi poza zakres
pomiarowy.
W czasie pomiaru nie należy się ruszać i
rozmawiać.
Skonsultuj się z lekarzem.
Mankiet jest nieprawidłowo założony.
Mankiet jest uszkodzony.
Należy prawidłowo założyć mankiet i
powtórzyć pomiar.
Jeśli błąd Err-2 będzie się powtarzać oznacza
to, że mankiet jest uszkodzony. Należy
skontaktować się z centrum serwisowym.
Mankiet został napompowany do pełna,
bo ruszałeś ręką lub rozmawiałeś podczas
pomiaru.
W czasie pomiaru nie należy się ruszać i
rozmawiać.
Rozładowały się baterie. Należy wymienić wszystkie baterie na nowe.
Wyświetla się „0”
Podczas wkładania baterii wcisnąłeś
przycisk START / STOP.
Naciśnij START / STOP, aby wyłączyć
zasilanie.
Jeżeli pomimo wskazanych powyżej zaleceń nie można uzyskać prawidłowych wyników pomiarów, należy
zaprzestać korzystania z urządzenia i skonsultować się z producentem lub autoryzowanym przedstawicie-
lem, którego dane kontaktowe podano w rozdziale „15. INFORMACJE O PRODUCENCIE I DYSTRYBUTORACH
”niniejszej Instrukcji. Nie należy samodzielnie podejmować prób naprawienia mechanizmu wewnętrznego
urządzenia.
12. WARUNKI GWARANCJI
Producent gwarantuje prawidłowość funkcjonowania urządzenia pod warunkiem przestrzegania
przez użytkownika warunków eksploatacji, transportu i przechowywania w czasie okresu gwarancji, tj. w
ciągu 5 lat od daty sprzedaży. Okres gwarancji na mankiet wynosi 12 miesięcy od daty sprzedaży.
Warunki gwarancji określone są w karcie gwarancyjnej wydawanej podczas zakupu urządzenia. Gwaran-
cja obowiązuje pod warunkiem, że kupujący nie otwierał jednostki elektronicznej i nie uszkodził jej.
Adresy punktów obsługi gwarancyjnej podano w rozdziale “15. INFORMACJE O PRODUCENCIE I
DYSTRYBUTORACH” niniejszej Instrukcji oraz na stronie internetowej www.nissei.pl.
13. KONSERWACJA, PRZECHOWYWANIE, NAPRAWA I UTYLIZACJA
WAŻNE!
Na pracę ciśnieniomierza wpływa liczba pomiarów, ostrożność podczas użytkowania i przechowy-
wania oraz czas pracy ciśnieniomierza. Z czasem jakość pracy ciśnieniomierza może sie pogorszyć.
Zalecamy sprawdzanie ciśnieniomierza co 2 lata. Urządzenie może sprawdzić tylko producent lub
fi rmy, wskazane przez producenta.
Do przechowywania urządzenia można użyć etui podróżnego.
Aby uniknąć usterek i uszkodzeń, nie przechowuj i nie zostawiaj urządzenia w następujących miej-
scach:
– Pod bezpośrednim wpływem promieni słońca
– W miejscach o ostrym wahaniu temperatur, o wysokiej temperaturze i wilgotności
– W miejscach o dużej ilości kurzu i pobliżu dywanów z długim włosiem
– W komodzie lub innym meblu, w którym trzymasz kulki naftalinowe.
Przed wyjmowaniem baterii wyłącz ciśnieniomierz. W przeciwnym razie uszkodzisz urządzenie.
Nie rozpoczynaj pompowania, jeśli nie masz założonego mankietu. Możliwe jest uszkodzenie mankie-
tu lub ciśnieniomierza.
Urządzenie nie jest wodoszczelne, unikaj kontaktu z wilgocią.
Nie wolno zabrudzać urządzenia, należy je chronić przed kurzem. Do czyszczenia urządzenia należy
użyć suchej miękkiej ściereczki.
Nie dopuszczać do kontaktu urządzenia ani jego części z wodą, rozpuszczalnikami, alkoholem, benzyną.
Nie dopuszczać do kontaktu mankietu z ostrymi przedmiotami, nie próbować rozciągać mankietu.
Nie należy poddawać urządzenia silnym uderzeniom i rzucać nim.
Urządzenie nie zawiera elementów ustawienia dokładności pomiaru. Nie wolno samodzielnie otwierać
bloku elektronicznego. W razie konieczności należy dokonywać napraw jedynie w specjalistycznych punktach
serwisowych.
Utylizację urządzenia należy przeprowadzać według zasad, obowiązujących w danym regionie.
Specjalne warunki utylizacji nie zostały ustalone przez producenta.
Obserwuj stan urządzenia. Upewnij się, że ciśnieniomierz nie został ubrudzony w trakcie użycia. Jeśli
powierzchnia głównej części ciśnieniomierza się ubrudziła, przetrzyj go morką ściereczką, nasiąkniętą
ciepłą lub namydloną wodą, następnie przetrzyj ciśnieniomierz miękką suchą ściereczką. Nie używaj ben-
zyny, rozpuszczalników, spirytusu i innych agresywnych roztworów, gdyż mogą uszkodzić ciśnieniomierz.
Aby wyczyścić mankiet, skorzystaj z neutralnego środka myjącego i ostrożnie poklep po jego powierzchni.
Nie trzyj mankietu i nie pierz go w pralce. Jeśli zabrudzenia mają charakter higieniczny, zwróć się do
dystrybutora lub producenta w celu odpłatnej wymiany mankietu.
Należy natychmiast zaprzestać korzystania z urządzenia i skontaktować się ze sprzedawcą lub
producentem, jeśli widoczne są uszkodzenia urządzenia.
Nie naciskać na wyświetlacz; nie stawiać urządzenia wyświetlaczem w dół.
Urządzenie zawiera małe części. Aby uniknąć zagrożenia połknięcia przez dziecko lub zwierzęta
domowe drobnych części, urządzenie należy zawsze trzymać poza ich zasięgiem.
Urządzenie nie jest przeznaczone do samodzielnego użytku przez nieprzygotowane osoby w miejscach
publicznych.
14. SPECYFIKACJA TECHNICZNA
Metoda pomiaru Metoda oscylometryczna
Wskaźnik 15-cyfrowy wyświetlacz LCD
Zakres wyświetlania:
ciśnienie w mankiecie, mm Hg 0-300
Zakres pomiaru:
ciśnienie w mankiecie, mm Hg
tętno, bpm
50 - 250 (skurczowe), 40 -180 (rozkurczowe)
30-199
Dokładność*:
ciśnienie w mankiecie, mm Hg
tętno, %
±3
±5
Pompowanie Automatyczne (pompa powietrzna, algorytm Measurement on infl ation)
Spuszczanie powietrza Automatyczne (elektrozawór)
Napięcie elektryczne, V 3
Zasilanie 2 baterie typu AAА (LR03)
Pamięć 2 bloki pamięci po 60 wyników każdy (ciśnienie, puls, data, godzina) +
średnia wartość pomiarów
Warunki eksploatacji urządzenia
temperatura, ˚C
wilgotność względna, % Rh
od 10 do 40
15 - 85
Warunki przechowywania
temperatura, ˚C
wilgotność względna, % Rh
od minus 20 do 60
10 - 95
Rozmiar mankietu Dla dorosłych (obwód nadgarstka 12,5-22,5 cm)
Wymiary gabarytowe:
Wymiar (bez mankietu), mm
Waga (bez opakowania, etui i baterii), g
64,0 х 88,0 х 26,4
~100
Rok produkcji: rok produkcji podano na obudowie urządzenia (w komorze na baterie) w
numerze seryjnym, po symbolach «SN»
Stopień ochrony IP IP20: ochrona przed obcymi ciałami stałymi o wielkości ponad 12,5 mm,
brak ochrony przed wnikaniem wody.
Stopień ochrony przed porażeniem
prądem elektrycznym
Urządzenie zasilane wewnętrznie, część robocza (mankiet) typu BF
Tryb pracy nieprzerwany
Klasyfi kacja zasilanie wewnętrzne
Oczekiwany okres eksploatacji 5 lat
Niniejsze urządzenie spełnia wymagania EN1060-1:1995+A2:2009 „Nieinwazyjne ciśnieniomierze, Część
1 – Wymagania ogólne”, EN1060-3:1997+A2:2009 „Nieinwazyjne ciśnieniomierze, Część 3 – Wymagania
dodatkowe dotyczące elektromechanicznych systemów do pomiaru ciśnienia krwi”.
Produkcja urządzeń jest certyfi kowana zgodnie z międzynarodowymi standardami ISO 9001, ISO 13485,
ISO 14001 Urządzenie spełnia wymagania międzynarodowych norm IEC 60601-1: 2005 + A1: 2012, IEC
60601-1-2: 2014.
* Gwarantowana dokładność pomiarów w wyżej określonym zakresie.
* Dokładność pomiaru urządzenia została potwierdzona zgodnie z protokołem ISO 81060-2. W badaniu
klinicznym użyto K5 do określenia wartości ciśnienia rozkurczowego dla wszystkich pomiarów osłucho-
wych.
* To urządzenie jest przeznaczone do użytku w środowisku o takim samym ciśnieniu atmosferycznym.
OPIS SYMBOLI:
Wskazuje na wymagania, których
nieprzestrzeganie może spowodować
obrażenia lub uszkodzenie urządzenia
Wskazuje na obowiązkowe działania,
których należy ściśle przestrzegać, aby
zapewnić bezpieczną pracę
Ważne: Należy zapoznać się z instrukcją
Zgodność z Dyrektywą 93/42/EWG
Producent
Urządzenie typu BF
Utylizację urządzenia należy przeprowadzać
według zasad, obowiązujących w danym
regionie.
Chronić przed wilgocią
Numer seryjny
40 Warunki przechowywania, transportu i
użytkowania
Przedstawiciel w Unii Europejskiej
Charakterystyki techniczne mogą ulec zmianie bez uprzedniego powiadomienia w celu poprawy wydaj-
ności. Data redakcji niniejszej Instrukcji obsługi została podana na ostatniej stronie jako EXXX/YYMM/XX,
gdzie YY - rok, a MM - miesiąc redakcji, a NN to numer redakcji.
15. INFORMACJE O PRODUCENCIE I DYSTRYBUTORACH
Producent: NIHON SEIMITSU SOKKI CO., LTD.
2508-13 Nakago Shibukawa Gunma 377-0293 Japan
EC-Representative: MDSS GmbH
Schiff graben 41, 30175 Hannover, Germany
Reklamacje dotyczące jakości należy kierować na adres:
Little Doctor Europe Sp. z o.o.
57G Zawila Street, 30-390, Krakow, Poland
тел.: +48 (12) 268-47-46, (12) 268-47-47. Fax: +48 (12) 268-47-53
E-mail: biuro@littledoctor.pl
website: www.nissei.pl
16. DANE TECHNICZNE NA TEMAT ZAKŁÓCEŃ ELEKTROMAGNETYCZNYCH
Model WS-C2 jest zgodny ze standardem dotyczącym zakłóceń elektromagnetycznych IEC60601-1-2:2014.
Z uwagi na to, że ciśnieniomierz jest elektrycznym urządzeniem medycznym, podczas eksploatacji należy
przestrzegać specjalnych środków ostrożności w zakresie zakłóceń elektromagnetycznych, zgodnie z
zasadami, podanymi niżej.
Ten ciśnieniomierz nie nadaje się do użytkowania w miejscach o wysokiej intensywności zakłóceń
elektromagnetycznych, na przykład w pobliżu aktywnych sprzętów chirurgicznych działającego na
wysokich falach, w pobliżach urządzeń do rezonansu magnetycznego itd.
Należy unikać sytuacji, w których ciśnieniomierz działałby w pobliżu innych urządzeń lub w tym
samym czasie, gdyż może to wpłynąć na prawidłowość pracy ciśnieniomierza.
Wykorzystywanie innych akcesoriów niż wskazane lub dostarczone przez producenta, może doprowa-
dzić do zwiększenia promieniowania elektromagnetycznego lub obniżenia odporności elektromagnetycz-
nej ciśnieniomierza, co w konsekwencji doprowadzi do nieprawidłowej pracy ciśnieniomierza.
Przenośne urządzenia do komunikacji radiowe (w tym kable antenowe i anteny zewnętrzne) mogą
być wykorzystywane w odległości co najmniej 30 cm od ciśnieniomierza (w tym jego cześci). W przeciw-
nym wypadku wydajność tych urządzeń może spaść.
Zwróć się do dystrybutora lub producenta w celu uzyskania specjalistycznych informacji o treści standardu
zakłóceń elektromagnetycznych.
www.nissei.pl
®,™ Trade Marks of Nihon Seimitsu Sokki Co., Ltd.
© Copyright 2021.
MDSS GmbH, Schiffgraben 41, 30175 Hannover, Germany
NIHON SEIMITSU SOKKI CO., LTD.
2508-13 Nakago Shibukawa Gunma 377-0293 Japan
web site: https://www.nissei-kk.co.jp/english/
Warranty card / Karta gwarancyjna
Model / Model Date of sale / Data sprzedaży
Serial number / Numer seryjny Warranty period / Okres gwarancji
Buyer’s name / Kupujący
Seal (stamp) of the selling company / Pieczęć (stempel)
fi rmy sprzedającej
Seller's signature / Podpis Sprzedawcy
To be fi lled out by the representative of the authorized service center / Wypełnia przedstawiciel
autoryzowanego centrum serwisowego
Date / Data Notes on servicing / Obsługa serwisowa
E708-2101-1_(en_pl)
1/2