
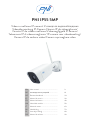
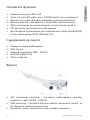
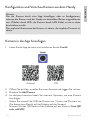
PNI IP55 5MP
Video surveillance IP camera/ IP камера за видеонаблюдение
Videoüberwachung IP-Kamera Cámara IP de videovigilancia/
Caméra IP de vidéosurveillance/Videomegfigyelő IP kamera/
Telecamera IP di videosorveglianza/ IP-camera voor videobewaking /
Kamera IP do nadzoru wideo/Camera supraveghere video
EN User manual ............................................. 3
BG Ръководство за употреба ................... 13
DE Benutzerhandbuch ...................................
ES Manual de usuario .................................... 33
FR Manuel utilisateur ..................................... 43
HU Használati utasítás ................................... 53
IT Manuale utente ........................................ 63
NL Handleiding .............................................. 73
PL Instrukcja obsługi ..................................... 83
RO Manual de utilizare ................................... 93


3User manual
English
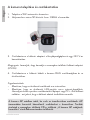
Main features
• WiFi and AP connection modes
• Recording on micro SD card, max. 128GB (card not included)
• Two-way audio (built-in microphone and speaker)
• Outdoor mounting, water protection class IP66, metal housing
• 36 IR LEDs for night vision to a distance of up to 30 m
• P2P connection for remote monitoring
• Remote control via CamHi application (Android/iOS) and via HiP2P
application (Windows PC)
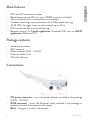
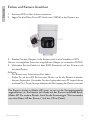
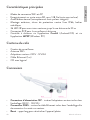
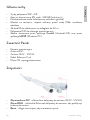
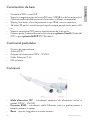
Package contents
• Surveillance camera
• WiFi antenna
• Power adapter 230V - 12V/2A
• Ethernet cable (1 m)
• CD with software
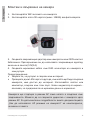
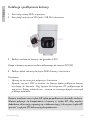
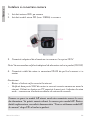
Connections
• 12V power connector - insert the power adapter included in the package
(230V - 12V/2A)
• RJ45 connector - insert the Ethernet cable included in the package in
order to connect the camera to the router
• Reset - long press to reset the camera

User manual 4
English
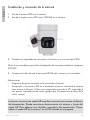
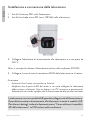
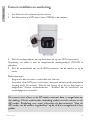
Camera installation and connection
1. Install the WiFi antenna on the camera.
2. Install the micro SD card (max. 128Gb) in the camera.
3. Connect the power adapter to the camera and to a 230V outlet.
Note: We recommend that you use the power adapter included in the package
(12V/2A).
4. Connect the network cable to the RJ45 connector of the camera and to
the router.
Warnings:
• Make sure the router is connected to the internet.
• Check if the LAN port in the router where the camera will be connected to
has internet access. Use a laptop or PC connected to this port. Green network
indicator - means that the transmission of network data is normal.
The camera will start in AP mode when connected to the power supply only.
You can connect directly to the camera via AP mode. For additional details,
see the documentation “How to use the camera’s AP mode” on the CD
included in the package.

5User manual
English
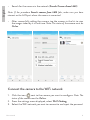
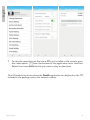
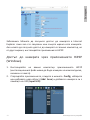
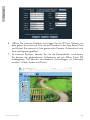
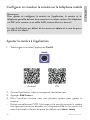
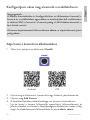
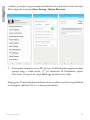
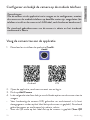
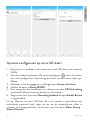
Configure and view the camera on the mobile phone
Notes:
To add and configure the camera through the application, the camera and
the mobile phone must be connected to the same router (the phone via
WiFi and the camera via LAN cable, as described above).
The default username of the camera is admin, and the default password is
admin.
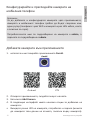
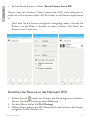
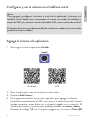
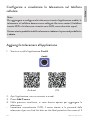
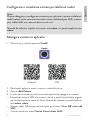
Add the camera to the application
1. Download and install the application CamHi.
Android iOS
2. Open the application, create an account and log in.
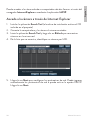
3. Press Add Camera
4. In the next interface, you have several options to add the camera:
• Manually enter the camera UID, user and password (you can find this
data on the label pasted on the camera). Default username and password
are admin, admin.
• Scan the QR code on the label pasted on the camera (Scan QR code,
add UID)

User manual 6
English
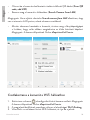
• Search for the camera in the network (Search Camera from LAN)
Note: If the procedure Search camera from LAN fails, make sure you have
internet on the LAN port where the camera is connected.
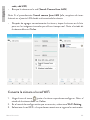
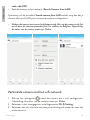
• After successfully adding the camera, tap the camera in the list to view
the images taken by it in real time. Note: The status of the camera must be
Online.
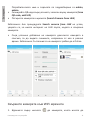
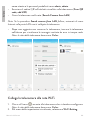
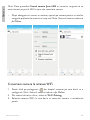
Connect the camera to the WiFi network
1. Click the icon next to the camera you want to configure. Note: The
status of the camera must be Online.
2. From the settings menu displayed, select Wi-Fi Setting.
3. Select the WiFi network you want to connect to and input the password.

7User manual
English
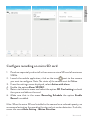
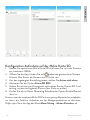
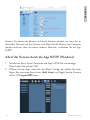
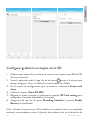
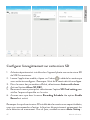
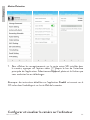
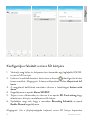
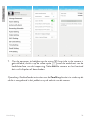
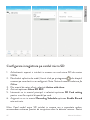
Configure recording on micro SD card
1. Purchase separately and install in the camera a micro SD card of maximum
128Gb.
2. Launch the mobile application, click on the icon next to the camera
you want to configure. Note: The status of the camera must be Online.
3. From the settings menu displayed, select Action with alarm.
4. Enable the option Alarm SD REC.
5. Return to the main menu and select the option SD Card setting to check
the space available on the card.
6. Make sure that in the menu Recording Schedule the option Enable
Record is enabled.
Note: When the micro SD card installed in the camera has a reduced capacity, we
recommend activating the recording function only at motion detection. To do this,
access the menu Alarm Setting - Motion Detection.

User manual 8
English
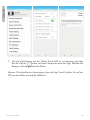
7. To view the recordings on the micro SD card installed in the camera, press
the video option from the bottom of the application main interface.
Select the camera and the file you want to play or download.
Note: Detailed instructions about the CamHi application can be found on the CD
included in the package and on the camera’s website.

9User manual
English
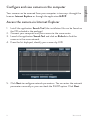
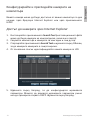
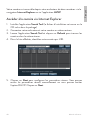
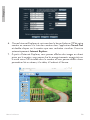
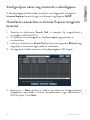
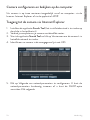
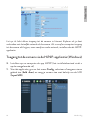
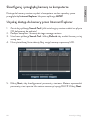
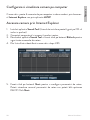
Configure and view camera on the computer
Your camera can be accessed from your computer in two ways: through the
browser Internet Explorer or through the application HiP2P.
Access the camera via Internet Explorer
1. Install the application Search Tool (the installation file can be found on
the CD included in the package)
2. Connect your computer and your camera to the same router.
3. Launch the application Search Tool and click on Refresh to find the
cameras in the same network.
4. From the list displayed, identify your camera by UID.
5. Click Next to configure network parameters. You can enter the network
parameters manually or you can check the DHCP option. Click Next.

User manual 10
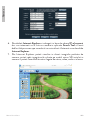
English
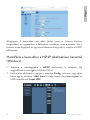
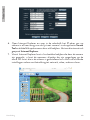
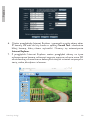
6. Open Internet Explorer and input in the address bar your camera’s IP or
return to the list of cameras in the application Serach Tool and double-
click on the camera you want to view. It will open automatically Internet
Explorer.
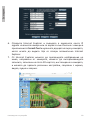
7. From Internet Explorer you can view live images taken by the camera,
you can play the recordings saved on the micro SD card installed in the
camera and you can make various settings related to network, video,
audio and alarm.

11 User manual
English
Note: You can only access the camera in Internet Explorer if you are connected
to the same network as the camera. If you want to access the camera from your
computer, but from another network, install the HiP2P application.
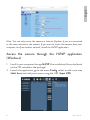
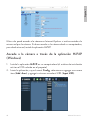
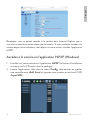
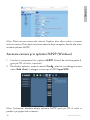
Access the camera through the HiP2P application
(Windows)
1. Install in your computer the app HiP2P (the installation file can be found
on the CD included in the package)
2. Launch the application, go to the menu Config, select or add a new area
(Add Area) and add your camera using the UID (Input UID).

User manual 12
English
Note: Detailed instructions on the HiP2P application can be found on the CD
included in the package and on the camera’s website.
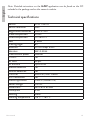
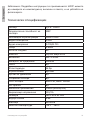
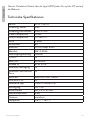
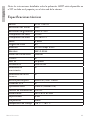
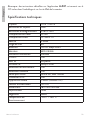
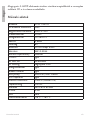
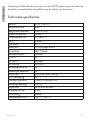
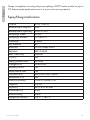
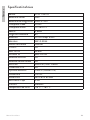
Technical specifications
Sensor 1/2.8” CMOS
Sensor resolution 5MP
Registration resolution 2560 x 1920
Video compression H.265
Audio compression G.726/G.711
Lens 3.6mm
Viewing angle 80°
Ethernet 10/100 Mbps RJ45
Wireless WiFi 2.4GHz
Transmission power 100mW
ONVIF Yes
IR LEDs 36 pcs.
IR distance Up to 30m
Motion detection Yes
Human detection Yes
Card slot Micro SD, max. 128Gb
P2P connection Yes
Mobile application CamHi (Adroid/iOS)
Power voltage 12V/2A
Dimensions 180 x 65 x 65 mm
Waterproof IP66
Housing Metal
Working temperature -26°C ~ +80°C

Ръководство за употреба
Български
13
Основните функции
• Режими на връзка WiFi и AP
• Запис на micro SD карта, макс. 128GB (картата не е включена)
• Двупосочно аудио (вграден микрофон и високоговорител)
• Външен монтаж, клас защита от вода IP66, метален корпус
• 36 IR светодиода за нощно виждане на разстояние до 30 м
• P2P връзка за дистанционно наблюдение
• Дистанционно управление чрез приложение CamHi (Android/iOS)
и чрез приложение HiP2P (Windows PC)
Съдържание на пакета
• Камера за видеонаблюдение
• WiFi антена
• Захранващ адаптер 230V - 12V/2A
• Ethernet кабел (1 м)
• CD със софтуер
Връзки
• 12V захранващ конектор - поставете захранващия адаптер,
включен в пакета (230V - 12V/2A)
• RJ45 конектор - поставете Ethernet кабела, включен в пакета, за
да свържете камерата към рутера
• Нулиране - дълго натискане, за да нулирате камерата

Ръководство за употреба
Български
14
Монтаж и свързване на камера
1. Инсталирайте WiFi антената на камерата.
2. Инсталирайте micro SD картата (макс. 128Gb) във фотоапарата.
3. Свържете захранващия адаптер към камерата и към 230V контакт.
Забележка: Препоръчваме ви да използвате захранващия адаптер,
включен в пакета (12V/2A).
4. Свържете мрежовия кабел към RJ45 конектора на камерата и
към рутера.
Предупреждения:
• Уверете се, че рутерът е свързан към интернет.
• Проверете дали LAN портът в рутера, към който ще бъде свързана
камерата, има достъп до интернет. Използвайте лаптоп или
компютър, свързан към този порт. Зелен индикатор за мрежа -
означава, че предаването на мрежови данни е нормално.
Камерата ще стартира в режим AP само когато е свързана към
захранването. Можете да се свържете директно с камерата чрез
режим AP. За допълнителни подробности вижте документацията
„Как да използвате AP режима на камерата“ на компактдиска,
включен в пакета.

Ръководство за употреба
Български
15
Конфигурирайте и прегледайте камерата на
мобилния телефон
бележки:
За да добавите и конфигурирате камерата чрез приложението,
камерата и мобилният телефон трябва да бъдат свързани към
един рутер (телефонът чрез WiFi и камерата чрез LAN кабел, както
е описано по-горе).
Потребителското име по подразбиране на камерата е admin, а
паролата по подразбиране е admin.
Добавете камерата към приложението
1. изтеглете и инсталирайте приложението CamHi.
Android iOS
2. Отворете приложението, създайте акаунт и влезте.
3. Натиснете Add Camera
4. В следващия интерфейс имате няколко опции за добавяне на
камерата:
• Въведете ръчно UID на камерата, потребител и парола (можете
да намерите тези данни на етикета, залепен върху камерата).

Ръководство за употреба
Български
16
Потребителското име и паролата по подразбиране са admin,
admin.
• Сканирайте QR кода върху етикета, залепен върху камерата (Scan
QR code, add UID)
• Потърсете камерата в мрежата (Search Camera from LAN)
Забележка: Ако процедурата Search camera from LAN не успее,
уверете се, че имате интернет на LAN порта, където е свързана
камерата.
• След успешно добавяне на камерата докоснете камерата в
списъка, за да видите снимките, направени от нея в реално
време. Забележка: Състоянието на камерата трябва да е Online.
Свържете камерата към WiFi мрежата
1. Щракнете върху иконата до камерата, която искате да

Ръководство за употреба
Български
17
конфигурирате. Забележка: Състоянието на камерата трябва да
е Online.
1. От показаното меню с настройки изберете Wi-Fi Seng.
2. Изберете WiFi мрежата, към която искате да се свържете, и
въведете паролата.
Конфигурирайте запис на micro SD карта
1. Купете отделно и инсталирайте в камерата micro SD карта с
максимум 128Gb. Мястото за инсталиране на картата е показано
на страница 4.
2. Стартирайте мобилното приложение, кликнете върху иконата
до камерата, която искате да конфигурирате. Забележка:
Състоянието на камерата трябва да е Online.
3. От показаното меню с настройки изберете Acon with alarm.
4. Активирайте опцията Alarm SD REC.
5. Върнете се в главното меню и изберете опцията SD Card seng

Ръководство за употреба
Български
18
за да проверите наличното място на картата.
6. Уверете се в това в менюто Recording Schedule опцията Enable
Record е активиран.
Забележка: Когато micro SD картата, инсталирана във фотоапарата,
е с намален капацитет, препоръчваме да активирате функцията за
запис само при детекция на движение. За да направите това, влезте
в менюто Alarm Seng - Moon Detecon.
7. За да видите записите на micro SD картата, инсталирана в
камерата, натиснете опцията за видео от долната част на
основния интерфейс на приложението. Изберете камерата и
файла, който искате да възпроизведете или изтеглите.
Забележка: Подробни инструкции за CamHi приложението може
да се намери на компактдиска, включен в пакета, и на уебсайта на
фотоапарата.

Ръководство за употреба
Български
19
Конфигурирайте и прегледайте камерата на
компютъра
Вашата камера може да бъде достъпна от вашия компютър по два
начина: през браузъра Internet Explorer или чрез приложението
Hi P 2P.
Достъп до камерата чрез Internet Explorer
1. Инсталирайте приложението Search Tool (инсталационният файл
може да бъде намерен на компактдиска, включен в пакета)
2. Свържете компютъра и камерата си към един и същ рутер.
3. Стартирайте приложението Search Tool и щракнете върху Обнови,
за да намерите камерите в същата мрежа.
4. От показания списък идентифицирайте вашата камера по UID.
5. Щракнете върху Напред, за да конфигурирате мрежовите
параметри. Можете да въведете мрежовите параметри ръчно
или да проверите опцията DHCP. Щракнете върху Напред.

Ръководство за употреба
Български
20
6. Отворете Internet Explorer и въведете в адресната лента IP
адреса на вашата камера или се върнете към списъка с камери в
приложението Serach Tool и щракнете двукратно върху камерата,
която искате да видите. Ще се отвори автоматично Internet
Explorer.
7. От Internet Explorer можете да преглеждате изображения на
живо, направени от камерата, можете да възпроизвеждате
записите, записани на micro SD картата, инсталирана в камерата,
и можете да правите различни настройки, свързани с мрежа,
видео, аудио и аларма.
Strona się ładuje...
Strona się ładuje...
Strona się ładuje...
Strona się ładuje...
Strona się ładuje...
Strona się ładuje...
Strona się ładuje...
Strona się ładuje...
Strona się ładuje...
Strona się ładuje...
Strona się ładuje...
Strona się ładuje...
Strona się ładuje...
Strona się ładuje...
Strona się ładuje...
Strona się ładuje...
Strona się ładuje...
Strona się ładuje...
Strona się ładuje...
Strona się ładuje...
Strona się ładuje...
Strona się ładuje...
Strona się ładuje...
Strona się ładuje...
Strona się ładuje...
Strona się ładuje...
Strona się ładuje...
Strona się ładuje...
Strona się ładuje...
Strona się ładuje...
Strona się ładuje...
Strona się ładuje...
Strona się ładuje...
Strona się ładuje...
Strona się ładuje...
Strona się ładuje...
Strona się ładuje...
Strona się ładuje...
Strona się ładuje...
Strona się ładuje...
Strona się ładuje...
Strona się ładuje...
Strona się ładuje...
Strona się ładuje...
Strona się ładuje...
Strona się ładuje...
Strona się ładuje...
Strona się ładuje...
Strona się ładuje...
Strona się ładuje...
Strona się ładuje...
Strona się ładuje...
Strona się ładuje...
Strona się ładuje...
Strona się ładuje...
Strona się ładuje...
Strona się ładuje...
Strona się ładuje...
Strona się ładuje...
Strona się ładuje...
Strona się ładuje...
Strona się ładuje...
Strona się ładuje...
Strona się ładuje...
Strona się ładuje...
Strona się ładuje...
Strona się ładuje...
Strona się ładuje...
Strona się ładuje...
Strona się ładuje...
Strona się ładuje...
Strona się ładuje...
Strona się ładuje...
Strona się ładuje...
Strona się ładuje...
Strona się ładuje...
Strona się ładuje...
Strona się ładuje...
Strona się ładuje...
Strona się ładuje...
Strona się ładuje...
Strona się ładuje...
Strona się ładuje...
Strona się ładuje...
-
 1
1
-
 2
2
-
 3
3
-
 4
4
-
 5
5
-
 6
6
-
 7
7
-
 8
8
-
 9
9
-
 10
10
-
 11
11
-
 12
12
-
 13
13
-
 14
14
-
 15
15
-
 16
16
-
 17
17
-
 18
18
-
 19
19
-
 20
20
-
 21
21
-
 22
22
-
 23
23
-
 24
24
-
 25
25
-
 26
26
-
 27
27
-
 28
28
-
 29
29
-
 30
30
-
 31
31
-
 32
32
-
 33
33
-
 34
34
-
 35
35
-
 36
36
-
 37
37
-
 38
38
-
 39
39
-
 40
40
-
 41
41
-
 42
42
-
 43
43
-
 44
44
-
 45
45
-
 46
46
-
 47
47
-
 48
48
-
 49
49
-
 50
50
-
 51
51
-
 52
52
-
 53
53
-
 54
54
-
 55
55
-
 56
56
-
 57
57
-
 58
58
-
 59
59
-
 60
60
-
 61
61
-
 62
62
-
 63
63
-
 64
64
-
 65
65
-
 66
66
-
 67
67
-
 68
68
-
 69
69
-
 70
70
-
 71
71
-
 72
72
-
 73
73
-
 74
74
-
 75
75
-
 76
76
-
 77
77
-
 78
78
-
 79
79
-
 80
80
-
 81
81
-
 82
82
-
 83
83
-
 84
84
-
 85
85
-
 86
86
-
 87
87
-
 88
88
-
 89
89
-
 90
90
-
 91
91
-
 92
92
-
 93
93
-
 94
94
-
 95
95
-
 96
96
-
 97
97
-
 98
98
-
 99
99
-
 100
100
-
 101
101
-
 102
102
-
 103
103
-
 104
104


w innych językach
- español: PNI IP55 5MP Manual de usuario
- italiano: PNI IP55 5MP Manuale utente
- français: PNI IP55 5MP Manuel utilisateur
