
VERMEIREN
Inovys II
U S E R M A N U A L
M A N U E L D ' U T I L I S A T I O N
G E B R U I K S A A N W I J Z I N G
G E B R A U C H S A N W E I S U N G
M A N U A L E D I I S T R U Z I O N I
M A N U A L D E I N S T R U C C I O N E S
I N S T R U K C J A O B S Ł U G I
N Á V O D K O B S L U Z E

All ri
ghts reserved, including translation.
No part of this manual may be reproduced in any form
what so ever (print, photocopy, microfilm or any other
process) without written permission of the publisher, or
processed, duplicated or distributed by using electronic
systems.
Tous droits réservés, y compris la traduction.
Aucune partie de ce manuel ne peut être reproduite,
sous quelque forme que ce soit (imprimée, photocopie,
microfilm ou tout autre procédé) sans l'autorisation écrite
du publicateur, ni traitée, dupliquée ou distribuée à l'aide
de systèmes électroniques.
Alle rechten, inclusief vertaling, voorbehouden.
Niets uit deze handleiding mag geheel of gedeeltelijk in
enige vorm (druk, fotokopie, microfilm of ieder ander
procedé) zonder de schriftelijke toelating van de uitgever
worden gereproduceerd of met behulp van elektronische
systemen worden verwerkt, gekopieerd of verspreid.
Alle Rechte, auch an der Übersetzung, vorbehalten.
Kein Teil der Gebrauchsanweisung darf in irgendeiner
Form (Druck, Fotokopie, Mikrofilm oder einem anderen
Verfahren) ohne schriftliche Genehmigung des
Herausgebers reproduziert oder unter Verwendung
elektronischer Systeme verarbeitet, vervielfältigt oder
verbreitet werden.
Tutti i diritti riservati (anche sulla traduzione).
Il presente manuale non può essere riprodotto, neppure
parzialmente, con alcun mezzo (stampa, fotocopia,
microfilm o altro procedimento) senza l’autorizzazione
scritta della casa produttrice, né elaborato, duplicato o
distribuito con l’ausilio di sistemi elettronici.
Todos los derechos reservados, incluidos los de la
traducción.
Se prohíbe la reproducción total o parcial del presente
manual de cualquier forma (impresión, fotocopia,
microfilm o cualquier otro procedimiento), así como la
edición, copia o distribución empleando sistemas
electrónicos, sin el permiso escrito del editor.
Wszelkie prawa zastrzeżone, łącznie z
tłumaczeniem.
Żadna część niniejszej instrukcji nie może być
powielana w jakiejkolwiek formie (drukowanej, fotokopii,
mikrofilmu ani innej) bez pisemnej zgody wydawcy, nie
może być również przetwarzana, kopiowana ani
rozprowadzana za pomocą systemów elektronicznych.
Všechna práva vyhrazena, včetně překladu.
Šíření jakékoliv části tohoto katalogu jakýmkoliv
způsobem (tisk, kopie, mikrofilm nebo jiný způsob) bez
písemného souhlasu vydavatele, nebo zpracování,
duplikace či distribuce prostřednictvím elektronických
systémů je zakázáno.
EN
Instructions for specialist dealer
This instruction manual is part and parcel
of the product and must accompany every
product sold.
Version: C, 2020-07
FR
Instructions pour les distributeurs
Ce manuel d'instructions fait partie du
produit et doit accompagner chaque
produit vendu.
Version : C, 2020-07
NL
Instructies voor de vakhandelaar
Deze handleiding is deel van het product
en dient bij iedere product te worden
geleverd.
Versie: C, 2020-07
DE
Hinweise für den Fachhändler
Diese Gebrauchsanweisung ist Bestand-
teil des Produkts und ist bei jeder
Produkts auszuhändigen.
Version: C, 2020-07
IT
Istruzioni per il rivenditore
Il presente Manuale di istruzioni è parte
integrante del prodotto e deve essere
fornito assieme alla prodotto.
Versione: C, 2020-07
ES
Instrucciones destinadas a los distri-
buidores especializados
El presente manual de instrucciones es
parte integrante del producto y se debe
adjuntar a todas las producto que se
vendan.
Versión: C, 2020-07
PL
Instrukcje dla wyspecjalizowanego
sprzedawcy
Niniejsza instrukcja obsługi jest
nieodłączną częścią produktu i musi być
dołączona do każdego sprzedawanego
produktu.
Wersja: C, 2020-07
CS
Pokyny pro specializovaného prodejce
Tento návod k obsluze je součástí
dodávky a musí být součástí každého
prodaného produktu.
Verze: C, 2020-07
Multi version: C, 2020-07
© Vermeiren Group

Language index
English
Français
Nederlands
Deutch
Italiano
Español
Polski
Czech
User manual
Manuel d'utilisation
Gebruiksaanwijzing
Bedienungshandbuch
Manuale di istruzioni
Manual de instrucciones
Instrukcja obsługi
Návod k obsluze

This page is intentionally left blank

Inovys II
2020-07
Page 1
Contents
Preface ..................................................................................................................................... 2
1 Product description.................................................................................................... 3
1.1 Intended Use ................................................................................................................ 3
1.2 Technical specifications .............................................................................................. 4
1.3 Drawing ....................................................................................................................... 5
1.4 Accessories .................................................................................................................. 5
1.5 Explanation of symbols ............................................................................................... 5
1.6 Safety rules .................................................................................................................. 6
2 Use ............................................................................................................................... 7
2.1 Carrying the wheelchair .............................................................................................. 7
2.2 Mounting the rear wheels (only for quick release 22", 24" rear wheels) ................... 7
2.3 Mounting or removing of the footrests ....................................................................... 7
2.4 Angle of footrests ........................................................................................................ 8
2.5 Fold away leg rest ....................................................................................................... 8
2.6 Operating the brakes.................................................................................................... 9
2.7 Mounting or removing of armrests.............................................................................. 9
2.8 Pushing handles ......................................................................................................... 10
2.9 Mounting or removing backrest ................................................................................ 10
2.10 Transfer in and out the wheelchair ............................................................................ 11
2.11 Correct position in the wheelchair ............................................................................ 11
2.12 Riding the wheelchair (only for 22" and 24" rear wheels) ....................................... 11
2.13 Riding the wheelchair by an attendant ...................................................................... 11
2.14 Moving on slopes ...................................................................................................... 11
2.15 Negotiating steps or curbs ......................................................................................... 12
2.16 Taking off the wheels (only for quick release 22", 24" rear wheels) ....................... 13
2.17 Backrest adjusting / Seat inclination ......................................................................... 14
2.18 Transport in the car .................................................................................................... 14
2.19 Use of the wheelchair as seat in a motor vehicle (Not for the Inovys II with
electronic kit / motor) ........................................................................................................... 15
3 Installation and adjustment .................................................................................... 17
3.1 Tools .......................................................................................................................... 17
3.2 Manner of delivery .................................................................................................... 17
3.3 Mounting backrest ..................................................................................................... 18
3.4 Adjusting the seat height and seat angle ................................................................... 18
3.5 Adjust the seat depth ................................................................................................. 20
3.6 Adjust the backrest .................................................................................................... 21
3.7 Adjust the brakes ....................................................................................................... 21
3.8 Adjusting of the footrests .......................................................................................... 22
3.9 Adjusting the armpads ............................................................................................... 24
3.10 Adjusting of the tip cap ............................................................................................. 25
4 Maintenance ............................................................................................................. 25

Inovys II
2020-07
Page 2
Preface
First of all we want to thank you for putting your trust in us by selecting one of our
wheelchairs.
The Vermeiren wheelchairs are the result of many years of research and experience. During
the development, special attention was given to the ease of use and the serviceability of the
wheelchair.
The expected lifetime of your wheelchair is strongly influenced by the care and maintenance
of the wheelchair.
This manual will help you get acquainted with the operation of your wheelchair.
Following the user instructions and the maintenance instructions are an essential part of the
warranty.
This manual reflects the latest product developments. Vermeiren has the right to introduce
changes without the obligation to adapt or replace previously delivered models.
For any further questions, please consult your specialist dealer.

Inovys II
2020-07
Page 3
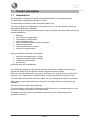
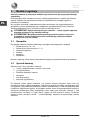
1 Product description
1.1 Intended Use
The wheelchair is intended for people with walking difficulties or no walking abilities.
The wheelchair is designed to transport 1 person.
The wheelchair is suited for indoor and limited outdoor use.
The user can propel the wheelchair by himself (only for 22", 24" rear wheels) or have the
wheelchair pushed by an attendant.
The different types of fittings and accessories, and the modular construction allow full use by
persons disabled by:
paralysis
loss of limbs (leg amputation)
limb defects or deformations
stiff or damaged joints
heart insuffiencies and poor blood circulation
balance disturbances
cachexia (decrease in muscle)
and also for aged persons.
When providing for individual requirements:
body size and weight (max. 135 kg)
physical and psychological condition
residential circumstances
environment
should be taken into consideration.
Your wheelchair should only be used on surfaces where all four wheels are touching the
ground and where there is sufficient contact to propel the wheels equally.
Ride only over flat surfaces with firm ground. It should not be used to drive on ground such
as gravel, mud, cobble stones, grassy surfaces, or other ground that is not firm or level.
The wheelchair should not be used as a ladder, nor is it a transport for heavy or hot objects.
When used on mats, carpeted floors or loose floor coverings, the floor covering can get
damaged.
Use only Vermeiren approved accessories.
The manufacturer is not liable for damage caused by the lack of or improper service or as a
result of not following instructions from this manual.
Compliance with the user and maintenance instructions are an essential part of the
guarantee conditions.

Inovys II
2020-07
Page 4
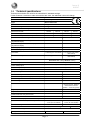
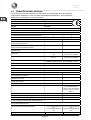
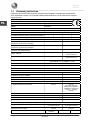
1.2 Technical specifications
Technical terms below are valid for the wheelchair in standard settings.
If other footrests / armrests or other accessories are used, the tabulated values will change.
Make
Vermeiren
Address
Vermeirenplein 1/15, B
-
2920 Kalmthout
Type
Manual wheelchair
Model
Inovys
II
Maximum occupant mass
135
kg
Description
Dimensions
Effective seat width
350 mm 400 mm 450 mm 500 mm
Overall width (depends on the seat width)
580 mm 630 mm 680 mm 730 mm
Dismantled width (without armrest)
550 mm 600 mm 650 mm 700 mm
Description
Dimensions Min.
Dimensions Max.
Overall length with footrests (depends on the
adjusted seat depth)
1050 mm 1090 mm
Dismantled length without footrests (depends on the
adjusted seat depth)
830 mm 870 mm
Total height (without headrest)
990 mm 1060 mm
Dismantled height (Backrest folded, without armrest)
710 mm 780 mm
Total mass
± 36,65 kg (24" rear wheels) ± 37,0 kg (16" rear wheels,
drum brakes)
Mass of heaviest part
± 20,70 kg (24" rear wheels) ± 25,20 kg (16" rear wheels,
drum brakes)
Masses of parts that can be dismantled or removed Footrests: 4,90 kg; Armrests: 3,45 kg;
Rear wheels 24":
4,15 kg
;
Back
rest
:
3,45 kg
Static stability downhill
10° (in standard configuration)
Static stability uphill
15° (in standard configuration)
Static stability sideways
12° (in standard configuration)
Obstacle climbing
60 mm
Seat plane angle
0° +21°
Effective seat depth
460 mm 520 mm
Seat surface height at front edge (with cushion)
460 mm 530 mm
Backrest angle
0° +54°
Backrest height
550 mm 585 mm
Distance between footrest and seat
400 mm 570 mm
(Do not use max. distance
with footrest in vertical
position -- touch the ground)
Angle footplate
80° 100°
Angle between seat and footrest
104° 194°
Distance between arm pad and seat
220 mm 320 mm
Front location of armrest structure
460 mm 490 mm
Hand rim diameter (only for 24" rear wheels)
535 mm
Horizontal location of axle (deflection)
-8 mm (16" rear wheels)
-4 mm (24" rear wheels)
41 mm (16" rear wheels)
42 mm (24" rear wheels)
Minimum turning radius
1520 mm 1620 mm
Diameter PU Rear wheels
16" (T30) + drum brakes 22" 24"
Diameter PU steering wheels
200 mm
Storage and use temperature
+ 5 °C + 41 °C

Inovys II
2020-07
Page 5
Storage and use humidity
30% 70%
We reserve the right to introduce technical changes. Measurement tolerance
±
1
5
m
m / 1,5 kg
/ °
Table 1: Technical specifications Inovys II
The wheelchair complies to the requirements set up in:
ISO 7176-8: Requirements and test methods for static, impact and fatigue strengths.
ISO 7176-16: Resistance to ignition of upholstered parts
ISO 7176-19: Use as seats in motor vehicles (not for Inovys with electronic parts / motors)
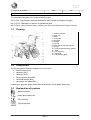
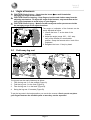
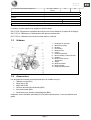
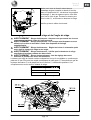
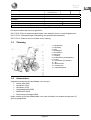
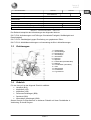
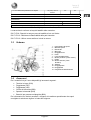
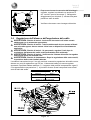
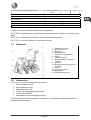
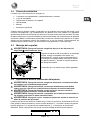
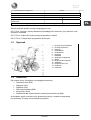
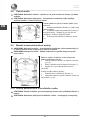
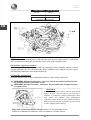
1.3 Drawing
1.4 Accessories
The following accessories are available for the Inovys II:
Wooden table (B12)
Headrest (L55)
Headrest (L58)
Personal safety belt (B58)
Horizontal wedge (B22)
Hemiplegic arm pads (B66)
Contact your specialist dealer about other accessories. He will gladly advise you.
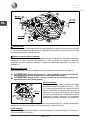
1.5 Explanation of symbols
Type designation
CE conformity
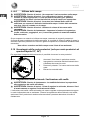
Indoor and outdoor use
Maximum mass
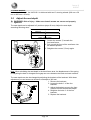
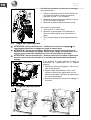
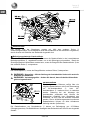
1 = Pushing handles
2 = Push bar
3 = Back
4 = Arm pads
5 = Armrests
6 = Brakes
7 = Tip cap
8 = Rear wheels (driving wheels)
9 = Frame
10 = Front wheels (steering wheels)
11 = Seat
12 = Leg supports
13 = Footrests
14 = Identification plate

Inovys II
2020-07
Page 6
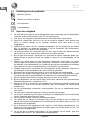
1.6 Safety rules
L To prevent injury and/or damage to your wheelchair, make sure that no objects
and/or body parts are caught in the spokes of the driving wheels (for 22", 24" rear
wheels).
L The parking brakes should be applied before getting into and out of the wheelchair.
L When getting into and out of the wheelchair, do not stand on the footplates. These
should be folded up beforehand, or the leg supports should be swung completely
outwards out of the way.
L Investigate the effects of shifting the centre of gravity on the behavior of the wheelchair,
for example on up or down gradients, on laterally sloping ground, or when overcoming
obstacles. Obtain support from an attendant.
L If you want to pick up something (lying in front of, on the side, or to the rear of the
wheelchair), you should not lean too far out to avoid tipping over.
L When moving through doors, arches, etc. ensure that there is enough room at the sides
so that you do not get your hands or arms caught or crushed and that there is no
damage to the wheelchair.
L Only use your wheelchair according to regulations. For example, avoid uncontrolled
rolling against obstacles (steps, curbs, doorframes, etc) or dropping down from ledges.
The manufacturer cannot assume liability for damage caused by overloading, collision
or other improper use.
L Stairs may only be negotiated when aided by another person. If furnishings like drive-on,
ramps or lifts are available, use them.
L When moving on the public highway, you are subject to the rules of the road.
L When driving your wheelchair, you should not be under the influence of alcohol or
medicine as in the case of driving other vehicles. This also applies to indoor driving.
L When travelling outdoors, adapt your driving to weather and traffic conditions.
L When transporting the wheelchair, never pick it up by grasping removable parts
(arm supports, footrests, etc.)
L To be better visible when driving in the dark, wear the brightest possible clothing or
clothes with reflectors, and check that the reflectors mounted on the sides and rear of
the wheelchair are clearly visible.
L Be careful when using possible causes of fire such as cigarettes since they may set the
seat and back covers alight.
L Never exceed the maximum load of 135 kg.
L Take care during all adjusting functions that no objects or body parts come into the area
of the adjustment as there is the risk of squashing.
L Check that the profile depth of the tyres is adequate.
L To avoid hand injury, do not push your hand between the driving wheel and the knee
lever brake when propelling your wheelchair (only for 22", 24" rear wheels with hand
rim).
L When driving outdoors, wear gloves which improve your grip on the tyre grips and
protect your fingers against dirt and heating (only for 22", 24" rear wheels with hand
rim).
L Take care when attaching the quick-assembly wheels that the axle is completely and
properly engaged (only for 22", 24" rear wheels with hand rim).

Inovys II
2020-07
Page 7
2 Use
This chapter describes the everyday use. These instructions are for the user and the
specialist dealer.
The wheelchair is delivered fully assembled by your specialist dealer. The instructions
intended for the specialist dealer on how to set up the wheelchair are given in § 3.
2.1 Carrying the wheelchair
The best way to carry the wheelchair is to make use of the wheels and roll the wheelchair.
If this is not possible (e.g. when the rear wheels are taken off for transportation in a car),
firmly grasp the frame on the front and the back. Do not use the foot or arm rests or the
wheels to grasp the wheelchair. At least two persons are required for transporting the
wheelchair.
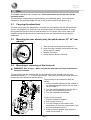
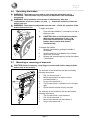
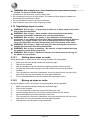
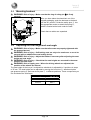
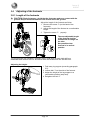
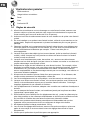
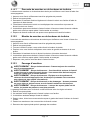
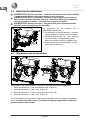
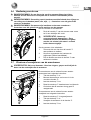
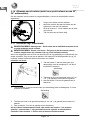
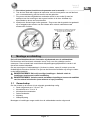
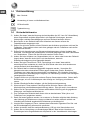
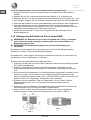
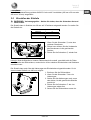
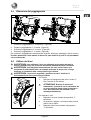
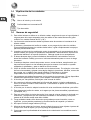
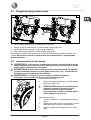
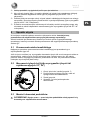
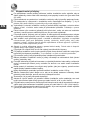
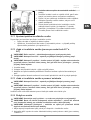
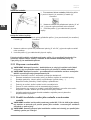
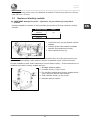
2.2 Mounting the rear wheels (only for quick release 22", 24" rear
wheels)
1. Take the rear wheel and push on button .
2. Keep the button pushed in and mount the rear
wheels axle till it stops.
3. Release the button.
4. Check that the wheel is secured.
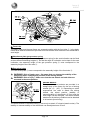
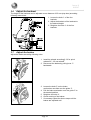
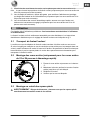
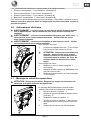
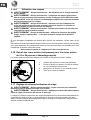
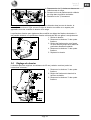
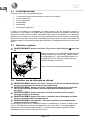
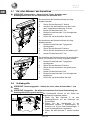
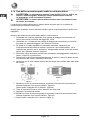
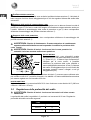
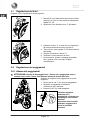
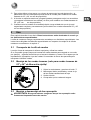
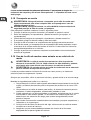
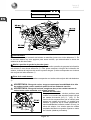
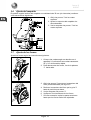
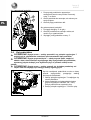
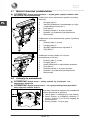
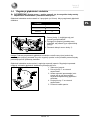
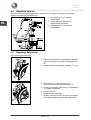
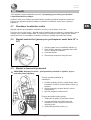
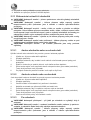
2.3 Mounting or removing of the footrests
L WARNING: Risk of injury - Make sure that the footrests are firmly locked before
using the footrests.
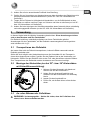
The wheelchair has two footrests that can be fold away to the "outside" with a 3 point
attachment system (, , on the figure below). This system provides a steady, play-free
connection of the footrest to the seat frame.
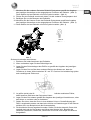
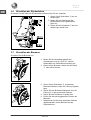
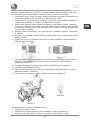
The mounting of the footrests is done as
follows:
1. Hold the footrest sideways at the outside of
the wheelchairs frame and mount the pins
into the holes .
2. Turn the footrest inwards till the pin click in
the hole of the attachment point .
3. Turn the footplates downwards.
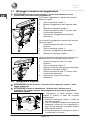
To take off the footrests:
1. Fold the footplates upwards.
2. Pull or push on lever .
3. Turn the footrest to the outside of the
wheelchair until the hole comes loose of the
pin from attachment point .
4. Pull the footrest upwards until the pins
come out the holes .

Inovys II
2020-07
Page 8
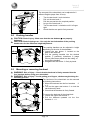
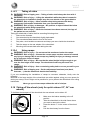
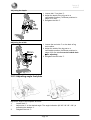
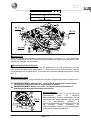
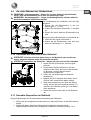
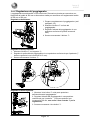
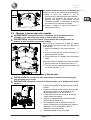
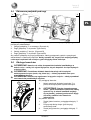
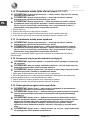
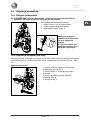
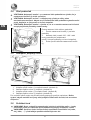
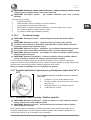
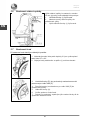
2.4 Angle of footrests
L CAUTION: Risk of injury – Check that the levers are well fixated after
adjusting the angle of the footrest.
L CAUTION: Risk of clamping – Keep fingers, buckles and clothes away from the
adjusting mechanism. To adjust the angle of the footrest, only touch them at the
level of the footplates-to avoid injury on your fingers.
L CAUTION: Risk of injury – Make sure that no objects and/or persons are inside
the swinging range of the adjust functions.
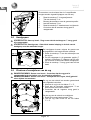
The angle or inclination of the footrest can be
easily adjusted as follow:
1. Loosen the lever on the side of the
footrest.
2. Adjust the angle (range 100° - 190°: step
less) of the footrest to a comfortable
position. Grasp the footrest at the level of the
footplates.
3. Retighten the lever firmly by hand.
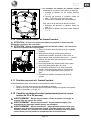
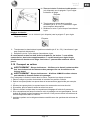
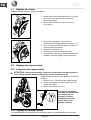
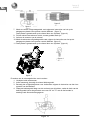
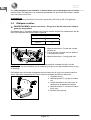
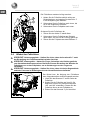
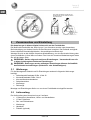
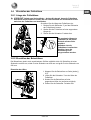
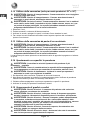
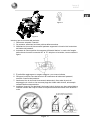
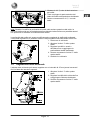
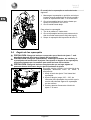
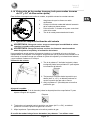
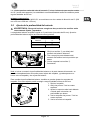
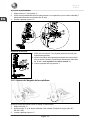
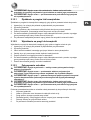
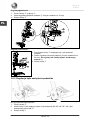
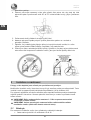
2.5 Fold away leg rest
The leg rest can be easily fold away as follow:
1. Take the leg rest on the outside (Figure A).
2. Fold the leg rest to the front (Figure A).
3. Take the leg rest on the back (Figure B).
4. Swing the leg rest forwards (Figure B).
To put the leg rests in the begin position you can do the reverse. Check you do not place
your fingers between the movable parts or were they can be squeezed.
A
B

Inovys II
2020-07
Page 9
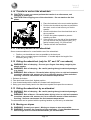
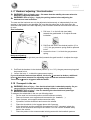
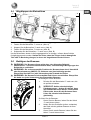
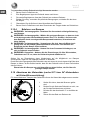
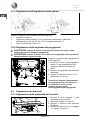
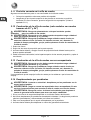
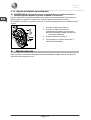
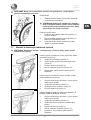
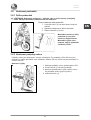
2.6 Operating the brakes
L WARNING: The brakes are not used to slow down the wheelchair during
movements – Use the brake only to prevent the wheelchair from unintended
movements.
L WARNING: Good operation of the brakes is influenced by wear and
contamination of the tires (water, oil, mud, …) – Check the condition of the tires
before each use.
L WARNING: The brakes are adjustable and can wear – Check the operation of the
brakes before each use.
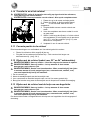
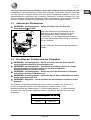
To apply the brakes:
1. Push the brake handles forward till you feel a
distinctive click.
L CAUTION: Risk of unintended movement –
Make sure the wheelchair is on a flat
horizontal surface before releasing the
brakes. Never release both brakes
simultaneously.
To release the brakes:
1. Release one brake by pulling the handle
backwards.
2. Hold the hand rim (if available) of the release
wheel with your hand.
3. Release the second brake by pulling the handle
backwards.
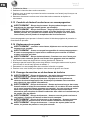
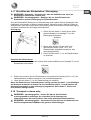
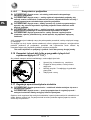
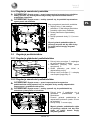
2.7 Mounting or removing of armrests
L CAUTION: Risk of clamping – Keep fingers, buckles and clothes away from the
bottom side of the armrest.
The armrests of the wheelchair can be mounted by
following instructions.
1. Pull out the star knob .
2. Mount the armrest from above into the
provided bracket .
3. Let go of the star knob .
4. Turn the star knob clockwise until it is finger-
tight.
5. Check that the armrest is firmly secured.
The armrests of the wheelchair can be removed by
following instructions.
1. Turn the star knob anti-clockwise.
2. Pull out the star knob .
3. Remove the armrest out the bracket .
4. Let go of the star knob .

Inovys II
2020-07
Page 10
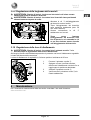
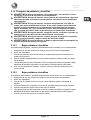
The arm pad of the wheelchair can be adjusted in 6
different heights (steps from 20 mm):
1. Turn the star knob anti-clockwise.
2. Pull out the star knob .
3. Pull the arm pad into the required position.
4. Let go of the star knob .
5. Turn the star knob clockwise until it is finger-
tight.
6. Check that the arm pad is firmly secured.
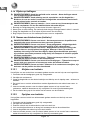
2.8 Pushing handles
L CAUTION: Risk of injury - Make sure that the star buttons are properly
tightened.
L CAUTION: Risk of tipping over - Use only the last indentation of the pushing
handle tube for the maximum height adjustment.
The pushing handles can be adjusted in height
depending on the size of the attendant.
1. Loosen the star button located on the
back of the backrest.
2. Pull the pushing handles into the desired
position (7 positions). Indentions (steps
30 mm) have been placed into the tubing of
the pushing handles.
3. Retighten the star button firmly by hand.
2.9 Mounting or removing backrest
L WARNING: Risk of injury – Check that the backrest is firmly mounted into the
four brackets before using your wheelchair.
L WARNING: Risk of injury – Avoid getting your fingers, clothes caught during the
assembly process.
The backrest of the wheelchair can be mounted
by following instructions.
1. Mount the backrest into the four brackets
+ .
2. Turn on the upper star buttons to lock the
star buttons by hand.
3. Check that the backrest is firmly fixated.
To remove the backrest of the wheelchair:
1. Loosen the upper star buttons .
2. Pull the backrest upwards out the four
brackets + .

Inovys II
2020-07
Page 11
2.10 Transfer in and out the wheelchair
L CAUTION: In case you cannot perform the transfer in a safe manner, ask
someone to assist you.
L CAUTION: Risk of tipping over of the wheelchair – Do not stand on the foot
plates.
1. Place the backrest in the most vertical position.
2. Position the wheelchair as close as possible to
the chair, couch or bed to/from you wish to
transfer.
3. Check both brakes from the wheelchair are in
the on position.
4. Fold the foot plates upwards to prevent
standing on them.
5. If the transfer is on the side of the wheelchair,
you can remove the arm support (see § 2.7)
and/or footrest (see § 2.3) on that side.
6. Transfer to/from the wheelchair.
2.11 Correct position in the wheelchair
Some recommendations for a comfortable use of the wheelchair:
Position your backside as close as possible to the back rest.
Make sure your upper legs are horizontal – If needed adjust the length of the
footrests. (see § 3.8.1)
2.12 Riding the wheelchair (only for 22" and 24" rear wheels)
L WARNING: Risk of clamping – Prevent your fingers from being caught by the
wheels spokes.
L WARNING: Risk of clamping – Be careful passing through restricted passages
(e.g. doors).
L WARNING: Risk of burns – Be careful when driving in hot or cold environments
(sunshine, extreme cold, saunas, etc.) for a sufficient amount of time and when
touching - Surfaces can assume the environment temperatures.
1. Release the brakes.
2. Take both hand rims at their highest position.
3. Lean forward and push the hand rims forward until straight arms.
4. Swing your arms loosely back to the hand rims topside and repeat the movement.
2.13 Riding the wheelchair by an attendant
L WARNING: Risk of clamping – Be careful passing through restricted passages
(e.g. doors).
L WARNING: Risk of burns – Be careful when driving in hot or cold environments
(sunshine, extreme cold, saunas, etc.) for a sufficient amount of time and when
touching - Surfaces can assume the environment temperatures.
The wheelchair can be pushed with the pushing handles or push bar by an attendant.
2.14 Moving on slopes
L WARNING: Control your speed – Moving on slopes as slow as possible.
L WARNING: Consider the capacities of your attendant – If your attendant does not
have enough force to control the wheelchair, put on the brakes.

Inovys II
2020-07
Page 12
L WARNING: Risk of tipping over – Lean forward to move your centre of gravity
forward. To improve a better stability.
1. If available on the wheelchair, wear the safety belt.
2. Do not attempt moving on too high slopes. The maximum slope angles (upwards and
downwards) are mentioned in table 1.
3. Ask an attendant to help you moving on the slope.
4. Lean forward to move your centre of gravity forward.
2.15 Negotiating steps or curbs
L WARNING: Risk of injury – Transporting a patient up or down steps is to be done
with at least two attendants.
L WARNING: Risk of injury – Wear suitable safety belt systems while being
transported (information obtainable from your specialist dealer).
L WARNING: Risk of injury – Sit quietly in your wheelchair and avoid jerky
movements. If you cannot sit quietly when being transported because of illness or
disability (e.g. slightly spastic, etc.), then at least two persons are required to
secure the wheelchair on both sides by taking hold of fixed parts of the frame.
L WARNING: Risk of injury – Make sure that your arms and legs do not protrude
outside the wheelchair while being transported.
L WARNING: Risk of injury or damages – No persons or objects should be below
the wheelchair while being transported.
L WARNING: Risk of injury – When the footrests have been removed, the legs of
the patient are not secured.
2.15.1 Getting down steps or curbs
Riding down steps or curbs can be done moving forwards with an attendant:
1. Make sure that the pushing handles are sufficiently tight.
2. Remove the footrests.
3. Ask the attendant to tip the wheelchair slightly backwards with the tip cap.
4. Get past the curbs while moving on the rear wheels and push the wheelchair
forwards.
5. The second person secure the wheelchair in front by taking hold of the front of the
frame after removing the footrests. He must walk backwards.
6. Put the wheelchair back on the four wheels after passing the curbs.
2.15.2 Moving up steps or curbs
Moving up steps or curbs can be done moving backwards with an attendant:
1. Make sure that the pushing handles are sufficiently tight.
2. Remove the footrests.
3. Turn the wheelchair to have the rear wheels facing the curb.
4. Lean backwards and move your centre of gravity above the rear wheels.
5. Ask the attendant to pull the wheelchair on the curb.
6. The second person secure the wheelchair in front by taking hold of the front of the
frame after removing the footrests. He must walk forewards.
7. Take back the normal position in the wheelchair.

Inovys II
2020-07
Page 13
2.15.3 Taking of stairs
L WARNING: Risk of tipping over – Taking of stairs shall always be done with 2
attendants.
L WARNING: Risk of injury – Lifting the wheelchair while the patient is seated in
the wheelchair is forbidden! Always keep the rear wheels on the ground/stairs.
L WARNING: Risk of injury – Wear suitable safety belt systems while being
transported (information obtainable from your specialist dealer).
L WARNING: Risk of injury or damages – No persons or objects should be below
the wheelchair while being transported.
L WARNING: Risk of injury – When the footrests have been removed, the legs of
the patient are not secured.
Taking the wheelchair of stairs shall be according following rules:
1. Remove the footrests.
2. One attendant tip the wheelchair slightly backwards.
3. The second attendant take the front of the frame.
4. Stay calm, avoid sudden movements and keep your arms inside the wheelchair.
5. Take the steps on the rear wheels of the wheelchair.
6. Mounting the footrests back after taking the stair.
2.15.4 Using ramps
L WARNING: Risk of injury – Do not exceed the maximum load or the ramps.
L WARNING: Risk of injury - Choose the correct ramps so there cannot be caused
any injury or damage. We do not accept any liability for injury or damage caused
by an improper choice of ramps.
L WARNING: Risk of injury - Be sure that the wheel height is high enough to get
over the free height of the ramps. The wheelchair frame may not touch the
ramps.
L WARNING: Risk of injury - Use a restraining safety belt to secure yourself in your
wheelchair.
L WARNING: Risk of tipping over - Put the adjustment functions (seat, back,
footrests, ...) that the wheelchair has the best stability.
If you are considering the installation of ramps to overcome obstacles, kindly note the
following:
Because of the large weight of the wheelchair we advise against using your own power for
driving on a ramp, since it might not be possible for you to prevent the wheelchair from rolling
backwards.
Never go up or down ramps without the aid of a helper.
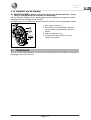
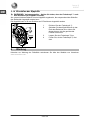
2.16 Taking off the wheels (only for quick release 22", 24" rear
wheels)
To facilitate the transport off the wheelchair the rear wheels can be taken off:
1. Make sure the brakes standing in the off
position.
2. Take the wheelchair to the side frame where
you want to remove the wheel.
3. Press the button in the center of the wheel
hub.
4. Pull the wheel away from the frame.

Inovys II
2020-07
Page 14
2.17 Backrest adjusting / Seat inclination
L WARNING: Risk of tipping over – Be aware that the stability decrease when the
backrest is adjusted backwards.
L WARNING: Risk of injury – Apply the parking brakes before adjusting the
backrest and seat inclination.
The seat and the backrest can only be adjusted simultaneously or independently from one
another in their angle by an attendant. Be sure that the patient sits in the chair when the
attendant shall perform the back adjusting, seat inclination and that the wheelchair does not
tip over.
Seat inclination:
1. Pull lever on the left side (see label)
towards the grab handle to adjust the seat
inclination.
Label
2. Pull/Push the seat in the desired position (0° to
+ 21°), the gas pressure spring shall be pressed
in/out.
3. Loosen the lever , to block the gas pressure
spring.
Backrest adjusting:
1. Pull lever on the right side (see label) towards the grab handle to adjust the angle
of the backrest.
Label
2. Pull/Push the backrest in the desired position (0° to + 54°), the gas pressure spring shall
be pressed in/out.
3. Loosen the lever , to block the gas pressure spring.
If your wheelchair features drum brakes, the levers are used as brakes; additional
levers have been mounted for adjusting angle of backrest and seat inclination.
These levers can be triggered with the thumb.
2.18 Transport in the car
L WARNING: Risk of injury – See that the wheelchair is attached properly. So you
can avoid injury from the passengers during collision or sudden braking.
L WARNING: Risk of injury – Use for attaching the wheelchair and passenger
NEVER the same seatbelt.
To transport the wheelchair in the car use following steps:
1. Set the seat in a horizontal position and the backrest vertically.
2. Remove footrests, arm supports and accessories (ex. headrest, ...).
3. Store footrests, arm supports and accessories safely.
4. If possible, fold the wheelchair and remove the wheels.
5. Place the wheelchair in the luggage place with 2 persons.
6. If the wheelchair and the passenger compartment is NOT separated, attach the
frame of the wheelchair securely to the vehicle. You can use the available safety
belts in the vehicle.
7. Place the patient in the recommended existing seats with their seatbelt systems.

Inovys II
2020-07
Page 15
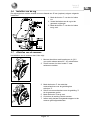
2.19 Use of the wheelchair as seat in a motor vehicle (Not for the
Inovys II with electronic kit / motor)
L WARNING: The wheelchair has passed the crash of ISO 7176-19: 2008 and, as
such, has been designed and tested for use only as forward-facing seat in a
motor vehicle.
L WARNING: The wheelchair's pelvic belt alone is not suited as an occupant
restraint belt.
The wheelchair is tested using the four-point strap-tie system and a 3-point occupant-
restraint system.
Whenever feasable, use the seat of the vehicle and store the wheelchair in the cargo area.
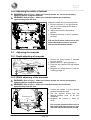
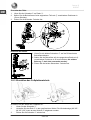
Steps to secure the wheelchair in a motor vehicle:
1. Check that the vehicle is equipped with a suitable wheelchair tie down and occupant-
restraint system, conform ISO 10542.
2. Check that the components of the wheelchair tie down and occupant restraint system
are not frayed, contaminated, damaged or broken.
3. If equipped with an adjustable seat and/or back tilt, make sure that the wheelchair
user is sitting as upright as possible. If the user's condition prevents this, a risk
assessment should be done to evaluate the user's safety during transit.
4. Remove all mounted accessories such as trays and respiratory equipment, and
secure them in a safe place.
5. Position the wheelchair facing forward in the travelling direction, centrally between
the tie-down rails mounted in the floor of the vehicle.
6. Make sure that the indicated zones around the wheelchair user are clear from rigid
vehicle parts.
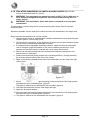
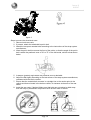
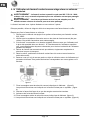
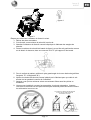
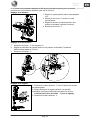
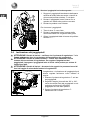
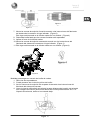
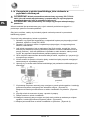
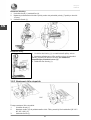
7. Mount the front securement straps according to the instructions of the strap-system
manufacturer at the indicated place. (figure 3)
This place is marked on the wheelchair with a symbol. (figure 4)
8. Roll back the wheelchair until the front straps are tight.
9. Apply the wheelchair brakes.
10. Mount the back securement straps according to the instructions of the strap-system
manufacturer at the indicated place. (figure 3)
11. This place is marked on the wheelchair with a symbol. (figure 4)

Inovys II
2020-07
Page 16
figure 3
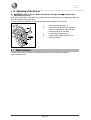
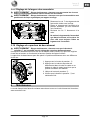
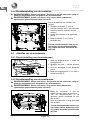
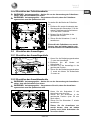
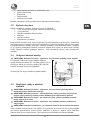
Steps to secure the wheelchair user:
1. Remove both arm rests.
2. If present, attach the wheelchair's pelvic belt.
3. Attach the occupant restraint belts according to the instructions of the strap-system
manufacturer.
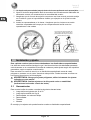
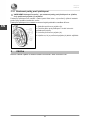
4. Wear the pelvic belt low across the front of the pelvis, so that the angle of the pelvic
belt is within the preferred zone of 30° to 75° to the horizontal, similar to that shown
below.
5. A steeper (greater) angle within the preferred zone is desirable.
6. Adjust the belt tightly according to the instructions of the strap-system manufacturer,
consistent with the user's comfort.
7. Ensure that the restraint belt connects in a straight line to the anchor point in the
vehicle and that no bends in the belt are visible, for instance at the axle of the rear
wheel.
8. Install the arm rests, if desired. Make sure that belts are not twisted or held away
from the body by wheelchair components such as arm rests or wheels.
Strona się ładuje...
Strona się ładuje...
Strona się ładuje...
Strona się ładuje...
Strona się ładuje...
Strona się ładuje...
Strona się ładuje...
Strona się ładuje...
Strona się ładuje...
Strona się ładuje...
Strona się ładuje...
Strona się ładuje...
Strona się ładuje...
Strona się ładuje...
Strona się ładuje...
Strona się ładuje...
Strona się ładuje...
Strona się ładuje...
Strona się ładuje...
Strona się ładuje...
Strona się ładuje...
Strona się ładuje...
Strona się ładuje...
Strona się ładuje...
Strona się ładuje...
Strona się ładuje...
Strona się ładuje...
Strona się ładuje...
Strona się ładuje...
Strona się ładuje...
Strona się ładuje...
Strona się ładuje...
Strona się ładuje...
Strona się ładuje...
Strona się ładuje...
Strona się ładuje...
Strona się ładuje...
Strona się ładuje...
Strona się ładuje...
Strona się ładuje...
Strona się ładuje...
Strona się ładuje...
Strona się ładuje...
Strona się ładuje...
Strona się ładuje...
Strona się ładuje...
Strona się ładuje...
Strona się ładuje...
Strona się ładuje...
Strona się ładuje...
Strona się ładuje...
Strona się ładuje...
Strona się ładuje...
Strona się ładuje...
Strona się ładuje...
Strona się ładuje...
Strona się ładuje...
Strona się ładuje...
Strona się ładuje...
Strona się ładuje...
Strona się ładuje...
Strona się ładuje...
Strona się ładuje...
Strona się ładuje...
Strona się ładuje...
Strona się ładuje...
Strona się ładuje...
Strona się ładuje...
Strona się ładuje...
Strona się ładuje...
Strona się ładuje...
Strona się ładuje...
Strona się ładuje...
Strona się ładuje...
Strona się ładuje...
Strona się ładuje...
Strona się ładuje...
Strona się ładuje...
Strona się ładuje...
Strona się ładuje...
Strona się ładuje...
Strona się ładuje...
Strona się ładuje...
Strona się ładuje...
Strona się ładuje...
Strona się ładuje...
Strona się ładuje...
Strona się ładuje...
Strona się ładuje...
Strona się ładuje...
Strona się ładuje...
Strona się ładuje...
Strona się ładuje...
Strona się ładuje...
Strona się ładuje...
Strona się ładuje...
Strona się ładuje...
Strona się ładuje...
Strona się ładuje...
Strona się ładuje...
Strona się ładuje...
Strona się ładuje...
Strona się ładuje...
Strona się ładuje...
Strona się ładuje...
Strona się ładuje...
Strona się ładuje...
Strona się ładuje...
Strona się ładuje...
Strona się ładuje...
Strona się ładuje...
Strona się ładuje...
Strona się ładuje...
Strona się ładuje...
Strona się ładuje...
Strona się ładuje...
Strona się ładuje...
Strona się ładuje...
Strona się ładuje...
Strona się ładuje...
Strona się ładuje...
Strona się ładuje...
Strona się ładuje...
Strona się ładuje...
Strona się ładuje...
Strona się ładuje...
Strona się ładuje...
Strona się ładuje...
Strona się ładuje...
Strona się ładuje...
Strona się ładuje...
Strona się ładuje...
Strona się ładuje...
Strona się ładuje...
Strona się ładuje...
Strona się ładuje...
Strona się ładuje...
Strona się ładuje...
Strona się ładuje...
Strona się ładuje...
Strona się ładuje...
Strona się ładuje...
Strona się ładuje...
Strona się ładuje...
Strona się ładuje...
Strona się ładuje...
Strona się ładuje...
Strona się ładuje...
Strona się ładuje...
Strona się ładuje...
Strona się ładuje...
Strona się ładuje...
Strona się ładuje...
Strona się ładuje...
Strona się ładuje...
Strona się ładuje...
Strona się ładuje...
Strona się ładuje...
Strona się ładuje...
Strona się ładuje...
Strona się ładuje...
Strona się ładuje...
Strona się ładuje...
Strona się ładuje...
Strona się ładuje...
Strona się ładuje...
Strona się ładuje...
Strona się ładuje...
Strona się ładuje...
Strona się ładuje...
Strona się ładuje...
Strona się ładuje...
Strona się ładuje...
Strona się ładuje...
Strona się ładuje...
Strona się ładuje...
Strona się ładuje...
Strona się ładuje...
Strona się ładuje...
Strona się ładuje...
Strona się ładuje...
Strona się ładuje...
Strona się ładuje...
Strona się ładuje...
Strona się ładuje...
Strona się ładuje...
Strona się ładuje...
Strona się ładuje...
Strona się ładuje...
Strona się ładuje...
Strona się ładuje...
Strona się ładuje...
-
 1
1
-
 2
2
-
 3
3
-
 4
4
-
 5
5
-
 6
6
-
 7
7
-
 8
8
-
 9
9
-
 10
10
-
 11
11
-
 12
12
-
 13
13
-
 14
14
-
 15
15
-
 16
16
-
 17
17
-
 18
18
-
 19
19
-
 20
20
-
 21
21
-
 22
22
-
 23
23
-
 24
24
-
 25
25
-
 26
26
-
 27
27
-
 28
28
-
 29
29
-
 30
30
-
 31
31
-
 32
32
-
 33
33
-
 34
34
-
 35
35
-
 36
36
-
 37
37
-
 38
38
-
 39
39
-
 40
40
-
 41
41
-
 42
42
-
 43
43
-
 44
44
-
 45
45
-
 46
46
-
 47
47
-
 48
48
-
 49
49
-
 50
50
-
 51
51
-
 52
52
-
 53
53
-
 54
54
-
 55
55
-
 56
56
-
 57
57
-
 58
58
-
 59
59
-
 60
60
-
 61
61
-
 62
62
-
 63
63
-
 64
64
-
 65
65
-
 66
66
-
 67
67
-
 68
68
-
 69
69
-
 70
70
-
 71
71
-
 72
72
-
 73
73
-
 74
74
-
 75
75
-
 76
76
-
 77
77
-
 78
78
-
 79
79
-
 80
80
-
 81
81
-
 82
82
-
 83
83
-
 84
84
-
 85
85
-
 86
86
-
 87
87
-
 88
88
-
 89
89
-
 90
90
-
 91
91
-
 92
92
-
 93
93
-
 94
94
-
 95
95
-
 96
96
-
 97
97
-
 98
98
-
 99
99
-
 100
100
-
 101
101
-
 102
102
-
 103
103
-
 104
104
-
 105
105
-
 106
106
-
 107
107
-
 108
108
-
 109
109
-
 110
110
-
 111
111
-
 112
112
-
 113
113
-
 114
114
-
 115
115
-
 116
116
-
 117
117
-
 118
118
-
 119
119
-
 120
120
-
 121
121
-
 122
122
-
 123
123
-
 124
124
-
 125
125
-
 126
126
-
 127
127
-
 128
128
-
 129
129
-
 130
130
-
 131
131
-
 132
132
-
 133
133
-
 134
134
-
 135
135
-
 136
136
-
 137
137
-
 138
138
-
 139
139
-
 140
140
-
 141
141
-
 142
142
-
 143
143
-
 144
144
-
 145
145
-
 146
146
-
 147
147
-
 148
148
-
 149
149
-
 150
150
-
 151
151
-
 152
152
-
 153
153
-
 154
154
-
 155
155
-
 156
156
-
 157
157
-
 158
158
-
 159
159
-
 160
160
-
 161
161
-
 162
162
-
 163
163
-
 164
164
-
 165
165
-
 166
166
-
 167
167
-
 168
168
-
 169
169
-
 170
170
-
 171
171
-
 172
172
-
 173
173
-
 174
174
-
 175
175
-
 176
176
-
 177
177
-
 178
178
-
 179
179
-
 180
180
-
 181
181
-
 182
182
-
 183
183
-
 184
184
-
 185
185
-
 186
186
-
 187
187
-
 188
188
-
 189
189
-
 190
190
-
 191
191
-
 192
192
-
 193
193
-
 194
194
-
 195
195
-
 196
196
-
 197
197
-
 198
198
-
 199
199
-
 200
200
-
 201
201
-
 202
202
-
 203
203
-
 204
204
-
 205
205
-
 206
206
-
 207
207
-
 208
208
-
 209
209
-
 210
210
-
 211
211
-
 212
212


w innych językach
- español: Vermeiren Inovys II Manual de usuario
- italiano: Vermeiren Inovys II Manuale utente
- Deutsch: Vermeiren Inovys II Benutzerhandbuch
- français: Vermeiren Inovys II Manuel utilisateur
- Nederlands: Vermeiren Inovys II Handleiding
Powiązane artykuły
-
Vermeiren Inovys II Instrukcja obsługi
-
-
Vermeiren Inovys II-E Instrukcja obsługi
-
-
Vermeiren 28 Instrukcja obsługi
-
-
Vermeiren Trigo T Instrukcja obsługi
-
-
Vermeiren V300 DL Instrukcja obsługi
-
