AAT NVIP-2DN3033V/IR-1P-II Instrukcja obsługi
- Kategoria
- Kamery ochrony
- Typ
- Instrukcja obsługi

U s e r ’s m a n u a l
NVIP-3000 series IP camera

NVIP-3000 series IP camera user’s manual
All rights reserved © AAT Holding S.A.
2
TABLE OF CONTENTS
TABLE OF CONTENTS ..................................................................................................... 2
1. START-UP AND INITIAL IP CAMERA CONFIGURATION ................................. 4
1.1. Overview ............................................................................................................. 4
1.2. Starting the IP camera .......................................................................................... 4
1.3. Initial configuration via the web browser ............................................................ 5
2. NETWORK CONNECTION UTILIZING WEB BROSWER .................................. 6
2.1. Recommended PC specification for web browser ............................................... 6
2.2. Connection with IP camera via web browser ....................................................... 6
3. USING AND CONFIGURING ....................................................................................... 8
3.1. Remote Preview Interface. ................................................................................... 8
3.2. . ............................................................................................................................. 9
4. RECORDS. ....................................................................................................................... 9
5. SETTINGS. ..................................................................................................................... 11
5.1 System ................................................................................................................ 11
5.1.1 Basic Information ....................................................................................... 11
5.1.2 Date and Time ............................................................................................ 12
5.1.3 Local Config .............................................................................................. 13
5.1.4 Storage ....................................................................................................... 13
5.2. Image .................................................................................................................. 14
5.2.1 Display Settings ......................................................................................... 14
5.2.2 Vide/Audio ................................................................................................. 15
5.2.3 OSD ............................................................................................................ 16
5.2.4 Video Mask ................................................................................................ 17
5.2.5 ROI ............................................................................................................. 17
5.2.6 Zoom/Focus ............................................................................................... 18
5.3 PTZ ..................................................................................................................... 19
5.4.Alarm .................................................................................................................... 20
5.4.1 Motion Detection ....................................................................................... 20
5.4.2 Alarm In ..................................................................................................... 22
5.4.3 Alarm Out .................................................................................................. 23
5.5 Events ................................................................................................................. 24
5.5.1 Object Removal .......................................................................................... 24
5.5.2 Exception ................................................................................................... 25

NVIP-3000 series IP camera user’s manual
All rights reserved © AAT Holding S.A.
3
5.5.3Line Crossing .............................................................................................. 26
5.5.4 Intrusion. .................................................................................................... 27
5.6 Network ................................................................................................................ 28
5.6.1 TCP/IP ....................................................................................................... 28
5.6.2 IPv6 ............................................................................................................ 28
5.6.3 PPPoE Config ............................................................................................ 28
5.6.4 IP Change Notificaton Config ................................................................... 24
5.6.5 Port ............................................................................................................. 28
5.6.6 DDNS ........................................................................................................ 29
5.6.7 SNMP ......................................................................................................... 29
5.6.8 RTSP .......................................................................................................... 29
5.6.9 UPnP .......................................................................................................... 30
5.6.10 Email. ........................................................................................................ 30
5.6.11 FTP ........................................................................................................... 31
5.7. Security .............................................................................................................. 32
5.7.1 User ............................................................................................................ 32
5.7.2 Online User ................................................................................................. 32
5.7.3 Block and Allow Lists ................................................................................ 32
5.8. Maintenance ....................................................................................................... 33
5.8.1 Backup and Restore .................................................................................... 33
5.8.2 Reboot ......................................................................................................... 33
5.8.3 Upgrade ...................................................................................................... 33
5.8.3 Operation Log ............................................................................................. 33
6. RESTORE TO DEFAULT ........................................................................................... 34
TABLE OF CONTENTS

NVIP-3000 series IP camera user’s manual
All rights reserved © AAT Holding S.A.
4
START-UP AND INITIAL CAMERA CONFIGURATION
1. START-UP AND INITIAL IP CAMERA CONFIGURATION
1.1. Overview
Following manual for IP Cameras NVIP-3000 series contains detailed information about camera
connection and operation, main page introduction, system related settings and camera settings.
Note
In this document you can find all available functionality. Depending on camera model some features
might be unavailable.
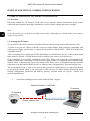
1.2. Starting the IP camera
To run NOVUS IP camera you have to connect ethernet cable between camera and network switch.
To power it up you can connect it directly via power supply adapter with parameters compatible with
camera power supply specification, or camera can be powered with PoE/PoE+ (IEEE 802.3af/802.3at)
compatible switch.
After connecting power supply green LED should light on. Initialization process is then started which
takes about 30 seconds. You can then proceed to connect to the camera via web browser.
If the connection is successfully established orange LED blinks with a frequency proportional to the
quantity of data sent. Connecting via web browser is then possible. If connection isn’t established (the
network cable is disconnected) green and orange LEDs aren't active, solid light means that network
connection is ok but camera doesn't receive or send any data, with possible PC network settings error.
The recommended way to start an IP camera and perform its configuration is a connection directly
to the network switch which is not connected to other devices. To obtain further information about
network configuration parameters (IP address, gateway, network mask, etc.) please contact your
network administrator.
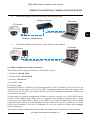
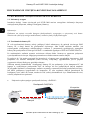
• Connection utilising network switch with PoE/PoE+ support
Computer
IP Camera
Network Switch PoE/PoE+
Network transmission
Power supply and

NVIP-3000 series IP camera user’s manual
All rights reserved © AAT Holding S.A.
5
START-UP AND INITIAL CAMERA CONFIGURATION
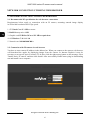
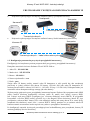
• Connection utilising external power supply and network switch
• Connection utilising external power supply directly to the computer
1.3. Initial configuration via the web browser
The default network settings for IP camera NVIP-7000 series are:
1. IP address= 192.168.1.200
2. Network mask - 255.255.255.0
3. Gateway - 192.168.1.1
4. User name - root
5. Password - pass
Knowing the camera’s IP address you need to appropriately set PC IP address, so the two devices can
operate in one network subnet ( e.g. for IP 192.168.1.1, appropriate address for the camera ranges from
192.168.1.2 to 192.168.1.254, for example 192.168.1.60). It is not allowed to set the same addresses for
camera and PC computer
You can either set a network configuration (IP address, gateway, net mask, etc.) of NOVUS IP camera
yourself or select DHCP mode (DHCP server is required in this method in target network) by using
web browser or by NMS software. When you use DHCP server check IP address lease and its linking
with camera MAC address to avoid changing or losing IP address during device operation or network/
DHCP server breakdown. You have to remember to use a new camera IP address after changing
network parameters.
After network setting configuration has been done, the camera can be connected to a target network.
Network transmission - cross over cable
IP Camera
Computer
IP Camera
Network transmission
Network Switch
Computer
Network transmission

NVIP-3000 series IP camera user’s manual
All rights reserved © AAT Holding S.A.
6
2. NETWORK CONNECTION UTILIZING WEB BROSWER
2.1. Recommended PC specification for web browser connections
Requirements below apply to connection with an IP camera, assuming smooth image display
in 1920x1080 resolution and 25 fps speed.
1. CPU Intel Core i3 3 GHz or newer
2. RAM Memory min. 4 GB
3. Graphic card NVIDIA GeForce 512 MB or equivalent
4. OS Windows 7 / 8 / 8.1 / 10
5. Network card 10/100/1000 Mb/s
2.2. Connection with IP camera via web browser
You have to enter camera IP address in the address bar. When you connect to the camera, web browser
will download the applet for displaying images from the camera. In Internet Explorer it may be
necessary to accept an ActiveX control. To do this, click the right mouse button on the message, select
"Install Active X control" and then click Install. After successfully NetIPCamera plug in downloading
run and install it on a computer.
NETWORK CONNECTION UTILIZING WEB BROWSER

NVIP-3000 series IP camera user’s manual
All rights reserved © AAT Holding S.A.
7
If the installation fails, changing security settings for the IE browser is required. In order to do that,
please choose: Tools > Internet options > Security tab > Custom level and:
• Under Download unsigned ActiveX controls - select either Enable or Prompt
• Under Initialize and script ActiveX controls not marked as safe - select Enable or Prompt
You can also add the camera’s IP address to “trusted zone” and set lowest security level for it.
In addition, when working in Windows / 7 / 8 / 8.1 / 10 the ActiveX applet may be blocked by
Windows Defender or User account control. In such case you should allow to run this applet, or simply
disable these functions.
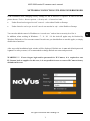
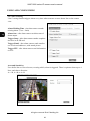
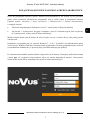
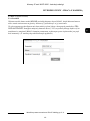
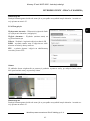
After successful installation login window will be displayed. Default user is root and default password
is pass. For safety reasons, it is recommended to change default user name and password.
WARNING !!! If user forgets login and/or password for IP Camera, it is required to sent
IP Camera back to supplier. In this case, it is not possible for user to restore IP Camera factory
defaults on his own.
NETWORK CONNECTION UTILIZING WEB BROWSER

NVIP-3000 series IP camera user’s manual
All rights reserved © AAT Holding S.A.
8
3. USING AND CONFIGURING
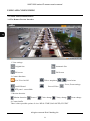
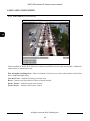
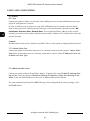
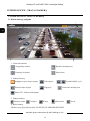
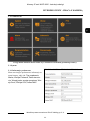
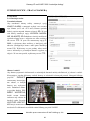
3.1 The Remote Preview Interface
1. View settings
Original size Automatic Size
Fill screen Full Screen
2. Camera functions
Live View On/Off Take a snapshoot Zoom In/out
On/Off Sound Record Video
PTZ panel – unavailable
3. Motion detection
Motion detection Sensor1 Color change Clarity change Scene change
4. Camera buffer
There is three possible options of view: REAL-TIME, BALANCED, FLUENT
USING AND CONFIGURING
Focus, Zoom settings

NVIP-3000 series IP camera user’s manual
All rights reserved © AAT Holding S.A.
9
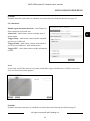
3.2 Focus and Zoom Settings
Camera got build in panel that allow user to set Zoom and Focus Value
Zoom Out
Zoom In
Focus Out
Focus In
One key focus
Auto Zoom Menu On/Off
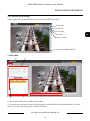
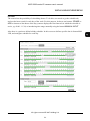
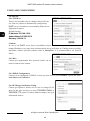
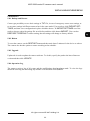
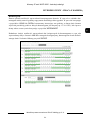
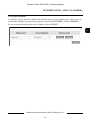
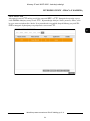
4. RECORDS
1. Switch between Pictures and Recorded Videos
2. Choose between pictures/videos in local storage or saved on SD card (selected models). At calen-
dar user can see witch day got any records (red color).
USING AND CONFIGURING
1
2
3
4
5

NVIP-3000 series IP camera user’s manual
All rights reserved © AAT Holding S.A.
10
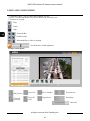
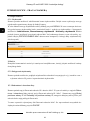
3. Available videos - list of videos that available for user
4. View - records and number of preview that can be search by user
5. Preview or records:
- Play
- Pause
- Stop
- Forward/Rev.
- Next/Previous
- Watermark/Save video to desktop
- On/Off Audio, sound regulation
Picture search panel
Off preview
Close all
previews
USING AND CONFIGURING
Fit to window
Orginal size
Zoom in/out
Start/Stop
Intervals
Save file
Save all
files

NVIP-3000 series IP camera user’s manual
All rights reserved © AAT Holding S.A.
11
5. SETTINGS
Notice: menu may looks different depends of camera model!
5.1 System
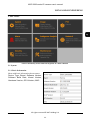
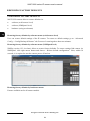
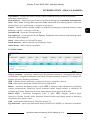
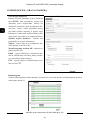
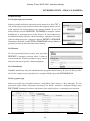
5.1.1 Basic Information
Menu with basic information about camera.
Device Type, Brand, Software Version,
Software Build Date, Kernel Version,
Hardware Version, OCX Version, MAC
USING AND CONFIGURING

NVIP-3000 series IP camera user’s manual
All rights reserved © AAT Holding S.A.
12
USING AND CONFIGURING
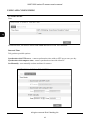
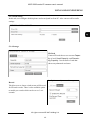
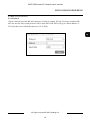
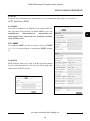
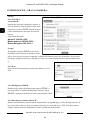
5.1.2 Date & Time
Zone
In Zone tab user, can choose actual Time Zone and turn on or off DST function.
Date and Time
Tab got three possible options:
Synchronize with NTP server - camera synchronizes time with set NTP server once per day.
Synchronize with computer time - camera synchronizes time with client PC
Set Manually - user manually set date and time for camera.

NVIP-3000 series IP camera user’s manual
All rights reserved © AAT Holding S.A.
13
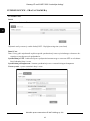
5.1.3 Local config
In this tab, user configure default picture and record path in client PC. Also can turn off/on audio
settings.
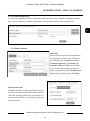
5.1.4 Storage
SD Card
Camera SD card shows user current Capac-
ity of card, Used Capacity and Remain-
ing Capacity. Current State of card that
shows any abnormal card state.
Record
Tab allow user to choose witch stream will be used
for SD card records. There is also available option
to enable pre records which can be set on 3 or 6
seconds.
USING AND CONFIGURING

NVIP-3000 series IP camera user’s manual
All rights reserved © AAT Holding S.A.
14
5.2 IMAGE
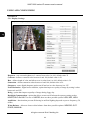
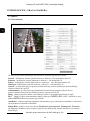
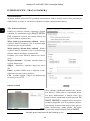
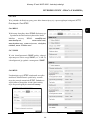
5.2.1 Display Settings
Brigtness - sets current brightness of camera from value 0 to 100, default value 25
Contrast - defines a contrast value between 0 and 100, default value is 50
Hue - defines depth of color and allow to set it value from 0 to 100, default value is 50
Saturation - defines saturation value between 0 and 100, default value is 50
Sharpness - turns digital sharpness option on/off and set its value between 0 to 255
Noise Reduction - digital noise reduction, option that improves quality of image by setting it value
between 0 and 255.
Defog - option that improves quality of image during foggy day.
Backlight Compensation - option that allows to turn on/off advanced exposure setting such as
HWDR, BLC and HLC. In case of HWDR, there are three possible options LOW, MID, HIGH.
Antiflicker - function that prevents flickering in artificial lighting depends on power frequency (50,
60Hz)
White Balance - allows to choose white balance from three possible options: INDOOR, OUT-
DOOR, MANUAL.
USING AND CONFIGURING

NVIP-3000 series IP camera user’s manual
All rights reserved © AAT Holding S.A.
15
Frequency - switches camera between 50Hz and 60Hz mode (change frequency will restart the de-
vice)
Day/Night mode - switches camera between Day/Night mode. Available options: Auto, Day,
Night, Schedule
Sensitivity - settings for camera day/night switching sensor, possible settings: HIGH, MID, LOW
Infra-red Mode - allows user to manual switch camera IR Illuminator, independently to current day
or night mode. Available options: AUTO, ON, OFF
Exposure Mode - after switch to manual mode user can define shutter value form 1/1 to 100000,
default 1/25
Corridor Pattern - rotates image by 90, 180 or 270 degrees.
Image Mirror - turns on mirror mode.
Image Flip - flips image horizontally
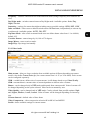
5.2.2 Video/Audio
Main stream - allows to chose resolution from available options (different depending on camera
model). Also define Frame Rate (fps) for current stream from 1 to 25 (or 30 in 60Hz). Each stream
can be configured separately.
VBR - variable bitrate, defines size of current stream, it will change based on set Video Quality
CBR - constant bitrate, constant value of stream dependent on chosen value of bitrate.
Bitrate - can be changed only in CBR mode and depends from camera model. Value of stream will
be changed depending on the option selected. Value can be set manual by user.
Video Quality - can be changed only in VBR mode. Can be selected from possible options: High-
est, Higher, Medium, Lower, Lowest. Value of bitrate will be changed depending on chosen op-
tion
I Frame Interval - defined value of base frame
Video Compression - video compression selection H.264/H.265 and MJPEG
Profile - chose available settings for current stream
USING AND CONFIGURING

NVIP-3000 series IP camera user’s manual
All rights reserved © AAT Holding S.A.
16
Also in same tab there is a option to choose and configure snapshots. User chooses which of availa-
ble streams will be used to make snapshots.
Video encode slice split - option not available
Watermark - option not available
Audio
Audio tab allow user to change default audio
codec. Option to switch between build in mi-
crophone (MIC) and line in connector. (on se-
lected models)
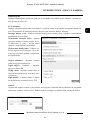
5.2.3 OSD
Camera got option to display information on screen in live preview.
Date Format - change available options for date format (YYYY/MM/DD, MM/DD/YYYY, DD/
MM/YYYY)
Device name - displays name of the device
OSD Content - additional place for extra information about camera
Each of chosen information can be displayed in different place on the screen.
USING AND CONFIGURING

NVIP-3000 series IP camera user’s manual
All rights reserved © AAT Holding S.A.
17
USING AND CONFIGURING
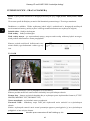
5.2.4 Video Mask
Camera got 4 defined video mask. To set them
user need to chose option Draw Area and then
draw which area need to be hide on live pre-
view. To turn selected zones on, check option
Enable and then click Save button. To clear
all drawn zones click Clear button.
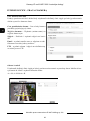
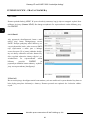
5.2.5 ROI
ROI zones allows user to focus on specific area of the screen. Those zones selected by user are in
much better quality then rest of the screen.
User can set up to 3 ROI zones. To draw zone user need to click DRAW AREA button and then
chose draw zone on the preview screen. After select OPEN and pres button SAVE zones is as-
signed to the live preview. Using slider user can choose LEVEL of quality for ROI zones.

NVIP-3000 series IP camera user’s manual
All rights reserved © AAT Holding S.A.
18
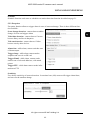
5.2.6 Lens control (selected models)
Chosen models of NOVUS IP 3000 series cameras got build in motor-zoom lens module. Additional
menu allows to control these lens.
Day and night switching focus - allow to automatic focus lens every time when camera switch form
day to night and night to day.
One Key Focus - instantly focusing on current view
Reset - camera reset lens position of lens to factory default.
Zoom– Zoom+ - manual camera zoom control
Focus-/Focus+ - manual camera focus control
USING AND CONFIGURING

NVIP-3000 series IP camera user’s manual
All rights reserved © AAT Holding S.A.
19
5.3 PTZ (selected models)
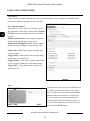
5.3.1 Protocol
Chosen cameras got active RS-485 connector. It allow to control PT unit. To proper configure RS-
485 user need to chose witch protocol will be used (PELCOD, PELCOP), give camera address (1-
255) and chose one of defined baud rate (110-115200).
USING AND CONFIGURING

NVIP-3000 series IP camera user’s manual
All rights reserved © AAT Holding S.A.
20
USING AND CONFIGURING
5.4 Alarm
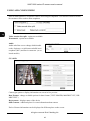
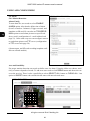
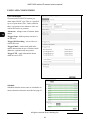
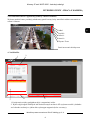
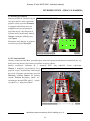
5.4.1 Motion Detection
Alarm Config
To turn alarm on, user needs to select ENABLE
ALARM option. After that he define time of alarm
(from 5 seconds to 2 minutes). Trigger rerecord and
snapshot on SD card. He can also use TRIGGER E-
MAIL option to send alarm pictures on specific ad-
dress e-mail, (configuration of e-mail address look
page 23). In the same way user can configure camera
to send alarm pictures on FTP server (configuration
of FTP server look page 24).
(Alarm output, and SD card recording/snapshot avail-
able on selected models)
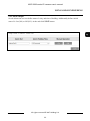
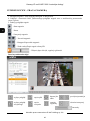
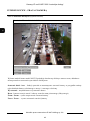
Area and Sensibility
For proper motion detection user needs to define zone for alarm. Using the slider user choose sensi-
tivity of camera depends of needs. To add areas user need to click DRAW button and then select ar-
ea on the preview. There is also a possibility to select SELECT ALL button or CLEAR ALL. Last
option is INVERT button who switch selected zones with non selected areas.
Strona jest ładowana ...
Strona jest ładowana ...
Strona jest ładowana ...
Strona jest ładowana ...
Strona jest ładowana ...
Strona jest ładowana ...
Strona jest ładowana ...
Strona jest ładowana ...
Strona jest ładowana ...
Strona jest ładowana ...
Strona jest ładowana ...
Strona jest ładowana ...
Strona jest ładowana ...
Strona jest ładowana ...
Strona jest ładowana ...
Strona jest ładowana ...
Strona jest ładowana ...
Strona jest ładowana ...
Strona jest ładowana ...
Strona jest ładowana ...
Strona jest ładowana ...
Strona jest ładowana ...
Strona jest ładowana ...
Strona jest ładowana ...
Strona jest ładowana ...
Strona jest ładowana ...
Strona jest ładowana ...
Strona jest ładowana ...
Strona jest ładowana ...
Strona jest ładowana ...
Strona jest ładowana ...
Strona jest ładowana ...
Strona jest ładowana ...
Strona jest ładowana ...
Strona jest ładowana ...
Strona jest ładowana ...
Strona jest ładowana ...
Strona jest ładowana ...
Strona jest ładowana ...
Strona jest ładowana ...
Strona jest ładowana ...
Strona jest ładowana ...
Strona jest ładowana ...
Strona jest ładowana ...
Strona jest ładowana ...
Strona jest ładowana ...
Strona jest ładowana ...
Strona jest ładowana ...
Strona jest ładowana ...
Strona jest ładowana ...
Strona jest ładowana ...
Strona jest ładowana ...
-
 1
1
-
 2
2
-
 3
3
-
 4
4
-
 5
5
-
 6
6
-
 7
7
-
 8
8
-
 9
9
-
 10
10
-
 11
11
-
 12
12
-
 13
13
-
 14
14
-
 15
15
-
 16
16
-
 17
17
-
 18
18
-
 19
19
-
 20
20
-
 21
21
-
 22
22
-
 23
23
-
 24
24
-
 25
25
-
 26
26
-
 27
27
-
 28
28
-
 29
29
-
 30
30
-
 31
31
-
 32
32
-
 33
33
-
 34
34
-
 35
35
-
 36
36
-
 37
37
-
 38
38
-
 39
39
-
 40
40
-
 41
41
-
 42
42
-
 43
43
-
 44
44
-
 45
45
-
 46
46
-
 47
47
-
 48
48
-
 49
49
-
 50
50
-
 51
51
-
 52
52
-
 53
53
-
 54
54
-
 55
55
-
 56
56
-
 57
57
-
 58
58
-
 59
59
-
 60
60
-
 61
61
-
 62
62
-
 63
63
-
 64
64
-
 65
65
-
 66
66
-
 67
67
-
 68
68
-
 69
69
-
 70
70
-
 71
71
-
 72
72


AAT NVIP-2DN3033V/IR-1P-II Instrukcja obsługi
- Kategoria
- Kamery ochrony
- Typ
- Instrukcja obsługi
w innych językach
Powiązane dokumenty
-
Novus NVIP-2V-6401 (NVIP-2DN3031V/IR-1P-II) Instrukcja obsługi
-
-
-
Novus NVIP-5H-6502M/F Instrukcja obsługi
-
-
-
-