Hendi 225059 Instrukcja obsługi
- Kategoria
- Piekarniki
- Typ
- Instrukcja obsługi

Ite
m:
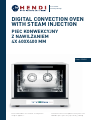
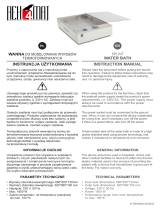
DIGITAL CONVECTION OVEN
WITH STEAM INJECTION
PIEC KONWEKCYJNY
Z NAWILŻANIEM
4X X MM
You should read this user manual carefully before
using the appliance
Przed uruchomieniem urządzenia należy koniecznie
dokładnie przeczytać niniejszą instrukcję obsługi
User manual
Instrukcja obsługi

2
INDEX
1. Technical service ............................................................................. 3
2. General warnings ............................................................................ 3
3. Technical specifi cations .................................................................. 4
4. Instructions for the installer ........................................................... 4
5. Use instructions (for the user) ....................................................... 6
6. Residual risks (for the user) .......................................................... 7
7. How to use the control panel ......................................................... 7
8. Ignition ............................................................................................ 7
9. Switch-off ....................................................................................... 8
10. Operation mode .............................................................................. 8
11. Cooking cycle ON/OFF ................................................................... 8
12. Displaying / changing parameters with the cooking cycle ON ..... 9
13. Delayed start to the cooking cycle ................................................ 9
14. “Programmed” mode ....................................................................10
15. Saving cooking programs .............................................................10
16. Cooking with a saved program .....................................................10
17. Manual humidifying ......................................................................10
18. Door device ....................................................................................11
19. Black – out .....................................................................................11
20. Oven cooking .................................................................................11
21. Routine cleaning and maintenance ...............................................11
22. Possible faults ................................................................................13
23. Technical assistance ......................................................................14
24. Informations to the consumers .....................................................14
25. Wiring layouts ................................................................................15
Keep this manual with the appliance.
Zachowaj instrukcję urządzenia.
For indoor use only.
Do użytku wewnątrz pomieszczeń.

3
EN
Dear Customer,
Thank you for purchasing this Hendi appliance. Please read this manual carefully before connecting the
appliance in order to prevent damage due to incorrect use. Read the safety regulations in particular very
carefully.
1. TECHNICAL SERVICE
A technical check-up once or twice a year helps pro-
long the life of the appliance and guarantees better
operation. Make sure that assistance is carried out
solely and exclusively by qualifi ed personnel. For
any spare parts orders or for any information about
the appliance, always mention the serial number
and model (data indicated on the “technical data”
plate at the rear of the oven).
2. GENERAL WARNINGS
• If, on receipt of the goods, the packaging is dam-
aged, write the following on the delivery note:
“I REVERSE THE RIGHT TO CONTROL THE
GOODS”,
specify the damage and get the driver
to sign in acceptance; send a claim in writing to
the seller within 4 calendar days from the date
of receipt. No claim shall be accepted after such
period.
• The warehouse inside temperature must not be
lower than -9°C; otherwise, the thermostat (reg-
ulation and safety thermostat) control devices of
the machine will be damaged. Failure to observe
this prohibition invalidates any responsibility of
the manufacturer of the machine.
• The appliance is intended for professional use
and must be utilised by qualifi ed personnel
trained to use it.
• Any modifi cation which may be necessary on the
electrical system to enable installation of the ap-
pliance, must be carried out solely by competent
personnel.
• It is dangerous to modify or attempt to modify the
characteristics of this appliance.
• Never clean the appliance with direct water jets,
because, if any water enters, it could limit the
machine’s safety.
• Before doing any maintenance or cleaning jobs,
disconnect the appliance from the electrical
mains and allow it to cool.
• When the tilting door is wide open, do not put an-
ything
on the surface, because the door hinges
could be irreparably damaged.
• Do not attempt to carry out the periodic controls
or any repairs by yourself. Contact the nearest
Service Centre and use only original spare parts.
N.B.: Improper or incorrect use and failure to ob-
serve the installation instructions shall release
the manufacture from all responsibility. In this
connection, the directives in the “POSITIONING”
paragraph must be strictly observed.

4
EN
3. TECHNICAL SPECIFICATIONS
Dimensions of appliance LxDxH
90xx(H) mm
Weight 8kg
Tray maximal load kg
Total load trays kg
Convection heating element kW
Max. absorbed power kW
Power supply voltage V, 50/60 Hz
Power cable diameter x ,5 mm
2
Type of cable H07RN-F
Connecting electric cable Tipo Y
Class I
Degree of protection against humidity IPX3
Water pressure 100-200 kPa
The noise level of the appliance in operation is below 70 dB (A).
The “technical data” plate is positioned on the rear panel of the appliance.
4. INSTRUCTIONS FOR THE INSTALLER
The following instructions are aimed at the quali-
fi ed installer, to ensure that he carries out the in-
stallation, adjustment and maintenance operations
as correctly as possible and according to current
legal regulations. Any operation must be per-
formed with electrical power cut to the appliance.
Before using the appliance, carefully remove the
special adhesive fi lm protecting the parts in stain-
less steel. Do not leave any glue residues on the
surfaces. If necessary, remove them at once, with
an appropriate solvent.
Fitting the feet
The feet are inside the appliance and must be secured on the four threaded holes on the base. If necessary,
the height of the feet can be adjusted by screwing or unscrewing.
Positioning
Position the appliance perfectly horizontally on
a table or similar support (the table or support
must be at least 85 cm above the fl oor). Position it
at a distance of not less than 10 cm from the side
and rear walls, to enable natural ventilating air to
circulate freely around it.
The appliance is not suitable for embedding and
for grouped positioning with other identical appli-
ances.
Electrical connection
The appliance must be connected to the electri-
cal mains according to current legal regulations.
Before making the connection, make sure of the
following:
• the voltage and frequency values of the power
supply system match the values on the “technical
data” plate affi xed on the appliance;
• the limiting valve and the system are able to support
the appliance’s load (see the “technical data” plate);
• the power supply system has an adequate
earth
connection according to current legal
regulations;

5
EN
• a omnipolar switch with minimum between-con-
tacts aperture of the overvoltage category III (4000
V),
sized to the load and conforming to current
legal regulations, is fi tted between the appliance
and the mains in the direct connection to the
mains;
• the omnipolar switch used for connection is easy
to reach when the appliance is installed;
• the yellow/green earth wire is not interrupted
by the switch;
• the power supply, when the appliance is operat-
ing, must not deviate from the rated voltage value
by ±10%;
• make sure that after inserting the power supply
cord into the terminal block it does not come into
contact with any of the cooking range’s hot parts.
• if the supply cable is damaged then it must be
replaced by the manufacturer or by your tech-
nical support or by a qualified person to avoid
any risk.
Connection to the water mains
(for ovens predisposed to humidifi er solenoid-valve)
The appliance must be fed with softened drinking
water, with pressure in the range from 100 to 200 kPa
(1.0
- 2.0 bar). Water must have hardness from 0.5°F to
3°F (it is suggstible to use a softener as to avoid the
malfunction of the fan, the breakage of the heating
element and to reduce the formation of lime inside
the cooking chamber). Connection to the water
mains should be made through the threaded 3/4”
solenoid-valve on the rear (on the bottom) of the
appliance, fi tting in between a mechanical fi lter and
an on/off tap (before you connect the fi lter, allow
a certain quantity of water to fl ow out in order to
drain any waste from the pipe).
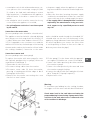
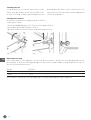
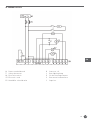
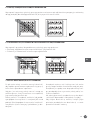
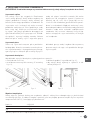
Connection to water tank
(for ovens predisposed to water pump)
To replace electrovalve with water pump (in ovens
with
optional predisposition to pump), follow the
steps below listed (image 1):
1. Remove back cover from oven.
2. Disconnect wiring cables from electrovalve.
3. Disconnect water tube (3) from electrovalve,
pressing e keeping pressed the edge of black
linking (quick insertion).
4. Remove the electrovalve unscrewing the screw
that fi x it to oven’s frame.
5. Fix the pump (1) to the frame with the appropri-
ate support (2) and the two screws (4) included.
6. Connect the cables previously disconnected from
electrovalve to pump.
7. Connect the tube previously disconnected from
electrovalve to pump’s linking.
8.
Connect the tube (6) with fi lter and ballast (includ-
ed
in “Pump kit”) to pump’s apron (7).
9. Replace back cover.
Warning:
To avoid limestone buildup into the cooking chamber,
we suggest to fi ll the water tank with decalcifi ed water.
Check water level in the tank before activating the
pump and during its functioning. If pump works with-
out water in the tank, what occurs is abnormal noise
at first and then its breakage.
Fig. 1

6
EN
Connecting the power cable:
The terminal board is on the rear panel of the ap-
pliance. Open the terminal board cover by obtain-
ing leverage with a screwdriver on the two side fi ns.
Loosen the cable gripper screw and allow the ca-
ble to pass through it. Arrange the conductors so
that the earth conductor is the last to detach from
its terminal if the cable goes into a state of faulty
traction. Connect the phase conductor to the ter-
minal marked with the letter “L”, the neutral
conductor to the terminal marked with the let-
ter “N” and the earth conductor to the terminal
marked with the symbol
.
Tighten the ring-nut of the cable gripper and close
the terminal board cover.
Tighten the cable gripper and re-fi t the rear side-panel
of the appliance.
Any appliance must be connected to an equipoten-
tial system whose effi ciency must fi rst be checked
according to current legal regulations.
This connection must be made between differ-
ent appliances by using the appropriate terminal
marked
with the symbol . The equipotential con-
ductor must
have a minimum diameter of 2,5 mm
2
.
The equipotential terminal is at the rear of the ap-
pliance.
Safety thermal breaker
The appliance is supplied with a manually resetting
thermal breaker to protect against excessive, dan-
gerous temperatures which could be accidentally
generated inside. If it is tripped, the device cuts off
the power supply to the appliance.
The device is located on the back of the unit and is
identifi ed by a suitable label. The reset button can
be activated after unscrewing the black plastic cov-
er and letting the oven cool down.
5. USE INSTRUCTIONS (FOR THE USER)
For fi rst use, we advise you to let the appliance to
run load-free for 30/40 minutes at a temperature
of 200°C. In this way, any unpleasant smells due
to thermal insulation and residual work grease are
eliminated.
This appliance must be used solely for the purpose
for which it was expressly designed, i.e. cooking
foods in the oven. Any other use is considered un-
suitable.
The appliance can be used: for all oven cooking of
deserts, pizzas, meat, fi sh, vegetables, as well as
for re-conditioning cooled and frozen foods.
When placing food in the cooking compartment,
leave a space of at least 40 mm between pans in
order not to over-obstruct air circulation.
Do not use pans with higher than necessary edges:
edges are barriers which prevent the circulation of
hot air (for cooking of bread and pastry; do not use
pans with borders higher than 20 mm, avoid that
products into the pan get in contact).
Warm up the oven before every cooking operation
(set a temperature 30°C higher than cooking tem-
perature) to obtain maximum uniformity. Do not
salt foods in the cooking compartment.
N
230V
L2 L1 N
400V / 2N
L2 L1

7
EN
6. RESIDUAL RISKS (FOR THE USER)
After a cooking operation, open the door cautiously,
to avoid a violent outfl ow of heat which could cause
burns.
While the oven is in operation, pay attention to the
possible hot zones (marked on the appliance) of its
external surfaces.
Place the machine on a bench or similar support,
at a height of at least 85 cm from the fl oor.
The bench or support must be able to support the
weight of the machine and house it correctly.
The appliance contains electrical parts and must
never be washed with a jet of water or steam.
The appliance is electrically connected: before at-
tempting any cleaning operation, cut power to the
appliance.
Do not use the door handle to move the appliance
(the glass panel may break).
When the tilting door is wide open, there is the risk
that things could be placed on the surface with the
risk of irreparably damaging the door hinges.
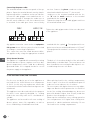
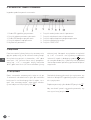
7. HOW TO USE THE CONTROL PANEL
Control Panel symbol legend:
1. Parameter on signal LED 6. Parameter value decrease button
2. Cooking parameter selection button 7. Parameter value increase button
3. Step on signal LED 8. Cooking program select/save button
4. Cooking step selection button 9. Manual humidifying button
5. Parameter display 10. START/STOP button
8. IGNITION
The control panel (digital) automatically turns on
as soon as the oven is electrically powered.
The display shows in succession the following written:
– “r.X.X” where “X.X” indicates the fi rmware revi-
sion number inserted in the electronic board (eg
“r.1.0”).
– “d.XX” where “X.X” is the abbreviation for the card
calibration of the model.
Then “0.00” appears on the display to indicate time
(expressed in hours and minutes) and the time led
turns on in the parameter fi eld (symbol
).
The phase 1 led turns on in the “phase” fi eld (set to
receive cooking parameters).

8
EN
9. SWITCHOFF
The control panel automatically turns off 10 min-
utes after the cooking cycle ends (in “manual”
mode or in “automatic” mode whether switched-
off automatically or by pressing the
START
STOP
button)
without any button being pressed.
The lights in the cooking chamber turn off, the dis-
play and operating function leds turn off.
Only the
START
STOP
button led remains on.
To restart the control panel, simply press the
START
STOP
button.
10. OPERATION MODE
The cooking cycle can be run in “manual” or “programmed” mode which can be divided in 4 steps. TIME/TEM-
PERATURE/HUMIDITY/ “HEART” TEMPERATURE cooking parameters can be set for each step.
MANUAL MODE
To select cooking parameters (TIME/TEMPERA-
TURE/HUMIDITY/“HEART” TEMPERATURE), press
the
SELECT
button the led for the selected parameter
turns on each time the button is pressed. At least
cooking time and temperature parameters must be
set for the cooking cycle to start.
• To select cooking cycle steps (1 – 2 – 3 – 4), press
the button
PHASE
the led relevant to the selected
step turns on each time the button is pressed.
The led relevant to the current step blinks during
the cooking cycle.
• To set or change the selected parameter, press
buttons .
Press button
to increase the parameter.
Press button
to decrease the parameter.
• The time parameter (symbol
) can be set from
0 hours and 01 minutes to 9 hours and 59 min-
utes. If “INF” or “HLD” appear on the display,
this means that the timer is excluded. The oven
operates continuously until manually turned off
with the button
START
STOP
.
When “INF” appears on the display (only displayed
for step 1), steps 2 - 3 - 4 are disabled (leds off).
When “HLD” appears on the display (only displayed
for step 4), this means that the cooking cycle, after
terminating the previous steps, continues without
the timer and with the parameters set for phase 4.
(The cooking cycle is switched off by pressing the
button
START
STOP
). This operation lets the user keep food
“warm” (at the end of the cooking cycle) for the de-
sired amount of time.
The temperature parameter (symbol
) can be set
from 30°C to 260°C.
The humidity parameter (symbol
) can be set
from 0 to 100 (continuous humidity).
N.B.: the “heart” temperature parameter be-
cause it is operating must be set before starting
the cooking cycle.
11. COOKING CYCLE ON/OFF
The cooking cycle starts and stops by pressing the
button
START
STOP
. The resistance, motor and water sole-
noid valve are switched off at the end of the cooking
cycle. The buzzer sounds for 30 seconds and “0.00”
blinks on the display. Temperature/humidity pa-
rameter settings for the last cycle step remain set.
If an “extra-time” is set during the next 30 sec-
onds, the oven automatically restarts and cooking
continues with the temperature and humidity pa-
rameters for the last step used. When “extra time”
has elapsed, the cooking cycle ends.
If the 30 seconds elapse or the cooking cycle is
interrupted by pressing the button
START
STOP
, all set pa-
rameters are reset and the oven readies for new
cooking cycle settings.

9
EN
12. DISPLAYING / CHANGING PARAMETERS WITH THE COOKING CYCLE ON
When the cooking cycle is on, parameters can be displayed by pressing the button
SELECT
and values can be
changed (keys
) in each step (button
PHASE
) in the cooking cycle.
Several seconds after the last change (for any of the four steps) operating step parameters are displayed (led
blinks on current step).
“Time” parameter is selected
The value set for the selected step (led on symbol
) is displayed for 4 seconds alternated by the remaining
total (COUNT DOWN) for the rest of the other steps for 4 seconds (led blinks on symbol
).
“Temperature” parameter
The value set for the selected step (led on symbol
) is displayed for 4 seconds alternated by the value read in
the cooking chamber for 4 seconds (led blinks on symbol
).
“Humidity” parameter
The set value is displayed for the selected step (fi xed led on symbol
).
13. DELAYED START TO THE COOKING CYCLE
To delay the start for the cooking cycle, proceed as
follows:
• Set the required parameters for each phase in the
cooking cycle, following the instructions in the
paragraph “OPERATING METHOD” (paragraph 10).
• Press the key
PHASE
until all the signal leds go out
on the control panel. The message “0.00” ap-
pears on the display.
• Press the keys / and set the required “DE-
LAY
TIME” on the display (maximum 9 hours and
59 minutes).
• Press the key
START
STOP
to activate the delayed start.
The led on the key
START
STOP
starts fl ashing to show that
the COUNTDOWN has started shown on the dis-
play. The DELAY TIME can be changed at any mo-
ment during the COUNTDOWN by pressing the
/ keys.
When the DELAY TIME is up, the cooking cycle will
start automatically.
To zero the DELAY TIME, just press the
START
STOP
key; the
display will show the operating parameters than
can be changed. Press the
START
STOP
again to continue
the cooking cycle; otherwise a delayed start for the
cooking cycle can be reset by proceeding as above.
N.B.: in case of BLACKOUT or power failure during
the COUNTDOWN, the programmed delay for the
cooking cycle is cancelled and all the relative set
parameters are zeroed.
A delayed start to the cooking cycle is only possible
in MANUAL MODE. It cannot be included in a pro-
grammed cooking cycle.

10
EN
14. “PROGRAMMED” MODE
Up to 99 cooking programs (cycles) can be saved. Each program can include 1 or more cooking
steps (up to 4).
15. SAVING COOKING PROGRAMS
Follow the steps below to save a cooking program:
• Press the
PROG
MEMO
button (led on) “P01” appears on
the display.
• Press buttons
/ and select the required
program number (up to P99).
• Set the relevant cooking cycle parameters follow-
ing the same procedure used for “manual” mode.
• Press and hold down the
PROG
MEMO
button for at least 5
seconds: the program is successfully saved with
the saved program number blinks on the display.
To cancel a saved program, simply replace it with a
new program (with the same number) where new
parameters are set for the new cooking cycle. The
new program must be saved by pressing the
PROG
MEMO
button.
16. COOKING WITH A SAVED PROGRAM
Follow the steps below to run a saved cooking pro-
gram:
• Press the button
PROG
MEMO
“P01” appears on the display.
• Press buttons
/ and select the required
program number
• Press button
START
STOP
.
“P – H” appears on the display (cooking chamber
“preheating” function).
The oven operates until it reaches a temperature
equal to the value set for step 1 (programmed cy-
cle) increased by 30°C.
When the preheating temperature is reached, “P – H”
blinks on the display and the buzzer sounds.
At this point, open the oven door, introduce food to
be cooked and close the door. the buzzer turns off
and the programmed cooking cycle starts.
N.B.: the “preheating” function is available (auto-
matically started) only in “programmed” cooking
modes.
When the oven is operating in “programmed”
mode,
set parameters can be displayed in the
same way as with “manual” mode.
For the user’s convenience, set parameters can
be changed during oven operations in “pro-
grammed” mode.
At the end of the programmed cooking cycle,
changed
parameters are automatically “RESET”
and return to the values initially saved in the pro-
gram.
17. MANUAL HUMIDIFYING
Humidity can be produced in the cooking cham-
ber (water solenoid valve on or activation of water
pump) at any time in the cooking cycle (in both
“manual” and “programmed” mode) by pressing
the button
MANUAL
(led on).
Continuous humidity as long as the button is pressed.
If an automatic humidifying cycle is in progress,
press button
MANUAL
(water solenoid valve on or acti-
vation of water pump) to interrupt it. Release the
automatic humidifying cycle button to resume.

11
EN
18. DOOR DEVICE
The device stops oven operations (stops the cooking cycle) whenever the door is opened. The cooking cycle
resumes where it left off when the door is closed.
19. BLACK OUT
When power returns after a black-out, the oven automatically resumes operations and the cooking cycle
resumes from where it left off.
20. OVEN COOKING
Cooking techniques
There are two different cooking techniques with this oven: convection and convection + humidifi cation.
Convection cooking
Heat is transferred to the foods by pre-heated air,
forced to circulate by in the cooking chamber. The
heat quickly and uniformly reaches all parts of the
chamber, enabling simultaneous cooking of dif-
ferent types of food (providing they have the same
cooking temperature), placed on the shelves with-
out mixing tastes and smells. Convection cooking
is particularly convenient for rapid de-freezing, and
for sterilising preserves and drying mushrooms
and fruit.
Cooking Convection + humidification
The fact of using a hot-moist climate inside the
cooking chamber with variable temperature and
moisture levels, is the most convenient and effi -
cient way of cooking: cooking times are reduced,
the surface of the foods remains soft and does not
form a crust, there is little weight loss and the fatty
mass is reduced.
21. ROUTINE CLEANING AND MAINTENANCE
(WARNING: Cut power to the appliance before every operation)
General cleaning
Clean the oven when it is cold. Wash enamelled
parts with lukewarm water and soap, do not use
abrasive products, steel wool, or acids, which
could ruin them. To clean the steel parts, do not
use products containing chlorine (sodium hy-
pochlorite, hydrochloric acid, etc) even if diluted.
Use specifi c off-the-shelf products or a little hot
vinegar. Rinse thoroughly with water and dry with
a soft cloth. Clean the glass door of the oven with
hot water only, and do not use rough cloths. Do not
allow foods (especially acid foods such as salt, vin-
egar, lemon, etc) to stagnate on the stainless steel
parts, because they could deteriorate. Do not wash
the appliance with direct jets of water, because if
water enters, this could limit the appliance’s safety.
Do not use corrosive substances (e.g. hydrochloric
acid) to clean the oven’s support bench.

12
EN
Cleaning the oven
It is good practice to clean the oven interior at the
end of every day of duty. In this way it will be easier
to remove cooking residues, preventing them from
burning when the oven is next used. Clean it accu-
rately with hot water and soap or with the appropriate
off-the-shelf products.
Cleaning the oven door
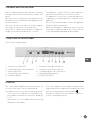
To clean the oven door thoroughly, proceed as follows:
• fully open the door;
• insert the equipped plugs in the “A” holes on the hinges (Fig. 2);
• lift the door gently and withdraw it (Fig. 3);
• put back the door in the initial position by operating inverserly.
Fig. 2 Fig. 3 Fig. 4
Replacing oven lamp
Electrically switch off the appliance; unscrew the protective glass cap with the corresponding rings for air-
proofi ng (Fig. 4); unscrew the lamp and replace it with another lamp suitable for high temperatures (300°C),
with the following characteristics:
Voltage 230/240 V
Power 15 W
Fitting E 14
Refi t the glass cap with the corresponding rings for airproofi ng and power up the appliance

13
EN
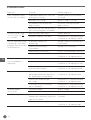
22. POSSIBLE FAULTS
Type of fault Cause Corrective action
Control panel completely
off (the oven does not work)
Incorrect electric connections to
the mains
Check the mains connection
No mains voltage Restore mains voltage
Thermal break safety device tripped Reset the thermal break safety device
Electronic card protection fuse
(control panel) burnt
Contact a qualifi ed technician
Cooking cycle set and
START
STOP
push button pressed:
the oven does not work
Door open or ajar Close the door
Damaged door switch device Contact a qualifi ed technician to
repair the sensor
Humidity production in
cooking chamber on:
No water fl ows from
the pipes (on the fans)
Incorrect connection to water mains
Connection of non-conforming pump
Check the connection to water mains
(electrovalve) or the connection of pump
Cut-off cock closed (electrovalve)
Tank without water (pump)
Check the cut-off cock
Check water level into the tank
Blocked water inlet fi lter Clean the fi lter
Electrovalve or pump water entrance
damaged
Contact a qualifi ed technician
to repair the solenoid
Door closed: water / vapour
comes out of the seal
Seal not fi tted correctly Check the seal fi tting
Damaged seal Contact a qualifi ed technician to
repair the seal
Handle mechanism loosened (lateral
opening door)
Contact a qualifi ed technician to
repair the prong
The oven does not cook
evenly
One of the motors is blocked or turns
slowly (If the oven has two motors)
Contact a qualifi ed technician to
repair the motor
The motors do not go into reverse Contact a qualifi ed technician to
repair the motor
Heating element not powered
or is damaged
Contact a qualifi ed technician to
repair the element
Lighting lamp in the cooking
chamber does not work
Damaged lamp Change the lamp
Light bulb “unscrewed”
Make sure the light bulb is fully
screwed-in
“ER1” appears on the display Breaking in the connection between
the cooking chamber probe (electronic
card) and the control panel
Check the connection to the control
panel
Damaged cooking chamber probe Contact a qualifi ed technician to
repair the probe

14
EN
23. TECHNICAL ASSISTANCE
Before leaving the factory, the appliance was com-
pletely regulated and tested by expert specialised
personnel to guarantee the best operating results.
All repairs and settings must be performed with ut-
most care and attention, respecting national safety
regulations in force. Always contact your retailer
or our nearest Service Centre, giving details of the
problem, the appliance model and the serial num-
ber (on the rating plate on the rear panel).
24. INFORMATIONS TO THE CONSUMERS
Further to Directive 2012/19/EU, the
symbol of the crossed rubbish skip on
the appliance means that at the end of
its life, the product must be disposed
of separately from the other rubbish.
The user must hand the appliance to
a specialised waste collection centre
for electric and electronic equipment.
The separate collection of the rubbish and sub-
sequent treatment, recovery and disposal help to
produce other equipment using recycled materials,
reducing the negative effects on the environment
and public health, which would be caused by incor-
rect management of the rubbish.
Should the user dispose of the product abusively,
administrative sanctions would be applied pursuant.

15
EN
25. WIRING LAYOUTS
M Power terminal board
T1 Safety thermostat
MI Door microswitch
SD Electronic card
EV Humidifi er solenoid-valve
B Contactor coil
L Oven lighting lamp
R Circular heating-element
V Oven motorised ventilator
C Capacitor

16
PL
SPIS TREŚCI
1. Serwis techniczny ..........................................................................18
2. Ostrzeżenia ogólne ........................................................................18
3. Dane techniczne.............................................................................20
4. Instrukcja dla instalatora ..............................................................20
5. Instrukcja dla użytkownika ............................................................22
6. Ryzyko resztkowe (dla użytkownika) .............................................23
7. Jak korzystać z panelu sterowania ...............................................23
8. Włączanie .......................................................................................23
9. Wyłączanie .....................................................................................24
10. Tryb pracy .......................................................................................24
11. Włączanie/wyłączanie cyklu pieczenia ..........................................25
12. Wyświetlanie / zmiana parametrów przy włączonym
cyklu pieczenia ...............................................................................25
13. Tryb zaprogramowany....................................................................26
14. Zapisywanie programów pieczenia ...............................................26
15. Pieczenie przy użyci zapisanego programu ..................................26
16. Nawilżanie ręczne ..........................................................................27
17. Zabezpieczenie drzwi .....................................................................27
18. Przerwa w zasilaniu .......................................................................27
19. Pieczenie ........................................................................................27
20. Regularne czyszczenie i konserwacja...........................................28
21. Możliwe usterki ..............................................................................29
22. Pomoc techniczna ..........................................................................30
23. Informacje dla konsumentów ........................................................30
24. Schematy instalacji elektrycznej ...................................................31

17
PL
UWAGA: wszystkie urządzenia wymagające stałego podłączenia do sieci wodnej
(między innymi niniejsze urządzenie) koniecznie muszą mieć podłączony dodatkowo
zmiękczacz wody usuwający z niej związki wapnia i magnezu. Zmiękczacz musi być
użytkowany zgodnie z zaleceniami producenta zawartymi w instrukcji obsługi.
W przypadku braku podłączenia zmiękczacza lub jego złego użytkowania i/lub rege-
neracji dystrybutor nie będzie uznawać reklamacji związanych z naprawami wynika-
jącymi z zakamienienia urządzenia.
Zaleca się stosowanie zmiękczaczy z bogatej oferty HENDI
W odpowiednim doborze konkretnego modelu pomoże
Ci przedstawiciel handlowy fi rmy HENDI
Do prawidłowej regeneracji zmiękczaczy zalecamy:
• Tabletki solne, worek 25 kg – kod: 231265
Twardość wody
Stopnie
niemieckie (°dH)
Stopnie francuskie
(°fH)
mmol/l Stopnie
Clarka
Podłączenie
zmiękczacza
powyżej 24 powyżej 40 powyżej 4,2 powyżej 28 Konieczne
18 - 24 32 - 40 3,2 – 4,2 22 - 28 Konieczne
12 - 18 19 – 32 2,1 – 3,2 13 - 22 Konieczne
4 - 12 7 - 19 0,7 – 2,1 5 - 13 Konieczne
poniżej 4 poniżej 7 poniżej 0,7 poniżej 5 Niewymagane

18
PL
Szanowny Kliencie,
Dziękujemy za zakup urządzenia firmy Hendi. Prosimy o uważne zapoznanie się z niniejszą instrukcją
przed podłączeniem urządzenia, aby uniknąć uszkodzeń spowodowanych niewłaściwą obsługą. Należy
zwrócić szczególną uwagę na zasady bezpieczeństwa.
1. PRZEGLĄDY TECHNICZNE
Systematyczne przeglądy techniczne, przeprowa-
dzane jeden, dwa razy rocznie w sposób znaczą-
cy przyczynią się do wydłużenia życia urządzenia
i zapewnią optymalną jego pracę. Należy się
upewnić, że serwis przeprowadzany jest wyłącz-
nie przez autoryzowany i wyszkolony personel.
Przy ewentualnym zamawianiu części zamien-
nych lub pozyskaniu innych informacji o urzą-
dzeniu podawać należy zawsze model i numer
seryjny (dostępne na tabliczce znamionowej,
znajdującej się z tyłu na obudowie urządzenia).
2. WAŻNE ZASADY BEZPIECZEŃSTWA
• Nieprawidłowa obsługa i niewłaściwe użytkowanie mogą spowodować poważ-
ne uszkodzenie urządzenia lub zranienie osób.
• Niniejsze urządzenie przeznaczone jest wyłącznie do użytku komercyjnego
i nie może być stosowane do użytku domowego.
• Urządzenie należy stosować wyłącznie zgodnie z przeznaczeniem. Producent
nie ponosi żadnej odpowiedzialności za szkody spowodowane nieprawidłową
obsługą i niewłaściwym użytkowaniem urządzenia.
• W czasie użytkowania zabezpiecz urządzenie i wtyczkę kabla zasilającego
przed kontaktem z wodą lub innymi płynami. W mało prawdopodobnym przy-
padku zanurzenia urządzenia w wodzie, należy natychmiast wyciągnąć wtyczkę
z kontaktu, a następnie zlecić kontrolę urządzenia specjaliście. Nieprzestrze-
ganie tej instrukcji może spowodować zagrożenie życia.
• Nigdy nie otwieraj samodzielnie obudowy urządzenia.
• Nie wtykaj żadnych przedmiotów w obudowę urządzenia.
• Nie dotykaj wtyczki kabla zasilającego wilgotnymi rękami.
• Niebezpieczeństwo porażenia prądem! Nie należy samodzielnie naprawiać
urządzenia. Wszelkie usterki i niesprawności winny być usuwane wyłącznie
przez wykwalifi kowany personel.
• Nigdy nie używać uszkodzonego urządzenia! Uszkodzone urządzenie należy
odłączyć od sieci i skontaktować się ze sprzedawcą.
• Ostrzeżenie: Nie zanurzać części elektrycznych urządzenia w wodzie ani w innych
płynach. Nie wkładać urządzenia pod bieżącą wodę.

19
PL
• Regularnie sprawdzać wtyczkę i kabel zasilający pod kątem uszkodzeń. Uszko-
dzoną wtyczkę lub kabel przekazać w celu naprawy do punktu serwisowe-
go lub innej wykwalifi kowanej osoby, aby zapobiec ewentualnym zagrożeniom
i obrażeniom ciała.
• Upewnić się, czy kabel zasilający nie styka się z ostrymi ani gorącymi przedmio-
tami; trzymać kabel z dala od otwartego płomienia. Aby wyjąć wtyczkę z gniazdka,
zawsze ciągnąć za wtyczkę, a nie za przewód.
• Zabezpieczyć kabel zasilający (lub przedłużający) przed przypadkowym wycią-
gnięciem z kontaktu. Przewód poprowadzić w sposób uniemożliwiający przypad-
kowe potknięcie.
• Stale nadzorować urządzenie podczas użytkowania.
• Ostrzeżenie! Jeżeli wtyczka jest włożona do gniazdka, urządzenie należy uważać
za podłączone do zasilania.
• Przed wyjęciem wtyczki z gniazdka wyłączyć urządzenie.
• Nigdy nie przenosić urządzenia, trzymając za kabel.
• Nie używać żadnych akcesoriów, które nie zostały dostarczone wraz z urządzeniem.
• Urządzenie należy podłączać wyłącznie do gniazdka o napięciu i częstotliwości
podanych na tabliczce znamionowej.
• Włożyć wtyczkę do gniazdka zlokalizowanego w dogodnym łatwo dostępnym miej-
scu, tak by w przypadku awarii istniała możliwość natychmiastowego odłączenia
urządzenia. W celu całkowitego wyłączenia urządzenia odłączyć je od źródła za-
silania. W tym celu wyjąć z gniazdka wtyczkę znajdującą się na końcu sznura
odłączanego urządzenia.
• Przed odłączeniem wtyczki zawsze pamiętać o wyłączeniu urządzenia!
• Nie korzystać z akcesoriów niezalecanych przez producenta. Zastosowanie nie-
zalecanych akcesoriów może stwarzać zagrożenie dla użytkownika oraz pro-
wadzić do uszkodzenia urządzenia. Korzystać wyłącznie z oryginalnych części
i akcesoriów.
• Z urządzenia nie mogą korzystać osoby (także dzieci), u których stwierdzono osła-
bione zdolności fi zyczne, sensoryczne lub umysłowe, albo którym brakuje odpo-
wiedniej wiedzy i doświadczenia.
• W żadnym wypadku nie zezwalać na obsługę urządzenia przez dzieci.
• Urządzenie wraz z przewodem przechowywać poza zasięgiem dzieci.
• Nie dopuścić, by dzieci wykorzystywały urządzenie do zabawy.
• Zawsze odłączyć urządzenie od zasilania, jeżeli ma być ono pozostawione bez
nadzoru, a także przed montażem, demontażem i czyszczeniem.
• Nie zostawiać urządzenia bez nadzoru podczas użytkowania.

20
PL
3. INFORMACJE OGÓLNE
Niniejsze informacje zostały opracowane ze względu na bezpieczeństwo użyt-
kownika oraz innych osób i zalecamy uważne jej przeczytanie przed zainstalowa-
niem i użyciem pieca.
Niniejszą instrukcję należy przechowywać razem z piecem do przyszłego wyko-
rzystania. W przypadku zgubienia, należy zwrócić się bezpośrednio do producen-
ta po jego kopię.
• Jeśli w momencie otrzymania towaru opakowanie jest uszkodzone, należy bez-
względnie spisać protokół szkody w obecności kuriera. W przeciwnym wypadku
reklamacja dotycząca uszkodzenia pieca nie będzie rozpatrywana.
• Piec został stworzony do gotowania i podgrzewania żywności i nie należy go uży-
wać do jakichkolwiek innych celów.
• Niniejszy piec został skonstruowany do stosowania przez profesjonalistów i mogą
z niego korzystać wyłącznie wykwalifi kowani pracownicy po przeszkoleniu, najle-
piej potwierdzonym własnoręcznym podpisem osób przeszkolonych. Pieca nigdy
nie wolno pozostawiać włączonego bez nadzoru.
• W przypadku usterek lub słabego działania piec należy wyłączyć, zamknąć zawór
doprowadzenia wody, wyłączyć z gniazda sieciowego i skontaktować się z autory-
zowanym centrum serwisowym.
• Wszystkie czynności montażowe i rozruchowe muszą być przeprowadzane przez
wykwalifi kowanego instalatora, zgodnie z instrukcją producenta oraz z zastoso-
waniem obowiązujących krajowych standardów.
• Aby przeprowadzić okresową konserwację oraz naprawy należy skontaktować się
z najbliższym centrum serwisowym oraz należy upewnić się, że używane są orygi-
nalne części zamienne. Nieprzestrzeganie tej instrukcji automatycznie powoduje
utratę wszelkich praw do gwarancji.
• Przed podjęciem jakichkolwiek czynności związanych z czyszczeniem i/lub serwi-
sem odłączyć urządzenie od sieci elektrycznej i odczekać aż ostygnie
• Opuszczonych drzwi pieca nie wolno używać jako półki - ryzyko wypadku i nieod-
wracalnego uszkodzenia zawiasów.
• Okresowe przeglądy i naprawy przeprowadzać może wyłącznie autoryzowany
i przeszkolony serwis. Używać wyłącznie oryginalnych części.
Strona się ładuje...
Strona się ładuje...
Strona się ładuje...
Strona się ładuje...
Strona się ładuje...
Strona się ładuje...
Strona się ładuje...
Strona się ładuje...
Strona się ładuje...
Strona się ładuje...
Strona się ładuje...
Strona się ładuje...
Strona się ładuje...
Strona się ładuje...
Strona się ładuje...
Strona się ładuje...
-
 1
1
-
 2
2
-
 3
3
-
 4
4
-
 5
5
-
 6
6
-
 7
7
-
 8
8
-
 9
9
-
 10
10
-
 11
11
-
 12
12
-
 13
13
-
 14
14
-
 15
15
-
 16
16
-
 17
17
-
 18
18
-
 19
19
-
 20
20
-
 21
21
-
 22
22
-
 23
23
-
 24
24
-
 25
25
-
 26
26
-
 27
27
-
 28
28
-
 29
29
-
 30
30
-
 31
31
-
 32
32
-
 33
33
-
 34
34
-
 35
35
-
 36
36


Hendi 225059 Instrukcja obsługi
- Kategoria
- Piekarniki
- Typ
- Instrukcja obsługi
w innych językach
- English: Hendi 225059 User manual
Powiązane artykuły
Inne dokumenty
-
MBM CMFG Use And Routine Maintenance Manual
-
Samsung NQ50J5530BS/EO Instrukcja obsługi
-
-
Hoover HOZP9177BI Instrukcja obsługi
-
-
Indesit C 65S F8 X U instrukcja
-
Unox SPEED-X™ Digital.ID™ XEPA-0523-EXRN Instrukcja obsługi
-
Waterdrop PWF03W-W Instrukcja obsługi
-
 REH4MAT Splint water bath Instrukcja obsługi
-
Sharp UA-HD40E Instrukcja obsługi
