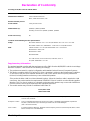
HP LaserJet 5100 Printer series instrukcja
- Kategoria
- Wydrukować
- Typ
- instrukcja

http://www.hp.com/support/lj5100
copyright © 2002
Hewlett-Packard Company
Printed in Germany
printed on recycled paper
Q1860-90924
*Q1860-90924*
*Q1860-90924*
hp LaserJet 5100
5100tn 5100dtn
Spine = 6.341 mm
start
start
začínáme
alapismeretek
LaserJet 5100 5100tn 5100dtnhp


English
hp LaserJet 5100, 5100tn,
and 5100dtn series printers
start guide

Hewlett-Packard Company
11311 Chinden Boulevard
Boise, Idaho 83714
© Copyright Hewlett-Packard
Company 2002
All Rights Reserved.
Reproduction, adaptation, or
translation without prior written
permission is prohibited,
except as allowed under the
copyright laws.
Publication number
Q1860-90924
First Edition, May 2002
Warranty
The information contained in
this document is subject to
change without notice.
Hewlett-Packard makes no
warranty of any kind with
respect to this information.
HEWLETT-PACKARD
SPECIFICALLY DISCLAIMS
THE IMPLIED WARRANTY
OF MERCHANTABILITY AND
FITNESS FOR A
PARTICULAR PURPOSE.
Hewlett-Packard shall not be
liable for any direct, indirect,
incidental, consequential, or
other damage alleged in
connection with the furnishing
or use of this information.
Trademark Credits
E
NERGY
S
TA R
and the Energy
Star logo are U.S. registered
marks of the United States
Environmental Protection
Agency.
HP-UX Release 10.20 and
later and HP-UX Release
11.00 and later (in both 32 and
64-bit configurations) on all HP
9000 computers are Open
Group UNIX 95 branded
products.
Microsoft and Windows are
U.S. registered trademarks of
Microsoft Corporation.
PostScript is a trademark of
Adobe Systems Incorporated.
UNIX is a registered trademark
of The Open Group.

ENWW
start guide 3
English
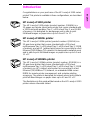
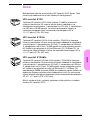
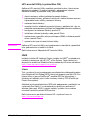
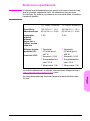
Introduction
Congratulations on your purchase of the HP LaserJet 5100 series
printer! This printer is available in three configurations, as described
below.
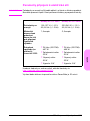
HP LaserJet 5100 printer
The HP LaserJet 5100 printer (product number: Q1860A) is a
22 pages per minute (ppm) laser printer that comes standard with
a 100-sheet multi-purpose Tray 1, a 250-sheet Tray 2, and 16 MB
of memory. It is designed for workgroups and is able to print
full-bleed images on paper sizes up to A3 and 11 x 17.
HP LaserJet 5100tn printer
The HP LaserJet 5100tn printer (product number: Q1861A) is a
22 ppm laser printer that comes standard with a 100-sheet
multi-purpose Tray 1, a 250-sheet Tray 2, a 500-sheet Tray 3, 32 MB
of memory, and an HP Jetdirect print server for connecting to a fast
Ethernet (10/100Base-TX) network. It is designed for network users
and is able to print full-bleed images on paper sizes up to A3 and
11 x 17.
HP LaserJet 5100dtn printer
The HP LaserJet 5100dtn printer (product number: Q1862A) is a
22 ppm laser printer that comes standard with a 100-sheet
multi-purpose Tray 1, a 250-sheet Tray 2, a 500-sheet Tray 3, 32 MB
of memory, an HP Jetdirect print server for connecting to a fast
Ethernet (10/100Base-TX) network, an embedded Web server
DIMM for remote printer management, and a duplex printing
accessory. The printer is designed for network users and is able to
print full-bleed images on paper sizes up to A3 and 11 x 17.
The illustrations in this guide will be based on the HP LaserJet 5100
printer unless otherwise stated.

4 start guide
ENWW
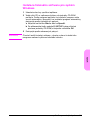
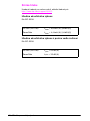
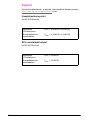
Installation checklist
This guide will help you set up and install the new printer. For proper
installation, please complete each section in order.
Unpack the printer steps 1-4
Install and connect the printer steps 5-13
Install printing software step 14
Verify printer setup step 15

ENWW
start guide 5
English
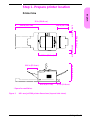
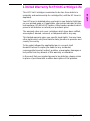
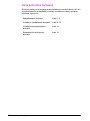
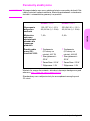
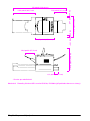
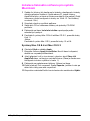
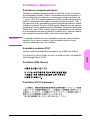
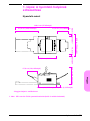
Step 1. Prepare printer location
Printer Size
Figure 1 HP LaserJet 5100 printer dimensions (top and side views)
11.9 in (30.3 cm)
24.6 in (62.5 cm)
18.5 in (47.0 cm)
10.6 in (27.0 cm)
18.5 in (47.0 cm)
4.3 in (11.0 cm)
18.6 in (47.3 cm)
55 in (139.8 cm)
3.9 in (10.0 cm)*
2.4 in (6.0 cm)*
25 in (63.5 cm)
* Space for ventilation.

6 start guide
ENWW
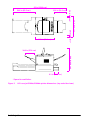
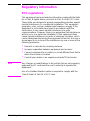
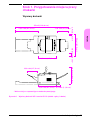
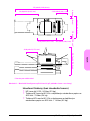
Figure 2 HP LaserJet 5100tn/5100dtn printer dimensions (top and side views)
24.6 in (62.5 cm)
6.1 in (15.5 cm)
24.4 in (62.0 cm)
11.9 in (30.3 cm)
55 in (139.8 cm)
3.9 in (10.0 cm)*
2.4 in (6.0 cm)*
18.5 in (47.0 cm)
10.6 in (27.0 cm)
25 in (63.5 cm)
* Space for ventilation.

ENWW
start guide 7
English
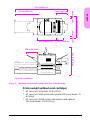
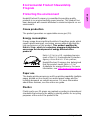
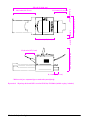
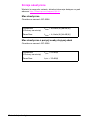
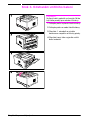
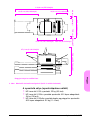
Figure 3 Maximum accessories configuration (top and side views)
Printer weight (without print cartridge)
•
HP LaserJet 5100 printer: 50 lb (23 kg)
•
HP LaserJet 5100tn printer with optional 500-sheet feeder: 75
lb (34 kg)
•
HP LaserJet 5100dtn printer with duplexer and optional
500-sheet feeder: 114 lb (52 kg)
29.7 in (75.5 cm)
24.6 in (62.5 cm)
18.5 in (47.0 cm)
11.9 in (30.3 cm)
10.6 in (27.0 cm)
6.5 in (16.6 cm)
55 in (139.8 cm)
25 in (63.5 cm)
3.9 in (10.0 cm)*
2.4 in (6.0 cm)*
* Space for ventilation.

8 start guide
ENWW
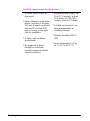
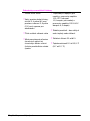
Location requirements for the printer
•
A sturdy, level surface for
placement
•
Space allowance around the
printer, including 2.4 inches
(60 mm) of space on the left
side and 3.9 inches (100
mm) of space on the right
side for ventilation
•
A clean, well-ventilated
environment
•
No exposure to direct
sunlight or chemicals,
including ammonia-based
cleaning solutions
•
Adequate power supply (for
100-127 V models, at least
10.5 amps; for 220-240 V
models, at least 5.3 amps)
•
A stable environment—no
abrupt temperature or
humidity changes
•
Relative humidity 20% to
80%
•
Room temperature 50° to
91° F (15° to 32.5° C)

ENWW
start guide 9
English
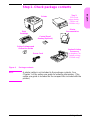
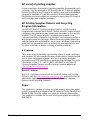
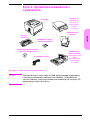
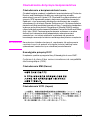
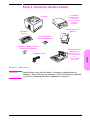
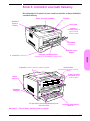
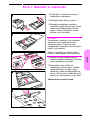
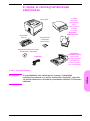
Step 2. Check package contents
Figure 4 Package contents
Note
A printer cable is not included in the package contents. See
Chapter 1 of the online use guide for ordering information. (The
online use guide is included on the compact disc included with the
printer.)
Printer
Print
Cartridge
Power Cord
Printer Software and
Online Use Guide
Tray 3
(500 sheet
paper feeder,
5100tn and
5100dtn only)
Printer
Documentation
Control Panel
Overlay (Optional)
Duplex Printing
Accessory
(or duplexer, for
2-sided printing,
5100dtn only)

10 start guide
ENWW
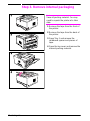
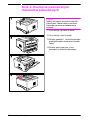
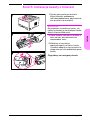
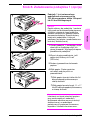
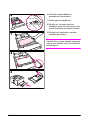
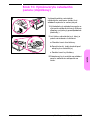
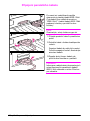
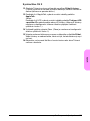
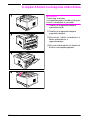
Step 3. Remove internal packaging
Note
Save all packing material. You may
need to repack the printer at a later
date.
1 Remove the tape from the front of
the printer.
2 Remove the tape from the back of
the printer.
3 Open Tray 1 and remove the
cardboard spacer and pieces of
tape.
4 Open the top cover and remove the
internal packing material.

ENWW
start guide 11
English
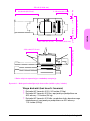
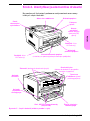
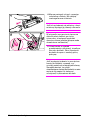
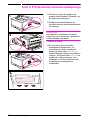
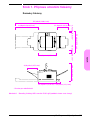
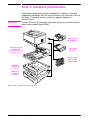
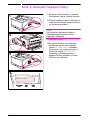
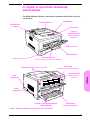
Step 4. Locate printer parts
The following illustrations give the location and names of the
important printer parts.
Figure 5 Printer parts (front and rear views)
Control
panel and
display
Paper stop
Top output bin
Tray 1 (100-sheet)
Tray 2 (250-sheet)
Paper level
indicator
Top cover
Paper size indicator
(set with dial inside tray)
Product and
serial numbers
(located on the
underside of the
top cover)
Power
switch
Rear output bin
(straight-through
paper path)
Power
connector
Rear door
(paper jam access)
Latches (to open rear door)
Network, I/O, or hard disk
(EIO slots)
Parallel interface
connector

12 start guide
ENWW
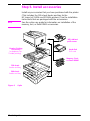
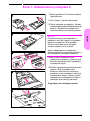
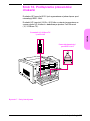
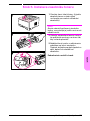
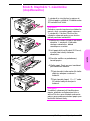
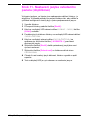
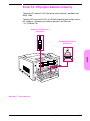
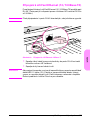
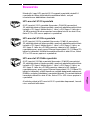
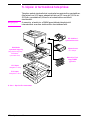
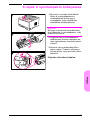
Step 5. Install accessories
Install any accessories that you have purchased with the printer.
(This includes the 500-sheet feeder and tray for the
HP LaserJet 5100tn and 5100dtn printers.) Use the installation
instructions that are packaged with the accessories.
Note
See the online use guide for information on installation of the
memory, font, or flash DIMM accessories.
Figure 6 Optional accessories
HP Jetdirect
print server
Hard disk
EIO card
Memory, Font,
or Flash DIMM
Duplex Printing
Accessory
(or duplexer, for
2-sided printing)
500-sheet
feeder and tray
250-sheet
feeder and tray

ENWW
start guide 13
English
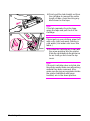
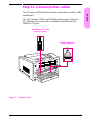
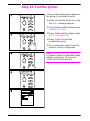
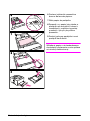
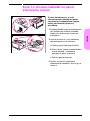
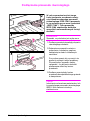
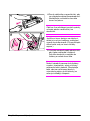
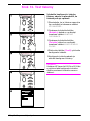
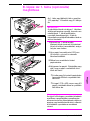
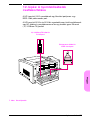
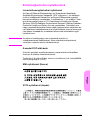
Step 6. Install print cartridge
1 Open the printer’s top cover.
Remove the print cartridge from its
packaging (save packaging for
possible cartridge storage).
Caution
To prevent damage to the print
cartridge, do not expose it to light for
more than a few minutes.
2 Rotate the cartridge and gently
shake it from side to side to
distribute the toner evenly inside the
cartridge.
3 Locate the sealing tape tab on the
end of the cartridge. Carefully bend
the tab back and forth until it
separates from the cartridge.
Continued on the next page.

14 start guide
ENWW
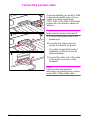
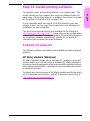
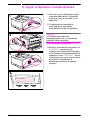
4 Firmly pull the tab straight out from
the cartridge to remove the entire
length of tape. Avoid touching any
black toner on the tape.
Note
If the tab separates from the tape,
grasp the tape and pull it out of the
cartridge.
Note
If toner gets on your clothing, wipe it off
with a dry cloth and wash clothing in
cold water. (Hot water sets toner into
fabric.)
5 Position the cartridge as shown with
the arrow pointing into the printer.
Slide the cartridge into the printer as
far as it will go and close the top
cover.
Note
If the print cartridge does not slide into
the printer easily, make sure all packing
material has been removed. Also,
make sure the jam access plates inside
the printer (identified with green
handles) are in the down position.

ENWW
start guide 15
English
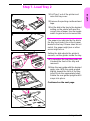
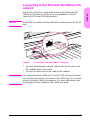
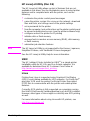
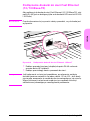
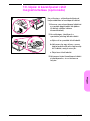
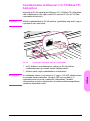
Step 7. Load Tray 2
1 Pull Tray 2 out of the printer and
raise the tray cover.
2 Remove the packing cardboard and
tape.
3 Set the dial in the tray to the desired
setting so the printer will read the
correct size of paper. Use the toggle
switch to gain access to more sizes.
Note
The paper size indicated by the dial in
the tray must match the size of paper
loaded in the tray. If these sizes do not
match, the paper might jam or other
errors might occur.
Setting the dial adjusts the printer’s
sensors, not the guides inside the tray.
4 To reposition the rear blue guide, tilt
it toward the front of the tray and
remove it.
5 Align the rear guide with the desired
paper size. With the guide angled
slightly toward the front of the tray,
insert it into the appropriate holes.
Rotate the rear guide upright until it
snaps into place.
Continued on the next page.

16 start guide
ENWW
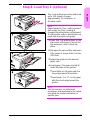
6 Slide the blue side guides to the
desired paper size.
7 Load paper into the tray.
8 Make sure the paper is flat in the tray
at all four corners and below the tabs
on the guides.
9 Close the tray cover and slide the
tray into the printer.
Note
See the online use guide for
instructions on loading and printing on
custom-size paper.

ENWW
start guide 17
English
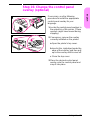
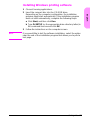
Step 8. Load Tray 1 (optional)
Tray 1 is a multi-purpose tray and holds
up to 100 sheets of paper,
approximately 10 envelopes, or
20 index cards.
Note
Paper loaded in Tray 1 will be printed
first unless the Tray 1 setting is
changed from the printer control panel.
To change the order in which trays are
used, see the online use guide.
1 Open Tray 1 by pulling down on the
top center of the door. Pull out the
tray extension until it clicks into
place.
2 Flip open the second tray extension
if the paper is longer than 9 inches
(229 mm).
3 Adjust the guides to the desired
paper size.
4 Load paper. The paper should fit
under the tabs on the guides.
•
Load letter or A4 paper with the
long edge toward the printer.
•
Load legal, 11 x 17, or A3 paper
with the short edge toward the
printer.
Note
See the sections on letterhead,
envelopes, and duplexing in the online
use guide for proper orientation of
specific jobs.

18 start guide
ENWW
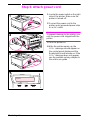
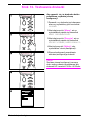
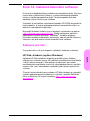
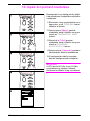
Step 9. Attach power cord
1 Locate the power switch on the right
side of the printer. Make sure the
printer is turned off.
2 Connect the power cord to the
printer and a grounded power strip
or an AC outlet.
Caution
To prevent damage to the printer, use
only the power cord shipped with the
printer.
3 Turn the printer on.
4 After the printer warms up, the
READY message should appear on
the control panel display and the
Ready light should remain on. If the
READY message does not appear,
see the problem solving chapter in
the online use guide.
READY
Strona się ładuje...
Strona się ładuje...
Strona się ładuje...
Strona się ładuje...
Strona się ładuje...
Strona się ładuje...
Strona się ładuje...
Strona się ładuje...
Strona się ładuje...
Strona się ładuje...
Strona się ładuje...
Strona się ładuje...
Strona się ładuje...
Strona się ładuje...
Strona się ładuje...
Strona się ładuje...
Strona się ładuje...
Strona się ładuje...
Strona się ładuje...
Strona się ładuje...
Strona się ładuje...
Strona się ładuje...
Strona się ładuje...
Strona się ładuje...
Strona się ładuje...
Strona się ładuje...
Strona się ładuje...
Strona się ładuje...
Strona się ładuje...
Strona się ładuje...
Strona się ładuje...
Strona się ładuje...
Strona się ładuje...
Strona się ładuje...
Strona się ładuje...
Strona się ładuje...
Strona się ładuje...
Strona się ładuje...
Strona się ładuje...
Strona się ładuje...
Strona się ładuje...
Strona się ładuje...
Strona się ładuje...
Strona się ładuje...
Strona się ładuje...
Strona się ładuje...
Strona się ładuje...
Strona się ładuje...
Strona się ładuje...
Strona się ładuje...
Strona się ładuje...
Strona się ładuje...
Strona się ładuje...
Strona się ładuje...
Strona się ładuje...
Strona się ładuje...
Strona się ładuje...
Strona się ładuje...
Strona się ładuje...
Strona się ładuje...
Strona się ładuje...
Strona się ładuje...
Strona się ładuje...
Strona się ładuje...
Strona się ładuje...
Strona się ładuje...
Strona się ładuje...
Strona się ładuje...
Strona się ładuje...
Strona się ładuje...
Strona się ładuje...
Strona się ładuje...
Strona się ładuje...
Strona się ładuje...
Strona się ładuje...
Strona się ładuje...
Strona się ładuje...
Strona się ładuje...
Strona się ładuje...
Strona się ładuje...
Strona się ładuje...
Strona się ładuje...
Strona się ładuje...
Strona się ładuje...
Strona się ładuje...
Strona się ładuje...
Strona się ładuje...
Strona się ładuje...
Strona się ładuje...
Strona się ładuje...
Strona się ładuje...
Strona się ładuje...
Strona się ładuje...
Strona się ładuje...
Strona się ładuje...
Strona się ładuje...
Strona się ładuje...
Strona się ładuje...
Strona się ładuje...
Strona się ładuje...
Strona się ładuje...
Strona się ładuje...
Strona się ładuje...
Strona się ładuje...
Strona się ładuje...
Strona się ładuje...
Strona się ładuje...
Strona się ładuje...
Strona się ładuje...
Strona się ładuje...
Strona się ładuje...
Strona się ładuje...
Strona się ładuje...
Strona się ładuje...
Strona się ładuje...
Strona się ładuje...
Strona się ładuje...
Strona się ładuje...
Strona się ładuje...
Strona się ładuje...
Strona się ładuje...
Strona się ładuje...
Strona się ładuje...
Strona się ładuje...
Strona się ładuje...
Strona się ładuje...
Strona się ładuje...
Strona się ładuje...
Strona się ładuje...
Strona się ładuje...
Strona się ładuje...
Strona się ładuje...
Strona się ładuje...
Strona się ładuje...
Strona się ładuje...
Strona się ładuje...
Strona się ładuje...
Strona się ładuje...
Strona się ładuje...
Strona się ładuje...
Strona się ładuje...
Strona się ładuje...
Strona się ładuje...
Strona się ładuje...
Strona się ładuje...
Strona się ładuje...
Strona się ładuje...
Strona się ładuje...
Strona się ładuje...
Strona się ładuje...
Strona się ładuje...
Strona się ładuje...
-
 1
1
-
 2
2
-
 3
3
-
 4
4
-
 5
5
-
 6
6
-
 7
7
-
 8
8
-
 9
9
-
 10
10
-
 11
11
-
 12
12
-
 13
13
-
 14
14
-
 15
15
-
 16
16
-
 17
17
-
 18
18
-
 19
19
-
 20
20
-
 21
21
-
 22
22
-
 23
23
-
 24
24
-
 25
25
-
 26
26
-
 27
27
-
 28
28
-
 29
29
-
 30
30
-
 31
31
-
 32
32
-
 33
33
-
 34
34
-
 35
35
-
 36
36
-
 37
37
-
 38
38
-
 39
39
-
 40
40
-
 41
41
-
 42
42
-
 43
43
-
 44
44
-
 45
45
-
 46
46
-
 47
47
-
 48
48
-
 49
49
-
 50
50
-
 51
51
-
 52
52
-
 53
53
-
 54
54
-
 55
55
-
 56
56
-
 57
57
-
 58
58
-
 59
59
-
 60
60
-
 61
61
-
 62
62
-
 63
63
-
 64
64
-
 65
65
-
 66
66
-
 67
67
-
 68
68
-
 69
69
-
 70
70
-
 71
71
-
 72
72
-
 73
73
-
 74
74
-
 75
75
-
 76
76
-
 77
77
-
 78
78
-
 79
79
-
 80
80
-
 81
81
-
 82
82
-
 83
83
-
 84
84
-
 85
85
-
 86
86
-
 87
87
-
 88
88
-
 89
89
-
 90
90
-
 91
91
-
 92
92
-
 93
93
-
 94
94
-
 95
95
-
 96
96
-
 97
97
-
 98
98
-
 99
99
-
 100
100
-
 101
101
-
 102
102
-
 103
103
-
 104
104
-
 105
105
-
 106
106
-
 107
107
-
 108
108
-
 109
109
-
 110
110
-
 111
111
-
 112
112
-
 113
113
-
 114
114
-
 115
115
-
 116
116
-
 117
117
-
 118
118
-
 119
119
-
 120
120
-
 121
121
-
 122
122
-
 123
123
-
 124
124
-
 125
125
-
 126
126
-
 127
127
-
 128
128
-
 129
129
-
 130
130
-
 131
131
-
 132
132
-
 133
133
-
 134
134
-
 135
135
-
 136
136
-
 137
137
-
 138
138
-
 139
139
-
 140
140
-
 141
141
-
 142
142
-
 143
143
-
 144
144
-
 145
145
-
 146
146
-
 147
147
-
 148
148
-
 149
149
-
 150
150
-
 151
151
-
 152
152
-
 153
153
-
 154
154
-
 155
155
-
 156
156
-
 157
157
-
 158
158
-
 159
159
-
 160
160
-
 161
161
-
 162
162
-
 163
163
-
 164
164
-
 165
165
-
 166
166
-
 167
167
-
 168
168
-
 169
169
-
 170
170
-
 171
171
-
 172
172


HP LaserJet 5100 Printer series instrukcja
- Kategoria
- Wydrukować
- Typ
- instrukcja
w innych językach
Powiązane artykuły
-
HP LaserJet 9000 Printer series Skrócona instrukcja obsługi
-
HP (Hewlett-Packard) LaserJet 9040/9050 Multifunction Printer series Instrukcja obsługi
-
-
HP LaserJet 5200 Printer series instrukcja
-
HP LaserJet 9050 Printer series Skrócona instrukcja obsługi
-
-
HP LaserJet 8150 Multifunction Printer series Skrócona instrukcja obsługi
-
HP LaserJet P3005 Printer series Skrócona instrukcja obsługi
-
HP LaserJet 4200 Printer series instrukcja
-
HP LaserJet M5035 Multifunction Printer series Skrócona instrukcja obsługi