
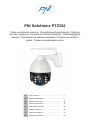
PNI SafeHome PTZ382
Video surveillance camera / Videoüberwachungskamera / Cámara
de video vigilancia / Caméra de vidéosurveillance / Videomeggyelő
kamera / Telecamera di videosorveglianza / Kamera do nadzoru
wideo / Camera supraveghere video
EN User manual ............................................. 3
DE Benutzerhandbuch ................................... 8
ES Manual de usuario .................................... 13
FR Manuel utilisateur ..................................... 18
HU Használati utasítás ................................... 24
IT Manuale utente ........................................ 28
PL Instrukcja obsługi ..................................... 33
RO Manual de utilizare ................................... 38


3User manual
English
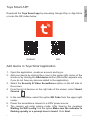
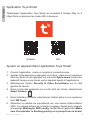
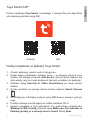
Tuya Smart APP
Download the Tuya Smart app by accessing Google Play or App Store
or scan the QR codes below:
Android iOS
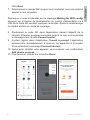
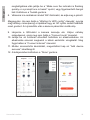
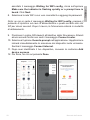
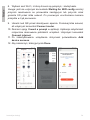
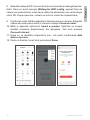
Add device in Tuya Smart application
1. Open the application, create an account and log in.
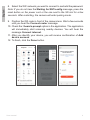
2. Add your device by clicking the + icon in the upper right corner of the
screen or by clicking the Add device button (this button appears only
if you do not have any devices added to the application).
3. Select the Security & Video Surveillance option on the left side of
the screen.
4. From the list of devices on the right side of the screen, select Smart
Camera
5. In the next interface, select the option QR Code from the upper right
corner.
6. Power the surveillance camera to a 230V power source.
7. The camera will enter pairing mode. After hearing the message
Waiting for WiFi cong, tick the option Make sure the indicator is
ashing quickly or a prompt tone is heard. Click Next.

User manual 4
English
8. Select the WiFi network you want to connect to and add the password.
Note: If you do not hear the Waiting for WiFi cong message, press the
reset button on the power cord or the one next to the SD slot for a few
seconds. After restarting, the camera will enter pairing mode.
9. Position the QR code in front of the camera lens. Wait a few seconds
until you hear the Connect router message.
10. Check the I heard a prompt option in the application. The application
will immediately start scanning nearby devices. You will hear the
message Connect internet.
11. After you identify your device, you will receive conrmation of Add
device success.
12. To nish, click the Done button.

5User manual
English
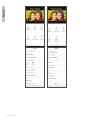
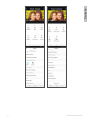
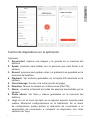
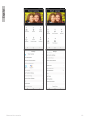
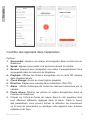
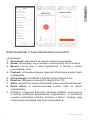
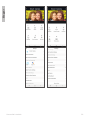
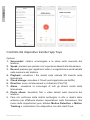
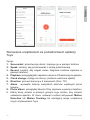
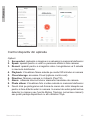
Device control via the Tuya app
Options:
1. Screenshot: captures an image and saves it in the phone’s memory
2. Speak: press to talk to the person in front of the camera
3. Record: press to record video. The recording will be saved in the
phone memory.
4. Playback: View les saved on the SD card inserted in the camera.
5. Cloud storage: access Cloud (fee will be applied)
6. Direction: Move the camera in 4 directions (Pan/Tilt)
7. Alarm: displays the history of all alarms sent by the camera.
8. Photo album: View photos and videos saved in the phone memory.
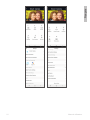
9. Click on the pencil icon in the upper right corner of the screen to
make dierent settings in the camera. In the settings menu you can
activate Motion Detection or Motion Tracking or share your device
with other Tuya users.

User manual 6
English

7User manual
English
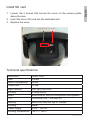
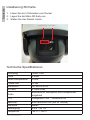
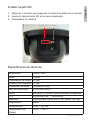
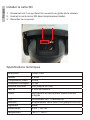
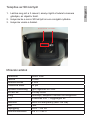
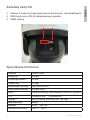
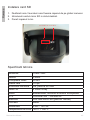
Install SD card
1. Loosen the 3 screws that secure the cover on the camera globe,
above the lens.
2. Insert the micro SD card into the dedicated slot.
3. Replace the cover.
Micro SD card slot Reset button
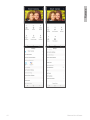
Technical specications
Resolution 1080P 2MP
Lens 3.6mm
Video compression H.264
Frame rate 15 fps
Night visibility Yes, up to 20-30m
IR LEDs 4 Array LEDs
Audio Bidirectional, built-in microphone and speaker
PTZ Horizontal 355° / Vertical 90°
Memory Micro SD card slot (up to 128GB)
Housing Metal
Power supply 230V - 12V 2A
Working temperature -26°C ~ +60°C

Benutzerhandbuch
Deutsche
8
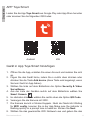
APP Tuya Smart
Laden Sie die App Tuya Smar t aus Google Play oder App Store herunter
oder scannen Sie die folgenden QR Kodes:
Android iOS
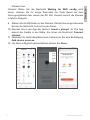
Gerät in App Tuya Smart hinzufügen
1. Önen Sie die App, erstellen Sie einen Account und melden Sie sich
an.
2. Fügen Sie das Gerät hinzu, indem Sie + rechts oben drücken oder
drücken Sie die Taste Add device (diese Taste wird angezeigt, wenn
Sie kein Gerät im App haben)
3. Wählen Sie links auf dem Bildschirm die Option Security & Video
Surveillance.
4. Aus der Liste der Geräten rechts auf dem Bildschirm wählen Sie
Smart Camera
5. Im nächsten Interface wählen Sie rechts oben die Option QR Code.
6. Versorgen Sie die Kamera mit 230V.
7. Die Kamera kommt in Modus Koppeln. Nach der Nachricht Waiting
for WiFi cong, kreuzen Sie in der App Make sure the indicator is
ashing quickly or a prompt tone is heard an. Klicken Sie Next.
8. Wählen Sie das gewünschte WiFi Netzwerk aus und geben Sie das

Benutzerhandbuch
Deutsche
9
Passwort ein.
Hinweis: Wenn Sie die Nachricht Waiting for WiFi cong nicht
hören, drücken Sie für einige Sekunden die Taste Reset auf dem
Versorgungskabel oder neben der SD Slot. Danach kommt die Kamera
in Modus Koppeln.
9. Stellen Sie die QR Kode vor der Kamera. Warten Sie einige Momente
bis Sie die Nachricht Connect router hören.
10. Kreuzen Sie in der App die Option I heard a prompt, an. Die App
scannt die Geräte in der Nähe. Sie hören die Nachricht Connect
internet.
11. Nachdem Ihr Gerät identiziert wird, bekommen Sie eine Bestätigung
Add device success.
12. Um alles erfolgreich abzuschließen klicken Sie Done.

Benutzerhandbuch
Deutsche
10
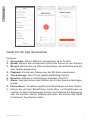
Gerät mit der App überwachen
Optionen:
1. Screenshot: hält ein Bild fest und speichert es im Telefon
2. Speak: drücken Sie und sprechen Sie mit der Person vor der Kamera
3. Record: drücken Sie um Video aufzunehmen, die Aufnahme wird auf
dem Telefon gespeichert.
4. Playback: Sie können Dateien aus der SD Karte visualisieren.
5. Cloud storage: Abruf Cloud (gebührenpichtige Option)
6. Direction: Kamera in 4 Richtungen bewegen (Pan/Tilt)
7. Alarm: zeigt die Historie aller Alarme, die von der Kamera übertragen
wurden.
8. Photo album: Visualisierung Bild und Video Dateien mit dem Telefon.
9. Klicken Sie auf dem Bleistift-Ikon rechts oben, um Einstellungen zu
machen. In Menü Einstellungen können Sie Detektion bei Bewegung
oder die Funktion Motion Tracking aktivieren. Sie können das Gerät
mit anderen Tuya Nutzern teilen.

Benutzerhandbuch
Deutsche
11

Benutzerhandbuch
Deutsche
12
Installierung SD Karte
1. Lösen Sie die 3 Schrauben vom Deckel.
2. Legen Sie die Mikro SD Karte ein.
3. Stellen Sie den Deckel zurück.
Micro SD card slot Reset button
Technische Spezikationen
Auösung 1080P 2MP
Linse 3.6mm
Video Kompression H.264
Frame rate 15 fps
Nachtsicht Ja, bis 20-30 m
IR Leds 4 Leds Array
Audio Bidirektional, Mikrophon und Lautsprecher
eingebaut
PTZ Waagerecht 355° / Senkrecht 90°
Speicher Slot card micro SD (bis zu 128GB)
Gehäuse Metall
Versorgung 230V - 5V 1A
Temperatur -26°C ~ +60°C

Manual de usuario
Español
13
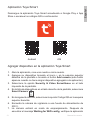
Aplicación Tuya Smart
Descargue la aplicación Tuya Smart accediendo a Google Play o App
Store o escanee los códigos QR a continuación:
Android iOS
Agregar dispositivo en la aplicación Tuya Smart
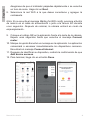
1. Abra la aplicación, cree una cuenta e inicie sesión.
2. Agregue su dispositivo tocando el icono + en la esquina superior
derecha de la pantalla o tocando el botón Add camera (este botón
aparece cuando no tiene ningún dispositivo agregado a la aplicación).
3. Seleccione la opción Security & Video Surveillance en el lado
izquierdo de la pantalla.
4. En la lista de dispositivos en el lado derecho de la pantalla, seleccione
Smart Camera
5. En la siguiente interfaz, seleccione la opción Código QR en la esquina
superior derecha.
6. Encienda la cámara de vigilancia a una fuente de alimentación de
230 V.
7. La cámara entrará en modo de emparejamiento. Después de
escuchar el mensaje Waiting for WiFi cong, verique la aplicación

Manual de usuario
Español
14
Asegúrese de que el indicador parpadee rápidamente o se escuche
un tono de aviso. Haga clic en Next.
8. Seleccione la red WiFi a la que desea conectarse y agregue la
contraseña.
Nota: Si no escucha el mensaje Waiting for WiFi cong, presione el botón
de reinicio en el cable de alimentación o junto a la ranura SD durante
unos segundos. Después de reiniciar, la cámara entrará en modo de
emparejamiento..
9. Coloque el código QR en la aplicación frente a la lente de la cámara.
Espere unos segundos hasta que escuche el mensaje Connect
router.
10. Marque la opción Escuché un mensaje en la aplicación. La aplicación
comenzará a escanear inmediatamente los dispositivos cercanos.
Escuchará el mensaje Connect internet.
11. Después de identicar su dispositivo, recibirá la conrmación de que
Add device success.
12. Para terminar, haga clic en el botón Done.

Manual de usuario
Español
15
Control de dispositivos en la aplicación
Opciones:
1. Screenshot: captura una imagen y la guarda en la memoria del
teléfono
2. Speak: presione para hablar con la persona que está frente a la
cámara
3. Record: presione para grabar video. La grabación se guardará en la
memoria del teléfono..
4. Playback: Ver archivos guardados en la tarjeta SD insertada en la
cámara
5. Cloud storage: Acceso a la nube (opción de pago)
6. Direction: Mueva la cámara en 4 direcciones (Pan/Tilt)
7. Alarm: muestra el historial de todas las alarmas transmitidas por la
cámara.
8. Photo album: Ver fotos y videos guardados en la memoria del
teléfono
9. Haga clic en el icono de lápiz en la esquina superior derecha para
realizar diferentes conguraciones en la habitación. En el menú
de conguración puede activar la detección de movimiento o el
seguimiento de movimiento o compartir su dispositivo con otros
usuarios de Tuya.

Manual de usuario
Español
16

Manual de usuario
Español
17
Instalar tarjeta SD
1. Aoje los 3 tornillos que aseguran la cubierta al globo de la cámara.
2. Inserte la tarjeta micro SD en la ranura dedicada.
3. Reemplazar la cubierta.
Micro SD card slot Reset button
Especicaciones técnicas
Resolución 1080P 2MP
Lente 3.6mm
Compresión de video H.264
Cuadros por segundo 15 fps
Visibilidad nocturna Si hasta20-30m
LED de infrarrojos 4 LED de matriz
Audio Micrófono y altavoz bidireccionales integrados
PTZ Horizontal 355 ° / Vertical 90 °
Memoria Ranura para tarjeta micro SD (hasta 128 GB)
Alojamiento Metal
Alimentación 230V - 12V 2A
Temperatura de
trabajo
-26°C ~ +60°C

Manuel utilisateur
Français
18
Application Tuya Smart
Téléchargez l’application Tuya Smart en accédant à Google Play ou à
l’App Store ou scannez les codes QR ci-dessous:
Android iOS
Ajouter un appareil dans l’application Tuya Smart
1. Ouvrez l’application, créez un compte et connectez-vous.
2. Ajoutez votre appareil en appuyant sur l’icône + dans le coin supérieur
droit de l’écran ou en appuyant sur le bouton Add camera (ce bouton
apparaît lorsque vous n’avez aucun appareil ajouté à l’application).
3. Sélectionnez l’option Security & Video Surveillance sur le côté
gauche de l’écran.
4. Dans la liste des appareils sur le côté droit de l’écran, sélectionnez
Smart Camera
5. Dans l’interface suivante, sélectionnez l’option dans le coin supérieur
droit QR Code.
6. Alimentez la caméra de surveillance sur une source d’alimentation
230V. La caméra entrera en mode de couplage. Après avoir entendu
le message Waiting for WiFi cong, vérier dans l’application Make
sure the indicator is ashing quickly or a prompt tone is heard.

Manuel utilisateur
Français
19
Click Next.
7. Sélectionnez le réseau WiFi auquel vous souhaitez vous connecter et
ajoutez le mot de passe.
Remarque: si vous n’entendez pas le message Waiting for WiFi cong,
appuyez sur le bouton de réinitialisation du cordon d’alimentation ou à
côté de la fente SD pendant quelques secondes. Après le redémarrage,
la caméra entrera en mode de couplage.
8. Positionnez le code QR dans l’application devant l’objectif de la
caméra. Attendez quelques secondes jusqu’à ce que vous entendiez
le message dans la salle Connect router.
9. Cochez l’option dans l’application I heard a prompt. L’application
commencera immédiatement à scanner les appareils à proximité.
Vous entendrez le message Connect internet.
10. Après avoir identié votre appareil, vous recevrez une conrmation
Add device success.
11. Pour terminer, cliquez sur le bouton Done.

Manuel utilisateur
Français
20
Contrôle des appareils dans l’application
Options:
1. Screenshot: capture une image et l’enregistre dans la mémoire du
téléphone
2. Speak: appuyez pour parler à la personne devant la caméra
3. Record: appuyez pour enregistrer une vidéo. L’enregistrement sera
sauvegardé dans la mémoire du téléphone.
4. Playback: Acher les chiers enregistrés sur la carte SD insérée
dans l’appareil photo
5. Cloud storage: Accès au cloud (option payante)
6. Direction: Déplacez la caméra dans 4 directions (Pan/Tilt)
7. Alarm: ache l’historique de toutes les alarmes transmises par la
caméra.
8. Photo album: Acher les photos et vidéos enregistrées dans la
mémoire du téléphone
9. Cliquez sur l’icône en forme de crayon dans le coin supérieur droit
pour eectuer diérents réglages dans la pièce. Dans le menu
des paramètres, vous pouvez activer la détection de mouvement
ou le suivi de mouvement ou partager votre appareil avec d’autres
utilisateurs de Tuya.
Strona się ładuje...
Strona się ładuje...
Strona się ładuje...
Strona się ładuje...
Strona się ładuje...
Strona się ładuje...
Strona się ładuje...
Strona się ładuje...
Strona się ładuje...
Strona się ładuje...
Strona się ładuje...
Strona się ładuje...
Strona się ładuje...
Strona się ładuje...
Strona się ładuje...
Strona się ładuje...
Strona się ładuje...
Strona się ładuje...
Strona się ładuje...
Strona się ładuje...
Strona się ładuje...
Strona się ładuje...
Strona się ładuje...
Strona się ładuje...
-
 1
1
-
 2
2
-
 3
3
-
 4
4
-
 5
5
-
 6
6
-
 7
7
-
 8
8
-
 9
9
-
 10
10
-
 11
11
-
 12
12
-
 13
13
-
 14
14
-
 15
15
-
 16
16
-
 17
17
-
 18
18
-
 19
19
-
 20
20
-
 21
21
-
 22
22
-
 23
23
-
 24
24
-
 25
25
-
 26
26
-
 27
27
-
 28
28
-
 29
29
-
 30
30
-
 31
31
-
 32
32
-
 33
33
-
 34
34
-
 35
35
-
 36
36
-
 37
37
-
 38
38
-
 39
39
-
 40
40
-
 41
41
-
 42
42
-
 43
43
-
 44
44


w innych językach
- español: PNI SafeHome PTZ382 Manual de usuario
- français: PNI SafeHome PTZ382 Manuel utilisateur
Powiązane artykuły
Inne dokumenty
-
Overmax OV-CAMSPOT 4.0 PTZ WHITE Instrukcja obsługi
-
Kruger & Matz Connect C70 external Wi-Fi camera Instrukcja obsługi
-
 Anjielo Smart KW02_TuyaID Video doorbell manual Instrukcja obsługi
-
Kruger Matz KM2240 Instrukcja obsługi
-
Calex Halo Slimme Ceiling Light Instrukcja instalacji
-
-
Perel SMART1003 Instrukcja obsługi
-
Perel SMART1002 Instrukcja obsługi
