Classic Exhibits VK-1112 Setup Instructions
- Typ
- Setup Instructions

© 2016
www.classicexhibits.com
Order #XXXXX -
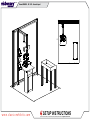
SETUP INSTRUCTIONS
If you would like to tell us about your experience with your setup instructions please email us at [email protected]
VK-1112 - General Layout
Plan View
10’
10’

© 2016
www.classicexhibits.com
Order #XXXXX -
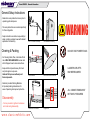
DO NOT USE POWER TOOLS
ALL CONNECTIONS MUST
BE TIGHTLY SECURED
Part Identification - Numbering
Spline Connection Base Plate & Extrusion Connection
General Setup Instructions
- Read entire setup instruction manual prior to
unpacking parts and pieces.
- The setup instructions are created specifically
for this configuration.
- Setup instructions are laid out sequentially in
steps, including exploded views with detailed
explanation for assembly.
WARNING
Cleaning & Packing
- For Cleaning Metal, Plex, & Laminate Parts:
Use a MILD NON-ABRASIVE cleanser and
soft cloth/paper towel to clean all surfaces.
- Keep exhibit components away from heat
and prolonged sun exposure.
Heat and UV exposure will warp and
fade components.
- Retain all provided Packing Materials.
All provided packing materials are for
ease of repacking & component protection.
Disassembly
- For loss prevention, tighten all setscrews
and locks during disassembly
7A
Hex Tool - Essential for Assembly
Extrusion & Lock Connection Engaged Lock
LADDERS OR LIFTS
MAY BE REQUIRED
General Information

© 2016
www.classicexhibits.com
Order #XXXXX -
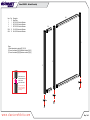
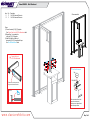
Step 1 of 5
Backwall Assembly
5A
5
2
3
6A
6
4
1
1
1
Item
1
2
3
4
5/5A
6/6A
Qty.
3
1
1
1
1/1
1/1
Description
Base Plate
95.75”h Q914 Vertical Extrusion
95.75”h Q914 Vertical Extrusion
95.75”h Q914 Vertical Extrusion
18”w Q914 Horizontal Extrusion
84”w Q914 Horizontal Extrusion
Steps:
1) Attach base plates to verticals [2], [3] & [4].
2) Connect horizontals [5] & [5A] between verticals [2] & [3].
3) Connect horizontals [6] & [6A] between verticals [3] & [4].
Screws
Connector
Q914 Connector
Silde extrusion over
connector and rest on
lower vertical;
secure with screws.
**To prevent product loss,
Keep all screws attached
to connector piece after
disassembling
*

© 2016
www.classicexhibits.com
Order #XXXXX -
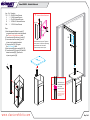
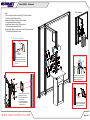
Step 2 of 5
Pedestal Attachment
7
Counter
Infill
8
7A
9
10A
10
Item
7/7A
8
9
10
10A
Qty.
1/1
1
1
1
1
Description
48”h Q914 Vertical Extrusion
5”w Z45 Horizontal Extrusion
42”w Q914 Horizontal Extrusion
12.7598”w Z41 Horizontal Extrusion
11.5”h Z41 Vertical Extrusion
Steps:
1) Attach the assembled Pedestal to vertical [7]
using standoff caps from the inside of the pedestal.
See Counter to Vertical Attachement detail.
2) Connect horizontal [8] to the back of vertical [7].
3) Lower counter down over vertical [7] and set
in place on top of assembled pedestals.
4) Connect verticals [7] & [7A] together.
See Q914 Connector detail.
5) Attach horizontal [9] between verticals [3] & [7A].
6) Connect horizontal [10] to vertical [7A]; insert infill
between horizontals [9] & [10] and secure
in place using vertical [10A].
*
*
*
Counter
V4 Connector
Slide V4 connector into groove. Tighten set
screw to secure V4. Insert screw cap through
hole of Counter & into V4 connector.
Tighten screw cap to secure in place.
Counter to Vertical Attachment
Screw Cap
*
Screws
Connector
Q914 Connector
Silde extrusion over
connector and rest on
lower vertical;
secure with screws.
**To prevent product loss,
Keep all screws attached
to connector piece after
disassembling
*

© 2016
www.classicexhibits.com
Order #XXXXX -
Step 3 of 5
Shelf Attachment
11
11 12
12
When assembled
Item
11
12
Qty.
2
2
Description
11”w Z45 Horizontal Extrusion
11”w Z45 Horizontal Extrusion
Steps:
1) Connect horizontal [11] & [12] together.
See Custom Cam Lock w/ Pill Slot Attachment detail.
2) Repeat Step 1. to assemble the
right side [11] & [12] together.
3) Install Plex shelves to the top of
horizontals [11] & [12] using standoff caps.
See Plex Shelf attachment detail.
**
****
Top View
Cam Lock
Custom Cam Lock
w/ Pill Slot Attachment
*
Tighten screw to clamp cam lock
into groove of vertical extrusion.
*
Slide connector with stud into
groove of extrusion and
twist to secure in place. Attach
plex with cap as shown.
Plex Shelf
Cap
V20
Plex Shelf Attachment

© 2016
www.classicexhibits.com
Order #XXXXX -
Step 4 of 5
Attachments
When assembled
Steps:
1) Connect Literature Racks to verticals [3] & [7/7A] where indicated.
See Literature Rack Attachment detail.
2) Attach Ipad Clamshell to vertical [3] where indicated.
See Ipad Clamshell Attachment detail.
3) Install Monitor Mount to vertical [7A] where shown.
See Monitor Mount Attachement detail.
4) Attach Graphic Signs to front and back of vertical [7A] where indicated.
See Graphic to Post Attachment detail.
*
Graphic
Cap
V20
Slide V20 connector into groove of
extrusion, then secure graphic to
connector using screw cap.
Graphic to Post Attachment
Attach connector piece to rack
as shown. Connect literature
rack to vertical extrusion.
Literature Rack Attachment
*
Tighten Lock
to Secure
Monitor Mount Attachment W/Out Stand Off Barrels
*
1) Attach backing plate to monitor.
2) Attach bolts to vertical.
3) Hang connection plate from
attached bolts.
4) Connect backing plate to
connection platewith bolts,
washers, and a nut.
Mounting
Plate
iPad Mount Attachment
*
Attach connector piece to iPad
mount as shown. Then connect
assembled iPad mount to vertical
extrusion.
Tighten Lock
to Secure
**
*
*
*
*
*
*

© 2016
www.classicexhibits.com
Order #XXXXX -
Step 5 of 5
Planter Box Assembly
When assembled
Item
13
Qty.
4
Description
33”h Q914 Vertical Extrusion
Steps:
1) Connect verticals [13] to wood build planter box using bolts
-
 1
1
-
 2
2
-
 3
3
-
 4
4
-
 5
5
-
 6
6
-
 7
7


Classic Exhibits VK-1112 Setup Instructions
- Typ
- Setup Instructions
w innych językach
- English: Classic Exhibits VK-1112
Powiązane artykuły
-
Classic Exhibits TF-523 Setup Instructions
-
-
-
-
-
-
-
-
-