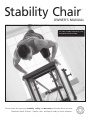
Merrithew Health & Fitness Stability Chair Instrukcja obsługi
- Typ
- Instrukcja obsługi

Please review this important assembly, safety and warranty information about your new
Merrithew Health & Fitness
™
Stability Chair
™
and keep it handy for future reference.
Stability Chair
™
For video assembly instructions, visit:
merrithew.com/eq-assembly
OWNER’S MANUAL

Stability Chair
™
Owner’s Manual
1
2
3
12
5
14
15
4. 11
2
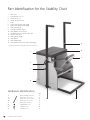
1 Chair Seat
2 3-prong Knob (
1/4"x 1")
3 Pop-up Pin (
5/16")
4 Handle Receptacle
(R/L)
*
5 Pedal
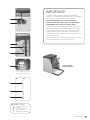
6 Heavy Chair Springs (red) [Fig B]
7 Light Chair Springs (blue) [Fig B]
8 Chair Snap [Fig A]
9 5-prong Star Knob [Fig A]
10 Serial Number Sticker [Fig C]
11 Horizontal Frame complete with Pedal
12 Wooden Sides (R/L)
13 Vertical Frame [Fig B]
14 Seat Support
15 Chair Handle (R/L)
*
16 Chair Handle Chrome Extension (R/L) [Fig D]
*
* Included with Split-Pedal Stability Chair with handle models only.
Part Identification for the Stability Chair
™
Hardware Identification
QTY
17 Bolt, Carriage (1/4"x 2") 8
18 Bolt, Hex (
1/4"x 1-1/2") 6
19 Bolt, Hex (
1/4"x 2-1/4") 4
20 Bolt, Hex (
3/8"x 3/4") 4
21 Bolt, Hex (
1/4"x 2") 8
22 Nylock Nut (
1/4") 16
23 Washer (
1/4") 22
24 Washer (
3/8") 4

merrithew.com
3
ALSO AVAILABLE
WITHOUT HANDLES
A
B
D
8
6
9
7
13
the serial number is applied
to the underside of the chair
seat, below the spring sticker.
C
10
15
16
4
REQUIRED TOOLS:
(SUPPLIED)
ADJUSTABLE WRENCH
IMPORTANT!
This manual contains important assembly, safety and warranty
information. Read the manual carefully before using your new Stability
Chair
™
and keep the manual on hand for future reference.
UNSAFE OR IMPROPER USE OF THIS EQUIPMENT AND
FAILING TO READ AND COMPLYWITH ALL REQUIREMENTS
ANDWARNINGS COULD RESULT IN SERIOUSINJURY.
It is impossible to predict every situation and condition that can occur
while using your Stability Chair. Merrithew Health & Fitness
™
makes
no representation about the safe use of the Stability Chair under all
conditions. There are risks associated with the use of any exercise
equipment that cannot be predicted or avoided, and you assume the
responsibility for that risk.
Merrithew Health & Fitness recommends cautious assembly and usage
and wish you many hours of safe and effective exercise.

Stability Chair
™
Owner’s Manual
4
User Guidelines
The Stability Chair is a sophisticated piece of equipment that,
when used properly, can facilitate many Pilates exercises safely and
effectively. However, care and caution must be taken as there are
some inherent dangers when using any exercise equipment – especially
when spring resistance is involved.
For inexperienced or first-time users, the Stability Chair should
only be used under the supervision of a trained professional.
This manual includes general guidelines for setup, usage and safety.
To get the most out of your Stability Chair, Merrithew Health & Fitness
offers a full range of instructional DVDs and manuals. Personalized
training is offered through our Corporate Training Center and
LicensedTraining Centers.
For more information on training, visit merrithew.com/education
For questions or technical assistance,
email [email protected]
Care & Cleaning
Wipe vinyl surfaces with a mixture of water and tea tree oil, a natural
disinfectant. Add 5 ml or 1 tsp of tea tree oil to a 1L or 1qt spray
bottle of water. A mixture of mild soap and water may be used to
remove more persistent dirt. Ensure cleaner does not leave an oily
residue, or make surfaces slippery. Clean all metal surface areas
as required, using a soft cloth and gentle cleaner.
If necessary, hinges can be cleaned with a cloth and window cleaner,
(spray cleaner onto the cloth first, not directly on the equipment).
It is not necessary to lubricate the hinges.
Mechanical
Safety Check
We recommend a monthly inspection
of the following elements:
Daily
w
Clean all surface areas after each use as per
Care & Cleaning instructions
Weekly
w
Check all springs for wear and damage and replace as needed
Monthly
w
Ensure all nuts, bolts and screws are securely fastened
Every Two Years
w
Replace all springs
FAILURE TO PERFORM RECOMMENDED SAFETY CHECKS, OR
USING THE MACHINE WITH IMPROPERLY ADJUSTED, BROKEN
OR WORN PARTS, COULD RESULT IN SERIOUS BODILY INJURY.
CAUTION
IMPROPER USE OF EXERCISE EQUIPMENT MAYCAUSE
SERIOUS BODILY INJURY. TO REDUCE RISK, PLEASE READ THE
FOLLOWING:
w
The Stability Chair should be used under the supervision
of a trained professional.
w
Before starting any exercise program, consult a physician.
w
Before using the equipment, read and follow the Safety instructions
in this Manual and obtain instruction from a qualified trainer.
w
Use equipment only for intended exercises.
w
Ensure the equipment is properly adjusted for your size
and ability level.
w
Stop exercising if you experience chest pain, feel faint, have
difficulty breathing or experience musculoskeletal discomfort.
w
Keep body, clothing and hair free from all moving parts.
w
Do not use if equipment appears worn, broken or damaged.
w
Do not attempt to repair equipment yourself without consulting
Merrithew Health & Fitness.
w
Do not allow children to use or be around equipment without adult
supervision.
w
All springs must be replaced every 24 months or as needed within
that period.
w
The Stability Chair should only be used by one person at a time.
w
Ensure you and your clients/patients have received proper
instruction regarding the correct and safe use of this equipment.
w
The Stability Chair should not be used by persons weighing over
250 lbs / 113 kgs.
WARNING: As with any athletic activity, the use of exercise
equipment involves risk of injury, damage and/or death.
By choosing to use Merrithew Health & Fitness equipment,
you and/or your clients/patients assume responsibility for
that risk, not the people who sold you the equipment,
distribute and/or manufacture it.

merrithew.com
5
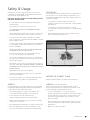
Safety & Usage
Full instructions on proper set-up and execution of each exercise
is provided in the STOTT PILATES
®
Complete Stability Chair Manual.
Thefollowing are general guidelines only.
FOR SAFETY REASONS: DO NOT LIFT CHAIR FROM CHAIRSEAT,
GRIP METAL FRAME INSTEAD.
w
Be careful that skin does not get caught when attaching and
detaching springs.
w
Ensure springs are securely hooked on the eyehooks.
IF A SPRING IS NOT SECURE, IT MAY UNHOOK AND DETACH
WITHHIGH FORCE.
w
When changing springs, always leave one spring on while moving
the desired spring into place to ensure the pedal does not fall.
w
Care must be taken when seated or standing on the Stability
Chair, ensuring there is sufficient surface area available to maintain
balance during the exercise.
w
In exercises where weight is displaced away from the Stability Chair
(e.g. Spring Eagle), a trained professional must sit on the Chair to
provide counterbalance.
NEVER STRETCH OFF THE SIDE OF THE CHAIR OR SWING FROM
THE HANDLES AS THIS MAY CAUSE IT TO TIP.
w
Be careful to not place fingers or toes underneath the pedal
or on top of the metal base of the Stability Chair.
w
Take care when attempting any new exercises, as the pedal may
propel the exerciser forward or leave them in a precarious position
without sufficient support.
w
When hands or feet are on the pedal, ensure they are secure and
will not slip. IF THE PEDAL IS RELEASED SUDDENLY, THE FORCE OF
THE SPRINGS MAY CAUSE INJURY, OR THE EXERCISER MAY LOSE
BALANCE AND FALL.
w
Gripper Mats may be used to prevent slipping.
w
Proper fitness apparel (including sticky socks) is recommended
whileusing this equipment.
w
Be careful to keep fingers, toes, clothing and hair away from the
space between the two pedals on the Split-Pedal Chair.
SPRINGS
Four springs in two tensions and three spring tension locations make
the Split-Pedal Stability Chair highly versatile and easily adjustable to
accommodate each user’s abilities and strengths.
w
When attaching springs, hook them to the pedal first, then
to the vertical frame. During regular use, change springs
by unhooking them from the vertical frame only.
w
Springs should remain attached to the pedal at all times.
w
Always attach the heavy springs to the inner eyehooks and light
springs to the outer eyehooks.
w
When changing springs, always leave one spring on while moving
the desired spring into place to ensure the pedal does not fall.
w
Do not have any weight on the pedal(s) when changing springs.
SPLIT-PEDALS
The Split-Pedal Chair has two pedals that can move independently or,
locked together, form one pedal. Splitting the pedals allows you to
work bilaterally, unilaterally and reciprocally to rebalance muscle and
challenge core stability.
w
To join pedals: loosen both star knobs and rotate lock,
ensuring it completely hooks onto metal shaft of star knob.Tighten
both star knobs.
w
To split pedals: loosen both star knobs and lift open side
of lock from shaft or star knob and rotate so it is completely under
one pedal.
w
When splitting pedals, make sure a spring is attached on both
sides, as pedal will fall if unsupported.
MOVING THE STABILITY CHAIR
Grasp the handles and tilt the side with the wheels towards you.
HANDLES (for models with handles)
Handles provide support in some standing and sitting exercises.
They are easily inserted and lock securely into place. Handles can be
purchased separately and installed later by the user.
w
To insert or adjust handles: Loosen 3-prong star knob.
Pull pop-up pin and insert chair handle into chair handle receptacle.
Ensure bolt head faces away from the seat vinyl. Release pop-up
pin at desired height and tighten 3-prong star knob to secure
handle in receptacle.
w
When performing exercises with the handles, ensure pop-up pins
are securely inserted into handles and both star knobs have been
fully tightened.
w
NOTE: Do not tighten pop-up pins.
Pedals lock together for use as a single pedal.

Stability Chair
™
Owner’s Manual
6
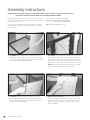
Assembly Instructions
IMPORTANT: DO NOT TIGHTEN ANY BOLTS OR SCREWS DURING ASSEMBLY UNTIL YOU ARE INSTRUCTED TO DO SO.
PLEASE READ THESE INSTRUCTIONS COMPLETELY BEFORE BEGINNING ASSEMBLY.
Place all parts from the box in a cleared area and position them on the
floor in front of you. Remove all packing material from your area and
place them back into the box.
Do not dispose of the packing materials until assembly is completed.
To prevent unsafe or improper use, please read each step carefully
before beginning.
For assistance or to report any missing parts:
Call toll-free: North America 1-800-910-0001
United Kingdom 0800-328-5676
Email: [email protected]
1 ALL MODELS Take horizontal frame complete with pedals [11]
and attach the wooden sides [12] to each side of the frame with
one 1/4"x 2" carriage bolt [17] and nut [22] ensuring ensuring that
the Logos are facing outward. Do not tighten.
3 ALL MODELS Attach the seat support [14] between the two
wooden sides [12] at the front, using two 1/4"x 1-1⁄2" hex bolts
[18] with washers[23] on the outside, making sure the holes for
the chair seat are facing upwards.
2 ALL MODELS Slide vertical frame [13] between the two wooden
sides [12] at the back, making sure thewheels are facing to the
outside. Match the threeholes on each side of the wooden sides
[12] with those on the vertical frame [13] and attach them loosely
with six 1/4"x 2" carriage bolts [17] and nuts[22]. Do not tighten.
NOTE: Gently tap all carriage bolts from the outside to set them
into the wood. Then tighten the nuts on the inside.
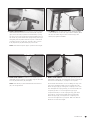
4a
MODELS WITHOUT HANDLES Attach the wooden sides [12] to
the horizontal frame [11] using 1/4"x2" carriage bolts [17] and
nuts [22]. Insert two 1/4"x1-1⁄2" hex bolts [18] and nuts [22]
with washers [23] in remaining holes on the wooden sides [12].
Tightenall hardware.

merrithew.com
7
4b MODELS WITH HANDLES Lift the pedal to access the horizontal
frame and fasten the bottom end of the chair handle receptacles
[4] to the wooden sides [12] and the horizontal frame [11] using
two 1/4"x 2-1/2" hex bolt [19] and nuts [22] with washers [23] on
the outside only. Check that the three prong knob [2] at the top is
facing away from the pedals. Attach the top end of chair handle
receptacles [4] to the wooden sides, using two 1/4"x 1-1⁄2"hex
bolts [18] and nuts [22] with washers [23] on both sides.
NOTE: Chair handle receptacles [4] are specified as left andright.
6 MODEL WITH HANDLES Assemble the chair handles [15] and
chair handle chrome extensions [16] together using two 3⁄8"x3⁄4"
hex bolts [20] with washers [24] and tighten.
NOTE: Chair Handles [15] and Chair Handle Chrome Extensions
[16] come as right and left.
5 ALL MODELS Place the chair seat [1] on top, aligning the edges
of the seat with the wooden sides [12]. From the underside, attach
the seat to the frame using four 1/4"x 2"hex bolts [21] with
washers [23]. Tighten all hardware.
7 MODELS WITH HANDLES Loosen the 3-prong knob [2] on the
chair handle receptacle [4], unscrew and pull out the pop-up pin [3]
and insert the chair handle [15, 16] fully into the receptacle.
Ensure that the bolt head faces out to not damage the vinyl of the
chair seat [1] and that the handle [15] faces towards the pedal.
Release the pop-up pin [3] ensuring it sits completely in one of the
holes and tighten the 3-prong knob [2] to secure the handle in the
receptacle [4]. There is no need to tighten the pop-up pin.
To adjust the handles, loosen the 3-prong knob [2], pull out the
pop-up pin [3], and position the handle at the desired height.
Release the pop-up pin, ensuring that it sits completely in one
of the holes and tighten the 3-prong knob. Make sure that both
handles are set at the same height.

Stability Chair
™
Owner’s Manual
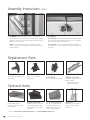
Replacement Parts
STABILITY CHAIR
SPRING PACKAGE
A complete spring replacement
package includes:
w
Light Chair Springs (2)
w
Heavy Chair Springs (2)
5-PRONG
STAR KNOB
Use to lock or unlock the pedals
3-PRONG KNOB
Use to lock or unlock the
chairhandles
POP-UP PIN
Use to adjust the height of the
chair handles
Optional Items
FOAM CUSHIONS
Available in three sizes. Used for
comfort and additional support
when performing a wide variety
ofexercises.
GRIPPER MATS
Non-slip rubber mats are
handy to increase traction and
preventslipping.
T.P.E. PILATES PADS
Non-slip, eco-friendly pads are
used to help establish correct
alignment and positioning or
provide cushioned support.
HANDLES
Updater kit for models without
handles. Includes hardware
andhandles
To order, visit merrithew.com/replacementparts or email [email protected]
8
Assembly Instructions CONT’D
8 ALL MODELS Attach the springs to hooks on the pedal first,
then to the hooks on the vertical frame. The heavy chair (red) springs
[6] attach to the inner eyehooks and the light chair (blue) springs [7]
attach to the outer eyehooks.
NOTE: To change the spring tension, only unhook the springs
from the vertical frame. The springs should remain attached to the
pedals at all times.
9 SPLIT PEDALS
To split pedals: Loosen both 5-prong star knobs [9] and lift open
side of chair snap [8] from star knob and rotate so it is completely
under one pedal. Tighten both star knobs.
To join pedals: Loosen both 5-prong star knobs [9] and rotate
chair snap [8] to hook onto metal shaft of star knob. Tighten both
star knobs.

merrithew.com
9
90-DAY FABRIC WARRANTY
The vinyl fabric upholstery will be replaced if it fails to give normal wear
for 90 days after delivery. Proof of damage may be required. Thiswarranty
does not cover cuts, burns, stains, soiling, pet damage or damage caused
by other unreasonable use. This warranty does not apply to fabrics cleaned
with abrasive, corrosive or chemical cleaners. If the identical fabric is not
available, Merrithew Health & Fitness will provide an equivalent fabric.
DISCLAIMER OF IMPLIED WARRANTIES
AND LIMITATION OF REMEDIES
Repair or replacement of defective parts is your exclusive remedy under the
terms of this limited warranty.
In the event of parts availability issues, Merrithew Health & Fitness will
not be responsible for any consequential or incidental damages arising
from the breach of either this limited warranty or any applicable implied
warranty, or for failure or damage resulting from acts of nature, improper
care and maintenance, accident, alteration, replacement of parts by
anyone other than Merrithew Health & Fitness, misuse, transportation,
abuse, hostile environments (inclement weather, acts of nature), improper
installation or installation not in accordance with local codes or printed
Merrithew Health & Fitness instructions.
This limited warranty is the sole express warranty given by
Merrithew Health & Fitness. No product performance, specification
or description wherever appearing is warranted by Merrithew
Health & Fitness except to the extent set forth in this limited
warranty. Any implied warranty protection arising under the laws
of any state, provinceor territory including implied warranty of
merchantability or fitness for a particular purpose, oruse, is hereby
limited in duration to the duration of this limited warranty.
Neither distributors, dealers, web resellers, nor the retailers selling this
product have any authority to make any additional warranties or to
promise remedies in addition to or inconsistent with those stated above.
Merrithew Health & Fitness maximum liability, in any event, shall not
exceed the purchase price of the product paid by the original purchaser.
Warranty
MERRITHEW HEALTH & FITNESS STABILITY CHAIR
Merrithew Health & Fitness warrants that all new Stability Chair products
are free of manufacturing defects in workmanship and materials, subject
to the terms below. This warranty becomes effective at the invoice date
of the original purchase. Parts repaired or replaced under the terms of this
warranty will be warranted for the remainder of the original warranty period.
This warranty applies to this equipment only:
w
while it remains in the possession of the original purchaser and proof
of purchase is demonstrated
w
if claims are made within the warranty period
w
if upgrades are made as required by Merrithew Health & Fitness
THIS WARRANTY SHALL BE NULL AND VOID IF:
w
the equipment is used for any other purpose other than
asintended
w
all safety and usage guidelines are not followed as specified
w
the equipment failure is a result of improper maintenance
w
the equipment has been subjected to accident, misuse, abuse,
improper service, or any modification not authorized by
Merrithew Health & Fitness
w
t he equipment is improperly installed
This warranty does not cover damage to the finish of any STOTT PILATES
equipment, or shipping charges, customs clearance fees (if applicable) or
any costs incurred in installing repaired or replacement parts shipped under
the provisions of this warranty.
LIMITED LIFETIME WARRANTY
Merrithew Health & Fitness will, at its option, repair or replace the metal
frame and related welding, provided that the part(s) fail due to a defect in
workmanship or materials.
TWO (2) YEAR LIMITED WARRANTY
Merrithew Health & Fitness will, at its option, repair or replace all other
components other than upholstery that fails for any reason, provided such
failure is reported to Merrithew Health & Fitness within a period of two
years from the invoice date of the original purchase.

Stability Chair
™
Owner’s Manual
10
size: 27"x 39"
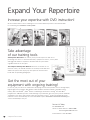
Increase your expertise with DVD instruction!
We offer almost limitless exercise challenges in our clear and detailed repertoire ofinstructional DVDs.
For a full listing visit merrithew.com/shop/dvds.
Expand Your Repertoire
Take advantage
of our training tools
Stability Chair Wall Chart: This full-size poster provides helpful cues and correct
positioning. Each exercise is described with name, equipment accessories, a select photo
andsuggested number of repetitions. Our Wall Charts are printed with
vegetable-based inks on FSC paper.
The Complete Stability Chair Manual: Written as a text book for our
Instructor courses, this manuals illustrates the Essential, Intermediate and
Advanced repertoire with step-by-step descriptions of movement and
breath and corresponding photographs.
Contact Us Today:
visit merrithew.com
call toll-free North America 1-800-910-0001
United Kingdom 0800-328-5676
or International +1-416-482-4050
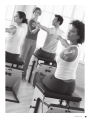
Get the most out of your
equipment with ongoing training!
For over 25 years, we have been committed to developing effective and responsible exercise through unique,
high- integrity fitness programs. Our signature STOTT PILATES
®
education method is unparalleled in the
™
, CORE
™
Athletic Conditioning & Performance Training
™
and Total Barre
™
programs offer additional repertoire to add challenge to your workouts. We invite you to join our worldwide
community of elite fitness professionals—with TheProfessional’s Choice
™
in Pilates & Mindful Movement
Education. Courses and workshops are offered worldwide. Explore merrithew.com/education/training for
courses andworkshops near you.

merrithew.com
11

2200 Yonge Street, Suite 500, Toronto, ON M4S 2C6 phone 416-482-4050
Please keep this manual in a safe place.
IMPORTANT
This is your Stability Chair
™
Serial Number:
P00220 PM-2082D-1 OCT 14 ™/® Trademark or registered trademark of Merrithew Corporation, used under license. Printed in Canada. All rights reserved.
Go to
merrithew.com/warranty
to activate your warranty!
Get the benefits:
w
Ensure that you’ll be able to repair it under warranty should you encounter a problem.
w
Make warranty service fast and efficient by having your information in our records.
w
In the unlikely event of a replacement or safety notice, we’ll be able to contact you immediately.
w
Proof of purchase for insurance purposes in the event of a loss due to fire, flood or theft.
w
Stay informed of any product updates.
Can’t get online?
Please fill out the warranty card enclosed with this product, and return to us.
-
 1
1
-
 2
2
-
 3
3
-
 4
4
-
 5
5
-
 6
6
-
 7
7
-
 8
8
-
 9
9
-
 10
10
-
 11
11
-
 12
12


Merrithew Health & Fitness Stability Chair Instrukcja obsługi
- Typ
- Instrukcja obsługi
w innych językach
Inne dokumenty
-
 Sunjoy 110205007-B Instrukcja instalacji
-
Woodbridge Air Bathtub Instrukcja obsługi
-
Vermeiren Normandie 2F Instrukcja obsługi
-
FlowerHouse FHTDDKB instrukcja
-
Vermeiren Nathalie Instrukcja obsługi
-
Spokey JONI Instrukcja obsługi
-
-
Vermeiren Normandie XXL Instrukcja obsługi
-
Vermeiren Inovys II Instrukcja obsługi
-
