Hama 00113983 Instrukcja obsługi
- Kategoria
- Budziki
- Typ
- Instrukcja obsługi
Ten podręcznik jest również odpowiedni dla

00
113983
TH400
Thermometer/Hygrometer
I
RUS
D
GB
PL
Operating Instructions
Bedienungsanleitung
Руководство по эксплуатации
Istruzioni per l‘uso
Instrukcja obsługi
All listed brands are trademarks of the corresponding companies.
Errors and omissions excepted, and subject to technical changes.
Our general terms of delivery and payment are applied.
00113983/10.15
Hama GmbH & Co KG
86652 Monheim
/ Germany
www.hama.com
C
D
R
Y
C
O
M
F
O
R
T
W
E
T

2
G Operating instruction
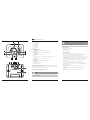
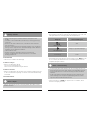
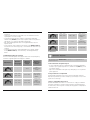
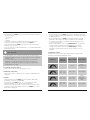
Controls and Displays
1. Comfort indication
2. Room temperature
3. Room humidity
4. Wireless symbol
5. Summer time
6. Snooze symbol
7. Time
8. Alarm symbol
9. SNOOZE/LIGHT button
= stops the alarm/activates the backlight (approx. 5 seconds)
10. MODE button
= settings/confirms the setting/switches the display mode
11. ALARM button
= display / setting alarm modes
12. + button
= increase the current set value/switch between 12 and 24-hour format
13. – button
= decreases the current set value/toggles between °C and °F
14. WAVE button
= activate/deactivate manual radio signal reception
15.
RESET button
= restoring factory settings
16. Battery compartment
Thank you for choosing a Hama product.
Take your time and read the following instructions and information completely. Please
keep these instructions in a safe place for future reference. If you sell the device, please
pass these operating instructions on to the new owner.
1. Explanation of Warning Symbols and Notes
Warning
This symbol is used to indicate safety instructions or to draw your attention to
specific hazards and risks.
3
Note
This symbol is used to indicate additional information or important notes.
2. Package Contents
•Thermometer/Hygrometer TH400
•2x AAA batteries
•These operating instructions
3. Safety Instructions
•The product is intended for private, non-commercial use only.
•Do not operate the product outside the power limits given in the specifications.
•Do not use the product in moist environments and avoid splashes.
•Do not use the product in the immediate vicinity of heaters or other heat sources or
in direct sunlight.
•Do not use the product in areas where the use of electronic devices is not permitted.
•Do not place the product near interference fields, metal frames, computers, TVs,
etc. Electronic devices and window frames can negatively affect the product’s
functionality.
•Do not drop the product and do not expose it to any major shocks.
•Do not open the device or continue to operate it if it becomes damaged.
•Do not attempt to service or repair the product yourself. Leave any and all service
work to qualified experts.
•Keep the packaging material out of the reach of children due to the risk of
suffocation.
•Dispose of packaging material immediately according to locally applicable
regulations.
•Do not modify the product in any way. Doing so voids the warranty.
C
D
R
Y
C
O
M
F
O
R
T
W
E
T
1 2
3
7
8
56
4
109 11 12 13 14
16
15

4 5
Warning – Batteries
•Immediately remove and dispose of dead batteries from the product.
•Only use batteries (or rechargeable batteries) that match the specified type.
•Do not mix old and new batteries or batteries of a different type or make.
•When inserting batteries, note the correct polarity (+ and - markings) and insert
the batteries accordingly. Failure to do so could result in the batteries leaking
or exploding.
•Do not charge batteries.
•Keep batteries out of the reach of children.
•Do not short circuit the batteries/rechargeable batteries and keep them away
from uncoated metal objects.
4. Getting Started
•Remove the screen protector from the display.
4.1. Inserting the batteries
•Open the battery compartment (16) and remove the contact breaker. Close the
battery compartment cover.
4.2. Replacing the batteries
•Open the battery compartment (16), remove the dead batteries and insert two new
AAA batteries with the correct polarity. Close the battery compartment cover.
5. Operation
Note – Input
Hold down the + button (12) or the – button (13) to select the values faster.
5.1. Automatic setting using the DCF signal
•Once the batteries are inserted, the clock automatically searches for a DCF signal.
During the search, the wireless icon (4) flashes.
Display (4) Searching for the DCF signal
Display flashing
Active
Displayed continuously
Successful – signal is being received
Not displayed Deactivated
•If the station still does not receive a signal, press and hold the WAVE button (14) for
approx. 3 seconds to start the manual search for the DCF signal. The wireless icon
(4) will start to flash.
Note – Time settings
•The search process takes about 7 minutes. If the search fails, it ends and is
repeated at the next clock hour. The wireless icon (4) disappears.
•In the meantime you can, however, set the time and the date manually.
•The clock automatically continues to search for the DCF signal on a daily basis
(between 1:00 a.m. and 3:00 a.m.). If the signal is received successfully, the
manually-set time and date are overwritten.
•Press and hold the WAVE button (14) again for approx. 3 seconds to stop the
manual search.
Note – Summer time
•The clock automatically switches to summer time. DST (5) appears on the display
as long as summer time is activated.

6 7
5.2 (Manual) settings
•Press and hold the MODE button (10) for approx. 3 seconds to make the following
settings one after the other:
• Time zone (7)
• Hours (7)
• Minutes (7)
•To select the individual values, press the + button (12) or the – button (13) and
confirm each selection by pressing the MODE button (10).
•Press the MODE button (10) immediately to adopt the set value displayed and skip
ahead.
•If you do not make an entry for 20 seconds, you automatically exit setup mode.
Note – Time zone
•The DCF signal can be received over long distances, but always transmits the
current Central European Time in Germany. Make sure you account for the time
difference in countries with another time zone.
•If you are in Moscow, the time is 3 hours later than in Germany. This means that
you should set +3 for the time zone. The clock then automatically sets the time to
3 hours after the DCF signal received or relative to the manually set time.
5.3 Selecting 12 or 24-hour format
•Press the + button (12) to switch between the 12 and 24-hour formats.
5.4 Celsius / Fahrenheit
•Press the – button (13) to switch between °C and °F for the temperature display.
5.5 Alarm
•Repeatedly press the MODE button (10) to access alarm mode.
• AL displayed accordingly in the seconds display.
•Press and hold the MODE button (10) for approx. 3 seconds to set the signal time of
the alarm displayed. The hours display begins to flash.
•Press the + button (12) or the – button (13) to select the hour for the alarm time
and confirm your selection by pressing the MODE button (10). The minutes display
begins to flash.
•Repeat the process to set the minutes for the alarm time.
•Press the MODE button (10) repeatedly to go back to the time display (7).
•If you do not make an entry for 20 seconds, you automatically exit setup mode.
•Press the ALARM (11) button repeatedly to activate or deactivate the daily alarm.
The alarm symbol (8) will appear/not appear.
•If the alarm is triggered, the alarm symbol (8) will begin to flash and an alarm signal
will sound.
•Press any button (except the SNOOZE/LIGHT button (9) to stop the alarm.
Otherwise, it will stop automatically after 2 minutes.
•If you press the SNOOZE/LIGHT button (9) during the alarm, the alarm is interrupted
for 5 minutes and then goes off again. The Snooze symbol (6) will flash.
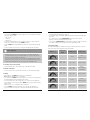
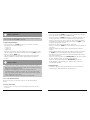
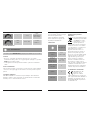
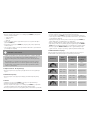
5.6. Comfort display
The thermometer/hygrometer displays the following comfort ranges based on the ratio
between the current room temperature and room humidity:
Display (1)
Temperature
range
Humidity range Comfort range
D
R
Y
C
O
M
F
O
R
T
W
E
T
–<40%
– Dry –
Ambient air too dry
D
R
Y
C
O
M
F
O
R
T
W
E
T
20°C – 22°C
26°C – 28°C
40% – 54% – Relative comfort –
D
R
Y
C
O
M
F
O
R
T
W
E
T
20°C – 28°C
22°C – 26°C
55% – 65%
40% – 75%
– Comfort –
Ideal temperature
and humidity
D
R
Y
C
O
M
F
O
R
T
W
E
T
20°C – 22°C
26°C – 28°C 66% – 74% – Relative comfort –
D
R
Y
C
O
M
F
O
R
T
W
E
T
–>75%
– Moist –
Humidity too high
D
R
Y
C
O
M
F
O
R
T
W
E
T
< 20°C
> 28°C
40% – 74% – No indicator –

8 9
5.7. Backlight
Note – Backlight
If you press the SNOOZE/LIGHT button (9), the display will light up for approx.
5 seconds.
5.8. Reset
•If displays continually fail to appear or are incorrect, use a pointed object (paper clip,
etc.) to press the RESET button (15) and restart the device.
•The thermometer/hygrometer returns to the factory settings and all stored information
is lost.
6. Care and Maintenance
Only clean this product with a slightly damp, lint-free cloth and do not use aggressive
cleaning agents. Make sure that water does not get into the product.
7. Warranty Disclaimer
Hama GmbH & Co. KG assumes no liability and provides no warranty for damage
resulting from improper installation/mounting, improper use of the product or from
failure to observe the operating instructions and/or safety notes.
8. Service and Support
Please contact Hama Product Consulting if you have any questions about this product.
Hotline: +49 9091 502-115 (German/English)
Further support information can be found here:
www.hama.com
9. Technical Data
Thermometer/
hygrometer
Power supply
3.0 V
2 x AAA batteries
Measuring range
Temperature (°C)
Humidity
0°C – +50°C / 32°F
– +122°F
20% – 95%
Radio-controlled
DCF clock
Yes
Hygrometer Yes
Thermometer Yes
10. Recycling Information
Note on environmental protection:
After the implementation of
the European Directive
2002/96/EU and 2006/66/EU
in the national legal system,
the following applies: Electric
and electronic devices as well as batteries
must not be disposed of with household
waste. Consumers are obliged by law to
return electrical and electronic devices as
well as batteries at the end of their service
lives to the public collecting points set up
for this purpose or point of sale. Details to
this are defined by the national law of the
respective country. This symbol on the
product, the instruction manual or the
package indicates that a product is subject
to these regulations. By recycling, reusing
the materials or other forms of utilising old
devices/Batteries, you are making an
important contribution to protecting our
environment.
11. Declaration of Conformity
Hereby, Hama GmbH & Co.
KG, declares that this device
is in compliance with the
essential requirements and other relevant
provisions of Directive 1999/5/EC.
See www.hama.com for declaration of
conformity according to R&TTE Directive
99/5/EC guidelines.

10
D Bedienungsanleitung
11
Bedienungselemente und Anzeigen
1. Komfortanzeige
2. Raumtemperatur
3. Raumluftfeuchtigkeit
4. Funksymbol
5. Sommerzeit
6. Schlummersymbol
7. Uhrzeit
8. Alarmsymbol
9. SNOOZE/ LIGHT-Taste
= Unterbrechung des Wecksignals/ Aktivierung Hintergrundbeleuchtung (ca. 5
Sekunden)
10. MODE -Taste
= Einstellungen / Bestätigung des Einstellungswerts / Wechsel Anzeigemodus
11. ALARM-Taste
= Anzeige/ Einstellung Alarm-Modi
12. + -Taste
= Erhöhung des aktuellen Einstellungswertes/ Wechsel 12-/24-Stundenformat
13. – -Taste
= Verringerung des aktuellen Einstellungswertes/ Wechsel zwischen °C und °F
14. WAVE-Taste
= Aktivierung/ Deaktivierung manueller Funksignal-Empfang
15. RESET-Knopf
= Zurücksetzung auf Werkseinstellung
16. 1Batteriefach
Vielen Dank, dass Sie sich für ein Hama Produkt entschieden haben!
Nehmen Sie sich Zeit und lesen Sie die folgenden Anweisungen und Hinweise zunächst
ganz durch. Bewahren Sie diese Bedienungsanleitung anschließend an einem sicheren
Ort auf, um bei Bedarf darin nachschlagen zu können. Sollten Sie das Gerät veräußern,
geben Sie diese Bedienungsanleitung an den neuen Eigentümer weiter.
1. Erklärung von Warnsymbolen und Hinweisen
Warnung
Wird verwendet, um Sicherheitshinweise zu kennzeichnen oder um Aufmerksamkeit
auf besondere Gefahren und Risiken zu lenken.
Hinweis
Wird verwendet, um zusätzlich Informationen oder wichtige Hinweise zu
kennzeichnen.
2. Packungsinhalt
•Thermo-/ Hygrometer TH-400
•2AAA-Batterien
•diese Bedienungsanleitung
3. Sicherheitshinweise
•Das Produkt ist für den privaten, nicht-gewerblichen Haushaltsgebrauch vorgesehen.
•Betreiben Sie das Produkt nicht außerhalb seiner in den technischen Daten
angegebenen Leistungsgrenzen.
•Verwenden Sie das Produkt nicht in einer feuchten Umgebung und vermeiden Sie
Spritzwasser.
•Betreiben Sie das Produkt nicht in unmittelbarer Nähe der Heizung, anderer
Hitzequellen oder in direkter Sonneneinstrahlung.
•Benutzen Sie das Produkt nicht in Bereichen, in denen elektronische Produkte nicht
erlaubt sind.
•Positionieren Sie das Produkt nicht in der Nähe von Störfeldern, Metallrahmen,
Computern und Fernsehern etc. Elektronische Geräte sowie Fensterrahmen
beeinträchtigen die Funktion des Produktes negativ.
•Lassen Sie das Produkt nicht fallen und setzen Sie es keinen heftigen Erschütterungen
aus.
•Öffnen Sie das Produkt nicht und betreiben Sie es bei Beschädigungen nicht weiter.
•Versuchen Sie nicht, das Produkt selbst zu warten oder zu reparieren. Überlassen Sie
jegliche Wartungsarbeit dem zuständigen Fachpersonal.
•Halten Sie Kinder unbedingt von dem Verpackungsmaterial fern, es besteht
Erstickungsgefahr.
•Entsorgen Sie das Verpackungsmaterial sofort gemäß den örtlich gültigen
Entsorgungsvorschriften.
•Nehmen Sie keine Veränderungen am Produkt vor. Dadurch verlieren sie jegliche
Gewährleistungsansprüche.

12 13
Warnung – Batterien
•Entfernen und entsorgen Sie verbrauchte Batterien unverzüglich aus dem
Produkt.
•Verwenden Sie ausschließlich Akkus (oder Batterien), die dem angegebenen Typ
entsprechen.
•Mischen Sie alte und neue Batterien nicht, sowie Batterien unterschiedlichen
Typs oder Herstellers.
•Beachten Sie unbedingt die korrekte Polarität (Beschriftung + und -) der Batterien
und legen Sie diese entsprechend ein. Bei Nichtbeachtung besteht die Gefahr des
Auslaufens oder einer Explosion der Batterien.
•Laden Sie Batterien nicht.
•Bewahren Sie Batterien außerhalb der Reichweite von Kindern auf.
•Schließen Sie Akkus/Batterien nicht kurz und halten Sie sie von blanken
Metallgegenständen fern.
4. Inbetriebnahme
•Entfernen Sie die Schutzfolie auf dem Display.
4.1. Batterien einlegen
•Öff
nen Sie das Batteriefach (16) und
entfernen Sie den Kontaktunterbrecher.
Schließen Sie die Batteriefachabdeckung anschließend
.
4.2. Batterien wechseln
•Öffnen Sie das Batteriefach (16), entnehmen Sie die verbrauchten Batterien und legen
Sie zwei neue AAA Batterien polrichtig ein. Schließen Sie die Batteriefachabdeckung
anschließend.
5. Betrieb Basisstation
Hinweis – Eingabe
Halten Sie die +-Taste (12) oder die – -Taste (13) gedrückt, um die Werte schneller
auswählen zu können.
5.1 Automatische Einstellung nach DCF-Signal
•Nach dem Einlegen der Batterien beginnt die Uhr automatisch die Suche nach einem
DCF-Signal. Während des Suchvorgangs blinkt das Funksymbol (4) auf.
Anzeige (4) Suche nach DCF-Signal
Blinkende Anzeige
Aktiv
Dauerhafte Anzeige
Erfolgreich – Signal wird empfangen
Keine Anzeige Inaktiv
•Wird wiederholt kein Signal empfangen, drücken und halten Sie die WAVE-Taste (14)
für ca. 3 Sekunden, um die manuelle Suche nach dem DCF-Signal zu starten. Das
Funksymbol (4) beginnt zu blinken.
Hinweis – Uhrzeiteinstellung
•Der Suchvorgang dauert etwa 7 Minuten. Falls dieser fehlschlägt, wird die Suche
beendet und zur nächsten vollen Stunde wiederholt. Das Funksymbol (4) erlischt.
•Sie können währenddessen eine manuelle Einstellung von Uhrzeit und Datum
vornehmen.
•Die Uhr sucht automatisch weiterhin täglich (zwischen 01:00 und 03:00 Uhr)
nach dem DCF-Signal. Bei erfolgreichem Signalempfang werden die manuell
eingestellte Uhrzeit und das Datum überschrieben.
•Drücken und halten Sie die WAVE-Taste (14) erneut für ca. 3 Sekunden, um den
manuellen Suchvorgang zu beenden.

14 15
Hinweis – Sommerzeit
Die Uhrzeit stellt sich automatisch auf die Sommerzeit um. Solange die Sommerzeit
aktiv ist, wird auf dem Display DST (5) angezeigt.
5.2. (Manuelle) Einstellungen
•Drücken und halten Sie die MODE-Taste (10) für ca. 3 Sekunden, um folgende
Einstellungen nacheinander vorzunehmen:
•Zeitzone (7)
•Stunden (7)
•Minuten (7)
•Drücken Sie zum Auswählen der einzelnen Werte die + -Taste (12) oder die – -Taste
(13) und bestätigen Sie die jeweilige Auswahl durch Drücken der MODE -Taste (10).
•Drücken Sie direkt die MODE- Taste
(10), um den angezeigten Einstellungswert zu übernehmen und zu überspringen.
•Erfolgt 20 Sekunden keine Eingabe, wird der Einstellungsmodus automatisch
verlassen.
Hinweis – Zeitzone
•Das DCF-Signal kann weitläufig empfangen werden, entspricht jedoch immer der
MEZ, die in Deutschland gilt. Beachten Sie daher, dass Sie in Ländern mit anderer
Zeitzone die Zeitverschiebung beachten.
•Befinden Sie sich in Moskau, ist es dort bereits 3 Stunden später als in
Deutschland. Stellen Sie daher bei der Zeitzone +3 ein. Die Uhr stellt sich dann
immer nach Empfang des DCF-Signals bzw. in Bezug auf die manuell eingestellte
Uhrzeit automatisch 3 Stunden weiter.
•Setzen Sie die Zeitzone auf 0, wenn keine Zeitzone verwendet wird.
5.3. 12- oder 24-Stundenformat
Drücken Sie die +-Taste (12), um zwischen dem 12- oder 24-Stundenformat zu
wechseln.
5.4. Celsius / Fahrenheit
•Drücken Sie die – -Taste (13), um bei der Temperaturanzeige zwischen °C und °F
zu wechseln.
5.5. Wecker
•Drücken Sie wiederholt die MODE-Taste (10), um in den Alarmmodus zu gelangen.
•In der Sekundenanzeige wird entsprechend AL angezeigt.
•Drücken und halten Sie die MODE-Taste (10) für ca. 3 Sekunden, um die Weckzeit
des angezeigten Alarms einzustellen. Die Stundenanzeige beginnt zu blinken.
•Drücken Sie die + -Taste (12) oder die – -Taste (13), um die Stunden der Weckzeit
auszuwählen und bestätigen Sie die Auswahl durch Drücken der MODE-Taste (10).
Die Minutenanzeige beginnt zu blinken.
•Wiederholen Sie diesen Vorgang für die Minuten der Weckzeit.
•Drücken Sie wiederholt die MODE-Taste (10), um zurück zur Anzeige der Uhrzeit (7)
zu gelangen.
•Erfolgt 20 Sekunden keine Eingabe, wird der Einstellungsmodus automatisch
verlassen.
•Um den täglichen Alarm zu aktivieren bzw. zu deaktivieren, drücken Sie wiederholt
die ALARM-Taste (11). Das Alarmsymbol (8) wird angezeigt/ nicht angezeigt.
•Wird der Wecker entsprechend ausgelöst, beginnt das Alarmsymbol (8) zu blinken
und ein Wecksignal ertönt.
•Drücken Sie eine beliebige Taste (außer SNOOZE/ LIGHT-Taste (9)), um den Alarm zu
beenden. Andernfalls endet dieser automatisch nach 2 Minuten.
•Drücken Sie während des Wecksignals die SNOOZE/LIGHT-Taste (9), wird
das Wecksignal für 5 Minuten unterbrochen und dann erneut ausgelöst. Das
Schlummersymbol (6) blinkt.
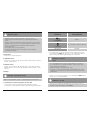
5.6. Komfortanzeige
•Das Thermo-/ Hygrometer zeigt folgende Komfortbereiche, basierend auf dem
Verhältnis aktueller Raumtemperatur und –luftfeuchtigkeit, an:

16 17
Anzeige (1) Temperaturbereich
Luftfeuchtigkeits-
bereich
Komfortbereich
D
R
Y
C
O
M
F
O
R
T
W
E
T
–<40%
– trocken –
Zu trockene
Umgebungsluft
D
R
Y
C
O
M
F
O
R
T
W
E
T
20°C – 22°C
26°C – 28°C
40% – 54% – relativer Komfort –
D
R
Y
C
O
M
F
O
R
T
W
E
T
20°C – 28°C
22°C – 26°C
55% – 65%
40% – 75%
– Komfort –
ideale Temperatur
und Luftfeuchtigkeit
D
R
Y
C
O
M
F
O
R
T
W
E
T
20°C – 22°C
26°C – 28°C 66% – 74% – relativer Komfort –
D
R
Y
C
O
M
F
O
R
T
W
E
T
–>75%
– feucht –
Zu hohe
Luftfeuchtigkeit
D
R
Y
C
O
M
F
O
R
T
W
E
T
< 20°C
> 28°C
40% – 74% – Kein Indikator –
5.7. Hintergrundbeleuchtung
Hinweis – Hintergrundbeleuchtung
Drücken Sie die SNOOZE/ LIGHT-Taste (9), wird das Display für ca. 5 Sekunden
beleuchtet.
5.8. Reset
•Bei andauernden, fehlerhaften/
ausbleibenden Anzeigen drücken
Sie mit einem spitzen Gegenstand
(Büroklammer, etc.) den RESET-Knopf
(15), um einen Neustart zu generieren.
•Das Thermo-/ Hygrometer kehrt in die
Werkseinstellung zurück und verliert
alle gespeicherten Informationen.
6. Wartung und Pflege
Reinigen Sie dieses Produkt nur mit einem
fusselfreien, leicht feuchten Tuch und
verwenden Sie keine aggressiven Reiniger.
Achten Sie darauf, dass kein Wasser in das
Produkt eindringt.
7. Haftungsausschluss
Die Hama GmbH & Co. KG
übernimmt keinerlei Haftung oder
Gewährleistung für Schäden, die aus
unsachgemäßer Installation, Montage
und unsachgemäßem Gebrauch des
Produktes oder einer Nichtbeachtung
der Bedienungsanleitung und/oder der
Sicherheitshinweise resultieren.
8. Service und Support
Bitte wenden Sie sich bei Fragen
zum Produkt gerne an die Hama-
Produktberatung.
Hotline: +49 9091 502-115 (Deu/Eng)
Weitere Supportinformationen finden
sie hier:
www.hama.com
9. Technische Daten
Thermo-/ Hygrometer
TH-400
Stromversorgung
3,0 V
2 x AAA Batterie
Messbereich
Temperatur (°C)
Luftfeuchtigkeit
0°C – +50°C / 32°F
– +122°F
20% – 95%
DCF-Funkuhr Ja
Hygrometer Ja
Thermometer Ja

18 19
R Руководство по эксплуатации
10. Entsorgungshinweise
Hinweis zum Umweltschutz:
Ab dem Zeitpunkt der
Umsetzung der europäischen
Richtlinien 2002/96/EG und
2006/66/EG in nationales
Recht gilt folgendes:
Elektrische und elektronische Geräte sowie
Batterien dürfen nicht mit dem Hausmüll
entsorgt werden. Der Verbraucher ist
gesetzlich verpflichtet, elektrische und
elektronische Geräte sowie Batterien am
Ende ihrer Lebensdauer an den dafür
eingerichteten, öffentlichen Sammelstellen
oder an die Verkaufsstelle zurückzugeben.
Einzelheiten dazu regelt das jeweilige
Landesrecht. Das Symbol auf dem Produkt,
der Gebrauchsanleitung oder der
Verpackung weist auf diese Bestimmungen
hin. Mit der Wiederverwertung, der
stofflichen Verwertung oder anderen
Formen der Verwertung von Altgeräten/
Batterien leisten Sie einen wichtigen
Beitrag zum Schutz unserer Umwelt.
11. Konformitätserklärung
Hiermit erklärt Hama GmbH &
Co. KG, dass sich dieses Gerät
in Übereinstimmung mit den
grundlegenden Anforderungen und den
übrigen einschlägigen Bestimmungen der
Richtlinie 1999/5/EG befindet. Die
Konformitäts-erklärung nach der R&TTE
Richtlinie 99/5/EG finden Sie unter www.
hama.com.
Органы управления и индикации
1. Индикация комфортности окружающей среды
2. Температура в помещении
3. Влажность воздуха в помещении
4. Значок радиосигнала
5. Индикация летнего времени
6. Автоповтор сигнала будильника
7. Время
8. Значок будильника
9. Кнопка SNOOZE/LIGHT
= функция автоповтора сигнала будильника; включение подсветки
(ок. 5 секунд)
10. Кнопка MODE
= настройки / подтверждение настройки / выбор режима индикации
11. Кнопка ALARM
= индикация / настройка будильника
12. Кнопка +
= увеличение текущего настраиваемого значения / выбор формата индикации
времени (12-часовой или 24-часовой)
13. Кнопка –
= уменьшение настраиваемого значения / выбор единицы измерения
температуры
(°C, °F)
14. Кнопка WAVE
= включение/выключение принудительного приема радиосигнала
15. Кнопка
RESET
= восстановление настроек по умолчанию
16. Отсек батарей
Благодарим за покупку изделия фирмы Hama.
внимательно ознакомьтесь с настоящей инструкцией. Храните инструкцию в
надежном месте для справок в будущем. В случае передачи изделия другому лицу
приложите и эту инструкцию.

20 21
1. Предупредительные пиктограммы и инструкции
Внимание
Данным значком отмечены инструкции, несоблюдение которых может
привести к опасной ситуации.
Примечание
Дополнительная или важная информация.
2. Комплект поставки
•Термометр и гигрометр TH400
•2батарея ААA
•Настоящая инструкция
3. Техника безопасности
•Изделие предназначено только для домашнего применения.
•Соблюдать технические характеристики.
•Беречь от влаги и брызг.
•Не эксплуатировать в непосредственной близости с нагревательными
приборами и беречь от прямых солнечных лучей
•Не применять в запретных зонах.
•Не размещайте устройство рядом с магнитными полями, металлическими
рамами, компьютером, телевизором и т.д. Электронные приборы отрицательно
влияют на работу устройства.
•Не ронять. Беречь от сильных ударов.
•Изделие не открывать. Запрещается эксплуатировать неисправное изделие.
•Запрещается самостоятельно ремонтировать устройство. Ремонт разрешается
производить только квалифицированному персоналу.
•Упаковку не давать детям: опасность асфиксии.
•Утилизировать упаковку в соответствии с местными нормами.
•Запрещается вносить изменения в конструкцию. В противном случае
гарантийные обязательства аннулируются.
Батареи. Техника безопасности
•Израсходованные батареи немедленно удалять из прибора и утилизировать.
•Разрешается применять аккумуляторы только указанного типа.
•Не применять различные типы или новые и старые батареи вместе.
•Соблюдать полярность батарей (+ и -). Несоблюдение полярности может
стать причиной взрыва батарей.
•Не подвергать аккумуляторы чрезмерной зарядке.
•Батареи хранить в безопасном месте и не давать детям.
•Не закорачивать контакты батарей. Не хранить рядом с металлическими
объектами.
4. Ввод в эксплуатацию
•Снимите с дисплея защитную пленку.
4.1. Загрузка батарей
•Откройте отсек батарей (16) и удалите изолятор. Закройте крышку отсека
батарей.
4.2. Замена батареи
•Откройте отсек батарей (16), извлеките и утилизируйте использованные
батареи. Вставьте две новые батареи ААА, соблюдая полярность. Закройте
крышку отсека батарей.
5. Эксплуатация
Ввод данных
Чтобы ускорить изменение значения во время настройки, удерживайтекнопку
+ (12) или кнопку – (13) .
5.1. Автоматическая настройка по сигналу DCF
•После загрузки батарей часы начинают автоматический поиск радиосигнала
DCF. Во время этого процесса на дисплее мигает значок радиосигнала (4).

22 23
Индикация (4) Поиск сигнала DCF
мигает
активный
горит непрерывно
сигнал принят успешно
не горит неактивный
•Если сигнал автоматически принять не удается, нажмите и ок. 3 секунд
удерживайте кнопки WAVE (14), чтобы включить поиск радиосигнала DCF
вручную. Значок радиосигнала (4) мигает.
Настройка часов. – Примечания
•Поиск длится около 7 минут. Если сигнал принять не удалось, операция
завершается автоматически. Повторная попытка будет произведена в
следующий полный час. Значок радиосигнала (4) гаснет.
•При необходимости часы и календарь можно настроить вручную.
•Поиск радиосигнала DCF осуществляется каждые сутки (между 01:00 и
03:00). При успешном приеме радиосигнала введенные вручную значения
времени и календаря заменяются.
•Нажмите и ок. 3 секунд удерживайте кнопки WAVE (14), чтобы завершить
принудительный поиск радиосигнала.
Индикация летнего времени
•Переключение на летнее время происходит автоматически. Во время
индикации летнего времени на дисплее отображается DST (5).
5.2 Настройка вручную
•Нажмите и около 3 секунд удерживайте кнопку MODE (10),
чтобы настроить параметры в следующем порядке:
• Часовой пояс (7)
• Час (7)
• Минуты (7)
•Кнопкой + (12) или – (13) установите значение и нажмите кнопку MODE (10),
чтобы подтвердить настройку.
•Чтобы применить настройку и перейти к следующему параметру, нажмите
кнопку MODE (10).
•Режим настройки выключается автоматически, если нажатий на кнопки не
производилось в течение 20 секунд.
Часовой пояс. – Примечание
•Радиосигнал точного времени DCF соответствует среднеевропейскому времени.
Если часы эксплуатируются в другом часовом поясе, то их необходимо
настроить соответствующим образом.
•Например, разница во времени между Москвой и Берлином составляет 3 часа.
В Москве, таким образом, необходимо сделать поправку в +3 часа. В этом
случае к показателю времени (установленному автоматически по радиосигналу
DCF или вручную) часы автоматически будут прибавлять 3 часа.
5.3 Выбор формата индикации времени (12-часовой или 24-часовой)
•Кнопкой + (12) установите формат индикации времени: 12-часовой или
24-часовой.
5.4. Индикация температуры
•Выбор единицы измерения температуры осуществляется кнопкой – (13).
5.5 Alarm
•Спомощью кнопки MODE (10) включите режим будильника.
•На месте индикации секунд отображается соответственно АL.
•Нажмите и около 3 секунд удерживайте кнопку MODE (10),
чтобы настроить время срабатывания будильника. Значение часа мигает.
•Кнопкой + (12) или – (13) установите значение часа, затем нажмите кнопку
MODE (10), чтобы подтвердить настройку. Значение минут мигает.
•Настройте минуты.

24 25
•Нажмите несколько раз кнопку MODE (10), чтобы вернуться к индикации
времени (7).
•Режим настройки выключается автоматически, если нажатий на кнопки не
производилось в течение 20 секунд.
•Чтобы включить или отключить ежедневное срабатывание будильника,
нажмите кнопку ALARM (11). Значок (8) отображается или не отображается в
зависимости от того, включена или выключена функция.
•При срабатывании будильник мигает значок будильника (8), и подается
звуковой сигнал.
•Чтобы отключить сигнал, нажмите любую кнопку, кроме SNOOZE / LIGHT (9).
Если сигнал не был отключен вручную, то он автоматически отключится через
2 минуты.
•Чтобы включить автоповтор сигнала будильника (через 5 минут), нажмите
кнопку SNOOZE / LIGHT (9). Значок Автоповтор сигнала будильника (27)
мигает.
5.6. Индикация комфортного климата
На основе отношения текущей температуры и влажности в помещении прибор
показывает следующие диапазоны комфортного климата:
Индикация (1)
Диапазон
температуры
Диапазон
влажности
воздуха
Диапазон
комфортного
климата
D
R
Y
C
O
M
F
O
R
T
W
E
T
–<40%
– Сухо –
Слишком сухой
воздух
D
R
Y
C
O
M
F
O
R
T
W
E
T
20°C – 22°C
26°C – 28°C
40% – 54%
– Относительно
комфортный
климат –
D
R
Y
C
O
M
F
O
R
T
W
E
T
20°C – 28°C
22°C – 26°C
55% – 65%
40% – 75%
– Комфортный
климат –
Оптимальная
температура и
влажность
D
R
Y
C
O
M
F
O
R
T
W
E
T
20°C – 22°C
26°C – 28°C 66% – 74%
– Относительно
комфортный
климат –
D
R
Y
C
O
M
F
O
R
T
W
E
T
–>75%
– Влажно –
Повышенная
влажность воздуха
D
R
Y
C
O
M
F
O
R
T
W
E
T
< 20°C
> 28°C
40% – 74% – Нет индикации –
5.7. Подсветка
Примечание – Подсветка
При нажатии кнопки SNOOZE/LIGHT (9) примерно на 5 секунд включается
подсветка дисплея.
5.8. Восстановление заводских настроек
•Вслучае «зависания» прибора, неправильной или отсутствующей индикации с
помощью острого предмета (скрепки и т. п.) нажмите кнопку RESET (15), чтобы
перезапустить прибор.
•При этом восстанавливаются заводские настройки прибора, а все сохраненные
данные удаляются.
6. Уход и техническое обслуживание
Чистку изделия производить только безворсовой слегка влажной салфеткой.
Запрещается применять агрессивные чистящие средства. Следите за тем, чтобы в
устройство не попала вода.
7. Отказ от гарантийных обязательств
Компания Hama GmbH & Co. KG не несет ответственность за ущерб, возникший
вследствие неправильного монтажа, подключения и использования изделия не
по назначению, а также вследствие несоблюдения инструкции по эксплуатации и
техники безопасности.

26 27
8. Отдел техобслуживания
По вопросам ремонта или замены
неисправных изделий обращайтесь
к продавцу или в сервисную службу
компании Hama.
Горячая линия отдела техобслуживания:
+49 9091 502-115 (немецкий,
английский)
Подробнее смотрите здесь: www.
hama.com
9. Технические характеристики
Термометр и
гигрометр
Питание
3,0 В
2 батареи ААА
Диапазон
измерения
Температура (°C)
Влажность воздуха
0°C – +50°C / 32°F
– +122°F
20% – 95%
Часы с коррекцией
по радиосигналу
точного времени
Да
Гигрометр Да
Термометр Да
10. Инструкции по утилизации
Охрана окружающей среды:
С момента перехода
национального
законодательства на
европейские нормативы
2002/96/EU и 2006/66/EU
действительно следующее:
Электрические и электронные приборы,
а также батареи запрещается
утилизировать с обычным мусором.
Потребитель, согласно закону, обязан
утилизировать электрические и
электронные приборы, а также батареи
и аккумуляторы после их
использования в специально
предназначенных для этого пунктах
сбора, либо в пунктах продажи.
Детальная регламентация этих
требований осуществляется
соответствующим местным
законодательством. Необходимость
соблюдения данных предписаний
обозначается особым значком на
изделии, инструкции по эксплуатации
или упаковке. При переработке,
повторном использовании материалов
или при другой форме утилизации
бывших в употреблении приборов Вы
помогаете охране окружающей среды.
В соответствии с предписаниями по
обращению с батареями, в Германии
вышеназванные нормативы действуют
для утилизации батарей и
аккумуляторов.
11. Декларация производителя
Компания Hama GmbH & Co.
KG настоящим
подтверждает, что данное
изделие полностью соответствует
основным требованиям, а также
предписаниям и положениям
нормативов 1999/5/EG. Заявление о
соответствии товара нормам R&TTE
99/5/EG см. на вебузле www.hama.com.

28
I Istruzioni per l‘uso
29
Elementi di comando e indicazioni
1. Indicazione comfort
2. Temperatura ambiente
3. Umidità aria ambiente
4. Simbolo radio
5. Ora legale
6. Simbolo snooze
7. Ora
8. Simbolo allarme
9. Tasto SNOOZE/LIGHT
= interruzione del segnale di sveglia /attivazione della retroilluminazione
(ca. 5 secondi)
10. Tasto MODE
= impostazioni / conferma del valore d’impostazione / cambio modalità di
visualizzazione
11. Tasto ALARM
= indicazione / impostazione della modalità sveglia
12. Tasto +
= aumento dell‘attuale valore d‘impostazione / cambio formato 12/24 ore
13. Tasto –
= diminuzione del valore attuale impostato / passaggio tra °C e °F / attivazione
14. Tasto WAVE
= attivazione/disattivazione manuale della ricezione di segnale radio
15. Pulsante
RESET
= ripristino delle impostazioni di fabbrica
16. Vano batterie
Grazie per avere acquistato un prodotto Hama!
Prima della messa in esercizio, leggete attentamente le seguenti istruzioni e avvertenze,
quindi conservatele in un luogo sicuro per una eventuale consultazione. In caso di
cessione dell‘apparecchio, consegnate anche le presenti istruzioni al nuovo proprietario.
1. Spiegazione dei simboli di avvertimento e delle indicazioni
Attenzione
Viene utilizzato per contrassegnare le indicazioni di sicurezza oppure per rivolgere
l‘attenzione verso particolari rischi e pericoli.
Avvertenza
Viene utilizzato per contrassegnare informazioni supplementari o indicazioni
importanti.
2. Contenuto della confezione
•Igrometro/Termometro TH400
•2batterie AAA
•Queste istruzioni per l’uso
3. Avvertenze di sicurezza
•Il prodotto è concepito per l’uso domestico privato, non commerciale.
•Non mettere in esercizio il prodotto al di fuori dei suoi limiti di rendimento indicati
nei dati tecnici.
•Non usare il prodotto in ambienti umidi ed evitare il contatto con gli spruzzi.
•Evitare di mettere in esercizio il prodotto in prossimità di riscaldamento, altre fonti di
calore o la luce diretta del sole.
•Non utilizzare il prodotto in zone in cui non sono ammesse le apparecchiature
elettroniche.
•Non posizionare il prodotto nelle vicinanze di campi di disturbo, telai metallici,
computer e televisori ecc. Gli apparecchi elettronici compromettono negativamente il
funzionamento del prodotto.
•Non fare cadere il prodotto e non sottoporlo a forti scossoni!
•Non aprire il prodotto e non utilizzarlo più se danneggiato.
•Non tentare di aggiustare o riparare l’apparecchio da soli. Fare eseguire qualsiasi
lavoro di riparazione al personale specializzato competente.
•Tenere l’imballo fuori dalla portata dei bambini, pericolo di soffocamento!
•Smaltire immediatamente il materiale d‘imballaggio attenendosi alle prescrizioni
locali vigenti.
•Non apportare modifiche all’apparecchio per evitare di perdere i diritti di garanzia.

30 31
Avvertenza – Batterie
•Rimuovere e smaltire immediatamente le batterie scariche.
•Utilizzare unicamente accumulatori (o batterie) conformi al tipo indicato.
•Non utilizzare batterie di tipi o costruttori diversi, né mischiare batterie vecchie
e nuove.
•Attenersi sempre alla corretta polarità (scritte + e -) delle batterie e inserirle
•di conseguenza. La mancata osservanza comporta la perdita di potenza o il
rischio di esplosione delle batterie.
•Non scaricare completamente le batterie.
•Conservare le batterie al di fuori della portata dei bambini
•Non cortocircuitare le batterie e tenerle lontano da oggetti metallici.
4. Messa in esercizio
•Rimuovere la pellicola protettiva sul display.
4.1. Inserimento delle batterie
•Aprire il vano batterie (16) e rimuovere l’interruttore di contatto. Quindi chiudere il
coperchio del vano batterie.
4.2. Sostituzione delle batterie
•Aprire il vano batterie (16), rimuovere e smaltire le batterie usate e inserire due
batterie AAA nuove con la polarità corretta. Quindi chiudere il coperchio del vano
batterie.
5. Esercizio
5.1. Impostazione automatica dopo il segnale DCF
•Dopo avere inserito le batterie, l’orologio inizia automaticamente a cercare un
segnale DCF. Durante il processo di ricerca, il simbolo della radio (4) lampeggia.
Indicazione (4) Ricerca del segnale DCF
Indicazione lampeggiante
Aktiv
Indicazione fissa
Ricerca riuscita -
il segnale viene ricevuto
Nessuna indicazione
Non attiva
•Se per diverse volte non viene ricevuto alcun segnale, tenere permuto il tasto WAVE
(14) per ca. 3 secondi, per avviare la ricerca manuale del segnale DCF. Il simbolo
radio (4) inizia a lampeggiare.
Nota – Impostazione dell‘ora
•Questo procedimento dura circa 7 minuti. Se la ricerca non ha successo, viene
terminata e riprende alla prossima ora piena. Il simbolo radio (4) si spegne.
•In questo lasso di tempo si può effettuare un‘impostazione manuale di ora e
data.
•L‘orologio continua a cercare automaticamente ogni giorno (tra l’1:00 e le 3:00)
il segnale DCF. Se il tentativo di ricezione ha successo, l‘ora e la data impostate
manualmente vengono sovrascritte.
•Tenere nuovamente premuto il tasto WAVE (14) per ca. 3 secondi per concludere il
processo di ricerca manuale.
Nota – Ora legale
•L‘orario si regola automaticamente sull‘ora legale. Finché è attiva l’ora legale, sul
display appare DST (5) .

32 33
5.2. Impostazioni (manuali)
•Tenere premuto il tasto MODE (10) per ca. 3 secondi per effettuare in sequenza le
seguenti impostazioni:
• Fuso orario (7)
• Ore (7)
• Minuti (7)
•Per selezionare i singoli valori, premere il tasto + (12) oppure il tasto – (13) e
confermare la selezione corrispondente premendo il tasto MODE (10).
•Premere direttamente il tasto MODE (10) per applicare il valore di impostazione
visualizzato e procedere oltre.
•Se per 20 secondi non si effettua alcuna immissione, si esce automaticamente dalla
modalità d‘impostazione.
Nota - fuso orario
•Il segnale DCF può essere ricevuto in tutto il mondo ma corrisponde sempre al
CET vigente in Germania. Nei paesi con altri fusi orari deve essere considerata la
variazione dell‘ora.
•Se ci si trova a Mosca, dove l‘ora è spostata in avanti di 3 ore rispetto alla
Germania, occorre impostare per il fuso orario +3. Dopo la ricezione del
segnale DCF o dell‘impostazione manuale, l‘orologio si porta quindi sempre
automaticamente 3 ore avanti.
5.3. Selezionare il formato 12/24 ore
•Premere il tasto + (12), per passare tra i formati 12 e 24 ore.
5.4. Indicazione temperatura
•Premere il tasto – (13) per commutare tra °C e °F durante la visualizzazione della
temperatura.
5.5 Sveglia
•Premere ripetutamente il tasto MODE (10) per passare alla modalità allarme.
•Sul display dei secondi viene visualizzato AL.
•Tenere premuto il tasto MODE (10) per ca. 3 secondi per impostare l’orario
dell’allarme visualizzato. Le cifre delle ore iniziano a lampeggiare.
•Premere il tasto + (12) oppure il tasto – (13) per selezionare le ore della sveglia e
confermare la selezione corrispondente premendo il tasto MODE (10). Le cifre dei
minuti iniziano a lampeggiare.
•Ripetere questo procedimento per selezionare i minuti della sveglia.
•Premere ripetutamente il tasto MODE (10) per ritornare all’indicazione dell’ora (7).
•Se per 20 secondi non si effettua alcuna immissione, si esce automaticamente dalla
modalità d‘impostazione.
•Premere ripetutamente il tasto ALARM (11) per attivare /disattivare la sveglia
quotidiana. Il simbolo della sveglia (8) viene visualizzato/non viene visualizzato.
•Se si attiva la sveglia, il simbolo corrispondente (8) inizia a lampeggiare e viene
emesso un segnale di sveglia.
•Premere un tasto qualsiasi - eccetto il tasto SNOOZE/LIGHT (9) - per terminare la
sveglia. Diversamente, l‘allarme termina automaticamente dopo 2 minuti.
•Se mentre suona la sveglia si preme il tasto SNOOZE/LIGHT (9), la sveglia si
interrompe per 5 minuti, quindi ricomincia a suonare. Il simbolo snooze (6)
lampeggia.
5.6. Indicazione comfort
Il termoigrometro indica i seguenti campi comfort in funzione del rapporto della
temperatura e dell’umidità dell’aria ambiente attuali:
Display (1)
Campo di
temperatura
Campo di umidità Campo comfort
D
R
Y
C
O
M
F
O
R
T
W
E
T
–<40%
– asciutto –
aria ambiente troppo
secca
D
R
Y
C
O
M
F
O
R
T
W
E
T
20°C – 22°C
26°C – 28°C
40% – 54% – comfort relativo –
D
R
Y
C
O
M
F
O
R
T
W
E
T
20°C – 28°C
22°C – 26°C
55% – 65%
40% – 75%
– comfort –
temperatura e
umidità dell’aria
ideali
D
R
Y
C
O
M
F
O
R
T
W
E
T
20°C – 22°C
26°C – 28°C 66% – 74% – comfort relativo –

34 35
D
R
Y
C
O
M
F
O
R
T
W
E
T
–>75%
– umido –
umidità dell’aria
troppo elevata
D
R
Y
C
O
M
F
O
R
T
W
E
T
< 20°C
> 28°C
40% – 74%
– nessuna
indicazione –
5.7. Retroilluminazione
Note – Retroilluminazione
Se si preme il tasto SNOOZE/LIGHT (9), il display viene illuminato per ca. 5 secondi.
5.8. Reset
•Nel caso in cui avvengano ripetutamente indicazioni errate o non vengano
visualizzate indicazioni, premere con un oggetto appuntito (fermaglio ecc.) il pulsante
RESET (15) per effettuare il riavvio.
•Il termoigrometro torna alle impostazioni di fabbrica e perde tutte le informazioni
salvate.
6. Cura e manutenzione
Pulire il prodotto unicamente con un panno che non lascia pelucchi e appena inumidito
e non ricorrere a detergenti aggressivi. Fare attenzione a non fare penetrare acqua nel
prodotto.
7. Esclusione di garanzia
Hama GmbH & Co.KG non si assume alcuna responsabilità per i danni derivati dal
montaggio o l‘utilizzo scorretto del prodotto, nonché dalla mancata osservanza delle
istruzioni per l‘uso e/o delle indicazioni di sicurezza.
8. Assistenza e supporto
In caso di domande sul prodotto, rivolgersi
alla Consulenza prodotto Hama.
Hotline: +49 9091 502-115 (ted./ing.)
Ulteriori informazioni sul supporto sono
disponibili qui: www.hama.com
9. Dati tecnici
Termoigrometro
Alimentazione
elettrica
3,0 V
2 batterie AAA
Campo di
misurazione
Temperatura (°C)
Umidità dell’aria
0°C – +50°C / 32°F
– +122°F
20% – 95%
Segnale orario via
radio DCF
Sì
IgrometroSì
TermometroSì
10. Indicazioni di smaltimento
Informazioni per protezione
ambientale:
Dopo l’implementazione della
Direttiva Europea 2002/96/EU
e 2006/66/EU nel sistema
legale nazionale, ci sono le
seguenti applicazioni: Le
apparecchiature elettriche ed elettroniche
e le batterie non devono essere smaltite
con i rifiuti domestici. I consumatori sono
obbligati dalla legge a restituire I
dispositivi elettrici ed elettronici e le
batterie alla fine della loro vita utile ai
punti di raccolta pubblici preposti per
questo scopo o nei punti vendita. Dettagli
di quanto riportato sono definiti dalle
leggi nazionali di ogni stato. Questo
simbolo sul prodotto, sul manuale
d’istruzioni o sull’imballo indicano che
questo prodotto è soggetto a queste
regole. Riciclando, ri-utilizzando i materiali
o utilizzando sotto altra forma i vecchi
prodotti/le batterie, darete un importante
contributo alla protezione dell’ambiente.
11. Dichiarazione di conformità
Hama GmbH & Co. KG
dichiara che questo
apparecchio soddisfa i
requisiti fondamentali ed è conforme alle
norme vigenti della direttiva 1999/5/CE. La
dichiarazione di conformità secondo la
direttiva R&TTE 99/5/CE è disponibile sul
sito www.hama.com.

36
P Instrukcja obsługi
37
Elementy obsługi i sygnalizacji
1. Wskaźnik komfortu cieplnego
2. Temperatura w pomieszczeniu
3. Wilgotność powietrza w pomieszczeniu
4. Symbol sygnału radiowego
5. Czas letni
6. Symbol drzemki
7. Godzina
8. Symbol alarmowy
9. Przycisk SNOOZE/LIGHT
= przerywanie sygnału budzenia / aktywacja podświetlenia ekranu (ok. 5 sekund)
10. PrzyciskMODE
= ustawienia / potwierdzanie ustawionej wartości/ zmiana trybu wyświetlania
11. Przycisk ALARM
= wskaźnik / ustawianie trybów alarmowych
12. Przycisk +
= zwiększanie aktualnie ustawionej wartości / przełączanie formatu
12-/24-godzinnego
13. Przycisk –
= zmniejszanie aktualnie ustawionej wartości / zmiana między °C i °F / włączanie
14. Przycisk WAVE
= włączanie/ wyłączanie ręcznego odbioru sygnału radiowego
15. Przycisk
RESET
= przywracanie ustawień fabrycznych
16. Schowek na baterie
Dziękujemy za zakup naszego produktu!
Przed pierwszym użyciem należy dokładnie przeczytać instrukcję obsługi. Instrukcję
należy przechować, gdyż może być jeszcze potrzebna.
1. Objaśnienie symboli ostrzegawczych i wskazówek
Ostrzeżenie
Używane w celu zwrócenia uwagi na szczególne niebezpieczeństwo lub ryzyko.
Wskazówki
Używane w celu zwrócenia uwagi na szczególnie przydatne informacje.
2. Zawartość opakowania
•Termohigrometr TH400
•2baterie AAA
•niniejsza instrukcja obsługi
3. Wskazówki bezpieczeństwa
•Produkt jest przeznaczony do prywatnego, niekomercyjnego użytku domowego.
•Nie stosować produktu poza zakresem mocy podanym w danych technicznych.
•Nie stosować produktu w wilgotnym otoczeniu i chronić go przed bryzgami wody.
•Nie używać produktu w bezpośredniej bliskości ogrzewania, innych źródeł ciepła ani
nie wystawiać go na bezpośrednie promieniowanie słoneczne.
•Nie używać produktu w miejscach, gdzie nie jest dozwolone stosowanie urządzeń
elektronicznych.
•Nie ustawiać produktu w pobliżu źródeł zakłóceń, ram metalowych, komputerów,
telewizorów itp. Urządzenia elektroniczne i futryny okienne wpływają negatywnie na
działanie produktu.
•Chronić produkt przed upadkiem i silnymi wstrząsami.
•Nie otwierać produktu i nie używać go, gdy jest uszkodzony.
•Nie próbować naprawiać samodzielnie urządzenia. Prace serwisowe zlecać
wykwalifikowanemu personelowi fachowemu.
•Materiały opakowaniowe trzymać koniecznie z dala od dzieci, istnieje
niebezpieczeństwo uduszenia.
•Materiały opakowaniowe należy natychmiast poddać utylizacji zgodnie z
obowiązującymi przepisami miejscowymi.
•Nie modyfikować urządzenia. Prowadzi to do utraty wszelkich roszczeń z tytułu
gwarancji.

38 39
Ostrzeżenie - baterie
•Natychmiast usunąć z produktu zużyte baterie i poddać je utylizacji.
•Używać wyłącznie akumulatorów (lub baterii) odpowiadających podanemu
typowi.
•Nie mieszać starych i nowych baterii ani baterii różnych typów lub producentów.
•Wkładając baterie, zwrócić koniecznie uwagę na właściwe podłączenie biegunów
(znak + i -). Nieprzestrzeganie grozi wyciekiem lub wybuchem baterii.
•Nie przeciążać baterii.
•Przechowywać baterie poza zasięgiem dzieci.
•Nie zwierać akumulatorów / baterii oraz trzymać je z dala od odkrytych
przedmiotów metalowych.
4. Uruchamianie
•Usunąć folię ochronną na wyświetlaczu.
4.1. Wkładanie baterii
•Otworzyć schowek na baterie (16) i usunąć przerywacz stykowy. Następnie zamknąć
pokrywę schowka na baterie.
4.2. Wymiana baterii
•Otworzyć schowek na baterie (16), wyjąć użyte baterie i włożyć dwie nowe baterie
typu AAA zgodnie z oznaczeniem biegunów. Następnie zamknąć pokrywę schowka
na baterie.
5. Obsługa
Wskazówka – wprowadzanie danych
Trzymać wciśnięty przycisk + (12) lub – (13), aby przyspieszyć nastawę wartości.
5.1. Automatyczne ustawianie wg sygnału czasowego DCF
•Po włożeniu baterii zegar rozpoczyna automatycznie wyszukiwanie sygnału
czasowego DCF. Podczas wyszukiwania symbol sygnału radiowego (4) zaczyna migać.
Wskaźnik (4) Szukaj sygnału DCF
Migający wskaźnik
Aktywne
Stały wskaźnik
Proces powiódł się - sygnał jest odbierany
Brak wskaźnika Nieaktywne
•Jeżeli sygnał ponownie nie zostanie odebrany, nacisnąć i trzymać wciśnięty przez
ok. 3 sekundy przycisk WAVE (14), aby rozpocząć ręczne wyszukiwanie radiowego
sygnału czasowego DCF. Symbol sygnału radiowego (4) zaczyna migać.
Wskazówka – ustawianie
zegara
•Proces wyszukiwania trwa ok. 7 minut. Jeżeli wyszukiwanie nie powiedzie się,
proces wyszukiwania jest przerywany i wznawiany o kolejnej pełnej godzinie.
Symbol sygnału radiowego (4) gaśnie.
•Wtym czasie można ręcznie ustawić godzinę i datę.
•Zegar będzie codziennie szukał automatycznie (między godziną 01:00 i 03:00)
sygnału DCF. Po pomyślnym odbiorze sygnału ręcznie ustawiona godzina i data
są nadpisywane.
•Ponownie nacisnąć i trzymać wciśnięty przez ok. 3 sekundy przycisk WAVE (14), aby
zakończyć proces ręcznego wyszukiwania.
Wskazówka – czas letni
•Czas zegara jest automatycznie przestawiany na czas letni. Gdy czas letni jest
aktywny, na ekranie wyświetlany jest symbol DST (5) .
Strona jest ładowana ...
Strona jest ładowana ...
-
 1
1
-
 2
2
-
 3
3
-
 4
4
-
 5
5
-
 6
6
-
 7
7
-
 8
8
-
 9
9
-
 10
10
-
 11
11
-
 12
12
-
 13
13
-
 14
14
-
 15
15
-
 16
16
-
 17
17
-
 18
18
-
 19
19
-
 20
20
-
 21
21
-
 22
22


Hama 00113983 Instrukcja obsługi
- Kategoria
- Budziki
- Typ
- Instrukcja obsługi
- Ten podręcznik jest również odpowiedni dla
w innych językach
- italiano: Hama 00113983 Manuale del proprietario
Powiązane dokumenty
-
Hama EWS-200 Instrukcja obsługi
-
Hama RC200 Operating Instructions Manual
-
-
-
Hama 00123190 Instrukcja obsługi
-
-
-
-
