Ideen Welt W240 Instrukcja obsługi
- Kategoria
- Lampki nocne dla dzieci
- Typ
- Instrukcja obsługi

D
Innen- und Außen-Thermometer
Bedienungsanleitung
Indoor and Outdoor Thermometer
Instruction manual
Vnitní a vnjí teplomr
Návod k obsluze
Termometr wewntrzny i zewntrzny
Instrukcja obsugi
H
Bels és küls hmér
Használati útmutató
W240

D EINLEITUNG..................................................................................................................................1
VORSICHT .....................................................................................................................................1
TEILE ..............................................................................................................................................2
VOR DER ERSTEN INBETRIEBNAHME .................................................................................... 2
BATTERIE EINLEGEN/AUSTAUSCHEN.................................................................................... 3
SENSOR.........................................................................................................................................3
BEDIENELEMENTE ...................................................................................................................... 3
ANZEIGE DES TEMPERATURTRENDS .................................................................................... 4
EISWARNUNG............................................................................................................................... 5
REINIGUNG UND PFLEGE.......................................................................................................... 5
TECHNISCHE DATEN .................................................................................................................. 5
INTRODUCTION............................................................................................................................6
CAUTION........................................................................................................................................ 6
PARTS ............................................................................................................................................7
BEFORE FIRST USE .................................................................................................................... 7
INSERTING/REMOVING THE BATTERIES ............................................................................... 7
SENSOR.........................................................................................................................................8
CONTROL ELEMENTS................................................................................................................. 8
TEMPERATURE TREND DISPLAY............................................................................................. 9
ICE ALARM .................................................................................................................................... 9
CLEANING AND MAINTENANCE................................................................................................ 9
TECHNICAL DATA ...................................................................................................................... 10
ÚVOD............................................................................................................................................ 11
POZOR.......................................................................................................................................... 11
DÍLY............................................................................................................................................... 12
PED PRVNÍM UVEDENÍM DO PROVOZU............................................................................. 12
VLOENÍ/ VMNA BATERIE.................................................................................................. 12
SENZOR ....................................................................................................................................... 13
OBSLUNÉ PRVK....................................................................................................................... 13
UKAZATEL TEPLOTNÍHO TRENDU......................................................................................... 14
ALARM MRAZU ........................................................................................................................... 14
ITNÍ A ÚDRBA.................................................................................................................... 14
TECHNICKÁ DATA...................................................................................................................... 15
WPROWADZENIE....................................................................................................................... 16
UWAGA......................................................................................................................................... 16
CZCI......................................................................................................................................... 17
PRZED PIERWSZYM UYCIEM................................................................................................ 17
WKADANIE/WYMIANA BATERII ............................................................................................. 17
CZUJNIK....................................................................................................................................... 18
PRZYCISKI................................................................................................................................... 18
TENDENCJE KSZTATOWANIA SI TEMPERATURY.......................................................... 19
OSTRZEENIE O ZAMARZANIU .............................................................................................. 19
CZYSZCZENIE I KONSERWACJA............................................................................................ 20
DANE TECHNICZNE................................................................................................................... 20
H BEVEZET................................................................................................................................... 21
BIZTONSÁGI TANÁCSOK.......................................................................................................... 21
RÉSZEK........................................................................................................................................22
MIELTT ELSZÖR HASZNÁLNÁ ........................................................................................... 22
ELEMEK BEHELYEZÉSE/CSERÉJE ........................................................................................22
ÉRZÉKEL................................................................................................................................... 23
KEZELSZERVEK ...................................................................................................................... 23
HMÉRSÉKLETI INGADOZÁSOK KIJELZÉSE....................................................................... 24
FAGYÁSPONT-FIGYELMEZTETÉS.......................................................................................... 24
TISZTÍTÁS ÉS KARBANTARTÁS .............................................................................................. 25
MSZAKI ADATOK ..................................................................................................................... 25

1
D
1. EINLEITUNG
Dieses Innen- und Außenthermometer dient zur Anzeige der Raum- und Außentemperatur(en).
Zusätzliche Funktionen des Gerätes sind: Warnung bei Temperaturen unter dem Gefrierpunkt,
Temperatur-Tendenzanzeige sowie Speicherung der maximalen und minimalen
Temperaturwerte. Außerdem verfügt Ihr Thermometer über eine Uhr- und Datumsanzeige
sowie eine Weckerfunktion.
2. VORSICHT
• Lesen Sie vor dem Gebrauch diese Bedienungsanleitung vollständig durch.
• Bei Weitergabe des Gerätes an Dritte muss auch diese Bedienungsanleitung ausgehändigt
werden.
• Dieses Gerät entspricht den technischen Normen und den betreffenden
Sicherheitsanforderungen für elektrische Geräte.
• Der Hersteller übernimmt keine Haftung für Schäden, die auf unsachgemäßen Gebrauch
oder Nichtbeachtung dieser Bedienungsanleitung zurückzuführen sind.
• Halten Sie Kinder von dem Gerät fern.
• Dieses Gerät ist nicht dafür bestimmt, durch Personen (einschließlich Kinder) mit
eingeschränkten physischen, sensorischen oder geistigen Fähigkeiten oder mangels
Erfahrung und/oder mangels Wissen benutzt zu werden, es sei denn, sie werden durch eine
für ihre Sicherheit zuständige Person beaufsichtigt oder erhielten von ihr Anweisungen, wie
das Gerät zu benutzen ist.
• Kinder müssen beaufsichtigt werden, damit sie nicht mit dem Gerät spielen.
• Das Gerät nur in gemäßigten Breitengraden verwenden, Tropen und besonders feuchtes
Klima vermeiden.
• Tauchen Sie das Gerät nicht unter Wasser. Stromschlaggefahr!
• Das Gerät darf nicht in der Nähe einer Badewanne oder Dusche, oder einem mit Wasser
gefüllten Waschbecken verwendet werden.
• Sollte das Gerät doch einmal ins Wasser fallen, lassen Sie es vor dem Wiedereinschalten
von einem Fachmann überprüfen.
• Schützen Sie das Thermometer vor jeglicher Nässe, d.h. auch vor Spritzwasser und
Feuchtigkeit. Insbesondere darauf achten, dass keinerlei Flüssigkeit durch die Öffnungen in
das Gerät gelangt.
• Obwohl der Sensor für den Außengebrauch hergestellt wurde, sollte er dennoch möglichst
von Nässe und Spritzwasser ferngehalten werden.
• Setzen Sie das Gerät nicht dem direkten Sonnenlicht aus. Benutzen Sie das Gerät auch
nicht direkt neben Hitze produzierenden Geräten wie Öfen oder Kochherden.
• Benutzen Sie das Gerät nicht, wenn es beschädigt ist. Um Gefahren zu vermeiden, dürfen
defekte Bauteile nur vom Hersteller, seinem Kundendienst oder ähnlich qualifizierten
Personen ersetzt werden.
• Öffnen Sie das Gerät nicht.
• Versuchen Sie nie, das Gerät selbst zu reparieren. Reparaturen dürfen nur von
qualifiziertem Fachpersonal durchgeführt werden.
• Lassen Sie das Gerät nicht fallen.
Hinweis zu Batterien
• Batterien nicht extremer Hitze wie direktem Sonnenlicht, Feuer etc. aussetzen.
• Batterien gehören nicht in den Hausmüll! Bitte entsorgen Sie gebrauchte Batterien auf
ökologische Art und Weise und nach den geltenden gesetzlichen Bestimmungen.
• Batterien sind sehr gefährlich, wenn sie verschluckt werden. Halten Sie Batterien und das
Gerät jederzeit von Kindern fern. Wenn Batterien verschluckt werden, sofort ärztliche Hilfe
holen.
• Es dürfen nur die vom Hersteller angegebenen Batterietypen eingesetzt werden.

2
D
• Batterien dürfen nicht aufgeladen oder durch andere Mittel reaktiviert, zerlegt, in Feuer
geworfen oder kurzgeschlossen werden.
• Vor der Entsorgung des Gerätes muss die Batterie entnommen werden.
Dieses Gerät dient ausschließlich für den privaten Haushaltsgebrauch und darf nicht für
kommerzielle Zwecke benutzt werden.
Sorgen Sie für eine fachgerechte Entsorgung von Verpackungsmaterialien. Informieren
Sie sich über Sammelstellen bzw. Mülltrennung bei Ihrer Kommune.
Erstickungsgefahr! Halten Sie jegliches Verpackungsmaterial von
Kleinkindern und Kindern fern.
Die normale Funktion des Thermometers kann durch starke elektromagnetische
Störung (z.B. durch Gebrauch einer Mikrowelle in der Nähe des Thermometers)
beeinflusst werden.
Sollte es zu einer derartigen Störung kommen, setzen Sie das Thermometer auf die
Grundeinstellungen zurück, indem Sie die Batterien entfernen und nach ca. 1 Minute
wieder einlegen (siehe Batterie einlegen und austauschen).
Sollte es weiter zu Störungen kommen, stellen Sie das Thermometer an einem anderen
Ort auf.
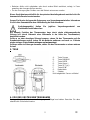
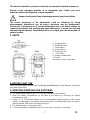
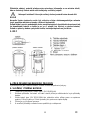
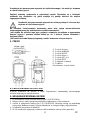
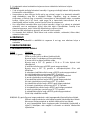
3. TEILE
4. VOR DER ERSTEN INBETRIEBNAHME
Reinigen Sie das Gerät wie unter Reinigung und Pflege beschrieben. Beachten Sie dazu
ebenfalls die Sicherheitshinweise.
A. Taste Snooze
B. Taste MIN/MAX
C. Taste MODE
D. Taste Alarm
E. Taste SET ((o))
F. Taste
°
C/
°
F
G. Batteriefach
H. Ständer
Nicht abgebildet: Sensor mit Kabel
oben
Vorderseite Rückseite

3
D
5. BATTERIE EINLEGEN/AUSTAUSCHEN
1. Das Thermometer wird mit einer Batterie des Typs 1,5V R3/LR3/AAA betrieben.
2. Öffnen Sie das Batteriefach an der Geräterückseite durch Entriegeln der
Batteriefachabdeckung.
3. Legen Sie eine Batterie des Typs 1,5V R3/LR3/AAA in die Mulde ein, beachten Sie dabei
die richtige Polarität, wie im Batteriefach angegeben. Das Gerät wird nun 3 mal Warntöne
von sich geben, wonach sich das Display einschaltet.
4. Das Gerät ist nun betriebsbereit.
5. Zum Schließen des Batteriefaches, den Deckel wieder auflegen und einrasten.
ACHTUNG
• Ausschließlich Batterien von bester Qualität verwenden. Minderwertige Batterien können
durch Auslaufen Geräteschäden verursachen.
• Sollten Batterien einmal ausgelaufen sein, diese mit Hilfe eines Tuches aus dem
Batteriefach entnehmen und bestimmungsgemäß entsorgen. Vermeiden Sie Haut- und
Augenkontakt mit der Batteriesäure. Sollten Sie doch einmal Augenkontakt mit
Batteriesäure erfahren, spülen Sie die Augen mit viel Wasser aus und kontaktieren
umgehend einen Arzt. Bei Kontakt der Batteriesäure mit der Haut, waschen Sie die Stelle
mit viel Wasser und Seife ab.
• Werden die Geräte für längere Zeit nicht benutzt, sollten die Batterien entnommen werden,
da die Geräte durch eventuelles Auslaufen der Batterien beschädigt werden können. Bei
nachlassender Leistung müssen die Batterien erneuert werden.
• Nimmt die Batterieleistung ab, die Batterien baldmöglichst ersetzen.
• Batterien dürfen nicht aufgeladen oder durch andere Mittel reaktiviert, zerlegt, in Feuer
geworfen oder kurzgeschlossen werden.
6. SENSOR
1. Ziehen Sie die Schutzfolie vom Sensor ab und kleben diesen an einem passenden Ort im
Außenbereich an.
7. BEDIENELEMENTE
7.1 VORDERSEITE DES THERMOMETERS
TASTE FUNKTION
MODE (C) Einfache Betätigung:
Wechsel zwischen Uhrzeit und Datumsanzeige
Lange Bestätigung (länger als 2 Sekunden drücken):
Modus zur Einstellung von Uhrzeit und Datum.
Drücken Sie die SET-Taste (E), um 24 oder 12 Stundenmodus zu wählen.
Bestätigen Sie die Einstellung mit MODE.
Drücken Sie die SET-Taste (E), um die Sekundenanzeige auf 00 zu stellen.
Bestätigen Sie die Sekundenanzeige mit MODE.
Drücken Sie die SET-Taste (E), um die Stundenanzeige zu erhöhen.
Bestätigen Sie die Stundenanzeige mit MODE.
Drücken Sie die SET-Taste (E), um die Minutenanzeige zu erhöhen.
Bestätigen Sie die Minutenanzeige mit MODE.
Drücken Sie die SET-Taste (E), um die Jahresanzeige zu erhöhen.
Bestätigen Sie die Jahresanzeige mit MODE.
Drücken Sie die SET-Taste (E), um die Monatsanzeige zu erhöhen.
Bestätigen Sie die Monatsanzeige mit MODE.
Drücken Sie die SET-Taste (E), um die Tagesanzeige zu erhöhen.
Bestätigen Sie die Tagesanzeige mit MODE.
Sie verlassen dadurch den Einstellungsmodus.

4
D
MIN/MAX (B) Drücken Sie einmal, um die maximal gemessene Temperatur anzuzeigen.
Drücken Sie zweimal, um die minimal gemessene Temperatur anzuzeigen.
Drücken Sie dreimal, um wieder zur augenblicklichen Temperatur
zurückzukehren.
Das Thermometer kehrt aus der Anzeige der Minimal- bzw. Maximal-
Temperatur nach 8 Sekunden automatisch zur Anzeige der augenblicklichen
Temperatur zurück.
Um die min- und maximal gemessenen Werte zu löschen, drücken Sie
MIN/MAX (B) länger als 2 Sekunden, während die entsprechenden Werte
angezeigt werden.
ALARM (D) Einfache Betätigung:
Im Timemodus drücken Sie ALARM (D), die eingestellte Alarmzeit wird
angezeigt. Nach 30 Sekunden wird wieder die gegenwärtige Uhrzeit
angezeigt, oder drücken Sie MODE (C).
Lange Bestätigung (länger als 2 Sekunden drücken):
Modus zur Einstellung der Weckzeit.
Drücken Sie die SET-Taste (E), um die Stundenanzeige zu erhöhen.
Bestätigen Sie die Stundenanzeige mit ALARM (D).
Drücken Sie die SET-Taste (E), um die Minutenanzeige zu erhöhen.
Bestätigen Sie die Minutenanzeige mit ALARM (D).
Sie verlassen dadurch den Einstellungsmodus.
SNOOZE (A) Im aktiven Snooze-Modus (erkennbar am Symbol „Zz“ neben der Uhrzeit) wird
der Alarm durch das Drücken der SNOOZE-Taste (A) für 8 Minuten
unterbrochen (erkennbar am blinkenden „Zz“-Symbol). Zum endgültigen
Beenden des Alarms drücken Sie eine beliebige andere Taste.
7.2 RÜCKSEITE DES THERMOMETERS
TASTE FUNKTION
SET ((o)) (E) Einfache Betätigung im Timemodus: Wechsel zwischen Sekunden und
Tagesanzeige.
°C/°F Einfache Betätigung: Wechsel zwischen der Temperaturanzeige in Grad
Celsius und Grad Fahrenheit.
Lange Betätigung im Timemodus (länger als 2 Sekunden drücken): Ein- und
Ausschalten der Eiswarnfunktion.
STÄNDER (H) Zum Aufstellen des Thermometers, klappen Sie den Ständer (H) aus.
8. ANZEIGE DES TEMPERATURTRENDS
Neben der Temperatur wird durch einen geraden, steigenden bzw. fallenden Pfeil angezeigt,
ob die Temperatur konstant bleibt, steigt oder fällt. Eine konstante Temperatur gilt in diesem
Fall als gegeben, wenn die Temperatur binnen einer Stunde nicht mehr als 1,0°C (bei
Fahrenheit ca. 2.0°F) nach oben oder unten abweicht.
Das Löschen der Minimal- bzw. Maximaltemperatur setzt auch die Indikation steigender oder
fallender Temperaturen zurück.

5
D
9. EISWARNUNG
Aktivieren Sie den Eisalarm durch Drücken der °C/°F Taste (F), für eine Dauer von 2
Sekunden. Eine Schneeikone erscheint neben der Außentemperaturanzeige. Bei
eingeschalteter Eis-Warnfunktion ertönt ein Warnsignal für 30 Sekunden und eine
Schneeikone blinkt, wenn sich die Temperatur zwischen -1
°
C und + 4
°
C bewegt, um vor
möglicher Glätte zu warnen. Steigt die Temperatur wieder über + 4
°
C, hört die Schneeikone
auf zu blinken.
10. REINIGUNG UND PFLEGE
Achtung! Vor der Reinigung immer die Batterie aus dem Batteriefach
entnehmen.
Achtung! Verwenden Sie auf keinen Fall Alkohol, Azeton, Benzin, aggressive
Reinigungsmittel usw. zur Reinigung. Auch keine harten Bürsten oder
metallische Gegenstände verwenden.
10.1 BATTERIEN
Zum Austauschen der Batterie gehen Sie wie unter Batterie einlegen/austauschen
beschrieben vor.
Benutzen Sie das Gerät über längere Zeit nicht, die Batterie entnehmen, um Auslaufen zu
verhindern.
10.2 REINIGUNG
Benutzen Sie einen feuchten Lappen, um das Gehäuse zu reinigen. Achten Sie darauf, dass
kein Wasser in die Messöffnungen oder andere Öffnungen eintritt. Gerät nach der Reinigung
immer trocken reiben.
11. TECHNISCHE DATEN
Stromversorgung: 1x 1,5V R3/LR3/AAA Batterie
Messbereich: 0°C bis +50°C / +32°F bis 122°F (innen)
Sensor: -20°C bis +50°C / -4°F bis + 122°F (außen)
Genauigkeit: +/-1,5°C
Auflösung: 0,1°C
Snooze: vorgegeben
Korrekte Entsorgung dieses Produktes
Innerhalb der EU weist dieses Symbol darauf hin, dass dieses Produkt
nicht über den Hausmüll entsorgt werden darf. Altgeräte enthalten
wertvolle recyclingfähige Materialien, die einer Wiederverwertung zugeführt
werden sollten, um der Umwelt bzw. der menschlichen Gesundheit nicht
durch unkontrollierte Müllbeseitigung zu schaden. Bitte entsorgen Sie
Altgeräte deshalb über geeignete Sammelsysteme oder senden Sie das
Gerät zur Entsorgung an die Stelle, bei der Sie es gekauft haben. Diese
wird dann das Gerät der stofflichen Verwertung zuführen.
Importiert durch:
Dirk Rossmann GmbH
Isernhägener Straße 16
30938
Bur
g
wedel

6
1. INTRODUCTION
This indoor and outdoor thermometer is intended for measuring and displaying the room and
outdoor temperature(s). Additional functions include: Warning when temperatures drop to
below freezing, temperature tendency display as well as storage of maximum and minimum
temperature data. Your thermometer also has a clock and date display as well as an alarm
function.
2. CAUTION
• Read the instruction manual prior to using the device.
• If you pass on the device to a third party, please include this instruction manual as well.
• This device complies with technical norms and safety requirements for electric devices.
• The manufacturer is not responsible for damages caused by improper use or non-
observance of this instruction manual.
• Keep children away from the device.
• This device is not intended to be used by persons (including children) with reduced physical,
sensory, or mental capabilities, or by those who lack experience and knowledge, unless
they are supervised or have been given instructions concerning the use of the device by a
person responsible for their safety.
• Children must be supervised at all times to ensure they do not play with the device.
• Only use the device in moderate climates, avoid tropics and very humid climates.
• Do not immerse the device in water. Danger of electric shock!
• The device must not be used in the vicinity of a bathtub or shower, or a washbasin filled
with water.
• Should the device fall in water, disconnect the power plug from the socket immediately and
have it checked by a qualified person prior to further use.
• Protect the device from moisture, which means from splashing water and dampness as well.
In particular, make sure that no moisture or liquids get inside the openings of the device.
• Although the sensor has been produced for outdoor use, it should still preferably be kept
away from moisture and splashing water.
• Do not expose the thermometer to direct sunlight. Do not use the thermometer right next to
heat-producing devices, such as an oven or stove.
• Do not use the device if it is damaged. In order to avoid hazards, defective parts should only
be replaced by the manufacturer, its Customer Service, or a similarly qualified person.
• Do not open the casing of the device.
• Do not try to repair the device on your own. Repairs should be conducted by qualified
specialists only.
• Do not drop the thermometer.
Advice regarding the batteries
• Do not expose batteries to extreme heat like direct sunlight, fire, etc.
• Batteries do not belong in household waste! Expired batteries must be disposed of in an
environmentally friendly way and according to the applicable legal regulations.
• Batteries are very dangerous if swallowed. Please keep expired batteries away from
children at all times. If a battery is swallowed, seek medical attention immediately.
• Use only batteries recommended by the manufacturer.
• Batteries must not be recharged or activated with another means, dismantled, thrown into
fire or short-circuited.
• The battery must be removed prior to disposing of the device.

7
This device is intended for private use and must not be used for commercial purposes.
Dispose of the packaging materials in an appropriate way. Contact your local
authorities about collecting points or waste separation.
Danger of suffocation! Keep all packaging material away from children.
The normal functioning of the thermometer could be influenced by strong
electromagnetic disturbances (e.g. by using a microwave near the thermometer).
Should such a disturbance occur, set the thermometer back to its default settings by
removing the batteries and inserting them again after approx. 1 minute (see Inserting
and removing the batteries). Should disturbances occur again, place the thermometer in
another location.
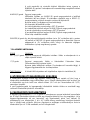
3. PARTS
4. BEFORE FIRST USE
Clean the thermometer as described in Cleaning and Maintenance. When doing so, also follow
the Safety Instructions.
5. INSERTING/REMOVING THE BATTERIES
1. The thermometer requires one 1.5 V, R3/LR3/AAA battery for operation.
2. Open the battery compartment on the back of the device by unlocking the battery
compartment cover.
3. Place a 1.5 V, R3/LR3/AAA battery into the compartment, paying attention to the correct
polarity as indicated on the battery compartment itself. The thermometer will now make 3
warning signals, after which the display will go on.
4. The thermometer is now ready for use.
5. To close the battery compartment, put the cover back on and click it into place.
A. Snooze button
B. Min/MAX button
C. Mode button
D. Alarm button
E. Set button ((o))
F. °C/°F button
G. Battery compartment
H. Stand
Not shown: Sensor with cable
top
front back

8
CAUTION
• Only use top-quality batteries. Cheap batteries could leak and damage the device as a
result.
• If the batteries leak, remove them with a cloth and dispose of them accordingly. Ensure that
leaking battery acid does not come into contact with skin and eyes. If you do get battery
acid in your eyes, flush them thoroughly with lots of water and consult a physician
immediately! If battery acid comes into contact with your skin, wash the affected area with
lots of water and soap.
• If the device is not to be used for a longer period of time, then the batteries should be
removed, as the device could become damaged should they leak. If the device functions
weaken, replace all batteries.
• If the performance of the batteries weakens, replace them as soon as possible.
• Batteries must not be recharged or activated with another means, dismantled, thrown into
fire or short-circuited.
6. SENSOR
1. Pull the protective film off of the sensor and adhere it to a suitable location outdoors.
7. CONTROL ELEMENTS
7.1 FRONT OF THE THERMOMETER
BUTTON FUNCTION:
MODE (C) Simple operation:
Switch between the time and date display.
Long confirmation necessary (press for longer than 2 seconds:
Mode for setting the time and date.
Press the SET button (E) to select 24 or 12 hour mode.
Confirm the setting with the MODE button.
Press the SET button (E) to reset the seconds display to 00.
Confirm the seconds setting with the MODE button.
Press the SET button (E) to increase the hour.
Confirm the hour setting with the MODE button.
Press the SET button (E) to increase the minutes.
Confirm the minutes setting with the MODE button.
Press the SET button (E) to increase the year.
Confirm the year setting with the MODE button.
Press the SET button (E) to increase the month.
Confirm the month setting with the MODE button.
Press the SET button (E) to increase the day of the week.
Confirm the day setting with the MODE button.
You will then leave the set mode.
MIN/MAX (B) Press once to display the maximum temperature measured.
Press twice to display the minimum temperature measured.
Press three times to return to the current temperature.
The thermometer automatically switches from the minimum or maximum
temperature to the current temperature display after 8 seconds.
In order to delete the minimum and maximum temperatures measured, press
MIN/MAX (B) longer than 2 seconds while the corresponding value is being
displayed.

9
ALARM (D) Simple operation:
In time mode, press ALARM (D) and the preset alarm time will be displayed.
After 30 seconds, the current time will be displayed again, or you can press
MODE (C).
Long confirmation necessary (press for longer than 2 seconds:
Mode for setting the alarm function.
Press the SET button (E) to increase the hour.
Confirm the hour setting with the ALARM (D) button.
Press the SET button (E) to increase the minutes.
Confirm the minute setting with the ALARM (D) button.
You will then leave the set mode.
SNOOZE (A) In the activated Snooze mode (recognisable by the “Zz” symbol next to the
time), the alarm will be disabled for 8 minutes by pressing the SNOOZE button
(A) (recognisable by the blinking “Zz” symbol). To completely disable the
alarm, press any other button.
7.2 BACK OF THE THERMOMETER
BUTTON FUNCTION:
SET ((o)) (E) Simple operation in time mode: Switch between seconds and day display.
°C/°F Simple operation: Switch between the temperature display in degrees Celsius
or degrees Fahrenheit.
Long confirmation necessary in time mode (press for longer than 2 seconds):
Turning the ice warning function on and off:
STAND (H) To stand up the thermometer, fold out the stand (H).
8. TEMPERATURE TREND DISPLAY
Next to the temperature, a straight, increasing or decreasing arrow will be displayed to indicate
whether the temperature is staying constant, increasing or decreasing. The temperature is
considered to be constant if it does not increase or decrease by more than 1 °C (or 2°F) within
an hour.
Deleting the minimum or maximum temperature will also reset the temperature
increase/decrease indicator.
9. ICE ALARM
Activate the ice alarm by pressing the °C/°F button (F) for 2 seconds. A snow icon appears
next to the outdoor temperature display. When the ice-warning function is activated, a warning
signal will sound for 30 seconds and a snow icon will blink if the temperature moves anywhere
between -1°C and +4°C, to warn that it may be icy. If the temperature rises over +4°C again,
then the snow icon stops blinking.
10. CLEANING AND MAINTENANCE
Warning! Before cleaning, always remove the batteries from the battery
compartment.
Warning! Do not under any circumstance use alcohol, acetone, petrol,
aggressive cleansers, etc. for cleaning purposes. In addition, do not use hard
brushes or metal objects for cleaning purposes.

10
10.1 BATTERIES
To replace the batteries, proceed as stated under Inserting/removing the Batteries.
If this device will not be used over a longer period of time, remove the batteries to avoid
leakage.
10.2 CLEANING
Use a damp cloth to clean the outer casing. Make sure that no water gets inside the measuring
hole or other openings. Dry off all parts thoroughly after cleaning.
11. TECHNICAL DATA
Power supply: 1x 1.5V R3/LR3/AAA battery
Measuring range: 0°C to +50°C / +32°F to 122°F (indoors)
Sensor: -20°C to +50°C / -4°F to +122°F (outdoors)
Accuracy: +/-1.5°C
Resolution: 0.1°C
Snooze: preset
Proper disposal of the product
Within the EU this symbol indicates that the product must not be disposed of
together with household waste. Old devices contain valuable recyclable materials
which should be reused in order not to harm the environment or people’s health
through uncontrolled waste disposal. Dispose of old devices through appropriate
collection systems or send the device to your retailer. It will then be taken for
recycling.
Imported by:
Dirk Rossmann GmbH
Isernhaegener Straße 16
30938 Burgwedel

11
1. ÚVOD
Tento vnitní a vnjí teplomr slouí k zobrazení prostorové a vnjí teploty
(teplot).Doplkové funkce pístroje jsou: signalizace pi teplotách pod bodem mrazu, zobrazení
tendenní teploty a uloení maximálních a minimálních teplotních hodnot. Krom toho
disponuje teplomr ukazatelem asu, data a funkcí budíku.
2. POZOR
• Ped uvedením do provozu pette pozorn písluné pokyny a bezpenostní pokyny.
• Jestlie pístroj pedáte jinému uivateli, prosím, pilote také tento návod k obsluze.
• Tento pístroj odpovídá technickm normám a píslunm bezpenostním pedpism
vztahujícím se na elektrické pístroje.
• Vrobce nenese odpovdnost za kody vzniklé v dsledku nesprávného pouívání nebo
nerespektování návodu k obsluze.
• Pístroj mjte mimo dosah dtí.
• Tento pístroj není uren pro pouití osobami (vetn dtí) se sníenmi fyzickmi,
smyslovmi nebo duevními schopnostmi nebo nedostatkem zkueností a znalostí, ledae
by byly pod dohledem nebo poueny o pouití pístroje osobou zodpovdnou za
bezpenost.
• Dti by mly bt pod dohledem, aby si nehrály s pístrojem.
• Pístroj pouívat pouze v mírnch íkovch stupních. Zamezit tropm a zvlát vlhkému
klimatu.
• Neponoujte pístroj pod vodu. Nebezpeí úrazu elektrickm proudem!
• Spotebi nesmí bt pouíván v blízkosti vany, sprchy nebo umyvadla naplnného vodou.
• Spadne-li pístroj do vody, ihned odpojte kabel ze zásuvky a nechte pístroj zkontrolovat
kvalifikovanou osobou ped dalím pouíváním.
• Chrate teplomr ped vlhkostí, tzn. i ped stíkající vodou a vlhkostí. Zvlát pozor na
to,aby se kapalina nedostala otvory do pístroje.
• Akoli byl senzor vyroben pro vnjí pouití, ml by bt vak co nejvíce chránn ped
vlhkem a stíkající vodou.
• Nevystavujte pístroj pímému slunenímu svtlu. Rovn nepouívejte pístroj v blízkosti
zaízení produkujících tepla jako kamna nebo nebo kuchyské sporáky.
• Nepouívejte pístroj, kdy má poruchu nebo je pokozen. Aby nebyla ohroena
bezpenost pouívání, defektní ásti smí bt vymnny pouze vrobcem nebo servisním
centrem vrobce nebo osobou s odpovídajíc kvalifikací.
• Nesnate dostat dovnit vrobku.
• Nikdy se nesnate vrobek sami opravovat. Opravu smí provést pouze kvalifikovan
odborník.
• Pístroj nesmí upadnout.
Pokyny k bateriím
• Baterie nevystavovat extrémnímu teplu jako pímému slunci, ohni apod.
• Baterie nepatí do domácího odpadu! Prosíme odstrate pouité baterie ekologickm
zpsobem dle platnch zákonnch ustanovení.
• Baterie jsou velmi nebezpené, jestlie se spolknou. Udrujte vdy ve vzdáleností od dtí.
V pípad spolknutí baterií vyhledejte okamit lékaskou pomoc.
• Pouívejte pouze typy baterií uvedené vrobcem.
• Baterie se nesmjí nabíjet ani aktivovat jinmi prostedky, rozebírat, vhazovat do ohn ani
zkratovat.
• Ped likvidací pístroje musí bt baterie demontována.
Tento pístroj slouí vhradn pro privátní domácí pouití a nesmí bt pouit ke
komerním úelm.

12
Zlikvidujte obalov materiál pedepsanm zpsobem. Informujte se na místním úad,
kde se nacházejí sbrná místa nebo kontejnery na tídn odpad.
Nebezpeí uduení! Uchovejte veker obalov materiál mimo dosah dtí.
Normální funkce teplomru me bt ovlivnna silnm elektromagnetickm ruením
(nap. pouitím mikrovlnné trouby v blízkosti teplomru).
Pokud dojde k porue podobného druhu, nastavte teplomr do základních nastavení tak,
e demontujete baterie a vloíte je po cca 1 minut (viz Vloení a vmna baterie).
Pokud se poruchy budou vyskytovat nadále, instalujte teplomr na jiné místo.
3. DÍLY
4. PED PRVNÍM UVEDENÍM DO PROVOZU
Vyistte pístroj dle itní a údrba. Dodrte rovn bezpenostní pokyny.
5. VLOENÍ/ VMNA BATERIE
1. Teplomr se provozuje s baterií typu 1,5V R3/LR3/AAA.
2. Otevete pihrádku na baterii na zadní stran pístroje odblokováním krytu pihrádky
baterie.
3. Vlote baterii typu 1,5V R3/LR3/AAA do ureného místa, pitom pozor na správnou
polaritu. Pístroj vydá nyní 3 krát vstran tón, potom se zapne displej.
4. Pístroj je nyní schopen provozu.
5. K uzavení pihrádky na baterii znovu poloit kryt a zaklapnout.
A. Tlaítko odpoinek
B. Tlaítko MIN/MAX
C. Tlaítko REIM
D. Tlaítko Alarm
E. Tlaítko SET ((o))
F. Tlaítko
°
C/
°
F
G. Pihrádka na baterii
H. Stojan
Není zobrazeno: senzor s drátkem
pední strana zadní strana
nahoe

13
POZOR
• Pouívejte jen baterie nejlepí kvality. Baterie o nízké kvalit mohou pístroj pokodit tím,
e teou.
• Kdyby baterie vytekly, vyndejte je z prostoru pro baterie pomocí hadíku a zlikvidujte je
podle závaznch pedpis. Pozor na jakkoli kontakt oí a pokoky s kyselinou v bateriích.
Pokud by dolo ke kontaktu kyseliny s oima, vypláchnte je velkm mnostvím vody a
okamit navtivte lékae. V pípad, e dojde k potísnní pokoky kyselinou, postiené
místo opláchnte velkm mnostvím vody a mdlem.
• Pokud pístroj po delí období nepouíváte, baterie vyndejte, aby se pístroj nepokodil
náhodnm vyteením baterií. Pokud se vkon pístroje zhorí, je teba baterie vymnit za
nové.
• Jakmile klesá vkon baterie, vymte baterie co nejdíve.
• Baterie se nesmjí nabíjet ani aktivovat jinmi prostedky, rozebírat, vhazovat do ohn ani
zkratovat.
6. SENZOR
1. Stáhnte ochrannou folii ze senzoru a pilepte na vhodné místo ve vnjí oblasti.
7. OBSLUNÉ PRVK
7.1 PEDNÍ STRANA TEPLOMRU
TLAÍTKO FUNKCE
REIM (C) Snadné ovládání:
Zmna mezi ukazatelem hodin a data
Dlouhé potvrzení (stisknout déle ne 2 sekundy):
Reim k nastavení hodin a data
Stisknte tlaítko SET (E), pro volbu reimu 24 nebo 12 hodin.
Potvrte nastavení pomocí REIM.
Stisknte tlaítko SET (E), abyste nastavili vteinového ukazatele na 00.
Potvrte ukazatel sekund pomocí REIM
Stisknte tlaítko SET (E) pro zvení ukazatele hodin.
Potvrte ukazatel hodin pomocí REIM.
Stisknte tlaítko SET (E) pro zvení ukazatele minut.
Stisknte tlaítko SET (E) pro zvení ukazatele roku.
Potvrte ukazatel roku pomocí REIM .
Stisknte tlaítko SET (E) pro zvení ukazatele dne.
Potvrte ukazatel dne pomocí REIM.
Tím opoutíte reim nastavení.
MIN/MAX (B) Stisknte jednou pro zobrazení maximální mené teploty.
Stisknte dvakrát pro zobrazení minimální mené teploty.
Stisknte tikrát pro okamité zobrazení teploty.
Teplomr se vrací z ukazatele minimální event. maximální teploty po 8
sekundách automaticky na ukazatel okamité teploty.
Pro vymazání min. a max. mench hodnot stisknte MIN/MAX (B)
nejmén 2 sekundy, potom budou zobrazeny písluné hodnoty.
ALARM (D) Snadné ovládání
V asovém reimu stisknte ALARM (D), ukáe se nastavená hodnota
alarmu. Po 30 sekundách bude znovu zobrazen nastaven as nebo
stisknte tlaítko REIM (C).
Dlouhé potvrzení (stisknout po déle ne 2 sekundy):
Reim k nastavení asu buzení

14
Stisknte tlaítko SET (E) pro zvení ukazatele hodin.
Potvrte ukazatele hodin ALARM (D).
Stisknte tlaítko SET (E) pro zvení minimálního ukazatele.
Potvrte ukazatel minut ALARM (D).
Tím opoutíte reim nastavení.
SNOOZE (A) V aktivním reimu Snooze (viditeln u symbolu „Zz“ vedle asu) je
zobrazena signalizace stisknutím tlaítka SNOOZE (A) na 8 minut
peruena.(viz blikající symbol Ke konenému odhláení stisknte
libovolné jiné tlaítko
7.2 ZADNÍ STRANA TEPLOMRU
TLAÍTKO FUNKCE
SET ((o)) (E) Snadné ovládání v reimu Time. Zmna mezi sekundami a ukazatelem
dne.
°C/°F Snadné ovládání: Zmna mezi ukazatelem teploty ve st..° a stupnm
Fahrenheita.
Dlouhá aktivace v reimu Time (stisknout déle ne 2 minuty). Zapnutí a
vypnutí funkce. Zapnutí a vypnutí vstrané funkce mrazení.
STOJAN (H) K instalaci teplomru rozlote stojan (H).
8. UKAZATEL TEPLOTNÍHO TRENDU
Krom ukazatele teploty je rovnou klesající event. stoupající kivkou zobrazeno, zda zstává
teplota stejná nebo klesá. Konstantní teplota je v tomto pípad jako daná, pokud se teplota
bhem hodiny o více ne 1,0°C (bei Fahrenheit ca. 2.0°F)smrem nahoru nebo dol.
Vymazání minimální event. max. teploty nastavuje zpt rovn indikaci stoupajících nebo
klesajících teplot.
9. ALARM MRAZU
Aktivujte alarm mrazu stisknutím tlaítka °C/°F (F) po dobu 2 sekund. Snhová ikona se objeví
vedle ukazatele vnjí teploty. Pi zapnuté vstrané funkci mrazení zazní vstran signál na
30 sekund a bliká snhová ikona, jestlie se teplota pohybuje mezi -1
°
C a + 4
°
C, jestlie
teplota stoupne znovu nad + 4
°
C, pestává ikona snhu svítit.
10. ITNÍ A ÚDRBA
Pozor! Ped itním vyjmte vdy baterii z pihrádky na baterie.
Pozor! V ádném pípad nepouívejte líh, aceton, benzín, agresivní isticí
prostedky event. k itní. Rovn nepouívat tvrdé kartáky nebo kovové
pedmty.
10.1 BATERIE
Pro vmnu baterie postupujte dle popisu v Baterie vloení/ vmna.
Pokud pístroj po delí as nepouíváte, vyjmte baterie pro zamezení vylití.
10.2 ISTNÍ

15
Pro vyitní krytu pouijte pouze vlhk hadík. Pozor na to, aby se do micích nebo jinch
otvor nedostala voda. Pístroj po vyitní vdy vytít dosucha.
11. TECHNICKÁ DATA
Napájení proudem: 1x 1,5V R3/LR3/AAA baterie
Rozsah mení: 0°C bis +50°C / +32°F bis 122°F (vnitní)
Senzor: -20°C bis +50°C / -4°F bis + 122°F (vnjí)
Pesnost: +/-1,5°C
Rozliení: 0,1°C
Snooze: zadáno
Správná likvidace tohoto produktu
V EU tento symbol znamená, e tento produkt nesmí bt odstrann jako
domovní odpad. Staré pístroje obsahují cenné recyklovatelné materiály, které
mají bt dodány k dalímu zuitkování, aby nedolo nekontrolovanm
odstranním odpadu k pokození ivotního prostedí event. pokození zdraví.
Prosím likvidujte staré pístroje pomocí sbrnch systém nebo zalete pístroj k
likvidaci na místo, kde jste ho koupili. To zajistí potom látkové zuitkování
pístroje.
Dovozce:
Dirk Rossmann GmbH
Isernhägener Straße 16
30938 Burgwedel

16
1. WPROWADZENIE
Termometr wewntrzny i zewntrzny suy do informowania o temperaturze w pomieszczeniu
oraz na zewntrz. Dodatkowe funkcje urzdzenia to: ostrzeganie o temperaturach poniej
punktu zamarzania, wywietlanie tendencji ksztatowania si temperatury oraz
zapamitywanie maksymalnej i minimalnej temperatury. Ponadto termometr posiada funkcj
pokazywania godziny i daty oraz budzika.
2. UWAGA
• Przed uyciem urzdzenia uwanie przeczytaj instrukcj obsugi.
• Jeli przekazujesz urzdzenie osobie trzeciej, docz take niniejsz instrukcj obsugi.
• Niniejsze urzdzenie spenia wszystkie standardy techniczne i wymagania bezpieczestwa
dla urzdze elektrycznych.
• Producent nie ponosi odpowiedzialnoci za uszkodzenia wynikajce z niewaciwego
uycia lub nieprzestrzegania niniejszej instrukcji obsugi.
• Trzymaj dzieci z dala od urzdzenia.
• Niniejsze urzdzenie nie jest przeznaczone dla osób (w tym dzieci) o ograniczonych
zdolnociach fizycznych, sensorycznych lub umysowych, odznaczajcych si brakiem
dowiadczenia lub wiedzy, chyba e pozostaj pod nadzorem osoby odpowiedzialnej za ich
bezpieczestwo lub otrzymaj od niej wskazówki dotyczce uywania urzdzenia.
• Dzieci powinny pozostawa pod nadzorem, aby nie bawiy si urzdzeniem.
• Uywaj urzdzenia wycznie w klimacie umiarkowanym, unikaj tropików oraz wilgotnego
klimatu.
• Nie zanurzaj urzdzenia w wodzie. Niebezpieczestwo poraenia prdem!
• Nie naley uywa urzdzenia w pobliu wanny, prysznica lub umywalki napenionej wod.
• Jeli urzdzenie wpado do wody, natychmiast odcz kabel zasilania z gniazda sieci i przed
ponownym uyciem oddaj je do sprawdzenia wykwalifikowanemu specjalicie.
• Chro termometr przed wszelkiego rodzaju wilgoci. Uwaaj przede wszystkim, aby woda
nie dostaa si przez aden z otworów do wntrza urzdzenia.
• Mimo i czujnik jest przeznaczony do uytku zewntrznego, naley, o ile to moliwe,
chroni go przed wilgoci oraz bezporednim kontaktem z wod.
• Nie wystawiaj urzdzenia na bezporednie dziaanie wiata sonecznego. Nie korzystaj z
urzdzenia w pobliu innych urzdze wytwarzajcych wysok temperatur, takich jak
piekarnik lub kuchenka.
• Nie uywaj urzdzenia, jeli jest ono uszkodzone. Aby unikn niebezpieczestwa,
uszkodzone czci powinny zosta wymienione przez producenta, Centrum Obsugi Klienta
lub przez wykwalifikowanego specjalist.
• Nie otwieraj obudowy urzdzenia.
• Nie próbuj naprawia urzdzenia samodzielnie. Naprawa musi by przeprowadzona
wyczne przez wykwalifikowanego specjalist.
• Nie pozwól, aby urzdzenie spado.
Wskazówki dotyczce baterii
• Nie wystawiaj baterii na dziaanie ekstremalnego gorca, np. bezporednich promieni
sonecznych, ognia itd.
• Baterie nie mog by wyrzucane wraz z odpadami domowymi! Pozbd si zuytych
baterii w ekologiczny sposób i zgodnie z obowizuj
cymi przepisami.
• Poknicie baterii jest bardzo niebezpieczne. Trzymaj baterie z dala od dzieci. Jeli dojdzie
do poknicia baterii natychmiast skonsultuj si z lekarzem.
• Uywaj wycznie baterii polecanych przez producenta.
• Baterii nie mona ponownie adowa lub reaktywowa w jakikolwiek inny sposób, niszczy,
wrzuca do ognia lub doprowadza do zwarcia.
• Wyjmij bateri zanim zutylizujesz urzdzenie.

17
Urzdzenie jest przeznaczone wycznie do uytku domowego i nie moe by uywane
w celach komercyjnych.
Zutylizuj materiay opakowania w odpowiedni sposób. Skontaktuj si z lokalnymi
wadzami, aby dowiedzie si gdzie znajduj si punkty zbiorcze lub miejsca
segregujce odpady.
Urzdzenie jest przeznaczone wycznie do celów prywatnych i nie moe by
uywane w celach komercyjnych.
Na normalne funkcjonowanie termometru moe mie wpyw mocne zakócenie
elektromagnetyczne (np. mikrofalówka w pobliu termometru).
Jeli dojdzie do zakóce tego typu, przywró ustawienia pocztkowe w termometrze
poprzez wyjcie i ponowne woeni baterii po ok. 1 minucie (zobacz Wkadanie i
wymiana baterii).
Jeli zakócenia nadal bd wystpoway, umie termometr w innym miejscu.
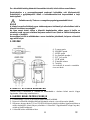
3. CZCI
4. PRZED PIERWSZYM UYCIEM
Wyczy urzdzenie jak opisano w czci Czyszczenie i konserwacja, przestrzegajc
wskaza dotyczcych bezpieczestwa.
5. WKADANIE/WYMIANA BATERII
1. W termometrze naley stosowa bateri typu 1,5V R3/LR3/AAA.
2. Zdejmij oson i otwórz przegrod na bateri znajdujc si z tyu urzdzenia.
3. Umie w przegrodzie bateri typu 1,5V R3/LR3/AAA, zwracajc uwag na prawidow
polaryzacj. Nadane zostan 3 sygnay dwikowe, a nastpnie wczy si wywietlacz.
4. Urzdzenie jest gotowe do dziaania.
5. W celu zamknicia przegrody na baterie naó prawidowo oson i lekko j docinij.
A. Przycisk Snooze
B. Przycisk MIN/MAX
C. Przycisk MODE
D. Przycisk Alarm
E. Przycisk SET ((o))
F. Przycisk
°
C/
°
F
G. Przegroda na baterie
H. Podpórka
Nie pokazane: czujnik i kabel
Widok z góry
Przód Ty

18
UWAGA
• Uywaj wycznie baterii najwyszej jakoci. Baterie niskiej jakoci mog wyciec i
uszkodzi urzdzenie.
• Jeli baterie wyciekn, wyjmij je za pomoc szmatki z przegrody baterii i zutylizuj zgodnie z
obowizujcymi przepisami. Unikaj jakiegokolwiek kontaktu kwasu z baterii z oczami i ze
skór. Jeli kwas z baterii dostanie si do oczu, przemyj je du iloci wody i natychmiast
skonsultuj si z lekarzem. Jeli kwas z baterii mia kontakt ze skór, przemyj dane miejsce
du iloci wody z mydem.
• Jeli nie uywasz urzdzenia przez duszy czas, wyjmij baterie, aby nie uszkodziy one
urzdzenia poprzez przypadkowy wyciek. Jeli urzdzenie zacznie gorzej pracowa,
wymie baterie na nowe.
• Jeli praca baterii si pogarsza, naley je jak najszybciej wymieni.
• Baterii nie mona ponownie adowa lub reaktywowa w jakikolwiek inny sposób, niszczy,
wrzuca do ognia lub doprowadza do zwarcia.
6. CZUJNIK
1. Zdejmij foli ochronn z czujnika i przyklej go w odpowiednim miejscu na zewntrz
pomieszczenia.
7. PRZYCISKI
7.1 PRZEDNIA STRONA TERMOMETRU
PRZYCISK FUNKCJA
MODE (C) Krótkie nacinicie:
Zmiana wywietlanych informacji: godzina/data
Nacinicie i przytrzymanie (duej ni 2 sekundy):
Tryb ustawiania godziny i daty.
Nacinij przycisk SET (E) w celu wybrania 24- lub 12-godzinnego trybu
wywietlania godziny.
Potwierd dokonane ustawienia naciskajc przycisk MODE.
Nacinij przycisk SET (E) w celu ustawienia wskanika sekund na 00.
Potwierd ustawienie sekund naciskajc przycisk MODE.
Nacinij przycisk SET (E) w celu ustawienia godzin.
Potwierd ustawienie godzin naciskajc przycisk MODE.
Nacinij przycisk SET (E) w celu ustawienia minut.
Potwierd ustawienie minut naciskajc przycisk MODE.
Nacinij przycisk SET (E) w celu ustawienia roku.
Potwierd ustawienie roku naciskajc przycisk MODE.
Nacinij przycisk SET(E) w celu ustawienia miesica.
Potwierd ustawienie miesica naciskajc przycisk MODE.
Nacinij przycisk SET(E) w celu ustawienia dnia.
Potwierd ustawienie dnia naciskajc przycisk MODE.
W ten sposób wyjdziesz z trybu ustawie.
MIN/MAX (B) Jednokrotne wcinicie powoduje wywietlenie maksymalnej zmierzonej
temperatury.
Dwukrotne wcini
cie powoduje wywietlenie minimalnej zmierzonej
temperatury.
Trzykrotne nacinicie powoduje ponowne wywietlenie obecnej
temperatury.
8 sekund po wywietleniu minimalnej lub maksymalnej temperatury
termometr automatycznie powraca do wywietlania aktualnej temperatury.
Strona się ładuje...
Strona się ładuje...
Strona się ładuje...
Strona się ładuje...
Strona się ładuje...
Strona się ładuje...
Strona się ładuje...
-
 1
1
-
 2
2
-
 3
3
-
 4
4
-
 5
5
-
 6
6
-
 7
7
-
 8
8
-
 9
9
-
 10
10
-
 11
11
-
 12
12
-
 13
13
-
 14
14
-
 15
15
-
 16
16
-
 17
17
-
 18
18
-
 19
19
-
 20
20
-
 21
21
-
 22
22
-
 23
23
-
 24
24
-
 25
25
-
 26
26
-
 27
27


Ideen Welt W240 Instrukcja obsługi
- Kategoria
- Lampki nocne dla dzieci
- Typ
- Instrukcja obsługi
w innych językach
- Deutsch: Ideen Welt W240 Benutzerhandbuch
- slovenčina: Ideen Welt W240 Používateľská príručka
- English: Ideen Welt W240 User manual
Inne dokumenty
-
National Geographic IN103TOP Instrukcja obsługi
-
Technoline WS 6750 Instrukcja obsługi
-
Hama 99106994 Instrukcja obsługi
-
Hama EWS-120 Instrukcja obsługi
-
-
Topcom CE0123 Instrukcja obsługi
-
Auriol 315731_1904 Instrukcja obsługi
-
Technoline Model Instrukcja obsługi
-
Technoline Funkwecker WT 265 Instrukcja obsługi