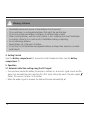
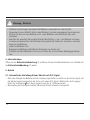
Hama RC 45 Operating Instructions Manual
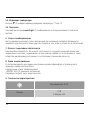
- Kategoria
- Budziki
- Typ
- Operating Instructions Manual

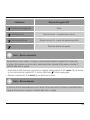
00
136278
136279
"HG-220"
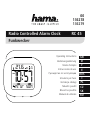
RC 45
Radio Controlled Alarm Clock
Funkwecker
E
F
D
GB
I
PL
CZ
SK
RO
RUS
Operating Instructions
Bedienungsanleitung
Mode d‘emploi
Instrucciones de uso
Руководство по эксплуатации
Istruzioni per l‘uso
Instrukcja obsługi
Návod k použití
Návod na použitie
Manual de utilizare
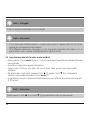
21.6
39
25
10
:
57
12 SUN
AM
DST
C
DM

MODE WAVE
SNOOZE/LIGHT
ALARM
ON/OFF
1
4
7
2 3
6
5

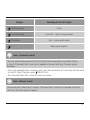
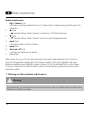
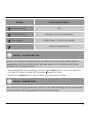
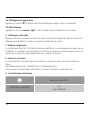
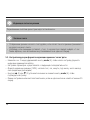
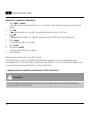
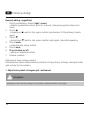
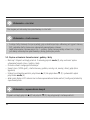
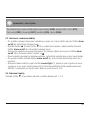
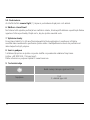
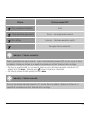
G Operating instruction
Controls and Displays
1. light / snooze button
= activating the backlight (approx. 5 seconds) / stopping the alarm for 5 minutes
2. p button
= p selection of the date, time, alarm time / switching between 12 and 24-hour format
3. q button
= q selection of the date, time, alarm time / language selection / Temperature unit
4. mode button
= setting the date, time, alarm
5. wave button
6. alarm on/off button
= set/disable the alarm
7. Battery compartment
Thank you for choosing a Hama product.
Take your time and read the following instructions and information completely. Please keep these
instructions in a safe place for future reference. If you sell the device, please pass these operating
instructions on to the new owner.
1. Explanation of Warning Symbols and Notes
Warning
This symbol is used to indicate safety instructions or to draw your attention to specic
hazards and risks.
2

3
Note
This symbol is used to indicate additional information or important notes.
2. Package Contents
•RC 45 radio-controlled alarm clock
•2x AAA batteries
•These operating instructions
3. Safety Instructions
•The product is intended for private, non-commercial use only.
•Protect the product from dirt, moisture and overheating, and only use it in a dry environment.
•Do not use the product in areas where the use of electronic devices is not permitted.
•Do not place the product near interference elds, metal frames, computers, TVs, etc. Electronic
devices and window frames can negatively affect the product’s functionality.
•Do not drop the product and do not expose it to any major shocks.
•Do not attempt to service or repair the product yourself. Leave any and all service work to qualied
experts.
•Do not modify the product in any way. Doing so voids the warranty.
•Keep the packaging material out of the reach of children due to the risk of suffocation.
•Dispose of packaging material immediately according to locally applicable regulations.

4
Warning - Batteries
•Immediately remove and dispose of dead batteries from the product.
•Only use batteries (or rechargeable batteries) that match the specied type.
•Do not mix old and new batteries or batteries of a different type or make.
•When inserting batteries, note the correct polarity (+ and - markings) and insert the batteries
accordingly. Failure to do so could result in the batteries leaking or exploding.
•Do not overcharge batteries.
•Keep batteries out of the reach of children.
•Do not short circuit the batteries/rechargeable batteries and keep them away from uncoated
metal objects.
4. Getting Started
Open the battery compartment (7), remove the contact breaker and then close the battery
compartment (7).
5. Operation
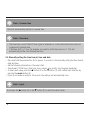
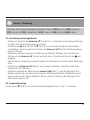
5.1 Automatic date/time setting using the DCF signal
•Once you have inserted the battery, the display is switched on, an acoustic signal sounds and the
alarm clock automatically starts searching for a DCF signal. During the search, the radio symbol
ashes. This process can take 7 to 5 minutes.
•When the wireless signal is received, the date and time are automatically set.

5
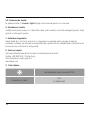
Display Searching for the DCF signal
Flashing display
Active
Constant display
Successful – signal is being received
No display
Error – signal search ended
Weak signal reception
Note – Automatic search
The clock automatically searches for the DCF signal ve times per day to ensure that the time
is correct. If the search fails, it ends and is repeated at the next clock hour. The radio symbol
disappears.
•If the clock repeatedly fails to receive a signal, press the wave button (5) to manually start the search
for the DCF signal. The radio symbol starts to ash.
•Press the wave button (5) to cancel the search procedure.
Note – Manual search
The manual search takes about 7 minutes. If the search fails, it ends and is repeated at the next
clock hour. The radio symbol disappears.

6
Note – Summer time
The clock automatically switches to summer time.
Note – Time zone
•The time zone is used if the DCF time signal is received in a country whose time zone does not
correspond to German time.
•If the time shift is +1 hour, for example, you need to set the time zone to +1. This will
automatically set the clock forward one hour.
5.2 Manually setting the time format, time and date
•Press and hold the mode button (4) for approx. 3 seconds to start manually setting the time format,
date and time.
•Set the following information in the order listed:
•Time format (12-/24-hour), time zone, hour, minute, year, month, day, language (weekday)
•To select each value, press the p button (2) or the q button (3), and conrm each selection by
pressing the mode button (4).
•If you do not make an entry for 30 seconds, the settings will automatically close.
Note – Input
Hold down the p button (2) or the q button (3) to select the values faster.

7
Note – Day of the week
For the weekday display, you can choose amongst the following languages: German (GER),
English (ENG), Italian (ITA), French (FRE), Dutch (DUT), Spanish (SPA) and Danish (DAN).
5.3 Alarm settings and display
•Press and hold the alarm on/off button (6) for approx. 3 seconds to open the alarm settings. The
hours display begins to ash.
•Press the p button (2) or the q button (3) to select the hours for the alarm time, and conrm your
selection by pressing the alarm on/off button (6). The minutes display begins to ash.
•Repeat the process to set the minutes for the alarm time. Once you have conrmed your minutes
selection with the alarm on/off button (6), the alarm is set and shows in the display.
•If the alarm is triggered, the alarm symbol will begin to ash and an alarm will sound.
•Press the alarm on/off button (6) to stop the alarm. Otherwise, it will stop automatically after 2
minutes.
•If you press the snooze/light button (1) during the alarm, the alarm is interrupted for 5 minutes
and then goes off again. The alarm symbol ashes. Press any button to disable the snooze function.
The same goes for the alarm signal. The alarm repeats every 24 hours.
5.4 Temperature indicator
Press the q button (3) to switch between °C and °F for the temperature display.
5.5 Backlight
Press the snooze/light button (1) to light up the display for approx. 5 seconds.
6. Care and Maintenance
Only clean this product with a slightly moist, lint-free cloth, and do not use aggressive cleaning agents.
Make sure that water does not get into the product.

8
7. Warranty Disclaimer
Hama GmbH & Co. KG assumes no liability and provides no warranty for damage resulting from
improper installation/mounting, improper use of the product or from failure to observe the operating
instructions and/or safety notes.
8. Service and Support
Please contact Hama Product Consulting if you have any questions about this product.
Hotline: +49 9091 502-115 (German/English)
Further support information can be found here:
www.hama.com
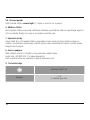
9. Technical Data
RC 45 radio-controlled alarm clock
Power supply
1.5 V
2 x AAA batteries

9
10. Recycling Information
Note on environmental protection:
After the implementation of the European Directive 2012/19/EU and 2006/66/EU in the
national legal system, the following applies: Electric and electronic devices as well as
batteries must not be disposed of with household waste. Consumers are obliged by law to
return electrical and electronic devices as well as batteries at the end of their service lives
to the public collecting points set up for this purpose or point of sale. Details to this are
dened by the national law of the respective country. This symbol on the product, the instruction
manual or the package indicates that a product is subject to these regulations. By recycling, reusing the
materials or other forms of utilising old devices/Batteries, you are making an important contribution to
protecting our environment.
11. Declaration of Conformity
Hama GmbH & Co. KG hereby declares that the device complies with the essential
requirements and other relevant provisions of Directive 2014/53/EU. See www.hama.com
for the declaration of conformity with the relevant directive.

10
Bedienungselemente
1. light / snooze Taste
= Aktivierung Hintergrundbeleuchtung (ca. 5 Sekunden) / Unterbrechung des Wecksignals für
5 Minuten
2. p Taste
= p Auswahl Datum, Uhrzeit, Wecker / Umstellung 12-/24-Stundenformat
3. q Taste
= q Auswahl Datum, Uhrzeit, Wecker / Sprachauswahl / Temperatureinheit
4. mode Taste
= Einstellung Datum, Uhrzeit, Wecker
5. wave Taste
6. alarm on/ off Taste
= Aktivierung/ Deaktivierung Wecker
7. Batteriefach
Vielen Dank, dass Sie sich für ein Hama Produkt entschieden haben! Nehmen Sie sich Zeit und
lesen Sie die folgenden Anweisungen und Hinweise zunächst ganz durch. Bewahren Sie diese
Bedienungsanleitung anschließend an einem sicheren Ort auf, um bei Bedarf darin nachschlagen
zu können. Sollten Sie das Gerät veräußern, geben Sie diese Bedienungsanleitung an den neuen
Eigentümer weiter.
1. Erklärung von Warnsymbolen und Hinweisen
Warnung
Wird verwendet, um Sicherheitshinweise zu kennzeichnen oder um Aufmerksamkeit auf besondere
Gefahren und Risiken zu lenken.
D Bedienungsanleitung

11
Hinweis
Wird verwendet, um zusätzlich Informationen oder wichtige Hinweise zu kennzeichnen.
2. Packungsinhalt
•Funkwecker RC45
•2AAA Batterien
•diese Bedienungsanleitung
3. Sicherheitshinweise
•Das Produkt ist für den privaten, nicht-gewerblichen Haushaltsgebrauch vorgesehen.
•Schützen Sie das Produkt vor Schmutz, Feuchtigkeit und Überhitzung und verwenden Sie es nur in
trockenen Umgebungen.
•Benutzen Sie das Produkt nicht in Bereichen, in denen elektronische Produkte nicht erlaubt sind.
•Positionieren Sie das Produkt nicht in der Nähe von Störfeldern, Metallrahmen, Computern und
Fernsehern etc. Elektronische Geräte sowie Fensterrahmen beeinträchtigen die Funktion des
Produktes negativ.
•Lassen Sie das Produkt nicht fallen und setzen Sie es keinen heftigen Erschütterungen aus.
•Versuchen Sie nicht, das Produkt selbst zu warten oder zu reparieren. Überlassen Sie jegliche
Wartungsarbeit dem zuständigen Fachpersonal.
•Nehmen Sie keine Veränderungen am Produkt vor. Dadurch verlieren sie jegliche
Gewährleistungsansprüche.
•Halten Sie Kinder unbedingt von dem Verpackungsmaterial fern, es besteht Erstickungsgefahr.
•Entsorgen Sie das Verpackungsmaterial sofort gemäß den örtlich gültigen Entsorgungsvorschriften.

12
Warnung - Batterien
•Entfernen und entsorgen Sie verbrauchte Batterien unverzüglich aus dem Produkt.
•Verwenden Sie ausschließlich Akkus (oder Batterien), die dem angegebenen Typ entsprechen.
•Mischen Sie alte und neue Batterien nicht, sowie Batterien unterschiedlichen Typs oder
Herstellers.
•Beachten Sie unbedingt die korrekte Polarität (Beschriftung + und -) der Batterien und legen
Sie diese entsprechend ein. Bei Nichtbeachtung besteht die Gefahr des Auslaufens oder einer
Explosion der Batterien.
•Laden Sie Batterien nicht.
•Bewahren Sie Batterien außerhalb der Reichweite von Kindern auf.
•Schließen Sie Akkus/Batterien nicht kurz und halten Sie sie von blanken Metallgegenständen
fern.
4. Inbetriebnahme
Öffnen Sie die Batteriefachabdeckung (7), entfernen Sie den Kontaktunterbrecher und schließen Sie
die Batteriefachabdeckung (7) wieder.
5. Betrieb
5.1. Automatische Einstellung Datum/ Uhrzeit nach DCF-Signal
•Nach dem Einlegen der Batterie wird das Display eingeschaltet, es ertönt ein akustisches Signal und
der Wecker beginnt automatisch die Suche nach einem DCF-Signal. Während des Suchvorgangs
blinkt das Funksymbol
auf. Dieser Vorgang kann bis zu 7 Minuten dauern.
•Bei Empfang des Funksignals werden Datum und Uhrzeit automatisch eingestellt.

13
Anzeige Suche nach DCF-Signal
Blinkende Anzeige
Aktiv
Dauerhafte Anzeige
Erfolgreich – Signal wird empfangen
Keine Anzeige
Fehlgeschlagen – Signalsuche eingestellt
Schwacher Signalempfang
Hinweis – automatische Suche
Die Uhr sucht automatisch fünfmal pro Tag nach dem DCF-Signal, um eine korrekte Uhrzeit zu
gewährleisten. Falls die Suche fehlschlägt, wird diese beendet und zur nächsten vollen Stunde
wiederholt. Das Funksymbol erlischt.
•Wird wiederholt kein Signal empfangen, drücken Sie die wave Taste (5), um die manuelle Suche
nach dem DCF-Signal zu starten. Das Funksymbol beginnt zu blinken.
•Drücken Sie die wave Taste (5), wenn Sie den Suchvorgang beenden wollen
Hinweis – manuelle Suche
Der manuelle Suchvorgang dauert etwa 7 Minuten. Falls dieser fehlschlägt, wird die Suche beendet
und zur nächsten vollen Stunde wiederholt. Das Funksymbol erlischt.

14
Hinweis – Sommerzeit
Die Uhrzeit stellt sich automatisch auf die Sommerzeit um.
Hinweis - Zeitzone
•Die Zeitzone kommt zur Anwendung, wenn in einem Land das DCF-Zeitsignal empfangen wird,
die Zeitzone jedoch nicht mit der deutschen Zeit übereinstimmt.
•Wenn die Zeitverschiebung z.B. 1 Stunde beträgt, müssen Sie die Zeitzone auf +1 einstellen.
Dadurch wird die Uhr automatisch eine Stunde vorgestellt.
5.2. Manuelle Einstellung Zeitformat/ Uhrzeit/ Datum
•Drücken und halten Sie die mode Taste (4) für ca. 3 Sekunden, um die manuelle Einstellung von
Zeitformat/ Uhrzeit/ Datum zu starten.
•Stellen Sie die folgenden Informationen nacheinander ein:
•Zeitformat (12/24h), Zeitzone, Stunde, Minute, Jahr, Monat, Tag, Sprache (Wochentag)
•Drücken Sie zum Auswählen der einzelnen Werte die p Taste (2) oder die q Taste (3) und
bestätigen Sie die jeweilige Auswahl durch Drücken der mode Taste (4).
•Die Einstellungen werden automatisch beendet, wenn länger als 30 Sekunden keine Eingabe erfolgt.
Hinweis – Eingabe
Halten Sie die p Taste (2) oder die q Taste (3) gedrückt, um die Werte schneller auswählen zu
können.

15
Hinweis – Wochentag
Sie können für die Wochentaganzeige die Sprachen Deutsch (GER), Englisch (ENG), Italienisch
(ITA), Französisch (FRE), Niederländisch (DUT), Spanisch (SPA), Dänisch (DAN) wählen.
5.3. Einstellung und Anzeige Wecker
•Drücken und halten Sie die alarm on/ off Taste (6) für ca. 3 Sekunden um die Alarmeinstellungen
zu starten. Die Stundenanzeige beginnt zu blinken.
•Drücken Sie die p Taste (2) oder die q Taste (3), um die Stunden der Weckzeit auszuwählen
und bestätigen Sie die Auswahl durch Drücken der alarm on/ off Taste (6). Die Minutenanzeige
beginnt zu blinken.
•Wiederholen Sie diesen Vorgang für die Minuten der Weckzeit. Nachdem Sie die Auswahl der
Minuten mit der alarm on/ off Taste (6) bestätigt haben, ist die Weckzeit aktiviert und wird
angezeigt.
•Wird der Wecker entsprechend ausgelöst, beginnt das Alarmsymbol zu blinken und ein Wecksignal
ertönt.
•Drücken Sie die alarm on/ off Taste (6), um den Alarm zu beenden. Andernfalls endet dieser
automatisch nach 2 Minuten.
•Drücken Sie während des Wecksignals die snooze/ light Taste (1), wird das Wecksignal für 5
Minuten unterbrochen und dann erneut ausgelöst. Das Alarmsymbol blinkt. Mit Berührung einer
Taste wird die Snooze Funktion deaktiviert. Gleiches gilt bei der Ertönung des Wecksignals. Der
Alarm startet wieder in 24h.
5.4. Temperaturanzeige
Drücken Sie die q Taste (3), um bei der Temperaturanzeige zwischen °C und °F zu wechseln.

16
5.5. Hintergrundbeleuchtung
Drücken Sie die snooze/light Taste (1), wird das Display für ca. 5 Sekunden beleuchtet.
6. Wartung und Pflege
Reinigen Sie dieses Produkt nur mit einem fusselfreien, leicht feuchten Tuch und verwenden Sie keine
aggressiven Reiniger. Achten Sie darauf, dass kein Wasser in das Produkt eindringt.
7. Haftungsausschluss
Die Hama GmbH & Co. KG übernimmt keinerlei Haftung oder Gewährleistung für Schäden, die aus
unsachgemäßer Installation, Montage und unsachgemäßem Gebrauch des Produktes oder einer
Nichtbeachtung der Bedienungsanleitung und/ oder der Sicherheitshinweise resultieren.
8. Service und Support
Bitte wenden Sie sich bei Fragen zum Produkt gerne an die Hama-Produktberatung.
Hotline: +49 9091 502-115 (Deu/Eng)
Weitere Supportinformationen nden Sie hier: www. hama.com
9. Technische Daten
Funkwecker RC45
Stromversorgung
1,5 V
2 x AAA Batterie

17
10. Entsorgungshinweise
Hinweis zum Umweltschutz:
Ab dem Zeitpunkt der Umsetzung der europäischen Richtlinien 2012/19/EU und 2006/66/
EG in nationales Recht gilt folgendes: Elektrische und elektronische Geräte sowie Batterien
dürfen nicht mit dem Hausmüll entsorgt werden. Der Verbraucher ist gesetzlich
verpichtet, elektrische und elektronische Geräte sowie Batterien am Ende ihrer
Lebensdauer an den dafür eingerichteten, öffentlichen Sammelstellen oder an die
Verkaufsstelle zurückzugeben. Einzelheiten dazu regelt das jeweilige Landesrecht. Das Symbol auf dem
Produkt, der Gebrauchsanleitung oder der Verpackung weist auf diese Bestimmungen hin. Mit der
Wiederverwertung, der stoichen Verwertung oder anderen Formen der Verwertung von Altgeräten/
Batterien leisten Sie einen wichtigen Beitrag zum Schutz unserer Umwelt.
11. Konformitätserklärung
Hiermit erklärt Hama GmbH & Co. KG, dass sich dieses Gerät in Übereinstimmung mit den
grundlegenden Anforderungen und den anderen relevanten Vorschriften der Richtlinie
2014/53/EU bendet. Die Konformitätserklärung gemäß der entsprechenden Richtlinie
nden Sie unter www.hama.com.

18
Éléments de commande et d'affichage
1. Touche light / snooze
= allumage du rétro-éclairage (env. 5 secondes) / interruption de la sonnerie de réveil pour 5
minutes
2. Touche p
= p réglage de la date, de l‘heure, de l‘heure de réveil / sélection du format 12/24 heures
3. Touche q
= q réglage de la date, de l‘heure, de l‘heure de réveil / sélection de la langue / Unité de
température
4. Touche mode
= réglage de la date, de l‘heure, de l‘heure de réveil
5. Touche wave
6. Touche alarm on / off
= Activation / Désactivation du réveil
7. Compartiment à pile
Nous vous remercions d’avoir choisi un produit Hama. Veuillez prendre le temps de lire l‘ensemble
des remarques et consignes suivantes. Veuillez conserver ce mode d‘emploi à portée de main an de
pouvoir le consulter en cas de besoin. Transmettez-le au nouveau propriétaire avec l’appareil le cas
échéant.
1. Explication des symboles d'avertissement et des remarques
Avertissement
Ce symbole est utilisé pour indiquer des consignes de sécurité ou pour attirer votre attention sur
des dangers et risques particuliers.
F Mode d‘emploi

19
Remarque
Ce symbole est utilisé pour indiquer des informations supplémentaires ou des remarques
importantes.
2. Contenu de l'emballage
•Réveil radio-piloté RC 45
•2piles LR03/AAA
•Mode d'emploi
3. Consignes de sécurité
•Ce produit est destiné à une installation domestique non commerciale.
•Protégez le produit de toute saleté, humidité, surchauffe et utilisez-le uniquement dans des locaux
secs.
•N‘utilisez pas le produit dans les zones dans lesquelles l‘utilisation d‘appareils électroniques est
interdite.
•Ne placez pas le produit à proximité de champs parasites, de cadres métalliques, d’ordinateurs,
de téléviseurs, etc. Les appareils électroniques ainsi que les cadres de fenêtre ont une inuence
négative sur le fonctionnement du produit.
•Protégez le produit des secousses violentes et évitez tout choc ou toute chute.
•Ne tentez pas de réparer l’appareil vous-même ni d’effectuer des travaux d’entretien. Déléguez tous
travaux d‘entretien à des techniciens qualiés.
•N’apportez aucune modication à l’appareil. Des modications vous feraient perdre vos droits de
garantie.
•Tenez les emballages d‘appareils hors de portée des enfants, risque d‘étouffement.
•Recyclez les matériaux d’emballage conformément aux prescriptions locales en vigueur.
Strona się ładuje...
Strona się ładuje...
Strona się ładuje...
Strona się ładuje...
Strona się ładuje...
Strona się ładuje...
Strona się ładuje...
Strona się ładuje...
Strona się ładuje...
Strona się ładuje...
Strona się ładuje...
Strona się ładuje...
Strona się ładuje...
Strona się ładuje...
Strona się ładuje...
Strona się ładuje...
Strona się ładuje...
Strona się ładuje...
Strona się ładuje...
Strona się ładuje...
Strona się ładuje...
Strona się ładuje...
Strona się ładuje...
Strona się ładuje...
Strona się ładuje...
Strona się ładuje...
Strona się ładuje...
Strona się ładuje...
Strona się ładuje...
Strona się ładuje...
Strona się ładuje...
Strona się ładuje...
Strona się ładuje...
Strona się ładuje...
Strona się ładuje...
Strona się ładuje...
Strona się ładuje...
Strona się ładuje...
Strona się ładuje...
Strona się ładuje...
Strona się ładuje...
Strona się ładuje...
Strona się ładuje...
Strona się ładuje...
Strona się ładuje...
Strona się ładuje...
Strona się ładuje...
Strona się ładuje...
Strona się ładuje...
Strona się ładuje...
Strona się ładuje...
Strona się ładuje...
Strona się ładuje...
Strona się ładuje...
Strona się ładuje...
Strona się ładuje...
Strona się ładuje...
Strona się ładuje...
Strona się ładuje...
Strona się ładuje...
Strona się ładuje...
Strona się ładuje...
Strona się ładuje...
-
 1
1
-
 2
2
-
 3
3
-
 4
4
-
 5
5
-
 6
6
-
 7
7
-
 8
8
-
 9
9
-
 10
10
-
 11
11
-
 12
12
-
 13
13
-
 14
14
-
 15
15
-
 16
16
-
 17
17
-
 18
18
-
 19
19
-
 20
20
-
 21
21
-
 22
22
-
 23
23
-
 24
24
-
 25
25
-
 26
26
-
 27
27
-
 28
28
-
 29
29
-
 30
30
-
 31
31
-
 32
32
-
 33
33
-
 34
34
-
 35
35
-
 36
36
-
 37
37
-
 38
38
-
 39
39
-
 40
40
-
 41
41
-
 42
42
-
 43
43
-
 44
44
-
 45
45
-
 46
46
-
 47
47
-
 48
48
-
 49
49
-
 50
50
-
 51
51
-
 52
52
-
 53
53
-
 54
54
-
 55
55
-
 56
56
-
 57
57
-
 58
58
-
 59
59
-
 60
60
-
 61
61
-
 62
62
-
 63
63
-
 64
64
-
 65
65
-
 66
66
-
 67
67
-
 68
68
-
 69
69
-
 70
70
-
 71
71
-
 72
72
-
 73
73
-
 74
74
-
 75
75
-
 76
76
-
 77
77
-
 78
78
-
 79
79
-
 80
80
-
 81
81
-
 82
82
-
 83
83


Hama RC 45 Operating Instructions Manual
- Kategoria
- Budziki
- Typ
- Operating Instructions Manual
w innych językach
- español: Hama RC 45
- italiano: Hama RC 45
- slovenčina: Hama RC 45
- français: Hama RC 45
- română: Hama RC 45
Powiązane artykuły
-
Hama 00123190 Instrukcja obsługi
-
Hama EWS-3100 Instrukcja obsługi
-
-
-
Hama 00186352 Instrukcja obsługi
-
-
-
-
-