
SUPAIR-VLD
PARC ALTAÏS
34 RUE ADRASTÉE
74650 ANNECY CHAVANOD
FRANCE
45°54.024’N / 06°04.725’ E
RCS 387956790
User’s manual
Revision index : 29/11/2018
English

SUPAIR | SKYPPER2 | page 2
Notice d’utilisation sellette | SKYPPER2Thank you for choosing the SKYPPER2 We
are glad to be able to share our common pa-
ragliding passion with you.
SUPAIR has been designing, producing and
selling free flying equipment since 1984. By
choosing a SUPAIR product you benefit from
almost thirty years of expertise, innovation
and listening. This is also our philosophy :
working endlessly to develop better pro-
ducts and to maintain a high quality produc-
tion.
We hope you will find this user’s manual
comprehensive, explicit and hopefully en-
joyable as well. We advise you to read it
carefully.
You will find the last up to date information
about this product, On our website www.
supair.com. If you have any further ques-
tions, feel free to ask one of our retailers for
answers. And naturally, the entire SUP’AIR
team is at your disposal on info@supair.com
We wish you many safe enjoyable flying
hours, and happy landings
Team SUPAIR

SUPAIR | SKYPPER2 | page 3
Notice d’utilisation sellette | SKYPPER2List of contents
Introduction 4
Technical specifications 5
Size choice 6
Components list 7
Equipment overview 8
Accessories assembly 9
Carabiners 9
Seat-plate 9
foot plate 10
Bumpair 10
Speed-bar system 11
Installing the main reserve parachute 12
Main Container specifications 12
Installing the reserve parachute in the POD 12
Risers connection – harness 13
Riser connection – reserve parachute 13
Installing the reserve parachute in the container 14
Installing the front reserve parachute 16
Installing the right connection point 16
Installing the left connection point 17
Installing the front reserve parachute container 18
Front reserve parachute pocket characteristics 19
Connecting the front reserve parachute container 19
Installing the front reserve parachute 20
Mandatory extraction test procedure 21
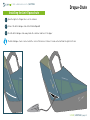
Drogue-Chute 22
Gear packing and tips 23
Safety Kit 24
Adjustments 25
The various adjustments 25
Adjusting the harness 26
Wing/harness Connection 27
Inflight behavior 28
Flight phases 29
Pre-Flight check 29
Take-off 29
In flight 30
Speed-bar use 30
Landing 30
Using the reserve parachute 31
Towing 31
Mandatory controls 31
Maintenance 32
Harness cleaning and maintenance 32
Storage and transport 32
Product longevity 32
Repairs 33
Materials 33
Recycling 33
Warranty 34
Disclaimer 34
Pilot’s gear 34
Service Book 35

SUPAIR | SKYPPER2 | page 4
Notice d’utilisation sellette | SKYPPER2
Welcome to the world of paragliding according to SUPAIR, a world of shared passion.
A technically advanced design harness, aiming at the Cross-Country and demanding pilots engaged on
a regular practice. Inspird by the first SKYPPER, this new one is outfitted with a cocoon in addition to a
standard ergonomically fitting efficient top to bottom back protector with a reasonable weight and size
for a high performance and precision.
Accurate feedback without parasitic instabi lity, enables precise and efficient steering.
It was designed with schooling and fun in mind to provide full comfort and a worry free learning curve.
The SKYPPER2 harness was certified EN 1651 : 1999 et LTF Nfl II 91/09.
Indicating that it meets European and German safety requirements.
After reading this manual, we suggest you to check your harness in static hang-posts to adjust it before
your first flight.
N.B : Three important icons will help you when reading this manual :
Introduction
Advice Caution ! Danger !!

SUPAIR | SKYPPER2 | page 5
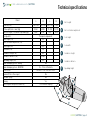
Notice d’utilisation sellette | SKYPPER2Technical specifications
Model S M L XL
Pilot size (cm) 150 -165 160 -183 180 - 195 > 195
Pilot weight (mini - maxi) (kg) 50-60 65-85 75-105 90-115
Harness weight (+ carabiners+speedbar)(kg) 5500 5700 5900 6100
Designed for Parapente uniquement
Back lenght (cm) 65
Back inclination adjustment (cm) 31
Seat length (cm) 41,5
Seat width (cm) 34
Carabiners height (cm) 46
Carabiners distance (cm) 39-45
Speedbag length (cm) 86
Impact damping system : Airbag No
Impact damping system : BUMPAIR Yes - 18 cm + Plastazote
Certification EN 1651 : 1999 - LTF Nfl II 91/09
Tandem (Pilot or Passenger) No
Acrobatic flying No
Towing Yes
Reserve parachute pocket volume (L) 7 Liter volume capacity
A
B
C
E
F
G
D
Back lenght
Back inclination adjustment
Seat length
Seat width
Carabiners height
Carabiners distance
Speedbag length
A
B
C
D
E
F
G

SUPAIR | SKYPPER2 | page 6
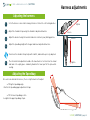
Notice d’utilisation sellette | SKYPPER2Size choice
Choosing your harness’ size is important. You will find here below a height/weight table that will help you in your size choice. With its hammock ar-
chitecture and its “lying flat” flying position, we advise you to try out the harness under a hanging device at one of our retailers in order to choose the
correct size.
Find a complete list of our retailers on www.supair.com
Preliminary test under hanging device
Size
Weight 1m55 1m60 1m65 1m70 1m75 1m80 1m85 1m90 1m95 2m
50 S S S
55 S S S
60 S S
65 M M M M M
70 M M M M M
75 M M M L L
80 M M M L L
85 M M L L L L
90 L L L XL
95 L L L XL
100 L L XL XL
105 L L XL XL
110 XL XL
115 XL XL

SUPAIR | SKYPPER2 | page 7
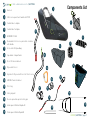
Notice d’utilisation sellette | SKYPPER2Components list
1
2
3
4
5
6
7Accelerator 3B Speedbag
SK2 reserve parachute handle with POD
Removable front reserve parachute container
with handle
BUMPAIR 18 SK2
Carbon fiber foot plate
Carbon fiber seatplate
Harness
9
11
8
1
Speed-bar crimped hooks
Dyneema® risers
12 GRIVEL Plume Carabiner
13 Toric ring
14 Safety lanyard
15 Reserve parachute pocket safety pin.
w
w
w
w
w
w
w
w
w
w
w
w
w
w
w
w
w
w
w
w
w
w
w
w
w
w
w
w
w
w
w
w
w
w
w
w
w
w
w
w
w
w
w
w
w
w
w
w
w
Asymmetric Dyneema® risers for front reserve
10
Zicral 30 mm carabiners
2
3
4
5
6
7
9
11
8
12
13
14
15
10
16 6mm square Maillons Rapides®
16
17 7mm square Maillon Rapide®
17

SUPAIR | SKYPPER2 | page 8
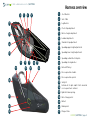
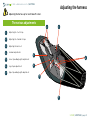
Notice d’utilisation sellette | SKYPPER2Harness overview
1
2
3
4
5
6
7
Speedbag lower length adjustments
Backrest angle adjustment
Speedbag upper length adjustments
Shoulder strap adjustment
Speedbag closing buckles
Lumbar adjustments
chest Buckles
Chest strap adjustment
9
10
8
Speedbag carbon fiber foot plate.
Rescue parachute handle
11
Harken® Pulleys
12
Rescue parachute pocket
13
Safety kit
14
Instrument Cockpit and/or front mounted
reserve parachute container
15
Hydration tube opening.
16
Back storage pocket
17
Ballast
18
Radio pocket
Leg Buckles
Safe-T-Bar
19
20
21 Drogue-Chute
1234
5
6
7
910
8
11
12
13
14
15 1617
18
19
20
21

SUPAIR | SKYPPER2 | page 9
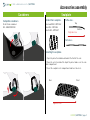
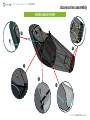
Notice d’utilisation sellette | SKYPPER2Accessories assembly
Front
Rear
Installing the seatplate :
Carbon fiber seatplate:
Size S and M Réf. : MPPL022
Size L Réf. : MPPL026
Size XL Réf. : MPPL027
Profile view :
Top
Bottom
1. Open the pocket located beneath and at the front of the seat.
2. Open the velcro located at the top of the pocket and access the seat-
plate compartment.
2. Insert the seatplate in its compartment and close the velcro.
Flight direction
Front view :
Flight direction
Zicral 30 mm carabiners
Compatible carabiners:
Réf. : MAILCOMOUS30
SeatplateCarabiners

SUPAIR | SKYPPER2 | page 10
Notice d’utilisation sellette | SKYPPER2Accessories assembly
FOOT PLATE for Speedbag BUMPAIR
1
2
3
4
5
1 2 3 4
zip

SUPAIR | SKYPPER2 | page 11
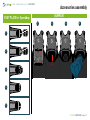
Notice d’utilisation sellette | SKYPPER2Accessories assembly
1
2
3
4
SPEED-BAR SYSTEM
5

SUPAIR | SKYPPER2 | page 12
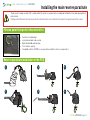
Notice d’utilisation sellette | SKYPPER2Installing the main reserve parachute
Thank you for reading carefully ! We recommend for the initial rescue parachute assembly and installation to be made by a qualified
professional.
Folding and installation of the reserve parachute inside the harness must conform to the specic line guide found in this manual.
Reserve parachute installation in the POD
• Container closed by flaps
• Locked via a double cable system
• Right sided handle and opening
• 7 liter volume capacity
• Compatible with the SUPAIR rescue parachutes and other solo rescue parachutes
Rescue parachute pocket characteristics
1
2 4
53
6

SUPAIR | SKYPPER2 | page 13
Notice d’utilisation sellette | SKYPPER2
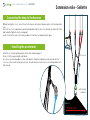
Connecting parachute risers & harness
Connecting the reserve
parachute risers to the
harness
- Assemble everything cor-
rectly.
- Make sure for the risers
not to be longer than one
another.
- Tighten each connection
securely.
w
w
w
w
w
w
w
w
w
w
w
w
w
w
w
w
w
w
w
w
w
w
w
w
w
w
w
w
w
w
w
w
w
w
w
w
w
w
w
w
w
w
w
w
w
w
w
w
w
w
w
w
w
w
w
w
w
w
w
M
M
M
M
M
M
M
M
M
M
M
M
M
M
M
M
M
M
M
M
M
M
M
M
M
M
M
M
M
M
M
M
M
M
M
M
M
M
M
M
M
M
M
M
M
M
M
M
M
M
M
M
M
w
w
w
w
w
w
w
w
w
w
w
w
w
w
w
w
w
w
w
w
w
w
w
w
w
w
w
w
w
w
w
w
w
w
w
w
w
w
w
w
w
w
w
w
w
w
w
w
w
w
w
w
w
w
w
w
w
w
w
M
M
M
M
M
M
M
M
M
M
M
M
M
M
M
M
M
M
M
M
M
M
M
M
M
M
M
M
M
M
M
M
M
M
M
M
M
M
M
M
M
M
M
M
M
M
M
M
M
M
M
M
M
w
w
w
w
w
w
w
w
w
w
w
w
w
w
w
w
w
w
w
w
w
w
w
w
w
w
w
w
w
w
w
w
w
w
w
w
w
w
w
w
w
w
w
w
w
w
w
w
w
w
w
w
w
w
w
w
w
w
w
M
M
M
M
M
M
M
M
M
M
M
M
M
M
M
M
M
M
M
M
M
M
M
M
M
M
M
M
M
M
M
M
M
M
M
M
M
M
M
M
M
M
M
M
M
M
M
M
M
M
M
M
M
w
w
w
w
w
w
w
w
w
w
w
w
w
w
w
w
w
w
w
w
w
w
w
w
w
w
w
w
w
w
w
w
w
w
w
w
w
w
w
w
w
w
w
w
w
w
w
w
w
w
w
w
w
w
w
w
w
w
w
M
M
M
M
M
M
M
M
M
M
M
M
M
M
M
M
M
M
M
M
M
M
M
M
M
M
M
M
M
M
M
M
M
M
M
M
M
M
M
M
M
M
M
M
M
M
M
M
M
M
M
M
M
- Open the 7mm square
Maillon Rapide
- Connect the bridle’s loop
to the Maillon Rapide®
- Push the maillon through
the plastic ring
- Twist
- Give a second twist to
the plastic ring
- Push the buckle through
the maillon
- Push the end risers
through the toric ring
- Push the maillon through
the risers buckles
- Tidy up the assembly
- Be certain for the riser end loops to be securely
fastened
- Close the Maillon Rapides® by hand first
- Tighten it using pliers by making a clockwise 1/4
turn
One maillon Rapide® 7mm and two toric flexible rings are needed
Connecting parachute & risers
12 4 53
Installing the main reserve parachute

SUPAIR | SKYPPER2 | page 14
Notice d’utilisation sellette | SKYPPER2
Rescue parachute assembly
w
w
w
w
w
w
w
w
w
w
w
w
w
w
w
w
w
w
w
w
w
w
w
w
w
w
w
w
w
w
w
w
w
w
w
w
w
w
w
w
w
w
w
w
w
w
w
w
w
w
w
w
w
w
w
w
w
w
w
w
w
w
w
w
w
w
w
w
w
w
w
w
w
w
w
w
w
w
w
w
w
w
w
w
w
w
w
w
w
w
w
w
w
w
w
w
w
w
w
w
w
w
w
w
w
w
w
w
w
w
w
w
w
w
w
w
w
w
w
w
w
w
w
w
w
w
w
w
w
w
w
w
w
w
w
w
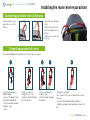
Place the excess lines and then the
reserve parachute in the reserve para-
chute containe.
Take the safety pin
With the help of a small cord, pull loop #1 through grommets #2 and #3
1
23
w
w
w
w
w
w
w
w
w
w
w
w
w
w
w
w
w
w
w
w
w
w
w
w
w
w
w
w
w
w
w
w
w
w
w
w
w
w
w
w
w
w
w
w
w
w
w
w
w
w
w
w
w
w
w
w
w
w
w
w
w
w
w
w
w
w
w
w
w
w
w
w
w
w
w
w
w
w
w
w
w
w
w
w
w
w
w
w
w
w
w
w
w
w
w
w
w
w
w
w
w
w
w
w
w
w
w
w
w
w
w
w
w
w
w
w
w
w
w
w
w
w
w
w
w
w
w
w
w
w
w
w
w
w
w
w
w
w
w
w
w
w
w
w
w
w
w
w
w
w
w
w
w
w
w
w
w
w
w
w
w
w
w
w
w
w
w
w
w
w
w
w
w
w
w
w
w
w
w
w
w
w
w
w
w
w
w
w
w
w
w
w
w
w
w
w
w
w
w
w
w
w
w
w
w
w
w
w
w
w
w
w
w
w
w
w
w
w
w
w
w
w
w
w
w
w
w
w
w
w
w
w
w
w
w
w
w
w
w
w
w
w
w
w
w
w
w
w
w
w
w
w
w
w
w
w
w
w
w
w
w
w
w
w
w
w
w
w
w
w
w
w
Push the yellow right plastic pin through the loop
to fasten and secure the assembly. Remove the pin.
w
w
w
w
w
w
w
w
w
w
w
w
w
w
w
w
w
w
w
w
w
w
w
w
w
w
w
w
w
w
w
w
w
w
w
w
w
w
w
w
w
w
w
w
w
w
w
w
w
w
w
w
w
w
w
w
w
w
w
w
w
w
w
w
w
w
w
w
w
w
w
w
w
w
w
w
w
w
w
w
w
w
w
w
w
w
w
w
w
w
w
w
w
w
w
w
w
w
w
w
w
w
w
w
w
w
w
w
w
w
w
w
w
w
w
w
w
w
w
w
w
w
w
w
w
w
w
w
w
w
w
w
w
w
w
w
Poignée vers
le haut
Push the reserve parachute to the end of
the reserve parachute pocket.
WARNING!
The pod must be positioned with the
handle exiting at the top
w
w
w
w
w
w
w
w
w
w
w
w
w
w
w
w
w
w
w
w
w
w
w
w
w
w
w
w
w
w
w
w
w
w
w
w
w
w
w
w
w
w
w
w
w
w
w
w
w
w
w
w
w
w
w
w
w
w
w
w
w
w
w
w
w
w
w
w
w
w
w
w
w
w
w
w
w
w
w
w
w
w
w
w
w
w
w
w
w
w
w
w
w
w
w
w
w
w
w
w
w
w
w
w
w
w
w
w
w
w
w
w
w
w
w
w
w
w
w
w
w
w
w
w
w
w
w
w
w
w
w
w
w
w
w
w
Installing the main reserve parachute
2
13
4
5
7
4
7
4
7
6

SUPAIR | SKYPPER2 | page 15
Notice d’utilisation sellette | SKYPPER2
Using the cord, pull loop #4 through
grommets #5,6 and 7
4
w
w
w
w
w
w
w
w
w
w
w
w
w
w
w
w
w
w
w
w
w
w
w
w
w
w
w
w
w
w
w
w
w
w
w
w
w
w
w
w
w
w
w
w
w
w
w
w
w
w
w
w
w
w
w
w
w
w
w
w
w
w
w
w
w
w
w
w
w
w
w
w
w
w
w
w
w
w
w
w
w
w
w
w
w
w
w
w
w
w
w
w
w
w
w
w
w
w
w
w
w
w
w
w
w
w
w
w
w
w
w
w
w
w
w
w
w
w
w
w
w
w
w
w
w
w
w
w
w
w
w
w
w
w
w
w
5Push the yellow left plastic pin
through loop #4 to fasten ans secure
the assembly
Remove the pin
Tuck away the two yellow plastic pins
inside their respective housing
Close the risers zipper sleeve by
pulling the tab to the end then back
to the beginning
7
w
w
w
w
w
w
w
w
w
w
w
w
w
w
w
w
w
w
w
w
w
w
w
w
w
w
w
w
w
w
w
w
w
w
w
w
w
w
w
w
w
w
w
w
w
w
w
w
w
w
w
w
w
w
w
w
w
w
w
w
w
w
w
w
w
w
w
w
w
w
w
w
w
w
w
w
w
w
w
w
w
w
w
w
w
w
w
w
w
w
w
w
w
w
w
w
w
w
w
w
w
w
w
w
w
w
w
w
w
w
w
w
w
w
w
w
w
w
w
w
w
w
w
w
w
w
w
w
w
w
w
w
w
w
w
w
w
w
w
w
w
w
w
w
w
w
w
w
w
w
w
w
w
w
w
w
w
w
w
w
w
w
w
w
w
w
w
w
w
w
w
w
w
w
w
w
w
w
w
w
w
w
w
w
w
w
w
w
w
w
w
w
w
w
w
w
w
w
w
w
w
w
w
w
w
w
w
w
w
w
w
w
w
w
w
w
w
w
w
w
w
6Fasten the handle using the Velcro
inside the upper small pocket
w
w
w
w
w
w
w
w
w
w
w
w
w
w
w
w
w
w
w
w
w
w
w
w
w
w
w
w
w
w
w
w
w
w
w
w
w
w
w
w
w
w
w
w
w
w
w
w
w
w
w
w
w
w
w
w
w
w
w
w
w
w
w
w
w
w
w
w
w
w
w
w
w
w
w
w
w
w
w
w
w
w
w
w
w
w
w
w
w
w
w
w
w
w
w
w
w
w
w
w
w
w
w
w
w
w
w
w
w
w
w
w
w
w
w
w
w
w
w
w
w
w
w
w
w
w
w
w
w
w
w
w
w
w
w
w
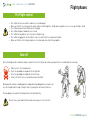
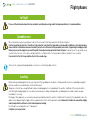
Mandatory extraction test procedure
Check the completed installation during a
Hang-test.
Have the installation checked by a professional outfit.
Conduct an extraction test every six ( 6 ) months to assure proper system
functionality
Note:
Conducting and extraction test does not imply deploying the reserve para-
chutewhich will stay inside its POD.
7
Installing the main reserve parachute

SUPAIR | SKYPPER2 | page 16
Notice d’utilisation sellette | SKYPPER2
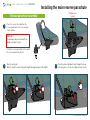
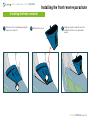
Installing the right connection point
Installing the front reserve parachute
1
2
3
Open the connection point
Push the loop through the ring
located beneath the main loca-
tion between the two straps
Bring both the connection
point and the carabiner
main connection point out
of the cocoon
Do not connect the
main self-locking ca-
rabiners to this junc-
tion point

SUPAIR | SKYPPER2 | page 17
Notice d’utilisation sellette | SKYPPER2
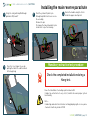
Installing the left riser attachment point
Installing the front reserve parachute
1
3
4
Look for the green left at-
tachment point which must
run though the metal ring
Connect the left riser, green
buckle side, with a larks head
knot.
Push the riser through the
upper metal ring where
the main connection point
is located, between the
two straps
2
Pull the riser with
the main carabiner
connection through the
cocoon opening slot

SUPAIR | SKYPPER2 | page 18
Notice d’utilisation sellette | SKYPPER2
Installing the front container
Installing the front reserve parachute
w
w
w
w
w
w
w
w
w
w
w
w
w
w
w
w
w
w
w
w
w
w
w
w
w
w
w
w
w
w
w
w
w
w
w
w
w
w
w
w
w
w
w
w
w
w
w
w
w
w
w
w
w
w
w
w
w
w
w
w
w
w
w
w
w
w
w
w
w
w
w
w
w
w
w
w
w
w
w
w
w
w
w
w
w
w
w
w
w
w
w
w
w
w
w
w
w
w
w
w
w
w
w
w
w
w
w
w
w
w
w
w
w
w
w
w
ww
w
w
w
w
w
w
w
w
w
w
w
w
w
w
w
w
w
w
w
w
w
w
w
w
w
w
w
w
w
w
w
w
w
w
w
w
w
w
w
w
w
w
w
w
w
w
w
w
w
w
w
w
w
w
w
w
w
w
w
w
w
w
w
w
w
w
w
w
w
w
w
w
w
w
w
w
w
w
w
w
w
w
w
w
w
w
w
w
w
w
w
w
w
w
w
w
w
w
w
w
w
w
w
w
w
w
w
w
w
w
w
w
w
w
w
w
w
w
w
w
w
w
w
w
w
w
w
w
w
w
w
w
w
w
w
w
w
w
w
w
w
w
w
w
w
w
w
w
w
w
w
w
w
w
w
w
w
w
w
w
w
w
w
w
1 2 3
Disconnect the cockpit by opening the
zip on each side of it Unfasten the velcro Duplicate steps 1 and 2 in reverse to
install the front reserve parachute
pocket

SUPAIR | SKYPPER2 | page 19
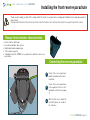
Notice d’utilisation sellette | SKYPPER2Installing the front reserve parachute
Thank you for reading carefully ! We recommend for the initial rescue parachute assembly and installation to be made by a qualified
professional.
Folding and installation of the reserve parachute inside the harness must conform to the specic line guide found in this manual.
• Front container with flaps
• Locked via a double cable system.
• Right sided handle and opening.
• 7 liter volume capacity.
• Compatible with the SUPAIR rescue parachutes and other solo rescue
parachutes.
Rescue front container characteristics
Connect the reserve parachute
pod to the handle with a lark’s
head knot
Connect the reserve parachute
to the asymmetrical risers fol-
lowing the instructions on page
13
Affix the other risers end to the
Velcro® strips on each side of
the container.
Connecting the reserve parachute
w
w
w
w
w
w
w
w
w
w
w
w
w
w
w
w
w
w
w
w
w
w
w
w
ww
w
w
w
w
w
w
w
w
w
w
w
w
w
w
w
w
w
w
w
w
w
w
w
8
1
2 3
4
5 6
7
9
1
2
3

SUPAIR | SKYPPER2 | page 20
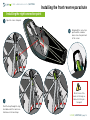
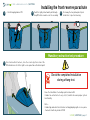
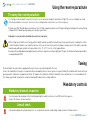
Notice d’utilisation sellette | SKYPPER2Placing the front reserve parachute
1 2
5 6
3
4 7
8
1
23
4
7
5 6
9
Place the line excess first
followed by the reserve pa-
rachute inside the reserve
parachute container
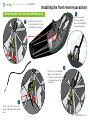
Installing the front parachute container
Take the pin
Using the pin, pull cord loop #1 through grommets #2 and #7
… then through grommet #4
… then through grommet #5 … then through grommet #6 Push the yellow left plastic
pin through loop #4 to fasten
and secure the assembly.
Remove the pin.
Take the pin
Using the pin, pull loop #7
through grommet #8
Strona się ładuje...
Strona się ładuje...
Strona się ładuje...
Strona się ładuje...
Strona się ładuje...
Strona się ładuje...
Strona się ładuje...
Strona się ładuje...
Strona się ładuje...
Strona się ładuje...
Strona się ładuje...
Strona się ładuje...
Strona się ładuje...
Strona się ładuje...
Strona się ładuje...
Strona się ładuje...
-
 1
1
-
 2
2
-
 3
3
-
 4
4
-
 5
5
-
 6
6
-
 7
7
-
 8
8
-
 9
9
-
 10
10
-
 11
11
-
 12
12
-
 13
13
-
 14
14
-
 15
15
-
 16
16
-
 17
17
-
 18
18
-
 19
19
-
 20
20
-
 21
21
-
 22
22
-
 23
23
-
 24
24
-
 25
25
-
 26
26
-
 27
27
-
 28
28
-
 29
29
-
 30
30
-
 31
31
-
 32
32
-
 33
33
-
 34
34
-
 35
35
-
 36
36


w innych językach
- English: SUPAIR Skypper 2 User manual
Powiązane artykuły
-
SUPAIR STRIKE Instrukcja obsługi
-
-
-
-
-
-
-
-
-

