
User’s manual
Harness
SUP’AIR - VLD
34 rue Adrastée
Parc Altaïs
74650 Annecy - Chavanod
FRANCE
45°54.024’N / 06°04.725’E
English
Revision index : 07/02/2019

Harness User’s manual
SUP’AIR _PIXAIR Page 2
ank you for choosing the PIXAIR We are glad
to be able to share our common paragliding pas-
sion with you.
SUP’AIR has been designing, producing and
selling free ying equipment since 1984. By
choosing a SUP’AIR product you benet from
almost thirty years of expertise, innovation and
listening. Our mission statement: research and
develop to constantly enhance our product line.
We hope you will nd this user’s manual com-
prehensive, explicit and hopefully enjoyable as
well. We advise you to read it carefully.
You will nd the lastest udated information
about this product on our website www.supair.
com. If you have further inquiries, feel free to
ask one of our retailers for answers. And natu-
rally, the entire SUP’AIR team is at your disposal
at info@supair.com
We wish you many safe enjoyable ying hours
and happy landings.
Team SUP’AIR

Harness User’s manual
SUP’AIR _PIXAIR Page 3
List of contents.
Introduction 4
Technical specications. 5
Size choice 6
Components list 7
Equipment overview 8
Accessories assembly. 9
Seat-plate 9
Speed-bar system 10
Foot-rest 11
Installing the reserve parachute. 12
POD reserve parachute handle connection. 12
Reserve parachute/harness connection 13
Reserve parachute characteristics 15
Installing the reserve parachute in its container 16
Gear packing and tips. 17
Adjustments 18
e various adjustments 18
Adjusting the harness 19
Wing/harness connection 20
Inight behavior 21
Flight phases 22
Pre-Flight check 22
Takeo 22
In ight 23
Speed-bar use 23
Landing 23
Using the reserve parachute 24
Towing 24
Mandatory thorough checkup. 24
Maintenance 25
Harness cleaning and maintenance 25
Storage and transport 25
Product longevity 25
Repairs 26
Spare parts. 26
Materials 26
Recycling 26
Warranty 27
Disclaimer 27
Pilot’s gear 27
28

Harness User’s manual
SUP’AIR _PIXAIR Page 4
Welcome to the paragliding world according to SUPAIR; a world of shared passion.
e PIXAIR was designed for pilots coming out of school or in progression. It brings comfort and peace of mind to pilots experiencing with their
rst XC ( Cross-Country ) ights to discover new horizons!
It was designed with schooling and fun in mind to provide full comfort and a worry free learning curve.
e harness PIXAIR harness was certied EN 1651: 1999 and LTF 91/09
Indicating that it meets European and German safety requirements.
Aer reading this manual we suggest you to check your harness during a hang-test to adjust it before your rst ight.
Introduction
N.B : ree important icons will help you when reading this manual
Advice Caution ! Danger !!

Harness User’s manual
SUP’AIR _PIXAIR Page 5
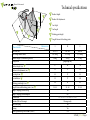
A
B
C
D
E
F
S M L
Pilot size (cm) 155 -175 170 -185 180 -195
Pilot weight (mini - maxi) 60 - 80 kg 65 - 85 kg 70 - 100 kg
Harness weight (+carabiners+speedbar) 3 300 g 3 620 g 3 720 g
Designed for paragliding only
Backrest height (cm) A57 64 70
Backrest tilt adjustments (cm) B35 37 38
Seat depth (cm) C46 47 48
Seat width(cm) D35 37 40
Hooking point height. (cm) E44 45 46
Length between the hooking points. (cm) F36 - 46 36 - 46 36 - 46
Impact damping system: Airbag Ye s
Impact damping system: Bumpair No
Certication Yes : EN 1651 : 1999 and LTF 91/09
Tandem (Pilot or Passenger) Passenger only
Acrobatic ying Ye s
Towing Ye s
Reserve parachute pocket volume ( Liters ). 7.5 L
Technical specications
ABackrest height.
BBackrest tilt adjustments.
CSeat depth.
DSeat length
EHooking point height.
FLength between the hooking points.
Characteristics Harness size

Harness User’s manual
SUP’AIR _PIXAIR Page 6
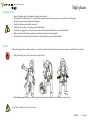
Choosing your harness’ size is important. You will nd here below a height/weight table to help you with your size choice. With its hammock archi-
tecture and reclined ying posture, we advise you to try out the harness during a hang-test rst at one of our retailers location to choose the correct
size.
For a complete list of our retailers list click here : www.supair.com
Size choice.
Preliminary hang-test.
Size
Weight 1m55 1m60 1m65 1m70 1m75 1m80 1m85 1m90 1m95
50
55 S S S S
60 S S S S
65 S S S S
70 S S S M M
75 S M M M L
80 M M M L L
85 L L L L
90 L L L L L
95 L L L L
100 L L L

Harness User’s manual
SUP’AIR _PIXAIR Page 7
2«E2» reserve parachute handle. (réf. : POIE2)
Zicral 30 mm carabiners. (réf. : MAILCOMOUS30)
wood seat plate. (réf. : MPPL017 à MPPL019 selon la taille)
Nomenclature
Harness
1
3
4
2
4
3
Options
Retractable 20mm foot rest (réf. : CALEPIEDRETRACT20)
Standard double stage accelerator/speed-bar (réf. : ACCELSOUPLE)
6
7
67
1
5Elastische Kordel für Beschleunigers Rückkehr
5

Harness User’s manual
SUP’AIR _PIXAIR Page 8
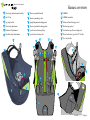
Harness overview
Chest strap with automatic buckles.
Safe-T-bar.
Leg strap buckle.
Chest strap adjustment.
Backrest tilt adjustment.
Reserve parachute handle
Reserve parachute pocket.
paragliding main hooking points.
Reserve parachute hooking points.
AIRBAG
AIRBAG air intake.
2
1
3
4
5
7
8
9
10
13
14
Radio and Small storage pocket.
15
Back storage pocket.
16
21
3
4
5
7
6
9
10
11
13
14
15
16
1
3
7
6
8
9
10
13
6
Accelerator/speed-bar recoiling cord
17
17
Shoulder straps adjustments.
6
Speed-bar/accelerator pulleys.
Speed-bar/accelerator tube.
11
12 Recoil accelerator/speed-bar “D” buckle.
18
Foot-rest buckle
19
12
18
19

Harness User’s manual
SUP’AIR _PIXAIR Page 9
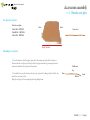
Seat plate description. :
Front
Rear
Installing the seat plate. :
Wooden seat plate.
Taille S Ref. : MPPL017
Taille M Ref. : MPPL018
Taille L Ref. : MPPL019
Accessories assembly
>> 1. Wooden seat plate
Prole view.
Top
Bottom
Rear Front
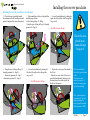
1. Face the harness. Grab the upper layer end of the seating area and pull it toward you.
Reach inside the seat-plate pocket and pull the leg straps rearward to give enough room to
insert and sandwich the seat plate between them.
2. Sandwich the seat-plate between the leg straps ad push it, leading edge rst, all the way
inside the seat-plate pocket.
Bring the leg straps to their original position by pulling them..
Flight direction.
Front view.

Harness User’s manual
SUP’AIR _PIXAIR Page 10
STANDARD double stage speed-bar/accelerator.
Accessories assembly
>> 2. Speed-bar system
Compatible accelerator/speed-bar :
Réf. : ACCELSOUPLE
Speedbar assembly. :
Regarding either side of the harness:
1. Push the accelerator/speed-bar line through the tube
located at the front side of the harness
2. Push the accelerator/speed-bar line through the pulley
connected to the lateral panel.
3. Pull the line through the side skirt opening slit.
4. Push the elasticated cord through the plastic “D” shaped
buckle and connect the plastic clip to the elasticated cord.
5. Finally, attach a hook to the cord before connecting it to the
glider’s speed-bar/accelerator.
6. Simulate the speed-bar/accelerator’s functionality by sliding the
cord back and forth.
17
11
12
12
11
17

Harness User’s manual
SUP’AIR _PIXAIR Page 11
Accessories assembly.
>> 3. Foot-rest (option)
1. Push the foot-rest strap through
buckle located at the front of the har-
ness’s side skirt.
2. Push the elastic under the guide
3. Wrap and connect the elastic around the main strap while pushing it through buckle.
4. Adjust the foot-rest length during a hang-test and stow away the straps excess in the elasticated holder.
1
2
3

Harness User’s manual
SUP’AIR _PIXAIR Page 12
ank you for reading the following carefully ! We recommend for the initial rescue parachute assembly and installation
to be made by a qualied professional.
Reserve parachute folding and installation inside the harness must conform to the specic guidelines found in this man-
ual.
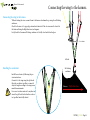
Connecting the handle to the rescue parachute’s deployment bag.
1. Fasten the handle strap to the
POD’s middle loop by making a
loop to loop ( Lark’s head ) knot.
2. Tighten the han-
dle/POD connection
securely.
Installing the reserve parachute.
DSingle reserve parachute.
Reserve parachute handle ( Ref. POIE2 ).
Reserve parachute inside its deployment bag and folded according the manufacturer’s specications.
Parachute rigging lines
B
C
A
D
B
C
A
w
w
w
w
w
w
w
w
w
w
w
w
w
w
w
w
w
w
w
w
w
w
w
w
w
w
w
w
w
w
w
w
w
w
w
w
w
w
w
w
w
w
w
w
w
w
w
w
w
w
w
w
w
w
w
w
w
w
w
w
w
w
w
w
w
w
w
w
w
w
w
w
w
w
w
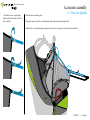
First, open the riser guiding sleeve all the way from top to bottom to access the
reserve parachute connection loops.
Once the riser guiding sleeve is fully opened, the zipper tab must be located on
the same side of the reserve parachute pocket.
>> Access to the reserve parachute connection points.
Reserve parachute/harness connection.
Opening direction

Harness User’s manual
SUP’AIR _PIXAIR Page 13
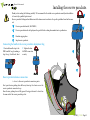
Reserve parachute/harness connection.
Installing the reserve parachute
>> Loop to loop connection ( Lark’s knot ) of the PIXAIR harness to the reserve parachute individual risers.
1. - Attach each riser to the
shoulder attachment points
by making a Lark’s knot (
loop to loop connection ).
Use the largest bridle loop
ends.
2. - Assemble everything cor-
rectly.
- Make sure for the risers not to
be longer than one another.
- Tighten each connection
securely.
w
w
w
w
w
w
w
w
w
w
w
w
w
w
w
w
w
w
w
w
w
w
w
w
w
w
w
w
w
w
w
w
w
w
w
w
w
w
w
w
w
w
w
w
w
w
w
w
w
w
w
w
w
w
w
w
w
w
w
M
M
M
M
M
M
M
M
M
M
M
M
M
M
M
M
M
M
M
M
M
M
M
M
M
M
M
M
M
M
M
M
M
M
M
M
M
M
M
M
M
M
M
M
M
M
M
M
M
M
M
M
M
w
w
w
w
w
w
w
w
w
w
w
w
w
w
w
w
w
w
w
w
w
w
w
w
w
w
w
w
w
w
w
w
w
w
w
w
w
w
w
w
w
w
w
w
w
w
w
w
w
w
w
w
w
w
w
w
w
w
w
M
M
M
M
M
M
M
M
M
M
M
M
M
M
M
M
M
M
M
M
M
M
M
M
M
M
M
M
M
M
M
M
M
M
M
M
M
M
M
M
M
M
M
M
M
M
M
M
M
M
M
M
M
w
w
w
w
w
w
w
w
w
w
w
w
w
w
w
w
w
w
w
w
w
w
w
w
w
w
w
w
w
w
w
w
w
w
w
w
w
w
w
w
w
w
w
w
w
w
w
w
w
w
w
w
w
w
w
w
w
w
w
M
M
M
M
M
M
M
M
M
M
M
M
M
M
M
M
M
M
M
M
M
M
M
M
M
M
M
M
M
M
M
M
M
M
M
M
M
M
M
M
M
M
M
M
M
M
M
M
M
M
M
M
M
w
w
w
w
w
w
w
w
w
w
w
w
w
w
w
w
w
w
w
w
w
w
w
w
w
w
w
w
w
w
w
w
w
w
w
w
w
w
w
w
w
w
w
w
w
w
w
w
w
w
w
w
w
w
w
w
w
w
w
M
M
M
M
M
M
M
M
M
M
M
M
M
M
M
M
M
M
M
M
M
M
M
M
M
M
M
M
M
M
M
M
M
M
M
M
M
M
M
M
M
M
M
M
M
M
M
M
M
M
M
M
M
>> Maillon Rapide connection of the PIXAIR harness using square steel links 6mm ( Maillon Rapide® ) for a separate or “Y” riser setup.
w
w
w
w
w
w
w
w
w
w
w
w
w
w
w
w
w
w
w
w
w
w
w
w
w
w
w
w
w
w
w
w
w
w
w
w
w
w
w
w
w
w
w
w
w
w
w
w
w
w
w
w
w
w
w
w
w
w
w
M
M
M
M
M
M
M
M
M
M
M
M
M
M
M
M
M
M
M
M
M
M
M
M
M
M
M
M
M
M
M
M
M
M
M
M
M
M
M
M
M
M
M
M
M
M
M
M
M
M
M
M
M
M
w
w
w
w
w
w
w
w
w
w
w
w
w
w
w
w
w
w
w
w
w
w
w
w
w
w
w
w
w
w
w
w
w
w
w
w
w
w
w
w
w
w
w
w
w
w
w
w
w
w
w
w
w
w
w
w
w
w
w
M
M
M
M
M
M
M
M
M
M
M
M
M
M
M
M
M
M
M
M
M
M
M
M
M
M
M
M
M
M
M
M
M
M
M
M
M
M
M
M
M
M
M
M
M
M
M
M
M
M
M
M
M
w
w
w
w
w
w
w
w
w
w
w
w
w
w
w
w
w
w
w
w
w
w
w
w
w
w
w
w
w
w
w
w
w
w
w
w
w
w
w
w
w
w
w
w
w
w
w
w
w
w
w
w
w
w
w
w
w
w
w
M
M
M
M
M
M
M
M
M
M
M
M
M
M
M
M
M
M
M
M
M
M
M
M
M
M
M
M
M
M
M
M
M
M
M
M
M
M
M
M
M
M
M
M
M
M
M
M
M
M
M
M
M
w
w
w
w
w
w
w
w
w
w
w
w
w
w
w
w
w
w
w
w
w
w
w
w
w
w
w
w
w
w
w
w
w
w
w
w
w
w
w
w
w
w
w
w
w
w
w
w
w
w
w
w
w
w
w
w
w
w
w
M
M
M
M
M
M
M
M
M
M
M
M
M
M
M
M
M
M
M
M
M
M
M
M
M
M
M
M
M
M
M
M
M
M
M
M
M
M
M
M
M
M
M
M
M
M
M
M
M
M
M
M
M
w
w
w
w
w
w
w
w
w
w
w
w
w
w
w
w
w
w
w
w
w
w
w
w
w
w
w
w
w
w
w
w
w
w
w
w
w
w
w
w
w
w
w
w
w
w
w
w
w
w
w
w
w
w
w
w
w
w
w
M
M
M
M
M
M
M
M
M
M
M
M
M
M
M
M
M
M
M
M
M
M
M
M
M
M
M
M
M
M
M
M
M
M
M
M
M
M
M
M
M
M
M
M
M
M
M
M
M
M
M
M
M
3. - Push the end riser through the
toric ring.
- Push the maillon through the risers
buckles.
4. - Give a second twist to the plastic
ring.
- Push the buckle through the mail-
lon.
6. Repeat the sequence on the
other side of the harness.
2. - Open the 7mm square Maillon
Rapide®.
- Connect the bridle’s loop to the
Maillon Rapide®.
- Push the maillon through the
plastic ring
- Twist
1. - Two maillon Rapide® 6mm and two toric exible rings are needed.
5. - Tidy up the assembly.- Be certain
for the riser end loops to be securely
fastened.
- Close the Maillon Rapide® tightly by
hand.
- Tighten using pliers and making a ¼
turn.
w
w
w
w
w
w
w
w
w
w
w
w
w
w
w
w
w
w
w
w
w
w
w
w
w
w
w
w
w
w
w
w
w
w
w
w
w
w
w
w
w
w
w
w
w
w
w
w
w
w
w
w
w
w
w
w
w
w
w
M
M
M
M
M
M
M
M
M
M
M
M
M
M
M
M
M
M
M
M
M
M
M
M
M
M
M
M
M
M
M
M
M
M
M
M
M
M
M
M
M
M
M
M
M
M
M
M
M
M
M
M
M
M
w
w
w
w
w
w
w
w
w
w
w
w
w
w
w
w
w
w
w
w
w
w
w
w
w
w
w
w
w
w
w
w
w
w
w
w
w
w
w
w
w
w
w
w
w
w
w
w
w
w
w
w
w
w
w
w
w
w
w
M
M
M
M
M
M
M
M
M
M
M
M
M
M
M
M
M
M
M
M
M
M
M
M
M
M
M
M
M
M
M
M
M
M
M
M
M
M
M
M
M
M
M
M
M
M
M
M
M
M
M
M
M
w
w
w
w
w
w
w
w
w
w
w
w
w
w
w
w
w
w
w
w
w
w
w
w
w
w
w
w
w
w
w
w
w
w
w
w
w
w
w
w
w
w
w
w
w
w
w
w
w
w
w
w
w
w
w
w
w
w
w
M
M
M
M
M
M
M
M
M
M
M
M
M
M
M
M
M
M
M
M
M
M
M
M
M
M
M
M
M
M
M
M
M
M
M
M
M
M
M
M
M
M
M
M
M
M
M
M
M
M
M
M
M
w
w
w
w
w
w
w
w
w
w
w
w
w
w
w
w
w
w
w
w
w
w
w
w
w
w
w
w
w
w
w
w
w
w
w
w
w
w
w
w
w
w
w
w
w
w
w
w
w
w
w
w
w
w
w
w
w
w
w
M
M
M
M
M
M
M
M
M
M
M
M
M
M
M
M
M
M
M
M
M
M
M
M
M
M
M
M
M
M
M
M
M
M
M
M
M
M
M
M
M
M
M
M
M
M
M
M
M
M
M
M
M
w
w
w
w
w
w
w
w
w
w
w
w
w
w
w
w
w
w
w
w
w
w
w
w
w
w
w
w
w
w
w
w
w
w
w
w
w
w
w
w
w
w
w
w
w
w
w
w
w
w
w
w
w
w
w
w
w
w
w
M
M
M
M
M
M
M
M
M
M
M
M
M
M
M
M
M
M
M
M
M
M
M
M
M
M
M
M
M
M
M
M
M
M
M
M
M
M
M
M
M
M
M
M
M
M
M
M
M
M
M
M
M
w
w
w
w
w
w
w
w
w
w
w
w
w
w
w
w
w
w
w
w
w
w
w
w
w
w
w
w
w
w
w
w
w
w
w
w
w
w
w
w
w
w
w
w
w
w
w
w
w
w
w
w
w
w
w
w
w
w
w
M
M
M
M
M
M
M
M
M
M
M
M
M
M
M
M
M
M
M
M
M
M
M
M
M
M
M
M
M
M
M
M
M
M
M
M
M
M
M
M
M
M
M
M
M
M
M
M
M
M
M
M
M
M
w
w
w
w
w
w
w
w
w
w
w
w
w
w
w
w
w
w
w
w
w
w
w
w
w
w
w
w
w
w
w
w
w
w
w
w
w
w
w
w
w
w
w
w
w
w
w
w
w
w
w
w
w
w
w
w
w
w
w
M
M
M
M
M
M
M
M
M
M
M
M
M
M
M
M
M
M
M
M
M
M
M
M
M
M
M
M
M
M
M
M
M
M
M
M
M
M
M
M
M
M
M
M
M
M
M
M
M
M
M
M
M
w
w
w
w
w
w
w
w
w
w
w
w
w
w
w
w
w
w
w
w
w
w
w
w
w
w
w
w
w
w
w
w
w
w
w
w
w
w
w
w
w
w
w
w
w
w
w
w
w
w
w
w
w
w
w
w
w
w
w
M
M
M
M
M
M
M
M
M
M
M
M
M
M
M
M
M
M
M
M
M
M
M
M
M
M
M
M
M
M
M
M
M
M
M
M
M
M
M
M
M
M
M
M
M
M
M
M
M
M
M
M
M
w
w
w
w
w
w
w
w
w
w
w
w
w
w
w
w
w
w
w
w
w
w
w
w
w
w
w
w
w
w
w
w
w
w
w
w
w
w
w
w
w
w
w
w
w
w
w
w
w
w
w
w
w
w
w
w
w
w
w
M
M
M
M
M
M
M
M
M
M
M
M
M
M
M
M
M
M
M
M
M
M
M
M
M
M
M
M
M
M
M
M
M
M
M
M
M
M
M
M
M
M
M
M
M
M
M
M
M
M
M
M
M
w
w
w
w
w
w
w
w
w
w
w
w
w
w
w
w
w
w
w
w
w
w
w
w
w
w
w
w
w
w
w
w
w
w
w
w
w
w
w
w
w
w
w
w
w
w
w
w
w
w
w
w
w
w
w
w
w
w
w
M
M
M
M
M
M
M
M
M
M
M
M
M
M
M
M
M
M
M
M
M
M
M
M
M
M
M
M
M
M
M
M
M
M
M
M
M
M
M
M
M
M
M
M
M
M
M
M
M
M
M
M
M
w
w
w
w
w
w
w
w
w
w
w
w
w
w
w
w
w
w
w
w
w
w
w
w
w
w
w
w
w
w
w
w
w
w
w
w
w
w
w
w
w
w
w
w
w
w
w
w
w
w
w
w
w
w
w
w
w
w
w
M
M
M
M
M
M
M
M
M
M
M
M
M
M
M
M
M
M
M
M
M
M
M
M
M
M
M
M
M
M
M
M
M
M
M
M
M
M
M
M
M
M
M
M
M
M
M
M
M
M
M
M
M
M
w
w
w
w
w
w
w
w
w
w
w
w
w
w
w
w
w
w
w
w
w
w
w
w
w
w
w
w
w
w
w
w
w
w
w
w
w
w
w
w
w
w
w
w
w
w
w
w
w
w
w
w
w
w
w
w
w
w
w
M
M
M
M
M
M
M
M
M
M
M
M
M
M
M
M
M
M
M
M
M
M
M
M
M
M
M
M
M
M
M
M
M
M
M
M
M
M
M
M
M
M
M
M
M
M
M
M
M
M
M
M
M
w
w
w
w
w
w
w
w
w
w
w
w
w
w
w
w
w
w
w
w
w
w
w
w
w
w
w
w
w
w
w
w
w
w
w
w
w
w
w
w
w
w
w
w
w
w
w
w
w
w
w
w
w
w
w
w
w
w
w
M
M
M
M
M
M
M
M
M
M
M
M
M
M
M
M
M
M
M
M
M
M
M
M
M
M
M
M
M
M
M
M
M
M
M
M
M
M
M
M
M
M
M
M
M
M
M
M
M
M
M
M
M
w
w
w
w
w
w
w
w
w
w
w
w
w
w
w
w
w
w
w
w
w
w
w
w
w
w
w
w
w
w
w
w
w
w
w
w
w
w
w
w
w
w
w
w
w
w
w
w
w
w
w
w
w
w
w
w
w
w
w
M
M
M
M
M
M
M
M
M
M
M
M
M
M
M
M
M
M
M
M
M
M
M
M
M
M
M
M
M
M
M
M
M
M
M
M
M
M
M
M
M
M
M
M
M
M
M
M
M
M
M
M
M
w
w
w
w
w
w
w
w
w
w
w
w
w
w
w
w
w
w
w
w
w
w
w
w
w
w
w
w
w
w
w
w
w
w
w
w
w
w
w
w
w
w
w
w
w
w
w
w
w
w
w
w
w
w
w
w
w
w
w
M
M
M
M
M
M
M
M
M
M
M
M
M
M
M
M
M
M
M
M
M
M
M
M
M
M
M
M
M
M
M
M
M
M
M
M
M
M
M
M
M
M
M
M
M
M
M
M
M
M
M
M
M
w
w
w
w
w
w
w
w
w
w
w
w
w
w
w
w
w
w
w
w
w
w
w
w
w
w
w
w
w
w
w
w
w
w
w
w
w
w
w
w
w
w
w
w
w
w
w
w
w
w
w
w
w
w
w
w
w
w
w
M
M
M
M
M
M
M
M
M
M
M
M
M
M
M
M
M
M
M
M
M
M
M
M
M
M
M
M
M
M
M
M
M
M
M
M
M
M
M
M
M
M
M
M
M
M
M
M
M
M
M
M
M
M
w
w
w
w
w
w
w
w
w
w
w
w
w
w
w
w
w
w
w
w
w
w
w
w
w
w
w
w
w
w
w
w
w
w
w
w
w
w
w
w
w
w
w
w
w
w
w
w
w
w
w
w
w
w
w
w
w
w
w
M
M
M
M
M
M
M
M
M
M
M
M
M
M
M
M
M
M
M
M
M
M
M
M
M
M
M
M
M
M
M
M
M
M
M
M
M
M
M
M
M
M
M
M
M
M
M
M
M
M
M
M
M
w
w
w
w
w
w
w
w
w
w
w
w
w
w
w
w
w
w
w
w
w
w
w
w
w
w
w
w
w
w
w
w
w
w
w
w
w
w
w
w
w
w
w
w
w
w
w
w
w
w
w
w
w
w
w
w
w
w
w
M
M
M
M
M
M
M
M
M
M
M
M
M
M
M
M
M
M
M
M
M
M
M
M
M
M
M
M
M
M
M
M
M
M
M
M
M
M
M
M
M
M
M
M
M
M
M
M
M
M
M
M
M
w
w
w
w
w
w
w
w
w
w
w
w
w
w
w
w
w
w
w
w
w
w
w
w
w
w
w
w
w
w
w
w
w
w
w
w
w
w
w
w
w
w
w
w
w
w
w
w
w
w
w
w
w
w
w
w
w
w
w
M
M
M
M
M
M
M
M
M
M
M
M
M
M
M
M
M
M
M
M
M
M
M
M
M
M
M
M
M
M
M
M
M
M
M
M
M
M
M
M
M
M
M
M
M
M
M
M
M
M
M
M
M
w
w
w
w
w
w
w
w
w
w
w
w
w
w
w
w
w
w
w
w
w
w
w
w
w
w
w
w
w
w
w
w
w
w
w
w
w
w
w
w
w
w
w
w
w
w
w
w
w
w
w
w
w
w
w
w
w
w
w
M
M
M
M
M
M
M
M
M
M
M
M
M
M
M
M
M
M
M
M
M
M
M
M
M
M
M
M
M
M
M
M
M
M
M
M
M
M
M
M
M
M
M
M
M
M
M
M
M
M
M
M
M

Harness User’s manual
SUP’AIR _PIXAIR Page 14
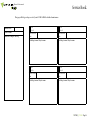
Installing the reserve parachute
1. - Open the 7mm square
Maillon Rapide®.
- Connect the reserve para-
chute single riser loop.
- Push the maillon through the
plastic ring
- Twist
3. - Give a second twist to the
plastic ring.
- Push the buckle through the
maillon.
2. - Push the end riser through
the toric ring.
- Push the maillon through the
risers buckles.
4. - If you use separate/inde-
pendente risers: Repeat steps
1 through 3 with the second
riser.
- If you use Y risers, continue
with next step
>> Reserve parachute/risers.
5. - Tidy up the assembly.
- Be certain for the riser end
loops to be securely fastened.
- Close the Maillon Rapide®
tightly by hand.
- Tighten using pliers and
making a ¼ turn.
One (1) square 7mm Maillon Rapide® will be needed + two (2 exible toric rings.
>> Position the risers
- Place the risers inside their guiding/
protective sleeve connected alongside the
harness.
- Push them through and under the zipper
tab.
- Bring them out through the reserve para-
chute container.
- Close the Zip to the tab above the le
shoulder.
M
M
M
M
M
M
M
M
M
M
M
M
M
M
M
M
M
M
M
M
M
M
M
M
M
M
M
M
M
M
M
M
M
M
M
M
M
M
M
M
M
M
M
M
M
M
M
M
M
M
M
M
M
M
M
M
M
M
M
M
M
M
M
M
M
M
M
M
M
M
M
M
M
M
M
M
M
M
M
M
M
M
M
M
M
M
M
M
M
M
M
M
M
M
M
M
M
M
M
M
M
M
M
M
M
M
M
M
M
M
M
M
M
M
M
M
M
M
M
M
M
M
M
M
M
M
M
M
M
M
M
M
M
M
M
M
M
M
M
M
M
M
M
M
M
M
M
M
M
M
M
M
M
M
M
M
M
M
M
M
M
M
M
M
M
M
M
M
M
Reserve parachute/harness connection.
A
A
Closing direction.

Harness User’s manual
SUP’AIR _PIXAIR Page 15
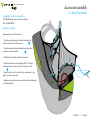
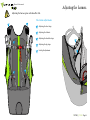
Installing the reserve parachute.
A
B
F
Le upper ap.
C
G
Right ap.
D
H
E
I
Reserve parachute risers.
- Five (5) ap dorsal pocket.
- Locking via cables
- Handle «E2» ( Ref.: POIE2 ).
- 3 to 7,5 liters. Lower ap.
JReserve parachute handle.
Reserve parachute surplus lines ( about 1
meter ).
Reserve parachute folded in its POD.
Rescue parachute pocket characteristics :
Reserve parachute single riser.
Right upper ap.
Le ap.
AB
F
C
G
D
H
E
I
J

Harness User’s manual
SUP’AIR _PIXAIR Page 16
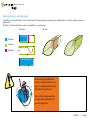
Adjusting the reserve parachute pocket:
Large size parachute
A panel/ap ( red on the illustration ), is located on the inside of the reserve parachute container ( green on the illustration ), to adapt its volume to your reserve
parachute size.
e Velcro® ( black on the illustration ) enables the panel/ap to be secured in place.
Moving the panel/
ap
Parachute
Container
Panel/Flap
>>Sliced view >> 3D view
Small size parachute
If the emergency parachute does
not have a snug t inside the rescue
pocket, it could potentially rotateon
itself while using the harness.
e risers then roll up around the
rescue parachute pod handle and
prevent a deployment.

Harness User’s manual
SUP’AIR _PIXAIR Page 17
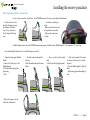
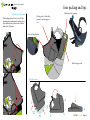
Installing the reserve parachute in its container.
1. - Place the reserve parachute inside
the container, with the handle positioned
upward, and parachute risers downward.
2. - Take a small piece of line to help with the
installation procedure.
- Push it through loop #1 ( B ap).
- Using the piece of line pull loop #1 through
grommet #2 – ap ©...
Installing the reserve parachute.
1
2
1
3. - Secure the installation by pushing the
right side of the yellow cable through the
loop cord #1
Carefully remove the line.
4. - Using the piece of line pull loop #3
through grommet #4 – ap (D)...
- ... then inside grommet #5 – ap C
- then inside grommet #6 – ap (A)
1
3
4
5
6
1
5. - Secure the installation by pushing the
le side of the yellow cable through the
loop cord #3
Carefully remove the line.
1
6
5. - Fasten the reserve parachute handle to
the Velcro®
- Push the two outer ends of the reserve
parachute handle inside their respective
housings located on either side of the
handle on the harness.
Check the com-
pleted instal-
lation during a
hang-test.
Have the installation
checked by a professional
outt.
Conduct an extrac-
tion test every six ( 6 )
months to assure proper
system functionality.
Note: conducting and
extraction test does not
imply deploying the
reserve parachutewhich
will stay inside its POD.
A
B
C
D
E
A
B
C
D
C

Harness User’s manual
SUP’AIR _PIXAIR Page 18
Gear packing and tips.
Radio pocket ( with safety
lanyard ) and storage poc-
ket.
Back storage pocket
Hydration tube opening.
Fold the harness.
Fold the foot-rest fastener
When ying without a foot-rest, fold the
fastening side panel inward, and keep it in
place with the snap button located on the
inner side of the pane.
Foot-rest ap fastener

Harness User’s manual
SUP’AIR _PIXAIR Page 19
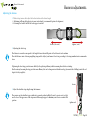
Adjusting the harness prior each takeo is vital.
Adjusting the harness.
Adjusting the chest strap.
Adjusting the backrest.
Adjusting the shoulder straps.
e various adjustments.
2
1
3
4Adjusting the leg straps.
2
1
4
33
4
5Seat depth adjustment 5

Harness User’s manual
SUP’AIR _PIXAIR Page 20
1. Without strap tension, rst adjust the backrest incline at the desired angle.
>> Tightening will bring the backrest at a more vertical angle ( recommended posture for beginners ).
>> Loosening the backrest will tilt the back support rearward.
3. Adjust the shoulder straps length using the trimmers.
e pressure on the shoulder straps contributes to general comfort in ight. It must be precise: not too tight
nor too loose. e upper area of the straps must oer enough support to maintain your torso in a comfortable
position. tighten cord.
loosen
Harness adjustments.
Adjusting the harness.
2. Adjusting the chest strap.
e distance to consider corresponds to the length between the middle points at the bottom of each carabiner.
e ideal distance varies between paragliding wing models. Adjust your harness’s chest strap according to the wing manufacturer’s recommenda-
tions.
tighten ( cord ).loosen ( tube cord ).
Tightening the chest-strap provides more stability but less piloting eciency while increasing the risk of riser twisting.
On the contrary loosening the strap provides more eciency but can be dangerous in turbulent aerology (increased risk of falling towards the col-
lapsed side of your glider).
Strona się ładuje...
Strona się ładuje...
Strona się ładuje...
Strona się ładuje...
Strona się ładuje...
Strona się ładuje...
Strona się ładuje...
Strona się ładuje...
Strona się ładuje...
Strona się ładuje...
-
 1
1
-
 2
2
-
 3
3
-
 4
4
-
 5
5
-
 6
6
-
 7
7
-
 8
8
-
 9
9
-
 10
10
-
 11
11
-
 12
12
-
 13
13
-
 14
14
-
 15
15
-
 16
16
-
 17
17
-
 18
18
-
 19
19
-
 20
20
-
 21
21
-
 22
22
-
 23
23
-
 24
24
-
 25
25
-
 26
26
-
 27
27
-
 28
28
-
 29
29
-
 30
30


w innych językach
- English: SUPAIR PIXAIR User manual
Powiązane artykuły
-
SUPAIR ALTIRANDO 3 Instrukcja obsługi
-
-
-
-
-
-
-
-
-
Inne dokumenty
-
3M DBI-SALA® Lad-Saf™ X3 Detachable Cable Sleeve 6160054, 9.5MM Instrukcja obsługi
-
LG GR-B247BVJ Instrukcja obsługi
-
-
LG GR-B197GBC Instrukcja obsługi
-
-
-
-
LG GR-B197DLC Instrukcja obsługi
-