Perel VTUSC6 Instrukcja obsługi
- Kategoria
- Ogrzewacze pomieszczeń
- Typ
- Instrukcja obsługi


VTUSC6
V. 02 – 17/05/2018 2 ©Velleman nv

VTUSC6
V. 02 – 17/05/2018 3 ©Velleman nv
A
B

VTUSC6
V. 02 – 17/05/2018 4 ©Velleman nv
operation – gebruik – usage –
uso – Anwendung – obsługa –
funcionamento
care – zorg – soin – cuidado –
Pflege – konserwacja –
manutenção

VTUSC6
V. 02 – 17/05/2018 5 ©Velleman nv
USER MANUAL
1. Introduction
To all residents of the European Union
Important environmental information about this product
This symbol on the device or the package indicates that disposal of the device after its
lifecycle could harm the environment. Do not dispose of the unit (or batteries) as
unsorted municipal waste; it should be taken to a specialized company for recycling.
This device should be returned to your distributor or to a local recycling service. Respect
the local environmental rules.
If in doubt, contact your local waste disposal authorities.
Thank you for choosing Perel! Please read the manual thoroughly before bringing this
device into service. If the device was damaged in transit, do not install or use it and
contact your dealer.
2. Safety Instructions
Read and understand this manual and all safety signs before using this appliance.
Indoor use only.
Class 2.
This device can be used by children aged from 8 years and above, and persons with
reduced physical, sensory or mental capabilities or lack of experience and knowledge if
they have been given supervision or instruction concerning the use of the device in a
safe way and understand the hazards involved. Children shall not play with the device.
Cleaning and user maintenance shall not be made by children without supervision.
Damage caused by disregard of certain guidelines in this manual is not covered by the
warranty and the dealer will not accept responsibility for any ensuing defects or
problems.
Do not disassemble the cleaner. There are no user-serviceable parts.
Never clean the tank with abrasive or corrosive chemicals.
Unplug the cleaner from the mains before filling up the tank. Fill the tank up to the limit
level only.
Make sure that the available voltage does not exceed the voltage stated in the
specifications of this manual.
If the supply cord is damaged, it must be replaced by the manufacturer, its service
agent or similarly qualified persons in order to avoid a hazard.
Disconnect the device from the mains to clean it or when it is not in use. Handle the
power cord by the plug only. Avoid touching the power cord with wet hands.
Only use the cleaner when the tank is filled with water.

VTUSC6
V. 02 – 17/05/2018 6 ©Velleman nv
Never leave the cleaner unattended when plugged in.
Keep the cleaner away from heat sources such as radiators. Operate on a dry and level
surface.
Do not immerse the cleaner.
This cleaner is suited to clean a wide range of materials. However, we recommend not
to clean following items:
o delicate materials such as hawksbill, pearl, emerald, ivory, coral, agate…;
o brittle metals such as solder;
o non water-resistant watches;
o other materials such as wood, contact lenses, ceramic, camera filters…
Note that damage caused by user modifications to the device is not covered by the
warranty.
3. General Guidelines
Refer to the Velleman
®
Service and Quality Warranty on the last pages of this manual.
All modifications of the device are forbidden for safety reasons. Damage caused by user
modifications to the device is not covered by the warranty.
Only use the device for its intended purpose. Using the device in an unauthorised way
will void the warranty.
Damage caused by disregard of certain guidelines in this manual is not covered by the
warranty and the dealer will not accept responsibility for any ensuing defects or
problems.
Nor Velleman nv nor its dealers can be held responsible for any damage (extraordinary,
incidental or indirect) – of any nature (financial, physical…) arising from the possession,
use or failure of this product.
Keep this manual for future reference.
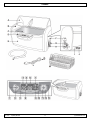
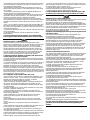
4. Overview
Refer to the illustrations on page 2 of this manual.
General
A
transparent lid
H
drainage pipe
B
LED light
I
power button
C
stainless steel tank
J
power socket
D
control panel
K
hose
E
housing
L
power cord
F
handles
M
basket
G
drainage valve

VTUSC6
V. 02 – 17/05/2018 7 ©Velleman nv
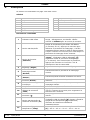
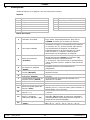
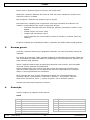
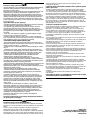
Control Panel
1
status indicator
Green: normal working status, ready.
Red: fault condition, overheated. Let the VTUSC6
cool down for at least 15 minutes.
2
on-off button
Press to switch the device on. Default time and
temperature settings are shown (5 minutes,
40 °C). Press again to start the cleaning process;
it stops automatically when the timer expires.
Press the button at any time to interrupt the
cleaning process.
3
function button
Press to start degassing function (degas). The
indicator [4] will flash during the degas process
(± 2 minutes). To interrupt the process, press the
button again. See note below the table.
4
degas indicator
Flashing during the degassing process.
5
normal cleaning indicator
Illuminated during normal cleaning process .
6
heater indicator
Illuminated when heater is active.
7
actual liquid temperature
Displays temperature of liquid in the tank.
8
timer display
Countdown timer indicates remaining cleaning
time.
9
set temperature
Indicates the selected temperature.
10
quick set time button
(Time)
Press to show initial timer (05:00). Press again to
increase the timer by 5 minutes.
11
decrease timer button ()
Each press decreases the timer by 1 minute.
12
heater on/off button (TC)
Press to switch on the heater; the indicator [6]
flashes. When set temperature [9] is reached,
the heater switches off automatically.
13
temperature set button
(Temp)
Press to select the desired temperature [9]:
40 °C – 45 °C – 50 °C – 55 °C – 60 °C.
Note on the degassing process:
When cleaning heavily soiled or greasy items or silver, copper or brass items, chemical
solutions need to be added into the water. The solution might form many small droplets
and take a long time to dissolve in the water. Newly added water may generate many
air bubbles on the tank walls. These will reduce the cleaning effect in the beginning
phase of ultrasonic cleaning.
Turning on the degas function will dissipate the droplets and the air bubbles, usually in
2 minutes, and improve cleaning efficiency.
5. Working Principle
The principle behind ultrasonic cleaning is cavitation.
When the ultrasonic cleaner is switched on, 3-dimensional sound waves of alternating
positive and negative pressure are generated and transmitted into the water in the
tank. These sound waves created micron-sized bubbles that grow and build up energy
during negative pressure and implode at a very high speed during positive pressure
(43,000 times per second). These implosions of high energy bubbles create cavities
that literally pull contaminants of the surface (at speeds up to 400 km/h). Due to the
size of the bubbles, they are effective in removing contaminants from the smallest of
crevices but harmless to the substrate itself.
Usually water is used as cleaning agent as it is inexpensive and environmentally safe.

VTUSC6
V. 02 – 17/05/2018 8 ©Velleman nv
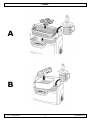
6. Operation
Refer to the illustrations on page 2 of this manual.
1. Open the lid [A] as illustrated, put the items in the basket [M] then put them in
the cleaning tank [C]. Do not overfill the basket and make sure the items don’t
touch each other to prevent scratches from rubbing.
Add water to a level between MIN and MAX and above the item(s) to be cleaned.
When desired, add some dishwashing liquid.
Note on indirect cleaning:
Place the objects in a small container (not included, e.g. glass jar, metal box...) and fill
this container with fluid so the items are submerged. Possible fluids include hexane (to
dissolve grease), acetone (to dissolve ink), pure alcohol (quick evaporation), watch oil
(prevent rust), rubbing alcohol (clean and disinfect)...
The selected container will absorb part of the ultrasonic energy which reduces the
cleaning effect:
container
absorbs
plastic
30 %
aluminium
20 %
stainless steel
8 %
Place the small container inside the stainless steel tank [C]. Do not use the basket [M].
Add water making sure the level is above the MIN indication but water does not flow
into the small container.
Do not run the device without sufficient water inside the tank to prevent irreversible
damage to the VTUSC6.
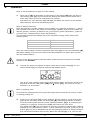
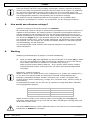
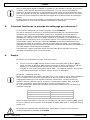
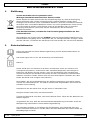
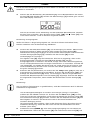
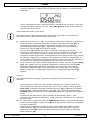
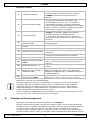
2. Connect the power cord [L] to a mains outlet and turn the switch [I] on. The
status indicator [1] turns green and the LED display shows:
This is the most common timer setting and working state. If the timer needs to be
adjusted, press the TIME button [10] and button [11]. The timer can be set
between 1 to 30 minutes.
Note on cleaning time:
Do not set the cleaning time too long as this might lead to loosening of screws, cracks
or coating peeling off.
3. Press the on-off button [2] to start cleaning. During cleaning, 2 sets of blue LED
lights at the two sides of the unit illuminate [B]. A buzzing sound can be heard
from the cleaning tank and the normal cleaning indicator [5] is lit, indicating the
cleaning is in progress. Closing the lid [A] will reduce the noise level.
The digital timer [8] will count down to show the remaining cleaning time. When it
displays 00:00, the cleaning is done. To stop cleaning at any time, press the on-off
button [2]. The unit is designed with an overheating protection to avoid extended
and continuous operation for too long. When the red light [1] is on, the unit will

VTUSC6
V. 02 – 17/05/2018 9 ©Velleman nv
not turn on. The unit will idle for about 20 minutes and can be restarted after the
green light [1] comes on.
4. When the heater is needed, press the Temp button [13] to select one of the 5
preset temperatures. Press the TC button [12]; the heater indicator [6] flashes to
indicate that the heater is turned on. The actual water temperature is shown in the
display [7]. When the water reaches the set temperature, the heater and heater
indicator [6] turn off.
Note:
To ensure safe operation, the heater is turned off automatically after 50 minutes.
To speed up mixing and use less solution, use the degas function. Press the Time
button [10] to set the timer to 10 minutes then press the function button [3]; the
heater indicator [6] illuminates. Press the on-off button [2] to start degassing.
The VTUSC6 returns to normal cleaning automatically after 2 minutes.
When debris “smoke” is no longer visible, cleaning is done. If additional cleaning is
needed, reset the timer and repeat the steps above.
5. When cleaning is completed, switch off the VTUSC6 [I], unplug the power cord
[L], open the lid [A] and retrieve the basket [M] and the items. Rinse and dry the
items.
Connect the hose [K] to the drainage pipe [H]. Open the drainage valve [G] to
drain the dirty water. Clean and wipe the tank dry. Do not use abrasive or
corrosive solutions. Close the drainage valve [G].
7. Cleaning and Maintenance
1. Do not turn on the unit without water in the tank.
Even though the unit is designed with multiple protections, if it is turned on for
over 15 seconds without water in the tank, it may damage the unit or severely
reduce the life of the unit.
2. Do not run the unit for extended time or continuously.
The unit is designed with overheat protection. If the unit has been running for
45 minutes, it is recommended to stop the unit for about 20 minutes to prolong the
life of the unit.
3. Do not keep water in the cleaning tank for a long time.
Remove the water from the tank after each use to prevent the tank from
corroding. Clean and wipe the tank dry.
4. Do not spray water over the housing.
Use a towel to wipe the tank and the housing dry.
5. Do not expose the unit under direct sunshine for a long time.
Keep the unit in a dry, cool and ventilated place.

VTUSC6
V. 02 – 17/05/2018 10 ©Velleman nv
8. Technical Specifications
ultrasonic frequency ..................................................................................... 35 kHz
temperature settings ....................................... 40 °C – 45 °C – 50 °C – 55 °C – 60 °C
tank material ......................................................................... stainless steel SUS304
housing/holder material .................................................................................... ABS
tank capacity .................................................................................................... 6 L
power consumption ....................................................................................... 310 W
power supply .............................................................................. 220-240 V~, 50 Hz
dimensions
outer ............................................................................. 43.8 x 30.0 x 25.0 cm
inner ....................................................................................... 32 x 20 x 10 cm
Use this device with original accessories only. Velleman nv cannot be held
responsible in the event of damage or injury resulting from (incorrect) use of
this device. For more info concerning this product and the latest version of this
manual, please visit our website www.perel.eu. The information in this manual
is subject to change without prior notice.
© COPYRIGHT NOTICE
The copyright to this manual is owned by Velleman nv. All worldwide rights
reserved. No part of this manual may be copied, reproduced, translated or reduced to
any electronic medium or otherwise without the prior written consent of the copyright
holder.

VTUSC6
V. 02 – 17/05/2018 11 ©Velleman nv
GEBRUIKERSHANDLEIDING
1. Inleiding
Aan alle ingezetenen van de Europese Unie
Belangrijke milieu-informatie betreffende dit product
Dit symbool op het toestel of de verpakking geeft aan dat, als het na zijn levenscyclus
wordt weggeworpen, dit toestel schade kan toebrengen aan het milieu. Gooi dit toestel
(en eventuele batterijen) niet bij het gewone huishoudelijke afval; het moet bij een
gespecialiseerd bedrijf terechtkomen voor recyclage. U moet dit toestel naar uw
verdeler of naar een lokaal recyclagepunt brengen. Respecteer de plaatselijke
milieuwetgeving.
Hebt u vragen, contacteer dan de plaatselijke autoriteiten betreffend de
verwijdering.
Dank u voor uw aankoop! Lees deze handleiding grondig voor u het toestel in gebruik
neemt. Werd het toestel beschadigd tijdens het transport, installeer het dan niet en
raadpleeg uw dealer.
2. Veiligheidsvoorschriften
Lees en begrijp deze handleiding en de veiligheidsinstructies vóór ingebruikname.
Enkel voor gebruik binnenshuis.
Klasse 2.
Dit toestel is geschikt voor gebruik door kinderen vanaf 8 jaar, door personen met
fysieke, zintuiglijke of verstandelijke beperkingen, of door personen met gebrek aan
ervaring en kennis, op voorwaarde dat dit onder toezicht gebeurt van een persoon die
verantwoordelijk is voor hun veiligheid of hun aanwijzingen heeft gegeven, hoe zij het
toestel moeten gebruiken en zich bewust zijn van de risico's die het gebruik van het
toestel met zich meebrengt. Kinderen mogen niet met het toestel spelen. De reiniging
en het onderhoud van het toestel mogen niet worden uitgevoerd door kinderen, tenzij
ze onder toezicht staan.
De garantie geldt niet voor schade door het negeren van bepaalde richtlijnen in deze
handleiding en uw dealer zal de verantwoordelijkheid afwijzen voor defecten of
problemen die hier rechtstreeks verband mee houden.
Demonteer de reiniger niet. De gebruiker mag geen onderdelen vervangen.
Vermijd het toestel te reinigen met schuurmiddelen.
Ontkoppel de reiniger van het lichtnet alvorens het reservoir te vullen. Vul het reservoir
tot aan de markering.
De beschikbare netspanning mag niet hoger zijn dan de spanning in de specificaties
achteraan de handleiding.

VTUSC6
V. 02 – 17/05/2018 12 ©Velleman nv
Indien de voedingskabel beschadigd is, dan moet deze door de fabrikant, diens
servicedienst, of een gelijkwaardig bekwaam persoon vervangen worden om gevaar te
voorkomen.
Trek de stekker uit het stopcontact (trek nooit aan de kabel!) voordat u het toestel reinigt
en als u het niet gebruikt. Raak de voedingskabel niet aan met natte handen.
Schakel de reiniger enkel in wanneer het reservoir met water is gevuld.
Laat en ingeschakelde reiniger nooit onbeheerd achter.
Houd de reiniger uit de buurt van warmtebronnen zoals radiatorkachels. Plaats het
toestel op een droog en horizontaal oppervlak.
Dompel de reiniger niet onder.
Deze reiniger reinigt tal van voorwerpen. Volgende voorwerpen zijn echter niet
geschikt:
o delicate materialen zoals karetschildpad, parels, smaragd, ivoor, koraal,
agaat…;
o broze metalen zoals soldeer;
o niet-waterbestendige horloges;
o andere materialen zoals hout, contactlenzen, keramiek, camerafilters…
Schade door wijzigingen die de gebruiker heeft aangebracht aan het toestel vallen niet
onder de garantie.
3. Algemene richtlijnen
Raadpleeg de Velleman
®
service- en kwaliteitsgarantie achteraan deze handleiding.
Om veiligheidsredenen mag u geen wijzigingen aanbrengen. Schade door wijzigingen
die de gebruiker heeft aangebracht aan het toestel valt niet onder de garantie.
Gebruik het toestel enkel waarvoor het gemaakt is. De garantie vervalt automatisch bij
ongeoorloofd gebruik.
De garantie geldt niet voor schade door het negeren van bepaalde richtlijnen in deze
handleiding en uw dealer zal de verantwoordelijkheid afwijzen voor defecten of
problemen die hier rechtstreeks verband mee houden.
Noch Velleman nv noch zijn verdelers kunnen aansprakelijk gesteld worden voor schade
(buitengewoon, incidenteel of onrechtstreeks) – van welke aard dan ook (financieel,
fysisch…) voortvloeiend uit het bezit, gebruik of falen van dit product.
Bewaar deze handleiding voor verdere raadpleging.

VTUSC6
V. 02 – 17/05/2018 13 ©Velleman nv
4. Omschrijving
Raadpleeg de afbeeldingen op pagina 2 van deze handleiding.
Algemeen
A
transparant deksel
H
afvoerpijp
B
led
I
voedingsknop
C
reservoir in roestvrij staal
J
voedingsaansluiting
D
bedieningspaneel
K
afvoerslang
E
behuizing
L
voedingskabel
F
handgrepen
M
mand
G
afvoerklep
Bedieningspaneel
1
statusindicatieled
Groen: normale werkingstoestand, klaar.
Rood: storing, oververhitting. Laat de VTUSC6
minstens 15 minuten afkoelen.
2
aan/uit-knop
Drukken om het apparaat in te schakelen. De
standaard tijds –en temperatuurinstellingen
worden getoond (5 minuten, 40 °C). Druk
opnieuw om het reinigingsproces te activeren;
stopt automatisch wanneer de timer is
verstreken. Druk op de toets om het
reinigingsproces op elk moment te onderbreken.
3
functieknop (function)
Drukken om de ontgassingfunctie te activeren
(degas). De indicatieled [4] knippert tijdens het
ontgassingproces (± 2 minuten). Om het proces
te onderbreken, druk opnieuw op de knop. Zie
opmerking onderaan de tabel.
4
ontgassingindicatieled
(Degas)
Knippert tijdens het ontgassingproces.
5
indicatieled normale
reiniging (Normal)
Licht op tijdens het normale reinigingsproces.
6
verwarmingsindicatieled
(Heater)
Licht op wanneer het verwarmingselement
geactiveerd is.
7
gemeten vloeistof-
temperatuur (Actual)
Toont de temperatuur van de vloeistof in het
reservoir.
8
timer display
Countdown timer toont de resterende
reinigingstijd.
9
geselecteerde temperatuur
Toont de geselecteerde temperatuur.
10
sneltoets tijdsinstelling
(Time)
Drukken om de initiële timer te tonen (05:00).
Opnieuw drukken om de timer met 5 minuten te
verhogen.
11
knop timer verminderen
()
Bij elke druk zal de timer met 1 minuut
verminderen.
12
aan/uit-knop warmte-
element (TC)
Drukken om het warmte-element in te schakelen;
de indicatieled [6] knippert. Wanneer de
geselecteerde temperatuur [9] is bereikt, wordt
het warmte-element automatisch uitgeschakeld.
13
knop instellen temperatuur
(Temp)
Drukken om de gewenste temperatuur te
selecteren [9]: 40 °C – 45 °C – 50 °C – 55 °C –
60 °C.

VTUSC6
V. 02 – 17/05/2018 14 ©Velleman nv
Opmerking: ontgassingsproces:
Voor het reinigen van zeer vuile of vettige voorwerpen, zilveren, koperen of messing
items is het nodig om chemische producten aan het water toe te voegen. De oplossing
zou vele kleine druppeltjes vormen en duurt lang voor ze in het water oplost. Het
toevoegen van water zou vele luchtbellen produceren op de reservoirwanden waardoor
het reinigingseffect afneemt in de beginfase van de ultrasone reiniging.
Het activeren van de ontgassingfunctie zal de druppels en de luchtbellen laten
verdwijnen, gewoonlijk in 2 minuten, en de efficiëntie van de reiniging verbeteren.
5. Hoe werkt een ultrasone reiniger?
Ultrasone reiniging werkt op het principe van cavitatie.
Na inschakeling zendt de reiniger 3-dimensionele geluidsgolven uit die een positieve en
negatieve druk opwekken. De ultrasone golven verwekken microscopische bellen die
energie ophopen bij een negatieve druk en met een hoge snelheid (43.000 keer per
seconde) imploderen bij een positieve druk. Deze imploderende bellen veroorzaken op
hun beurt een leegte die de vuile partikels letterlijk van het oppervlak trekken (met
een snelheid tot 400 km/u). Door de kleine afmetingen van de bellen is deze methode
zeer geschikt voor het reinigen van moeilijk bereikbare plaatsen en dit zonder gevaar
voor beschadiging van het substraat.
Als reinigingsmiddel wordt meestal water gebruikt aangezien het goedkoop en
milieuvriendelijk is.
6. Werking
Raadpleeg de afbeeldingen op pagina 2 van deze handleiding.
1. Open het deksel [A] zoals afgebeeld, leg de voorwerpen in de mand [M] en plaats
ze in het reinigingsreservoir [C]. De mand niet overladen en zorg ervoor dat de
items elkaar niet raken om krassen te vermijden door wrijving.
Water bijvullen tussen MIN en MAX peil - de te reinigen items moeten volledig
ondergedompeld worden. Indien gewenst, een kleine hoeveelheid afwasmiddel
toevoegen.
Opmerking: indirecte reiniging:
Plaats de items in een kleine houder (niet meegeleverd, bv. glazen pot, metalen box…)
en vul deze met vloeistof zodat de voorwerpen helemaal ondergedompeld zijn.
Mogelijke vloeistoffen bevatten: hexaan (verwijdert vet), aceton (verwijdert inkt),
zuivere alcohol (snelle verdamping), horloge-olie (voorkomt roest), alcohol (reinigt en
desinfecteert)…
De geselecteerde houder zal een deel van de ultrasone energie absorberen waardoor
het reinigingseffect afneemt:
houder
absorbeert
plastic
30 %
aluminium
20 %
roestvrij staal
8 %
Plaats de kleine houder in het roestvrije stalen reservoir [C], de mand [M] niet
gebruiken. Water bijvullen, zorg ervoor dat het water het MIN peil overstijgt maar niet
in de kleine houder vloeit.
Het toestel niet activeren zonder voldoende water in het reservoir om onherroepelijke
schade aan de VTUSC6 te vermijden.

VTUSC6
V. 02 – 17/05/2018 15 ©Velleman nv
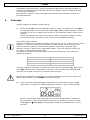
2. Koppel de voedingskabel [L] aan het lichtnet en druk op de voedingsknop [I]. De
statusindicatieled [1] wordt groen en op het led display verschijnt er:
Dit is de meest gebruikte tijdsinstelling en werkmodus. Indien de timer moet
ingesteld worden, druk op de TIME knop [10] en knop [11]. De timer kan
ingesteld worden tussen 1 en 30 minuten.
Opmerking: reinigingsduur:
Stel de reinigingsduur niet te lang in omdat dit kan leiden tot het loskomen van
schroeven, barstjes of een afschilferende deklaag.
3. Druk op de aan/uit-knop [2] om het reinigingsproces te starten. Tijdens het
reinigen lichten 2 blauwe leds [B] op aan de zijkant van het toestel. Bij het
activeren, kunt u een zoemend geluid horen vanuit het reservoir en licht de
indicatieled normale reiniging [5] op, dit betekent dat het reinigingsproces bezig
is. Door het deksel [A] te sluiten, neemt het lawaai af.
Het timer display [8] geeft weer hoeveel minuten het reinigingsproces nog zal
duren. Wanneer er 00:00 verschijnt, dan is het reinigen klaar. Om het
reinigingsproces op elk ogenblik te onderbreken, druk op de aan/uit-knop [2]. Het
toestel is voorzien van oververhittingsbeveiliging om overbelasting te vermijden.
Wanneer de statusindicatieled [1] rood oplicht, zal het toestel niet starten en
inactief blijven gedurende een 20-tal minuten. Het reinigingsproces kan opnieuw
gestart worden nadat de statusindicatieled [1] groen oplicht.
4. Indien nodig, druk op de Temp-knop [13] om het verwarmingselement te
activeren en één van de 5 ingestelde temperaturen te selecteren. Druk op de TC-
knop [12]; de verwarmingsindicatieled [6] knippert om aan te geven dat het
verwarmingselement geactiveerd is. De gemeten watertemperatuur [7] wordt op
het display weergegeven. Wanneer het water de ingestelde temperatuur heeft
bereikt, slaan het verwarmingselement en de verwarmingsindicatieled [6] af.
Opmerking:
Om een veilige bediening te waarborgen, slaat het verwarmingselement automatisch af
na 50 minuten.
Om het mixen te versnellen en minder product te gebruiken, activeer de
ontgassingfunctie [3]. Druk op de sneltoets [10] om de timer in te stellen op 10
minuten, druk daarna op de functieknop [3]; de verwarmingsindicatieled [6] licht
op. Druk op de aan/uit-knop [2] om het ontgassen te starten. De VTUSC6 gaat
automatisch terug over tot normale reiniging na 2 minuten.
Wanneer de vervuilde nevel niet langer zichtbaar is, is de reiniging afgelopen.
Indien een extra reiniging nodig is, de timer resetten en de stappen herhalen zoals
beschreven hierboven.
5. Wanneer het reinigen klaar is, schakel de VTUSC6 [I] uit, ontkoppel de
voedingskabel [L], open het deksel [A] en neem de mand met de items [M] eruit.
Spoel en droog de items af.
Verbind de afvoerslang [K] met de afvoerpijp [H]. Open de afvoerklep [G] om het
vuile water te lozen. Maak het reservoir schoon en wrijf deze droog. Geen
schurende of bijtende producten gebruiken. Sluit de afvoerklep [G].

VTUSC6
V. 02 – 17/05/2018 16 ©Velleman nv
7. Reiniging en onderhoud
1. Het toestel niet activeren zonder water in het reservoir.
Ondanks het feit dat het toestel beveiligd is en het geactiveerd wordt gedurende
15 seconden zonder water in het reservoir, kan dit het toestel ernstig beschadigen
of de levensduur aanzienlijk verkorten.
2. Geen langdurig of continu gebruik.
Het toestel is voorzien van oververhittingsbeveiliging. Na 45 minuten continue
werking, is het aangeraden om een twintigtal minuten te wachten om de
levensduur van het toestel te verlengen.
3. Ledig het reservoir na gebruik.
Verwijder het water uit het reservoir na elk gebruik om corrosie te verhinderen.
Maak het reservoir schoon en droog het af.
4. De behuizing niet afspoelen.
Gebruik een doek om het reservoir en de behuizing droog te wrijven.
5. Het toestel niet langdurig blootstellen aan direct zonlicht.
Bewaar het toestel op een droge, koele en goed geventileerde plaats.
8. Technische specificaties
ultrasone frequentie...................................................................................... 35 kHz
temperatuurinstellingen ................................... 40 °C – 45 °C – 50 °C – 55 °C – 60 °C
materiaal reservoir ................................................................. roestvrij staal SUS304
materiaal behuizing/houder ............................................................................... ABS
inhoud reservoir ................................................................................................ 6 L
verbruik ....................................................................................................... 310 W
voeding ...................................................................................... 220-240 V~, 50 Hz
afmetingen
buitenkant ...................................................................... 43.8 x 30.0 x 25.0 cm
binnenkant .............................................................................. 32 x 20 x 10 cm
Gebruik dit toestel enkel met originele accessoires. Velleman nv is niet
aansprakelijk voor schade of kwetsuren bij (verkeerd) gebruik van dit toestel.
Voor meer informatie over dit product en de laatste versie van deze
handleiding, zie www.perel.eu. De informatie in deze handleiding kan te allen
tijde worden gewijzigd zonder voorafgaande kennisgeving.
© AUTEURSRECHT
Velleman nv heeft het auteursrecht voor deze handleiding. Alle wereldwijde
rechten voorbehouden. Het is niet toegestaan om deze handleiding of gedeelten
ervan over te nemen, te kopiëren, te vertalen, te bewerken en op te slaan op een
elektronisch medium zonder voorafgaande schriftelijke toestemming van de
rechthebbende.

VTUSC6
V. 02 – 17/05/2018 17 ©Velleman nv
MODE D’EMPLOI
1. Introduction
Aux résidents de l'Union européenne
Des informations environnementales importantes concernant ce produit
Ce symbole sur l'appareil ou l'emballage indique que l’élimination d’un appareil en fin de
vie peut polluer l'environnement. Ne pas jeter un appareil électrique ou électronique (et
des piles éventuelles) parmi les déchets municipaux non sujets au tri sélectif ; une
déchèterie traitera l’appareil en question. Renvoyer les équipements usagés à votre
fournisseur ou à un service de recyclage local. Il convient de respecter la
réglementation locale relative à la protection de l’environnement.
En cas de questions, contacter les autorités locales pour élimination.
Nous vous remercions de votre achat ! Lire la présente notice attentivement avant la
mise en service de l’appareil. Si l’appareil a été endommagé pendant le transport, ne
pas l’installer et consulter votre revendeur.
2. Consignes de sécurité
Lire et comprendre ce mode d'emploi et toutes les consignes de sécurité avant d'utiliser
l'appareil.
Utiliser cet appareil uniquement à l'intérieur.
Classe 2.
Cet appareil peut être utilisé par des enfants âgés de 8 ans et plus et des personnes
manquant d’expérience et de connaissances ou dont les capacités physiques,
sensorielles ou mentales sont réduites, si elles ont été formées et encadrées quant à
l'utilisation de l'appareil d'une manière sûre et connaissent les risques encourus. Ne pas
laisser les enfants jouer avec l'appareil. Le nettoyage et l'entretien ne doivent pas être
effectués par des enfants sans surveillance.
La garantie ne s’applique pas aux dommages survenus en négligeant certaines
directives de cette notice et votre revendeur déclinera toute responsabilité pour les
problèmes et les défauts qui en résultent.
Ne pas démonter le nettoyeur. Il n’y a aucune pièce maintenable par l’utilisateur.
Éviter de nettoyer l’appareil à l’aide de produits abrasifs ou corrosifs.
Déconnecter le nettoyeur du réseau électrique avant de remplir le réservoir. Remplir e
réservoir jusqu’au repère.
La tension réseau ne peut pas dépasser la tension mentionnée dans les spécifications à
la fin de cette notice.
Si le câble flexible externe est endommagé, il doit être remplacé par le fabricant, son
service technique ou toute autre personne qualifiée, pour éviter tout danger.

VTUSC6
V. 02 – 17/05/2018 18 ©Velleman nv
Débrancher l’appareil s’il n’est pas utilisé ou pour le nettoyer. Tirer la fiche pour
débrancher l'appareil ; non pas le câble. Éviter de toucher le cordon d’alimentation avec
les mains mouillées.
Ne brancher l’appareil que lorsque le réservoir est rempli.
Ne jamais laisser un appareil branché sans supervision.
Tenir le nettoyeur à l’écart de sources de chaleur comme des radiateurs. Placer
l’appareil sur une surface sèche et plane.
Ne jamais immerger le nettoyeur dans un liquide.
Cet appareil a été conçu pour le nettoyage d’une multitude d’objets. Nous déconseillons
toutefois d’utiliser ce nettoyeur avec :
o des matériaux délicats comme l’écaille de tortue, la perle, l’émeraude, l’ivoire,
le corail, l’agate… ;
o des métaux fragiles comme la soudure ;
o des montres non étanches ;
o d’autres matériaux comme le bois, des lentilles de contact, la céramique, des
filtres de caméra…
Les dommages occasionnés par des modifications à l’appareil par le client, ne tombent
pas sous la garantie.
3. Directives générales
Se référer à la garantie de service et de qualité Velleman
®
en fin de ce mode d'emploi.
Toute modification est interdite pour des raisons de sécurité. Les dommages
occasionnés par des modifications par le client ne tombent pas sous la garantie.
N’utiliser l'appareil qu’à sa fonction prévue. Un usage impropre annule d'office la
garantie.
La garantie ne se s’applique pas aux dommages survenus en négligeant certaines
directives de ce mode d'emploi et votre revendeur déclinera toute responsabilité pour
les problèmes et les défauts qui en résultent.
Ni Velleman ni ses distributeurs ne peuvent être tenus responsables des dommages
exceptionnels, imprévus ou indirects, quelles que soient la nature (financière,
corporelle, etc.), causés par la possession, l’utilisation ou le dysfonctionnement de ce
produit.
Garder ce mode d'emploi pour toute référence ultérieure.

VTUSC6
V. 02 – 17/05/2018 19 ©Velleman nv
4. Description
Se référer aux illustrations en page 2 de cette notice.
Général
A
couvercle transparent
H
tuyau de vidange
B
voyant LED
I
interrupteur d’alimentation
C
réservoir en inox
J
connexion d’alimentation
D
panneau de commande
K
flexible de vidange
E
boîtier
L
cordon d’alimentation
F
poignées
M
panier
G
valve de vidange
Panneau de commande
1
indicateur LED d’état
Vert : état de fonctionnement normal, prêt.
Rouge : dérangement, surchauffe. Laisser
refroidir le VTUSC6 pour au moins 15 minutes.
2
touche marche/arrêt
Presser pour activer l’appareil. Le réglage de
temps et température par défaut est affiché
(5 minutes, 40 °C). Appuyer de nouveau pour
démarrer le processus de nettoyage ; s’arrête
automatiquement quand le délai de temporisateur
s’expire. Presser sur la touche pour interrompre le
processus de nettoyage à tout moment.
3
touche de fonction
(Function)
Presser pour activer la fonction de dégazage
(degas). L’indicateur LED de dégazage [4]
clignotera durant le processus de dégazage
(± 2 minutes). Pour interrompre le processus,
appuyer de nouveau sur la touche. Voir la
remarque en bas de cette table.
4
indicateur LED de
dégazage (Degas)
Clignote durant le processus de dégazage.
5
indicateur LED de
nettoyage normal
(Normal)
S’illumine durant le processus de nettoyage
normal.
6
indicateur LED de chauffe
(Heater)
S’illumine quand l’élément chauffant est activé.
7
température du liquide
mesurée (Actual)
Affiche la température du liquide dans le
réservoir.
8
minuterie à affichage
numérique
Minuterie compte à rebours indique le temps de
nettoyage restant.
9
température sélectionnée
Affiche la température sélectionnée.
10
touche de raccourci pour
réglage de minuterie
(Time)
Appuyer pour afficher la minuterie initiale
(05:00). Presser de nouveau pour augmenter la
minuterie de 5 minutes.
11
touche diminuer la
minuterie ()
Chaque appui diminuera la minuterie d’une
minute.
12
touche marche/arrêt de
l’élément de chauffe (TC)
Presser pour activer l’élément de chauffe ;
l’indicateur LED de chauffe [6] clignote. Quand la
température sélectionnée [9] est atteinte,
l’élément de chauffe sera désactivé
automatiquement.
13
touche de réglage de
température (Temp)
Presser pour sélectionner la température désirée
[9] : 40 °C – 45 °C – 50 °C – 55 °C – 60 °C.

VTUSC6
V. 02 – 17/05/2018 20 ©Velleman nv
Remarque : processus de dégazage :
Pour le nettoyage d’objets encrassés ou graisseux, des articles en argent, en cuivre ou
en laiton, il faut ajouter des solutions chimiques à l’eau. La solution formerait de
nombreux gouttes minuscules et prends beaucoup de temps avant de dissoudre dans
l’eau. En ajoutant de l’eau, de nombreuses bulles d’air seraient générées sur les parois
du réservoir ce qui diminuera l’effet de nettoyage dans la phase initiale du nettoyage
sonore.
En activant la fonction de dégazage, les gouttes et bulles d’air seront dissipées,
généralement en 2 minutes, et améliore l’efficacité du nettoyage.
5. Comment fonctionne le principe du nettoyage par ultrasons ?
Le principe du nettoyage par ultrasons repose sur la cavitation.
Une fois le nettoyeur enclenché, il émet des ondes acoustiques 3-dimensionnelles
entrainant des variations de pression (positives et négatives) du liquide dans le
réservoir. Ces ondes acoustiques engendrent des bulles de gaz microscopiques
amassant de l’énergie sous une pression négative et implosant à une vitesse élevée
(43.000 fois par seconde) sous une pression positive. Ces implosions de bulles (à une
vitesse allant jusqu’à 400 km/h) créent des cavités qui arrachent littéralement les
particules de saleté de la surface. Grâce à la petite taille des bulles, ce processus de
nettoyage convient particulièrement au nettoyage d’endroits difficilement accessibles et
ceci sans danger d’endommager le substrat.
Généralement, l’agent nettoyant utilisé est l’eau étant donné son bas coût et son
utilisation sans danger pour l’environnement.
6. Emploi
Se référer aux illustrations en page 2 de cette notice.
1. Ouvrir le couvercle [A] comme illustré, placer les objets dans le panier [M] et
poser-les dans le réservoir [C]. Ne pas surcharger le panier et s’assurer que les
objets ne se touchent pas pour éviter des rayures par cause de friction.
Remplir de l’eau entre les repères MIN et MAX – les objets à nettoyer doivent être
entièrement submergés. Si désiré, ajouter un peu de détergent.
Remarque : nettoyage indirect :
Placer les objets dans une petite cuve (pas livrée, p.ex. bocal en verre, boîte métallique,
etc.) et remplir la cuve avec du liquide de sorte que les objets à nettoyer soient
entièrement submergés. Des liquides éventuels contiennent : hexane (dissout la
graisse), acétone (dissout l’encre), alcool pur (évaporation rapide), huile d’horloge
(prévient l’oxydation, alcool isopropylique (nettoie et désinfecte), etc.
La cuve sélectionnée absorbera une partie de l’énergie ultrasonore ce qui diminuera
l’effet de nettoyage :
cuve
absorbe
plastique
30 %
aluminium
20 %
inox
8 %
Placer la petite cuve dans le réservoir en inox [C], ne pas utiliser le panier [M]. Ajouter
de l’eau, s’assurer que le niveau d’eau dépasse le repère MIN mais ne coule pas dans la
petite cuve.
Ne pas activer l’appareil sans suffisamment d’eau dans le réservoir pour éviter de
l’endommagement irrévocable au VTUSC6.
Strona się ładuje...
Strona się ładuje...
Strona się ładuje...
Strona się ładuje...
Strona się ładuje...
Strona się ładuje...
Strona się ładuje...
Strona się ładuje...
Strona się ładuje...
Strona się ładuje...
Strona się ładuje...
Strona się ładuje...
Strona się ładuje...
Strona się ładuje...
Strona się ładuje...
Strona się ładuje...
Strona się ładuje...
Strona się ładuje...
Strona się ładuje...
Strona się ładuje...
Strona się ładuje...
Strona się ładuje...
Strona się ładuje...
Strona się ładuje...
Strona się ładuje...
Strona się ładuje...
Strona się ładuje...
Strona się ładuje...
Strona się ładuje...
-
 1
1
-
 2
2
-
 3
3
-
 4
4
-
 5
5
-
 6
6
-
 7
7
-
 8
8
-
 9
9
-
 10
10
-
 11
11
-
 12
12
-
 13
13
-
 14
14
-
 15
15
-
 16
16
-
 17
17
-
 18
18
-
 19
19
-
 20
20
-
 21
21
-
 22
22
-
 23
23
-
 24
24
-
 25
25
-
 26
26
-
 27
27
-
 28
28
-
 29
29
-
 30
30
-
 31
31
-
 32
32
-
 33
33
-
 34
34
-
 35
35
-
 36
36
-
 37
37
-
 38
38
-
 39
39
-
 40
40
-
 41
41
-
 42
42
-
 43
43
-
 44
44
-
 45
45
-
 46
46
-
 47
47
-
 48
48
-
 49
49


Perel VTUSC6 Instrukcja obsługi
- Kategoria
- Ogrzewacze pomieszczeń
- Typ
- Instrukcja obsługi
w innych językach
- español: Perel VTUSC6 Manual de usuario
- Deutsch: Perel VTUSC6 Benutzerhandbuch
- português: Perel VTUSC6 Manual do usuário
- français: Perel VTUSC6 Manuel utilisateur
- Nederlands: Perel VTUSC6 Handleiding
Powiązane artykuły
Inne dokumenty
-
Velleman VTUSCT6 Instrukcja obsługi
-
Silvercrest SUR 46 A1 Operation and Safety Notes
-
Velleman VTUSC Instrukcja obsługi
-
Velleman VTUSCT2 Instrukcja obsługi
-
Sanitas SUR 42 Skrócona instrukcja obsługi
-
Beta 1895 6 Instrukcja obsługi
-
-
Carrera Sinus Ultra Instructions For Use And Guarantee
-
Silvercrest SUR 46 C2 Operating Instructions Manual
-