Novus NVIP-2ATM-4401 Instrukcja obsługi
- Kategoria
- Kamery ochrony
- Typ
- Instrukcja obsługi
Niniejsza instrukcja jest również odpowiednia dla

U s e r ’ s m a n u a l
4000 series IP cameras

IP 4000 series cameras - user’s manual ver. 1.2
All rights reserved © AAT Holding S.A.
2
1. WWW INTERFACE .................................................................................................. 4
1.1. The Remote Preview Interface .......................................................................... 4
2. CAMERA OPERATION MODE - PLAYBACK ....................................................... 7
3. CAMERA CONFIGURATION MODE - REMOTE SETTING ............................... 8
3.1. A group of settings "Display" ............................................................................ 9
3.1.1. „Live” Menu ........................................................................................ 9
3.1.2. „Image Control” Menu ......................................................................... 9
3.1.3. „Privacy Zone” Menu. ........................................................................ 10
3.1.4 „ROI” Menu (Region Of Interest) ........................................................ 11
3.2. A group of settings "Record"........................................................................... 12
3.2.1. „Record Parameters” Menu ................................................................ 12
3.2.2. „Schedule” Menu ............................................................................... 12
3.3. A group of settings "Network" ........................................................................ 13
3.3.1. „Network Setting” Menu .................................................................... 13
3.3.2. „WiFi Setting” Menu .......................................................................... 14
3.3.3. „Video Streaming” Menu ................................................................... 15
3.3.4. „Email” Menu ................................................................................... 16
3.3.5. „DDNS” Menu ................................................................................... 16
3.3.6. „IP Filter” Menu ................................................................................. 16
3.3.7. „RTSP” Menu .................................................................................... 16
3.3.8. „FTP” Menu....................................................................................... 16
3.4. A group of settings „Alarm”............................................................................ 17
3.4.1. „Motion” Menu ................................................................................... 17
3.4.2. „Alarm” Menu ..................................................................................... 18
3.4.3. „Lens Shade” Menu ............................................................................ 18
3.4.4. „Audio events detection” Menu ........................................................... 19
3.4.5. „PIR” Menu ........................................................................................ 20
3.4.6. „Deterrent” Menu ................................................................................ 21
TABLE OF CONTENTS

IP 4000 series cameras - user’s manual ver. 1.2
All rights reserved © AAT Holding S.A.
3
3.5. A group of settings „Device” ...........................................................................23
3.5.1. „SD Card” Menu ..........................................................................23
3.5.2. „Audio” Menu .............................................................................23
3.5.3. „Log” Menu ................................................................................24
3.5.4. „Cloud Storage” Menu ................................................................24
3.6. A group of settings „System” ..........................................................................25
3.6.1. „General” Menu ...........................................................................25
3.6.2. „Users” Menu ...............................................................................26
3.6.3. „Info” Menu .................................................................................26
3.7. A group of settings „Advanced” ......................................................................27
3.7.1. ”Firmware Update” Menu ............................................................27
3.7.2. „Load Default” Menu ...................................................................27
3.7.3. „Maintain” Menu .........................................................................27
3.7.4. „Settings backup” Menu ...............................................................27
3.8. A group of settings „Intelligent” ......................................................................28
3.8.1. „Schedule” Menu .........................................................................28
3.8.2. „Detection” Menu ........................................................................28
3.8.2.1. „Perimeter Intrusion Detection (PD)” Menu ...............29
3.8.2.2. „Line Crossing Detection (LC)” Menu .......................31
3.8.2.3. „Stationary Object Detection (SOD)” Menu ...............33
3.8.2.4. „Pedestrian Detection (PD)” Menu.............................35
3.8.2.5. „Face Detection (FD)” Menu .....................................37
3.8.2.5.1 Cameras with a basic version .......................37
3.8.2.5.2 Cameras with an advanced version ..............49
3.8.2.6. „Cross Counting” Menu .............................................41
3.8.3. „Analysis” Menu ..........................................................................43
4. CAMERA CONFIGURATION MODE - LOCAL SETTING ................................44
TABLE OF CONTENTS

IP 4000 series cameras - user’s manual ver. 1.2
All rights reserved © AAT Holding S.A.
4
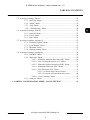
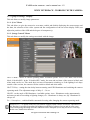
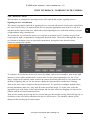
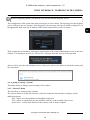
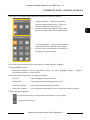
WWW INTERFACE - MAIN WINDOW
1. WWW INTERFACE
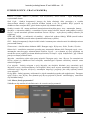
1.1. The Remote Preview Interface
In subsequent chapters are described all the functionality present in 4000 series cameras.
Depending on your camera model and/or firmware version, some features may not be
available or not supported. Detailed information about the features of the camera are
included in the data sheet at www.aat.pl, and in the quick start guide supplied with the
camera.
6.
8.
7.
3. 4.
5.
2. 1.
9.

IP 4000 series cameras - user’s manual ver. 1.2
All rights reserved © AAT Holding S.A.
5
WWW INTERFACE - MAIN WINDOW
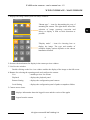
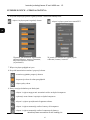
1. Displays the image control panel on fisheye cameras:
2. Stream selection buttons for display in the remote preview window.
3. Live Preview window.
Double-clicking on the live view window enables the display of the image on the full screen.
4. Buttons for selecting the operating mode and configure the camera:
Live - enables preview live stream
Playback - displays the playback panel
Remote Setting - displays the configuration panel camera
Local Setting - displays the configuration panel of paths to snapshots folders
5. Camera access icons:
- displays information about the logged in user and the version of the applet
- logout from the camera
"Mount type" - icons for determining the way of
mounting the camera. The right choice affects the
selection of image geometry correction and
allows to display it with as little distortion as
possible
"Display mode" - icons for choosing how to
display the image. The type and number of
available display options depends on the chosen
installation location.

IP 4000 series cameras - user’s manual ver. 1.2
All rights reserved © AAT Holding S.A.
6
WWW INTERFACE - MAIN WINDOW
6. Buttons enabling panels for image adjustment and lens control options:
7. Enable/disable live preview
8. Buttons to set the size and aspect ratio
9. Additional features control icons:
- enable/disable the lens control panel - enable/disable the image adjustment panel
The panel is able to adjust the hue,
brightness, contrast, color saturation and
sharpness (clarity).
The panel is able to adjust the field of view
(zoom) and focus
- sets the original aspect ratio
- fits the image to the browser window
- sets full screen
- enables and disables enlarge the picture
- enables and disables the record a video stream on your computer
- performs a screenshot and saves on your computer
- enables and disables the audio transmission from the camera to PC
enables and disables the audio transmission from PC to the camera

IP 4000 series cameras - user’s manual ver. 1.2
All rights reserved © AAT Holding S.A.
7
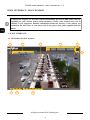
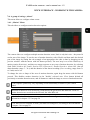
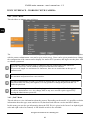
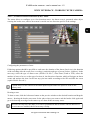
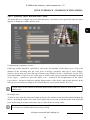
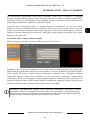
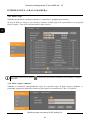
2. CAMERA OPERATION MODE - PLAYBACK
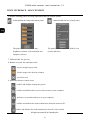
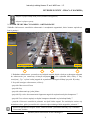
Playback tab allows to play and manage recordings that the camera saves to the memory card.
1. A player calendar - allows to search recordings (the date on which recordings are available for
playback is marked with a green triangle ). After selecting a date, from the drop-down list
“Type”, select the kind of recording to search and then click Search button.
2. A player control buttons, from left:
- Play/Pause button
- Stop button
- Forward-one-frame button
- Record button to select a fragment of the recordings to be saved on your computer *
- Capture button to save on your computer currently displayed frame *
- Download button to download to PC a block of recordings. After pressing opens another
window, where is possible to choose corresponding fragment recordings for download *
WWW INTERFACE - WORKING WITH CAMERA
5. 4. 3.
2.
1.
- enables and disables the white LED (warning light)
- enables and disables the siren
* video clip recordings, screenshots and download settings are made in the Local Setting tab

IP 4000 series cameras - user’s manual ver. 1.2
All rights reserved © AAT Holding S.A.
8
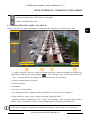
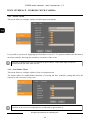
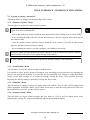
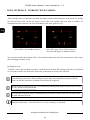
- button for changing the playback speed. After pressing it, the options for choosing the playback
speed, from x1 / 8 to x8, are displayed
3. Recordings timeline. Recordings in continuous mode are shown in green color, and in alarm
mode - in blue color. You can change the range of time axis for precise selection of recordings -
using the mouse wheel or using the zoom buttons on the left side of the timeline.
4. Preview window. Double-clicking by left mouse button on the preview window enables and
disables displaying of the image on the full screen.
5. Additional function buttons, from left:
- Zoom button enables and disables the zooming part of the image. Zooming is done by selecting
the part of the image with the mouse left button pressed. Pressing the right button restores the
original image size.
- sets the original aspect ratio
- fits the image to the browser window
- sets full screen
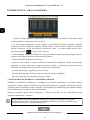
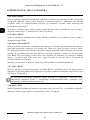
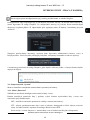
3. CAMERA CONFIGURATION MODE - REMOTE SETTING
This tab allows the user to modify and configuration of all parameters and camera settings, available
in the particular model. Most of the settings can be changed in a convenient and safe manner,
selecting the parameter value from the drop-down list. In the case of fields allow to enter your own
parameter is specified allowable range.
However, any changes should be made prudently, so as not to cause loss of stream or communication
with the camera.
WWW INTERFACE - WORKING WITH CAMERA
Please note that in order to changes were visible (or applied), pressing the Save button located
on each tab (except the Log, Info and Firmware Upgrade tabs) - before closing it is needed.

IP 4000 series cameras - user’s manual ver. 1.2
All rights reserved © AAT Holding S.A.
9
WWW INTERFACE - WORKING WITH CAMERA
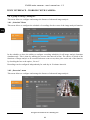
3.1. A group of settings "Display"
This tab allows to modify image parameters.
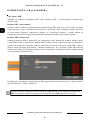
3.1.1. „Live” Menu
This tab allows to give the camera its own name, enable and disable displaying the camera name and
the date, the selection of the video system and the configuration of the on-screen display OSD (can
adjust the position of the OSD and the degree of transparency).
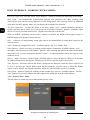
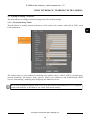
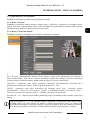
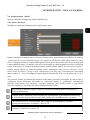
3.1.2. „Image Control” Menu
This tab allows to modify the settings associated with the image.
IR-CUT Mode - choice of camera operating mode. Available options: Auto, Color Mode, Black-White
Mode, Schedule(BW). In the "Schedule(BW)" mode, the start and end time of the camera in black and
white mode can be set. This mode does not turn off automatic switching, so if the lighting level drops
outside of the set time, the camera will also switch to black and white mode.
IR-CUT Delay - setting the time delay between turning on/off IR illuminator and switching the camera
operating mode. The adjustment range of delay: 2 ~ 36 sec.
IR-LED - set the mode of IR illuminator. Available options: Auto - Illuminator works autonomously
and turns on and off according to lighting changes, On - illuminator is always on, Off - Illuminator is
always off.
D<->N Autofocus - enables/disables automatic focusing after changing the camera operating mode
Autofocus D<->N option works only on cameras equipped with a motor-zoom lens. Operation of
this function is strongly dependent on brightness and kind of observed scene and in some cases
correct sharpening the image with this function can be disrupted (focus may not be set correctly).
In this case, disable this function.

IP 4000 series cameras - user’s manual ver. 1.2
All rights reserved © AAT Holding S.A.
10
WWW INTERFACE - WORKING WITH CAMERA
Lens Flip, Angle Flip, Corridor Mode, Angle Rotation - options to modify the displaying of the image
Back Light - rear backgrounds compensation function that eliminates the effect resulting from
observing the area with too strong light source in the background. After selecting Enable an additional
drop-down list BLC appears, where you can choose the strength of the function.
3D Noise Reduction - we have the ability to set three modes: Auto - camera automatics decides to
enable reduction and by slider Level can specify the maximum correction, Manual - manually adjust
the level of noise correction and Disable - digital noise reduction is turned off.
WDR (or DWDR - depending on the model) - enables or disables the WDR (wide dynamic range) or
DWDR (digital wide dynamic range) function
HLC - a function of compensating strong light sources and automatically leveling their impact on the
camera's sensor
AGC - defines the strength of the AGC. Available options: Off, Low, Middle, High
White Balance - allows to set way of working a white balance automation. Available options: Auto -
automatics itself corrects the color balance, Manual - after selecting this option, the sliders to manually
adjust the level of color components appears, Indoor - an option dedicated when the camera works
inside the room
Shutter - allows selection of shutter mode. Available options: Auto and Manual. When set to Manual,
an additional drop-down list appears, allowing you to select a specific shutter speed value.
Time Exposure - function related to the Shutter option has two functions: when the Shutter option is set
to Auto, it specifies the longest shutter speed that the automatic exposure can use. When the Shutter
option is set to Manual, the exposure automatic adopts the selected shutter speed as a constant.
Defog Mode - feature to improved visibility in bad weather (fog, rain etc). Available options: Disable,
Auto, Manual. If you select Manual the slider appears for setting the strength of the function.
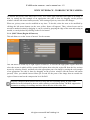
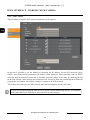
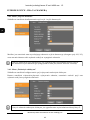
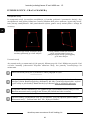
3.1.3. „Privacy Zone” Menu
This tab allows to enable up to four independent privacy zones.

IP 4000 series cameras - user’s manual ver. 1.2
All rights reserved © AAT Holding S.A.
11
WWW INTERFACE - WORKING WITH CAMERA
To activate the privacy zone move the Privacy Zone slider right, and then select part of an image to
hide, by setting the red rectangle of an appropriate size (this is done by dragging on the preview
window with the left mouse button pressed). After setting all privacy zones save the changes.
When set, privacy zones can be modified at any time. To do this, select the zone to be modified by
clicking the left mouse button (on the zone yellow frame will appear). Then, selected zone can be
moved to another location by dragging it, can be resized by grasping the edge of the zone and setting as
needed, or can by deleted by clicking on the Delete button.
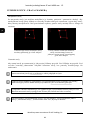
3.1.4. „ROI” Menu (Region Of Interest)
This tab allows to set the "areas of interest" for the streams.
This tab allows to define up to eight regions of interest. To activate the appropriate region must first
select the stream in which will be operate ROI option, then select the region ID from the list, activate
an area by selecting Enable, and then select the appropriate part of an image by setting the red rectangle
of an appropriate size (this is done by dragging on the preview window with the mouse left button
pressed). Next, you should choose frames per second for the parts of the image that are outside the
region of interest and set the compression level for ROI.
Properly configured ROI function allows to keep the best recording quality in parts of the
monitored scene indicated by the user while reducing overall data stream. The ROI supports the
economic recording of recordings and also affects the size of the video files.

IP 4000 series cameras - user’s manual ver. 1.2
All rights reserved © AAT Holding S.A.
12
WWW INTERFACE - WORKING WITH CAMERA
3.2. A group of settings "Record"
This tab allows to modify the recording options.
3.2.1. „Record Parameters” Menu
This menu allows to enable/disable recording to the SD card, enable/disable pre-alarm recording,
enable recording in the event of a network outage, and select a stream to record (main or sub stream).
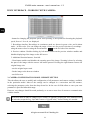
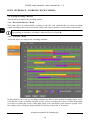
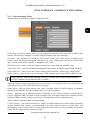
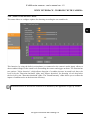
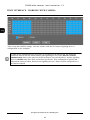
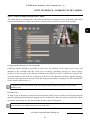
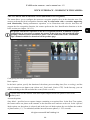
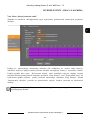
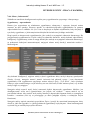
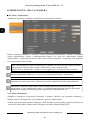
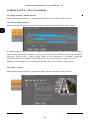
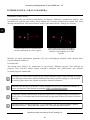
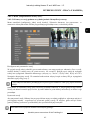
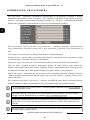
3.2.2. „Schedule” Menu
This menu allows to configure the recordings schedule .
In the schedule can be set up recordings schedules for three events: normal recording (green color),
recording the events of motion detection (yellow color), recording the events of alarm input/output
(red color), recording the events of PIR (light purple color) and audio events detection (purple color).
Recordings can be configured independently for each day in intervals of 30 minutes.
The enabling of continuous recording is indicated by the red letter R

IP 4000 series cameras - user’s manual ver. 1.2
All rights reserved © AAT Holding S.A.
13
3.3. A group of settings "Network"
The menu allows to configure network settings and video streams settings.
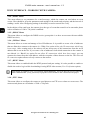
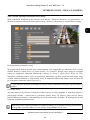
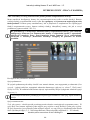
3.3.1. „Network Setting” Menu
This tab allows to modify network parameters of the camera (for cameras with built-in WiFi: wired
LAN parameters).
The camera allows to set a method for obtaining of IP address (Static, PPPoE, DHCP), network ports,
network parameters (IP address, mask, gateway, DNS server addresses), and enable/disable UPNP
services, and enabling / disabling and configuring the Multicast service.
WWW INTERFACE - WORKING WITH CAMERA
We do not recommend using the DHCP servers in the network monitoring devices. For optimum
quality and reliability is advisable to use a static IP network settings.

IP 4000 series cameras - user’s manual ver. 1.2
All rights reserved © AAT Holding S.A.
14
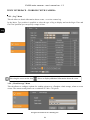
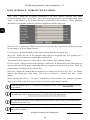
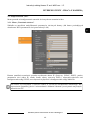
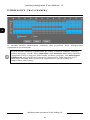
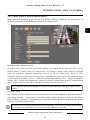
3.3.2. „WiFi” Menu
This tab allows to modify WiFi network parameters of the camera.
In this tab is possible to set the method of obtaining the IP address for the WiFi network (Static,
DHCP, Auto) and network parameters (IP address, mask, gateway). When choosing Auto or DHCP,
select the desired network from the list of available networks visible in the table, by checking the box
in the first column. After entering the password in the Password field and confirming the selection by
pressing the Save button, the camera is ready to connect to the WiFi network.
The camera will connect to the WiFi network after disconnecting the wired LAN cable.
WWW INTERFACE - WORKING WITH CAMERA
We do not recommend using the DHCP servers in the network monitoring devices. For optimum
quality and reliability is advisable to use a static IP network settings.

IP 4000 series cameras - user’s manual ver. 1.2
All rights reserved © AAT Holding S.A.
15
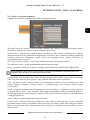
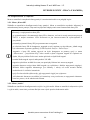
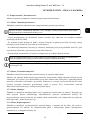
3.3.3. „Video Streaming” Menu
This tab allows to modify the settings of camera streams.
In the Video Streaming settings menu you can change the parameters for each of the available video
streams. The stream to configure is selected using the buttons at the top of the page.
Resolution - the resolution of configured video stream. Each of the video streams available in the
camera can be individually configured. This allows e.g. to set a high-quality stream for archival video
and a second stream in lower quality, to displaying "live" video.
FPS (frames per second) - select the number of frames per second from the available range
Video Code Type - a choice of standard encoding the video stream. Available options H264 and H265
Video Code Level - allows to set one of the available profiles (Baseline, Main Profile, High Profile)
Bitrate Control - there are two types of bit rates: CBR (constant bit rate) and VBR (variable bit rate).
When the VBR is selected, from the drop-down list below you can choose the level of quality of the
video stream. If you select CBR, this list does not appear.
Bitrate Mode - allows to select bitrates from a list of available values (Predefined option), or manually
enter the desired bitrate, from the available range (User-defined option).
Bitrate - parameter has a different function, depending on the option selected in position Bitrate
Control: when the VBR is selected, sets the maximum size of the data stream with a variable bit rates,
while the CBR is selected, sets the specific size of the data stream with a constant bit rates.
Audio - enables or disables audio stream encoding.
I Frame Interval - time interval between key frames. For higher bitrates, key frames interval should be
smaller. Smaller frame interval is recommended to increase position accuracy of return video and
advantageous to the network video. If frame interval become small, the video streaming will become
bigger, but the image quality will become better.
WWW INTERFACE - WORKING WITH CAMERA
Profiles Baseline, Main Profile and High Profile are available only for H264 coding standard.
For H265 standard only the Main Profile is available.

IP 4000 series cameras - user’s manual ver. 1.2
All rights reserved © AAT Holding S.A.
16
3.3.4. „Email” Menu
This menu allows to set parameters for e-mail message, which the camera can send when an event
occurs. Here should be given the parameters and settings of the sender and recipient, and the interval of
sending e-mails. After configuring settings is the ability to send a test mail for verify.
In the subject of the email sent, the camera gives the type of event that caused it to be sent and a photo
with a resolution of 1280 x 720 pixels is attached.
3.3.5. „DDNS” Menu
This menu allows to configure the DDNS service (prerequisite is to have an account with an available
DDNS services).
3.3.6. „IP Filter” Menu
This menu allows to create and manage a list of IP addresses. It is possible to create a list of addresses
that are allowed to connect to the camera (i.e. White List, option Allow only IP connections which have
been setup). After creating such a list camera will not accept any of the connections from the an IP
address that is not on the list. If you create a list of addresses from which connection to the camera is
not allowed (i.e. Black List, option Do not allow IP connections which have been setup), you can
connect the camera from the each address, with the exception of those that are on the list. The Allow all
IP connection option allows to freely connect to the camera.
3.3.7. „RTSP” Menu
This menu allows to enable/disable the RTSP protocol and port setting. It is also possible to enable or
disable the need to log in while downloading/viewing RTSP video stream (User Verification option).
3.3.8. „FTP” Menu
This menu allows to configure the camera to send photos to an FTP server when an event occurs. The
camera sends photos at a resolution of 1280 x 720 pixels.
WWW INTERFACE - WORKING WITH CAMERA
When login is required (User Verification option Enabled), you will need to log in with the
camera administrator (root) password, to play the RTSP stream on the external device/player.

IP 4000 series cameras - user’s manual ver. 1.2
All rights reserved © AAT Holding S.A.
17
3.4. A group of settings „Alarm”
This menu allows to configure alarm events.
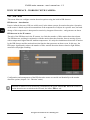
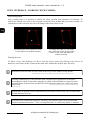
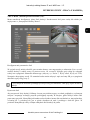
3.4.1. „Motion” Menu
This tab allows to configure motion detection options.
The camera allows to configure multiple motion detection zones, limit is only their size - they must fit
on the area of the image. To set the area of motion detection, select Enable and then mark the desired
part of the image by setting the red rectangle of an appropriate size (this is done by dragging on the
preview window with the mouse with left button pressed). The next step is to set the sensitivity of
motion (option Sensitivity), and then set camera response to an event of motion detection, by selecting
Send Email, Send to the cloud*, Send to FTP, Deterrent**, Enable Record or Alarm Out. Also an
alarm duration (range 5 - 30 s) and the duration of the alarm recording (Post recording, range from 5 s
to 5 min) can be set.
To change the size or shape of the area of motion detection, again drag the mouse with left button
pressed. This disables motion detection in the "double" selected area. Clear button deleted all
previously set motion detection areas, and All button set whole the image as a area of motion detection.
WWW INTERFACE - WORKING WITH CAMERA
Event response options may vary depending on the functionality available in your camera
model.
Detection of motion in a set area/areas is indicated by the green letter M. When the events of
motion detection are recorded on the SD card, the letter M is red.
* for the Send to Cloud response to work, you must first configure it, according to the
information in chapter 3.5.4 on page 24
** for the Deterrent response to work, you must first configure it, according to the information
in chapter 3.4.6 on page 21

IP 4000 series cameras - user’s manual ver. 1.2
All rights reserved © AAT Holding S.A.
18
3.4.2. „Alarm” Menu
This menu allows to configure options of alarm inputs and outputs.
It is possible to set the state triggering the alarm input event (NO, NC options available), the duration of
the alarm, and also choosing the reaction to occurrence of the event.
3.4.3. „Lens Shade” Menu
This menu allows to configure option of lens covering detection.
The camera allows to enable/disable detection of covering the lens, sensitivity setting and select the
response to the occurrence of an event.
WWW INTERFACE - WORKING WITH CAMERA
Detection of alarm input event is indicated by green letter I. If the alarm input events are
recorded on the SD card, letter I is red.
Detection of an event of covering the lens is indicated by green letter C.

IP 4000 series cameras - user’s manual ver. 1.2
All rights reserved © AAT Holding S.A.
19
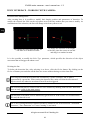
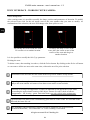
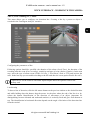
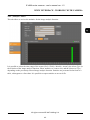
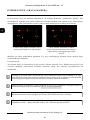
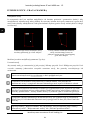
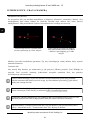
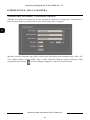
3.4.4. „Audio events detection” menu
This menu allows to configure options for detecting exceeding the set sound levels.
This function, by using the built-in microphone (or connected to the camera's audio input), allows to
detect sudden changes in the sound level surrounding the camera and trigger an alarm. The function has
two options: "Noise detection", which allows detection of a sudden increase in sound level above the
level set by the "Detection threshold" slider, and "Silence detection" for detecting a level drop below
the level set by the "Detection threshold" slider. The "Sound Intensity" slider allows you to reduce the
impact of ambient noise on the detection efficiency.
WWW INTERFACE - WORKING WITH CAMERA
Detection increase or decrease the sound level is indicated by the appearance of pop-up window.

IP 4000 series cameras - user’s manual ver. 1.2
All rights reserved © AAT Holding S.A.
20
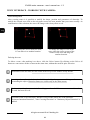
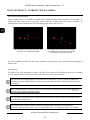
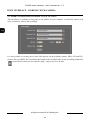
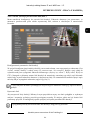
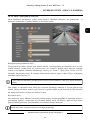
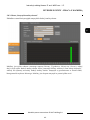
3.4.5. „PIR” Menu
This menu allows to configure motion detection options using the built-in PIR detector.
PIR detector - introduction
Passive infrared detectors (PIR) are widely used, in the alarm systems for motion detection. Operation
of the sensor is based on precise measurement of the temperature of objects in a specific area, and each
change of this temperature is interpreted as motion by integrated electronics - and generates an alarm.
PIR detector in the IP camera
The task of the PIR detector in the IP camera is to limit the number of false motion detection alarms.
The PIR detector, working in conjunction with the motion detection function, detects moving objects
with a temperature higher than the ambient temperature. It is only the simultaneous detection of motion
by the PIR detector and the motion detection function that generates an alarm event. In this way, the
PIR sensor significantly reduces the number of false motion detection alarms related to light flashes,
snowfall or day/night switching.
Configuration and management of the PIR detection zones are carried out identically to the motion
detection options (chapter 3.4.1 "Motion" menu)
WWW INTERFACE - WORKING WITH CAMERA
Detection of motion in a set area/areas is indicated by the green letters PIR. When the events of
motion detection are recorded on the SD card, the letters PIR are red.
Strona się ładuje...
Strona się ładuje...
Strona się ładuje...
Strona się ładuje...
Strona się ładuje...
Strona się ładuje...
Strona się ładuje...
Strona się ładuje...
Strona się ładuje...
Strona się ładuje...
Strona się ładuje...
Strona się ładuje...
Strona się ładuje...
Strona się ładuje...
Strona się ładuje...
Strona się ładuje...
Strona się ładuje...
Strona się ładuje...
Strona się ładuje...
Strona się ładuje...
Strona się ładuje...
Strona się ładuje...
Strona się ładuje...
Strona się ładuje...
Strona się ładuje...
Strona się ładuje...
Strona się ładuje...
Strona się ładuje...
Strona się ładuje...
Strona się ładuje...
Strona się ładuje...
Strona się ładuje...
Strona się ładuje...
Strona się ładuje...
Strona się ładuje...
Strona się ładuje...
Strona się ładuje...
Strona się ładuje...
Strona się ładuje...
Strona się ładuje...
Strona się ładuje...
Strona się ładuje...
Strona się ładuje...
Strona się ładuje...
Strona się ładuje...
Strona się ładuje...
Strona się ładuje...
Strona się ładuje...
Strona się ładuje...
Strona się ładuje...
Strona się ładuje...
Strona się ładuje...
Strona się ładuje...
Strona się ładuje...
Strona się ładuje...
Strona się ładuje...
Strona się ładuje...
Strona się ładuje...
Strona się ładuje...
Strona się ładuje...
Strona się ładuje...
Strona się ładuje...
Strona się ładuje...
Strona się ładuje...
Strona się ładuje...
Strona się ładuje...
Strona się ładuje...
Strona się ładuje...
Strona się ładuje...
Strona się ładuje...
Strona się ładuje...
Strona się ładuje...
-
 1
1
-
 2
2
-
 3
3
-
 4
4
-
 5
5
-
 6
6
-
 7
7
-
 8
8
-
 9
9
-
 10
10
-
 11
11
-
 12
12
-
 13
13
-
 14
14
-
 15
15
-
 16
16
-
 17
17
-
 18
18
-
 19
19
-
 20
20
-
 21
21
-
 22
22
-
 23
23
-
 24
24
-
 25
25
-
 26
26
-
 27
27
-
 28
28
-
 29
29
-
 30
30
-
 31
31
-
 32
32
-
 33
33
-
 34
34
-
 35
35
-
 36
36
-
 37
37
-
 38
38
-
 39
39
-
 40
40
-
 41
41
-
 42
42
-
 43
43
-
 44
44
-
 45
45
-
 46
46
-
 47
47
-
 48
48
-
 49
49
-
 50
50
-
 51
51
-
 52
52
-
 53
53
-
 54
54
-
 55
55
-
 56
56
-
 57
57
-
 58
58
-
 59
59
-
 60
60
-
 61
61
-
 62
62
-
 63
63
-
 64
64
-
 65
65
-
 66
66
-
 67
67
-
 68
68
-
 69
69
-
 70
70
-
 71
71
-
 72
72
-
 73
73
-
 74
74
-
 75
75
-
 76
76
-
 77
77
-
 78
78
-
 79
79
-
 80
80
-
 81
81
-
 82
82
-
 83
83
-
 84
84
-
 85
85
-
 86
86
-
 87
87
-
 88
88
-
 89
89
-
 90
90
-
 91
91
-
 92
92


Novus NVIP-2ATM-4401 Instrukcja obsługi
- Kategoria
- Kamery ochrony
- Typ
- Instrukcja obsługi
- Niniejsza instrukcja jest również odpowiednia dla
w innych językach
- English: Novus NVIP-2ATM-4401 User manual
Powiązane artykuły
-
Novus NVIP-2VE-4201 (NVIP-2DN2101V/IR-1P) Instrukcja obsługi
-
-
-
-
-
-
-
-
Novus NVR-6332-H2/F Instrukcja obsługi
-
Inne dokumenty
-
Abus TVAC80010B Instrukcja obsługi
-
TrueCam a4 Instrukcja obsługi
-
Xblitz Dual Core Instrukcja obsługi
-
Overmax Camspot 4.4 – Wi-Fi/detekcja ruchu Instrukcja obsługi
-
media-tech MT4098 Instrukcja obsługi
-
-
Blaupunkt HOS-X20 Instrukcja obsługi
-
Abus PPIC90200 Instrukcja obsługi
-
-
JUNG W8280 Instrukcja obsługi