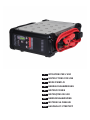
LAUNCH Flashpower 120 Instructions For Use Manual
- Typ
- Instructions For Use Manual

ISTRUZIONI PER L’USOI
INSTRUCTIONS FOR USEEN
MODE D’EMPLOIF
GEBRAUCHSANWEISUNGD
INSTRUCCIONESE
INSTRUÇÕES DE USOPT
GEBRUIKSAANWIJZINGNL
INSTRUKCJA OBSŁUGIPL
HASZNÁLATI ÚTMUTATÓ
HU

2
MANUALE D’USO ED ISTRUZIONI PER CARICABATTERIE ELETTRONICO
12V MULTIFUNZIONE.
Conservare accuratamente le istruzioni di sicurezza e consegnarle al personale utilizzatore.
DESTINAZIONE D’USO
Il caricabatterie elettronico, è destinato al seguente uso:
• per la carica e l’alimentazione dei veicoli
• da utilizzare su batterie a 12V, Wet - Agm - lithium (LiFePO4)
• durante le fasi di riprogrammazione e autodiagnosi
Non sono consentite le seguenti operazioni:
• è vietato l’uso su batterie diverse da 12V
• è vietato l’utilizzo al di fuori delle prescrizioni tecniche contenute nella tabella DATI TECNICI
• è vietato l’utilizzo in ambienti umidi, bagnati o esposti ad intemperie
• è vietato l’utilizzo per tutte quelle applicazioni diverse da quelle indicate
SICUREZZA DELLA POSTAZIONE DI LAVORO
Non utilizzare il caricabatterie in ambienti contenenti atmosfere potenzialmente esplosive o
Impedire che bambini o visitatori possano avvicinarsi alla postazione di lavoro mentre si sta
operando con il tester batterie. La presenza di altre persone provoca distrazione e può
comportare la perdita del controllo durante l’utilizzo.
Non inalare eventuali gas nocivi sprigionati dalla batteria del veicolo, mentre si opera sul motore.
Durante le operazioni di collegamento, allontanare il volto dalla batteria del veicolo. Il liquido
contenuto all’interno della batteria è corrosivo, qualora vi fosse un contatto accidentale con
dell’acido con la pelle o con gli occhi sciacquare immediatamente con acqua e consultare
un medico.
della batteria stessa.
Utilizzare il caricabatterie in una zona asciutta evitando umidità.
SICUREZZA CARICABATTERIE
• Controllare prima dell’utilizzo che il caricabatterie non abbia subito danneggiamenti, e che non vi
siano cavi scoperti o parti usurate.
• Non utilizzare il caricabatterie se è danneggiato, poiché vi è rischio di scosse elettriche, non cercare
IMPORTANTE LEGGERE COMPLETAMENTE IL PRESENTE MANUALE PRIMA
DI UTILIZZARE IL CARICABATTERIE. IN CASO DI MANCATO RISPETTO
DELLE NORME DI SICUREZZA E DELLE ISTRUZIONI OPERATIVE,
POSSONO VERIFICARSI SERI INFORTUNI.
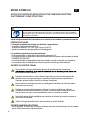
ATTENZIONE
ISTRUZIONI PER L’USO
I

3
• Collegare il cavo di alimentazione del caricabatterie alla presa di rete, assicurandosi che la tensione di
rete sia quella indicata sul dispositivo di alimentazione. (Vedere tabella DATI TECNICI)
• Al termine delle operazioni non lasciare il caricabatterie collegato alla presa di rete per un lungo
periodo.
• Non manomettere il circuito elettronico del caricabatterie.
INDICAZIONE PER LA SICUREZZA DEL PERSONALE
• Si raccomanda la massima attenzione, avendo cura di concentrarsi sempre sulle proprie azioni.
Non utilizzare il caricabatterie in caso di stanchezza o sotto l’effetto di droghe, bevande alcoliche o
medicinali.
• Utilizzare sempre i seguenti dispositivi individuale di protezione:
• scarpe di sicurezza
• occhiali di protezione
• Effettuare tutte le operazioni previste in ambienti adeguatamente areati ed asciutti.
• Non mettere mai in contatto fra di loro i morsetti delle due pinze (rossa (+) positiva; nero (-)
negativo).
• Assicurarsi che i cavi del caricabatterie siano lontani da ventole, parti in movimento e dal condotto del
carburante.
• Non indossare vestiti larghi, non portare bracciali, catenine o oggetti metallici quando si lavora sul
veicolo.
• Prima di riporre il caricabatterie assicurarsi che sia raffreddato raggiungendo la temperatura ambiente.
UTILIZZO ACCURATO DEL CARICABATTERIE
• caricabatterie.
• Non utilizzare mai il caricabatterie se la custodia, le pinze, i cavi o il cavo di alimentazione sono
danneggiati. Se si sentono odori inusuali o se produce troppo calore.
• sicurezza ed aumentare i rischi per l’operatore.
• Far riparare il caricabatterie solo ed esclusivamente da personale specializzato e solo impiegando
pezzi di ricambio originali.
• Pima di eseguire ogni operazione, spegnere le luci del veicolo e tutti gli accessori eventualmente in
funzione.
• del veicolo. Eventuale superamento può causare esplosioni, danni al veicolo, al caricabatterie
ed alle persone.
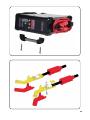
• Collegare sempre il conduttore di uscita con pinza rossa (+) al polo positivo della batteria, il
conduttore di uscita con pinza nera (-) alla massa del veicolo.
ISTRUZIONI PER L’USO
I

4
DISPOSITIVI DI PROTEZIONE INDIVIDUALI PREVISTI DURANTE L’UTILIZZO DEL CARICABATTERIE
Può essere necessario l’utilizzo di ulteriori dispositivi di protezione individuali da utilizzare in
funzione dei valori riscontrati nell’indagine di igiene ambientale/analisi rischi, nell’eventualità
che i valori superino i limiti previsti dalle vigenti normative.
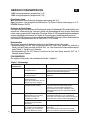
DATI TECNICI
INDOSSARE SEMPRE GLI OCCHIALI PROTETTIVI
UTILIZZARE SEMPRE CALZATURE DI SICUREZZA
UTILIZZARE SEMPRE GUANTI DI PROTEZIONE PER AGENTI FISICI DURANTE
L’UTILIZZO DEL TESTER BATTERIE
DA UTILIZZARE PER BATTERIE
TENSIONE NOMINALE
TENSIONE DI RICARICA
POTENZA ASSORBITA
CAPACITÀ BATTERIA IN CARICA
CAPACITÀ BATTERIA IN MANTENIMENTO
LUNGHEZZA CAVO PINZE
SEZIONE CAVO MORSETTI
GRADO DI PROTEZIONE
LUNGHEZZA CAVO ALIMENTAZIONE
DIMENSIONI
PESO
12V Wet - Agm - Lithium LiFePO4
110V-240V 50/60Hz
12V max
1800 Watt
10÷1200 Ah
10÷3000 Ah
2.7 m
25 mm2
IP20
1.7 m
350x450x150 mm
8.8 kg
• Non invertire mai la polarità l’inversione di polarità può causare esplosioni, danni al veicolo, al
caricabatterie ed alle persone.
• Per la pulizia utilizzare un panno asciutto, scollegando sempre il caricabatterie dalla rete di
alimentazione. Non utilizzare mai panni umidi o bagnati.
INDICAZIONI DI SICUREZZA PER IL CARICABATTERIE
•
• Non utilizzare il caricabatterie se è danneggiato, poiché vi è rischio di scosse elettriche, non cercare di
• Collegare il caricabatterie alla presa di rete, assicurandosi che la tensione di rete sia quella indicata sul
dispositivo di alimentazione. (Vedere tabella DATI TECNICI)
• Non coprire in alcun modo il caricabatterie durante il suo l’utilizzo. Garantire uno spazio adeguato per
la ventilazione.
• Non utilizzare il caricabatterie in ambienti umidi, bagnati, non esporlo a pioggia. Ambienti umidi e
contaminati aumentano il rischio di scosse elettriche.
ISTRUZIONI PER L’USO
I

5
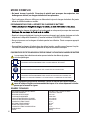
LED DI SEGNALAZIONE
Sul pannello frontale del caricabatterie sono presenti 15 led. N° 4 led sullo stato della batteria,
che segnalano:
• “Full” la batteria è carica, ed in mantenimento
• “Charging” la batteria è in carica
• “Fault” la batteria è danneggiata
• “Reverse” inversione di polarità
• N°1 “led ON” sullo stato di carica della batteria (colore Blu)
• N°1 “Start/Stop” (colore Giallo) sullo stato di funzionamento, segnala se sta erogando nella modalità
selezionata
• N°2 led sulla modalità operativa “Function” Flash o Charge (led Giallo)
• N°4 led sulla segnalazione di corrente erogata “Amperage” descritte successivamente (led giallo)
• N°3 led sulla segnalazione della tensione di alimentazione e tipo di batteria “Volt/Batt” descritte
successivamente (led Giallo).
Sul pannello frontale del caricabatterie sono previsti n° 5 pulsanti:
• “Start/Stop” avvia o ferma l’erogazione nella modalità selezionata
• “Function” selezionala modalità operativa
• “Volt/Batt” seleziona la tensione di Supply o il tipo di batteria da caricare
• “Amperage” seleziona la corrente erogata
• “A/V” (display) seleziona cosa visualizzare sul display
DISPLAY DIGITALE
Il tasto di selezione “A/V” permette di visualizzare a display la tensione o la corrente.
FUNZIONI DEL CARICABATTERIE E MODALITÀ OPERATIVE
A) Modalità operative: “Function”
Charge
Modalità di carica della batteria. Prevede 7 fasi di carica, di seguito descritte:
• FASE 1: Analisi 1. Se la batteria presenta una tensione superiore ai 6,5V, procede con la successiva fase.
Tensioni sotto i 6,5V causano il ritorno in stand-by del dispositivo.
i 13V
• FASE 3: Analisi 2. Ricerca elemento in corto. Il caricabatterie stacca l’erogazione di corrente per 5 minuti. Se
durante questo arco di tempo la tensione della batteria scende al di sotto degli 11,7V il dispositivo ritornerà
in stand-by. Se la tensione rimane superiore agli 11,7V si passa alla FASE 4. In caso di elemento in corto
o batteria solfatata (segnalata da ERR02 sul display durante la FASE 3) è consigliato ricaricare la batteria
in modalità RECOVERY.
• FASE 6: Tampone. La tensione scende al livello di mantenimento e viene completato il ciclo di carica.
Si accende il led verde di FULL.
• FASE 7: Ciclo a impulsi. Ciclo di mantenimento batteria a impulsi (per periodi prolungati).
Flash
Modalità Alimentatore per assistenza nella programmazione dei veicoli. Non prevede alcuna fase di
carica al suo interno, è un puro alimentatore stabilizzato alla tensione nominale di batteria. Il suo scopo è
quello di fornire corrente in supporto alla batteria, per evitare la sua scarica in operazioni che richiedono
energia per brevi o lunghi periodi.
Recovery
Modalità di recupero per batterie solfatate accessibile mediante pressione prolungata del tasto
“Function”. Sullo schermo apparirà la scritta “rEC” con la visualizzazione della misura di tensione o
ISTRUZIONI PER L’USO
I

6
corrente istantanea, durante questa fase lampeggia il led “Charge”.
Il caricabatterie esegue un ciclo di ricarica speciale nel quale vengono forzate tensioni superiori alla
media per tentare il recupero della batteria. In questa modalità non sono previsti messaggi di errore
durante il ciclo di carica, viene segnalato alla conclusione se la batteria è stata recuperata o meno in
base alla tensione e corrente assorbita. Modalità a 6 fasi di carica, di seguito descritte:
• FASE 1: Analisi1. Se la batteria presenta una tensione superiore ai 3V, procede con la successiva
fase. Tensioni sotto i 3V causano il ritorno in stand-by del dispositivo.
raggiunge i 13V
• FASE 5: Tampone. La tensione scende al livello di mantenimento e viene completato il ciclo di carica.
Si accende il led verde di FULL.
• FASE 6: Ciclo a impulsi. Ciclo di mantenimento batteria a impulsi (per periodi prolungati).
ATTENZIONE: a causa della tensione elevate che si raggiunge durante questo ciclo di ricarica,
si deve effettuare il recupero con batteria scollegata dal veicolo. Un recupero con batteria
collegata al veicolo potrebbe causare danni all'elettronica di bordo.
Tensione minima batterie
Se la tensione iniziale della batteria è inferiore a 2.5V, la batteria non può essere recuperata.
B) Modalità di alimentazione “Flash” e carica “Amperage”
Fasce di corrente di alimentazione preimpostate:
Flash 10A: corrente di alimentazione impostata a 10A
Flash 30A: corrente di alimentazione impostata a 30A
Flash 60A: corrente di alimentazione impostata a 60A
Flash 120A: corrente di alimentazione impostata a 120A
Fasce di carica preimpostate per selezionare la batteria connessa (la corrente di uscita è regolata in
automatico)
Charge 10Ah – 100Ah
Charge 100Ah – 300Ah
Charge 300Ah – 600Ah
Charge 600Ah – 1200Ah
C) Tensioni di alimentazione “Flash” e Batterie Supportate “Volt / Batt.”
Fasce di tensione di alimentazione preimpostate:
13,8V: Tensione di alimentazione impostata a 13,8V
14,4V: Tensione di alimentazione impostata a 14,4V
14,8V: Tensione di alimentazione impostata a 14,8V
Tipologie di batterie preimpostate:
Wet: Batterie con elettrolita all’acido. Fine carica a 14,4V
Agm: Batterie Agm a piastra piana o batterie a spirale tipo Optima. Fine carica a 14,7V
LiFePO4: Batterie LiFePO4
Memorizzazione delle impostazioni
Il dispositivo realizza la memorizzazione delle impostazioni sul pannello frontale di controllo. Nel caso
caricabatterie si avvia con le ultime impostazioni memorizzate. Con caricabatterie impostato in modalità
FLASH il ciclo di lavoro riprende automaticamente al ritorno dell’alimentazione.
In modalità CHARGE, invece, verrà visualizzato sul display l’errore ER01 e sarà necessario premere il
tasto START/ STOP per riprendere il normale ciclo di ricarica.
ISTRUZIONI PER L’USO
I

7
Analisi Batteria
Le analisi all'interno delle modalità operative, possono terminare con la segnalazione di alcuni errori.
• Batteria Danneggiata: si accende il led ''Fault'' e si spegne il led ''Start / Stop'', entra in Stand-By,
compare sul display la scritta ''Errx'' dove 'x' è il numero corrispondente alla causa dell'errore (Vedi
tabella 1). Segnale acustico singolo di due secondi.
• Inversione di polarità: si accende il led ''Reverse'' e viene visualizzato a display ''Err7'' con segnale
acustico di due secondi.
INDICAZIONI ERRORI
Gli errori che possono essere segnalati sono riportati in tabella 1.
Tabella 1: indicazione degli Errori
SEGNALAZIONE
DISPLAY CAUSA RIMEDIO
Er01 Cavi scollegati, cavi in
cortocircuito. Posizionare correttamente le pinze e riprendere
la carica della batteria; (vedere il paragrafo
“Utilizzo del caricabatterie”).
Batteria completamente in
cortocircuito. Consultare il Centro Servizi della batteria più
vicino.
Er02 Batteria guasta o non
recuperabile.
Non accetta corrente
dopo 20h di recovery
La batteria può essere difettosa.
Er03 Sovratemperatura interna del
caricabatteria. Sovraccarico del
dispositivo
Rimuovere eventuali oggetti che coprono l'area di
ventilazione del caricabatteria o spostarlo in una
zona più fresca. Attendere che il caricabatteria
riparta automaticamente.
Er04 Errore di tensione.
Tensione batteria troppo bassa.
(Si sta tentando di caricare una
batteria da 6Volt).
Impostare un ciclo di “Recovery”.
Utilizzare il caricabatterie solo con batterie
supportate a 12V.
Riprendere la carica della batteria (vedere
paragrafo “Come si usa il caricabatterie”).
Batteria con uno o più elementi
in cortocircuito. La batteria può essere difettosa.
Er05 Batteria con tensione troppo
alta rispetto a quella impostata.
(Si sta tentando di caricare una
batteria da 24Volt).
Utilizzare il caricabatterie solo con batterie
supportate a 12V.
Riprendere la carica della batteria (vedere
paragrafo “Come si usa il caricabatterie”).
Er06 Batteria di capacità eccessiva.
carica.
Utilizzare un caricabatteria con capacità di carica
maggiore.
Er07 and led
reverse Le pinze dei conduttori di uscita
sono collegati impropriamente
alla batteria.
Posizionare correttamente le pinze e riprendere
la carica della batteria; (vedere il paragrafo
“Come si usa il caricabatterie”).
Er08 Corrente di uscita troppo alta.
Corrente sopra il limite
massimo.
Diminuire l’assorbimento sulla batteria.
ISTRUZIONI PER L’USO
I

8
CARICA DELLA BATTERIA
Carica di batterie collegate al veicolo
2. Individuare il polo corrispondente alla massa del veicolo; in genere collegata al morsetto negativo.
3. Carica di una batteria con morsetto negativo collegato alla massa del veicolo, nel seguente modo:
• Collegare il conduttore di uscita con pinza rossa al polo (+) positivo della batteria.
• Collegare il conduttore di uscita con pinza nera alla massa del veicolo, lontano dalla batteria
e dal condotto del carburante.
4. Carica di una batteria con morsetto positivo collegato alla massa del veicolo, nel seguente modo:
• Collegare il conduttore di uscita con pinza nera al polo (-) negativo della batteria.
• Collegare il conduttore di uscita con pinza rossa alla massa del veicolo, lontano dalla batteria
e dal condotto del carburante.
Carica di batterie non collegate ad un veicolo
2. Collegare il conduttore di uscita con pinza rossa al polo (+) positivo della batteria.
3. Collegare il conduttore di uscita con pinza nera al polo (-) negativo della batteria.
ATTENZIONE Assicurarsi che entrambi i morsetti dei conduttori di uscita abbiano un contatto
adeguato con i loro rispettivi terminali.
UTILIZZO DEL CARICABATTERIE
1. Una volta connessi i cavi dei conduttori di uscita alla batteria, collegare il cavo di alimentazione
dell’apparecchio alla presa di rete, assicurandosi che la tensione corrisponda a quella nominale del
caricabatterie (230V-50Hz); a questo punto, l’apparecchio emette un segnale acustico per 0,5 secondi e
tutti i led di segnalazione, posti sul pannello di comando, si illuminano per due secondi; in questa fase il
display mostra “- - - -”.
CHARGE 10-100Ah acceso. L'accensione dei led varia a seconda dell'ultimo programma memorizzato.
3. A questo punto, con il caricabatterie in modalità “stand-by”, settare i parametri di carica appropriati al tipo
di batteria da caricare, mediante i tasti posti sul pannello di comando. I parametri di carica scelti sono
evidenziati dall’accensione del led corrispondente.
Parametri di carica impostabili:
• Tasto Function: (vedere paragrafo A - Modalità operative: “Function”) a seconda del ciclo di lavoro,
selezionare:
- Flash, Charge o Recovery.
• Tasto Amperage: (vedere paragrafo B - Modalità di alimentazione e carica: “Amperage”)
A seconda della corrente di alimentazione necessaria per sostenere la tensione di batteria durante le
operazioni di riprogrammazione è possibile selezionare quattro diverse correnti di alimentazione:
Se selezioniamo la funzione FLASH possiamo scegliere tra:
- Flash 10A: il caricabatteria eroga 10A costanti
- Flash 30A: il caricabatteria eroga 30A costanti
- Flash 60A: il caricabatteria eroga 60A costanti
- Flash 120A: il caricabatteria eroga 120A costanti
A seconda della capacità della batteria da ricaricare selezionare la funzione CHARGE; possiamo
scegliere tra:
- Charge 10Ah – 100Ah:
- Charge 100Ah – 300Ah:
- Charge 300Ah – 600Ah:
- Charge 600Ah – 1200Ah:
ISTRUZIONI PER L’USO
I

9
• Tasto Volt / Batt (vedere paragrafo C - Tensioni di alimentazione “Flash” e Batterie Supportate:
“Volt / Batt.”)
A seconda della tensione di alimentazione necessaria per sostenere la tensione di batteria durante le
operazioni di riprogrammazione.
(SOLO MODALITÀ FLASH) è possibile selezionare tre diverse tensioni di alimentazione:
13,8V: Tensione di alimentazione impostata a 13,8V
14,4V: Tensione di alimentazione impostata a 14,4V
14,8V: Tensione di alimentazione impostata a 14,8V
A seconda della tecnologia costruttiva della batteria (SOLO MODALITÀ CHARGE) selezionare: Wet,
LiFePO4 o Agm.
4. Dopo aver impostato i parametri di carica, premere il tasto START/STOP per avviare la carica della
batteria. L’accensione dei led START/STOP e CHARGING indicano che la carica è in corso, il display
indicherà la corrente di carica e la tensione della batteria.
5. Durante la carica della batteria nelle fasi “I” ed “U0” rimane acceso il led CHARGING.
6. All’accensione del led FULL la batteria sarà caricata al 100%, da questo momento il caricabatterie
batteria, provvedendo a mantenerla sempre ad un livello ottimale di carica. In questa fase di carica
l’apparecchio può rimanere collegato per diversi mesi.
carica.
INTERRUZIONE VOLONTARIA DEL CICLO DI CARICA
dell’apparecchio dalla presa di rete e scollegare i conduttori di uscita dai morsetti della batteria.
INTERRUZIONE DEL CICLO DI CARICA IN CASO DI INTERRUZIONE DELLA LINEA DI RETE
In caso di interruzioni sulla linea di rete 110V - 230V il caricabatteria memorizza il ciclo di lavoro che
stava eseguendo in modo da poterlo riprende automaticamente (solo in modalità FLASH) al ritorno
dell'alimentazione sulla linea di rete a 230Volt. Questa funzione è fondamentale nei casi in cui il
caricabatteria esegua cicli di alimentazione molto lunghi anche in assenza di operatore. In modalità
CHARGE sarà invece necessario premere il pulsante START/STOP per riprendere il ciclo di lavoro.
FINE CARICA
1. Terminata la carica premere il tasto START/STOP del caricabatterie. Lo spegnimento del led indica
che il caricabatteria ha terminato il ciclo di lavoro.
2. Scollegare il cavo di alimentazione dell’apparecchio dalla presa di rete.
3. Scollegare il conduttore di uscita con pinza nera dalla massa del veicolo o dal morsetto negativo (-)
della batteria.
4. Scollegare il conduttore di uscita con pinza rossa dal morsetto positivo (+) della batteria.
Al termine delle operazioni riporre il caricabatteria in una zona asciutta e priva di umidità. Per la pulizia
del corpo esterno utilizzare un panno asciutto.
MANUTENZIONE
Gli interventi di manutenzione e di riparazione devono essere eseguiti da personale specializzato.
SMALTIMENTO
Il simbolo del cassonetto barrato riportato sull’apparecchiatura o sulla confezione indica che il prodotto,
L’utilizzatore che intendesse smaltire questo strumento può:
ISTRUZIONI PER L’USO
I

10
- Riconsegnarlo al proprio rivenditore al momento dell’acquisto di uno strumento equivalente.
- Nel caso di prodotti ad uso esclusivo professionale, contattare il produttore che dovrà disporre
una procedura per il corretto smaltimento.
Il corretto smaltimento di questo prodotto permette il riutilizzo delle materie prime in esso contenute ed
evita danni all’ambiente ed alla salute umana.
pericolosi, comporta l’applicazione delle sanzioni previste.
GARANZIA
Questa attrezzatura è fabbricata e collaudata secondo le norme attualmente vigenti nella Comunità
Europea. E’ coperta da garanzia per un periodo di 12 mesi per uso professionale o 24 mesi per uso non
professionale.
Vengono riparati guasti dovuti a difetti di materiale o di produzione, mediante ripristino o sostituzione dei
pezzi difettosi a nostra discrezione.
stessa.
Non sono soggetti a garanzia difetti dovuti all’usura, all’uso errato od improprio e a rotture causate da
colpi e/o cadute.
quando viene inviato all’assistenza smontato.
Sono espressamente esclusi danni causati a persone e/o cose di qualsiasi genere e/o natura, diretti
e/o indiretti.
DICHIARAZIONE DI CONFORMITÀ UE
Dichiariamo sotto la nostra responsabilità che il prodotto descritto è conforme a tutte le disposizioni
pertinenti alle seguenti Direttive:
• Direttiva Compatibilità Elettromagnetica (E.M.C.) 2014/30/UE;
• Direttiva Bassa Tensione (L.V.D.) 2014/35/UE;
• Direttiva sulla restrizione dell’uso di determinate sostanze pericolose nelle apparecchiature elettriche
ed elettroniche (Ro.H.S.) 2011/65/UE;
ISTRUZIONI PER L’USO
I

11
OPERATING MANUAL AND INSTRUCTIONS FOR ELECTRONIC MULTIPURPOSE 12V
BATTERY CHARGER.
Store the safety instructions with care and hand them over to the users.
PURPOSE OF USE
The electronic battery charger can be used for the following purposes:
• charging and supplying power to motor vehicles;
• use on 12V, Wet - Agm - lithium (LiFePO4) batteries;
• reprogramming and self-diagnosis.
The electronic battery charger must not be used for the following operations:
• use on batteries other than 12V
• use in humid or wet environments, or in bad weather;
• use for any applications other than stated ones.
WORK AREA SAFETY
Do not operate the battery charger in environments containing potentially explosive
the dust or fumes.
Keep children and bystanders away from your workplace while operating the battery charger.
Distractions from other people can cause you to lose control over the battery charger during use.
Do not inhale any harmful gases that may be released by the battery of the motor vehicle while
working on the engine.
During connection operations, keep your face away from the motor vehicle battery. The battery
contains corrosive liquid; in the event of accidental contact with your skin or eyes, rinse
immediately with water and seek medical advice.
Do not drop any metal tools on the motor vehicle battery: it may short-circuit.
Use the battery charger in a dry area, avoiding humidity.
BATTERY CHARGER SAFETY
• Before use, check that the battery charger has not been damaged, and that there are no uncovered
cables or worn parts.
• Do not use the battery charger when damaged, to avoid the risk of electric shocks; do not try to open
or modify it.
IMPORTANT! READ THIS MANUAL CAREFULLY BEFORE USING THE BATTERY
CHARGER. FAILURE TO COMPLY WITH THE SAFETY STANDARDS AND
OPERATING INSTRUCTIONS MAY RESULT IN SERIOUS INJURY.
CAUTION
INSTRUCTIONS FOR USE
EN

12
• Connect the power supply cable of the battery charger to the mains socket, making sure that the mains
voltage matches the voltage stated on the power supply device. (See TECHNICAL DATA table)
• After use, do not leave the battery charger connected to the mains socket for a long time.
• Do not damage the electronic circuit of the battery charger.
PERSONNEL SAFETY
• of drugs, alcohol, or medications.
• Always use the following personal protective equipment:
• safety shoes;
• eye protection;
• protective gloves against physical agents.
• Use the battery charger in well-aired, dry rooms.
• Never allow the clips of the clamps (positive-red and negative-black) to touch together.
• Check that the cables of the battery charger are kept away from fans, moving parts and the fuel pipe.
• Do not wear loose clothing, jewellery or metal objects when working on the motor vehicle.
• Before replacing the battery charger, make sure that it has cooled to room temperature.
BATTERY CHARGER USE AND CARE
• Do not put any objects into any slots or openings on the surface of the battery charger.
• Do not use the battery charger if the case, the clamps, the cables or the power supply cable have been
damaged, if it gives off unusual smells or too much heat.
• Do not modify the battery charger. This can reduce the effectiveness of safety measures and increase
operator risk.
• Have the battery charger repaired only through a trained repair person and only using original
replacement parts.
• Before carrying out any operations, turn off the lights of the motor vehicle and cut out any running
accessories.
• Always check that the voltage of the battery charger matches the voltage of the motor vehicle’s
system, to prevent explosions, damage to the motor vehicle, the battery charger and people.
• Always connect the output lead with red clamp (+) to the positive post of the battery, and the
output lead with black clamp (-) to the motor vehicle’s chassis.
• Never reverse polarity; reversed polarity can cause explosions or damage to the motor vehicle,
the battery charger and people.
• To clean the battery charger, use a dry cloth. Always disconnect the battery charger from the power
supply mains. Never use damp or wet cloths.
BATTERY CHARGER SAFETY
• Periodically check the battery charger, the power supply cable and the clamps.
INSTRUCTIONS FOR USE
EN

13
• Do not use the battery charger when damaged, to avoid the risk of electric shocks; do not try to open
or modify it.
• Connect the battery charger to the mains socket, making sure that the mains voltage matches that
stated on the power supply device. (See TECHNICAL DATA table)
• Do not cover the battery charger when using it. Allow adequate space for ventilation.
• Do not use the battery charger in humid or wet environments; do not expose it to rain. Wet and
contaminated environments increase the risk of electric shocks.
SIGNALLING LEDS
The front panel of the battery charger accommodates 15 LEDs, including 4 battery status LEDs,
indicating the following:
• “Full”: battery is charged, and is in charge maintenance status
• “Charging”: battery is charging
• “Fault”: battery is damaged
• “Reverse”: polarity reversal
• 1 battery charge status LED, “led ON” (blue colour)
PERSONAL PROTECTIVE EQUIPMENT TO WEAR WHILE OPERATING BATTERY CHARGER
Failure to observe the following warnings may result in physical injury and/or disease.
Additional personal protective equipment to wear according to the values found in the
environmental hygiene/risk analysis survey if the values exceed the limits under current
regulations.
TECHNICAL DATA
ALWAYS WEAR EYE PROTECTION
ALWAYS WEAR SAFETY SHOES
ALWAYS WEAR PROTECTIVE GLOVES AGAINST PHYSICAL AGENTS WHILE
OPERATING BATTERY CHARGER
FOR USE WITH BATTERIES
RATED VOLTAGE
CHARGING VOLTAGE
ABSORBED POWER
BATTERY CHARGING CAPACITY
BATTERY HOLDING CAPACITY
CLAMP CABLE LENGTH
CLIP CABLE SECTION
DEGREE OF PROTECTION
POWER SUPPLY CABLE LENGTH
DIMENSIONS
WEIGHT
12V Wet - Agm - Lithium LiFePO4
110V-240V 50/60Hz
12V max
1800 Watt
10÷1200 Ah
10÷3000 Ah
2.7 m
25 mm2
IP20
1.7 m
350x450x150 mm
8.8 kg
INSTRUCTIONS FOR USE
EN

14
• 1 operating status LED, “Start/Stop” (yellow colour); indicates whether output is in accordance with
selected mode
• 2 operating mode LEDs, “Function”: Flash or Charge (yellow LED)
• 4 supplied current LEDs, “Amperage”, described below (yellow LED)
• 3 supply voltage and battery type LEDs, “Volt/Batt”, described below (yellow LED).
The front panel of the battery charger accommodates 5 buttons:
• “Start/Stop”: starts or stops supply in selected mode
• “Function”: selects operating mode
• “Volt/Batt”: selects supply voltage or type of battery to charge
• “Amperage”: selects supplied current
• “A/V” (display): selects information to display
DIGITAL DISPLAY
The “A/V” selector button selects voltage or current display.
BATTERY CHARGER FEATURES AND OPERATING MODES
A) Operating modes: “Function”
Charge
Battery charging mode. There are 7 charging steps, as described below:
• STEP 1: Test 1. If battery output is above 6.5V, the unit proceeds with the next step. Outputs below 6.5V will
cause the device to revert to stand-by.
• STEP 2: Pre-charge. Charge starts at a constant current, until battery voltage reaches 13V.
• STEP 3: Test 2. Checks whether the battery has short-circuited elements. The battery charger stops
supplying current for 5 minutes. If during this time battery voltage falls below 11.7V, the device reverts to
stand-by. If voltage remains above 11.7V, the battery charger moves on to STEP 4. If any element short-
the battery should be charged in the RECOVERY mode.
• STEP 4: Deep cycle charging. The battery charges until the set limit is reached.
• STEP 5: Constant voltage. Keeps the battery at charge end voltage.
• STEP 6: Buffer. Voltage falls to the maintenance level and the charging cycle is completed. The green FULL
LED turns on.
• STEP 7: Pulsed current cycle. Pulsed battery maintenance cycle (over long periods).
Flash
Power Supplier mode assisting in motor vehicle programming. No charge phase occurs in it. It is just a
power supplier stabilized at rated battery voltage. It is designed to deliver current supporting the battery,
Recovery
Recovery mode for sulphated batteries accessible by a prolonged press of the “Function” key. The
screen displays the message “rEC” and shows the instantaneous voltage or current reading; during this
The battery charger performs a special charging cycle, in which higher than average voltages are forced,
to attempt recovery of the battery. In this mode, no error messages are generated during the charging
cycle; when the cycle is completed, a message is displayed to indicate whether or not the battery has
been recovered on the basis of voltage or current absorption. This mode has 6 charging steps, as
described below:
• STEP 1: Test 1. If battery output is above 3V, the unit proceeds with the next step. Outputs below 3V
will cause the device to revert to stand-by.
• STEP 2: Pre-charge. Charge starts at a constant current, until battery voltage reaches 13V.
• STEP 3: Deep cycle charging. The battery charges until the set limit value is reached.
• STEP 4: Constant voltage. Keeps the battery at charge end voltage.
• STEP 5: Buffer. Voltage falls to the maintenance level and the charging cycle is completed. The green
INSTRUCTIONS FOR USE
EN

15
FULL LED will turn on.
• STEP 6: Pulsed current cycle. Pulsed battery maintenance cycle (over long periods).
ATTENTION: Because of the high voltage reached during this charging cycle, the battery recovery
process must be performed with the battery disconnected from the motor vehicle. Recovery
with the battery connected to the motor vehicle may result in damage to the motor vehicle’s
electronics.
Minimum battery voltage
If the initial voltage of the battery is lower than 2.5V, the battery cannot be recovered.
B) “Flash” supply and charging mode: “Amperage”
Preset supply current bands:
Flash 10A: supply current set to 10A
Flash 30A: supply current set to 30A
Flash 60A: supply current set to 60A
Flash 120A: supply current set to 120A
Preset charging bands to select connected battery (output current adjusted automatically)
Charge 10Ah – 100Ah: Supports batteries from 10Ah to 100Ah
Charge 100Ah – 300Ah: Supports batteries from 100Ah to 300Ah
Charge 300Ah – 600Ah: Supports batteries from 300Ah to 600Ah
Charge 600Ah – 1200Ah: Supports all batteries from a minimum of 600Ah to a maximum of 1200Ah.
C) “Flash” supply voltage and supported batteries: “Volt / Batt.”
Preset supply bands:
13.8V: Supply voltage set to 13.8V
14.4V: Supply voltage set to 14.4V
14.8V: Supply voltage set to 14.8V
Preset battery types:
Wet: Acid electrolyte batteries. Charge end at 14.4V
Agm: Flat plate Agm batteries or Optima type spiral batteries. Charge end at 14.7V
LiFePO4: LiFePO4 batteries
Saving settings
The battery charger saves the settings on the front control panel. In the event of an accidental power
loss or voluntary power off, when the charger is restarted, it will restart with the latest saved settings.
With the battery charger set to the FLASH mode, the work cycle will resume automatically when the
power supply is restored.
Whereas in the CHARGE mode, the screen will display the error message ER01, and the START/STOP
key will have to be pressed, to resume the normal charge cycle.
Battery testing
The tests within the operating modes may terminate with the signalling of some errors.
• Damaged Battery: the “Fault” LED switches on and the “Start / Stop” LED switches off, and the charger
enters Stand-by mode. The display shows the message “Errx”, where ‘x’ is the number corresponding
to the cause of the error (see Table 1). Single two second audible warning.
• Polarity reversal: the “Reverse” LED switches on, and the display shows the message “Err7” with a two
second audible warning.
ERROR CODES
The errors that may be reported are described in Table 1.
INSTRUCTIONS FOR USE
EN

16
Table 1: Numbering of errors
DISPLAY
INDICATION CAUSE SOLUTION
Er01 Leads disconnected, leads
short-circuited. Position the clamps correctly and start charging
the battery again (see section “Operating Battery
Charger”).
Battery completely
short-circuited. Contact your nearest battery service centre.
Er02 Battery faulty or unrecoverable.
No current accepted after 20
hours of recovery
The battery could be defective.
Er03 Internal overheating of battery
charger. Battery charger
overload.
Remove any objects that could be covering the
ventilation area of the battery charger or move it
to a cooler area. Wait for the battery charger to
start again automatically.
Er04 Voltage error.
Battery voltage too low. (You
are attempting to charge a 6V
battery).
Set a “Recovery” cycle.
Only use the battery charger with supported 12V
batteries.
Start charging the battery again (see section
“Operating Battery Charger”).
One or more elements of the
battery has/have short-circuited. The battery could be defective.
Er05 Battery voltage too high
compared to that set. (You are
attempting to charge a 24V
battery).
Only use the battery charger with supported 12V
batteries.
Start charging the battery again (see section
“Operating Battery Charger”).
Er06 Battery capacity excessive.
Unable to reach end condition. Use a battery charger with greater capacity.
Er07 and led
reverse The clamps of the output leads
are not connected correctly to
the battery.
Position the clamps correctly and start charging
the battery again (see section “Operating Battery
Charger”).
Er08 Excessively high output current.
Current exceeds maximum limit. Reduce battery absorption.
BATTERY CHARGING
Charging batteries connected to motor vehicle
1. Before starting to charge the battery, make sure that the power supply lead is not plugged into the
mains supply.
2. Locate the motor vehicle’s earthing point, which is normally connected to the negative battery terminal.
3. Charge a battery with negative earth, grounded to the motor vehicle’s chassis, as follows:
• Connect the output lead with the red clamp to the positive terminal (+) of the battery.
• Connect the output lead with the black clamp to the motor vehicle’s earthing point, keeping it away
from the battery and fuel pipe.
4. Charge a battery with positive earth, grounded to the motor vehicle’s chassis, as follows:
• Connect the output lead with the black clamp to the negative terminal (-) of the battery.
• Connect the output lead with the red clamp to the motor vehicle’s earthing point, keeping it away
from the battery and fuel pipe.
Connecting batteries that are not connected to a motor vehicle
1. Before starting to charge the battery, make sure the power supply lead is not plugged into the mains
supply.
INSTRUCTIONS FOR USE
EN

INSTRUCTIONS FOR USE
EN
17
2. Connect the output lead with the red clamp to the positive terminal (+) of the battery.
3. Connect the output lead with the black clamp to the negative terminal (-) of the battery.
ATTENTION: Make sure that both clamps of the output leads generate a suitable contact with
their corresponding terminals.
OPERATING BATTERY CHARGER
1. Once the output leads have been connected to the battery, plug the power supply lead of the battery
charger into the mains socket, making sure that the voltage matches the rated voltage of the battery
charger (230V-50Hz); having done this, the battery charger will emit an acoustic signal for 0.5 seconds,
and all the LED indicators on the control panel will switch on for 2 seconds; at this stage, the display shows
“- - - -”.
5-30Ah LED on. The LEDs light up differently based on the last programme saved.
3. At this stage, with the battery charger in “stand-by” mode, set the charging parameters suitable for the
type of battery to be charged, using the keys on the control panel. The charging parameters selected are
displayed by the corresponding LED, which switches on.
Settable charging parameters:
• Function key: (see section A – Operating Modes: “Function”) depending on the work
cycle, select:
- Flash, Charge or Recovery.
• Amperage key: (see section B – Supply and charging mode: “Amperage”)
Based on the supply current required to support the battery voltage during reprogramming operations,
you can select four different supply currents:
If you select the FLASH feature, you can choose among the following options
- Flash 10A: battery charger delivers a constant current of 10A
- Flash 30A: battery charger delivers a constant current of 30A
- Flash 60A: battery charger delivers a constant current of 60A
- Flash 120A: battery charger delivers a constant current of 120A
Based on the capacity of the battery to charge, select the CHARGE feature; you can choose among the
following options:
- Charge 10Ah – 100Ah: Supports batteries from 10Ah to 100Ah.
- Charge 100Ah – 300Ah: Supports batteries from 100Ah to 300Ah
- Charge 300Ah – 600Ah: Supports batteries from 300Ah to 600Ah
- Charge 600Ah – 1200Ah: Supports all batteries from 600Ah to 1200Ah.
• Volt / Batt key (see section C - “Flash” supply voltage and supported batteries: “Volt / Batt.”)
Depending on the supply voltage required to support the battery voltage during reprogramming
operations (ONLY FLASH MODE), you can select three different supply voltages:
13.8V: Supply voltage set to 13.8V
14.4V: Supply voltage set to 14.4V
14.8V: Supply voltage set to 14.8V
Depending on the construction/type of the battery (ONLY CHARGE MODE), select: Wet, LiFePO4 or Agm.
4. Once the charging parameters have been set, press the START/STOP key to start charging the
battery. When the START/STOP and CHARGING LEDs light up, the battery is charging; the display
will show the charging current and the voltage of the battery.
5. The CHARGING LED remains lit in phases “I” and “U0” whilst the battery is charging.
6. When the FULL LED switches on, it means that the battery is fully charged (100%), and the charger will

INSTRUCTIONS FOR USE
EN
18
so that it is always at an optimal level of charge. In this charging phase, the appliance can be left
connected to the battery for several months.
7. If you wish to end or interrupt the charging cycle, follow the charge end/interruption instructions.
INTENTIONAL INTERRUPTION OF CHARGING CYCLE
If you want to interrupt the battery charging cycle, simply press the START/STOP key; the corresponding
LED will switch off to show that the work cycle has ended. Disconnect the output lead of the appliance
from the mains socket and the output leads from the battery terminals.
INTERRUPTION OF CHARGING CYCLE IN CASE OF A POWER SUPPLY CUT
In the case of a 110V – 230V mains power supply cut, the battery charger saves the work cycle it was
performing in order to restore it automatically (only in the FLASH mode) as soon as the 230V power
supply is restored. This feature is fundamental if the battery charger is used to charge batteries without
the operator supervising the cycle; for example, during very long charging cycles. Whereas, in the
CHARGE mode, the START/STOP key must be pressed to resume the work cycle.
END OF CHARGING
1. Once the battery is charged, press the START/STOP key of the battery charger. The LED will turn off
to show that the battery charger has completed the work cycle.
2. Disconnect the power supply lead of the appliance from the mains socket.
3. Disconnect the output lead with the black clamp from the motor vehicle’s earthing point or from the
negative terminal (-) of the battery.
4. Disconnect the output lead with the red clamp from the positive terminal (+) of the battery.
After use, replace the battery charger in a dry place free from humidity. To clean the outer casing, use
a dry cloth.
MAINTENANCE
Maintenance and repair jobs must be carried out by trained personnel.
DISPOSAL
The crossed-out wheelie bin symbol on the equipment or packaging means that the product should be
collected separately from other types of urban waste at the end of its useful life.
Any user who is going to dispose of this tool can:
- deliver it to an appropriate collection facility for electronic or electrotechnical equipment;
- return it to the dealer upon purchase of a new, equivalent item of equipment;
- in case of a product for professional use only, contact the manufacturer which will arrange for the
product to be properly disposed of.
Proper disposal of this product allows the raw materials contained in it to be reused and prevents
damage to the environment or human health.
Illegal disposal of this product is a violation of the provision concerning the disposal of hazardous waste
WARRANTY
This tool is manufactured and tested in accordance with current EU regulations. It is covered by a
12-month warranty for professional use or a 24-month warranty for nonprofessional use.
pieces or replacing them at our discretion.

19
Should assistance be required once or several times during the warranty period, the expiry date of this
warranty will remain unchanged.
This warranty will not cover defects due to wear, misuse or breakdowns caused by blows and/or falls.
In addition, this warranty will no longer be valid if any changes are made, or if the tool is damaged or
sent to the customer service in pieces.
This warranty explicitly excludes any damage to people and/or things, whether direct or consequential.
EU DECLARATION OF CONFORMITY
We hereby declare, assuming full responsibility, that the described product complies with all the relevant
provisions of the following Directives:
• Electromagnetic Compatibility Directive (EMC) 2014/30/EU;
• Low Voltage Directive (LVD) 2014/35/EU;
• Directive concerning the restriction of the use of certain hazardous substances in electric and electronic
equipment (RoHS) 2011/65/EU.
INSTRUCTIONS FOR USE
EN

20
NOTICE D'UTILISATION ET INSTRUCTIONS POUR CHARGEUR DE BATTERIE
ÉLECTRONIQUE 12V MULTIFONCTIONS.
Garder scrupuleusement les instructions sur la sécurité et les remettre au personnel concerné.
DESTINATION D’USAGE
Le chargeur de batterie électronique est destiné à l’usage suivant :
• la charge et l’alimentation des véhicules
• à utiliser sur batteries à 12V, Wet - Agm - lithium (LiFePO4)
• pendant les phases de reprogrammation et d'autodiagnostic.
Les opérations suivantes ne sont pas autorisées :
• il est interdit d’utiliser ce dispositif sur des batteries autres que 12V ;
• il est interdit d’utiliser ce dispositif en dehors des prescriptions techniques contenues dans le tableau
DONNÉES TECHNIQUES ;
• il est interdit d’utiliser ce dispositif dans des lieux humides, mouillés ou exposés aux intempéries ;
• il est interdit d’utiliser ce dispositif pour toutes les opérations autres que celles indiquées
SÉCURITÉ DU POSTE DE TRAVAIL
Ne pas utiliser le chargeur de batteries dans des lieux présentant des atmosphères
aux poussières ou aux vapeurs.
Empêcher que des enfants ou des visiteurs s’approchent du poste de travail pendant les
opérations avec le chargeur de batterie. La présence d’autres personnes peut distraire
l’opérateur qui peut perdre le contrôle du chargeur de batteries.
Ne pas inhaler les éventuels gaz nocifs qui se dégagent de la batterie du véhicule pendant
l’intervention sur le moteur.
Pendant les opérations de branchement, éloigner le visage de la batterie du véhicule.
Le liquide se trouvant dans la batterie est corrosif ; en cas de contact accidentel de l’acide
avec la peau ou les yeux, rincer immédiatement à l'eau et consulter un médecin.
Ne pas faire tomber d'outils métalliques sur la batterie du véhicule qui pourrait provoquer un
court-circuit de la batterie.
Utiliser le chargeur de batterie dans une zone sèche en évitant l'humidité.
SÉCURITÉ CHARGEUR DE BATTERIE
• Avant l'utilisation, contrôler que le chargeur de batterie n'ait pas été endommagé, qu'il ne présente
pas de câbles découverts ou de pièces usées.
IL EST IMPORTANT DE LIRE INTÉGRALEMENT LE PRÉSENT MANUEL AVANT
D’UTILISER LE CHARGEUR DE BATTERIE. LE NON-RESPECT DES NORMES
DE SÉCURITÉ ET DES INSTRUCTIONS D’UTILISATION PEUT PROVOQUER DE
GRAVES ACCIDENTS.
ATTENTION
MODE D’EMPLOI
F
Strona się ładuje...
Strona się ładuje...
Strona się ładuje...
Strona się ładuje...
Strona się ładuje...
Strona się ładuje...
Strona się ładuje...
Strona się ładuje...
Strona się ładuje...
Strona się ładuje...
Strona się ładuje...
Strona się ładuje...
Strona się ładuje...
Strona się ładuje...
Strona się ładuje...
Strona się ładuje...
Strona się ładuje...
Strona się ładuje...
Strona się ładuje...
Strona się ładuje...
Strona się ładuje...
Strona się ładuje...
Strona się ładuje...
Strona się ładuje...
Strona się ładuje...
Strona się ładuje...
Strona się ładuje...
Strona się ładuje...
Strona się ładuje...
Strona się ładuje...
Strona się ładuje...
Strona się ładuje...
Strona się ładuje...
Strona się ładuje...
Strona się ładuje...
Strona się ładuje...
Strona się ładuje...
Strona się ładuje...
Strona się ładuje...
Strona się ładuje...
Strona się ładuje...
Strona się ładuje...
Strona się ładuje...
Strona się ładuje...
Strona się ładuje...
Strona się ładuje...
Strona się ładuje...
Strona się ładuje...
Strona się ładuje...
Strona się ładuje...
Strona się ładuje...
Strona się ładuje...
Strona się ładuje...
Strona się ładuje...
Strona się ładuje...
Strona się ładuje...
Strona się ładuje...
Strona się ładuje...
Strona się ładuje...
Strona się ładuje...
Strona się ładuje...
Strona się ładuje...
Strona się ładuje...
Strona się ładuje...
-
 1
1
-
 2
2
-
 3
3
-
 4
4
-
 5
5
-
 6
6
-
 7
7
-
 8
8
-
 9
9
-
 10
10
-
 11
11
-
 12
12
-
 13
13
-
 14
14
-
 15
15
-
 16
16
-
 17
17
-
 18
18
-
 19
19
-
 20
20
-
 21
21
-
 22
22
-
 23
23
-
 24
24
-
 25
25
-
 26
26
-
 27
27
-
 28
28
-
 29
29
-
 30
30
-
 31
31
-
 32
32
-
 33
33
-
 34
34
-
 35
35
-
 36
36
-
 37
37
-
 38
38
-
 39
39
-
 40
40
-
 41
41
-
 42
42
-
 43
43
-
 44
44
-
 45
45
-
 46
46
-
 47
47
-
 48
48
-
 49
49
-
 50
50
-
 51
51
-
 52
52
-
 53
53
-
 54
54
-
 55
55
-
 56
56
-
 57
57
-
 58
58
-
 59
59
-
 60
60
-
 61
61
-
 62
62
-
 63
63
-
 64
64
-
 65
65
-
 66
66
-
 67
67
-
 68
68
-
 69
69
-
 70
70
-
 71
71
-
 72
72
-
 73
73
-
 74
74
-
 75
75
-
 76
76
-
 77
77
-
 78
78
-
 79
79
-
 80
80
-
 81
81
-
 82
82
-
 83
83
-
 84
84


LAUNCH Flashpower 120 Instructions For Use Manual
- Typ
- Instructions For Use Manual
w innych językach
- español: LAUNCH Flashpower 120
- italiano: LAUNCH Flashpower 120
- Deutsch: LAUNCH Flashpower 120
- português: LAUNCH Flashpower 120
- français: LAUNCH Flashpower 120
- Nederlands: LAUNCH Flashpower 120
Inne dokumenty
-
Beta 1498/120A Instrukcja obsługi
-
-
-
-
-
Telwin TEL014 Instrukcja obsługi
-
-
-
Schumacher SPI3 Automatic Battery Charger Instrukcja obsługi
-