Silvercrest SCCM 800 A1 Operating Instructions Manual
- Typ
- Operating Instructions Manual

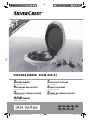
CUPCAKE MAKER SCCM 800 A1
CUPCAKE MAKER
Operating instructions
ELEKTROMOS MUFFIN SÜTŐ
Kezelési útmutató
PŘÍSTROJ NA VÝROBU MUFFINŮ
Návod k obsluze
CUPCAKE-MAKER
Bedienungsanleitung
OPIEKACZ DO MUFFINEK
Instrukcja obsługi
APARAT ZA KOLAČKE
Navodilo za uporabo
PRÍSTROJ NA FORMOVÉ KOLÁČE
Návod na obsluhu
IAN 96966
RP96966_Cupcakemaker_Cover_LB4.indd 2 24.02.14 11:44

English . . . . . . . . . . . . . . . . . . . . . . . . . . . . . . . . . . . . . . . . . . 2
Be sure to note the fold-out page.
Polski . . . . . . . . . . . . . . . . . . . . . . . . . . . . . . . . . . . . . . . . . 16
Proszę zwrócić uwagę na informacje umieszczone na wewnętrznej stronie okładki
Magyar . . . . . . . . . . . . . . . . . . . . . . . . . . . . . . . . . . . . . . . . 31
Kérjük, figyeljen a kinyitható oldalra
Slovensko . . . . . . . . . . . . . . . . . . . . . . . . . . . . . . . . . . . . . . 46
Prosimo, upoštevajte tekst na zavihani strani.
Česky . . . . . . . . . . . . . . . . . . . . . . . . . . . . . . . . . . . . . . . . . 59
Povšimněte si vyklápěcí strany
Slovensky . . . . . . . . . . . . . . . . . . . . . . . . . . . . . . . . . . . . . . 72
Prosím, všimnite si vyklápaciu stranu.
Deutsch . . . . . . . . . . . . . . . . . . . . . . . . . . . . . . . . . . . . . . . . 85
Bitte beachten Sie die Ausklappseite
SCCM 800 A1_14_V1.3_GB_PL_HU_SI_CZ_SK_DE
Inhalt Seite 1 Montag, 24. Februar 2014 11:42 11

2
5
1
3
4
6
8
7
9
RP96966 Cupcake Maker LB4 Seite 1 Montag, 24. Februar 2014 10:45 10

2
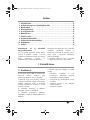
Contents
1. Device description . . . . . . . . . . . . . . . . . . . . . . . . . . . . . . . . . . . . . . . . . . . . . . . . . . . . . . . 2
2. Part names (see foldout page) . . . . . . . . . . . . . . . . . . . . . . . . . . . . . . . . . . . . . . . . . . . . . . 3
3. Technical data. . . . . . . . . . . . . . . . . . . . . . . . . . . . . . . . . . . . . . . . . . . . . . . . . . . . . . . . . . 3
4. Safety information . . . . . . . . . . . . . . . . . . . . . . . . . . . . . . . . . . . . . . . . . . . . . . . . . . . . . . 3
5. Before using for the first time. . . . . . . . . . . . . . . . . . . . . . . . . . . . . . . . . . . . . . . . . . . . . . . 6
6. Bake cupcakes. . . . . . . . . . . . . . . . . . . . . . . . . . . . . . . . . . . . . . . . . . . . . . . . . . . . . . . . . . 7
7. Cleaning and storing . . . . . . . . . . . . . . . . . . . . . . . . . . . . . . . . . . . . . . . . . . . . . . . . . . . . . 8
8. Recipe suggestions for cupcakes . . . . . . . . . . . . . . . . . . . . . . . . . . . . . . . . . . . . . . . . . . . . . 8
9. Suggested frosting recipes . . . . . . . . . . . . . . . . . . . . . . . . . . . . . . . . . . . . . . . . . . . . . . . . 11
10. Disposal. . . . . . . . . . . . . . . . . . . . . . . . . . . . . . . . . . . . . . . . . . . . . . . . . . . . . . . . . . . . . 13
11. HOYER Handel GmbH Warranty. . . . . . . . . . . . . . . . . . . . . . . . . . . . . . . . . . . . . . . . . . . . 13
Congratulations on the purchase of
your new product.
You have selected a high-quality product.
The operating instructions are a constituent
part of this product. They contain important
information about safety, use and disposal.
Familiarize yourself with all the operating
and safety instructions before using the
product. Use the product only as described
and for the stated spheres of application.
If you pass the product on to a third party,
always pass on all the documentation as
well.
1. Device description
1.1 Intended purpose
The SilverCrest SCCM 800 A1 Cupcake
Maker is suitable for baking cupcakes. The
preparation of other foods is not permitted.
Cupcakes are small buns which used to be
baked in cups. The shape is similar to that of
muffins, but cupcakes are softer and sweeter
than muffins and are usually decorated.
Only use the appliance indoors, never
outside.
This product is intended for use in private
households and is not suitable for
commercial purposes.
The appliance is likewise suitable for:
• use in staff kitchens in shops, offices and
other commercial areas,
• use in agricultural settings,
• customers in hotels, motels and other
accommodation,
• bed-and-breakfast establishments.
1.2 Scope of supply
• 1 cupcake maker
• 50 cupcake cases: diameter 50 mm,
height 20 mm
• 1 copy of the operating instructions
RP96966 Cupcake Maker LB4 Seite 2 Montag, 24. Februar 2014 10:45 10

SCCM 800 A1 3
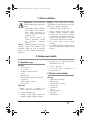
1.3 Markings on the appliance
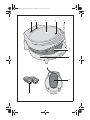
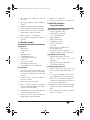
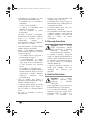
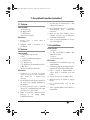
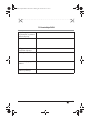
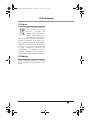
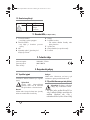
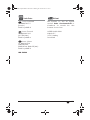
2. Part names (see foldout page)
1 Red indicator
– comes on when the appliance is
connected to the power supply
2 Green indicator
– comes on as soon as operating
temperature has been reached
3 Lid
4 Warning symbol “Warning, hot
surfaces!”
5 Handles
6 Cake moulds
– these can be lined with cupcake
cases 9, or simply filled with the
cupcake mixture
7 Bottom part
8 Cable store (on the bottom)
9 Cupcake cases
3. Technical data
Rated voltage: 220-240 V
~
/50 Hz
Rated power: 800-1,000 W
Protection class: I
4. Safety information
4.1 Explanation of terms
The following keywords are used in these
user instructions:
Warning!
High risk: ignoring this warning
could result in a risk to life and
limb.
Caution!
Medium risk: ignoring this warning may
result in damage.
Note:
Low risk: points to be noted when handling
the appliance.
4.2 Special informations for this
appliance
Warning! To avoid injury, please
observe the following information.
• This appliance can be used by children aged from
8 years and above and persons with reduced
Symbol 4 Location Meaning
Lid 3 Warns of hot
surfaces
RP96966 Cupcake Maker LB4 Seite 3 Montag, 24. Februar 2014 10:45 10

4
physical, sensory or mental capabilities or lack of
experience and knowledge if they have been
given supervision or instruction concerning use of
the appliance in a safe way and understand the
hazards involved. Children shall not play with the
appliance.
• Cleaning and user maintenance shall not be
made by children unless they are older than 8 and
supervised.
• Keep the appliance and its cord out of reach of
children less than 8 years.
• The surfaces of the appliance can get hot, so
when the appliance is running, only hold it by
handles
5
.
• Always remove the plug from the mains socket
before starting to clean the appliance.
• Never immerse the appliance in water, and
protect it from splashes and water droplets.
• Before cleaning, allow the appliance to cool
down to avoid the risk of burns.
Caution! To avoid material damage,
please observe the following conditions.
• Never use abrasive, corrosive or caustic cleaning
materials. These could damage the appliance as
well as the non-stick coating.
• The appliance must not be operated with an
external time switch or separate remote control
system, such as a wireless remote control socket.
4.3 General information
• Please read these user instructions
carefully before use. They are a
constituent part of the appliance and
must be kept to hand at all times.
• Use the appliance only for the purpose
described (see “1.1 Intended purpose”
on page 2).
• To prevent damage, check that the
mains voltage required (see type plate
on the appliance) is compatible with
your mains voltage.
• Please note that any claim under the
warranty or for liability will be invalid if
accessories are used that are not
recommended in these user instructions,
or if original spare parts are not used for
repairs. This also applies to repairs
undertaken by unqualified persons. You
will find the service address in “Service
Centre” on page 15.
• If the appliance should develop a fault
during the warranty period, it may only
be repaired by our Service Centre.
Otherwise all claims under warranty are
null and void. You will find the service
address in “Service Centre” on
page 15.
• To ensure you can intervene promptly if
a fault occurs, never leave the appliance
unsupervised during operation.
• Check that the power socket is easily
accessible since the appliance does not
have an On/Off switch.
4.4 Protection against electric shock
Warning! The following safety
information is intended to protect
you against electric shock.
• The appliance must not under any
circumstances be used if it is damaged.
Have the device repaired in such cases
by a qualified specialist. You will find the
service address in “Service Centre” on
page 15.
• If the mains cable for this appliance is
damaged, it must be replaced by the
manufacturer or a person with similar
qualifications in order to avoid a
hazard.
• Water or other liquids must never be
allowed to enter the appliance. For this
reason:
– never use it outdoors
– never immerse it in liquids
RP96966 Cupcake Maker LB4 Seite 4 Montag, 24. Februar 2014 10:45 10

SCCM 800 A1 5
– never place liquid-filled objects, e.g.
pans, on the appliance
– never use in very humid environments.
If liquid should enter the appliance,
unplug the mains plug immediately and
have the appliance repaired by a
qualified technician. You will find the
service address in “Service Centre” on
page 15.
• The appliance must be connected up to
a mains socket with earthing contact.
• Avoid using extension cables. An
extension cable may only be used under
very specific conditions:
– the extension cable must be suitable
for the current rating of the appliance;
– the extension cable must be routed
across surfaces or the floor (not
allowed to hang in mid air); ensure
the cable is out of the reach of
children and does not pose a tripping
hazard;
– never use a damaged extension
cable;
– do not connect any other appliances
to the mains socket as this could
overload the mains supply (do not use
multi-sockets).
• Do not touch the appliance, the mains
cable or the mains plug with wet hands.
• Always unplug the mains cable by
pulling out the plug. Never pull on the
cable to remove the plug.
• Never carry the appliance by the mains
cable.
• Ensure that the mains cable is not kinked,
twisted or crushed.
• Fully unwind the mains cable during use
to avoid overheating and scorching.
• Keep the mains cable away from hot
surfaces, such as cooker hotplates.
• If you are not going to use the appliance
for a while, remove the plug from the
wall socket. This is the only way to
ensure that the machine is completely
free of current.
4.5 Protection against the danger of fire
Warning! As the appliance
works at high temperatures, please
observe the following safety
information to prevent fire.
• The appliance may only be used on a
firm, level, dry and non-flammable
surface. This will prevent it from tipping
over, sliding or setting fire to the surface
and causing damage.
• Maintain a distance of at least 50 cm
from other objects to prevent them from
catching fire.
4.6 Preventing injury
Warning! To avoid injury, please
observe the following information.
• Please note that hot steam may escape
from the sides of the appliance during
baking.
• Take care when removing the finished
cupcakes – they are also very hot.
• Do not move the appliance during use
as it becomes hot. This will ensure you
avoid sustaining any burns.
• Always allow the appliance to cool
down before transporting or cleaning.
• Ensure that it is not possible for anyone
to trip over or to get caught up in or step
on the mains cable and injure
themselves.
RP96966 Cupcake Maker LB4 Seite 5 Montag, 24. Februar 2014 10:45 10

6
4.7 For the safety of your child
Warning! Children are often
unaware of danger and are injured
as a result. Please note therefore:
• Only allow children to use this appliance
under the supervision of an adult.
• Ensure the appliance is always kept out
of the reach of children.
• Ensure that children cannot pull the
appliance down onto themselves with
the cable.
• Ensure that the packing foil does not
become a deadly trap for a child.
Packing foils are not toys.
4.8 Material damage
Caution! To avoid material damage,
please observe the following conditions.
• The appliance must not be placed on
hot stoves, put in a hot oven or set up in
the vicinity of gas heaters and on-
demand water heaters, as this could
cause damage.
• Only use implements made from wood
or heat-resistant plastic. Metal
implements may damage the coated
surfaces.
• Surface cleaners (furniture and work
surfaces) may contain ingredients that
could attack and soften the rubber feet.
In this case, place the appliance on a
non-flammable surface.
• Do not place any items on the
appliance.
• If the appliance is connected to the
mains it may be damaged by lightning
during thunderstorms.
5. Before using for the first time
During manufacture, many parts are given a
thin film of oil to protect them. Before using
the appliance for the first time, run it without
cupcakes so that any residues can
evaporate.
Note When heating up for the first few
times, a slight smell may be produced. Make
sure the room is adequately ventilated.
1. Take the appliance out of the
packaging.
2. Check that the appliance shows no signs
of damage.
3. Clean the appliance before using it for
the first time. Observe the information in
the section entitled “7. Cleaning and
storing” on page 8.
4. Select a location that is firm, level and
not flammable. Maintain a distance of
approx. 50 cm from other objects.
5. Unwind the mains cable completely.
6. Insert the plug into a suitable mains
socket.
The red indicator light 1 now lights up
and the appliance heats up.
As soon as the operating temperature
has been reached, the green indicator
light 2 lights up.
7. Leave the appliance switched on for
around 10 – 15 minutes.
8. Unplug the mains plug and allow the
appliance to cool down.
RP96966 Cupcake Maker LB4 Seite 6 Montag, 24. Februar 2014 10:45 10

SCCM 800 A1 7
9. Clean the appliance again. Observe the
information in the section entitled
“7. Cleaning and storing” on page 8.
Note: The first cupcakes you bake should
be thrown away, not eaten, as they will not
taste right.
6. Bake cupcakes
1. Select a location which is firm, level and
not flammable. Maintain a distance of
approx. 50 cm from other objects.
2. Unwind the power supply cable
completely.
3. Lift open lid 3, holding the appliance by
handles 5 as you do so.
4. Remove any dust that may be present
with a dry cloth.
5. Lightly grease the coated inner surfaces
of lid 3 and of bottom part 7.
Note Ideally use cooking oil, applying
it with a pastry brush.
6. Close lid 3.
7. Insert the plug in a suitable power supply
socket.
Red indicator 1 now comes on and the
appliance heats up.
As soon as operating temperature has
been reached, green indicator light 2
comes on.
The appliance is now ready to use.
8. Lift open lid 3, holding the appliance by
handles 5 as you do so.
9. Distribute the prepared cupcake mixture
among cake moulds 6.
Note: You can also place cupcake
cases 9 in the cake moulds 6, then fill
the cases with the mixture and bake the
cupcakes. You can then remove the
finished cupcakes in their cases 9.
10.Close lid 3.
Notes
• Baking takes 15 - 20 minutes. You can
select a slightly shorter or longer baking
time depending on how brown you want
the cakes to be.
• During baking, green indicator 2 will go
off and back on. This controls the
required operating temperature.
Warning! When you open the lid
3 hot steam may rise towards you.
You should therefore protect your
hands with a tea towel or oven
gloves.
11. As soon as the cupcakes are baked to
your taste, remove them from the
appliance.
Lift open lid 3, holding the appliance by
handles 5 as you do so.
Caution!
– Only use implements made of wood or
heat-resistant plastic. Metal implements
may damage the coated surfaces.
– Use oven gloves to prevent burns.
12.Leave the cupcakes on a cooling rack to
cool.
13.Decorate the cupcakes to taste with icing
sugar, icing, fruit, frosting, cream,
coloured sugar or the like.
14.Remove the plug from the power supply
socket after use. This is the only way to
ensure that the appliance is completely
de-energized.
RP96966 Cupcake Maker LB4 Seite 7 Montag, 24. Februar 2014 10:45 10

8
7. Cleaning and storing
Warning! To avoid the danger of
an electric shock or burning:
– Always remove the plug from the
mains socket before starting to
clean the appliance.
– Never immerse the appliance in
water, and protect it from
splashes and water droplets.
– Before cleaning, allow the
appliance to cool down to avoid
the risk of burns.
Caution! Never use abrasive, corrosive or
caustic cleaning materials. These could
damage the appliance as well as the non-
stick coating.
Note: Do not leave it too long to clean the
appliance, otherwise residues of cake mix
may dry on and be difficult to remove.
1. Remove crumbs and residues of cake mix.
2. Wipe the appliance inside and out with
a soft, damp cloth. You may also use a
little mild washing-up liquid, but must
then wipe the appliance again with
clean water to avoid any aftertaste
affecting the flavour of the cupcakes.
3. Wipe dry with a dry cloth.
4. To store the appliance, wind up the mains
cable on the cable store 8 (underneath).
8. Recipe suggestions for cupcakes
8.1 Standard cupcake recipe
Ingredients
• 125 g butter
• 125 g sugar
• 1 sachet vanilla sugar
•2 eggs
• 200 g plain flour
• 50 g ground almonds
• 1 pinch salt
• 2 tsp baking powder
•4 tbsp milk
Preparation
1. Use the balloon whisk attachment of the
food mixer to cream the butter, sugar,
salt and vanilla sugar.
2. Gradually beat in the eggs.
3. Mix in the flour, baking powder and
almonds alternating with the milk.
4. Put the cake mix in cake moulds 6, no
higher than the top of the moulds.
5. Bake for 15 - 20 minutes.
6. Then cool thoroughly on a cooling rack.
8.2 Chocolate-chip cupcakes
Ingredients
• 100 g milk chocolate
• 300 g plain flour
• 2 tsp baking powder
• 1 tsp bicarbonate of soda
•1 pinch salt
•2 eggs
• 150 g margarine
• 80 g sugar
• 250 ml milk
Preparation
1. Coarsely grate the chocolate.
RP96966 Cupcake Maker LB4 Seite 8 Montag, 24. Februar 2014 10:45 10

SCCM 800 A1 9
2. Mix all the dry ingredients with the
chocolate.
3. Mix eggs, margarine, sugar and milk in
a bowl.
4. Add the flour mixture and stir together.
5. Grease and preheat the cupcake maker.
6. Put the cake mix in cake moulds 6, no
higher than the top of the moulds.
7. Bake for approx. 15 - 20 minutes.
8. The cupcakes can then be decorated as
required.
8.3 Chocolate cupcakes
Ingredients
• 100 g butter
• 150 g sugar
•2 eggs
• 100 g plain flour
• ½ tsp baking powder
• ¼ tsp bicarbonate of soda
•¼ tsp salt
• 75 g cocoa powder
• 130 ml milk, possibly more
• 1 tsp vanilla extract or vanilla paste
Preparation
1. Sieve flour and cocoa powder into a
bowl, add baking powder, bicarbonate
of soda and salt through the sieve and
mix well.
2. Combine butter, sugar and vanilla to
form a loose batter.
3. Beat in the eggs one at a time.
4. Mix in the flour mixture and about
130 ml of milk alternately and combine
to form a consistent mixture.
5. If the mixture is too dry, add a little milk
at a time until it becomes looser.
6. Put the cake mix in cake moulds 6, no
higher than the top of the moulds.
7. Bake for 15 - 20 minutes.
8. Then cool thoroughly on a cooling rack.
8.4 Red Velvet Cupcakes –
for special occasions
Ingredients for the cake mix
• 3 large egg whites, 90 g
• 30 ml red food colouring
• 1 ½ tsp vanilla extract
• 200 g plain flour
• 200 g caster sugar
• 3 tsp baking powder
• 2 tsp cocoa powder
•½ tsp salt
• 60 g rapeseed or safflower oil,
at room temperature
• 55 g butter, at room temperature
• 120 g buttermilk, at room temperature
Ingredients for frosting
• 200 g chopped white chocolate
• 270 g cream cheese, at room
temperature
• 70 g butter, at room temperature
• 1/8 tsp almond essence
Preparing the cake mix
1. Gently combine the egg whites, red
food colouring and vanilla extract in a
jug.
2. In a bowl, thoroughly mix the flour,
sugar, baking powder, cocoa and salt.
3. Beat the oil and butter together for
1 minute in a mixing bowl using a food
processor on medium speed.
4. Add the flour mixture and the buttermilk
and beat at low speed until everything is
moist.
5. Then continue processing on medium
speed for 1.5 minutes.
RP96966 Cupcake Maker LB4 Seite 9 Montag, 24. Februar 2014 10:45 10

10
6. Mix in half the egg mixture, slowly at first
then beating at medium speed for
30 seconds.
7. Proceed in exactly the same way with
the second half of the egg mixture.
Preparing the
cream cheese frosting
1. Melt the white chocolate in a small jug
in the microwave, stirring with a silicone
spatula every 15 seconds.
2. Allow the melted chocolate to cool
down until it is no longer warm, but is still
liquid.
3. Stir the butter and cream cheese until
smoothly combined.
4. Stir in the cooled liquid white chocolate
until a homogeneous mixture forms.
5. Then stir in the almond essence.
6. If the frosting is too soft, just cool in the
refrigerator a little.
Preparing the cupcakes
1. Put the mixture in cake moulds 6, no
more than the 2/3 of the way to the top.
2. Bake for 15 - 20 minutes.
3. Then cool on a cooling rack for
about 10 minutes.
4. Decorate the cupcakes with the frosting.
8.5 Swimming pool cupcakes
Ingredients for the cake mix
• 250 g plain flour
• 2 tsp baking powder
• 2 tbsp soya flour
• 2 tbsp water or
•2 eggs
• 250 g yoghurt
• 75 ml oil
•6 tsp vanilla sugar
• 6 tinned peaches or 24 cherries
Ingredients for frosting
• 225 g butter, at room temperature
• 600 g icing sugar
• 100 ml milk
• 3 tsp vanilla sugar
• Food colouring, blue
• Sprinkles if liked
Preparing the cake mix
1. For the cake mix, first mix the dry
ingredients.
2. Then add the moist ingredients except
for the peaches or cherries.
3. Then briefly mix everything together until
the dry ingredients are moist.
4. Quarter the drained peaches.
5. Now put a teaspoonful of cake mix in
each cake mould 6.
6. Put a piece of peach or a cherry in each
cake mould 6.
7. Top up with cake mix to just below the
top of each cake mould.
8. Bake for 15 - 20 minutes.
Preparing the frosting
1. For the frosting, first mix the food colouring
(if in powdered form) with the milk.
2. Then cream the butter with 300 g of the
icing sugar, the blue milk and the vanilla
sugar.
3. Then beat 100 g at a time of the
remaining icing sugar into the creamy
mixture for 2 minutes until all the icing
sugar has been used up.
4. Cool a little in the refrigerator if
necessary.
8.6 Sugar-sweet cupcakes
Ingredients for the cake mix
• 200 g plain flour
• 150 g sugar
RP96966 Cupcake Maker LB4 Seite 10 Montag, 24. Februar 2014 10:45 10

SCCM 800 A1 11
• 200 g butter
•2 eggs
• ½ sachet baking powder
Ingredients for frosting
• 200 g butter
• 200 g cream cheese
• 200 g sugar
• Food colouring if liked
• Cocoa powder if liked
• Syrup of choice if liked
• Sprinkles if liked
Preparing the cake mix
1. For the cake mix, cream 200 g butter (at
room temperature) and 150 g sugar.
2. Mix 200 g flour and half a sachet of
baking powder and add about 2 tbsp to
the creamed butter mixture, mixing well.
3. Add one egg and mix in.
4. Add another 2 tbsp of the flour mixture
and mix well.
5. Add and mix in the second egg.
6. Now add the rest of the flour mixture
and mix everything until smooth.
Preparing the frosting
1. Cream 200 g butter (at room
temperature) and 200 g sugar.
2. Add the cream cheese a spoonful at a
time and continue stirring.
3. Add food colouring, cocoa or syrup as
desired.
Preparing the cupcakes
1. Put the cake mix in cake moulds 6, no
higher than the top of the moulds.
2. Bake for 15 - 20 minutes.
3. Then cool on a cooling rack for
about 10 minutes.
4. Decorate the cupcakes with the frosting.
9. Suggested frosting recipes
9.1 Cream cheese frosting
Ingredients
• 100 g butter, softened
• 100 g icing sugar
• 110 g cream cheese
• A little grated lemon rind
Preparation
1. Mix the softened butter with the icing
sugar.
2. Add the cream cheese and the lemon
rind.
9.2 Strawberry frosting
Ingredients
• 250 g strawberries, frozen or fresh
• 200 ml milk
• 1 sachet instant dessert (vanilla flavour)
• 2 tbsp sugar
• 175 g butter, softened
• 175 g full-fat cream cheese
• 50 g sugar
• A little red food colouring
Preparation
1. Bring 150 ml of the milk to the boil with
the frozen strawberries until they have
thawed (this step can be omitted for
fresh strawberries).
2. Use a stick blender to process the
thawed or fresh strawberries in the milk
so that the mixture is completely smooth.
RP96966 Cupcake Maker LB4 Seite 11 Montag, 24. Februar 2014 10:45 10

12
3. Mix 50 ml milk with 2 tbsp sugar and
the vanilla instant dessert and add to the
boiling strawberry milk.
4. Prepare the instant dessert as usual and
allow to cool to room temperature.
5. Beat the softened butter with the cream
cheese and 50 g of the sugar until light
and fluffy.
6. Gradually stir in the cold(!) strawberry
dessert until you have a smooth mixture.
7. As boiling causes the strawberries to
lose some of their colour, you can
brighten up the frosting by adding red
food colouring.
8. Put the frosting in a piping bag and use
as desired.
9.3 Chocolate frosting
Ingredients
• 100 ml cream
• 75 g plain chocolate, at least 70 %
cocoa solids
• 1 pinch salt
• 1 sachet vanilla sugar
Preparation
1. Break up the chocolate and place in a
mixing bowl.
2. Heat the cream in a pan until bubbles
form.
3. Pour the cream into the mixing bowl and
wait for the chocolate to go soft.
4. Add salt and vanilla.
5. Stir everything until thoroughly mixed
and allow to cool thoroughly.
6. Once the mixture is cool, beat with a
hand mixer.
7. Put in a piping bag and ice the
cupcakes.
9.4 Zesty lemon frosting
Ingredients
• 3 egg whites
• 120 g icing sugar
• Lemon (unwaxed)
Preparation
1. Beat egg whites until stiff. Trickle in the
sieved icing sugar at the same time.
2. Now put this meringue mix onto the
cupcakes and arrange it creatively.
3. Put the cupcakes in the oven with top
heat for a short period (about 5 minutes)
until the tips of the meringue caps turn
brown.
4. To decorate, now cut the lemon into
slices and push into the meringue caps
rind-first (either 1/4 or 1/2 pieces).
9.5 Lime and mascarpone frosting
Ingredients
• 250 g mascarpone
• 50 g icing sugar
•1 lime
Preparation
1. Cream the mascarpone with the icing
sugar.
2. Wash the lime in hot water and dry it.
3. Grate a little of the lime zest (about 1
tsp) and squeeze out 2-3 tsp juice.
4. Mix juice and zest into the frosting.
5. Put in a piping bag and ice the cupcakes
with rosettes.
9.6 Blue frosting
Ingredients
• 225 g butter, at room temperature
• 600 g icing sugar
• 100 ml milk
RP96966 Cupcake Maker LB4 Seite 12 Montag, 24. Februar 2014 10:45 10

SCCM 800 A1 13
•3 tsp vanilla sugar
• Food colouring, blue
•Sprinkles if liked
Preparation
1. For the frosting, first mix the food
colouring (if in powdered form) with the
milk.
2. Then cream the butter with 300 g of the
icing sugar, the blue milk and the vanilla
sugar.
3. Then beat 100 g at a time of the
remaining icing sugar into the creamy
mixture for 2 minutes until all the icing
sugar has been used up.
4. Cool a little in the refrigerator if
necessary.
10. Disposal
10.1 Appliance
The symbol with the crossed-
out rubbish bin on wheels
means that within the European
Union, the product must be dis-
posed of to a sorted rubbish
collection. This applies to the product and all
accessories which are marked with this sym-
bol. Marked products must not be disposed
of via the regular domestic waste but must
be handed in to a recycling centre for elec-
trical or electronic devices. Recycling helps
to reduce the use of raw materials and to
relieve the environment. You can obtain
information about disposal and the location
of your nearest recycling centre from your
local waste management service, for exa-
mple, or Yellow Pages.
10.2 Packaging
If you wish to discard the packaging, please
observe the applicable environmental
regulations in your country.
11. HOYER Handel GmbH Warranty
Dear Customer,
You have a warranty on this product which
is valid for 3 years from the date of
purchase. In the event of this product being
defective, you have statutory rights against
the seller of the product. These statutory
rights are not limited by our warranty as set
out below.
Warranty conditions
The warranty period begins with the date of
purchase. Please keep the original till receipt
in a safe place. This is required as your
proof of purchase.
If a defect in materials or workmanship
occurs within three years of the date your
product was purchased, we will repair or
replace the product at our discretion at no
charge to you. This service under warranty
assumes that the defective product and the
proof of purchase (till receipt) are submitted
within the three-year period and that a brief
description in writing is provided of what the
defect is and when it occurred.
RP96966 Cupcake Maker LB4 Seite 13 Montag, 24. Februar 2014 10:45 10

14
If the defect is covered by our warranty, the
repaired product or a new one will be sent
back to you. There is no new warranty period
following repair or replacement of the product.
Warranty period and statutory claims
relating to defects
The warranty period is not extended when a
service is provided under warranty. This also
applies to replaced and repaired parts. Any
damage or defects present at purchase must
be reported immediately the product is
unpacked. Repairs incurred once the warranty
period has expired are chargeable.
Scope of warranty
The product has been carefully
manufactured in accordance with strict
quality guidelines and was thoroughly
checked before being delivered.
The warranty applies to defective materials
or workmanship. This warranty does not
extend to product parts exposed to normal
wear and tear (and which can therefore be
considered wear parts) or to damage to
fragile parts such as switches, batteries or
parts made of glass.
This warranty is void if the product is
damaged or if it is not used or maintained
properly. All the information in the operating
instructions should be observed precisely to
ensure that the product is used properly.
It is essential to avoid intended uses and
actions which are discouraged or warned
against in the operating instructions.
The product is intended for only private use
and not for commercial purposes.
The warranty is void in the event of misuse,
incorrect treatment, use of force or
interference by anyone other than our
authorized service centre.
Warranty process
Please follow the instructions below to
ensure that your claim is processed quickly.
• In case of any enquiry, please keep the
article number (for this product:
IAN 96966) and the till receipt as proof
of purchase.
• The article number can be found on the
rating plate, as an engraving, on the
cover sheet of your instructions (bottom
left) or as a label on the back or
underside of your appliance.
• If malfunctions or any other defects
should occur, in the first instance contact
the Service Centre mentioned below by
telephone or e-mail.
• Once a product has been recorded as
defective, you can then send it Freepost
to the service address you are given,
enclosing the proof of purchase (till
receipt) and quoting what the defect is
and when it occurred.
You can download these
instructions and many other
manuals, product videos and
software from
www.lidl-service.com.
RP96966 Cupcake Maker LB4 Seite 14 Montag, 24. Februar 2014 10:45 10

SCCM 800 A1 15
Service Centre
Service Great Britain
Tel.: 0871 5000 720 (£ 0.10/Min.)
E-Mail: ho[email protected].uk
Service Ireland
Tel.: 1890 930 034
(0,08 EUR/Min., (peak))
(0,06 EUR/Min., (off peak))
E-Mail: hoyer@lidl.ie
Service Cyprus
Tel.: 8009 4409
E-Mail: ho[email protected]
Service Malta
Tel.: 80062230
E-Mail: ho[email protected]t
IAN: 96966
Supplier
Please note that the address below is not a
service address. In the first instance, con-
tact the service centre mentioned above.
HOYER Handel GmbH
Kühnehöfe 5
22761 Hamburg
Germany
IR
CY
MT
RP96966 Cupcake Maker LB4 Seite 15 Montag, 24. Februar 2014 10:45 10

16
Spis treści
1. Opis urządzenia . . . . . . . . . . . . . . . . . . . . . . . . . . . . . . . . . . . . . . . . . . . . . . . . . . . . . . . 16
2. Nazwa części (patrz strona rozkładana) . . . . . . . . . . . . . . . . . . . . . . . . . . . . . . . . . . . . . . 17
3. Dane techniczne . . . . . . . . . . . . . . . . . . . . . . . . . . . . . . . . . . . . . . . . . . . . . . . . . . . . . . . 17
4. Zasady bezpieczeństwa. . . . . . . . . . . . . . . . . . . . . . . . . . . . . . . . . . . . . . . . . . . . . . . . . . 17
5. Przed pierwszym użyciem . . . . . . . . . . . . . . . . . . . . . . . . . . . . . . . . . . . . . . . . . . . . . . . . 21
6. Wypiekanie cupcakes . . . . . . . . . . . . . . . . . . . . . . . . . . . . . . . . . . . . . . . . . . . . . . . . . . . 21
7. Czyszczenie i przechowywanie. . . . . . . . . . . . . . . . . . . . . . . . . . . . . . . . . . . . . . . . . . . . . 23
8. Przepisy na babeczki cupcakes . . . . . . . . . . . . . . . . . . . . . . . . . . . . . . . . . . . . . . . . . . . . . 23
9. Przepisy na lukry . . . . . . . . . . . . . . . . . . . . . . . . . . . . . . . . . . . . . . . . . . . . . . . . . . . . . . 27
10. Utylizacja . . . . . . . . . . . . . . . . . . . . . . . . . . . . . . . . . . . . . . . . . . . . . . . . . . . . . . . . . . . . 29
11. Gwarancja firmy HOYER Handel GmbH. . . . . . . . . . . . . . . . . . . . . . . . . . . . . . . . . . . . . . . 29
Gratulujemy zakupu nowego
urządzenia.
Jest to wysokiej jakości produkt. Instrukcja
obsługi jest integralną częścią tego
produktu. Zawiera ona ważne wskazówki
dotyczące bezpieczeństwa, użytkowania i
utylizacji.
Przed rozpoczęciem użytkowania produktu
należy się zapoznać z wszystkimi instrukcjami
dotyczącymi obsługi oraz bezpieczeństwa.
Produktu należy używać tylko w opisany
sposób i do opisanych celów.
Przekazując produkt innym osobom, należy
razem z nimi przekazać całą jego
dokumentację.
1. Opis urządzenia
1.1 Zastosowanie
Wypiekacz do babeczek SilverCrest SCCM
800 A1 jest przeznaczony do wypiekania
amerykańskich babeczek, nazywanych też
cupcakes. Przygotowywanie innych
artykułów spożywczych jest niedozwolone.
Cupcakes to małe babeczki, które były
początkowo wypiekane w filiżankach. Ich
kształt jest podobny do muffinów. Cupcakes
są jednak mniejsze i słodsze od muffinów, a
poza tym dekoruje si je kremem itp.
Urządzenia należy używać tylko w domu,
nigdy na dworze i na wolnym powietrzu.
Urządzenie przeznaczone jest do użytku
prywatnego, nie do stosowania
w działalności gospodarczej.
Urządzenie nadaje się również do:
• używania w kuchniach pracowniczych
w sklepach, biurach i innych
pomieszczeniach pracowniczych,
• używania w gospodarstwach rolnych,
• używania przez klientów w hotelach,
motelach i innych kompleksach
mieszkalnych,
• używania w pensjonatach podających
śniadania.
RP96966 Cupcake Maker LB4 Seite 16 Montag, 24. Februar 2014 10:45 10

SCCM 800 A1 17
1.2 Skład zestawu
• 1 Wypiekacz do babeczek
• 50 foremek: średnica 50 mm,
wysokość 20 mm
• 1 instrukcja obsługi
1.3 Oznaczenia na urządzeniu
2. Nazwa części (patrz strona rozkładana)
1 Czerwona lampka kontrolna
– świeci, gdy urządzenie jest zasilane
prądem.
2 Zielona lampka kontrolna
– świeci, gdy jest osiągnięta
temperatura wypiekania.
3 Pokrywa
4 Symbol ostrzegawczy „Ostrzeżenie
przed gorącymi powierzchniami“
5 Uchwyty
6 Wgłębienia na ciasto
– można do nich wkładać foremki albo
po prostu wlewać ciasto na cupcakes
7 Podstawa
8 Nawijarka kabla (pod spodem)
9 Foremek
3. Dane techniczne
Napięcie znamionowe: 220-240 V
~
/50 Hz
Moc znamionowa: 800-1.000 W
Klasa ochrony: I
4. Zasady bezpieczeństwa
4.1 Wyjaśnienie haseł
Instrukcja obsługi zawiera następujące
hasła ostrzegawcze:
Ostrzeżenie!
Wysokie ryzyko: Nieprzestrzeganie
tego ostrzeżenia grozi utratą
zdrowia lub życia.
Uwaga!
Średnie ryzyko: Nieprzestrzeganie tego
ostrzeżenia może spowodować szkody
materialne.
Wskazówka:
Niskie ryzyko: Kwestie, które należy
uwzględnić przy eksploatacji urządzenia.
Oznaczenie 4 Miejsce Znaczenie
Pokrywa 3 Ostrzeżenie
przed
gorącymi
powierzchni
ami
RP96966 Cupcake Maker LB4 Seite 17 Montag, 24. Februar 2014 10:45 10

18
4.2 Wskazówki specjalne dla tego
urządzenia
Ostrzeżenie!
Należy przestrzegać następujących
wskazówek, aby uniknąć uszkodzeń
ciała.
• Dzieci powyżej 8 roku życia i osoby o
ograniczonej sprawności fizycznej, sensorycznej i
umysłowej oraz osoby nieposiadające
dostatecznej wiedzy albo wystarczającego
doświadczenia mogą używać tego urządzenia
tylko pod opieką lub pod warunkiem, że zostały
poinstruowane o bezpiecznym sposobie
używania urządzenia i zrozumiały zagrożenia
związane z używaniem urządzenia. Dzieciom nie
wolno bawić się urządzeniem.
• Dzieciom nie wolno czyścić urządzenia ani
wykonywać przewidzianych do wykonywania
przez użytkownika czynności pielęgnacyjnych,
chyba że są w wieku powyżej 8 lat i znajdują się
pod opieką.
• Dzieci w wieku poniżej 8 lat nie mogą mieć
kontaktu z urządzeniem i przewodem sieciowym.
• Powierzchnie urządzenia mogą być gorące.
Pracujące urządzenie chwytać tylko za
uchwyty
5
.
• Przed czyszczeniem zawsze odłączać wtyczkę
sieciową.
• Nigdy nie zanurzać urządzenia w wodzie i
chronić go przed wodą rozpryskową i
kropelkową.
• Przed czyszczeniem należy poczekać na
ostudzenie urządzenia do tego stopnia, aby nie
było niebezpieczeństwa oparzenia się.
Uwaga! By uniknąć szkód materialnych
należy przestrzegać poniższych wskazówek.
• Nie stosować nigdy szorujących, żrących lub
rysujących środków czyszczących. Mogłoby to
uszkodzić urządzenie lub powłokę
antyadhezyjną.
• Nie wolno użytkować urządzenia z zewnętrznym
przełącznikiem czasowym lub oddzielnym
systemem telemechanicznym, jak na przykład
zdalnie sterowane gniazdo.
4.3 Wskazówki ogólne
• Przed użyciem należy zapoznać się
dokładnie z niniejszą instrukcją obsługi.
Jest ona częścią składową urządzenia
imusi być zawsze dostępna.
• Urządzenie należy zawsze stosować
zgodnie z opisanym zastosowaniem
(patrz "1.1 Zastosowanie" na
stronie 16).
• Sprawdzić, czy wymagane napięcie
sieciowe (patrz tabliczka znamionowa
urządzenia) zgodne jest z faktycznym
napięciem w sieci, co pozwoli uniknąć
uszkodzenia urządzenia.
• Należy pamiętać, że stosowanie
akcesoriów niezalecanych w niniejszej
instrukcji obsługi lub przeprowadzanie
napraw przy użyciu nieoryginalnych
części zamiennych spowoduje utratę
wszelkich roszczeń z tytułu gwarancji
i rękojmi. Dotyczy to również napraw
przeprowadzanych przez osoby
niewykwalifikowane. Dane kontaktowe
znajdziesz w "Centrum serwisowe" na
stronie30.
• W przypadku ewentualnych usterek
w okresie gwarancji do
przeprowadzenia naprawy uprawnione
jest wyłącznie nasze centrum
serwisowe. W przeciwnym razie
wszelka gwarancja wygasa. Dane
kontaktowe znajdziesz w "Centrum
serwisowe" na stronie30.
• Włączonego urządzenia nie wolno
pozostawiać bez nadzoru, aby móc
w porę zareagować w razie
wystąpienia usterek w jego działaniu.
RP96966 Cupcake Maker LB4 Seite 18 Montag, 24. Februar 2014 10:45 10
Strona się ładuje...
Strona się ładuje...
Strona się ładuje...
Strona się ładuje...
Strona się ładuje...
Strona się ładuje...
Strona się ładuje...
Strona się ładuje...
Strona się ładuje...
Strona się ładuje...
Strona się ładuje...
Strona się ładuje...
Strona się ładuje...
Strona się ładuje...
Strona się ładuje...
Strona się ładuje...
Strona się ładuje...
Strona się ładuje...
Strona się ładuje...
Strona się ładuje...
Strona się ładuje...
Strona się ładuje...
Strona się ładuje...
Strona się ładuje...
Strona się ładuje...
Strona się ładuje...
Strona się ładuje...
Strona się ładuje...
Strona się ładuje...
Strona się ładuje...
Strona się ładuje...
Strona się ładuje...
Strona się ładuje...
Strona się ładuje...
Strona się ładuje...
Strona się ładuje...
Strona się ładuje...
Strona się ładuje...
Strona się ładuje...
Strona się ładuje...
Strona się ładuje...
Strona się ładuje...
Strona się ładuje...
Strona się ładuje...
Strona się ładuje...
Strona się ładuje...
Strona się ładuje...
Strona się ładuje...
Strona się ładuje...
Strona się ładuje...
Strona się ładuje...
Strona się ładuje...
Strona się ładuje...
Strona się ładuje...
Strona się ładuje...
Strona się ładuje...
Strona się ładuje...
Strona się ładuje...
Strona się ładuje...
Strona się ładuje...
Strona się ładuje...
Strona się ładuje...
Strona się ładuje...
Strona się ładuje...
Strona się ładuje...
Strona się ładuje...
Strona się ładuje...
Strona się ładuje...
Strona się ładuje...
Strona się ładuje...
Strona się ładuje...
Strona się ładuje...
Strona się ładuje...
Strona się ładuje...
Strona się ładuje...
Strona się ładuje...
Strona się ładuje...
Strona się ładuje...
Strona się ładuje...
Strona się ładuje...
Strona się ładuje...
Strona się ładuje...
-
 1
1
-
 2
2
-
 3
3
-
 4
4
-
 5
5
-
 6
6
-
 7
7
-
 8
8
-
 9
9
-
 10
10
-
 11
11
-
 12
12
-
 13
13
-
 14
14
-
 15
15
-
 16
16
-
 17
17
-
 18
18
-
 19
19
-
 20
20
-
 21
21
-
 22
22
-
 23
23
-
 24
24
-
 25
25
-
 26
26
-
 27
27
-
 28
28
-
 29
29
-
 30
30
-
 31
31
-
 32
32
-
 33
33
-
 34
34
-
 35
35
-
 36
36
-
 37
37
-
 38
38
-
 39
39
-
 40
40
-
 41
41
-
 42
42
-
 43
43
-
 44
44
-
 45
45
-
 46
46
-
 47
47
-
 48
48
-
 49
49
-
 50
50
-
 51
51
-
 52
52
-
 53
53
-
 54
54
-
 55
55
-
 56
56
-
 57
57
-
 58
58
-
 59
59
-
 60
60
-
 61
61
-
 62
62
-
 63
63
-
 64
64
-
 65
65
-
 66
66
-
 67
67
-
 68
68
-
 69
69
-
 70
70
-
 71
71
-
 72
72
-
 73
73
-
 74
74
-
 75
75
-
 76
76
-
 77
77
-
 78
78
-
 79
79
-
 80
80
-
 81
81
-
 82
82
-
 83
83
-
 84
84
-
 85
85
-
 86
86
-
 87
87
-
 88
88
-
 89
89
-
 90
90
-
 91
91
-
 92
92
-
 93
93
-
 94
94
-
 95
95
-
 96
96
-
 97
97
-
 98
98
-
 99
99
-
 100
100
-
 101
101
-
 102
102


Silvercrest SCCM 800 A1 Operating Instructions Manual
- Typ
- Operating Instructions Manual
w innych językach
- Deutsch: Silvercrest SCCM 800 A1
- slovenčina: Silvercrest SCCM 800 A1
Powiązane artykuły
-
Silvercrest SKMP 1200 A2 Operating Instructions Manual
-
Silvercrest SJB 15 B1 Operating Instructions Manual
-
Silvercrest SWE 1200 C3 Operating Instructions Manual
-
Silvercrest 329290 1904 Operating Instructions Manual
-
-
Silvercrest SKM 550 A1 Recipe book
