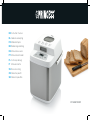
Princess Homemade Deluxe Instrukcja obsługi
- Kategoria
- Maszyny do wypieku chleba
- Typ
- Instrukcja obsługi
Niniejsza instrukcja jest również odpowiednia dla

EN Instruction manual
NL Gebruiksaanwijzing
FR Mode d’emploi
DE Bedienungsanleitung
ES Manual de usuario
PT Manual de utilizador
PL Instrukcja obsługi
IT Manuale utente
SV Bruksanvisning
CS Návod na použití
SK Návod na použitie
01.152007.01.001

2
EN

3
SAFETY INSTRUCTIONS
Before using the electrical appliance, the following basic
precautions should always be followed:
• Read all instructions
• Before using check that the voltage of wall outlet
corresponds to the one shown on the rating plate.
• Do not operate any appliance with a damaged cord or
plug or after the appliance malfunctions, or is dropped
or damaged in any manner. Return appliance to
manufacturer or the nearest authorized service agent
for examination, repair or electrical or mechanical
adjustment.
• Do not touch hot surfaces. Use handles or knobs.
• To protect against electric shock do not immerse cord,
plugs, or housing in water or other liquid.
• Unplug from outlet when not in use, before putting on
or taking o parts, and before cleaning.
• Do not let cord hang over edge of table or hot surface.
• The use of accessory not recommended by the appliance
manufacturer may cause injuries.
• This appliance is not intended for used by persons
(including children) with reduced physical, sensory
or mental capabilities, or lack of experience and
knowledge, unless they have been given supervision or
instruction concerning use of the appliances by a person
responsible for their safety.
• Children should be supervised to ensure that they do
not play with the appliance.
• Do not place on or near a hot gas or electric burner, or in
a heated oven.
• Extreme caution must be used when moving an
appliance containing hot oil or other hot liquids.
• Do not touch any moving or spinning parts of the
machine when baking..
• Never switch on the appliance without properly placed
bread pan lled ingredients.
• Never beat the bread pan on the top or edge to remove
the pan, this may damage the bread pan.
• Metal foils or other materials must not be inserted into
the bread maker as this can give rise to the risk of a re
or short circuit.
• Never cover the bread maker with a towel or any other
material, heat and steam must be able to escape freely.
A re can be caused if it is covered by, or comes into
contact with combustible material.
• Turn any control to OFF, then remove plug from wall
outlet.
• Do not operate the appliance for other than its intended
use.
• This appliance has been incorporated with a grounded
plug. Please ensure the wall outlet in your house is well
earthed.
• This appliance is intended to be used in household and
similar applications such as:
• Sta kitchen areas in shops, oces and other working
environments;
o Farm houses;
o By clients in hotels, motels and other residential type
environments;
o Bed and breakfast type environments.
• The appliance is not intended to be operated by means
EN

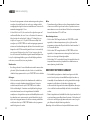
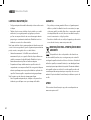
1
10
11
2
7
8
9
12
3 4 4 5 6
4
of an external timer or separate remote-control system.
• Do not use outdoors.
• Save these instructions
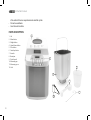
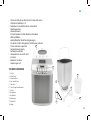
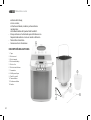
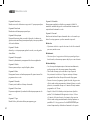
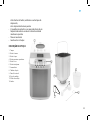
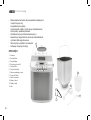
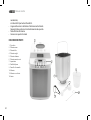
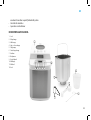
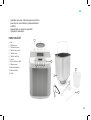
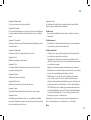
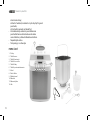
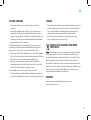
PARTS DESCRIPTION
1. Lid
2. Menu button
3. Weight button
4. Up and down button
5. Color button
6. Start/stop button
7. Kneader
8. Bread pan
9. Control panel
10. Measuring cup
11. Measuring spoon
12. Hook
Instruction manual
EN

5
BEFORE THE FIRST USE
• The appliance may emit a little smoke and a characteristic smell when
you turn it on for the rst time. This is normal and will soon stop. Make
sure the appliance has sucient ventilation.
• Unpack your appliance and check whether all parts and accessories are
complete and free of damage.
• Clean all the parts according to the section “CLEANING AND
MAINTENANCE”.
• Set the bread maker on bake mode and bake empty for about 10
minutes. Then let it cool down and clean all the detached parts again.
• Dry all parts thoroughly and assemble them, the appliance is ready for
use.
USE
Start/stop button
• The button is used for starting and stopping the selected baking
program.
• To start a program, press the START/STOP button once. A short beep
will be heard, the indicator will light up, and the two dots in the time
display begin to ash and the program starts. Any other button is
inactivated except the START/STOP button after a program has begun.
• To stop the program, press the START/STOP button for approx. 3
seconds, then a beep will be heard, it means that the program has
been switched o. This feature will help to prevent any unintentional
disruption to the operation of program.
Menu button
• The MENU button is used to set dierent programs. Each time it is
pressed (accompanied by a short beep) the program will vary. Press the
button discontinuously, the 19 menus will be cycled to show on the
LCD display. Select your desired program. The functions of 19 menus
will be explained below.
Program 1: Basic
For white and mixed breads, it mainly consist of wheat our or rye our.
The bread has a compact consistency. You can adjust the bread brown by
setting the COLOR button.
Program 2: French
For light breads made from ne our. Normally the bread is uy and
has a crispy crust. This is not suitable for baking recipes requiring butter,
margarine or milk.
Program 3: Sweet
For breads with additives such as fruit juices, grated coconut, raisins, dry
fruits, chocolate or added sugar. Due to a longer phase of rising the bread
will be light and airy.
Program 4: Ultra-fast
Kneading, rising and baking in a very fast way. But the baked bread is the
roughest one among all bread menus.
Program 5: Quick
Kneading, rising and baking time is shorter then basic bread but longer
than Ultra-fast bread. The bread interior tissue is denser.
Program 6: Cake
Kneading, rising and baking, but rise with soda or baking powder. This
setting will mix ingredients then bake for a preset time.
Instruction manual
EN

6
Program 7: Dessert
For baking desserts, that only require one kneading and one rise.
Program 8: Rice bread
Mix cooked rice into the our with 1:1 to make the bread.
Program 9: Corn bread
Mix corn into the our with to make the bread.
Program 10: Purple rice
For the bread of gluten-free ours and baking mixtures. Gluten-free ours
require longer for the uptake of liquids and have dierent rising properties.
Program 11: Gruel
Kneading and stewing to make coarse cereals gruel, e.g. Chinese Babao gruel.
Program 12: Sticky rice
Stirring and heating to make glutinous rice ball
Program 13: Mix
Stir to let the our and liquids mix thoroughly
Program 14: Dough
For prepare the yeast dough for buns, pizza or plaits. There is no baking in
this program.
Program 15: Knead
User can set the kneading time
Program 16: Rice wine
Prepare glutinous rice and distiller's yeast to brew rice wine.
Program 17: Yogurt
For mixing the milk and lactic acid bacteria to make yogurt.
Program 18: Jam
For making jam from fresh fruits and marmalades from Seville oranges. Do
not increase the quantity or allow the recipe to boil over the barrel into the
baking chamber.
Program 19: Bake
For additional baking of breads that are too light or not baked through. In
this program there is no kneading or resting.
Color button
• With the button you can select light, medium or dark color for the
crust.
Weight button
• Select the weight. Press the weight button to choose your desired
gross weight, see the mark beneath it for reference.
Up and down button
• If you want the appliance do not start working immediately you can
use this button to set the delay time.
• You must decide how long it will be before your bread is ready by
pressing the these buttons. Please note the delay time should include
the baking time of program.
• At rst the program and degree of browning must be selected, then
pressing the up or down button to increase or decrease the delay time
at the increment of 10 minutes. The maximum delay is 15 hours.
• Example: Now it is 8:30p.m, if you would like your bread to be ready in
the next morning at 7 o’clock, i.e. in 10 hours and 30 minutes. Select
your menu, color, loaf size then press the up or down to add the time
until 10:30 appears on the LCD. Then press the START/STOP button to
activate this delay program and the indicator will light up. You can see
the dot ashed and LCD will count down to show the remaining time.
Instruction manual
EN

7
You will get fresh bread at 7:00 in the morning, if you don’t want to take
out the bread immediately, the keeping warm time of 1hour starts.
Note: For time delayed baking, do not use any easily perishable
ingredients such as eggs, fresh milk, fruits, onions, etc.
Keep warm
• Bread can be automatically kept warm for 1 hour after baking. During
keeping warm, if you would like to take the bread out, switch the
program o by pressing the START/STOP button.
Memory
• If the power supply has been interrupted during the course of making
bread, the process of making bread will be continued automatically
within 10 minutes, even without pressing START/STOP button. If the
interruption time exceeds 10 minutes, the memory cannot be kept, you
must discard the ingredients in the bread pan and add the ingredients
into bread pan again, and the bread maker must be restarted. But if the
dough has not entered the rising phase when the power supply breaks
o, you can press the START/STOP directly to continue the program
from the beginning.
Environment
• The machine may work well in a wide range of temperature, but there
may be any dierence in loaf size between a very warm room and a
very cold room. We suggest that the room temperature should be
within the range of 15
o
C to 34
o
C.
Warning display
• If the display shows “HHH” after you have pressed START/STOP button,
the temperature inside is still too high. Then the program has to be
stopped. Open the lid and let the machine cool down for 10 to 20
minutes.
• If the display shows “EE0” after you have pressed START/STOP button,
the temperature sensor is disconnected please check the sensor
carefully by Authorized expert.
• If the display shows “L:LL” after you have pressed button, the
temperature inside is too low. Then move the break maker to warm
place and use.
HOW TO MAKE BREAD
• Place the bread pan in position, and then turn it clockwise until they
click in correct position. Fix the kneading blade onto the drive shaft. It
is recommended to ll hole with heat-resisting margarine prior to place
the kneading blade to avoid the dough sticking the kneading blade,
also this would make the kneading blade be removed from bread
easily.
• Place ingredients into the bread pan. Please keep to the order
mentioned in the recipe. Usually the water or liquid substance should
be put rstly, then add sugar, salt and our, always add yeast or baking
powder as the last ingredient.
Note: the quantities of our and raising agent that may be used refer to
the recipe.
• Make a small indentation on the top of our with nger, add yeast
into the indentation, make sure it does not come into contact with the
liquid or salt.
• Close the lid gently and plug the power cord into a wall outlet.
• Press the MENU button until your desired program is selected.
• Press the COLOR button to select the desired crust color.
• Press the LOAF SIZE button to select the desired size.
• Set the delay time by pressing the up or down button. This step may
be skipped if you want the bread maker to start working immediately.
Instruction manual
EN

8
• Press the START/STOP button once to start working, and the indicator
will light up.
• For the bread menu’s beeps sound will be heard during operation. This
is to prompt you to add ingredients. Open the Lid and put in some
ingredients. It is possible that steam will escape through the vent in the
lid during baking. This is normal.
• Once the process has been completed, ten beeps will be heard. You
can press START/STOP button for approx. 3 seconds to stop the process
and take out the bread. Open the Lid and while using oven mitts, turn
the bread pan in anti-clockwise and take out the bread pan.
Caution: the Bread pan and bread may be very hot! Always handle with care.
• Let the bread pan cool down before removing the bread. Then use
non-stick spatula to gently loosen the sides of the bread from the pan.
• Turn bread pan upside down onto a wire cooling rack or clean cooking
surface and gently shake until bread falls out.
• Let the bread cool for about 20 minutes before slicing. It is
recommended slicing bread with electric cutter or dentate cutter, had
better not with fruit knife or kitchen knife, otherwise the bread may be
subject to deformation.
• If you are out of the room or have not pressed START/STOP button at
the end of operation, the bread will be kept warm automatically for 1
hour, when keep warm is nished, one beep will be heard.
• When do not use or complete operation, unplug the power cord.
Note: Before slicing the loaf, use the hook to remove out the Kneading
blade hidden on the bottom of loaf. The loaf is hot, never use the hand to
remove the kneading blade.
About Quick Breads
• Quick breads are made with baking powder and baking soda
that activated by moisture and heat. For perfect quick breads, it is
suggested that all liquids be placed in the bottom of the bread pan ;dry
ingredients on top, During the initial mixing of quick bread batters, dry
ingredients may collect in the corners of the pan, it may be necessary
to help machine mix to avoid our clumps. if so, use a rubber spatula.
CLEANING AND MAINTENANCE
• Disconnect the machine from the power outlet and let it cool down
before cleaning.
• Bread pan: remove the bread pan by turning it in anti-clockwise,
then pulling the handle, wipe inside and outside of pan with damp
clothes, do not use any sharp or abrasive agents for the consideration
of protecting the non-stick coating. The pan must be dried completely
before installing.
Note: Insert the bread pan and press down until it xed in correct position.
If it cannot be inserted, adjust the pan lightly to make it is on the correct
position then turn it in clockwise.
• Kneading blade: If the kneading blade is dicult to remove from the
bread, use the hook. Also wipe the blade carefully with a cotton damp
cloth. Both the bread pan and kneading blade are dishwashing safe
components.
• Housing: gently wipe the outer surface of housing with a wet cloth. Do
not use any abrasive cleaner for cleaning, as this would degrade the
high polish of the surface. Never immerse the housing into water for
cleaning.
Note: It is suggested not disassembling the lid for cleaning.
• Before the bread maker is packed for storage, ensure that it has
completely cooled down, clean and dry, and the lid is closed.
Instruction manual
EN

9
GUARANTEE
• This product is guaranteed for 24 months granted. Your warranty is
valid if the product is used in accordance to the instructions and for
the purpose for which it was created. In addition, the original purchase
(invoice, sales slip or receipt) is to be submitted with the date of
purchase, the name of the retailer and the item number of the product.
• For the detailed warranty conditions, please refer to our service
website: www.service.princess.info
GUIDELINES FOR PROTECTION OF THE
ENVIRONMENT
This appliance should not be put into the domestic garbage
at the end of its durability, but must be oered at a central point for the
recycling of electric and electronic domestic appliances. This symbol on
the appliance, instruction manual and packaging puts your attention to
this important issue. The materials used in this appliance can be recycled.
By recycling of used domestic appliances you contribute an important
push to the protection of our environment. Ask your local authorities for
information regarding the point of recollection.
SUPPORT
You can nd all available information and spare parts at
www.service.princess.info
Instruction manual
EN

10
VEILIGHEIDSINSTRUCTIES
Voordat het elektrische apparaat wordt gebruikt, moeten de
volgende elementaire voorzorgsmaatregelen altijd worden
opgevolgd:
• Lees alle instructies
• Controleer vóór gebruik of de spanning van het stopcontact
overeenkomt met wat wordt aangegeven op het typeplaatje.
• Gebruik het apparaat niet met een beschadigd snoer
of stekker, of nadat het apparaat defect is geraakt of is
gevallen of op welke andere manier dan ook beschadigd
is. Breng het apparaat terug naar de fabrikant of de
dichtstbijzijnde erkende serviceagent voor onderzoek,
reparatie of elektrische of mechanische aanpassingen.
• Raak hete oppervlakken niet aan. Gebruik de
handgrepen of knoppen.
• Ter bescherming tegen een elektrische schok, mag het
netsnoer, de stekker of de behuizing nooit in water of
andere vloeistoen ondergedompeld worden.
• Trek de stekker uit het stopcontact wanneer het niet
wordt gebruikt, vóór het opzetten van of uitnemen van
onderdelen en vóór het reinigen.
• Laat het snoer niet over de rand van de tafel of een heet
oppervlak hangen.
• Het gebruik van accessoires die niet door de fabrikant van
het apparaat worden aanbevolen, kan letsel veroorzaken.
• Dit apparaat is niet bedoeld voor gebruik door
personen (met inbegrip van kinderen) met verminderde
lichamelijke, zintuiglijke of psychische capaciteiten, of
met een gebrek aan ervaring en kennis, tenzij ze onder
toezicht staan van of geïnstrueerd zijn m.b.t. het gebruik
van dit apparaat, door een persoon die verantwoordelijk
is voor hun veiligheid.
• Kinderen dienen onder toezicht te staan om ervoor te
zorgen dat ze niet met het apparaat spelen.
• Plaats het apparaat niet op of bij een hete gas- of
elektrische brander, of in een verhitte oven.
• Er moet uiterste voorzichtigheid worden gebruikt bij het
verplaatsen van een apparaat met hete olie of andere
hete vloeistoen.
• Raak geen bewegende of draaiende machineonderdelen
aan bij het bakken.
• Schakel nooit het apparaat nooit aan zonder dat het bakblik
gevuld met ingrediënten op de juiste wijze is geplaatst.
• Sla nooit op de bovenkant of rand van het bakblik om het
te verwijderen; dit zou het bakblik kunnen beschadigen.
• Metaalfolie of andere materialen mogen niet in de
broodmachine worden geplaatst omdat hierdoor
brandgevaar of kortsluiting kan ontstaan.
• Dek de broodmachine nooit af met een handdoek of
ander materiaal; hitte en stoom moeten vrijelijk kunnen
ontsnappen. Brand kan worden veroorzaakt wanneer het
wordt afgedekt door, of in contact komt met brandbare
materialen.
• Zet alle bedieningstoetsen op UIT, verwijder dan de
stekker uit het stopcontact.
• Bedien het apparaat uitsluitend voor het bedoelde gebruik.
• Dit apparaat is uitgerust met een geaarde stekker. Zorg
ervoor dat het stopcontact in uw huis goed is geaard.
• Dit apparaat is bedoeld voor huishoudelijk en
soortgelijke toepassingen zoals:
• Personeelskeukens in winkels, kantoren en overige
werkplekken;
o Boerderijen;
Gebruiksaanwijzing
NL

1
10
11
2
7
8
9
12
3 4 4 5 6
11
o Door gasten in hotels, motels en overige accommodaties;
o Bed and breakfast-achtige accommodaties.
• Het apparaat dient niet te worden aangesloten op een
externe tijdklok of een apart op afstand bedienbaar systeem.
• Niet buitenshuis gebruiken.
• Bewaar deze instructies
OMSCHRIJVING VAN DE ONDERDELEN
1. Deksel
2. Menutoets
3. Gewichttoets
4. Toets omhoog en omlaag
5. Kleurtoets
6. Start/stop toets
7. Kneder
8. Bakblik
9. Bedieningspaneel
10. Maatbeker
11. Maatlepel
12. Haak
Gebruiksaanwijzing
NL

12
VOOR HET EERSTE GEBRUIK
• Het apparaat kan een beetje rook en een karakteristieke geur afgeven
wanneer het voor de eerste keer wordt aangezet. Dit is normaal en
stopt spoedig. Zorg ervoor dat het apparaat voldoende ventilatie heeft.
• Pak uw apparaat uit en controleer of alle onderdelen en accessoires
compleet en schadevrij zijn.
• Reinig alle onderdelen in overeenstemming met het hoofdstuk
"REINIGING EN ONDERHOUD".
• Stel de broodmachine in op bakstand en bak in lege toestand voor
ongeveer 10 minuten. Laat het dan afkoelen en reinig alle losse
onderdelen opnieuw.
• Droog alle onderdelen grondig af en monteer deze; het apparaat is
klaar voor gebruik.
GEBRUIK
Start/stop toets
• De toets wordt gebruikt om het gekozen bakprogramma te starten en
te stoppen.
• Druk eenmaal op de START/STOP toets om een programma te starten.
U hoort een korte pieptoon, het indicatielampje licht op en de twee
puntjes in de tijdweergave beginnen te knipperen en het programma
start. Nadat het programma is begonnen zijn alle andere toetsen,
behalve de START/STOP toets, gedeactiveerd.
• Druk ongeveer 3 seconden op de START/STOP toets om het
programma te stoppen; er is een pieptoon te horen, wat betekent
dat het programma is uitgeschakeld. Deze functie helpt om een
onbedoelde verstoring van de werking van het programma te
voorkomen.
Menutoets
• De MENU-toets wordt gebruikt om verschillende programma's in te
stellen. Elke keer dat de toets wordt ingedrukt (vergezeld van een
korte pieptoon) zal het programma veranderen. Als u voortdurend met
onderbrekingen op de toets drukt, worden de 19 menu's circulair op
het LCD-display vertoond. Kies het gewenste programma. De functies
van de 19 menu's worden hieronder uitgelegd.
Programma 1: Basis
Voor witte en gemengde broden, die voornamelijk uit tarwemeel of
roggemeel bestaan. Het brood heeft een compacte consistentie. U kunt
de bruining van het brood aanpassen door de knop COLOR (kleur) in te
stellen.
Programma 2: Frans
Voor licht brood gemaakt van jn meel. Normaal is het brood luchtig
en heeft het een krokante korst. Dit is niet geschikt voor bakrecepten
waarvoor boter, margarine of melk nodig is.
Programma 3: Zoet
Voor brood met additieven, zoals vruchtensappen, geraspte kokos,
rozijnen, droog fruit, chocolade of toegevoegde suikers. Door een langere
fase voor het rijzen zal het brood licht en luchtig zijn.
Programma 4: Supersnel
Kneden, rijzen en bakken op een zeer snelle manier. Maar het gebakken
brood is het grofste onder alle broodmenu’s.
Programma 5: Snel
Kneed-, rijs- en baktijd zijn korter dan van het basis brood maar langer dan
het supersnelle brood. Het binnenweefsel van het brood is dichter.
Gebruiksaanwijzing
NL

13
Programma 6: Cake
Kneden, rijzen en bakken, maar rijzen met soda- of bakpoeder. Deze
instelling zal de ingrediënten mengen en vervolgens bakken volgens een
vooraf ingestelde tijd.
Programma 7: Dessert
Voor het bakken van desserts, die alleen één keer kneden en één keer
rijzen vereisen.
Programma 8: Rijstbrood
Meng gekookte rijst in de bloem in een verhouding 1:1 om het brood te
maken.
Programma 9: Maisbrood
Meng maïs in de bloem om het brood te maken.
Programma 10: Paarse rijst
Voor het brood van glutenvrij meel en bakmengsels. Glutenvrij meel
vereist meer tijd voor het opnemen van vloeistoen en heeft andere
eigenschappen voor het rijzen.
Programma 11: Pap
Kneden en stoven om pap van grove granen te maken, bijvoorbeeld
Chinese Babao pap.
Programma 12: Kleefrijst
Roeren en verwarmen om een kleverige rijstbal te maken
Programma 13: Mengen
Roeren om de bloem en vloeistoen grondig mengen
Programma 14: Deeg
Voor het voorbereiden van gistdeeg voor broodjes, pizza of vlechten. Er is
geen bakken in dit programma.
Programma 15: Kneden
De gebruiker kan de kneedtijd instellen
Programma 16: Rijstwijn
Bereid kleefrijst en distilleerdergist voor het brouwen van rijstwijn.
Programma 17: Yoghurt
Voor het mengen van de melk en melkzuurbacteriën voor het maken van
yoghurt.
Programma 18: Jam
Voor het maken van vers fruitjam en marmelade van Sevilla sinaasappelen.
Verhoog niet de hoeveelheid of laat het recept van het vat in de
ovenruimte overkoken.
Programma 19: Bakken
Voor het extra bakken van brood die te licht of niet doorgebakken is. In dit
programma is er geen kneden of rusten.
Kleurtoets
• Met deze toets kunt u een lichte, medium of donkere kleur voor de
korst selecteren.
Gewichttoets
• Kies het gewicht. Druk op de gewichttoets om het gewenste
brutogewicht te kiezen, kijk naar het teken eronder ter referentie.
Toets omhoog en omlaag
• Als u wilt dat het apparaat niet meteen gaat werken, kunt u deze toets
gebruiken om de vertragingstijd in te stellen.
• U moet beslissen hoe lang het moet duren voordat uw brood klaar is
door deze toetsen in te drukken. Houd er rekening mee de baktijd van
het programma bij de vertragingstijd in moet worden begrepen.
Gebruiksaanwijzing
NL

14
• Eerst moet het programma en de mate van bruining worden gekozen,
vervolgens door middel van de toets omhoog en omlaag wordt de
vertragingstijd verlengd of verkort met intervallen van 10 minuten. De
maximale vertragingstijd is 15 uur.
• Voorbeeld: Het is nu 20.30; als u uw brood de volgende morgen om 7
uur klaar wilt hebben, dus over 10 uur en 30 minuten. Kies uw menu,
kleur, broodgrootte en druk op de "omhoog” of "omlaag” toets om
de tijd toe te voegen, tot 10:30 p het LCD scherm verschijnt. Druk
vervolgens op de START/STOP toets om dit vertragingsprogramma te
activeren en het indicatielampje zal oplichten. U kunt zien dat de punt
knipperde en het LCD scherm zal af gaan tellen om de resterende tijd
weer te geven. U krijgt vers brood om 7:00 uur 's morgens; als u het
brood er niet meteen uit wilt halen, begint de warmhoudtijd van 1uur.
Let op: Voor tijdvertraagd bakken, geen snel bederfelijke ingrediënten
zoals eieren, verse melk, fruit, uien, enz. gebruiken.
Warmhouden
• Brood kan gedurende 1 uur na het bakken automatisch warm worden
gehouden. Tijdens het warmhouden, als u het brood eruit wil halen,
schakelt u het programma uit door op de START/STOP toets te drukken.
Geheugen
• Als de stroomtoevoer tijdens het broodmaken wordt onderbroken,
zal het proces van broodmaken automatisch binnen 10 minuten
worden hervat, zelfs zonder op de START/STOP toets te drukken.
Als de onderbreking de 10 minuten overschrijdt, kan het geheugen
niet worden bewaard; u moet de ingrediënten in het bakblik
verwijderen en de ingrediënten opnieuw in het bakblik plaatsen en de
broodmachine moet opnieuw worden gestart. Maar als het deeg de
rijsfase niet is ingegaan wanneer de stroomvoorziening onderbroken
wordt, kunt u direct op de START/STOP drukken om het programma
vanaf het begin voort te zetten.
Milieu
• De machine werkt goed binnen een breed temperatuurbereik, maar
er kan een verschil in de grootte van het brood optreden tussen een
warme kamer en een zeer koude kamer. We bevelen een temperatuur
binnen het bereik van 15
o
C tot 34
o
C aan.
Waarschuwingsscherm
• Als het scherm “HHH” aangeeft nadat u de START/STOP toets hebt
ingedrukt, is de binnentemperatuur nog te hoog. Dan moet het
programma gestopt worden. Open het deksel en laat de machine 10
tot 20 minuten afkoelen.
• Als het scherm “EE0” aangeeft nadat u de START/STOP toets hebt
ingedrukt, is de temperatuursensor niet aangesloten; laat de sensor
dan door een bevoegde deskundige nakijken.
• Als de display “L:LL” toont nadat u de knop hebt ingedrukt, dan is de
temperatuur binnenin te laag. Verplaats de broodmaker naar een
warme plaats en gebruik het daar.
HOE WORDT HET BROOD GEMAAKT
• Zet het bakblik op zijn plaats en draai het vervolgens met de klok
mee tot het in de juiste positie vastklikt. Bevestig het kneedmes op
de aandrijfas. Het wordt aanbevolen om het gat met hittebestendige
margarine te vullen alvorens het kneedmes te plaatsen om te
voorkomen dat het deeg aan het kneedmes blijft plakken; dit zorgt er
ook voor dat het kneedmes makkelijke uit het brood verwijderd kan
worden.
• Plaats de ingrediënten in het bakblik. Houd de volgorde aan die in het
recept wordt aangegeven. Meestal moet het water of de vloeibare stof
als eerste toe worden gevoegd, daarna suiker, zout en meel, voeg de
gist of bakpoeder altijd als laatste ingrediënt toe.
Opmerking: de hoeveelheden meel en rijsmiddel die kunnen worden
Gebruiksaanwijzing
NL

15
gebruikt, verwijzen naar het recept.
• Maak met de vinger een klein kuiltje bovenop de bloem, voeg gist toe
in het kuiltje, zorg ervoor dat het niet in contact komt met de vloeistof
of het zout.
• Doe het deksel voorzichtig dicht en steek de stekker in het stopcontact.
• Druk op de MENU-toets tot u het gewenste programma heeft
geselecteerd.
• Druk op de KLEUR-toets om de gewenste kleur van de korst te
selecteren.
• Druk op de BROODGROOTTE-toets om de gewenste grootte te
selecteren.
• Stel de vertragingstijd in door op de omhoog of omlaag toets
te drukken Deze stap kan worden overgeslagen als u wilt dat de
broodmachine direct gaat werken.
• Druk eenmaal op de START/STOP toets om te beginnen met werken en
het indicatielampje zal oplichten.
• Voor brood met extra ingrediënten zullen pieptonen worden gehoord
tijdens de werking. Dit geeft aan dat u ingrediënten toe moet voegen.
Open het deksel en voeg enkele ingrediënten toe. Het is mogelijk dat
er stoom door het ventiel in het deksel ontsnapt tijdens het bakken. Dit
is normaal.
• Zodra het proces is voltooid, zijn er tien pieptonen te horen. U kunt de
START/STOP toets ongeveer 3 seconden indrukken om het proces stop
te zetten en het brood eruit te halen. Open het Deksel en met behulp
van ovenwanten, draait u het bakblik tegen de klok in en neemt het
bakblik uit het apparaat.
Pas op: het Bakblik en het brood kunnen zeer heet zijn! Ga altijd
voorzichtig te werk.
• Laat het bakblik afkoelen voordat u het brood verwijdert. Gebruik
vervolgens een antikleef-spatel om de zijkanten van het brood
voorzichtig van het blik los te maken.
• Draai het bakblik ondersteboven boven een afkoelrek of een schoon
kookoppervlak en schud totdat het brood eruit valt.
• Laat het brood ongeveer 20 minuten afkoelen voordat u het aansnijdt.
Het wordt aanbevolen het brood met een elektrisch of getand mes
te snijden, beter niet met fruit- of keukenmes, anders kan het brood
onderhevig zijn aan vervorming.
• Als u niet in de kamer bent of de START/STOP toets niet hebt ingedrukt
aan het einde van het bedrijf, wordt het brood automatisch een uur
warmgehouden; er is een pieptoon te horen als het warmhouden is
afgelopen.
• Wanneer niet in gebruik of het bedrijf is voltooid, haalt u de stekker uit
het stopcontact.
Let op: Voordat u het brood aansnijdt, gebruikt u de haak om het
kneedmes aan de onderkant van het brood te verwijderen. Het brood is
heet; gebruik nooit uw handen om het kneedmes te verwijderen.
Over snel brood
• Snelle broden worden met bakpoeder en baking soda gemaakt die
door vocht en hitte worden geactiveerd. Voor perfecte snelle broden,
is het raadzaam dat alle vloeistof op de bodem van het bakblik
wordt geplaatst; droge ingrediënten daar bovenop; Tijdens de eerste
menging van snelle-brood-beslagen, kunnen droge bestanddelen in
de hoeken van het bakblik samenklonteren; kan het nodig zijn om
de machine te helpen bij het mixen om meelklonten te voorkomen.
Gebruik in dat geval een rubberen spatel.
Gebruiksaanwijzing
NL

16
REINIGING EN ONDERHOUD
• Haal de stekker van de machine uit het stopcontact en laat het
afkoelen voordat u het schoonmaakt.
• Bakblik: verwijder het bakblik door het tegen de klok in te draaien, dan
aan het handvat te trekken; veeg de binnen- en de buitenkant van het
blik met vochtige lappen schoon, gebruik geen scherpe schoonmaak-
of schuurmiddelen, voor de bescherming van de antiaanbaklaag. Het
blik moet volledig zijn opgedroogd voordat het geïnstalleerd wordt.
Let op: Plaats het bakblik en druk het naar beneden tot het in de juiste
positie bevestigd is. Als het niet geplaatst kan worden, pas het blik dan
licht aan om het op de juiste positie te plaatsen en draai het dan met de
klok mee.
• Kneedmes: Als het kneedmes moeilijk uit het brood te verwijderen
is, gebruik dan de haak. Veeg ook het mes voorzichtig schoon met
een vochtige katoenen lap. Zowel het bakblik als het kneedmes zijn
vaatwasbestendige componenten.
• Behuizing: veeg de buitenkant van de behuizing voorzichtig schoon
met een natte lap. Gebruik geen schuurmiddel voor de reiniging,
aangezien dit de hoogglans van het oppervlak zou aantasten. Dompel
de behuizing nooit onder in water om het te reinigen.
Let op: Het is raadzaam om het deksel niet te demonteren voor het
reinigen.
• Voordat de broodmachine wordt opgeborgen, moet u ervoor zorgen
dat het volledig is afgekoeld, schoon en droog en dat het deksel dicht
is.
GARANTIE
• Dit product heeft een garantie van 24 maanden. Uw garantie is
geldig als het product volgens de instructies en voor het doel waar
het voor gemaakt is wordt gebruikt, Daarnaast dient het originele
aankoopbewijs (factuur, rekening of bon) meegestuurd te worden,
met de datum van aankoop, de naam van de leverancier en het
productnummer van het artikel.
• Voor gedetailleerde garantievoorwaarden kunt u onze website
raadplegen: www.service.princess.info
AANWIJZINGEN TER BESCHERMING VAN
HET MILIEU
Dit apparaat mag aan het einde van de levensduur niet met
het huishoudelijk afval worden weggeworpen, maar moet bij een
centraal inzamelpunt voor de recycling van elektrische en elektronische
huishoudelijke apparaten worden aangeboden. Dit symbool op het
apparaat, in de gebruiksaanwijzing en op de verpakking vestigt uw
aandacht op deze belangrijke kwestie. De gebruikte materialen in dit
apparaat kunnen worden gerecycled. Door gebruikte huishoudelijke
apparaten te recyclen, levert u een belangrijke bijdrage aan de
bescherming van ons milieu. Raadpleeg uw plaatselijke autoriteiten voor
informatie met betrekking tot de inzamelpunten.
ONDERSTEUNING
U kunt alle beschikbare informatie en reserveonderdelen vinden op
www.service.princess.info!
Gebruiksaanwijzing
FR

17
CONSIGNES DE SÉCURITÉ
Avant d'utiliser cet appareil électrique, observez toujours
les précautions de base suivantes :
• Lisez toutes les instructions
• Avant utilisation, vériez que la tension de la prise secteur
correspond bien à celle indiquée sur la plaque signalétique.
• N’utilisez pas l’appareil si la che ou le cordon d'alimentation
sont endommagés, suite à un dysfonctionnement de
l’appareil, ou si ce dernier a subi quelque chute ou dommage
que ce soit. Retournez l'appareil au fabricant ou au service de
réparation compétent le plus proche an qu'il soit examiné,
réparé ou réglé.
• Ne touchez pas les surfaces chaudes. Utilisez les
poignées ou les boutons.
• An d'éviter de subir une décharge électrique,
n'immergez pas le câble, la che ou l'appareil dans de
l'eau ou tout autre liquide.
• Débranchez l'appareil lorsqu'il n'est pas utilisé, avant
d'installer ou de démonter des pièces et avant de le nettoyer.
• Ne laissez pas le cordon d'alimentation pendre d'une
table ou sur une surface chaude.
• L'utilisation d'accessoires non recommandés par le
fabricant peut entraîner des blessures.
• Cet appareil ne doit pas être utilisé par des personnes (y
compris des enfants) présentant des capacités mentales,
sensorielles ou physiques réduites ou un manque
d'expérience/de connaissances, à moins qu'elles ne soient
supervisées ou conseillées sur le fonctionnement de
l'appareil par une personne responsable de leur sécurité.
• Les enfants doivent être surveillés pour qu'ils ne jouent
pas avec l'appareil.
• Ne placez pas l’appareil à proximité d’une cuisinière à
gaz ou électrique chaude ou dans un four chaud.
• Vous devez redoubler de vigilance lorsque vous déplacez
un appareil contenant de l’huile chaude ou tout autre
liquide chaud.
• Ne touchez aucune pièce en mouvement de la machine
lorsqu’elle cuit le pain.
• N’allumez jamais l’appareil sans avoir préalablement
placé correctement la cuve de cuisson comportant les
ingrédients du pain.
• Ne frappez pas le haut de la cuve de cuisson sur le
haut ou les bords an d’enlever la cuve, cela pourrait
endommager la cuve de cuisson.
• Du papier aluminium ou d’autres matériaux ne doivent
pas être introduits dans la machine à pain car cela peut
créer un risque d’incendie ou de court-circuit.
• Ne couvrez jamais la machine à pain avec une serviette
ou tout autre matériau car la chaleur et la vapeur doivent
pouvoir s’échapper librement. Couvrir l’appareil ou le
mettre en contact avec un matériau combustible peut
causer un incendie.
• Positionnez les commandes sur Arrêt puis retirez la che
de la prise secteur.
• Utilisez uniquement cet appareil aux ns indiquées dans
le présent manuel.
• Cet appareil est muni d’un connecteur mis à la terre.
Veillez à ce que la prise secteur de votre domicile soit
bien mise à la terre.
• Cet appareil est destiné à l’utilisation domestique et des
applications semblables telles que :
• les cuisines des employés de magasins, de bureaux et
d'autres environnements professionnels ;
Gebruiksaanwijzing
FR

1
10
11
2
7
8
9
12
3 4 4 5 6
18
o des fermes ;
o par les clients d'hôtels, motels et autres endroits de
type résidentiels ;
o environnements de type chambre d’hôtes.
• L’appareil n’est pas destiné à fonctionner avec des
dispositifs de programmation externe ou un système
individuel de télécommande.
• N’utilisez pas l’appareil à l’extérieur.
• Conservez ce mode d'emploi.
DESCRIPTION DES PIÈCES
1. Couvercle
2. Bouton Menu
3. Bouton Poids
4. Bouton Haut et Bas
5. Bouton Couleur
6. Bouton Marche/arrêt
7. Pétrisseuse
8. Cuve de cuisson
9. Panneau de commande
10. Doseur
11. Cuillère à mesurer
12. Crochet
Mode d’emploi
FR

19
AVANT LA PREMIÈRE UTILISATION
• Il est possible que l'appareil émette une légère fumée ainsi qu'une
odeur particulière lorsque vous l'allumez pour la première fois. Ceci est
normal et ne dure pas longtemps. Assurez-vous que l'appareil soit bien
ventilé.
• Déballez votre appareil et vériez que toutes les pièces et accessoires
sont présents et en bon état.
• Nettoyez l'ensemble des pièces conformément à ce qui est indiqué
dans la section « NETTOYAGE ET ENTRETIEN ».
• Réglez la machine à pain sur le mode cuisson et cuisez à vide pendant
10 minutes. Ensuite, laissez-le refroidir et nettoyez toutes les pièces
détachées une nouvelle fois.
• Séchez complètement toutes les pièces et assemblez-les. L’appareil est
prêt à l’emploi.
UTILISATION
Bouton Marche/arrêt
• Ce bouton est utilisé pour démarrer et arrêter le programme de cuisson
sélectionné.
• Pour commencer un programme, appuyez une fois sur le bouton
Marche/Arrêt. Un bip court retentira, le voyant s’allumera, les deux
points de l’achage de la durée clignoteront et le programme
commencera. Tous les boutons sauf le bouton Marche/Arrêt seront
désactivés après le démarrage d’un programme.
• Pour arrêter le programme, appuyez sur le bouton Marche/Arrêt
pendant environ 3 secondes, un bip retentira, signiant que le
programme a été arrêté. Cette fonctionnalité vous aidera à empêcher
toute interruption involontaire du programme.
Bouton Menu
• Le bouton MENU est utilisé pour régler diérents programmes. À chaque
pression (accompagnée d’un bip court), le programme variera. Appuyez
plusieurs fois sur le bouton de manière discontinue pour faire déler un
à un les 19 programmes sur l’écran LCD. Sélectionnez le programme que
vous souhaitez. Les fonctions des 19 menus sont expliquées ci-dessous.
Programme 1 : Basique
Pour les pains blancs et mélangés. Le pain est principalement constitué de
farine de blé ou de seigle. Il a une consistance compacte. Vous pouvez régler
le degré de brunissement du pain à l’aide du bouton COLOR (COULEUR).
Programme 2 : Français
Pour les pains légers élaborés à partir de farine ne. Le pain est
généralement moelleux et a une croûte croustillante. Ce programme ne
convient pas aux recettes nécessitant du beurre, de la margarine ou du lait.
Programme 3 : Pain sucré
Pour les pains contenant des additifs tels que des jus de fruits, de la noix de
coco râpée, des raisins secs, des fruits secs, du chocolat ou du sucre ajouté.
En raison d’une phase de levée plus longue, le pain sera léger et aéré.
Programme 4 : Ultrarapide
Pétrissage, levage et cuisson de façon très rapide. Cependant, vous
obtiendrez le pain cuit le plus grossier parmi tous les menus de pain.
Programme 5 : Rapide
La durée de pétrissage, de levage et de cuisson est plus courte que le pain
basique, mais plus long que le pain ultrarapide. La mie est plus dense.
Programme 6 : Gâteau
Pétrissage, levage et cuisson, mais levage avec du bicarbonate de soude
ou de la levure chimique. Ce réglage mélange les ingrédients, puis cuit
pendant une durée préréglée.
Mode d’emploi
FR

20
Programme 7 : Dessert
Pour cuire des desserts nécessitant uniquement un pétrissage et un levage.
Programme 8 : Pain de riz
Mélanger du riz cuit dans la farine avec une proportion 1:1 pour faire le pain.
Programme 9 : Pain de maïs
Mélanger du maïs dans la farine pour faire le pain.
Programme 10 : Riz violet
Pour du pain de farines sans gluten et mélanges de boulangerie. Le farines
sans gluten ont besoin de davantage de temps pour l'absorption des
liquides et ont diérentes propriétés de levage.
Programme 11 : Gruau
Pétrissage et cuisson lente pour faire des gruaux de céréales grossiers, tels
que du gruau Babao chinois.
Programme 12 : Riz gluant
Agitation et chauage pour faire des boules de riz gluant
Programme 13 : Mélange
Agitation pour obtenir un mélange homogène de farine et de liquides
Programme 14 : Pâte
Pour préparer une pâte levée pour une brioche, une pizza ou une tresse. Il
n’y a pas de cuisson dans ce programme.
Programme 15 : Pétrissage
L’utilisateur peut régler la durée de pétrissage.
Programme 16 : Vin de riz
Préparation de riz gluant et de levure de boulangerie pour brasser du vin
de riz.
Programme 17 : Yaourt
Pour mélanger le lait et des bactéries lactiques pour faire du yaourt.
Programme 18 : Conture
Pour faire des contures avec des fruits frais et des marmelades avec des
oranges amères. N’augmentez pas la quantité et ne laissez pas bouillir au-
dessus de la cuve dans la chambre de cuisson.
Programme 19 : Cuisson
Pour une cuisson supplémentaire des pains trop légers ou pas assez cuits.
Ce programme ne comprend ni pétrissage ni pose.
Bouton Couleur
• Ce bouton permet de sélectionner une couleur claire, dorée ou sombre
pour la croûte.
Bouton Poids
• Sélection du poids. Appuyez sur le bouton Poids pour choisir le poids
de pain souhaité (indiqué par la èche).
Bouton Haut et Bas
• Si vous souhaitez que l’appareil ne commence pas à fonctionner
immédiatement, vous pouvez utiliser ce bouton pour régler le temps
d’attente.
• Vous devez décider du délai avant que votre pain ne soit prêt en
appuyant sur ces boutons. Remarque : le temps d’attente doit inclure le
temps de cuisson du programme.
• Sélectionnez tout d’abord le programme et le degré de brunissement,
puis appuyez sur le bouton Haut ou Bas pour augmenter ou diminuer
le temps d’attente par incrément de 10 minutes. Le temps d’attente
maximum est de 15 heures.
• Exemple : il est 20h30. Vous souhaitez que votre pain soit prêt le
Mode d’emploi
FR
Strona się ładuje...
Strona się ładuje...
Strona się ładuje...
Strona się ładuje...
Strona się ładuje...
Strona się ładuje...
Strona się ładuje...
Strona się ładuje...
Strona się ładuje...
Strona się ładuje...
Strona się ładuje...
Strona się ładuje...
Strona się ładuje...
Strona się ładuje...
Strona się ładuje...
Strona się ładuje...
Strona się ładuje...
Strona się ładuje...
Strona się ładuje...
Strona się ładuje...
Strona się ładuje...
Strona się ładuje...
Strona się ładuje...
Strona się ładuje...
Strona się ładuje...
Strona się ładuje...
Strona się ładuje...
Strona się ładuje...
Strona się ładuje...
Strona się ładuje...
Strona się ładuje...
Strona się ładuje...
Strona się ładuje...
Strona się ładuje...
Strona się ładuje...
Strona się ładuje...
Strona się ładuje...
Strona się ładuje...
Strona się ładuje...
Strona się ładuje...
Strona się ładuje...
Strona się ładuje...
Strona się ładuje...
Strona się ładuje...
Strona się ładuje...
Strona się ładuje...
Strona się ładuje...
Strona się ładuje...
Strona się ładuje...
Strona się ładuje...
Strona się ładuje...
Strona się ładuje...
Strona się ładuje...
Strona się ładuje...
Strona się ładuje...
Strona się ładuje...
Strona się ładuje...
Strona się ładuje...
Strona się ładuje...
Strona się ładuje...
-
 1
1
-
 2
2
-
 3
3
-
 4
4
-
 5
5
-
 6
6
-
 7
7
-
 8
8
-
 9
9
-
 10
10
-
 11
11
-
 12
12
-
 13
13
-
 14
14
-
 15
15
-
 16
16
-
 17
17
-
 18
18
-
 19
19
-
 20
20
-
 21
21
-
 22
22
-
 23
23
-
 24
24
-
 25
25
-
 26
26
-
 27
27
-
 28
28
-
 29
29
-
 30
30
-
 31
31
-
 32
32
-
 33
33
-
 34
34
-
 35
35
-
 36
36
-
 37
37
-
 38
38
-
 39
39
-
 40
40
-
 41
41
-
 42
42
-
 43
43
-
 44
44
-
 45
45
-
 46
46
-
 47
47
-
 48
48
-
 49
49
-
 50
50
-
 51
51
-
 52
52
-
 53
53
-
 54
54
-
 55
55
-
 56
56
-
 57
57
-
 58
58
-
 59
59
-
 60
60
-
 61
61
-
 62
62
-
 63
63
-
 64
64
-
 65
65
-
 66
66
-
 67
67
-
 68
68
-
 69
69
-
 70
70
-
 71
71
-
 72
72
-
 73
73
-
 74
74
-
 75
75
-
 76
76
-
 77
77
-
 78
78
-
 79
79
-
 80
80


Princess Homemade Deluxe Instrukcja obsługi
- Kategoria
- Maszyny do wypieku chleba
- Typ
- Instrukcja obsługi
- Niniejsza instrukcja jest również odpowiednia dla
w innych językach
- čeština: Princess Homemade Deluxe Návod k obsluze
- español: Princess Homemade Deluxe El manual del propietario
- italiano: Princess Homemade Deluxe Manuale del proprietario
- Deutsch: Princess Homemade Deluxe Bedienungsanleitung
- slovenčina: Princess Homemade Deluxe Návod na obsluhu
- svenska: Princess Homemade Deluxe Bruksanvisning
- português: Princess Homemade Deluxe Manual do proprietário
- français: Princess Homemade Deluxe Le manuel du propriétaire
- English: Princess Homemade Deluxe Owner's manual
- Nederlands: Princess Homemade Deluxe de handleiding
Powiązane artykuły
Inne dokumenty
-
Tristar BM-4586 Instrukcja obsługi
-
Tristar BM 4585 Instrukcja obsługi
-
Unold 68425 Instrukcja obsługi
-
-
-
-
-
Tefal PF220838 Instrukcja obsługi
-
-