
AOBD2
UNIVERSAL OBD-II/EOBD CODE READER
UNIVERSELE OBD-II/EOBD FOUTCODELEZER
LECTEUR DE CODES DÉFAUTS OBD-II/EOBD UNIVERSEL
LECTOR DE CÓDIGOS UNIVERSAL OBD-II/EOBD Y CAN
OBD-II/EOBD UND CAN UNIVERSAL-DIAGNOSEGERÄT
UNIWERSALNY SKANER I CZYTNIK KODÓW OBD-II/EOBD I CAN
SCANNER E LEITOR DE CÓDIGO UNIVERSAL OBD-II/EOBD E CAN
USER MANUAL 2
HANDLEIDING 9
MODE D'EMPLOI 16
MANUAL DEL USUARIO 23
BEDIENUNGSANLEITUNG 30
INSTRUKCJA OBSŁUGI 37
MANUAL DO UTILIZADOR 44

AOBD2
V. 01 – 07/02/2017 2 ©Velleman nv
USER MANUAL
1. Introduction
To all residents of the European Union
Important environmental information about this product
This symbol on the device or the package indicates that disposal of the device after its lifecycle could
harm the environment. Do not dispose of the unit (or batteries) as unsorted municipal waste; it should
be taken to a specialized company for recycling. This device should be returned to your distributor or to
a local recycling service. Respect the local environmental rules.
If in doubt, contact your local waste disposal authorities.
Thank you for choosing Perel! Please read the manual thoroughly before bringing this device into service. If the
device was damaged in transit, do not install or use it and contact your dealer.
2. Safety Instructions
This device can be used by children aged from 8 years and above, and persons with reduced
physical, sensory or mental capabilities or lack of experience and knowledge if they have been
given supervision or instruction concerning the use of the device in a safe way and understand the
hazards involved. Children shall not play with the device. Cleaning and user maintenance shall not
be made by children without supervision.
Do not disassemble or open the cover. There are no user-serviceable parts inside the device.
Refer to an authorized dealer for service and/or spare parts.
Always perform automotive testing in a safe environment. Operate in a well-ventilated work area – exhaust
gases are poisonous!
Wear eye protection. Keep clothing, hair, tools, test equipment, etc. away from all moving or hot engine
parts.
Put blocks on drive wheels and never leave the vehicle unattended while running tests.
Use extreme caution when working around the ignition coil, distributor cap, ignition wires and spark plugs.
These components create hazardous voltages when the engine is running.
Put the transmission in PARK (for automatic transmission) or NEUTRAL (for manual transmission). Make
sure the parking brake is engaged.
Keep a fire extinguisher suitable for gasoline/chemical/electrical fires nearby.
Do not connect or disconnect any test equipment with the ignition on or when the engine is running.
Keep the code reader dry, clean and free from oil, water and grease. Use a mild detergent on a clean cloth
to clean the outside of the code reader when necessary.
3. General Guidelines
Refer to the Velleman® Service and Quality Warranty on the last pages of this manual.
Protect this device from shocks and abuse. Avoid brute force when operating the device.
Familiarise yourself with the functions of the device before actually using it.
All modifications of the device are forbidden for safety reasons. Damage caused by user modifications to
the device is not covered by the warranty.
Only use the device for its intended purpose. All other uses may lead to short circuits, burns, electroshocks,
crash, etc. Using the device in an unauthorized way will void the warranty.
Damage caused by disregard of certain guidelines in this manual is not covered by the warranty and the
dealer will not accept responsibility for any ensuing defects or problems.
Nor Velleman nv nor its dealers can be held responsible for any damage (extraordinary, incidental or
indirect) – of any nature (financial, physical…) arising from the possession, use or failure of this product.
Do not switch the device on immediately after it has been exposed to changes in temperature. Protect the
device against damage by leaving it switched off until it has reached room temperature.
Keep this manual for future reference.

AOBD2
V. 01 – 07/02/2017 3 ©Velleman nv
4. Product Features and Vehicle Coverage
multi-language auto diagnostic tool for OBD-II, EOBD and JOBD
reads and erases DTCs
supports CAN (Controller Area Network), VPW, PWM, ISO9141, KWP2000 protocols
retrieves VIN (Vehicle Identification No.) on 2002 and newer vehicles supported by mode 9
works with all OBD-II, EOBD, JOBD compliant vehicles with a 16-pin interface
o for EU and Asia: all 2000 and newer cars
o for US: all 1996 and newer cars, light trucks and SUV's
o all CAN, VPW, PWM, ISO9141, KWP2000 protocols compliant vehicles (including those equipped with
the next-generation protocol Control Area Network)
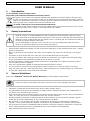
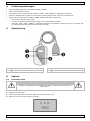
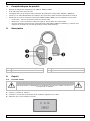
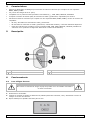
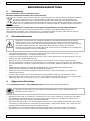
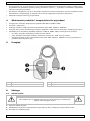
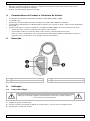
5. Overview
1
LCD display
3
OBD-II connector
2
ENTER button
4
SCROLL button
6. Operation
6.1 Reading Codes
WARNING
Do not connect or disconnect any test equipment with the ignition on or when
the engine is running.
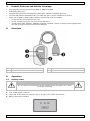
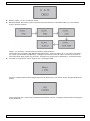
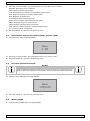
1. Turn off the ignition of the car.
2. Locate the 16-pin Data Link Connector (DLC). Plug the code reader into the DLC.
3. Wait for the code to initialize.

AOBD2
V. 01 – 07/02/2017 4 ©Velleman nv
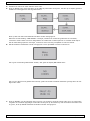
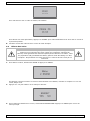
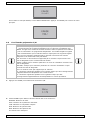
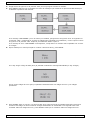
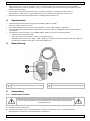
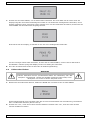
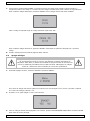
4. Turn on the ignition but do not start the car.
5. Press ENTER. A sequence of messages showing the OBD protocols may be observed on the display until the
vehicle protocol is detected.
Note that not all the above messages will necessarily be observed.
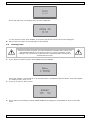
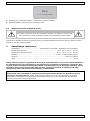
If a LINK ERROR message is displayed, turn off the ignition for about 10 seconds, check if the code reader
is securely connected and turn the ignition back on. Repeat from step 5.
If the error message reappears, check if the vehicle is compatible with the code reader.
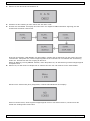
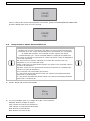
6. Wait for the main menu to be displayed. Select DTC by pressing ENTER.
If there are no Diagnostic Trouble Codes (DTCs) retrieved the display will indicate NO CODES.
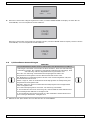
If there are any DTCs, the total number of the Fault Codes followed by that of the Pending Codes will be
displayed.
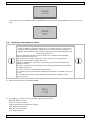
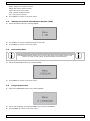
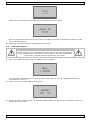
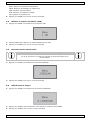
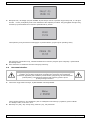
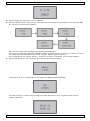
7. Read the DTCs by pressing SCROLL. The first code number will be displayed on the first line, the numerical
sequence of the code and the total number of the codes stored will be displayed on the second line. To view
additional codes, press SCROLL until all codes have been displayed.

AOBD2
V. 01 – 07/02/2017 5 ©Velleman nv
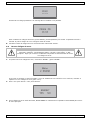
If the code retrieved is a pending code, PD will be displayed.
To view previous codes, press SCROLL to scroll through the list until the first code is displayed.
8. Refer to the list of DTCs on the last pages of this manual.
6.2 Erasing Codes
WARNING
Erasing the DTCs allows the code reader to delete not only the codes from the
vehicle’s on-board computer, but also manufacturer-specific data. Further, the
I/M Readiness Status for all vehicle monitors is reset to Not Ready or Not
Complete. Do not erase the codes before the system has been checked by a
professional technician.
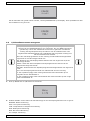
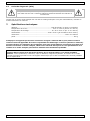
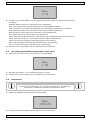
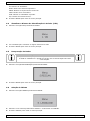
1. If you decide to erase the DTCs, select ERASE and press ENTER.
If the code reader is not connected or no communication is established with the vehicle, then refer chapter
6.1 Reading Codes, steps 1 to 6.
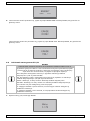
2. Press Yes to erase or No to cancel.
3. If the codes are successfully cleared, ERASE DONE will be displayed. Press ENTER to return to the main
menu.

AOBD2
V. 01 – 07/02/2017 6 ©Velleman nv
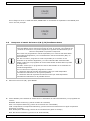
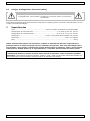
If the codes are not successfully cleared, ERASE FAIL will be displayed. Press ENTER to return to the main
menu.
6.3 Retrieving I/M Readiness Status
IMPORTANT
The I/M Readiness function is used to check the operations of the emission
system on OBD-II-compliant vehicles. It is an excellent function to use prior to
having a vehicle inspected for compliance to a state emissions programme. A
negative test result does not necessarily indicate that the tested vehicle will fail
the state I/M inspection.
YES: All supported monitors on the vehicle have completed their diagnostic
testing and the MIL light is on.
NO: At least one monitor supported on the vehicle has not completed its
diagnostic testing and/or the MIL light is on.
READY: Indicates that a particular monitor being checked has completed its
diagnostic testing.
NOT RDY: Indicates that a particular monitor being checked has not completed
its diagnostic testing.
N/A: The monitor is not supported on that vehicle.
: A flashing right arrow indicates additional information is available on the next
screen.
: A flashing left arrow indicates additional information is available on the
previous screen.
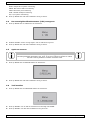
1. Select the I/M function by pressing ENTER.
2. Use SCROLL to view the status of the MIL light and the monitors:
MISFIRE: Misfire monitor.
FUEL: Fuel system monitor.
CCM: Comprehensive components monitor.
EGR: EGR system monitor.
O2S: O2 sensors monitor.
AT: Catalyst monitor.

AOBD2
V. 01 – 07/02/2017 7 ©Velleman nv
EVAP: Evaporative system monitor.
HO2S: O2 sensor heater monitor.
2AIR: Secondary air monitor.
HCM: Heated catalyst monitor.
A/C: A/C system monitor.
3. Press ENTER to return to the main menu.
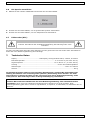
6.4 Viewing the Vehicle Identification Number (VIN)
1. Select the VIN function by pressing ENTER.
2. Use SCROLL to view the additional digits of the VIN.
3. Press ENTER to return to the main menu.
6.5 Rescanning Data
IMPORTANT
The RESCAN function allows you to retrieve the most current data stored in the
ECM or to relink to the vehicle if communication is disconnected.
1. Select the RESCAN function by pressing ENTER.
2. Press ENTER to return to the main menu.
6.6 Language Selection
1. Select the LANGUAGE function by pressing ENTER.
2. Select your language by pressing SCROLL and confirm with ENTER.
3. Press SCROLL to return to the main menu.

AOBD2
V. 01 – 07/02/2017 8 ©Velleman nv
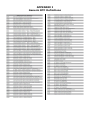
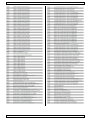
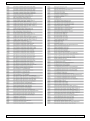
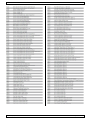
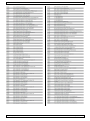
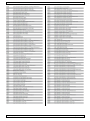
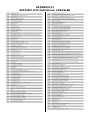
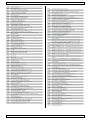
6.7 Diagnostic Trouble Codes (DTCs)
WARNING
Parts or components should not be replaced based on only a DTC check without
consulting the vehicle service manual or a professional technician!
The DTC list on the final pages of this manual is a generic code list. Consult your vehicle service manual for
more information.
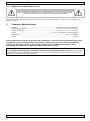
7. Technical Specifications
display ................................................................................. backlit 2-line LCD, 8 characters
operating temperature ........................................................... 0 °C to 50 °C (32 °F to 122 °F)
storage temperature ........................................................... -20 °C to 70 °C (-4 °F to 158 °F)
power ........................................................................... 8-16 V, provided via vehicle battery
dimensions ............................................................................................. 126 x 78 x 28 mm
weight ...................................................................................................................... 200 g
Use this device with original accessories only. Velleman nv cannot be held responsible in the event
of damage or injury resulting from (incorrect) use of this device. For more info concerning this
product and the latest version of this manual, please visit our website www.perel.eu. The
information in this manual is subject to change without prior notice.
© COPYRIGHT NOTICE
The copyright to this manual is owned by Velleman nv. All worldwide rights reserved. No part of this
manual may be copied, reproduced, translated or reduced to any electronic medium or otherwise without the
prior written consent of the copyright holder.

AOBD2
V. 01 – 07/02/2017 9 ©Velleman nv
HANDLEIDING
1. Inleiding
Aan alle ingezetenen van de Europese Unie
Belangrijke milieu-informatie betreffende dit product
Dit symbool op het toestel of de verpakking geeft aan dat, als het na zijn levenscyclus wordt
weggeworpen, dit toestel schade kan toebrengen aan het milieu. Gooi dit toestel (en eventuele
batterijen) niet bij het gewone huishoudelijke afval; het moet bij een gespecialiseerd bedrijf
terechtkomen voor recyclage. U moet dit toestel naar uw verdeler of naar een lokaal recyclagepunt
brengen. Respecteer de plaatselijke milieuwetgeving.
Hebt u vragen, contacteer dan de plaatselijke autoriteiten betreffende de verwijdering.
Bedankt voor uw aankoop! Lees deze handleiding grondig door voor u het toestel in gebruik neemt. Werd het
toestel beschadigd tijdens het transport, installeer het dan niet en raadpleeg uw dealer.
2. Veiligheidsvoorschriften
Dit toestel is geschikt voor gebruik door kinderen vanaf 8 jaar, door personen met fysieke,
zintuiglijke of verstandelijke beperkingen, of door personen met gebrek aan ervaring en kennis,
op voorwaarde dat dit onder toezicht gebeurt van een persoon die verantwoordelijk is voor hun
veiligheid of hun aanwijzingen heeft gegeven, hoe zij het toestel moeten gebruiken en zich
bewust zijn van de risico's die het gebruik van het toestel met zich meebrengt. Kinderen mogen
niet met het toestel spelen. Reiniging en onderhoud mogen niet worden uitgevoerd door kinderen
zonder toezicht.
Demonteer of open dit toestel NOOIT. Er zijn geen onderdelen in het toestel die door de gebruiker
gerepareerd kunnen worden. Contacteer uw verdeler voor eventuele reserveonderdelen.
Altijd testen in een veilige omgeving. Laat de motor draaien in een goed geventileerde werkruimte.
Uitlaatgassen zijn giftig!
Draag een veiligheidsbril. Houd kleding, haar, gereedschappen, testapparatuur, enz. weg van alle
bewegende of hete motoronderdelen.
Plaats blokken voor de aangedreven wielen en laat het voertuig nooit onbeheerd achter tijdens het testen.
Wees uiterst voorzichtig bij het werken rond de bobine, verdelerkap, bougiekabels en bougies. Deze
onderdelen creëren een gevaarlijk hoge spanning wanneer de motor draait.
Plaats de transmissie in PARKEERSTAND (voor automatische transmissie) of NEUTRAAL (voor
handgeschakelde transmissie). Zorg ervoor dat de parkeerrem is bediend.
Houd een brandblusser in de buurt die geschikt is voor het blussen van benzine/chemische/elektrische branden.
Verbind of ontkoppel geen testapparatuur als het contact aan staat of als de motor draait.
Houd het toestel droog, schoon, vrij van olie/water en vet. Indien nodig, gebruik een mild
schoonmaakmiddel en een propere doek om de buitenkant van het toestel te reinigen.
3. Algemene richtlijnen
Raadpleeg de Velleman® service- en kwaliteitsgarantie achteraan deze handleiding.
Bescherm tegen schokken. Vermijd brute kracht tijdens de bediening van het toestel.
Leer eerst de functies van het toestel kennen voor u het gaat gebruiken.
Om veiligheidsredenen mag u geen wijzigingen aanbrengen aan het toestel. Schade door wijzigingen die de
gebruiker heeft aangebracht aan het toestel valt niet onder de garantie.
Gebruik het toestel enkel waarvoor het gemaakt is. Andere toepassingen kunnen leiden tot kortsluitingen,
brandwonden, elektrische schokken, enz. Bij onoordeelkundig gebruik vervalt de garantie.
De garantie geldt niet voor schade door het negeren van bepaalde richtlijnen in deze handleiding en uw dealer
zal de verantwoordelijkheid afwijzen voor defecten of problemen die hier rechtstreeks verband mee houden.
Noch Velleman nv noch zijn verdelers kunnen aansprakelijk gesteld worden voor schade (buitengewoon,
incidenteel of onrechtstreeks) – van welke aard dan ook (financieel, fysisch…) voortvloeiend uit het bezit,
gebruik of falen van dit product.
Schakel het toestel niet onmiddellijk in nadat het werd blootgesteld aan temperatuurschommelingen. Om
beschadiging te vermijden, moet u wachten tot het toestel de kamertemperatuur heeft bereikt.
Bewaar deze handleiding voor verdere raadpleging.

AOBD2
V. 01 – 07/02/2017 10 ©Velleman nv
4. Producteigenschappen
meertalig diagnosetoestel voor OBD-II, EOBD en JOBD
leest en wist foutcodes (DTC)
ondersteunt CAN- (Controller Area Network), VPW-, PWM- ISO9141-, KWP2000-protocollen
leest het chassisnummer (VIN) van voertuigen vanaf bouwjaar 2002, die mode 9 ondersteunt
werkt met alle voertuigen met OBD2, EOBD, JOBD en 16-polige aansluiting
o EU en Azië: vanaf bouwjaar 2000
o VS: alle voertuigen vanaf bouwjaar 1996, lichte vrachtwagens en SUV's
o alle CAN-, VPW-, PWM-, ISO9141-, KW2000-protocollen compatibele voertuigen (ook de voertuigen met
de volgende generatie Control Area Network protocol)
5. Omschrijving
1
lcd-display
3
OBDII-connector
2
ENTER-knop
4
SCROLL-knop
6. Gebruik
6.1 Foutcodes lezen
WAARSCHUWING
Verbind of ontkoppel geen testapparatuur als het contact aan staat of als de
motor draait.
1. Schakel het contact uit.
2. Zoek de 16-polige DLC-connector. Sluit het toestel aan op de DLC.
3. Wacht tot de code op het scherm verschijnt.

AOBD2
V. 01 – 07/02/2017 11 ©Velleman nv
4. Schakel het contact in maar start de motor niet.
5. Druk op ENTER. Een reeks berichten die de OBD II-protocollen weergeven, worden op de display getoond
totdat het voertuigprotocol wordt gedetecteerd.
Merk op dat niet alle bovenstaande berichten worden weergegeven.
Wanneer de foutmelding "LINK ERROR" verschijnt, schakel het contact uit gedurende 10 seconden,
controleer of het toestel correct is aangesloten en schakel het contact opnieuw in. Herhaal vanaf stap 5.
Als de foutmelding opnieuw verschijnt, controleer of het voertuig compatibel is met het toestel.
6. Wacht totdat het hoofdmenu wordt weergegeven. Druk op ENTER om DTC te selecteren.
Als er geen foutcodes gedetecteerd worden, dan geeft de display NO CODES weer.
Als er meer dan één fout gedetecteerd wordt, geeft het toestel het aantal foutcodes gevolgd door de niet-
afgeronde codes.
7. Druk op SCROLL om de foutcodes weer te geven. De eerste lijn geeft de eerste code weer. De numerieke
volgorde en het aantal opgeslagen foutcodes verschijnen op de tweede lijn. Om de andere foutcodes weer
te geven, druk op ENTER totdat alle foutcodes worden weergegeven.

AOBD2
V. 01 – 07/02/2017 12 ©Velleman nv
Indien het een niet-afgeronde foutcode betreft, verschijnt “PD” op de display.
Om de voorgaande foutcodes weer te geven, druk op SCROLL om de lijst te doorbladeren totdat de eerste
code wordt weergegeven.
8. Raadpleeg de lijst met foutcodes achteraan deze handleiding.
6.2 Foutcodes wissen
WAARSCHUWING
Het wissen van de foutcodes wist niet alleen de foutcodes uit de boordcomputer
van het voertuig, maar ook fabrikantspecifieke data. Verder is de I/M Readiness-
status teruggezet naar “Not Ready” of “Not complete”. Verwijder de foutcodes
niet zomaar en laat het systeem nakijken door een vakman.
1. Als u de foutcodes wilt wissen, selecteer ERASE en druk op ENTER.
Als het toestel niet aangesloten is of geen verbinding maakt met het voertuig, raadpleeg hoofdstuk 6.1
Foutcodes lezen, stap 1-6.
2. Druk op Yes om te wissen of NO om te annuleren.
3. Als de foutcodes succesvol gewist zijn, verschijnt ERASE DONE op de display. Druk op ENTER om naar het
hoofdmenu terug te keren.

AOBD2
V. 01 – 07/02/2017 13 ©Velleman nv
Als de foutcodes niet gewist kunnen worden, verschijnt ERASE FAIL op de display. Druk op ENTER om naar
het hoofdmenu terug te keren.
6.3 I/M Readiness-status weergeven
BELANGRIJK
De I/M Readiness-functie is een inspectieprogramma en wordt gebruikt voor de
controle van het uitlaatgassysteem van voertuigen, die voor OBD II-diagnose
geschikt zijn. Het is een uitstekende functie om te gebruiken voordat het
voertuig wordt geïnspecteerd op het naleven van de emissienormen. Een
negatief testresultaat betekent niet noodzakelijk dat het geteste voertuig niet
aan de emissienormen voldoet.
YES: Alle controleprogramma’s die het voertuig checkt hebben de diagnosetest
uitgevoerd en het MIL-lampje brandt niet.
NO: Minstens een controleprogramma heeft de test niet uitgevoerd en/of het
MIL-lampje brandt.
READY: Geeft aan dat een bepaald controleprogramma de controle van de
diagnosetest uitgevoerd heeft.
NOT RDY: Geeft aan dat een bepaald programma de diagnosetest niet uitgevoerd
heeft.
N/A: Het controleprogramma wordt niet ondersteund door het voertuig.
: Een oplichtend pijltje naar rechts geeft aan dat extra informatie op het
volgende scherm beschikbaar is.
: Een oplichtend pijltje naar links betekent dat extra informatie op het vorige
scherm beschikbaar is.
1. Druk op ENTER om de I/M-functie te selecteren.
2. Gebruik SCROLL om de status van het MIL-lampje en de controleprogramma’s weer te geven:
MISFIRE: Misfire monitoring.
FUEL: Fuel system monitoring.
CCM: Comprehensive component monitoring.
EGR: EGR system monitoring.
O2S: O2 sensors Monitoring.
AT: Catalyst monitoring.

AOBD2
V. 01 – 07/02/2017 14 ©Velleman nv
EVAP: Evaporative system monitoring.
HO2S: O2 sensor heater monitoring.
2AIR: Secondary air monitoring.
HCM: Heated catalyst monitoring.
A/C: A/C system monitoring.
3. Druk op ENTER om naar het hoofdmenu terug te keren.
6.4 Het voertuigidentificatienummer (VIN) weergeven
1. Druk op ENTER om de VIN-functie te selecteren.
2. Gebruik SCROLL om de overige cijfers van de VIN weer te geven.
3. Druk op ENTER om naar het hoofdmenu terug te keren.
6.5 Opnieuw scannen
BELANGRIJK
De RESCAN-functie maakt het mogelijk de belangrijkste data, die in de
besturingseenheid opgeslagen zijn, weer te geven of opnieuw contact te maken
met het voertuig nadat het contact verbroken werd.
1. Druk op ENTER om de RESCAN-functie te selecteren.
2. Druk op ENTER om naar het hoofdmenu terug te keren.
6.6 Taal instellen
1. Druk op ENTER om de LANGUAGE-functie te selecteren.
2. Druk op SCROLL om uw taal te selecteren en bevestig met ENTER.
3. Druk op SCROLL om naar het hoofdmenu terug te keren.

AOBD2
V. 01 – 07/02/2017 15 ©Velleman nv
6.7 Diagnostische foutcodes (DTC)
WAARSCHUWING
De onderdelen of componenten mogen niet vervangen worden op basis van
slechts een diagnosetest. Raadpleeg eerst de handleiding van het voertuig of een
vakman!
De lijst achteraan deze handleiding is lijst met generieke codes. Voor meer informatie, raadpleeg de handleiding
van het voertuig.
7. Technische specificaties
display ......................................... lcd-display met achtergrondverlichting, 2 lijnen, 8 karakters
werktemperatuur ................................................................ 0 °C tot 50 °C (32 °F tot 122 °F)
opslagtemperatuur ........................................................... -20 °C tot 70 °C (-4 °F tot 158 °F)
voeding ................................................................................. 8 V tot 16 V (via de autoaccu)
afmetingen ............................................................................................. 126 x 78 x 28 mm
gewicht .................................................................................................................... 200 g
Gebruik dit toestel enkel met originele accessoires. Velleman nv is niet aansprakelijk voor schade of
kwetsuren bij (verkeerd) gebruik van dit toestel. Voor meer informatie over dit product en de
laatste versie van deze handleiding, zie www.perel.eu. De informatie in deze handleiding kan te
allen tijde worden gewijzigd zonder voorafgaande kennisgeving.
© AUTEURSRECHT
Velleman nv heeft het auteursrecht voor deze handleiding. Alle wereldwijde rechten voorbehouden.
Het is niet toegestaan om deze handleiding of gedeelten ervan over te nemen, te kopiëren, te vertalen, te
bewerken en op te slaan op een elektronisch medium zonder voorafgaande schriftelijke toestemming van de
rechthebbende.

AOBD2
V. 01 – 07/02/2017 16 ©Velleman nv
MODE D'EMPLOI
1. Introduction
Aux résidents de l'Union européenne
Informations environnementales importantes concernant ce produit
Ce symbole sur l'appareil ou l'emballage indique que l’élimination d’un appareil en fin de vie peut
polluer l'environnement. Ne pas jeter un appareil électrique ou électronique (et des piles éventuelles)
parmi les déchets municipaux non sujets au tri sélectif ; une déchetterie traitera l’appareil en question.
Renvoyer l'appareil à votre fournisseur ou à un service de recyclage local. Il convient de respecter la
réglementation locale relative à la protection de l’environnement.
En cas de questions, contacter les autorités locales pour élimination.
Nous vous remercions de votre achat ! Lire attentivement le présent mode d'emploi avant la mise en service de
l’appareil. Si l'appareil a été endommagé pendant le transport, ne pas l’installer et consulter votre revendeur.
2. Consignes de sécurité
Cet appareil peut être utilisé par des enfants âgés de 8 ans et plus et des personnes manquant
d’expérience et de connaissances ou dont les capacités physiques, sensorielles ou mentales sont
réduites, si elles ont été formées et encadrées quant à l'utilisation de l'appareil d'une manière
sûre et connaissent les risques encourus. Ne pas laisser les enfants jouer avec l'appareil. Le
nettoyage et l'entretien effectués normalement par l'utilisateur ne doivent pas l'être par des
enfants sans supervision.
Ne jamais désassembler ni ouvrir le boîtier. Il n’y a aucune pièce réparable par l’utilisateur dans
l'appareil. Commander des pièces de rechange éventuelles chez votre revendeur.
Toujours effectuer les essais automobiles dans un environnement sécuritaire. Faire fonctionner le véhicule
dans une zone de travail bien ventilé. Les gaz d'échappement sont toxiques !
Porter une protection oculaire. Garder les vêtements, cheveux, mains, outils, équipement d'essai, etc.
éloignés des pièces du moteur en mouvement ou chaudes.
Toujours bloquer les roues motrices et ne jamais laisser le véhicule sans surveillance durant les tests.
Etre extrêmement prudent lorsque vous travaillez autour de la bobine d'allumage, du chapeau du
distributeur, les fils d'allumage et les bougies. Ces composants créent des tensions dangereuses lorsque le
moteur est en marche.
Mettre le véhicule est en position PARK (boîte automatique) ou au point mort (boîte mécanique). S'assurer
que le frein à main est serré.
Garder un extincteur adapté aux feux d'essence/électriques/de produits chimiques à proximité.
Ne pas brancher ou débrancher un équipement de test si le contact est mis ou si le moteur est en marche.
Garder l'appareil sec, propre, exempt d'huile, d'eau et de graisse. Si nécessaire, utiliser un détergent doux
sur un chiffon propre pour nettoyer l'extérieur de l'appareil.
3. Directives générales
Se référer à la garantie de service et de qualité Velleman® en fin de ce mode d'emploi.
Protéger l’appareil des chocs et de l'abus. Traiter l'appareil avec circonspection pendant
l’opération.
Se familiariser avec le fonctionnement de l'appareil avant de l'utiliser.
Toute modification est interdite pour des raisons de sécurité. Les dommages occasionnés par des
modifications par le client ne tombent pas sous la garantie.
N’utiliser l'appareil qu’à sa fonction prévue. Tout autre usage peut causer des courts-circuits, des brûlures,
des électrochocs, etc. Un usage impropre annule d'office la garantie.
La garantie ne se s’applique pas aux dommages survenus en négligeant certaines directives de ce mode
d'emploi et votre revendeur déclinera toute responsabilité pour les problèmes et les défauts qui en résultent.
Ni Velleman ni ses distributeurs ne peuvent être tenus responsables des dommages exceptionnels,
imprévus ou indirects, quelles que soient la nature (financière, corporelle, etc.), causés par la possession,
l’utilisation ou le dysfonctionnement de ce produit.
Ne pas brancher immédiatement l’appareil après exposition à des variations de température. Afin d’éviter
des dommages, attendre jusqu’à ce que l’appareil ait atteint la température ambiante.
Garder ce mode d'emploi pour toute référence ultérieure.

AOBD2
V. 01 – 07/02/2017 17 ©Velleman nv
4. Caractéristiques du produit
appareil de diagnostic multilingue pour OBD-II, EOBD et JOBD
lit et efface les codes d'erreur DTC
compatible avec les protocoles CAN (Controller Area Network), VPW, PWM, ISO9141, KWP2000
retrouve le n° VIN (Identification du véhicule) des véhicules à partir de 2002 supportant le mode 9
fonctionne sur tous les véhicules conformes à OBD2, EOBD, JOBD avec une interface à 16 broches
o UE et l'Asie : tous les véhicules à partir de l'année 2000
o Etats-Unis : tous les véhicules, camions légers et SUV à partir de l'année 1996
o tous les véhicules conformes aux protocoles CAN, VPW, PWM, ISO9141, KW2000 (y compris ceux
équipés du protocole de nouvelle génération Control Area Network).
5. Description
1
afficheur LCD
3
connecteur OBD-II
2
bouton ENTER
4
bouton SCROLL
6. Emploi
6.1 Lire des codes
AVERTISSEMENT
Ne pas brancher ou débrancher un équipement de test si le contact est mis ou si
le moteur est en marche.
1. Couper le contact du véhicule.
2. Localiser le connecteur de données (DLC). Brancher l'appareil sur le DLC.
3. Attendre que le code s'affiche à l'écran.

AOBD2
V. 01 – 07/02/2017 18 ©Velleman nv
4. Mettre le contact sans démarrer le moteur.
5. Appuyer sur ENTER. L'écran affiche une séquence de messages affichant les protocoles OBD, jusqu'à ce que
le protocole du véhicule soit détecté.
Noter que pas tous les messages ci-dessus ne doivent pas apparaître.
Si un message d'erreur "LINK ERROR" s'affiche, couper le contact pendant environ 10 secondes, vérifier que
l'appareil est connecté correctement et remettre le contact. Répéter à partir de l'étape 5.
Si le message d'erreur réapparaît, vérifier si le véhicule est compatible avec l'appareil.
6. Attendre jusqu'à ce que le menu principal s'affiche. Appuyer sur ENTER pour sélectionner DTC.
Si aucun code d'erreur n'est détecté (DTC), l'écran affiche NO CODES.
Si des codes d'erreur sont détectés (DTC), le nombre de codes d'erreur et le nombre des codes en attente
s'affichent.
7. Appuyer sur SCROLL pour lire les codes. La première ligne affiche le numéro du premier code d'erreur
tandis que la seconde ligne affiche l'ordre du code et le nombre total de codes enregistrés. Pour afficher les
autres codes, appuyer sur SCROLL jusqu'à ce que tous les codes s'affichent.

AOBD2
V. 01 – 07/02/2017 19 ©Velleman nv
Si le code d'erreur est un code en attente, PD s'affiche.
Pour afficher les codes précédents, appuyer sur SCROLL pour d'abord atteindre la fin de la liste en revenir à
la première position.
8. Consulter la liste des codes d'erreur en fin du mode d'emploi.
6.2 Effacer des codes
AVERTISSEMENT
L'effacement des codes diagnostiques techniques DTC permet à l'appareil de
supprimer non seulement les codes à partir de l'ordinateur embarqué du
véhicule, mais également des données spécifiques du fabricant. De même, l'état
de préparation I/M (I/M Readiness Status) passe à l'état "Not Ready" ou "Not
Complete". Ne pas effacer les codes avant que le véhicule ait été révisé par un
technicien.
1. Pour effacer les DTC, sélectionner ERASE et appuyer sur ENTER.
Si l'appareil n'est pas connecté ou aucune communication n'est établie, consulter le chapitre 6.1 Lire des
codes, étapes 1à 6.
2. Appuyer sur Yes pour effacer ou sur Non pour annuler.
3. Si les codes sont effacés avec succès, l’écran affiche ERASE DONE. Appuyer sur ENTER pour revenir au
menu principal.

AOBD2
V. 01 – 07/02/2017 20 ©Velleman nv
Si les codes ne sont pas effacés, l’écran affiche ERASE FAIL. Appuyer sur ENTER pour revenir au menu
principal.
6.3 Lire l'état de préparation I/M
IMPORTANT
La fonction de préparation I/M (I/M Readiness) est utilisée pour vérifier le
fonctionnement du système antipollution sur les véhicules compatibles avec
OBDII. Il s'agit d'une excellente fonction à utiliser avant l'inspection d'un véhicule
pour la conformité à un programme antipollution. Un résultat négatif ne signifie
pas nécessairement que le véhicule testé ne répond pas aux exigences légales.
YES: Tous les moniteurs supportés par le véhicule ont terminé leur test de
diagnostic et le témoin MIL n'est pas allumé.
NO: Au moins un des moniteurs supportés par le véhicule n'a pas terminé son
test de diagnostic et/ou le témoin MIL est allumé.
READY: Indique qu'un moniteur particulier en cours de vérification a terminé son
test de diagnostic
NOT RDY: Indique qu'un moniteur particulier en cours de vérification n'a pas
terminé son test de diagnostic.
N/A: Le moniteur n'est pas supporté par le véhicule.
: Une flèche clignotante pointant vers la droite indique que des renseignements
supplémentaires sont disponibles sur l'écran suivant.
: Une flèche clignotante pointant vers la gauche indique que des
renseignements supplémentaires sont disponibles sur l'écran précédent.
1. Appuyer sur ENTER pour sélectionner la fonction I/M.
2. Utiliser SCROLL pour afficher l'état du témoin MIL et les moniteurs :
MISFIRE: Moniteur de ratés.
FUEL: Moniteur du système de carburant.
CCM: Moniteur du composant complet.
EGR: Moniteur du système EGR.
O2S: Moniteur des capteurs O2.
AT: Moniteur du catalyseur.
Strona się ładuje...
Strona się ładuje...
Strona się ładuje...
Strona się ładuje...
Strona się ładuje...
Strona się ładuje...
Strona się ładuje...
Strona się ładuje...
Strona się ładuje...
Strona się ładuje...
Strona się ładuje...
Strona się ładuje...
Strona się ładuje...
Strona się ładuje...
Strona się ładuje...
Strona się ładuje...
Strona się ładuje...
Strona się ładuje...
Strona się ładuje...
Strona się ładuje...
Strona się ładuje...
Strona się ładuje...
Strona się ładuje...
Strona się ładuje...
Strona się ładuje...
Strona się ładuje...
Strona się ładuje...
Strona się ładuje...
Strona się ładuje...
Strona się ładuje...
Strona się ładuje...
Strona się ładuje...
Strona się ładuje...
Strona się ładuje...
Strona się ładuje...
Strona się ładuje...
Strona się ładuje...
Strona się ładuje...
Strona się ładuje...
Strona się ładuje...
Strona się ładuje...
Strona się ładuje...
Strona się ładuje...
-
 1
1
-
 2
2
-
 3
3
-
 4
4
-
 5
5
-
 6
6
-
 7
7
-
 8
8
-
 9
9
-
 10
10
-
 11
11
-
 12
12
-
 13
13
-
 14
14
-
 15
15
-
 16
16
-
 17
17
-
 18
18
-
 19
19
-
 20
20
-
 21
21
-
 22
22
-
 23
23
-
 24
24
-
 25
25
-
 26
26
-
 27
27
-
 28
28
-
 29
29
-
 30
30
-
 31
31
-
 32
32
-
 33
33
-
 34
34
-
 35
35
-
 36
36
-
 37
37
-
 38
38
-
 39
39
-
 40
40
-
 41
41
-
 42
42
-
 43
43
-
 44
44
-
 45
45
-
 46
46
-
 47
47
-
 48
48
-
 49
49
-
 50
50
-
 51
51
-
 52
52
-
 53
53
-
 54
54
-
 55
55
-
 56
56
-
 57
57
-
 58
58
-
 59
59
-
 60
60
-
 61
61
-
 62
62
-
 63
63


w innych językach
- español: Perel AOBD2 Manual de usuario
- Deutsch: Perel AOBD2 Benutzerhandbuch
- português: Perel AOBD2 Manual do usuário
- français: Perel AOBD2 Manuel utilisateur
- Nederlands: Perel AOBD2 Handleiding
Powiązane artykuły
Inne dokumenty
-
 Topdon Phoenix Elite Instrukcja obsługi
-
Topdon Phoenix Lite 2 Instrukcja obsługi
-
AVTech - Velleman CCTVPROM17 Instrukcja obsługi
-
Velleman CCTVPROM14 Instrukcja instalacji
-
HQ Power VDPL300CB Instrukcja obsługi
-
Mopar Auxiliary Switch Bank Instrukcja instalacji
-
 Catalyst iPhone Total Protection Case Instrukcja obsługi

