Orbit 57567 Instrukcja obsługi

Typ
Instrukcja obsługi

Ten podręcznik jest również odpowiedni dla

PN 94906-24 rA
*12 Station remote shown
MODELS:
28566, 28568, 57567
Wireless remote
Users manUal
RESET
PROGRAM
RAIN DELAY
AUTO
OFF
SET
CLOCK
SET
DATE
BUDGET
HOW
OFTEN
RUN
TIME
START
TIME
ON
2 min 10 min 30 min
ON ON
p 801 295 9820
f 801 951 5815
www.uid-studio.net
1065 South 500 West
Bountiful, Utah 84010
proof no: 3
date: 11.20.13
des: SM
client: Orbit
sku: 94906
upc: NA
le name: 94906-24 rA.indd
software: InDesign CS6
colors
additional instructions:
·Translation Proong code:
·
·
color
non printing
PMS
???
PMS
????
color
non printing
PMS
????
Registration
K
Printers are responsible for
meeting print production
requirements. Any changes
must be approved by the
client and Fluid Studio.
printed piece must meet
designated specications
on this form.
dimensions:
at: w: 11.0" h: 8.5"
nished: w: 5.5" d: 0.0" h: 8.5"
© 2010 Fluid Studio. This
work is the property of Fluid
Studio, and cannot be used,
reproduced or distributed
in any way without their
express permission.
The wireless remote (another Orbit
®
innovation) allows the homeowner a
simple way to turn sprinklers on and off without having to go to the timer.
This feature is useful during repairs and sprinkler adjustments or manually
running the sprinklers for extra watering.
Remote Features:
• Turning on the sprinklers to a single station, selected stations or all stations.
• Preset watering durations of 2, 10 or 30 minutes.
• Operating range up to 300' from the timer.
Some of the common uses are:
• Turning sprinklers on and off while adjusting sprinkler heads.
• Turning the sprinklers on to test repairs.
• Turning sprinklers on to provide extra water to dry sections of your lawn.
A
1 – 6 (or 12) Individual Station Buttons
B
ON
Watering Duration
(2, 10 & 30 minutes)
C
ALL Water All Stations
D
OFF Turn off all stations
E
NEXT Moves to next station
F
RAIN
DELAY
Stops watering for 24 Hours.
Note: This remote is water resistant but is not waterproof.
Please do not submerge in water.
Using the remote
Important: The wireless remote will not work unless the timer dial is on AUTO.
To Water One Station:
• Press the station number.
• Press “X” MIN ON to water the station for the minutes selected.
To Water All Stations:
• Press the ALL button on the remote control.
• Press the “X” MIN ON button to water all stations (sequentially) for the
minutes selected.
• To advance to the next station (before the current station’s watering duration
is complete) press NEXT.
To Water Selected Stations:
• Press the station numbers that you want to run. (Example: 3, 7, 10, and 6).
Note: The timer will water in sequence from lowest to the highest (3, 6, 7, 10) no
matter which order you press the keys.
• Press “X” MIN ON to water each station for the minutes selected.
• To advance to the next station (before the current station’s watering duration is
complete) press NEXT.
Rain Delay
The “Rain Delay” feature prevents the sprinkler timer from watering for 24 hours.
Note: Use the RAIN DELAY button on the timer to delay watering for 48 or 72 hours.
Using the remote to activate “Rain Delay”:
• Press the RAIN DELAY button.
• To cancel the Rain Delay, press OFF.
installing the Wireless remote battery
• Remove the battery lid by inserting (and twisting) a flat bladed screwdriver in
the slot (located on the bottom of the remote).
• Install a 9-volt battery in the battery compartment.
• Replace the battery compartment door (ensuring that the rubber gasket is in place).
re-syncing the remote to yoUr timer
Note: The remote and timer will already be synced. The instructions below should
only be used if you obtain a replacement remote or if your remote fails to work after
following the solutions (listed below) in trouble shooting.
• Turn the timer dial to OFF.
• Hold down the PROGRAM button (on the timer) until the icon flashes on the LCD.
• Press and hold buttons 1 and 2 (on the remote) at the same time. When you
hear 4 beeps, release the buttons.
troUble shooting
Note: To maximize the remote range, install the timer in an area with the least amount of
solid obstructions or electrical interference between the timer and remote.
Problem: The remote does not turn the sprinklers on.
Possible Solutions:
• The timer dial is not on AUTO; turn the dial to AUTO.
• The timer is not plugged in; plug in timer.
• Low battery; replace the 9-volt battery in the remote.
• Out of range; move closer to the timer and try again.
• Remote and Timer are no longer synced; re-sync the remote.
ON
2 min 10 min 30 min
ON ON
A
F
B
C
DE
6 Station remote shown
help
Before returning this sprinkler timer to the store, contact Orbit
®
Technical
Service at: 1-800-488-6156, 1-801-299-5555.
Listings: This device complies with Part 15 of the FCC Rules. Operation is
subject to the following two conditions: (1) This device may not cause harmful
interference, and (2) This device must accept any interference received,
including interference that may cause undesired operation.
Warning: Changes or modifications to this unit not expressly approved by the
party responsible for compliance could void the user’s authority to operate the
equipment.
NOTE: This equipment has been tested and found to comply with the limits for a
Class B digital device, pursuant to Part 15 of the FCC Rules. This Class B digital
apparatus complies with Canadian ICES-003. These limits are designed to provide
reasonable protection against harmful interference in a residential installation.
This equipment generates, uses and can radiate radio frequency energy and, if
not installed and used in accordance with the instructions, may cause harmful
interference to radio communications. However, there is no guarantee that
interference will not occur in a particular installation. If this equipment does cause
harmful interference to radio or television reception, which can be determined
by turning the equipment off and on, the user is encouraged to try to correct the
interference by one or more of the following measures:
• Reorient or relocate the receiving antenna.
• Increase the separation between the equipment and receiver.
• Connect the equipment into an outlet on a circuit different from that to which
the receiver is connected.
• Consult the dealer or an experienced radio/TV technician for help.
SAFETY OF CHILDREN: The controller is not intended for use by young
children or infirm person without supervision. Young children should be
supervised to ensure they do not play with the controller.
orbit
®
irrigation limited 3 year Warranty
Orbit
®
Irrigation Products, Inc. warrants to its customers that its products will
be free from defects in materials and workmanship for a period of 3 years
from the date of purchase. We will replace, free of charge, the defective part
or parts found to be defective under normal use and service for a period of up
to 3 years after purchase (proof of purchase required). We reserve the right to
inspect the defective part prior to replacement. Orbit
®
Irrigation Products, Inc.
will not be responsible for consequential or incidental cost or damage caused
by the product failure. Orbit
®
liability under this warranty is limited solely to
the replacement or repair of defective parts. To exercise your warranty, return
the unit to your dealer with a copy of the sales receipt.
Orbit
®
Irrigation Products, Inc.
North Salt Lake, UT 84054 USA
www.orbitonline.com | 1-800-488-6156
© 2011 Orbit
®
Irrigation Products, Inc.
All rights reserved. All trade names are registered
trademarks of respective manufacturers listed.
*Se muestra la estación remota 12
MODELOS:
28566, 28568, 57567
control remoto
inalámbrico
manUal del
UsUario
RESET
PROGRAM
RAIN DELAY
AUTO
OFF
SET
CLOCK
SET
DATE
BUDGET
HOW
OFTEN
RUN
TIME
START
TIME
ON
2 min 10 min 30 min
ON ON
El control inalámbrico (otra innovación de Orbit®) le ofrece a al propietario una
manera simple de encender y apagar los regadores sin tener que ir al temporizador.
Esta resulta ser una característica útil mientras se reparan o regulan los regadores
o cuando se opera de forma manual para obtener un mayor riego.
El control remoto presenta:
• Encendido de los regadores en una estación, varias estaciones seleccionadas o en
todas.
• Duración de riego programado de 2, 10 ó 30 minutos.
• Rango de operación de hasta 91,44 m desde el temporizador.
Algunos de sus usos más comunes son:
• Encendido y apagado de los regadores mientras se regulan los cabezales de los
regadores.
• Encendido de los regadores para probar reparaciones.
• Encendido de los regadores para proporcionar agua adicional a las áreas secas del
césped.
A
1 – 6 (o 12) Botones de estaciones individuales
B
ON
Duración de riego
(2, 10 y 30 minutos)
C
ALL Todas las estaciones de riego
D
OFF Apagado de todas las estaciones
E
NEXT Continúa a la siguiente estación.
F
RAIN DELAY Detiene el riego por 24 horas.
Nota: Este control remoto es resistente al agua pero no es a
prueba de ella. No lo sumerja en agua.
Uso del control remoto
Importante: El control remoto sólo funcionará si el selector del temporizador está en
AUTO.
Para regar una estación:
• Presione el número de la estación.
• Presione “X” MIN ON para regar la estación durante la cantidad de minutos
seleccionados.
Para regar todas las estaciones:
• Presione el botón ALL en el control remoto.
• Presione el botón “X” MIN ON para regar todas las estaciones (de manera
secuencial) durante la cantidad de minutos seleccionados.
• Para avanzar a la siguiente estación (antes de que haya finalizado el riego de la
estación actual) presione NEXT.
Para regar las estaciones seleccionadas:
• Presione los números de las estaciones que desee operar. (Ejemplo: 3, 7, 10, y 6).
Nota: : El temporizador regará en secuencia, comenzando desde el más bajo hasta el
más alto, sin importar el orden en que presione los botones.
• Presione “X” MIN ON para regar cada estación durante la cantidad de minutos
seleccionados.
• Para avanzar a la siguiente estación (antes de que haya finalizado el riego de la
estación actual) presione NEXT.
Retardo por lluvia
La función “Rain Delay” evita que el temporizador del regador riegue durante 24 horas.
Nota: Presione el botón RAIN DELAY en el temporizador para detener el riego durante 48
ó 72 horas.
Uso del control remoto para activar el modo “retardo por lluvia”:
• Presione el botón RAIN DELAY.
• Para cancelar el modo de retardo por lluvia presione OFF.
instalación de la batería del control remoto inalámbrico
• Retire la tapa de la batería insertando (y girando) un destornillador de punta plana
en la ranura (ubicada en el parte inferior del control remoto).
• Instale una batería de 9 voltios en el compartimiento.
• Reemplace la puerta del compartimiento de la batería (asegúrese de que la
empaquetadura de goma esté en su posición).
cómo volver a sincronizar el control remoto con el
temporizador
Nota: El control remoto y el temporizador ya estarán sincronizados. Debe seguir las
siguientes instrucciones sólo si usted tiene un control remoto de repuesto o si éste no
funciona correctamente después de seguir las soluciones (descritas más abajo) en la
sección solución de problemas.
• Gire el selector del temporizador a OFF.
• Mantenga presionado el botón PROGRAM (en el temporizador) hasta que el ícono
aparezca en la pantalla LCD.
• Presione al mismo tiempo los botones 1 y 2 (en el control remoto). Cuando oiga 4
pitidos, suelte los botones.
solUción de problemas
Nota: Para maximizar el rango del control remoto, instale el temporizador en un área donde
exista la menor cantidad de obstrucción sólida o interferencia eléctrica entre el temporizador
y el control remoto.
Problema: El control remoto no enciende los regadores.
Posibles soluciones:
• El selector del temporizador no está en AUTO; gírelo hasta AUTO.
• El temporizador no está enchufado; enchúfelo.
• Batería baja; reemplace la batería de 9 voltios en el control remoto.
• Fuera de rango; acérquese al temporizador e intente de nuevo.
• El control remoto y el temporizador ya no están sincronizados; vuelva a sincronizar
el control remoto.
ON
2 min 10 min 30 min
ON ON
A
F
B
C
DE
Se muestra la estación remota 6
ayUda
Antes de devolver este temporizador para regadores a la tienda, póngase en contacto
con el Servicio técnico de Orbit
®
llamando al: 1-800-488-6156, 1-801-299-5555.
Clasificaciones: Este dispositivo cumple con la sección 15 de las reglas de
la FCC. El funcionamiento está sujeto a las siguientes dos condiciones: (1)
Este dispositivo no debe causar interferencia perjudicial, y (2) deberá aceptar
cualquier interferencia recibida, incluida la interferencia que pudiese causar el
funcionamiento no deseado.
Advertencia: Los cambios o las modificaciones a esta unidad que no estén
expresamente aprobadas por la parte responsable del cumplimiento podrían
anular la autorización del usuario para utilizar el equipo.
NOTA: Este equipo ha sido probado y se ha verificado que cumple los límites para
un dispositivo digital clase B, conforme a la sección 15 de las reglas de la FCC. Este
instrumento digital clase B cumple con el ICES-003 de Canadá. Estos límites han
sido diseñados para proporcionar una protección razonable contra la interferencia
perjudicial en una instalación residencial. Este equipo genera, utiliza y puede irradiar
energía de radiofrecuencia y, si no se instala y usa de acuerdo con las instrucciones,
puede causar interferencia perjudicial a las comunicaciones de radio. Sin embargo,
no se garantiza que no se producirán interferencias en una instalación en especial. Si
este equipo genera interferencia perjudicial a la recepción de radio o televisión, lo que
se puede determinar apagando y encendiendo el equipo, se recomienda al usuario que
intente corregir la interferencia con una o más de las siguientes medidas:
• Reorientar o reubicar la antena de recepción.
• Aumentar la separación entre el equipo y el receptor.
• Conectar el equipo a un tomacorriente de un circuito distinto al que usa el receptor.
• Solicitar ayuda al concesionario o a un técnico con experiencia en radio/TV.
SEGURIDAD DE LOS NIÑOS: El controlador no está diseñado para que lo usen
niños pequeños o personas enfermas sin supervisión. Se debe supervisar a los
niños pequeños para asegurarse de que no jueguen con el controlador.
garantía limitada de 3 años de orbit
®
irrigation
Orbit
®
Irrigation Products Inc. garantiza a sus clientes que sus productos estarán
libres de defectos en los materiales y en la fabricación durante un período de
3 años a partir de la fecha de compra. Reemplazaremos, sin cargos, la o las
piezas defectuosas o las piezas que se consideren defectuosas bajo un uso y
servicio normales por un período de hasta 3 años después de la compra (se
exige comprobante de compra). Nos reservamos el derecho de inspeccionar la
pieza defectuosa antes de su reemplazo. Orbit
®
Irrigation Products, Inc. no será
responsable de costos o daños indirectos o incidentales causados por la falla del
producto. La responsabilidad de Orbit
®
bajo esta garantía se limita solamente
al reemplazo o reparación de las piezas defectuosas. Para utilizar su garantía,
regrese la unidad al distribuidor con una copia del recibo de venta.
Orbit
®
Irrigation Products, Inc.
North Salt Lake, UT 84054 USA
www.orbitonline.com | 1-800-488-6156
© 2011 Orbit
®
Irrigation Products, Inc.
Todos los derechos reservados. Todos los nombres comerciales son marcas
registradas de los respectivos fabricantes mencionados.
*12 télécommande de station
MODÈLES :
28566, 28568, 57567
télécommande
sans fil
manUel de
l’UtilisateUr
RESET
PROGRAM
RAIN DELAY
AUTO
OFF
SET
CLOCK
SET
DATE
BUDGET
HOW
OFTEN
RUN
TIME
START
TIME
ON
2 min 10 min 30 min
ON ON
La télécommande (encore une innovation signée Orbit
®
) offre au propriétaire une
méthode simple pour activer et désactiver les sprinklers sans devoir se déplacer
jusqu’à la minuterie. Cette fonction est utile pendant les réparations ou réglages
des sprinklers ou pour faire fonctionner manuellement les sprinklers pour un
arrosage supplémentaire.
Fonctions de la télécommande :
• Activation des sprinklers sur une seule station, plusieurs stations sélectionnées
ou toutes les stations.
• Durées d’arrosage préréglée de 2, 10 ou 30 minutes.
• Portée jusqu’à 300’ de la minuterie
Quelques utilisations classiques :
• Actionner et couper les sprinklers pendant le réglage des têtes d’arrosage.
• Actionner les sprinklers pour tester des réparations.
• Actionner les sprinklers pour fournir plus d’eau à des zones sèches de votre gazon.
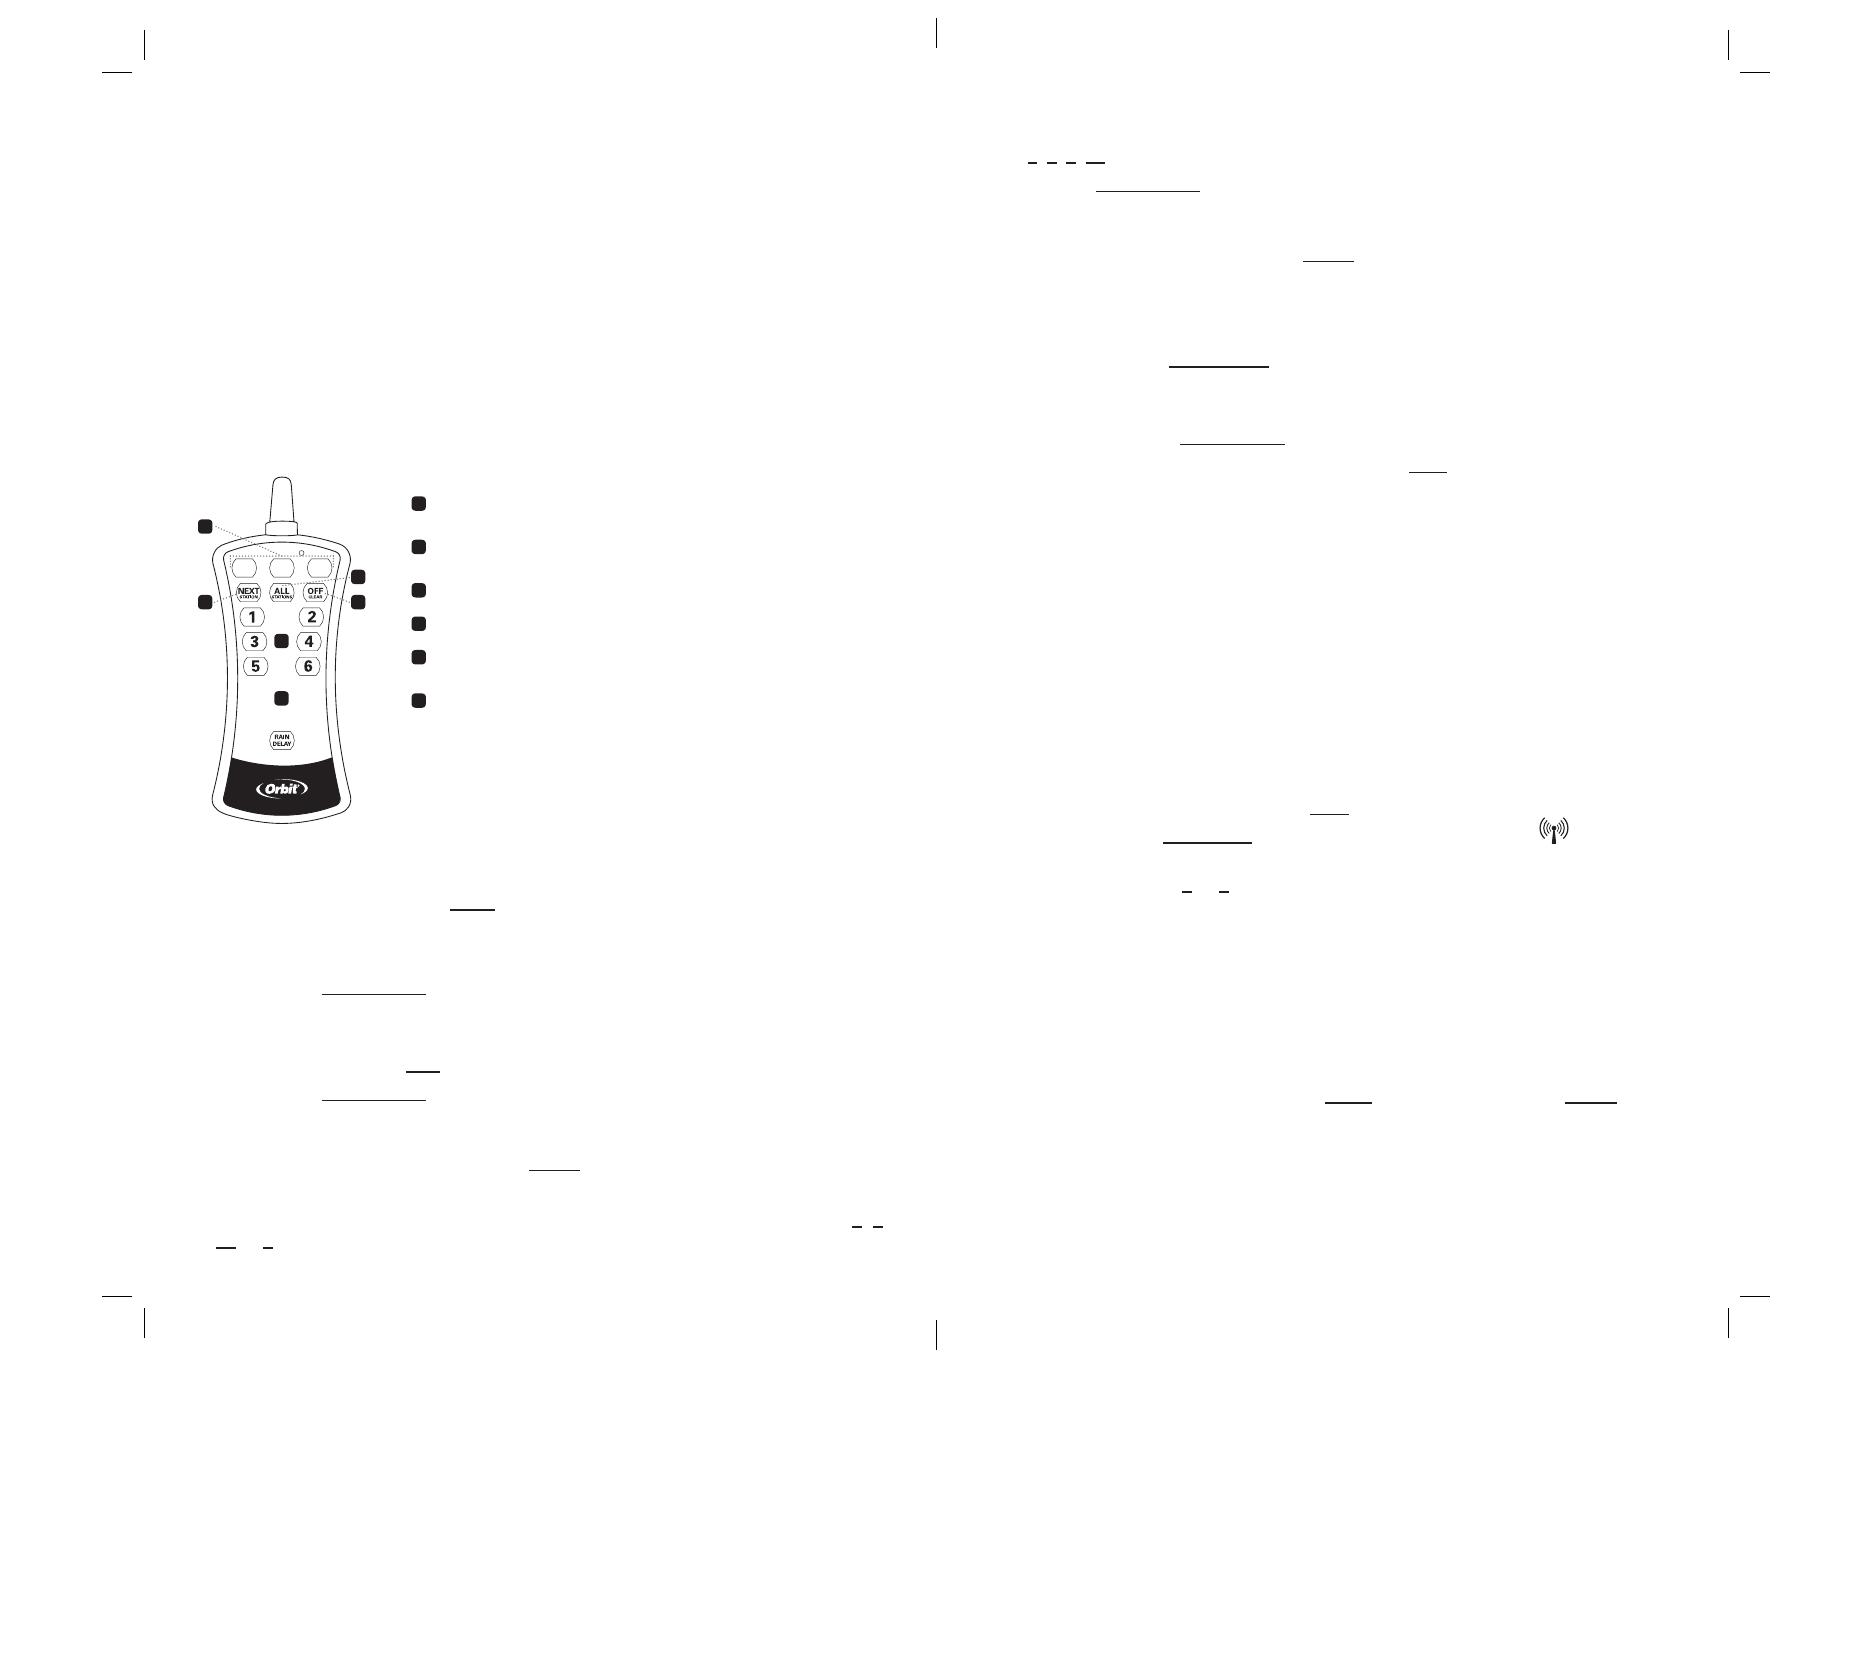
A
1 – 6 (ou 12) Boutons de stations individuelles
B
ON
Durée d'arrosage
(2, 10 et 30 minutes)
C
ALL Irriguer toutes les stations
D
OFF Arrêter toutes les stations
E
NEXT Passer à la station suivante
F
RAIN
DELAY
Arrêter l'arrosage pendant 24
heures
Remarque : La télécommande est à l’épreuve de l’eau mais
n’est pas étanche. Ne l’immergez pas dans l’eau.
Utilisation de la télécommande
Important: La télécommande ne fonctionnera pas aussi longtemps que le cadran de la
minuterie ne se trouve pas sur AUTO.
Pour irriguer une station :
• Appuyez sur le numéro de la station.
• Appuyez sur «X» MIN ON pour irriguer la station pendant le nombre de minutes
sélectionné.
Pour irriguer toutes les stations :
• Appuyez sur le bouton ALL de la télécommande.
• Appuyez sur «X» MIN ON pour irriguer toutes les stations (en séquence) pendant
le nombre de minutes sélectionné.
• Pour passer à la station suivante (avant que la séquence d’arrosage de la station
en cours soit terminée), appuyez sur NEXT.
Pour irriguer des stations sélectionnées :
• Appuyez sur les numéros de station que vous souhaitez irriguer. (exemple : 3, 7,
10 et 6).
Note : La minuterie va irriguer les stations en séquence, de la plus basse à la plus
haute (3, 6, 7, 10), quel que soit l’ordre dans lequel vous avez enfoncé les boutons.
• Appuyez sur «X» MIN ON pour irriguer la station pendant le nombre de minutes
sélectionné.
• Pour passer à la station suivante (avant que la séquence d’arrosage de la station
en cours soit terminée), appuyez sur NEXT.
Retardement de l’arrosage
La fonction «Rain Delay» empêche la minuterie des sprinklers d’arroser pendant
24 heures.
Note : Utilisez le bouton RAIN DELAY sur la minuterie pour reporter larrosage de 48 ou
72 heures.
Utilisez la télécommande pour activer «Rain Delay» :
• Appuyez sur le bouton RAIN DELAY.
• Pour annuler le report de l’arrosage, appuyez sur OFF.
installation de la pile de la télécommande
• Déposez le couvercle du compartiment de la pile en insérant et en faisant
tourner un tournevis plat dans la fente située dans le bas de la télécommande.
• Placez une pile de 9 volts dans le compartiment de la batterie.
• Remettez le couvercle du compartiment de la pile en place (en veillant à ce que
le joint en caoutchouc soit lui aussi en place).
resynchronisation de la télécommande sUr votre
minUterie
Note : La télécommande et la minuterie seront déjà synchronisées. N’utilisez les
instructions suivantes que si votre télécommande est remplacée ou refuse tout service
après que vous ayez essayé de résoudre le problème en recourant aux solutions
énumérées au chapitre dépannage (voir ci-dessous).
• Tournez le cadran de la minuterie sur OFF.
• Maintenez le bouton PROGRAM (de la minuterie) enfoncé jusqu’à
ce que
l’icône clignote à l’écran.
• Maintenez les boutons 1 et 2 (de la télécommande) enfoncés en même temps.
Relâchez les boutons après avoir entendu 4 bips.
dépannage
Note : Pour optimiser la portée de la télécommande, installez la minuterie dans une
zone présentant le moins possible d’obstacles solides ou d’interférences électriques
entre la minuterie et la télécommande.
Problème : La télécommande ne met pas les sprinklers en marche.
Solutions possibles :
• Le cadran de la minuterie n’est pas sur AUTO ; placez le cadran sur AUTO.
• La minuterie n’est pas branchée sur le secteur ; branchez-la.
• Batterie faible ; remplacez la pile 9 V de la télécommande.
• Hors de portée ; rapprochez-vous de la minuterie et réessayez.
• Télécommande et minuterie ne sont plus synchronisées ; resynchronisez la
télécommande.
ON
2 min 10 min 30 min
ON ON
A
F
B
C
DE
6 télécommande de station
aide
Avant de restituer votre minuterie de sprinklers au magasin, prenez contact avec
le service technique d’Orbit
®
au : 1-800-488-6156, 1-801-299-5555.
Listings : Cet appareil est conforme à la partie 15 des directives FCC. Son
fonctionnement est sujet aux deux conditions suivantes : (1) Cet appareil ne peut
pas provoquer d’interférences nuisibles, et (2) Cet appareil doit accepter toutes
les interférences qu’il reçoit, notamment les interférences pouvant provoquer un
fonctionnement intempestif.
Avertissement : Tout changement ou modification de cet appareil sans
l’approbation expresse de la partie responsable de sa conformité est susceptible
d’entraîner la révocation de l’autorisation d’utilisation de l’appareil.
Note : Cet appareil a été testé et classé dans la catégorie d’un appareil numérique
de classe B en accord avec la partie 15 des directives FCC. Cet appareil numérique
de classe B est conforme à l’ICES-003 (Canada). Ces contraintes sont destinées
à fournir une protection raisonnable contre les interférences nuisibles quand
l’appareil est utilisé dans une installation résidentielle. Cet appareil génère,
utilise et émet de l’énergie de fréquences radio et peut causer des interférences
nuisibles aux communications radio s’il n’est pas installé ou utilisé conformément
aux instructions fournies. Il n’existe toutefois aucune garantie que de telles
interférences ne se produiront pas dans une installation particulière. Si cet
appareil cause des interférences nuisibles à la réception des signaux de radio ou
de télévision, ce qui peut être déterminé en allumant et en éteignant l’appareil,
l’utilisateur peut tenter de remédier au problème à l’aide d’une ou plusieurs des
mesures suivantes :
• Réorienter ou déplacer l’antenne réceptrice.
• Augmenter l’espacement entre l’équipement et le récepteur.
• Brancher l’appareil sur un circuit différent de celui du récepteur.
• Contacter le revendeur ou un technicien qualifié pour toute assistance.
SÉCURITÉ DES ENFANTS: Le contrôleur n’est pas destiné à être utilisé sans
supervision par des enfants ou des personnes handicapées. Les jeunes enfants
doivent être surveillés afin de s’assurer qu’ils ne jouent pas avec l’appareil.
garantie limitée de 3 ans d’orbit
®
irrigation
Orbit
®
Irrigation Products, Inc. garantit à ses clients que ses produits seront
exempts de vices de matériau et de fabrication pendant une période de 3 ans à
compter de la date d’achat. Nous nous engageons à remplacer gratuitement la
ou les pièces qui s’avèrent défectueuses en cas d’utilisation et d’entretien normal
pendant une période de 3 ans à compter de la date d’achat (la preuve d’achat doit
être fournie). Nous nous réservons le droit d’inspecter la pièce défectueuse avant
son remplacement. Orbit
®
Irrigation Products, Inc. décline toute responsabilité
pour les frais ou dommages consécutifs ou incidents à la défaillance du produit.
La responsabilité d’Orbit
®
aux termes de cette garantie se limite au remplacement
ou à la réparation des pièces défectueuses. Pour bénéficier d’une intervention en
garantie, vous devez ramener l’appareil à votre revendeur avec une copie de la
preuve d’achat.
Orbit
®
Irrigation Products, Inc.
North Salt Lake, UT 84054 USA
www.orbitonline.com | 1-800-488-6156
© 2011 Orbit
®
Irrigation Products, Inc.
Tous droits réservés. Toutes les marques commerciales sont des marques
déposées des fabricants respectifs mentionnés.
*12 Stazione remota visualizzata
MODELLI:
28566, 28568, 57567
manUale Utenti
telecomando
RESET
PROGRAM
RAIN DELAY
AUTO
OFF
SET
CLOCK
SET
DATE
BUDGET
HOW
OFTEN
RUN
TIME
START
TIME
ON
2 min 10 min 30 min
ON ON
Il telecomando senza fili (un’altra innovazione Orbit
®
) offre al proprietario della casa
un modo semplice per accendere e spegnere gli irrigatori senza dover andare al
timer. Questa funzione è utile durante le riparazione e le regolazioni dell’irrigatore
o quando si mettono in funzione manualmente gli irrigatori per un’irrigazione
supplementare.
Funzioni a distanza:
• Accensione degli irrigatori per una singola stazione, per delle stazioni selezionate o
per tutte le stazioni.
• Preimpostare le durate d’irrigazione per 2, 10 o 30 minuti.
• Gamma di funzionamento fino a 300’ dal timer.
Ecco alcuni degli utilizzi più comuni:
• Accensione e spegnimento degli irrigatori durante la regolazione delle testine
d’irrigazione.
• Accensione degli irrigatori per testare le riparazioni.
• Accensione degli irrigatori per fornire acqua supplementare alle zone asciutte del
vostro prato.
A
1 – 6 (o 12) Pulsanti stazioni individuali
B
ON [ACCESO]
Durata irrigazione
(2, 10 & 30 minuti)
C
ALL [TUTTE] Irrigare tutte le stazioni
D
OFF [SPENTO] Spegnere tutte le stazioni
E
NEXT
[SUCCESSIVA]
Si sposta alla stazione
successiva
F
RAIN DELAY
[RITARDO
PIOGGIA]
Sospende l'irrigazione per
24 ore
Nota: Questo telecomando è resistente allacqua ma non è
impermeabile. Non immergerlo nellacqua.
Utilizzo del telecomando
Importante: Il telecomando senza fili non funzionerà se il quadrante del timer non si
trova su AUTO.
Per irrigare una stazione:
• Premere il numero della stazione.
• Premere “X” MIN ON per irrigare la stazione per i minuti selezionati.
Per irrigare tutte le stazioni:
• Premere il pulsante ALL sul telecomando.
• Premere il pulsante “X” MIN ON per irrigare tutte le stazioni (in sequenza) per i
minuti selezionati.
• Per spostarsi alla stazione successiva (prima che la durata d’irrigazione della
stazione corrente sia stata completata) premere NEXT.
Per irrigare le stazioni selezionate:
• Premere i numeri delle stazioni che si vogliono far funzionare. (Esempio: 3, 7, 10, e 6).
Nota: Il timer irrigherà in sequenza dal numero di stazione più basso a quello più alto (3,
6, 7, 10) a prescindere dall’ordine in cui si premono i pulsanti.
• Premere “X” MIN ON per irrigare ogni stazione per i minuti selezionati.
• Per spostarsi alla stazione successiva (prima che la durata d’irrigazione della
stazione corrente sia stata completata) premere NEXT.
Ritardo di pioggia
L’opzione “Rain Delay” impedisce al timer d’irrigazione di irrigare per 24 ore.
Nota: Usare il pulsante RAIN DELAY sul timer per ritardare l’irrigazione di 48 o 72 ore.
Utilizzare il telecomando per attivare l’opzione “Rain Delay”:
• Premere il pulsante RAIN DELAY.
• Per annullare il Rain Delay, premere OFF.
installazione della batteria del telecomando senza fili
• Rimuovere il coperchietto della batteria inserendo (e girando) un cacciavite a punta
piatta nella fessura (che si trova nella parte inferiore del telecomando).
• Inserire una batteria da 9 volt nel vano batterie.
• Rimontare lo sportellino del vano batterie (accertandosi che la guarnizione in
gomma sia al suo posto).
ri-sincronizzare il telecomando con il timer
Nota: Il telecomando e il timer saranno già sincronizzati. Le istruzioni fornite qui di
seguito vanno utilizzate solo se si riceve un telecomando in sostituzione o se il proprio
telecomando non funziona dopo aver consultato le soluzioni (indicate qui sotto) nella
sezione relativa alla risoluzione dei problemi.
• Portare il quadrante del timer su OFF.
• Tenere premuto il pulsante PROGRAM (sul timer) fino a quando l
icona non
lampeggerà sull’LCD.
• Tenere premuti contemporaneamente i pulsanti 1 e 2 (sul telecomando). Quando si
sentono 4 bip, rilasciare i pulsanti.
risolUzione dei problemi
Nota: Per sfruttare al massimo la portata del telecomando, installare il timer in una zona
dove ci sono meno ostacoli solidi o interferenza elettrica fra il timer e il telecomando.
Problema: Il telecomando non accende gli irrigatori.
Soluzioni possibili:
• Il quadrante del timer non si trova su AUTO; spostare il quadrante su AUTO.
• Il timer non è collegato; collegare il timer.
• Batteria scarica; sostituire la batteria da 9 volt nel telecomando.
• Fuori portata; avvicinarsi di più al timer e riprovare.
• Telecomando e timer non sono più sincronizzati; ri-sincronizzare il telecomando.
ON
2 min 10 min 30 min
ON ON
A
F
B
C
DE
*6 Stazione remota
assistenza
Prima di restituire il timer d’irrigazione al negozio, contattare lAssistenza Tecnica
Orbit
®
ai seguenti numeri: 1-800-488-6156, 1-801-299-5555.
Omologazioni: Questo dispositivo è conforme alla Parte 15 del regolamento della
FCC. Il suo utilizzo è soggetto alle due seguenti condizioni: (1) Questo dispositivo
non deve causare alcuna interferenza dannosa, e (2) il presente dispositivo deve
accettare qualsiasi interferenza ricevuta, comprese le interferenze che possono
portare ad un funzionamento non desiderato.
Avvertenza: Eventuali modifiche non autorizzate su questa unità che non siano
espressamente approvate dalla parte responsabile della conformità potrebbero
annullare il diritto dell’utilizzatore di servirsi della presente apparecchiatura.
NOTA: Questa apparecchiatura è stata collaudata e dichiarata conforme con i
limiti imposti agli apparecchi digitali di Classe B, Parte 15 del regolamento della
FCC. Questo apparecchio digitale di Classe B è conforme alla norma ICES-003
del Canada. Questi limiti sono destinati a garantire una protezione ragionevole
dalle interferenze dannose in un ambiente residenziale. Questa apparecchiatura
genera, utilizza e può emettere dell’energia di radiofrequenza e, se non utilizzata
e installata rispettando le istruzioni, potrebbe causare un’interferenza dannosa
alle comunicazioni radio. Tuttavia, non si può escludere l’avverarsi di eventuali
interferenze in una particolare installazione. Se questa apparecchiatura causa
delle interferenze dannose alla ricezione radio o televisione, che può essere
determinata accendendo e spegnendo l’apparecchiatura, l’utente dovrà prendere le
seguenti misure per cercare di eliminarle:
• Riorentiare o spostare l’antenna di ricezione.
• Aumentare la distanza fra l’apparecchiatura e il ricevitore.
• Collegare l’apparecchiatura ad una presa di corrente su un circuito diverso da
quello dove è connesso il ricevitore.
• Consultare il rivenditore o un tecnico radio/TV esperto.
SICUREZZA DEI BAMBINI: Il controller non è stato concepito per essere utilizzato
da bambini piccoli o persone inabili senza la necessaria supervisione. Sorvegliate i
bambini piccoli per evitare che si mettano a giocare con il controller.
3 anni di garanzia orbit
®
irrigation limited
Orbit
®
Irrigation Products, Inc. garantisce ai propri clienti che i suoi prodotti
saranno privi di difetti per quanto riguarda materiali e lavorazione per un periodo
di 3 anni dalla data di acquisto. Per un periodo di 3 anni a partire dalla data di
acquisto sostituiremo senza spese i componenti difettosi o che si riveleranno tali
se utilizzati nelle condizioni di utilizzo e di manutenzione normali (si richiede una
prova d’acquisto). Ci riserviamo il diritto di ispezionare la parte difettosa prima
di sostituirla. Orbit
®
Irrigation Products, Inc. non sarà responsabile di eventuali
costi o danni accessori o conseguenti causati da una difettosità del prodotto. La
responsabilità di Orbit
®
in virtù della presente garanzia, si limita esclusivamente
alla sostituzione o alla riparazione dei componenti difettosi. Per esercitare il
vostro diritto di garanzia, restituite l’unità al vostro rivenditore con una copia della
ricevuta di acquisto.
Orbit
®
Irrigation Products, Inc.
North Salt Lake, UT 84054 USA
www.orbitonline.com | 1-800-488-6156
© 2011 Orbit
®
Irrigation Products, Inc. Tutti i diritti riservati. Tutti i marchi
commerciali sono marchi depositati dei rispettivi produttori elencati.
*Pokazano pilota na 12 stacji
MODELE:
28566, 28568, 57567
instrUkcja
obsłUgi pilota
RESET
PROGRAM
RAIN DELAY
AUTO
OFF
SET
CLOCK
SET
DATE
BUDGET
HOW
OFTEN
RUN
TIME
START
TIME
ON
2 min 10 min 30 min
ON ON
Pilot (kolejna innowacja Orbit
®
) umożliwia właścicielowi domu łatwe włączanie
i wyłączanie zraszaczy bez potrzeby podchodzenia do programatora czasowego.
Funkcja ta jest przydatna podczas naprawy i regulacji zraszaczy oraz ręcznego
uruchamiania zraszaczy w celu dodatkowego nawadniania.
Funkcje pilota:
• Włączenie zraszaczy w jednej stacji, wybranej stacji lub wszystkich stacjach.
• Ustawienie czasu trwania zraszania: 2, 10 lub 30 min.
• Zasięg: do 100 m od programatora czasowego.
Przykładowe zastosowania:
• Włączanie i wyłączanie zraszaczy z ustawianiem głowic zraszających.
• Włączanie zraszaczy w celu sprawdzenia wyników napraw.
• Włączanie zraszaczy w celu dodatkowego nawodnienia suchych obszarów
trawnika.
A
1–6 (lub 12) Przyciski poszczególnych stacji
B
ON (WŁ.)
Czas zraszania
(2, 10 i 30 min)
C
ALL
(WSZYSTKIE)
Zraszanie przez wszystkie
stacje
D
OFF (WYŁ.) Wyłączenie wszystkich stacji
E
NEXT
(NASTĘPNA)
Przejście do następnej stacji
F
RAIN DELAY
(OPÓŹNIENIE
ZRASZANIA)
Zatrzymanie zraszania na 24
godziny
Uwaga: Ten pilot jest wodoodporny, ale nie jest wodoszczelny.
Nie wolno zanurzać go w wodzie.
UżyWanie pilota
Ważne: Pilot nie będzie działać, jeśli na pokrętle programatora czasowego nie będzie
ustawiony tryb AUTO.
Aby zraszać z jednej stacji:
• Nacisnąć numer stacji.
• Nacisnąć przycisk „X” MIN ON, aby zraszać ze stacji przez ustawioną liczbę
minut.
Zraszanie ze wszystkich stacji:
• Nacisnąć przycisk ALL na pilocie.
• Nacisnąć przycisk „X” MIN ON, aby zraszać ze wszystkich stacji (kolejno) przez
ustawioną liczbę minut.
• Aby przejść do następnej stacji (przed zakończeniem zraszania z bieżącej stacji),
nacisnąć przycisk NEXT.
Zraszanie z wybranych stacji:
• Nacisnąć numery stacji, które mają być włączone. (Przykład: 3, 7, 10 i 6).
Uwaga: Programator czasowy będzie włączać zraszanie w kolejności od najniższego do
najwyższego numeru stacji (3, 6, 7, 10), bez względu na kolejność naciskania przycisków.
• Nacisnąć przycisk „X” MIN ON, aby zraszać ze każdej stacji przez ustawioną liczbę
minut.
• Aby przejść do następnej stacji (przed zakończeniem zraszania z bieżącej stacji),
nacisnąć przycisk NEXT.
Opóźnienie zraszania
Funkcja „Rain Delay” (Opóźnienie zraszania) uniemożliwia zraszanie przez 24
godziny.
Uwaga: Aby opóźnić zraszanie o 48 lub 72 godziny, należy nacisnąć przycisk RAIN
DELAY na programatorze.
Włączanie funkcji „Rain Delay” (Opóźnienie zraszania) z pilota:
• Nacisnąć przycisk RAIN DELAY.
• Aby wyłączyć funkcję „Rain Delay”, nacisnąć przycisk OFF.
zakładanie baterii do pilota
• Zdjąć pokrywę baterii, wkładając (i obracając) płaski śrubokręt do szczeliny na
spodzie pilota.
• Założyć 9-woltową baterię.
• Założyć pokrywę baterii (upewnić się, że gumowa uszczelka jest na swoim miejscu).
synchronizacja pilota z programatorem
Uwaga: Pilot i programator są fabrycznie zsynchronizowane. Poniższe instrukcje powinny
być używane tylko wtedy, gdy pilot zostanie wymieniony na inny lub nie będzie działać
pomimo wykonania procedury rozwiązywania problemów (podanej poniżej).
• Ustawić pokrętło programatora w pozycji OFF.
• Nacisnąć i przytrzymać przycisk PROGRAM (na programatorze), aż na wyświetlaczu
zacznie migać ikona
.
• Nacisnąć jednocześnie i przytrzymać przyciski 1 i 2 na pilocie. Po usłyszeniu 4
sygnałów dźwiękowych zwolnić przyciski.
rozWiązyWanie problemóW
Uwaga: Aby zmaksymalizować zasięg pilota, należy zainstalować programator czasowy w
takim miejscu, aby pomiędzy programatorem i pilotem było jak najmniej stałych obiektów
zasłaniających i zakłóceń elektrycznych.
Problem: Pilot nie włącza zraszaczy.
Możliwe rozwiązanie:
• Pokrętło programatora nie jest w pozycji AUTO; przestawić pokrętło na AUTO.
• Programator nie jest podłączony do zasilania; podłączyć.
• Rozładowana bateria; wymienić 9-woltową baterię w pilocie.
• Za duża odległość; podejść z pilotem bliżej programatora i spróbować ponownie.
• Pilot i programator utraciły synchronizację; zsynchronizować pilota.
ON
2 min 10 min 30 min
ON ON
A
F
B
C
DE
Pokazano pilota na 6 stacji
pomoc
Przed zwróceniem programatora zraszaczy do sklepu zadzwonić pod numer działu
pomocy technicznej Orbit
®
: 1-800-488-6156 lub 1-801-299-5555 (USA).
Informacje: Urządzenie spełnia wymagania przepisów FCC, część 15. Prawidłowe
działanie urządzenia zależy od dwóch warunków: (1) to urządzenie nie może
generować szkodliwych zakłóceń; (2) to urządzenie musi być odporne na wszelkie
odbierane zakłócenia, w tym takie, które mogą powodować niepożądane działanie.
Ostrzeżenie: Zmiany lub modyfikacje urządzenia nie zatwierdzone jednoznacznie
przez instytucję odpowiedzialną za zgodność mogą doprowadzić do utraty przez
użytkownika prawa do używania urządzenia.
UWAGA: Urządzenie zostało przetestowane i uznane za zgodne z wymaganiami
dotyczącymi urządzeń cyfrowych klasy B, zgodnie z przepisami FCC, część 15.
To urządzenie cyfrowe klasy B spełnia wymagania kanadyjskiej normy ICES-
003. Zadaniem tych ograniczeń jest zapewnienie wystarczającej ochrony przed
szkodliwymi zakłóceniami w instalacjach domowych. To urządzenie generuje,
wykorzystuje i może emitować energię o częstotliwościach radiowych i jeśli nie
będzie zainstalowane i używane zgodnie z instrukcjami, może powodować szkodliwe
zakłócenia łączności radiowej. Nie ma jednak żadnej gwarancji, że zakłócenia nie
wystąpią w konkretnej instalacji. Jeśli urządzenie powoduje szkodliwe zakłócenia
odbioru sygnału radiowego lub telewizyjnego, co można stwierdzić przez wyłączenie
i włączenie urządzenia, użytkownik powinien spróbować skorygować ten problem w
następujący sposób:
• Zmienić orientację lub przestawić antenę odbiorczą.
• Zwiększyć odległość między urządzeniem a odbiornikiem.
• Podłączyć urządzenie do gniazdka w innym obwodzie elektrycznym niż ten, do
którego podłączony jest odbiornik.
• Skonsultować się ze sprzedawcą lub doświadczonym technikiem RTV w celu
uzyskania pomocy.
BEZPIECZEŃSTWO DZIECI: Pilota nie mogą używać dzieci ani osoby niepełnosprawne
bez nadzoru. Dzieci powinny być pod nadzorem, aby nie mogły bawić się pilotem.
ograniczona 3 lat gWarancja orbit
®
irrigation
Firma Orbit
®
Irrigation Products, Inc. udziela swoim klientom gwarancji, że jej
urządzenia będą pozbawione wad materiałowych i wykonania przez 3 lat od daty
zakupu. W okresie sześciu lat od daty zakupu (wymagany jest paragon/faktura)
firma zobowiązuje się do bezpłatnej wymiany wadliwej części lub 3, która uległa
uszkodzeniu w warunkach normalnego użytkowania i konserwacji. Zastrzegamy
sobie prawo do sprawdzenia wadliwej części przed wymianą. Orbit
®
Irrigation
Products, Inc. nie ponosi odpowiedzialności za przypadkowe lub następcze koszty
lub uszkodzenia w wyniku awarii urządzenia. Zobowiązania gwarancyjny Orbit
®
ograniczają się wyłącznie do wymiany lub naprawy wadliwych części. Aby skorzystać
z gwarancji, należy zwrócić urządzenie do sprzedawcy wraz z dowodem zakupu
(paragonem/fakturą).
Orbit
®
Irrigation Products, Inc.
North Salt Lake, UT 84054 USA
www.orbitonline.com | 1-800-488-6156
© 2011 Orbit
®
Irrigation Products, Inc. Wszelkie prawa zastrzeżone. Wszystkie nazwy
handlowe są zastrzeżonymi nazwami handlowymi odpowiednich wymienionych
producentów.
  • Page 1 1
  • Page 2 2
  • Page 3 3
  • Page 4 4
  • Page 5 5
  • Page 6 6
  • Page 7 7
  • Page 8 8
  • Page 9 9
  • Page 10 10
  • Page 11 11

Orbit 57567 Instrukcja obsługi

Typ
Instrukcja obsługi
Ten podręcznik jest również odpowiedni dla