
DEUTSCH Urheberrechtlich geschützt.
Nachdruck, auch auszugsweise, nur mit unserer Genehmigung.
Änderungen, die dem technischen Fortschritt dienen, vorbehalten.
ENGLISH Copyright.
No part of this manual may be reproduced without our prior approval.
Subject to alterations in the interests of technical progress.
FRANÇAIS Copyright
Toute reproduction même partielle est interdite sans notre autorisation.
Tous changements de constructions permis par l'évolution des techniques réservés.
NEDERLANDS Door de auteurswet beschermd.
Niets uit deze uitgave mag worden verveelvoudigd en/of openbaar gemaakt door middel van druk,
fotocopie, microfilm of op welke andere wijze dan ook zonder voorafgaande toestemming van
de uitgever. Technische wijzigingen voorbehouden.
ITALIANO Diritti d'autore riservati.
Riproduzione, anche parziale, solo previa nostra autorizzazione.
La Ditta si riserva la facoltà di apportare modifiche al prodotto in base al progresso tecnologico.
ESPAÑOL Copyright.
Prohibida la reproducción íntegra o parcial sin nuestra autorización.
Reservado el derecho a modificaciones en el interés del perfeccionamiento técnico.
MAGYAR SzerzŒi jogvédelem alatt.
Utánnyomás, kivonatosan is, csak engedélyünkkel.
A mıszaki fejlŒdést szolgáló módosítások jogát fenntartjuk magunknak.
POLSKI Prawa autorskie zastrze˝one.
Kopiowanie, równie˝ fragmentów, tylko za naszà zgodà.
Zastrzega si´ wprowadzanie zmian s∏u˝àcych post´powi technicznemu.
Stand: 08.2005
#72796
1 - DGB/F/NL/I/E/H/PL 360238 - M - 0.5 - 0904
Digital 390
Funk - Multiplexer
Radio multiplexer
Multiplexeur radiocommandé
Radiografische multiplexer
Multiplexer radioricetrasmittente
Multiplexor remoto
Rádió multiplexer
Multiplexer radiowy
D
Einbau und Bedienungsanleitung
Installation and operating instructions
Notice de montage et d’utilisation
Montage- en bedieningshandleiding
Istruzioni d’installazione e d’uso
Instrucciones de montaje y de empleo
Beépítési és kezelési útmutató
Instrukcja monta˝u i obs∏ugi
GB
FNLIEHPL

2 Einbau und Bedienungsanleitung, Digital 390 D (#72796)
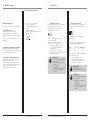
Vorsicht!
Gefahr von Personenschäden!
Hier folgen wichtige Sicherheitshinweise,
die zur Vermeidung von Personenschäden
unbedingt beachtet werden müssen!
Achtung!
Gefahr von Sachschäden!
Hier folgen wichtige Sicherheitshinweise,
die zur Vermeidung von Sachschäden
unbedingt beachtet werden müssen!
Hinweis / Tipp
Kontrolle
Verweis
i
Hinweise 1. Symbolerklärung . . . . . . . . . . . . . . . . . . . . .2
2. Inhaltsverzeichnis . . . . . . . . . . . . . . . . . . . . .2
3. Allgemeine Sicherheitshinweise . . . . . . . . .3
4. Funktion / Hinweise . . . . . . . . . . . . . . . . . . .4
4.1 Funktionsbeschreibung . . . . . . . . . . . . .4
4.2 Allgemeine Hinweise . . . . . . . . . . . . . . .4
5. Montage . . . . . . . . . . . . . . . . . . . . . . . . . . . .5
5.1 Montieren und Anschließen . . . . . . . .5
6. Inbetriebnahme . . . . . . . . . . . . . . . . . . . . . .6
6.1 Allgemeine Angaben . . . . . . . . . . . . . . .6
6.1.1 Erstinbetriebnahme . . . . . . . . . . . . . . . .6
6.1.2 Lern-Lösch-Modus . . . . . . . . . . . . . . . . .7
6.1.3 Zusatzfunktionsmodus . . . . . . . . . . . . . .8
7. Anhang . . . . . . . . . . . . . . . . . . . . . . . . . . . .11
7.1 Technische Daten Digital 390 . . . . . . . .11
2. Inhaltsverzeichnis1. Symbolerklärung
83

82
Einbau und Bedienungsanleitung, Digital 390 D (#72796) 3
3. Allgemeine Sicherheitshinweise
Bitte unbedingt lesen!
Zielgruppe
Dieses Gerät darf nur von qualifiziertem und geschultem Fachpersonal montiert, angeschlossen und in Betrieb
genommen werden!
Qualifiziertes und geschultes Fachpersonal im Sinne dieser Beschreibung sind Personen
• mit Kenntnis der allgemeinen und speziellen Sicherheits- und Unfallverhütungsvorschriften,
• mit Kenntnis der einschlägigen elektrotechnischen Vorschriften,
• mit Ausbildung in Gebrauch und Pflege angemessener Sicherheitsausrüstung,
• mit ausreichender Unterweisung und Beaufsichtigung durch Elektrofachkräfte,
• mit der Fähigkeit, Gefahren zu erkennen, die durch Elektrizität verursacht werden können,
• mit Kenntnis in der Anwendung der EN 12635 (Anforderungen an Installation und Nutzung).
Gewährleistung
Für eine Gewährleistung in Bezug auf Funktion und Sicherheit müssen die Hinweise in dieser Anleitung beachtet
werden. Bei Missachtung der Warnhinweise können Körperverletzungen und Sachschäden auftreten. Für Schäden,
die durch Nichtbeachtung der Hinweise eintreten, haftet der Hersteller nicht.
Von der Gewährleistung ausgeschlossen sind Batterien, Sicherungen und Glühlampen.
Um Einbaufehler und Schäden zu vermeiden, ist unbedingt nach den Montageanweisungen der Einbauanleitung
vorzugehen. Das Produkt darf erst nach Kenntnisnahme der zugehörigen Einbau- und Bedienungsanleitung betrieben
werden.
Die Einbau- und Bedienungsanleitung ist dem Betreiber des Gerätes zu übergeben und aufzubewahren.
Sie beinhaltet wichtige Hinweise für Bedienung und Prüfung.
Das Produkt wird gemäß den in der Hersteller- und Konformitätserklärung aufgeführten Richtlinien und Normen
gefertigt. Das Produkt hat das Werk in sicherheitstechnisch einwandfreiem Zustand verlassen.
Bestimmungsgemäße Verwendung
Das Gerät ist ausschließlich für das Öffnen und Schließen von Garagentoren bestimmt.
Neben den Hinweisen in dieser Anleitung sind die allgemein gültigen Sicherheits- und Unfallvorschriften zu
beachten! Es gelten unsere Verkaufs- und Lieferbedingungen.
Hinweise zum Einbau des Gerätes
• Beachten Sie die örtlichen Schutzbestimmungen.
• Verlegen Sie die Netz- und Steuerleitungen unbedingt getrennt.
• Montieren Sie alle Impulsgeber und Steuerungseinrichtungen (z. B. Funkcodetaster) in Sichtweite des Tores und in
sicherer Entfernung zu beweglichen Teilen des Tores. Eine Mindestmontagehöhe von 1,5 Metern muss eingehalten
werden.
Hinweise zur Reinigung des Gerätes
Auf keinen Fall dürfen zur Reinigung eingesetzt werden: direkter Wasserstrahl, Hochdruckreiniger, Säuren oder Laugen.
• Bei Bedarf reinigen Sie das Gerät mit einem trockenen Tuch.

4 Einbau und Bedienungsanleitung, Digital 390 D (#72796)
4. Funktion / Hinweise
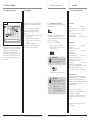
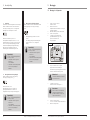
4.1 Funktionsbeschreibung
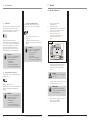
TR 1
REL 1
ST1
NL
1
L1
ST2
LL
EE
LED - E
LED-L
Display
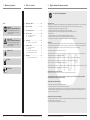
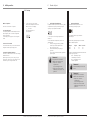
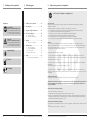
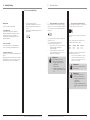
Der Digital 390 ist eine 868 MHz Empfangs- und
Sendeeinheit. Er empfängt bis zu 699 individuelle
48-Bit-Telegramme und sendet ein eingelerntes
Mastertelegramm aus, mit dem z.B. der
Funkempfänger einer Tiefgaragentor-Steuerung
angesteuert werden kann.
Gleichzeitig kann ein Relais geschaltet werden, dessen
Schließerkontakt als zusätzlicher Ausgang zur
Verfügung steht.
4.1 / 1
Der Digital 390 arbeitet im 868 MHz-Bereich, der auch
von anderen Funkdiensten genutzt wird.
Daher kann es durch Geräte, die auf der gleichen bzw.
einer benachbarten Frequenz arbeiten, zu
Beeinträchtigungen des Betriebes und der Reichweite
kommen.
Die Empfangsleistung kann von mehreren Faktoren
gestört werden:
• Montageort
• nicht entstörte Geräte und Anlagen
• andere Sender im Frequenzbereich
• Wetterlage u. a.
Wenden Sie sich bei nicht behebbaren Störungen an
den Fachbetrieb oder den Hersteller.
4.2 Allgemeine Hinweise
Instrukcja monta˝u i obs ugi, Digital 390 PL (#72796) 81
6. Uruchomienie 7. Za∏àcznik
6 Wprowadzanie/zmiana kodu liczbowego
Po przejÊciu do menu kodu liczbowego na
wyÊwietlaczu pojawi si´ »C_ _«.
Funkcj´ dodatkowà mo˝na wykorzystaç, gdy tryby
programowania (tryb programowania-kasowania i
funkcji dodatkowych) majà byç zwalniane za pomocà
kodu liczbowego.
W ten sposób wprowadza si´ nowy kod liczbowy:
1. Wybraç za pomocà przycisków ↑ po˝àdany
kod liczbowy. Aby wy∏àczyç ochron´ kodu
liczbowego, wybraç »000«.
2. Potwierdziç nowy kod wciÊni´ciem przycisku L.
Wskazówka!
Mo˝na przerwaç programowanie bez
zapisywania:
• PrzejÊcie do nast´pnej funkcji dodat
kowej:
Wcisnàç przycisk E
• PrzejÊcie do trybu pracy:
Wcisnàç jednoczeÊnie przyciski L i E
Wskazówka!
Gdy wybrany zostanie kod o d∏ugoÊci
poni˝ej 3 miejsc, na wyÊwietlaczu poja-
wi si´ komunikat o b∏´dzie »err«.
Dane techniczne
Cz´stotliwoÊç: 868 MHz
Zasilanie napi´ciem: 230 V AC ± 10 %
Pobór pràdu: ok. 3 VA
WyjÊcie:
bezpotencja∏owy styk zwierny
Rodzaj zabezpieczenia: IP66
Zakres temperatury: -20°C do +60°C
Tabela obcià˝eƒ
Typ obcià˝enia maks. obcià˝enie
obcià˝enie omowe:
˚arówki, 230 V
Lampy halogenowe itd. 16 A / 3 680 VA
obcià˝enie indukcyjne:
Lampy halogenowe z nawini´tymi
transformatorami 2,6 A / 600 VA
(Transformator obcià˝ony co
najmniej w 85%)
Niekompensowane lub
kompensowane seryjnie
Êwietlówki z
obcià˝niki ferromagnetyczne 10 A / 2 300 VA
Kompensowane równolegle
Êwietlówki z
obcià˝niki ferromagnetyczne 2,6 A / 600 VA
PojemnoÊç startera: elektroniczne
startery, elektroniczne
transformatory itd. 4 A / 920VA
U˝ytkowanie zgodne z przeznaczeniem
Multiplexer radiowy Digital 390 zosta∏ opracowany i
skonstruowany wy∏àcznie do odbioru i generowania
48-bitowych telegramów radiowych.
Producent nie odpowiada za szkody, które powstajà w
wyniku nieprawid∏owego lub niezgodnego
z przeznaczeniem u˝ytkowania.
Produkt spe∏nia najistotniejsze wymogi dyrektywy
R&TTE 1995/5/EG.
Do u˝ytku w: EU/CH/FL/IS/N
Deklaracja zgodnoÊci jest do wglàdu u producenta
wymienionego w dokumentacji dostawy.
Nie usuwaç zu˝ytych urzàdzeƒ do odpadów
domowych!
7 Dane techniczne Digital 390

80 Instrukcja monta˝u i obs ugi, Digital 390 PL (#72796)
3 Test dzia∏ania
(Wysy∏anie telegramu master do sterowania)
Po przejÊciu do menu testu dzia∏ania na wyÊwietlaczu
znajduje si´ »F« i ustawiony czas impulsu przekaênika
w sekundach.
W celu wys∏ania wcisnàç przycisk L.
Multiplexer radiowy wysy∏a telegram master
przez ok. 1 sekund´ i przekaênik jest w∏àczany na
okres preinstalowanej d∏ugoÊci impulsu. Na okres
d∏ugoÊci impulsu miga wyÊwietlacz.
Funkcj´ tà mo˝na wykorzystaç, aby wczytaç np.
telegram master do sterowania bramy.
6. Uruchomienie
Wskazówka!
Mo˝na przerwaç programowanie bez
zapisywania:
• PrzejÊcie do nast´pnej funkcji dodat
kowej:
Wcisnàç przycisk E
• PrzejÊcie do trybu pracy:
Wcisnàç jednoczeÊnie przyciski L i E
4 Historia (Odczytywanie pami´ci)
Po przejÊciu do menu historii na wyÊwietlaczu pojawi
si´ »H_ _«.
Wcisnàç prawy przycisk ↑.
Ka˝dym wciÊni´ciem przycisku numery miejsc w
pami´ci ostatnich 10 telegramów b´dà wskazywane
do ty∏u.
Wskazówka!
Mo˝na przerwaç programowanie bez
zapisywania:
• PrzejÊcie do nast´pnej funkcji dodat
kowej:
Wcisnàç przycisk E
• PrzejÊcie do trybu pracy:
Wcisnàç jednoczeÊnie przyciski L i E
Wskazówka!
Mo˝na przerwaç programowanie bez
zapisywania:
• PrzejÊcie do nast´pnej funkcji dodat
kowej:
Wcisnàç przycisk E
• PrzejÊcie do trybu pracy:
Wcisnàç jednoczeÊnie przyciski L i E
5 Kasowanie ca∏ej pami´ci
Po przejÊciu do menu »Kasowanie ca∏ej pami´ci« na
wyÊwietlaczu pojawi si´ »E A«.
• Wcisnàç jednoczeÊnie lewy i prawy przycisk ↑.
Ca∏a zawartoÊç pami´ci jest kasowana.
Podczas usuwania (ok. 8 s) wyÊwietlacz miga.
Einbau und Bedienungsanleitung, Digital 390 D (#72796) 5
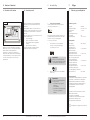
5. Montage
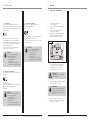
SMB-Buchs e
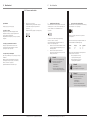
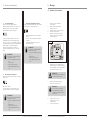
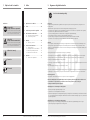
5.1 Montieren und Anschließen
5.1 / 1
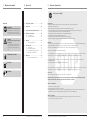
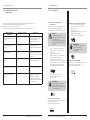
1. Schrauben Sie den Gehäusedeckel ab und
entnehmen Sie die Platine.
2. Montieren Sie das Gehäuse des
Funk-Multiplexers am gewünschten Montageort.
3. Entfernen Sie die Schutzfolie von der Platine.
4. Schrauben Sie die Schutzabdeckung ab.
5. Schließen Sie das Antennenkabel an der
SMB-Antennenbuchse (Abb. 5.1/1) an und
positionieren Sie die Antenne an einer
geeigneten Stelle.
7. Schließen Sie das Netzkabel an die
Anschlussklemme ST1 der Platine (Abb. 4.1.1) an.
Achtung!
Beachten Sie die Belastungstabelle
unter Technische Daten.
Hinweis:
Alle Kabel sind durch die M 16/20-
Öffnungen über die mitgelieferten
Verschraubungen in das Gerät
einzuführen.
8. Setzen Sie die Platine ein und schrauben Sie sie
mit den beiliegenden Schrauben und
Unterlegscheiben fest.
9. Schrauben Sie die Schutzabdeckung auf.
6. Nur bei Relaissteuerung: Schließen Sie das zu
schaltende Gerät (z.B. Tiefgaragentor-Antrieb)
an die Anschlussklemme ST2 der Platine
(Abb. 4.1/1) an.

6 Einbau und Bedienungsanleitung, Digital 390 D (#72796)
6. Inbetriebnahme
Funktionsmodi:
Es stehen insgesamt drei Modi zur Verfügung.
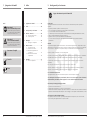
6.1.1 Betriebsmodus
Im Betriebsmodus empfängt der Funk-Multiplexer
Funktelegramme, sendet ein Mastertelegramm und
gibt einen Relaisimpuls aus.
Auf dem Display wird der Speicherplatz des
Telegramms angezeigt.
6.1.2 Lern-Lösch-Modus
Im Lern-Lösch-Modus können Sie Sendertelegramme
einlernen und einzelne Speicherplätze löschen.
6.1.3 Zusatzfunktionsmodus
Der Zusatzfunktionsmodus bietet folgende
Zusatzfunktionen:
Impulslänge Relaiskontakt, Sperren einzelner
Speicherplätze, Funktionstest, History, Löschen des
gesamten Speichers, Zahlencode eingeben/ändern.
1. Schalten Sie die Versorgungsspannung zu.
Der Funk-Multiplexer führt zunächst einen
LED-Check durch. Anschließend erscheint auf
dem Display »_ _ _«.
Der Funk-Multiplexer befindet sich im
Betriebsmodus!
6.1.1 Erstinbetriebnahme
Instrukcja monta˝u i obs ugi, Digital 390 PL (#72796) 79
6. Uruchomienie
Po przejÊciu do menu blokowania na wyÊwietlaczu
wskazane zostanie miejsce w pami´ci »001«.
Wybraç za pomocà przycisków ↑ miejsce w pami´ci do
zablokowanie.
Aktualny stan miejsc w pami´ci zostanie wskazany przez
obie diody LED L i LED E:
Status: zaj´te wolne zablokowane
LED-L: wy∏. za∏. za∏.
LED-E: za∏. wy∏. za∏.
Aby zmieniç status wybranego miejsca w pami´ci,
nale˝y wcisnàç przycisk L:
• Przypadek a) Miejsce w pami´ci jest zaj´te
-> Miejsce w pami´ci jest blokowane
• Przypadek b) Miejsce w pami´ci jest zablokowane
-> Blokada jest wy∏àczana
1 D∏ugoÊç impulsu styku przekaênika
Po przejÊciu do menu impulsowania na wyÊwietlaczu
znajduje si´ »I« (po lewej) oraz d∏ugoÊç impulsu w s
(po prawej). Fabrycznie ustawiona jest wartoÊç
standardowa 1 s.
Mo˝na ustawiç innà dowolnà d∏ugoÊç impulsu w
zakresie mi´dzy 1 i 99 s.
Gdy wygenerowany ma byç impuls przekaênika,
wybraç d∏ugoÊç impulsu »0«.
1. Wybraç za pomocà Êrodkowego i/lub prawego
przycisku ↑ po˝àdanà d∏ugoÊç impulsu (w s).
WyÊwietlacz miga.
2. Dla zapisania wcisnàç przycisk L.
Gdy zapisana jest nowa wartoÊç, wyÊwietlacz
przestaje migaç.
Wskazówka!
Mo˝na przerwaç programowanie bez
zapisywania:
• PrzejÊcie do nast´pnej funkcji dodat
kowej:
Wcisnàç przycisk E
• PrzejÊcie do trybu pracy:
Wcisnàç jednoczeÊnie przyciski L i E
Wskazówka!
Blokada wolnych miejsc w pami´ci nie
jest mo˝liwa.
Wskazówka!
Mo˝na przerwaç programowanie bez
zapisywania:
• PrzejÊcie do nast´pnej funkcji dodat
kowej:
Wcisnàç przycisk E
• PrzejÊcie do trybu pracy:
Wcisnàç jednoczeÊnie przyciski L i E
2 Blokowanie poszczególnych miejsc
w pami´c

78 Instrukcja monta˝u i obs ugi, Digital 390 PL (#72796)
Aby przejÊç do trybu funkcji dodatkowych, wcisnàç jednoczeÊnie przyciski L i E.
WciÊni´ciem przycisku E przechodzi si´ z jednej funkcji dodatkowej do nast´pnej.
Zmiany sà zapisywane za pomocà przycisku L.
Aby opuÊciç tryb funkcji dodatkowych, wcisnàç jednoczeÊnie przyciski L i E.
.
6. Uruchomienie
Tryb funkcji dodatkowych Wskazanie na wyÊwietlaczu Zastosowanie
1 D∏ugoÊç impulsu styku przekaênika np. I..I Zmiana d∏ugoÊci impulsu przekaênika
(wartoÊç standardowa: 1 s) lub
dezaktywacja wyjÊcia przekaênika.
2 Blokowanie poszczególnych miejsc
w pami´c
np. 001 Blokowanie czasowo ograniczonego
uprawnienia dost´pu dla okreÊlonych
u˝ytkowników.
3 Test dzia∏ania F... Programowanie telegramu master do
sterowania (np. sterowanie bramy).
4 Historia H Wskazanie ostatnich 10 telegramów
5 Kasowanie ca∏ej pami´ci E A Programowanie repeatora
6 Wprowadzanie/zmiana kodu C Dopuszczenie trybów programowania
(tryb programowania-kasowania i
tryb funkcji dodatkowych) za pomocà
kodu liczbowego.
6.1.3 Tryb funkcji dodatkowych
Einbau und Bedienungsanleitung, Digital 390 D (#72796) 7
6. Inbetriebnahme
Beenden des Lern-Lösch-Modus
Drücken Sie innerhalb von 30 sec. die Taste L und E
gleichzeitig.
Auf dem Display erscheint »_ _ _«.
Sie befinden sich im Betriebsmodus.
6.1.2 Lern-Lösch-Modus
Achtung!
Das Mastertelegramm des
Funkrepeaters lässt sich nur im
Zusatzfunktionsmodus
(siehe Funktionstest), an die
Torsteuerung übertragen und besitzt
ein eigenständiges Telegramm.
B) Löschen einzelner Speicherplätze
1. Um in den Lernmodus zu wechseln, wählen Sie
mit den ↑-Tasten den zu löschenden
Speicherplatz an.
2. Drücken Sie die Taste E.
Die LED-E blinkt für ca. 5 Sekunden. Wenn ein
Sendertelegramm gelöscht ist, erscheint auf
dem Display »rdy«.
Insgesamt können 1 Mastertelegramm (Speicherplatz
000) und 699 individuelle Sendertelegramme
(Speicherplätze 001 bis 699) gespeichert werden:
1. Um in den Lernmodus zu wechseln, wählen Sie
mit den ↑-Tasten den gewünschten
Speicherplatz an.
2. Drücken Sie die Taste L für 1 s.
Die LED-L blinkt 30 s. Während dieser Zeit kann
ein Sender eingelernt werden.
3. Drücken Sie die Taste des einzulernenden
Senders. Wenn der Funk-Multiplexer das
Sendertelegramm gelernt hat, erscheint
auf dem Display »rdy«. Anschließend wird der
nächste freie Speicherplatz angezeigt.
4. Wiederholen Sie die Punkte 1-3 für jedes
weitere Sendertelegramm das eingelernt werden
soll.
Hinweis:
Wenn der Speicherplatz bereits belegt
ist, oder innerhalb von 30 sec. keine
Sendetaste betätigt wurde, erscheint die
Fehlermeldung »err«.
Hinweis:
Sie können keine freien oder gesperrten
Speicherplätze löschen.
In diesen Fällen erscheint die
Fehlermeldung »err«.
Beenden des Lern-Lösch-Modus
Drücken Sie innerhalb von 30 sec. die Taste L und E
gleichzeitig.
Auf dem Display erscheint anschließend »_ _ _«.
Sie befinden sich im Betriebsmodus.
A) Einlernen von Sendertelegrammen und
Mastertelegramm

Um in den Zusatzfunktionsmodus zu gelangen, drücken Sie die Tasten L und E gleichzeitig.
Sie können von einer Zusatzfunktion zur nächsten durch Drücken der Taste E wechseln.
Änderungen werden mit der Taste L gespeichert.
Um den Zusatzfunktionsmodus zu verlassen, drücken Sie die Tasten L und E gleichzeitig.
8 Einbau und Bedienungsanleitung, Digital 390 D (#72796)
6. Inbetriebnahme
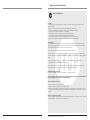
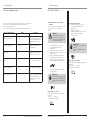
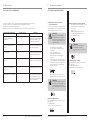
Zusatzfunktionsmodus Dispalyanzeige Anwendung
1 Impulslänge Relaiskontakt z.B. I..I Änderung der Impulslänge des Relais
impulses (Standardwert: 1 s) oder
Deaktivierung des Relaisausganges.
2 Sperren einzelner Speicherplätze z.B. 001 Sperren der zeitlich begrenzten
Zutrittsberechtigung für bestimmte
Besucher.
3 Funktionstest F... Einlernen des Mastertelegramms in
die Steuerung (z.B. Torsteuerung).
4 History H Anzeige der letzten 10 Telegramme
5 Löschen des gesamten Speichers E A Neuprogrammierung des Repeaters
6 Zahlencode eingeben/ändern C Freigabe der Programmiermodi
(Lern-Lösch-Modus und
Zusatzfunktionmodus) mittels
Zahlencodes.
6.1.3 Zusatzfunktionsmodus
Instrukcja monta˝u i obs ugi, Digital 390 PL (#72796) 77
6. Uruchomienie
Zakoƒczenie trybu programowania-kasowania
Wcisnàç w ciàgu 30 sekund jednoczeÊnie przyciski
L i E.
Na wyÊwietlaczu pojawia si´ »_ _ _«.
Nastàpi przejÊcie do trybu pracy.
6.1.2 Tryb programowania-kasowania
Uwaga!
Telegram master repeatera radiowego
mo˝na przenosiç wy∏àcznie w trybie
funkcji dodatkowej (patrz test
dzia∏ania), do sterowania bramy i
posiada w∏asny telegram.
B) Kasowanie poszczególnych miejsc w pami´ci
1. Aby przejÊç do trybu programowania, wybraç
za pomocà przycisków ↑ miejsce w pami´ci do
skasowania.
2. Wcisnàç krótko przycisk E.
Dioda LED E miga przez ok. 5 sekund. Gdy
telegram wysy∏kowy zostanie usuni´ty,
na wyÊwietlaczu pojawi si´ »rdy«.
¸àcznie mo˝na zapisaç 1 telegram master (miejsce w
pami´ci 000) i 699 indywidualnych telegramów
wysy∏kowych (miejsca w pami´ci 001 do 699):
1. Aby przejÊç do trybu programowania, wybraç
za pomocà przycisków ↑ po˝àdane
miejsce w pami´ci.
2. Wcisnàç przycisk L na 1 sekund´.
Przez 30 sekund miga dioda LED.
W tym czasie mo˝na zaprogramowaç nadajnik.
3. Wcisnàç przycisk programowanego nadajnika.
Gdy multiplexer radiowy wyuczy si´
telegramu wysy∏kowego, na wyÊwietlaczu
pojawi si´ »rdy«. Nast´pnie wskazywane
jest najbli˝sze wolne miejsce w pami´ci.
4. Powtórzyç punkty 1-3 dla kolejnego telegramu
wysy∏ki, który ma byç wyuczony.
.
Wskazówka:
JeÊli miejsce w pami´ci jest ju˝ zaj´te
lub w ciàgu 30 sekund nie wciÊni´to
przycisku wysy∏ania, pojawi si´ komuni-
kat o b∏´dzie »err«.
Wskazówka:
Mo˝na skasowaç wolne lub zablokowa-
ne miejsca w pami´ci.
W takich wypadkach pojawi si´ komu-
nikat o b∏´dzie »err«.
Zakoƒczenie trybu programowania-kasowania
Wcisnàç w ciàgu 30 sekund jednoczeÊnie przyciski
L i E.
Na wyÊwietlaczu pojawia si´ nast´pnie »_ _ _«.
Nastàpi przejÊcie do trybu pracy.
A) Programowanie telegramów wysy∏kowych i
telegramu master

76 Instrukcja monta˝u i obs ugi, Digital 390 PL (#72796)
6. Uruchomieni
Tryb dzia∏ania:
Do dyspozycji sà ∏àcznie trzy tryby.
6.1.1 Trybie roboczy
W trybie roboczym odbiera telegramy radiowe
multiplexera radiowego, wysy∏a telegram master i
generuje impuls przekaênikowy.
Na wyÊwietlaczu wskazywane jest miejsce w pami´ci
telegramu.
6.1.2 Tryb programowania-kasowania
W trybie programowania-kasowania mo˝na
programowaç telegramy wysy∏kowe i kasowaç
poszczególne miejsca w pami´ci.
6.1.3 Tryb funkcji dodatkowych
Tryb funkcji dodatkowych oferuje nast´pujàce funkcje
dodatkowe:
D∏ugoÊç impulsu styku przekaênika, blokowanie
poszczególnych miejsc w pami´ci, test dzia∏ania,
historia, kasowanie ca∏ej pami´ci,
wprowadzanie/zmiana kodów liczbowych.
1. W∏àczyç napi´cie zasilajàce.
Multiplexer radiowy przeprowadza nast´pnie
test diod LED. Nast´pnie na wyÊwietlaczu
pojawia si´ »_ _ _«.
Multiplexer radiowy znajduje si´ w trybie pracy!
6.1.1 Pierwsze uruchomienie
6. Inbetriebnahme
Einbau und Bedienungsanleitung, Digital 390 D (#72796) 9
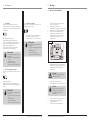
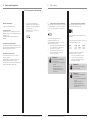
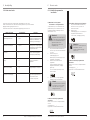
2 Sperren einzelner Speicherplätze
Nach dem Wechsel in das Sperr-Menü wird im Display
der Speicherplatz »001« angezeigt.
Wählen Sie mit den ↑-Tasten den zu sperrenden
Speicherplatz an.
Der aktuelle Status der Speicherplätze wird über die
beiden LEDs LED-L und LED-E angezeigt:
Status: belegt frei gesperrt
LED-L: aus an an
LED-E: an aus an
Um den Status des angewählten Speicherplatzes zu
ändern, drücken Sie die Taste L:
• Fall a) Speicherplatz ist belegt
-> Speicherplatz wird gesperrt
• Fall b) Speicherplatz ist gesperrt
-> Sperrung wird aufgehoben
1 Impulslänge Relaiskontakt
Nach dem Wechsel in das Impuls-Menü erscheint auf
dem Display ein »I« (links) sowie die Impulslänge in s
(rechts). Ab Werk ist ein Standardwert von 1 s
eingestellt.
Sie können eine andere beliebige Impulslänge
zwischen 1 und 99 s einstellen.
Wenn kein Relaisimpuls ausgegeben werden soll,
wählen Sie die Impulslänge »0«.
1. Wählen Sie mit der mittleren und/oder rechten
↑-Taste die gewünschte Impulslänge (in s) an.
Das Display blinkt.
2. Drücken Sie zum Speichern die Taste L.
Wenn der neue Wert gespeichert ist, hört das
Display auf zu blinken.
Hinweis!
So können Sie die Programmierung
abbrechen, ohne zu speichern:
• Wechsel zur nächsten
Zusatzfunktion:
Taste E drücken
• Wechsel in den Betriebsmodus:
Tasten L und E gleichzeitig drücken
Hinweis!
Die Sperrung von freien
Speicherplätzen ist nicht möglich.
Hinweis!
So können Sie die Programmierung
abbrechen, ohne zu speichern:
• Wechsel zur nächsten
Zusatzfunktion:
Taste E drücken
• Wechsel in den Betriebsmodus:
Tasten L und E gleichzeitig drücken

10 Einbau und Bedienungsanleitung, Digital 390 D (#72796)
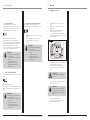
3 Funktionstest
(Aussenden des Mastertelegramms an die Steuerung)
Nach dem Wechsel in das Funktionstest-Menü
erscheint auf dem Display ein »F« und eingestellte
Impulszeit des Relaisimpulses in Sekunden.
Drücken Sie zum Aussenden die Taste L.
Der Funk-Multiplex sendet ein Mastertelegramm
ca. 1sec. aus, und das Relais wird für die Dauer der
voreingestellten Impulslänge geschaltet. Für den
Zeitraum der Impulslänge blinkt das Display.
Diese Funktion können Sie nutzen, um z.B. das
Mastertelegramm in die Torsteuerung einzulernen.
6. Inbetriebnahme
Hinweis!
So können Sie die Programmierung
abbrechen, ohne zu speichern:
• Wechsel zur nächsten
Zusatzfunktion:
Taste E drücken
• Wechsel in den Betriebsmodus:
Tasten L und E gleichzeitig drücken
4 History (Auslesen des Speichers)
Nach dem Wechsel in das History-Menü erscheint auf
dem Display ein »H_ _«.
Drücken Sie die rechte ↑-Taste.
Mit jedem Drücken werden die Speicherplatznummern
der letzten 10 Telegramme rückwärtszählend
angezeigt.
Hinweis!
So können Sie die Programmierung
abbrechen, ohne zu speichern:
• Wechsel zur nächsten
Zusatzfunktion:
Taste E drücken
• Wechsel in den Betriebsmodus:
Tasten L und E gleichzeitig drücken
Hinweis!
So können Sie die Programmierung
abbrechen, ohne zu speichern:
• Wechsel zur nächsten
Zusatzfunktion:
Taste E drücken
• Wechsel in den Betriebsmodus:
Tasten L und E gleichzeitig drücken
5 Löschen des gesamten Speichers
Nach dem Wechsel in das Menü »Löschen des
gesamten Speichers« erscheint auf dem Display
»E A«.
• Drücken Sie die linke und rechte ↑-Taste
gleichzeitig.
Der gesamte Speicherinhalt wird gelöscht.
Während des Löschvorganges (ca. 8 s) blinkt das
Display.
Instrukcja monta˝u i obs ugi, Digital 390 PL (#72796) 75
5. Monta˝
SMB-Buchs e
5.1 Monta˝ i pod∏àczenie
5.1 / 1
1. Odkr´ciç pokryw´ obudowy i
wyjàç uk∏ad scalony.
2. Zamontowaç obudow´
multiplexera radiowego w po˝àdanym miejscu.
3. Usunàç foli´ ochronnà z uk∏adu scalonego.
4. Odkr´ciç pokryw´ ochronnà.
5. Pod∏àczyç kabel antenowy do
gniazda antenowego SMB (rys. 5.1/1) i
ustawiç anten´ w odpowiednie
miejsce.
7. Pod∏àczyç kabel sieciowy do zacisku przy∏àczenio-
wego ST1 uk∏adu scalonego (rys. 4.1.1).
Uwaga!
Przestrzegaç tabeli obcià˝eƒ w danych
technicznych.
Wskazówka:
Wszystkie kable nale˝y wprowadziç
przez otwory M16/20 przez do∏àczone
z∏àczki do urzàdzenia.
8. W∏o˝yç uk∏ad scalony i przykr´ciç go za pomocà
do∏àczonych Êrub i podk∏adek.
9. Przykr´ciç pokryw´ ochronnà.
6. Tylko przy sterowaniu przekaênikowym:
Pod∏àczyç prze∏àczane urzàdzenie (np. nap´d
bramy gara˝u podziemnego) do zacisku
przy∏àczeniowego ST2 uk∏adu scalonego
(rys. 4.1/1).

74 Instrukcja monta˝u i obs ugi, Digital 390 PL (#72796)
4. Dzia∏anie / wskazówki
4.1 Opis dzia∏ania
TR 1
REL 1
ST1
NL
1
L1
ST2
LL
EE
LED - E
LED-L
Display
Digital 390 jest jednostkà do odbioru i generowania
sygna∏u w zakresie 868 MHz. Odbiera ona do 699
indywidualnych telegramów 48-bitowych i wysy∏a
wyuczony telegram master, za pomocà którego mo˝na
sterowaç np. odbiornikiem radiowym sterowania
bramy gara˝owej.
JednoczeÊnie mo˝na w∏àczyç przekaênik, którego styk
zwierny jest dost´pny jako dodatkowe wyjÊcie.
4.1 / 1
Digital 390 pracuje w zakresie 868 MHz, który jest
wykorzystywany równie˝ przez inne s∏u˝by radiowe.
Dlatego mo˝e dochodziç do zak∏ócenia pracy i zakresu
dzia∏ania wskutek dzia∏ania urzàdzeƒ, które pracujà na
tej samej lub sàsiadujàcej cz´stotliwoÊci.
Moc odbioru mo˝e byç zak∏ócone przez kilka
czynników:
• Miejsce monta˝u
• nieodk∏ócone urzàdzenia i instalacje
• inne nadajniki w zakresie cz´stotliwoÊci
• warunki pogodowe itp.
W razie zak∏óceƒ zwróciç si´ do specjalistycznego
zak∏adu lub producenta.
4.2 Ogólne wskazówki
Einbau und Bedienungsanleitung, Digital 390 D (#72796) 11
6. Inbetriebnahme 7. Anhang
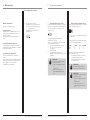
6 Zahlencode eingeben/ändern
Nach dem Wechsel in das Zahlencode-Menü erscheint
auf dem Display ein »C_ _«.
Die Zusatzfunktion können Sie nutzen, wenn Sie die
Programmiermodi (Lern-Lösch-Modus und
Zusatzfunktionsmodus) mittels Zahlencode freigeben
möchten.
So geben Sie einen neuen Zahlencode ein:
1. Wählen Sie mit den ↑-Tasten den gewünschten
Zahlencode aus. Um den Zahlencodeschutz
aufzuheben, wählen Sie »000«.
2. Bestätigen Sie den neuen Code durch Drücken
der Taste L.
Hinweis!
So können Sie die Programmierung
abbrechen, ohne zu speichern:
• Wechsel zur nächsten
Zusatzfunktion:
Taste E drücken
• Wechsel in den Betriebsmodus:
Tasten L und E gleichzeitig drücken
Hinweis!
Wenn ein Code mit weniger als drei
Stellen ausgewählt wurde, erscheint auf
dem Display die Fehlermeldung »err«.
Technische Daten
Frequenz: 868 MHz
Spannungsversorgung: 230 V AC ± 10 %
Stromaufnahme: ca. 3 VA
Ausgang:
Potenzialfreier Schließerkontakt
Schutzart: IP66
Temperaturbereich: -20°C bis +60°C
Belastungstabelle
Belastungstyp max. Belastung
Ohmsche Belastung:
Glühlampen, 230 V
Halogenlampen usw. 16 A / 3.680 VA
Induktive Belastung:
Halogenlampen mit ge-
wickelten Transformatoren 2,6 A / 600 VA
(Transformator mindestens 85% belastet)
Nicht- oder serienkompensierte
Leuchtstofflampen mit
ferromagnetischen Ballasten 10 A / 2.300 VA
Parallelkompensierte
Leuchtstofflampen mit
ferromagnetischen Ballasten 2,6 A / 600 VA
Kapazitiv EVG: elektronische
Vorschaltgeräte, elektronische
Transformatoren usw. 4 A / 920VA
Bestimmungsgemäßer Gebrauch
Der Funk-Multiplexer Digital 390 ist ausschließlich als
Empfangs- und Sendeeinheit für
48-Bit-Funktelegramme entwickelt und gefertigt
worden.
Der Hersteller haftet nicht für Schäden, die durch
unsachgemäßen oder
bestimmungsfremden Gebrauch entstehen.
Dieses Produkt erfüllt die wesentlichen Anforderungen
der R&TTE-Richtlinie 1995/5/EG.
Für den Einsatz in : EU/CH/FL/IS/N
Die Konformitätserklärung kann eingesehen werden
bei dem in den Lieferunterlagen genannten Hersteller.
Altgeräte nicht im Hausmüll entsorgen!
7 Technische Daten Digital 390

12 Installation and operating instructions, Digital 390 GB (#72796)
Caution!
Danger of personal injuries!
The following safety advice must be
observed at all times so as to avoid
personal injuries!
Attention!
Danger of material damages!
The following safety advice must be
observed at all times so as to avoid
material damages!
Advice / tip
Check
Reference
i
Advice 1. Meaning of symbols . . . . . . . . . . . . . . . . . .12
2. Table of contents . . . . . . . . . . . . . . . . . . . .12
3. General safety advice . . . . . . . . . . . . . . . . .13
4. Function / Advice . . . . . . . . . . . . . . . . . . . .14
4.1 Description of function . . . . . . . . . . . .14
4.2 General advice . . . . . . . . . . . . . . . . . . .14
5. Installation . . . . . . . . . . . . . . . . . . . . . . . . .15
5.1 Installation and connection . . . . . . . . .15
6. Initial operation . . . . . . . . . . . . . . . . . . . . .16
6.1 General information . . . . . . . . . . . . . .16
6.1.1 Start-up . . . . . . . . . . . . . . . . . . . . . . . .16
6.1.2 Learning - Deleting mode . . . . . . . . . .17
6.1.3 Additional functions mode . . . . . . . . .18
7. Appendix . . . . . . . . . . . . . . . . . . . . . . . . . . .21
7.1 Technical details Digital 390 . . . . . . . . .21
2. Table of contents1. Meaning of symbols
Instrukcja monta˝u i obs ugi, Digital 390 PL (#72796) 73
3. Ogólne wskazówki bezpieczeƒstwa
Prosz´ koniecznie przeczytaç!
Grupa docelowa
Urzàdzenie to byç pod∏àczane i uruchamiany wy∏àcznie przez wykwalifikowany i przeszkolony personel specjalistyczny!
Wykwalifikowanym i przeszkolonym personelem specjalistycznym w rozumieniu niniejszego opisu sà osoby
• posiadajàce wiedz´ w zakresie specjalnych przepisów BHP,
• posiadajàce wiedz´ w zakresie w∏aÊciwych przepisów elektrotechnicznych,
• posiadajàce wykszta∏cenie w zakresie u˝ytku i piel´gnacji odpowiedniego wyposa˝enia
bezpieczeƒstwa,
• wystarczajàco przeszkolone i pod nadzorem wykwalifikowanych elektryków,
• umiejàce rozpoznawaç zagro˝enia, które mogà byç spowodowane elektrycznoÊcià.
• posiadajàce wiedz´ w zakresie normy EN 12635 (wymogi dla instalacji i wykorzystania).
Gwarancja
Gwarancja w odniesieniu do dzia∏ania i bezpieczeƒstwa obowiàzuje wy∏àcznie przy zachowaniu wskazówek niniejszej
instrukcji. W razie nieprzestrzegania wskazówek ostrzegawczych mogà wystàpiç obra˝enia cia∏a i szkody materialne.
Za szkody, które powstajà w wyniku nieprzestrzegania tych wskazówek, producent nie odpowiada.
Gwarancji nie podlegajà baterie, bezpieczniki i ˝arówki.
Aby uniknàç b∏´dów monta˝owych i uszkodzenia bramy i nap´du bramy, nale˝y koniecznie post´powaç zgodnie ze
wskazówkami monta˝owymi instrukcji zabudowy.
Produkt mo˝e byç u˝ywany wy∏àcznie po zapoznaniu si´ odpowiednià instrukcjà monta˝u i obs∏ugi.
Instrukcj´ monta˝u i obs∏ugi nale˝y przechowywaç i przekazaç u˝ytkownikowi urzàdzenia.
Zawiera ona istotne wskazówki dotyczàce obs∏ugi i kontroli.
Wyrób zosta∏ wykonany zgodnie z dyrektywami i normami wymienionymi w deklaracji producenta i zgodnoÊci. Produkt
opuÊci∏ zak∏ad produkcyjny w nienagannym stanie technicznym.
U˝ytkowanie zgodne z przeznaczeniem
Urzàdzenie jest przeznaczone wy∏àcznie do otwierania i zamykania bram gara˝owych.
Oprócz wskazówek w niniejszej instrukcji nale˝y przestrzegaç ogólnie obowiàzujàcych przepisów BHP!
Obowiàzujà nasze warunki sprzeda˝y i dostaw.
Wskazówki do monta˝u urzàdzenia.
• Przestrzegaç miejscowych przepisów bezpieczeƒstwa.
• Uk∏adaç przewody sieciowe i sterowania koniecznie oddzielnie.
• Montowaç wszystkie czujniki impulsowania i urzàdzenia sterowania (np. przycisk kodowania radiowego) w zasi´gu
widzenia bramy, ale w bezpiecznej odleg∏oÊci do ruchomych elementów bramy. Zachowana musi byç minimalna
wysokoÊç monta˝owa 1,5 metra.
Wskazówki do czyszczenia urzàdzenia
W ˝adnym wypadku do czyszczenia nap´du nie u˝ywaç: bezpoÊredniego strumienia wody, wysokociÊnieniowego agre-
gatu czyszczàcego, kwasów lub zasad.
• W razie potrzeby czyÊciç urzàdzenie suchà Êciereczkà.

72 Instrukcja monta˝u i obs ugi, Digital 390 PL (#72796)
Ostro˝nie!
Niebezpieczeƒstwo doznania obra˝eƒ!
Poni˝ej przedstawione sà wskazówki dotyczàce
bezpieczeƒstwa, które muszà byç koniecznie
przestrzegane w celu unikni´cia doznania obra˝eƒ!
Uwaga!
Niebezpieczeƒstwo wystàpienia szkód
materialnych!
Poni˝ej przedstawione sà wskazówki dotyczàce
bezpieczeƒstwa, które muszà byç koniecznie
przestrzegane w celu unikni´cia wystàpienia
szkód!
Wskazówka / porada
Kontrola
Odsy∏acz
i
Wskazówki 1. ObjaÊnienie symboli . . . . . . . . . . . . . . . . . .72
2. Spis treÊci . . . . . . . . . . . . . . . . . . . . . . . . . . .72
3. Ogólne wskazówki bezpieczeƒstwa . . . . .73
4. Dzia∏anie / wskazówki . . . . . . . . . . . . . . . .74
4.1 Opis dzia∏ania . . . . . . . . . . . . . . . . . . .74
4.2 Ogólne wskazówki . . . . . . . . . . . . . . .74
5. Monta˝ . . . . . . . . . . . . . . . . . . . . . . . . . . . .75
5.1 Monta˝ i pod∏àczenie . . . . . . . . . . . .75
6. Uruchomienie . . . . . . . . . . . . . . . . . . . . . . .76
6.1 Dane ogólne . . . . . . . . . . . . . . . . . . . .76
6.1.1 Pierwsze uruchomienie . . . . . . . . . . . .76
6.1.2 Tryb programowania-kasowania . . . . .77
6.1.3 Tryb funkcji dodatkowych . . . . . . . . . .78
7. Za∏àcznik . . . . . . . . . . . . . . . . . . . . . . . . . . .81
7.1 Dane techniczne Digital 390 . . . . . . . .81
2. Spis treÊci1. ObjaÊnienie symboli
Installation and operating instructions, Digital 390 GB (#72796) 13
3. General safety advice
Please read carefully!
Target group
Mounting, installation and initial operation of this unit may only be carried out by qualified
and trained specialist personnel!
Qualified and trained specialist personal in terms of this description are persons
• who have knowledge of the general and special regulations regarding safety and accident preventions,
• who have knowledge of the relevant electro-technical regulations,
• with training in the use and maintenance of suitable safety equipment,
• with sufficient training and supervision by electricians,
• with the ability to recognize the hazards that are caused by electricity,
• with the knowledge to apply the EN 12635 (Requirements to installation and use).
Warranty
For an operations and safety warranty, the advice in this instruction manual has to be werden. Bei Missachtung der
observed. Disregard for these warnings may lead to personal injuries or material damages. If
this advice is disregarded, the manufacturer will not be liable for damages that might occur.
Batteries, fuses and bulbs are excluded from warranty.
To avoid installation mistakes and damages, please follow exactly the mounting instructions provided in this manual.
This unit may only be used after thoroughly reading the respective mounting and operating instructions.
The installation and operating instructions have to be handed over to the user of this unit, who should keep it
for further reference.
They contain important advice regarding operation and checks.
.
This unit is produced according to the directives and standards mentioned in the Manufacturer's Declaration and in the
Declaration of Conformity. The product has left the factory in perfect condition with regard to safety.
Correct use
This unit is meant to be used exclusively to open and close garage doors.
Beside the advice in these instructions the general regulations regarding safety and accident prevention
must be observed! Our sales and supply terms and conditions are effective.
Advice for installation
• Observe the local safety regulations.
• Always lay mains and control cables separately .
• Install all impulse and control devices (e.g. RC code keypad) within sight of the door and at a safe distance from
movable parts of the door. A minimum mounting height of 1,5 m must be maintained.
Advice for cleaning
The following must not be used for cleaning: direct water jets, high pressure cleaners, acids or bases.
• If necessary, clean the unit with a dry cloth.

14 Installation and operating instructions, Digital 390 GB (#72796)
4. Function / Advice
4.1 Description of function
TR 1
REL 1
ST1
NL
1
L1
ST2
LL
EE
LED - E
LED-L
Display
The Digital 390 is an 868 MHz receiving and
transmitting unit. It receives up to 699 individual 48-bit
telegrams and transmits one learned master telegram,
with which e.g. the radio receiver of an underground
garage door control unit may be controlled.
At the same time a relay can be switched, the closing
contact of which is available as additional exit.
4.1 / 1
The Digital 390 works in the 868 MHz range that is
also used by other radio services.
Therefore devices that operate on the same or on a
nearby frequency may interfere and disturb
the operating range.
The receiving power may be disturbed by several
factors:
• Place of installation
• Unshielded devices and systems
• Other transmitters in the frequency range
• Weather conditions and other things
In case of interferences that cannot be eliminated
please contact your specialist dealer or
the manufacturer.
4.2 General advice
Beépítési és kezelési útmutató, Digital 390 H (#72796) 71
6. Üzembe helyezés 7. Függelék
6 Számkód beadása/módosítása
A Számkód menübe kapcsolás után »C_ _« jelenik
meg a kijelzŒn.
A segédmıveletet akkor használhatja, ha engedélyezni
szeretné a programozó módot (tanuló-törlŒ módot és
segédmıveleti gombot) a számkód segítségével. Új
számkódot a következŒképpen adhat be:
1. A ↑ gombokkal válassza ki a kívánt számkódot.
A számkód-védelem megszüntetéséhez válassza
a »000«.
2. Hagyja jóvá az új kódot az L gomb
megnyomásával.
.
Útmutatás!
A programozás tárolás nélkül az alábbi-
ak szerint szakítható félbe:
• Átkapcsolás a következŒ
segédmıveletre:
az E gomb megnyomásával
• Átkapcsolás üzemelési módba:
Egyidejıleg nyomja meg az L és E
gombokat
Útmutatás!
Ha három jegyınél kisebb kódot
választott, az »err« hibaüzenet jelenik
meg a kijelzŒn.
Mıszaki adatok
Frekvencia: 868,3 MHz
Feszültségellátás: 230 V~ ± 10 %
Áramfelvétel: kb. 3 VA
Kimenet:
Potenciálmentes záró érintkezŒ
Védettségi mód: IP66
HŒmérséklettartomány: -20°C - +60°C
Terhelési táblázat
Terheléstípus
Max. terhelés
Ohmos terhelés: izzólámpa, 230 V-os
Halogén lámpák stb. 16 A / 3 680 VA
Induktív terhelés:
Halogén lámpák
tekercselt transzformátorokkal 2,6 A / 600 VA
(transzformátor minimum
85%-ig terhelve)
Nem- vagy soros
kompenzálású fénycsŒ lámpák
ferromágneses elŒtétekkel 10 A / 2 300 VA
Párhuzamos kompenzálású
fénycsŒ lámpák
ferromágneses elŒtétekkel 2,6 A / 600 VA
Kapacitív EVG: elektronikus elŒtétek,
elektronikus transzformátorok stb. 4 A / 920VA
Rendeltetésszerı használat
A Digital 390 rádió multiplexert kizárólag 48 bites
rádió-táviratok adó-vevŒ egységeként fejlesztettük ki és
gyártottuk le.
A gyártó nem felel a szakszerıtlen vagy a
rendeltetésétŒl eltérŒ használat révén keletkezŒ
károkért.
A termék teljesíti az R&TTE 1995/5/EG jelı Irányelv
lényeges követelményeit.
Felhasználás helye az alábbi országokban:
EU/CH/FL/IS/N
A szállítási okmányokban megadott gyártónál bele
lehet tekinteni a szabvány-megfelelési nyilatkozatba.
Az elhasználódott készülékeket ne dobja a
háztartási szemétbe!
7 Digital 390 mıszaki adatai

70 Beépítési és kezelési útmutató, Digital 390 H (#72796)
3 Mıködéspróba
(A vezér-távirat kiküldése a vezérlŒnek)
A Mıködéspróba menüre kapcsolás után »F« jelenik
meg a kijelzŒn és a relé-impulzus beállított
impulzusideje is látható másodpercekben .
A kiküldéshez nyomja meg az L gombot.
A rádió multiplex kb. 1 másodpercig vezér-táviratot
küld ki és a relé az elŒre beállított impulzushossz
idŒtartamára bekapcsol. Az impulzushossz idŒtartama
alatt villog a kijelzŒ.
Ezt a mıveletet lehet használni pl. a vezér-távirat
kapuvezérlŒnek történŒ betanítására.
6. Üzembe helyezés
Útmutatás!
A programozás tárolás nélkül az
alábbiak szerint szakítható félbe:
• Átkapcsolás a következŒ
segédmıveletre:
az E gomb megnyomásával
• Átkapcsolás üzemelési módba:
Egyidejıleg nyomja meg az L és E
gombokat
4 ElŒzmények (a memória kiolvasása)
Az ElŒzmények menübe kapcsolás után »H_ _« jelenik
meg a kijelzŒn.
Nyomja meg a jobb oldali ↑ gombot.
Valahányszor megnyomja a gombot, az utolsó 10 távi-
rat memóriahelyének száma eggyel csökken.
Útmutatás!
A programozás tárolás nélkül az
alábbiak szerint szakítható félbe:
• Átkapcsolás a következŒ
segédmıveletre:
az E gomb megnyomásával
• Átkapcsolás üzemelési módba:
Egyidejıleg nyomja meg az L és E
gombokat
Útmutatás!
A programozás tárolás nélkül az
alábbiak szerint szakítható félbe:
• Átkapcsolás a következŒ
segédmıveletre:
az E gomb megnyomásával
• Átkapcsolás üzemelési módba:
Egyidejıleg nyomja meg az L és E
gombokat
5 Az egész memória törlése
Az »Egész memória törlése« menübe kapcsolás után
»E A« jelenik meg a kijelzŒn.
• Nyomja meg a bal és jobb ↑ gombot
egyidejıleg.
TörlŒdik az egész memória tartalma.
A törlŒ folyamat alatt (kb. 8 másodpercig) villog
a kijelzŒ.
Installation and operating instructions, Digital 390 GB (#72796) 15
5. Installation
SMB-Buchs e
5.1 Installation and connection
5.1 / 1
.1. Unscrew and open the cover of the housing and
take out the circuit board.
2. Mount the housing of the radio multiplexer
to the desired place.
3. Remove the protective foil from the circuit
board.
4. Unscrew the protective cover.
5. Connect the aerial cable to the
SMB aerial socket (fig. 5.1/1) and
align the aerial at a suitable place.
7. Connect the mains cable to the connecting
terminal ST1 on the circuit board (fig. 4.1.1).
Attention!
Observe the table of loads under
"Technical details".
Advice:
All cables have to be inserted into the
unit through the M 16/20
openings via the supplied screw
connections.
6. Only for relay control: Connect the device to be
switched (e.g. underground garage door
operator) to the connecting terminal ST2 on the
circuit board (fig. 4.1/1).

16 Installation and operating instructions, Digital 390 GB (#72796)
6. Initial operation
Modes of operation:
There are in total 3 modes of operation.
6.1.1 Operating mode
In the operating mode the radio multiplexer receives
radio telegrams, sends out a master telegram and
emits a relay impulse.
On the display the storage place of the telegram is
shown.
6.1.2 Learn / delete mode
In the learn / delete mode you can enter transmitter
telegrams and delete single storage places.
6.1.3 Mode of additional functions
The mode of additional functions offers the following
additional functions:
Impulse length of relay contact, locking of single
storage places, function test, history, deletion of the
total memory, enter / change numeric code.
1. Connect the unit to power supply.
First the radio multiplexer carries out an
LED check. Then on the display
»_ _ _« is shown.
The radio multiplexer is in
operating mode!
6.1.1 Start-up
Beépítési és kezelési útmutató, Digital 390 H (#72796) 69
6. Üzembe helyezés
2 Egyes memóriahelyek
A Zárolási menübe kapcsolás után a »001«
memóriahely jelenik meg a kijelzŒn.
A ↑gombokkal válassza meg a zárolandó
memóriahelyet.
A memóriahely pillanatnyi állapotát a két darab
(LED-L és LED-E) LED jelzi ki:
Állapot: foglalt szabad zárolva
LED-L: Ki Be Be
LED-E: Be Ki Be
A választott memóriahely állapotának módosításához
nyomja meg az L gombot:
• a) eset – memóriahely foglalt
-> memóriahely zár alá kerül
• b) eset – memóriahely zárolva
-> zárolás megszınik
1 Relé-érintkezŒ impulzushossza
Az Impulzus menüre kapcsolás után (balra) »I«, jobbra
az impulzushossz (mp-ben) jelenik meg a kijelzŒn.
Gyárilag 1 mp-es alapérték van beállítva.
1 és 99 mp közé esŒ tetszŒleges impulzushossz
állítható be.
Ha nem akar kiadni relé-impulzust, válasszon »0«
impulzushosszat.
1. A középsŒ és/vagy jobb oldali ↑ gombbal
válassza meg a kívánt impulzushosszat
(mp- ben). A kijelzΠvillog.
2. Az érték eltárolásához nyomja meg az
L gombot.
Ha az új érték a memóriába került, megszınik a
kijelzŒ villogása.
Útmutatás!
A programozás tárolás nélkül az
alábbiak szerint szakítható félbe:
• Átkapcsolás a következŒ
segédmıveletre:
az E gomb megnyomásával
• Átkapcsolás üzemelési módba:
Egyidejıleg nyomja meg az L és E
gombokat
Útmutatás!
Szabad memóriahelyeket nem lehet
zárolni.
Útmutatás!
A programozás tárolás nélkül az
alábbiak szerint szakítható félbe:
• Átkapcsolás a következŒ
segédmıveletre:
az E gomb megnyomásával
• Átkapcsolás üzemelési módba:
Egyidejıleg nyomja meg az L és E
gombokat

68 Beépítési és kezelési útmutató, Digital 390 H (#72796)
A segédmıveleti módba az L és E gombok egyidejı megnyomásával lehet eljutni.
Egyik segédmıveletrŒl a másikra az E gomb megnyomásával lehet átkapcsolni.
A módosítások az L gombbal tárolhatók.
A segédmıveleti módot az L és E gombok egyidejı megnyomásával lehet elhagyni.
6. Üzembe helyezés
Segédmıveleti mód KijelzŒ kijelzése Alkalmazás
1 Relé-érintkezŒ impulzushossza pl. I..I A relé impulzushosszának módosítása
(alapérték: 1 mp) vagy a relé kimenet
kikapcsolás.
2 Egyes memóriahelyek pl. 001 Meghatározott látogatóknál az
idŒben zárolása korlátozott belépési
jogosultság zárolás.
3 Mıködéspróba F... A vezér-távirat betanítása a
vezérlŒbe (pl. kapuvezérlŒbe).
4 ElŒzmények H Az utolsó 10 távirat kijelzése
5 Az egész memória törlése E A Az ismétlŒ átprogramozása
6 Számkód beadása/módosítása C A programozó módok engedélyezése
(Tanuló – törlŒ mód és
segédmıveleti mód) számkódok
segítségével.
6.1.3 Segédmıveleti mód
Installation and operating instructions, Digital 390 GB (#72796) 17
6. Initial operation
Terminate the learn / delete mode
Push simultaneously the buttons L and E within 30 sec.
The display will show »_ _ _«.
You are in the operating mode.
6.1.2 Learn / delete mode
Attention!
The master telegram of the radio
repeater can be transmitted to the door
control unit only in the mode of
additional functions (see function test)
and it has an independent telegram.
B) Delete single storage places
1. In order to change to the learning mode, select
the storage place to be deleted
with the buttons ↑.
2. Push the button E.
The LED E flashes for approx. 5 sec. As soon as
a transmitter telegram
is deleted, the display shows »rdy«.
In total 1 master telegram (storage place 000) and 699
individual transmitter telegrams
(storage places 001 to 699) can be saved:
1. In order to change to the learning mode, select
the desired storage place with the buttons ↑.
2. Push the button L for 1 sec.
The LED L flashes for 30 sec. During this time
a transmitter can be learned.
3. Push the button of the transmitter to be
learned.
As soon as the radio multiplexer has learned
the transmitter telegram, the display
shows »rdy«. Then the next free storage place
is displayed.
.
4. Repeat point 1 to 3 for every
further transmitter telegram that has to be
learned.
Advice:
If the storage place is already occupied
or if no transmitter button is actuated
within 30 sec., the error message »err«
is displayed.
Advice:
You cannot delete any free or locked
storage places.
In this case the error message »err« is
displayed.
Terminate the learn / delete mode
Push simultaneously the buttons L and E within 30 sec.
The display will show »_ _ _«.
You are in the operating mode.
.
A) Learning of transmitter telegrams and
master telegram

18 Installation and operating instructions, Digital 390 GB (#72796)
To come to the mode of additional functions, push simultaneously the buttons L and E.
You can change from one additional function to the next with the button E.
Changes are saved with the button L.
To leave the mode of additional functions push simultaneously the buttons L and E.
.
6. Initial operation
Mode of additional functions Display Application
1 Impulse length relay contact e.g.. I..I Change of the impulse length of the
relay impulse (standard value: 1 sec.)
or deactivation of the relay exit.
2 Lock single storage places e.g.. 001 Locking of the temporary access
for specified visitors.
3 Function test F... Learning the master telegram to
the control unit (e.g. door control).
4 History H Display of the last 10 telegrams
5 Delete the total memory E A New programming of the repeater
6 Enter / change numeric code C Enabling of the programming modes
(Learn/delete mode and mode for
additional functions) by means of
numeric codes.
6.1.3 Mode of additional functions
Beépítési és kezelési útmutató, Digital 390 H (#72796) 67
6. Üzembe helyezés
Kilépés tanuló – törlŒ módból
30 másodpercen belül nyomja meg egyidejıleg az 1 és
E gombokat.
A kijelzŒn »_ _ _« jelenik meg.
A készülék üzemelési módban van.
6.1.2 Tanuló – törlŒ mód
Figyelem!
A rádió-ismétlŒ vezér távirata csak a
segédmıveleti módban vihetŒ át a
kapuvezérlŒnek (lásd mıködéspróbát)
és önálló távirattal rendelkezik.
B) Egyes memóriahelyek törlése
1. Tanuló módba úgy kapcsolhat, hogy a
↑ gombokkal megválasztja a törlendŒ
memóriahelyet.
2. Nyomja meg a E gombot.
A LED-E kb. 5 másodpercig villog. Ha eltınt az
adó-távirat a memóriából, a kijelzŒn
»rdy« jelenik meg.
Összesen 1 vezér távirat (000-ás memóriahely) és 699
egyedi adó távirat (001 – 699 memóriahely)
tárolható:
1. Tanuló módba úgy kapcsolhat, hogy a
↑ gombokkal megválasztja a kívánt
memóriahelyet.
2. Nyomja meg az L gombot 1 másodpercig.
A LED-L 30 másodpercig villog. Ezalatt be lehet
tanítani az adót.
3. Nyomja meg a betanítandó adó gombját.
Ha a rádió multiplexer betanulta az adó
táviratát, »rdy« jelenik meg a kijelzŒn. Utána
megjelenik a következŒ szabad memóriahely.
4. Minden betanítandó adó-táviratnál ismételje
meg az 1-3 pontokat.
Útmutatás:
Ha a memóriahely már foglalt, vagy 30
másodpercen belül nem mıködtették az
adás-gombot, »err« hibaüzenet jelenik
meg.
Útmutatás:
Szabad vagy zárolt memóriahelyek nem
törölhetŒk.
Ilyenkor az »err« hibaüzenet jelenik
meg.
Kilépés tanuló – törlŒ módból
30 másodpercen belül nyomja meg egyidejıleg az 1 és
E gombokat.
Ekkor a kijelzŒn »_ _ _« jelenik meg.
A készülék üzemelési módban van.
A) Adók táviratainak és a vezér táviratnak
betanulása

66 Beépítési és kezelési útmutató, Digital 390 H (#72796)
6. Üzembe helyezés
Mıködési módok:
Összesen három mód áll rendelkezésre.
6.1.1 Üzemelési mód
Az üzemelési módban a rádió multiplexer veszi a
rádiótáviratokat és vezértáviratot valamint relé
impulzust ad ki.
A kijelzŒn a távirat memóriahelye látható.
6.1.2 Tanuló – törlŒ mód
A tanuló – törlŒ módban lehet betanítani az adók
táviratait és lehet törölni az egyes memóriahelyeket.
6.1.3 Segédmıveleti mód
A segédmıveleti mód az alábbi segédmıveleteket
kínálja:
Relé-érintkezŒ impulzushossza, egyes memóriahelyek
zárolása, mıködéspróba, elŒzmények, az egész
memória törlése, számkódok beadása/módosítása.
1. Kapcsolja rá a tápfeszültséget.
A rádió multiplexer elŒször LED ellenŒrzést
végez.
Utána a kijelzŒn »_ _ _« jelenik meg.
A rádió multiplexer üzemelési módban van!
6.1.1 ElsŒ üzembe helyezés
Installation and operating instructions, Digital 390 GB (#72796) 19
6. Initial operation
2 Lock single storage places
After the change to the lock menu the display will
show the storage place »001«.
Select the storage place to be locked with the
buttons ↑.
The current status of the storage places is displayed by
the LED L and LED E:
Status: occupied free locked
LED-L: off on on
LED-E: on off on
To change the status of the selected storage place,
push the button L:
• case a) storage place is occupied
-> storage place will be locked
• case b) storage place is locked
-> lock will be disabled
1 Impulse length relay contact
After change to the impulse menu the display shows
an »I« (left) and the impulse length in sec. (right).
The factory setting has a default value of 1 sec.
You can set another user-defined impulse length
between 1 and 99 sec.
If no relay impulse is to be given, select impulse
length »0«.
1. Select the desired impulse length (in sec.) with
the middle and/or right.
↑ button. The display will flash
2. Push the button L to save.
As soon as the new value has been saved, the
display stops flashing.
Advice!
You can cancel the programming
without saving as follows:
• Change to the next
additional function:
Push button E
• Change to the operating mode:
Push buttons L and E simultaneously
Advice!
Free storage places cannot be locked.
Advice!
You can cancel the programming
without saving as follows:
• Change to the next
additional function:
Push button E
• Change to the operating mode:
Push buttons L and E simultaneously

20 Installation and operating instructions, Digital 390 GB (#72796)
3 Funktionstest
(Send out a master telegram to the control unit)
After the change to the function test menu, the display
will show an »F« and the set impulse time of the relay
impulse in seconds.
Push button L to send out a master telegram.
The radio multiplex sends out a master telegram
for 1 sec.and the relay is switched for the time of the
set impulse length. The display will flash during the
time of the impulse length.
You can use this function e.g. to learn the master
telegram to the door control unit.
6. Initial operation
Advice!
You can cancel the programming
without saving as follows:
• Change to the next
additional function:
Push button E
• Change to the operating mode:
Push buttons L and E simultaneously
4 History (read the memory)
After the change to the history menu the display will
show an »H_ _«.
Push the right ↑ button.
Every push of the button will show in a decremental
way the storage place numbers of the last
10 telegrams.
Advice!
You can cancel the programming
without saving as follows:
• Change to the next
additional function:
Push button E
• Change to the operating mode:
Push buttons L and E simultaneously
Advice!
You can cancel the programming
without saving as follows:
• Change to the next
additional function:
Push button E
• Change to the operating mode:
Push buttons L and E simultaneously
5 Delete the total memory
After the change the menu »delete the total
memory« the display will show
»E A«.
• Push simultaneously the left and right ↑ button.
The total memory is deleted.
During the deleting process (approx. 8 sec.) the
display will flash.
Beépítési és kezelési útmutató, Digital 390 H (#72796) 65
5. Szerelés
SMB-Buchs e
5.1 Felszerelés és csatlakoztatás
5.1 / 1
1. Csavarozza le a ház fedelét és
vegye ki az alaplapot.
2. Szerelje fel a rádió multiplexer házát a kívánt
szerelési helyen.
3. Távolítsa el a védŒfóliát az alaplapról.
4. Csavarozza le a védŒborítót.
5. Csatlakoztassa az antennakábelt az SMB
antennacsatlakozóba (1/1 az 5. ábrán) és
helyezze az antennát alkalmas helyre.
.
7. Csatlakoztassa a hálózati kábelt az alaplap ST1
csatlakozókapcsára (4.1.1. ábra).
Figyelem!
Vegye figyelembe a Mıszaki adatok
terhelési táblázatát.
Útmutatás:
Minden kábelt a készülékhez adott
csavaros bevezetŒvel kell bevezetni a
készülékbe az M 16/20-as nyílásokon
keresztül.
8. Tegye be az alaplapot és csavarozza le szorosan
a mellékelt csavarokkal és alátétkarikákkal.
9. Csavarozza rá a védŒborítót.
6. Csak relés vezérlés esetén: Csatlakoztassa a
kapcsolandó készüléket (pl. mélygarázs
kapumıködtetŒjét) az alaplemez ST2
csatlakozókapcsára (1/1 a 4. ábrán).
Strona się ładuje...
Strona się ładuje...
Strona się ładuje...
Strona się ładuje...
Strona się ładuje...
Strona się ładuje...
Strona się ładuje...
Strona się ładuje...
Strona się ładuje...
Strona się ładuje...
Strona się ładuje...
Strona się ładuje...
Strona się ładuje...
Strona się ładuje...
Strona się ładuje...
Strona się ładuje...
Strona się ładuje...
Strona się ładuje...
Strona się ładuje...
Strona się ładuje...
Strona się ładuje...
Strona się ładuje...
-
 1
1
-
 2
2
-
 3
3
-
 4
4
-
 5
5
-
 6
6
-
 7
7
-
 8
8
-
 9
9
-
 10
10
-
 11
11
-
 12
12
-
 13
13
-
 14
14
-
 15
15
-
 16
16
-
 17
17
-
 18
18
-
 19
19
-
 20
20
-
 21
21
-
 22
22
-
 23
23
-
 24
24
-
 25
25
-
 26
26
-
 27
27
-
 28
28
-
 29
29
-
 30
30
-
 31
31
-
 32
32
-
 33
33
-
 34
34
-
 35
35
-
 36
36
-
 37
37
-
 38
38
-
 39
39
-
 40
40
-
 41
41
-
 42
42


w innych językach
- español: Marantec Digital 390 El manual del propietario
- italiano: Marantec Digital 390 Manuale del proprietario
- Deutsch: Marantec Digital 390 Bedienungsanleitung
- français: Marantec Digital 390 Le manuel du propriétaire
- English: Marantec Digital 390 Owner's manual
- Nederlands: Marantec Digital 390 de handleiding
Powiązane artykuły
Inne dokumenty
-
 Locinox SlimStone-2 Weather Resistant Keypad Instrukcja obsługi
-
Eltako ESW12DX-UC Instrukcja obsługi
-
Dormakaba LA GARD 700 Series Multiplexer Instrukcja instalacji
-
Eltako ESR12NP-230V+UC Impulse Switch Instrukcja obsługi
-
Honeywell BDR 91 Instrukcja obsługi
-
GROHE 39 141 Instrukcja obsługi
-
Samsung SGH-E700 Instrukcja obsługi
-
Samsung SGH-X600 Instrukcja obsługi
-
-
HOTPOINT/ARISTON CP65SFA /HA instrukcja
