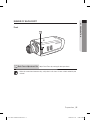
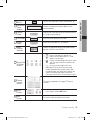
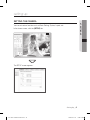
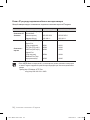
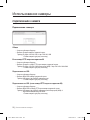
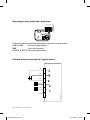
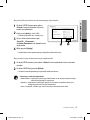
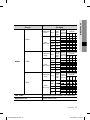
Samsung SNC-M300 Instrukcja obsługi
- Kategoria
- Dodatkowy sprzęt muzyczny
- Typ
- Instrukcja obsługi
Niniejsza instrukcja jest również odpowiednia dla

SNC-M300
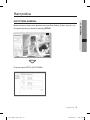
SNC-M300
user manual
ENG RUS POL
imagine the possibilities
Thank you for purchasing this Samsung product. To receive
more complete service, please register your product at
www.samsung.com/global/register
Cover-SNC-M300-AB68-00721E.indd 1 2008-07-14 오후 5:59:57

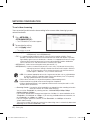
safety precautions
CAUTION
RISK OF ELECTRIC SHOCK. DO NOT OPEN
CAUTION: TO REDUCE THE RISK OF ELECTRIC SHOCK,
DO NOT REMOVE COVER (OR BACK)NO USER-SERVICEABLE PARTS
INSIDEREFER SERVICING TO QUALIFIED SERVICE PERSONNEL
This symbol indicates that dangerous voltage consisting a risk of electric shock is present within this
unit.
This symbol indicates that there are important operating and maintenance instructions in the literature
accompanying this unit.
WARNING
• To reduce the risk of fire or electric shock, do not expose this appliance to rain or moisture.
• The camera is to be only connected to PoE networks without routing to the outside plant.
WARNING
1. Be sure to use only the standard adapter that is specified in the specification sheet.
Using any other adapter could cause fire, electrical shock, or damage to the product.
2. Incorrectly connecting the power supply or replacing battery may cause explosion, fire,
electric shock, or damage to the product.
3. Do not connect multiple cameras to a single adapter. Exceeding the capacity may cause
abnormal heat generation or fire.
4. Securely plug the power cord into the power receptacle. Insecure connection may cause fire.
5.
When installing the camera, fasten it securely and firmly. A falling camera may cause personal
injury.
6.
Do not place conductive objects (e.g. screwdrivers, coins, metal things, etc.) or containers
filled with water on top of the camera. Doing so may cause personal injury due to fire, electric
shock, or falling objects.
7. Do not install the unit in humid, dusty, or sooty locations. Doing so may cause fire or electric
shock.
EU-SNC-M300-ENG.indd 2 2008-07-14 오후 3:36:12

8. If any unusual smells or smoke come from the unit, stop using the product. In such case,
immediately disconnect the power source and contact the service center. Continued use in
such a condition may cause fire or electric shock.
9. If this product fails to operate normally, contact the nearest service center. Never disassemble
or modify this product in any way. (SAMSUNG is not liable for problems caused by
unauthorized modifications or attempted repair.)
10. When cleaning, do not spray water directly onto parts of the product. Doing so may cause fire
or electric shock.
CAUTION
1. Do not drop objects on the product or apply strong shock to it. Keep away from a location
subject to excessive vibration or magnetic interference.
2. Do not install in a location subject to high temperature (over 122°F), low temperature (below
14°F), or high humidity. Doing so may cause fire or electric shock.
3. If you want to relocate the already installed product, be sure to turn off the power and then
move or reinstall it.
4. Remove the power plug from the outlet when then there is a lightning. Neglecting to do so
may cause fire or damage to the product.
5. Keep out of direct sunlight and heat radiation sources. It may cause fire.
6.
Install it in a place with good ventilation.
7.
Avoid aiming the camera directly towards extremely bright objects such as sun, as this may
damage the CCD image sensor.
8. Apparatus shall not be exposed to dripping or splashing and no objects filled with liquids,
such as vases, shall be placed on the apparatus.
9. The Mains plug is used as a disconnect device and shall stay readily operable at any time.
EU-SNC-M300-ENG.indd 3 2008-07-14 오후 3:36:13

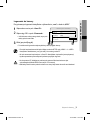
important safety instructions
1. Read these instructions.
2. Keep these instructions.
3. Heed all warnings.
4. Follow all instructions.
5. Do not use this apparatus near water.
6. Clean only with dry cloth.
7. Do not block any ventilation openings.
Install in accordance with the manufacturer’s instructions.
8
. Do not install near any heat sources such as radiators, heat registers, or other apparatus
(including amplifiers) that produce heat.
9
. Do not defeat the safety purpose of the polarized or grounding-type plug.
A polarized plug has two blades with one wider than the other.
A grounding type plug has two blades and a third grounding prong.
The wide blade or the third prong is provided for your safety.
If the provided plug does not fit into your outlet, consult an electrician for replacement of the
obsolete outlet.
10. Protect the power cord from being walked on or pinched particularly at plugs, convenience
receptacles, and the point where they exit from the apparatus.
11
. Only use attachments/accessories specified by the manufacturer.
12. Use only with cart, stand, tripod, bracket, or table specified by the manufacturer, or sold with
the apparatus.
13
. Unplug this apparatus. When a cart is used, use caution when moving the cart/apparatus
combination to avoid injury from tip-over.
14
. Refer all servicing to qualified service personnel.
Servicing is required when the apparatus has been damaged in any way, such as power-
supply cord or plug is damaged, liquid has been spilled or objects have fallen into the
apparatus, the apparatus has been exposed to rain or moisture, does not operate normally,
or been dropped.
EU-SNC-M300-ENG.indd 4 2008-07-14 오후 3:36:13

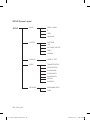
Contents _01
contents
Preparation
03
Installation and Connection
08
Network Connection & Setup
17
Setting Static IP
22
Setting Dynamic IP
26
03 Features
03 Precautions – Installation and Use
04 Recommended PC Specifications
04 Compatible IP Routers
04 Compatible PoE Switches
04 Checking the components in the package
05 Names of each part
08 Installing the Camera
12 Connecting
18 Connecting the camera to an IP router with
local area networking
20 Connecting the camera directly to local area
networking
21 Searching for the camera
22 Manual Network Setting
25 Automatic Network Setting
26 Dynamic IP Setting
27 Port Forwarding (Port Mapping) Setting
EU-SNC-M300-ENG.indd 1 2008-07-14 오후 3:36:13

02_ Contents
Using the Camera
28
Setting Up
41
Appendix
64
28 Connecting to the camera
30 Installing ActiveX
32 Using the Viewer Screen
36 Using the Search Viewer Screen
41 Setting the camera
43 Basic Configuration
49 System configuration
54 Layout Configuration
55 Event Configuration
62 Network Configuration
64 Troubleshooting
66 Specifications
EU-SNC-M300-ENG.indd 2 2008-07-14 오후 3:36:13

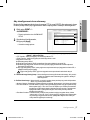
Preparation _03
01 PREPARATION
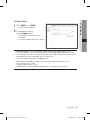
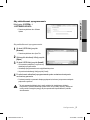
FEATURES
Various Communication Protocol Support
This product supports various communication protocols such as ARP, HTTP and DHCP as well as
TCP/IP, UDP, SMTP for Email transmission and FTP protocol.
Monitoring Through
Web Browser
Monitoring Through Web Browser This product enables watching a video through an Internet web
browser so that you can watch a video through the Internet as you can within the local network.
Automatic Local IP Setting Function
This function offers an easy way of configuring the network settings with a minimal key input for
those who are not familiar with it.
Alarm Function
If this product is connected with a motion sensor and the sensor detects a motion, a recorded
video clip is sent through the FTP/Email(SMTP) registered by the user or saved on the SDHC
memory card and a signal is sent to an alarm output port.
Motion
Detection Function
If the user specifies a target area to monitor and the motion sensor detects a motion within that
area, a still image is sent to the FTP/Email(SMTP) server designated by the user or saved on the
SDHC memory card, and signals are sent to the alarm output terminal.
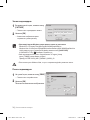
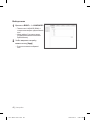
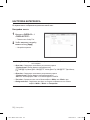
PRECAUTIONS – INSTALLATION AND USE
Do not disassemble your camera.
Always be cautious when handling your camera.
Do not subject the camera to impact or vibration and always be cautious of damaging the camera
due to neglectful storage and/or operation.
Do not install the camera at a location where it would become exposed to rain or humidity and do
not operate the camera in a wet environment.
Do not clean the camera’s main body using harsh abrasives or similar substances. If dirty, use a dry
piece of cloth to clean instead.
Install the camera in a shaded area or environment, protected from direct sunlight.
Direct sunlight exposure has a negative effect on the camera.
Do not bend or throw the SDHC memory card.
Do not store or use the SDHC memory card in a hot, humid, or dusty environment.
Protect the contacts of the SDHC memory card from foreign substance buildup.
If foreign substances have been built up on the contacts, remove using a soft piece of cloth.
When removing the SDHC memory card, disable SD Card Recording to protect against data loss
(refer to page 57 for instruction on disabling SD Card Recording).
Data cannot be stored on SDHC memory cards whose service life has expired.
Please purchase a new SDHC memory card if you experience this.
The manufacturer will not be held responsible for data loss incurred by the customer due to im-
proper use.
Using non-recommended PoE device may cause malfunction of either the camera or PoE device
itself. (Refer to page 4 for the compatible PoE Switch)
preparation
EU-SNC-M300-ENG.indd 3 2008-07-14 오후 3:36:13

04_ Preparation
RECOMMENDED PC SPECIFICATIONS
CPU: Pentium4/2.4GHz or higher
Operating System: Windows XP(Service Pack2) / Windows Vista
Resolution: 1024X768 pixels or higher
RAM: 512MB or higher
Web
Browser:
Internet Explorer 6.0 or higher
Video Card:
Radeon, Nvidia
Video Memory:
128MB
DirectX 8.1 or higher
COMPATIBLE IP ROUTERS
Linksys
D-Link
Netgear
COMPATIBLE POE SWITCHES
Linksys SRW224G4P
D-Link DES-1316
SMC SMCPWR-INJ3
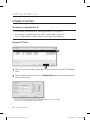
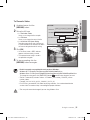
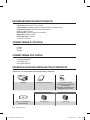
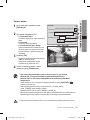
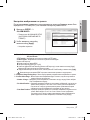
CHECKING THE COMPONENTS IN THE PACKAGE
Make sure that the following items are included in the package.
Camera
User's Manual
C Mount Adapter
Auto Iris Lens Connector
Options
Software CD CS Lens C Lens
EU-SNC-M300-ENG.indd 4 2008-07-14 오후 3:36:13

Preparation _05
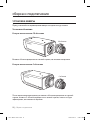
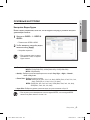
01 PREPARATION
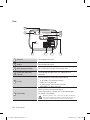
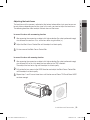
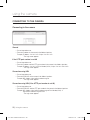
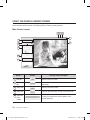
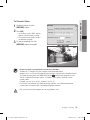
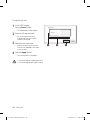
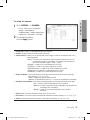
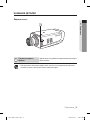
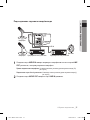
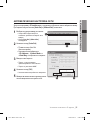
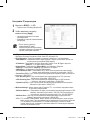
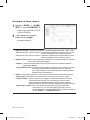
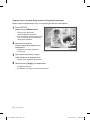
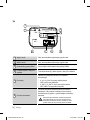
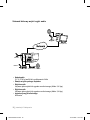
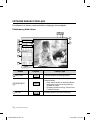
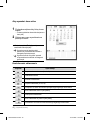
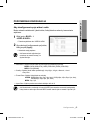
NAMES OF EACH PART
Front
1
Back Focus Adjustment Bar
Adjust Back Focus by moving this bar up or down.
When the camera lens becomes dirty, softly clean it with a lens tissue or a cloth soaked in pure
ethanol.
1
EU-SNC-M300-ENG.indd 5 2008-07-14 오후 3:36:13

06_ Preparation
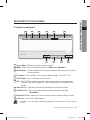
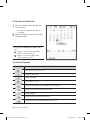
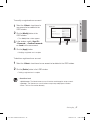
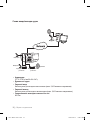
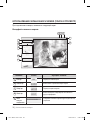
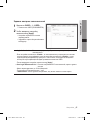
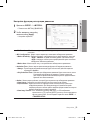
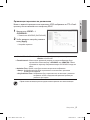
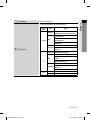
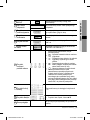
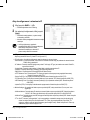
Rear
1
Audio Out For outgoing audio signals.
2
Audio In For incoming audio signals.
3
SDHC Memory Card Slot This is where you insert your SDHC memory card.
4
System, SD, and Power
Indicators
These indicators provide system, SD, and power status
information.
5
I/O Port
Used to connect the camera to an external device.
A_IN 1 and 2: These are alarm in ports.
GND: This is the GND port.
A_OUT 1 and 2: These are alarm out ports.
NOT USED: This port is not used.
6
Reset Button
Reverts all camera settings to their default.
When it is pressed for 3 seconds, the system indicator goes
out and the system reboots.
When the camera is reset, connection is possible only after the
basic network settings (IP address, subnet mask, gateway, etc.)
have been configured again using the IP installer program.
7 86 5
4
3
2
1
EU-SNC-M300-ENG.indd 6 2008-07-14 오후 3:36:14

Preparation _07
01 PREPARATION
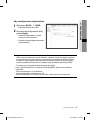
7
Ethernet Port
Ethernet cable port.
8
Power Port
Connect the power cable to this port.
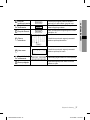
LED
Status
Description
SYSTEM
Turns on
When the power is switched on and the
network connection is normal.
Flashes
When the DDNS setting fails.
When the DDNS is being set.
When the network connection is not
stable.
Turns off
When the power is switched off.
When the camera is rebooting.
SD
Turns on
When the memory card is inserted and
the system is in normal operation.
Flashes
When recording fails.
When the memory card is short of
capacity.
When the memory card is not inserted
normally.
Turns off
When the power is switched off.
When the camera is rebooting.
When the memory cared is removed.
PWR
Turns on When the power is switched on.
Turns off When the power is switched off.
EU-SNC-M300-ENG.indd 7 2008-07-14 오후 3:36:14

08_
Installation and Connection
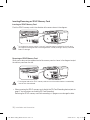
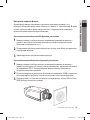
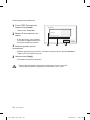
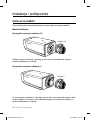
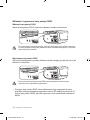
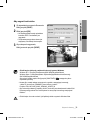
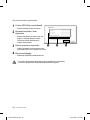
INSTALLING THE CAMERA
Disconnect the power cord before installation or relocation.
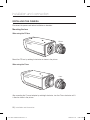
Mounting the lens
When using the CS lens
Mount the CS lens by rotating it clockwise as shown in the picture.
When using the C lens
After mounting the C-mount adapter by rotating it clockwise, turn the C lens clockwise until it
is fixed as shown in the picture.
installation and connection
CS lens
C lens
EU-SNC-M300-ENG.indd 8 2008-07-14 오후 3:36:14

Installation and Connection
_09
02
INSTALLATION AND CONNECTION
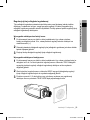
Adjusting the back focus
The back focus of the camera is adjusted at the factory before delivery but some lenses can
be out of focus depending on the lens type. In this case, you have to adjust the back focus.
The following describes how to adjust the back focus of the lenses.
In case of the lens with no zooming function
1
After exposing the camera to an object with high resolution (like a dart-patterned image)
at a distance of more than 10m, set the lens focus ring to infinite (
∞
).
2
Adjust the Back Focus Control Bar until the object is of best quality.
3
Fix the screw of the Back Focus Control Bar.
In case of the lens with zooming function
1
After exposing the camera to an object with high resolution (like a dart-patterned image)
at a distance of 3 to 5m, fully rotate the lens zoom to the TELE direction.
Then adjust the lens focus ring until the object is of best quality.
2
Fully rotate the lens zoom to the WIDE direction and adjust the Back Focus Control Bar
until the object is of best quality.
3
Repeat step 1 and 2 two or three times until the focuses of Zoom TELE and Zoom WIDE
are clear enough.
EU-SNC-M300-ENG.indd 9 2008-07-14 오후 3:36:14

10_
Installation and Connection
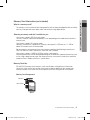
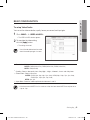
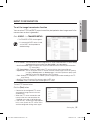
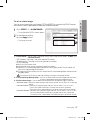
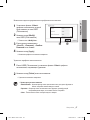
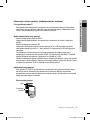
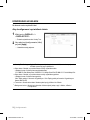
Inserting/Removing an SDHC Memory Card
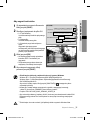
Inserting an SDHC Memory Card
Push the SDHC memory card in the direction of the arrow shown in the diagram.
Do not force the memory card in. If you can’t insert the memory card into the slot with ease,
you might be inserting the card in the wrong direction. Forcibly inserting a memory card could
lead to its damage.
Removing an SDHC Memory Card
Gently press down on the exposed end of the memory card as shown in the diagram to eject
the memory card from the slot.
Pressing too hard on the SDHC memory card can cause the card to shoot out uncontrollably
from the slot when released.
When removing the SDHC memory card, disable the SD Card Recording feature (refer to
page 57 for instructions on disabling SD Card Recording).
Removing the SDHC memory card while recording is in progress can damage the data.
NA-M300-ENG_AB68-00721A.indd 10 2008-08-01 오전 11:25:24

Installation and Connection
_11
02
INSTALLATION AND CONNECTION
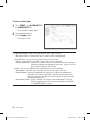
Memory Card Information (not included)
What is a memory card?
The memory card is an external data storage device that has been developed to offer an entirely
new way to record and share video, audio, and text data using digital devices.
Selecting a memory card that’s suitable for you
Your camera supports SDHC memory cards.
You may, however, experience compatibility issues depending on the model and make of the
memory card.
Your camera supports SD memory cards.
However, the maximum supported SD memory card capacity is 2GB and ver 1.1, 4GB or
above SD memory cards are incompatible.
For your camera, we recommend you use a memory card from the following manufacturers:
SDHC/SD Memory Card: Panasonic®, SanDisk®, and Toshiba®
Your camera supports 128MB to 16GB of memory card capacity.
Playback performance can be affected depending on the read/write speed of the memory card,
so use a high-speed memory card. We recommend you use a memory card with a read/write
speed of at least 10Mbps and Class 6 specifications.
Memory Card Use
SD and SDHC memory cards feature a switch that disables writing data on to the media.
Having this switch to the Lock position will prevent accidental deletion of data stored in the
memory card but at the same time will also prevent you from writing data on to the media.
Me
mo
ry Card Components
SDHC
Lock Switch
Contacts
EU-SNC-M300-ENG.indd 11 2008-07-14 오후 3:36:14

12_
Installation and Connection
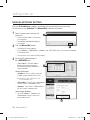
CONNECTING
Connecting Ethernet Cable
Connect the Ethernet cable to the network port as shown.
EU-SNC-M300-ENG.indd 12 2008-07-14 오후 3:36:15

Installation and Connection
_13
02
INSTALLATION AND CONNECTION
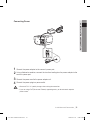
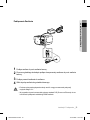
Connecting Power
1
Connect the power adapter to the camera’s power port.
2
Using a flathead screwdriver, connect the two lines leading from the power adapter to the
camera’s power port.
3
Connect the power cord to the power adapter unit.
4
Connect the power plug to a power outlet.
Beware of DC 12V’s polarity charges when making the connection.
If you are using a PoE (Power over Ethernet) supporting router, you do not need a separate
power source.
EU-SNC-M300-ENG.indd 13 2008-07-14 오후 3:36:15

14_
Installation and Connection
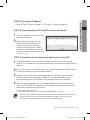
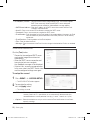
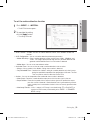
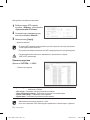
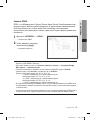
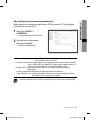
To connect input and output ports:
Connect alarm lines to the input and output ports on the rear.
A_IN 1, A_IN 2 :
T
hese are alarm in ports.
GND : This is the GND port.
A_OUT 1, A_OUT 2 : These are alarm out ports.
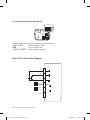
Alarm In/Out Connection Diagram
1
A_IN1
A_OUT1
A_OUT2
Not Used
A_IN2
GND
2
3
4
5
6
External Relay
External Relay
EU-SNC-M300-ENG.indd 14 2008-07-14 오후 3:36:15

Installation and Connection
_15
02
INSTALLATION AND CONNECTION
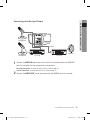
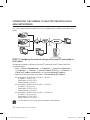
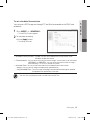
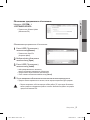
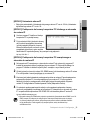
Connecting to Audio Input/Output
1
Connect the AUDIO IN port of the camera with the microphone directly or LINE OUT
port of the amplifier that the microphone is connected to.
Direct Mic Connection: Set Audio Input Gain high (10). (Refer to page 43)
Line Out Connection: Set Audio Input Gain low (1). (Refer to page 43)
2
Connect the AUDIO OUT port of the camera with the LINE IN port of the speaker.
Microphone
Pre-Amp
Speaker
LINE-IN
Pre-Amp
Microphone
LINE-OUT
EU-SNC-M300-ENG.indd 15 2008-07-14 오후 3:36:15

16_
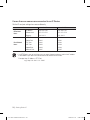
Installation and Connection
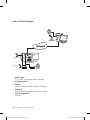
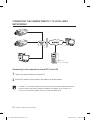
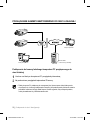
Audio I/O Block Diagram
Speaker
Pre-Amp
Microphone
PC
Audio Codec
G.711 PCM, μ-law 64kbps 8kHz sampling
Full duplex Audio
Audio in
Used for mono signal line input (Max.2.4 Vpp)
Audio out
Used for mono signal line output (Max.2.4 Vpp)
Li
ne
out impedance
600ohm
Pre-Amp
Microphone
EU-SNC-M300-ENG.indd 16 2008-07-14 오후 3:36:15
Strona się ładuje...
Strona się ładuje...
Strona się ładuje...
Strona się ładuje...
Strona się ładuje...
Strona się ładuje...
Strona się ładuje...
Strona się ładuje...
Strona się ładuje...
Strona się ładuje...
Strona się ładuje...
Strona się ładuje...
Strona się ładuje...
Strona się ładuje...
Strona się ładuje...
Strona się ładuje...
Strona się ładuje...
Strona się ładuje...
Strona się ładuje...
Strona się ładuje...
Strona się ładuje...
Strona się ładuje...
Strona się ładuje...
Strona się ładuje...
Strona się ładuje...
Strona się ładuje...
Strona się ładuje...
Strona się ładuje...
Strona się ładuje...
Strona się ładuje...
Strona się ładuje...
Strona się ładuje...
Strona się ładuje...
Strona się ładuje...
Strona się ładuje...
Strona się ładuje...
Strona się ładuje...
Strona się ładuje...
Strona się ładuje...
Strona się ładuje...
Strona się ładuje...
Strona się ładuje...
Strona się ładuje...
Strona się ładuje...
Strona się ładuje...
Strona się ładuje...
Strona się ładuje...
Strona się ładuje...
Strona się ładuje...
Strona się ładuje...
Strona się ładuje...
Strona się ładuje...
Strona się ładuje...
Strona się ładuje...
Strona się ładuje...
Strona się ładuje...
Strona się ładuje...
Strona się ładuje...
Strona się ładuje...
Strona się ładuje...
Strona się ładuje...
Strona się ładuje...
Strona się ładuje...
Strona się ładuje...
Strona się ładuje...
Strona się ładuje...
Strona się ładuje...
Strona się ładuje...
Strona się ładuje...
Strona się ładuje...
Strona się ładuje...
Strona się ładuje...
Strona się ładuje...
Strona się ładuje...
Strona się ładuje...
Strona się ładuje...
Strona się ładuje...
Strona się ładuje...
Strona się ładuje...
Strona się ładuje...
Strona się ładuje...
Strona się ładuje...
Strona się ładuje...
Strona się ładuje...
Strona się ładuje...
Strona się ładuje...
Strona się ładuje...
Strona się ładuje...
Strona się ładuje...
Strona się ładuje...
Strona się ładuje...
Strona się ładuje...
Strona się ładuje...
Strona się ładuje...
Strona się ładuje...
Strona się ładuje...
Strona się ładuje...
Strona się ładuje...
Strona się ładuje...
Strona się ładuje...
Strona się ładuje...
Strona się ładuje...
Strona się ładuje...
Strona się ładuje...
Strona się ładuje...
Strona się ładuje...
Strona się ładuje...
Strona się ładuje...
Strona się ładuje...
Strona się ładuje...
Strona się ładuje...
Strona się ładuje...
Strona się ładuje...
Strona się ładuje...
Strona się ładuje...
Strona się ładuje...
Strona się ładuje...
Strona się ładuje...
Strona się ładuje...
Strona się ładuje...
Strona się ładuje...
Strona się ładuje...
Strona się ładuje...
Strona się ładuje...
Strona się ładuje...
Strona się ładuje...
Strona się ładuje...
Strona się ładuje...
Strona się ładuje...
Strona się ładuje...
Strona się ładuje...
Strona się ładuje...
Strona się ładuje...
Strona się ładuje...
Strona się ładuje...
Strona się ładuje...
Strona się ładuje...
Strona się ładuje...
Strona się ładuje...
Strona się ładuje...
Strona się ładuje...
Strona się ładuje...
Strona się ładuje...
Strona się ładuje...
Strona się ładuje...
Strona się ładuje...
Strona się ładuje...
Strona się ładuje...
Strona się ładuje...
Strona się ładuje...
Strona się ładuje...
Strona się ładuje...
Strona się ładuje...
Strona się ładuje...
Strona się ładuje...
Strona się ładuje...
Strona się ładuje...
Strona się ładuje...
Strona się ładuje...
Strona się ładuje...
Strona się ładuje...
Strona się ładuje...
Strona się ładuje...
Strona się ładuje...
Strona się ładuje...
Strona się ładuje...
Strona się ładuje...
Strona się ładuje...
Strona się ładuje...
Strona się ładuje...
Strona się ładuje...
Strona się ładuje...
Strona się ładuje...
Strona się ładuje...
Strona się ładuje...
Strona się ładuje...
Strona się ładuje...
Strona się ładuje...
Strona się ładuje...
Strona się ładuje...
Strona się ładuje...
Strona się ładuje...
Strona się ładuje...
Strona się ładuje...
Strona się ładuje...
Strona się ładuje...
Strona się ładuje...
Strona się ładuje...
Strona się ładuje...
Strona się ładuje...
Strona się ładuje...
Strona się ładuje...
Strona się ładuje...
Strona się ładuje...
Strona się ładuje...
Strona się ładuje...
Strona się ładuje...
Strona się ładuje...
Strona się ładuje...
Strona się ładuje...
Strona się ładuje...
Strona się ładuje...
Strona się ładuje...
Strona się ładuje...
Strona się ładuje...
Strona się ładuje...
Strona się ładuje...
Strona się ładuje...
Strona się ładuje...
Strona się ładuje...
Strona się ładuje...
Strona się ładuje...
Strona się ładuje...
Strona się ładuje...
Strona się ładuje...
Strona się ładuje...
Strona się ładuje...
Strona się ładuje...
Strona się ładuje...
Strona się ładuje...
Strona się ładuje...
Strona się ładuje...
Strona się ładuje...
Strona się ładuje...
Strona się ładuje...
Strona się ładuje...
Strona się ładuje...
Strona się ładuje...
Strona się ładuje...
Strona się ładuje...
Strona się ładuje...
Strona się ładuje...
Strona się ładuje...
Strona się ładuje...
Strona się ładuje...
Strona się ładuje...
Strona się ładuje...
Strona się ładuje...
Strona się ładuje...
Strona się ładuje...
-
 1
1
-
 2
2
-
 3
3
-
 4
4
-
 5
5
-
 6
6
-
 7
7
-
 8
8
-
 9
9
-
 10
10
-
 11
11
-
 12
12
-
 13
13
-
 14
14
-
 15
15
-
 16
16
-
 17
17
-
 18
18
-
 19
19
-
 20
20
-
 21
21
-
 22
22
-
 23
23
-
 24
24
-
 25
25
-
 26
26
-
 27
27
-
 28
28
-
 29
29
-
 30
30
-
 31
31
-
 32
32
-
 33
33
-
 34
34
-
 35
35
-
 36
36
-
 37
37
-
 38
38
-
 39
39
-
 40
40
-
 41
41
-
 42
42
-
 43
43
-
 44
44
-
 45
45
-
 46
46
-
 47
47
-
 48
48
-
 49
49
-
 50
50
-
 51
51
-
 52
52
-
 53
53
-
 54
54
-
 55
55
-
 56
56
-
 57
57
-
 58
58
-
 59
59
-
 60
60
-
 61
61
-
 62
62
-
 63
63
-
 64
64
-
 65
65
-
 66
66
-
 67
67
-
 68
68
-
 69
69
-
 70
70
-
 71
71
-
 72
72
-
 73
73
-
 74
74
-
 75
75
-
 76
76
-
 77
77
-
 78
78
-
 79
79
-
 80
80
-
 81
81
-
 82
82
-
 83
83
-
 84
84
-
 85
85
-
 86
86
-
 87
87
-
 88
88
-
 89
89
-
 90
90
-
 91
91
-
 92
92
-
 93
93
-
 94
94
-
 95
95
-
 96
96
-
 97
97
-
 98
98
-
 99
99
-
 100
100
-
 101
101
-
 102
102
-
 103
103
-
 104
104
-
 105
105
-
 106
106
-
 107
107
-
 108
108
-
 109
109
-
 110
110
-
 111
111
-
 112
112
-
 113
113
-
 114
114
-
 115
115
-
 116
116
-
 117
117
-
 118
118
-
 119
119
-
 120
120
-
 121
121
-
 122
122
-
 123
123
-
 124
124
-
 125
125
-
 126
126
-
 127
127
-
 128
128
-
 129
129
-
 130
130
-
 131
131
-
 132
132
-
 133
133
-
 134
134
-
 135
135
-
 136
136
-
 137
137
-
 138
138
-
 139
139
-
 140
140
-
 141
141
-
 142
142
-
 143
143
-
 144
144
-
 145
145
-
 146
146
-
 147
147
-
 148
148
-
 149
149
-
 150
150
-
 151
151
-
 152
152
-
 153
153
-
 154
154
-
 155
155
-
 156
156
-
 157
157
-
 158
158
-
 159
159
-
 160
160
-
 161
161
-
 162
162
-
 163
163
-
 164
164
-
 165
165
-
 166
166
-
 167
167
-
 168
168
-
 169
169
-
 170
170
-
 171
171
-
 172
172
-
 173
173
-
 174
174
-
 175
175
-
 176
176
-
 177
177
-
 178
178
-
 179
179
-
 180
180
-
 181
181
-
 182
182
-
 183
183
-
 184
184
-
 185
185
-
 186
186
-
 187
187
-
 188
188
-
 189
189
-
 190
190
-
 191
191
-
 192
192
-
 193
193
-
 194
194
-
 195
195
-
 196
196
-
 197
197
-
 198
198
-
 199
199
-
 200
200
-
 201
201
-
 202
202
-
 203
203
-
 204
204
-
 205
205
-
 206
206
-
 207
207
-
 208
208
-
 209
209
-
 210
210
-
 211
211
-
 212
212
-
 213
213
-
 214
214
-
 215
215
-
 216
216
-
 217
217
-
 218
218
-
 219
219
-
 220
220
-
 221
221
-
 222
222
-
 223
223
-
 224
224
-
 225
225
-
 226
226
-
 227
227
-
 228
228
-
 229
229
-
 230
230
-
 231
231
-
 232
232
-
 233
233
-
 234
234
-
 235
235
-
 236
236
-
 237
237
-
 238
238
-
 239
239
-
 240
240
-
 241
241
-
 242
242
-
 243
243
-
 244
244
-
 245
245
-
 246
246
-
 247
247
-
 248
248
-
 249
249
-
 250
250
-
 251
251
-
 252
252
-
 253
253
-
 254
254
-
 255
255
-
 256
256
-
 257
257
-
 258
258
-
 259
259
-
 260
260


Samsung SNC-M300 Instrukcja obsługi
- Kategoria
- Dodatkowy sprzęt muzyczny
- Typ
- Instrukcja obsługi
- Niniejsza instrukcja jest również odpowiednia dla
Powiązane artykuły
Inne dokumenty
-
4XEM IPCAMW45 Instrukcja obsługi
-
RTS VLink WebRTC Instrukcja obsługi
-
media-tech MT4009 Instrukcja obsługi
-
 Riva RC3202HD-6211(W) Instrukcja instalacji
-
Intellinet 550420 Instrukcja obsługi
-
PXM PX333 Instrukcja obsługi
-
Novus NVIP-5V-6402M/F (NVIP-5DN3615AV/IR-1P/F) Instrukcja obsługi
-
-
Abus TVIP72500 Instrukcja obsługi
-
