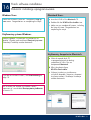
HP PSC 1400 All-in-One Printer series instrukcja
- Typ
- instrukcja

2
3
1
HP Photosmart 2600/2700 series all-in-one
User Guide
HP Photosmart 2600/2700 series all-in-one
User Guide
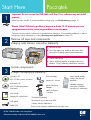
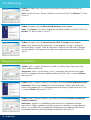
Start Here
Remove all tape and components
Locate components
Windows CD
Macintosh CD
User Guide
print cartridges
power cord and
adapter
control panel overlay
(sticker, may be pre-
attached)
USB cable
The contents of your box may differ.
Follow the steps in order. If you have problems during setup, see Troubleshooting on page 10.
Important: Do not connect the USB cable until Step 15 or software may not install
properly.
a Remove all tape.
b Lower the paper tray, and then the access door.
Remove the shipping material and components.
HP PSC 1400 All-in-One series Setup Guide
Pocztek
Zdejmij cał tam i wszystkie elementy
Znajd nastpujce elementy
dysk CD dla systemu Windows
dysk CD dla komputerów
Macintosh
Podrcznik uytkownika
pojemniki z tuszem
kabel zasilajcy
i zasilacz
nakładka na panel
sterowania (naklejka,
moe być ju załoona)
kabel USB
Rzeczywista zawartoć opakowania moe być inna.
Opisane czynnoci naley wykonywać w przedstawionej kolejnoci. W przypadku problemów w trakcie
konfiguracji naley zapoznać si z sekcj Rozwizywanie problemów na stronie 10.
Podrcznik instalacji urzdzenia HP PSC 1400 All-in-One series
Wane: Kabel USB naley podłczyć dopiero w kroku 15. W przeciwnym razie
oprogramowanie moe zostać nieprawidłowo zainstalowane.
a Zdejmij cał tam.
b Opuć podajnik papieru, a nastpnie drzwiczki
dostpu. Wyjmij materiały pakunkowe i elementy.
*Purchased separately
*
*Naley zakupić oddzielnie
*

2 • HP All-in-One
4
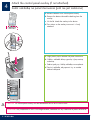
Attach the control panel overlay (if not attached)
a Bend the bottom of the control panel overlay.
b Remove the bottom tab and the backing from the
overlay.
c Lift the lid. Attach the overlay to the device.
d Press down on the overlay to ensure it is firmly
attached.
CAUTION: The control panel overlay must be attached for the HP All-in-One to work!
Załó nakładk na panel sterowania (jeli nie jest załoona)
a Zagnij doln czć nakładki na panel sterowania.
b Odklej z nakładki doln wypustk i tyln warstw
ochronn.
c Podnie pokryw. Naklej nakładk na urzdzenie.
d Docinij nakładk, aby upewnić si, e została
dobrze naklejona.
OSTRONIE: Aby urzdzenie HP All-in-One mogło działać, nakładka musi być załoona na panel sterowania!

HP All-in-One • 3
6
7
5
12 3 4
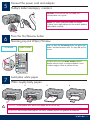
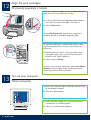
Load plain white paper
Press the On/Resume button
Connect the power cord and adapter
On/Resume
After you press the On /Resume button, the green light
flashes, and then becomes solid. This may take up to a
minute.
Important: Do not connect the USB cable until
instructed later in this guide.
CAUTION: To avoid paper jams, do not force paper too far into the tray.
Włó zwykły biały papier
Nacinij przycisk Włcz/Wznów
Podłcz kabel zasilajcy i zasilacz
Włcz/Wznów
Po naciniciu przycisku Włcz /Wznów zielona
lampka zacznie migać, a nastpnie bdzie wiecić
wiatłem cigłym. Moe to potrwać minut.
Wane: Nie naley podłczać kabla USB dopóki
w dalszej czci tego podrcznika nie zostanie podana
odpowiednia instrukcja.
OSTRONIE: Aby uniknć zacić papieru, nie naley wkładać papieru zbyt głboko do podajnika.

4 • HP All-in-One
9
8
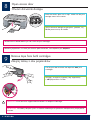
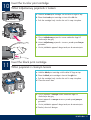
Remove tape from both cartridges
Pull the pink tab to remove the tape from both print
cartridges.
CAUTION: Do not touch the copper-colored contacts or retape the cartridges.
Open access door
Lower the access door until it stops. Make sure the print
carriage moves to the center.
The device must be On before you can insert the print cartridges.
Pocignij za róow wypustk, aby zdjć tam
z obu pojemników z tuszem.
OSTRONIE: Nie naley dotykać styków w kolorze miedzianym ani ponownie naklejać tamy na pojemniki
z tuszem.
Zdejmij tam z obu pojemników
Otwórz drzwiczki dostpu
Opuć drzwiczki dostpu a do oporu. Sprawd, czy
karetka przesuwa si do rodka.
Załoenie pojemników z tuszem jest moliwe pod warunkiem, e urzdzenie jest włczone .

HP All-in-One • 5
10
11
Insert the tri-color print cartridge
a Hold the tri-color print cartridge with the blue HP logo on top.
b Place the tri-color print cartridge in front of the left slot.
c Push the cartridge firmly into the slot until it snaps into place.
Insert the black print cartridge
a Hold the black print cartridge with the blue HP logo on top.
b Place the black print cartridge in front of the right slot.
c Push the cartridge firmly into the slot until it snaps into place.
d Close the access door.
a Chwyć trójkolorowy pojemnik z tuszem niebieskim logo HP
skierowanym do góry.
b Umieć trójkolorowy pojemnik z tuszem z przodu przed lewym
gniazdem.
c Wcinij dokładnie pojemnik do gniazda, a do zatrzanicia.
Włó trójkolorowy pojemnik z tuszem
Włó pojemnik z czarnym tuszem
a Chwyć pojemnik z czarnym tuszem niebieskim logo HP
skierowanym do góry.
b Umieć pojemnik z czarnym tuszem z przodu przed prawym
gniazdem.
c Wcinij dokładnie pojemnik do gniazda, a do zatrzanicia.
d Zamknij drzwiczki dostpu.

6 • HP All-in-One
12
13
Align the print cartridges
Turn on your computer
a Turn on your computer, login if necessary, and then wait
for the desktop to appear.
b Close any open programs.
After you insert the cartridges, a print cartridge alignment
page prints. (This may take a few minutes.)
a Lift the lid. Place the top of alignment page face down
in the left front corner of the glass. Close the lid.
b Press the Scan button.
After the On/Resume light stops blinking, alignment is
complete. Recycle or discard the alignment page.
Wyrównaj pojemniki z tuszem
a Włcz komputer, zaloguj si, jeli jest to konieczne,
i zaczekaj na wywietlenie pulpitu.
b Zamknij wszystkie otwarte programy.
Włcz komputer
a Podnie pokryw. Umieć w lewym przednim rogu
szyby górn czć strony wyrównania skierowan
drukiem w dół. Zamknij pokryw.
b Nacinij przycisk Skanuj .
Wyrównywanie zostanie zakoczone, gdy lampka Włcz/
Wznów przestanie migać. Stron wyrównania mona
wykorzystać ponownie lub zutylizować.
Po włoeniu pojemników wydrukowana zostanie strona
wyrównania pojemników z tuszem. Moe to potrwać
kilka minut.

HP All-in-One • 7
14
Choose the correct CD
a Locate the HP All-in-One Macintosh CD.
b Continue to the next step.
a Insert the HP All-in-One Windows CD.
b Follow the onscreen instructions.
If the startup screen does not appear, double-click My
Computer , double-click the CD-ROM icon, and then
double-click setup.exe .
Windows Users: Macintosh Users:
Wybierz odpowiedni dysk CD
Jeli ekran startowy nie zostanie wywietlony, kliknij
dwukrotnie ikon Mój komputer , kliknij dwukrotnie
ikon CD-ROM , a nastpnie kliknij dwukrotnie plik
setup.exe .
a Włó do napdu dysk CD z oprogramowaniem
do obsługi urzdzenia HP All-in-One w systemie
Windows .
b Postpuj zgodnie z instrukcjami wywietlanymi na
ekranie.
a Włó do napdu dysk CD
z oprogramowaniem do obsługi
urzdzenia HP All-in-One na
komputerach Macintosh .
b Przejd do nastpnego kroku.
Uytkownicy systemu Windows: Uytkownicy komputerów Macintosh:

8 • HP All-in-One
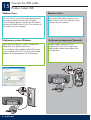
15
Connect the USB cable
Macintosh Users:Windows Users:
You may have to wait several minutes before you see
the onscreen prompt to connect the USB cable.
Once the prompt appears, connect the USB cable to
the port on the back of the HP All-in-One, and then to
any USB port on your computer.
Connect the USB cable to the port on the
back of the HP All-in-One, and then to any
USB port on your computer.
Zanim na ekranie pojawi si monit o podłczenie
kabla USB, moe upłynć kilka minut.
Po wywietleniu monitu podłcz kabel USB do portu
z tyłu urzdzenia HP All-in-One. Drugi koniec kabla
podłcz do dowolnego portu USB w komputerze.
Podłcz kabel USB do portu z tyłu
urzdzenia HP All-in-One. Drugi koniec
kabla podłcz do dowolnego portu USB
w komputerze.
Podłcz kabel USB
Uytkownicy systemu Windows: Uytkownicy komputerów Macintosh:

HP All-in-One • 9
16
Finish software installation
Follow the onscreen instructions. Complete the Sign up
now screen. Congratulations on completing the setup!
a Insert the HP All-in-One Macintosh CD.
b Double-click the HP All-in-One Installer icon.
c Make sure you complete all screens, including
the Setup Assistant. Congratulations on
completing the setup!
Windows Users:
Macintosh Users:
If you do not see these screens, see Troubleshooting on
page 10.
Postpuj zgodnie z instrukcjami wywietlanymi na
ekranie. Wypełnij pola na ekranie Zarejestruj si teraz .
Gratulacje! Instalacja została ukoczona.
a Włó do napdu dysk CD
z oprogramowaniem do obsługi
urzdzenia HP All-in-One na
komputerach Macintosh .
b Kliknij dwukrotnie ikon
HP All-in-One Installer .
c Wykonaj instrukcje wywietlone na
wszystkich ekranach, włcznie z ekranami
Asystenta instalacji. Gratulacje! Instalacja
została ukoczona.
Dokocz instalacj oprogramowania
Uytkownicy systemu Windows:
Uytkownicy komputerów Macintosh:
Jeli te ekrany nie zostan wywietlone, naley
zapoznać si z rozdziałem Rozwizywanie problemów
na stronie 10.

10 • HP All-in-One
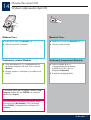
Problem: (Windows only) You did not see the screen telling you when to connect the
USB cable.
Action: Cancel all screens. Remove, and then re-insert the HP All-in-One Windows CD. Refer
to Step 14.
Problem: (Windows only) The Microsoft Add Hardware screens appear.
Action: Click Cancel on all screens. Unplug the USB cable, and then insert the HP All-in-One
Windows CD. Refer to Steps 14 and 15.
Problem: (Windows only) The Device Setup Has Failed To Complete screen appears.
Action: Verify that the control panel overlay is firmly attached. See Step 4. Unplug the
device and plug it in again. Check all connections. Make sure the USB cable is plugged
into the computer. Do not plug the USB cable into a keyboard or non-powered hub. See
Step 15.
Troubleshooting
Rozwizywanie problemów
Problem: (tylko w systemie Windows) Nie został wywietlony ekran informujcy, kiedy
naley podłczyć kabel USB.
Rozwizanie: Anuluj wszystkie ekrany. Wyjmij, a nastpnie włó ponownie do napdu
dysk CD z oprogramowaniem do obsługi urzdzenia HP All-in-One w systemie Windows .
Patrz punkt 14.
Problem: (tylko w systemie Windows) Wywietlony został ekran Kreator dodawania sprztu .
Rozwizanie: Kliknij przycisk Anuluj na wszystkich ekranach. Odłcz kabel USB i włó
ponownie do napdu dysk CD z oprogramowaniem do obsługi urzdzenia HP All-in-One
w systemie Windows . Patrz punkty 14 i 15.
Problem: (tylko w systemie Windows) Wywietlony został ekran Nie udało si zakoczyć
instalacji urzdzenia .
Rozwizanie: Sprawd, czy nakładka na panel sterowania jest dokładnie załoona.
Patrz punkt 4. Odłcz urzdzenie i podłcz je ponownie. Sprawd wszystkie połczenia.
Upewnij si, e kabel USB jest podłczony do komputera. Nie podłczaj kabla USB do
koncentratora klawiatury lub niezasilanego koncentratora. Patrz punkt 15.

1
6
7
4
5
2
3
8
9
10
11
12
© Copyright 2005 Hewlett-Packard Development Company, L.P. Printed in [].
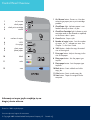
Control Panel Overview
Visit www.hp.com/support for assistance.
on/resume
100%
fit to page
cancel
number of copies
check paper
check print cartridge
plain paper
photo paper
black
color
scan
1 On/Resume button: Powers on. Use after
correcting a paper jam or print cartridge
problem.
2 Check Paper light: Indicates paper is not
loaded correctly or there is a jam.
3 Check Print Cartridge light: Indicates a print
cartridge needs to be cleaned or replaced;
or the access door is open.
4 Cancel button: Stops a job.
5 Number of copies button: Sets the number
of copies. An “E” indicates an error. See
Chapter 1 in the User Guide.
6 100% button: Makes the copy the actual
size of the original.
7 Fit to page button: Adjusts the copy to the
size of the paper.
8 Plain paper button: Sets the paper type
to plain.
9 Photo paper button: Sets the paper type
to photo.
10 Black button: Starts a black and white
copy job.
11 Color button: Starts a color copy job.
12 Scan button: Copies the original to the
computer.
Printed on 100% recycled paper.
Informacje w innym jzyku znajduj si na
drugiej stronie arkusza.

1
6
7
4
5
2
3
8
9
10
11
12
*Q7286-90229*
Q7286-90229
*Q7286-90229*
Alternate language on other side of page.
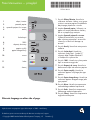
Panel sterowania — przegld
Copyright 2005 Hewlett-Packard Development Company, L.P. Printed in [].
Wydrukowano na papierze wyprodukowanym w 100% z makulatury.
Dodatkow pomoc mona znaleć pod adresem www.hp.com/support.
włcz/wznów
100%
dopasuj do strony
anuluj
liczba kopii
sprawd papier
sprawd pojemnik z tuszem
papier zwykły
papier fotograficzny
mono
kolor
skanuj
1 Przycisk Włcz/Wznów : Umoliwia
włczenie zasilania. Naley uyć go po
usuniciu zacicia papieru lub problemu
dotyczcego pojemnika z tuszem.
2 Lampka Sprawd papier : Wskazuje, e
papier nie został prawidłowo włoony
lub e wystpiło jego zacicie.
3 Lampka Sprawd pojemnik z tuszem :
Wskazuje koniecznoć czyszczenia
albo wymiany pojemnika z tuszem lub
informuje, e drzwiczki dostpu s
otwarte.
4 Przycisk Anuluj : Umoliwia zatrzymanie
zadania.
5 Przycisk Liczba kopii : Umoliwia
ustawienie liczby kopii. Symbol „E”
wskazuje błd. Zobacz Rozdział 1
w Podrczniku uytkownika.
6 Przycisk 100% : Umoliwia wykonywanie
kopii o rozmiarze oryginału.
7 Przycisk Dopasuj do strony : Umoliwia
dostosowanie kopii do rozmiaru papieru.
8 Przycisk Papier zwykły : Umoliwia
ustawienie papieru zwykłego jako typu
papieru.
9 Przycisk Papier fotograficzny : Umoliwia
ustawienie papieru fotograficznego jako
typu papieru.
10 Przycisk Mono : Umoliwia rozpoczcie
czarno-białego zadania kopiowania.
11 Przycisk Kolor : Umoliwia rozpoczcie
kolorowego zadania kopiowania.
12 Przycisk Skanuj : Umoliwia skopiowanie
oryginału na komputer.
-
 1
1
-
 2
2
-
 3
3
-
 4
4
-
 5
5
-
 6
6
-
 7
7
-
 8
8
-
 9
9
-
 10
10
-
 11
11
-
 12
12


HP PSC 1400 All-in-One Printer series instrukcja
- Typ
- instrukcja
w innych językach
Powiązane artykuły
-
HP PSC 2350 All-in-One Printer series instrukcja
-
HP Officejet 4350 All-in-One Printer series Instrukcja instalacji
-
-
-
HP Deskjet 460 Mobile Printer series instrukcja
-
-
HP PSC 1310 All-in-One Printer series instrukcja
-
-
-