
1
Grand X In
User Guide

2
LEGAL INFORMATION
Copyright © 2012 ZTE CORPORATION.
All rights reserved.
No part of this publication may be quoted,
reproduced, translated or used in any form or
by any means, electronic or mechanical,
including photocopying and microfilm, without
the prior written permission of ZTE
Corporation.
ZTE Corporation reserves the right to make
modifications on print errors or update
specifications in this guide without prior
notice.
The Bluetooth
®
trademark and logos are
owned by the Bluetooth SIG, Inc. and any
use of such trademarks by ZTE Corporation
is under license. Other trademarks and trade
names are the property of their respective
owners.
We offer self-service for our smart terminal
device users. Please visit ZTE official website
(at www.zte.com.cn) for more information on
self-service and supported product models.
Information subject to the website.
Version No. : R1.0
Edition Time : 201207
Manual No. : 079584504897

3
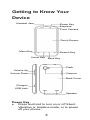
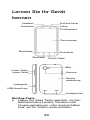
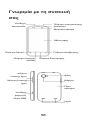
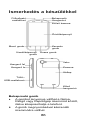
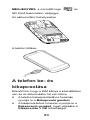
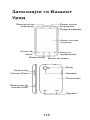
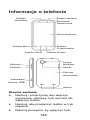
Getting to Know Your
Device
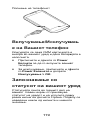
Power Key
• Press and hold to turn on or off Silent,
Vibration or Airplane mode, or to power
off your phone.
Headset Jac
k
Power Key
Touch Screen
Earpiece
Back Key
Menu Ke
y
Search Key
Front Camera
Home Ke
y
Volume Up
Volume Down
Charger
/
USB Jac
k
Camera
Back Cover
Flash
Speaker

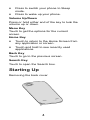
4
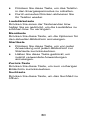
•
Press to switch your phone to Sleep
mode.
•
Press to wake up your phone.
Volume Up/Down
Press or hold either end of the key to tur
n
volume up or down.
Menu Key
Touch to get the options for the current
screen.
Home Key
•
Touch to return to the Home Screen
any application or screen.
•
Touch and hold to see recently used
applications.
Back Key
Touch to go to the previous screen.
Search Key
Touch to open the Search box.
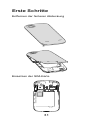
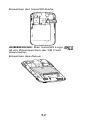
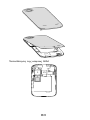
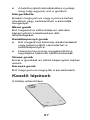
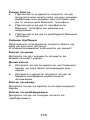
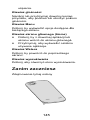
Starting Up
Removing the back cover
n
the
from

5
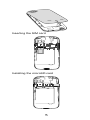
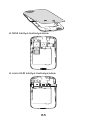
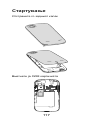
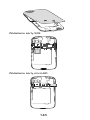
Inserting the SIM card
Installing the microSD card

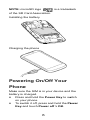
6
NOTE: microSD logo is a trade
m
of the SD Card Association.
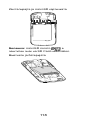
Installing the battery
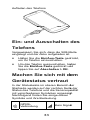
Charging the phone
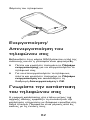
Powering On/Off Your
Phone
Make sure the SIM is in your device and
battery is charged.
•
Press and hold the Power Key to s
w
on your phone.
•
To switch it off, press and hold the P
o
Key and touch Power off > OK.
m
ark
the
w
itch
o
wer

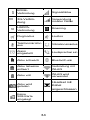
7
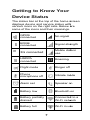
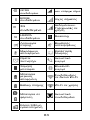
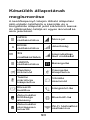
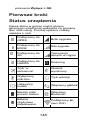
Getting to Know Your
Device Status
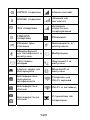
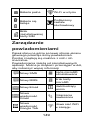
The status bar at the top of the home
s
displays device and service status wit
h
various icons on the right side. Below
a
some of the icons and their meanings.
GPRS
connected
No signal
EDGE
connected
Signal str
e
3G connected
Mobile da
t
use
HSDPA
connected
Roaming
Flight mode Ringer off
Phone
microphone off
Vibrate m
o
Alarm set Speaker
o
Battery low Bluetooth
Battery partially
drained
Connecte
d
Wi-Fi net
w
Battery full Wi-Fi in u
s
s
creen
h
a
re
e
ngth
t
a in
o
de
o
n
on
d
to a
w
ork
s
e

8
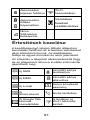
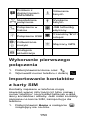
/
Battery
charging
Wired hea
d
connected
No SIM card
installed
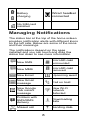
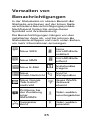
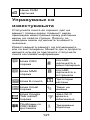
Managing Notifications
The status bar at the top of the home sc
r
provides notification alerts with different
i
on the left side. Below are some of the i
c
and their meanings.
The notifications depend on the apps
installed and you can touch and drag th
e
status bar down to see more information
New SMS
microSD ca
r
unmounted
New MMS
microSD ca
r
removed
New Email Upcoming
e
New Gmail
message
Call on hold
New Google
Talk instant
message
New Wi-Fi
network
detected
Problem with
SMS/MMS
delivery
Downloadin
g
data
Missed call Sending da
t
d
set
r
een
i
cons
c
ons
e
.
r
d
r
d
e
vent
g
t
a

9
Call in progress
USB teth
e
on
USB connected
Portable
W
hotspot
/
Song is playing GPS on
Updates
available
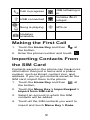
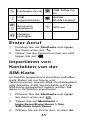
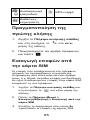
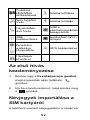
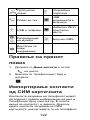
Making the First Call
1. Touch the Home Key and then
the bottom.
2. Enter the phone number and touc
h
Importing Contacts Fr
o
the SIM Card
Contacts saved on the phone can hav
e
information than just a name and a ph
o
number, such as Email, contact icon,
a
address. If you’ve got contacts saved
o
SIM card, import them to the phone.
1. Touch the Home Key and then
the bottom.
2. Touch the Menu Key > Import/ex
p
Import from SIM card.
3. Select an account to which the SI
M
contacts will be added.
4. Touch all the SIM contacts you wa
import and touch Menu Key > Do
n
e
ring is
W
i-Fi
at
h
.
o
m
e
more
o
ne
a
nd
o
n the
at
p
ort >
M
nt to
n
e.

10
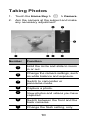
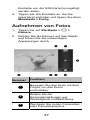
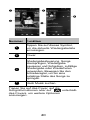
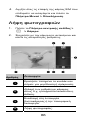
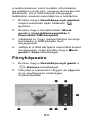
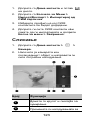
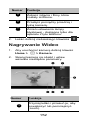
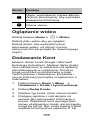
Taking Photos
1. Touch the Home Key > > Camera.
2. Aim the camera at the subject and make
any necessary adjustment.
Number
Function
Hold the circle and slide to zoom
in or out.
Change the camera settings, such
as white balance and exposure.
Switch to camcorder or
panorama mode.
Capture a photo.
View photos and videos you have
captured.
Switch between the front and the
back cameras.
Change the flash setting, only
1
2
3
4
5
6
7

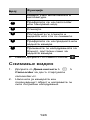
11
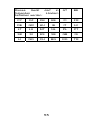
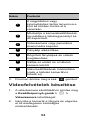
Number
Function
available for the back camera.
3. Lightly touch the blue button .
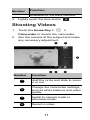
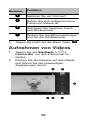
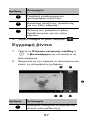
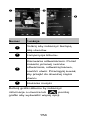
Shooting Videos
1. Touch the Home Key > >
Camcorder to launch the camcorder.
2. Aim the camera at the subject and make
any necessary adjustment.
Numbe
r
Function
Hold the circle and slide to zoom
in or out.
Change the camcorder settings,
such as white balance and video
quality.
Switch to camera mode or
panorama mode.
Record a video.
1
2
3
4

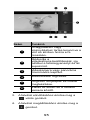
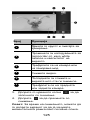
12
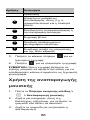
Numbe
r
Function
View photos and videos you
have captured.
Switch between the front and
the back cameras.
3. Touch the red button to start
recording.
4. Touch to stop recording.
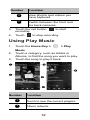
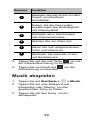
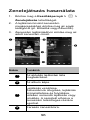
Using Play Music
1. Touch the Home Key > > Play
Music.
2. Touch a category, such as Artists or
Albums, to find the song you want to play.
3. Touch the song to play it back.
Number Function
Touch to see the current playlist.
Album artwork.
5
6
1
2

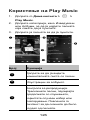
13
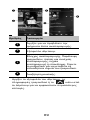
Playback control. Skip songs,
pause and resume playback, use
shuffle or repeat. Drag the slider to
jump to any part of the song.
Search for music.
Touch the album artwork, the song
information or below the artwork to
show more options.
Numbe
r
Function
Song, artist and album names.
Touch and hold to search for
related information.
Give the song a thumbs-up or
thumbs-down.
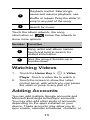
Watching Videos
1. Touch the Home Key > > Video
Player. Touch a video file to watch it.
2. Touch the screen to show the video
control panel, with which you can pause
the video or jump to any part of it.
Adding Accounts
You can add multiple Google accounts and
Microsoft Exchange ActiveSync accounts.
You may also add other kinds of accounts,
depending on the apps installed on your
device. These accounts may allow you to
sync emails, calendar schedules, contacts, or
3
4
5
6

14
other information between your device and
the web.
1. Touch the Home Key > the Menu Key >
System settings > Accounts & sync.
2. Touch ADD ACCOUNT.
3. Touch the type of account you want to
add.
4. Follow the onscreen steps to enter the
information about the account. Most
accounts require a username and
password, but the details may vary. You
may also need to obtain some
information from IT support or system
administrator.
When the account is successfully added, it is
displayed in the Accounts & sync list.
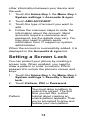
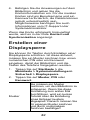
Setting a Screen Lock
You can protect your phone by creating a
screen lock. When enabled, you need to
draw a pattern or enter a numeric PIN or
password to unlock the phone’s screen and
keys.
1. Touch the Home Key > the Menu Key >
System settings > Security > Screen
lock.
2. Touch Pattern, PIN or Password.
Pattern
You must draw a pattern to
unlock the screen. The first
time you set this, a short
tutorial about creating an
unlock pattern appears. Then
you’re prompted to draw and
redraw your own pattern.

15
PIN or
Password
Set a numeric PIN or a
password that you must enter
to unlock your screen.
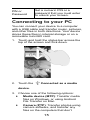
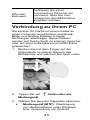
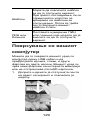
Connecting to your PC
You can connect your device to a computer
with a USB cable and transfer music, pictures,
and other files in both directions. Your device
stores these files in internal storage or on a
removable microSD card.
1. Touch and hold the status bar across the
top of the screen and flick down.
2. Touch the Connected as a media
device.
3. Choose one of the following options:
• Media device (MTP): Transfer media
files on Windows, or using Android
File Transfer on Mac.
• Camera (PTP): Transfer photos using
camera software, and transfer any
files on the computers that don’t

16
support MTP.
To disconnect the device from the computer,
simply unplug the USB cable when you’re
finished.
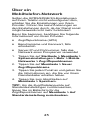
Connecting to the Internet
Via Wi-Fi
1. Touch the Home Key > Menu Key >
System settings > Wi-Fi.
2. Slide the Wi-Fi switch to the ON position
to turn on Wi-Fi.
The Wi-Fi networks that your phone has
detected are displayed with their names
and security settings. If your phone finds
a network that you connected to
previously, it connects to it.
3. Touch a network name to connect to it.
If the network is secured, you're
prompted to enter a password or other
credentials. (Ask your network
administrator for details.)
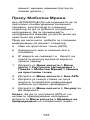
Via a Mobile Phone Network
If the GPRS/EDGE/3G settings are not
pre-configured on your phone, contact your
carrier to get the settings. Do not change the
settings as the service might stop working.
Before you begin, get the following
information from your carrier.
• Access Point Name (APN)
• Username and password if needed
• Server IP and the port number if the
network uses a proxy server

17
1. Touch the Home Key > Menu Ke
y
System settings > More > Mobil
e
networks > Access Point Name
s
2. Touch the Menu Key > New APN.
3. Touch each item to enter the infor
m
you get from your service provider
.
4. Touch the Menu Key > Save to
complete.
TIP: To set the APN to default settings
,
the Menu Key > Reset to default in t
h
APNs screen.
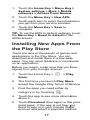
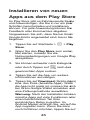
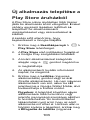
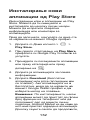
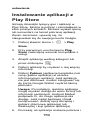
Installing New Apps F
r
the Play Store
There are tens of thousands of games
applications in the Play Store. You can
download and install them in a few ea
s
steps. You can send feedback or com
m
on an application.
Before you begin, make sure that you
h
signed in to your Google account.
1. Touch the Home Key > > Pl
a
Store.
2. The first time you launch Play Sto
accept the Google Play Terms of
S
3. Find the apps you need either by
category or by touching .
4. Touch the app to see more inform
a
about it.
5. Touch Download (free apps) or th
e
(paid apps). If the app is not free,
y
need to sign in to your Google Wa
l
account and select a payment me
t
y
>
e
s
.
m
ation
.
,
touch
h
e
r
om
and
s
y
m
ents
h
ave
a
y
re,
S
ervice.
a
tion
e
price
y
ou
l
let
t
hod.

18
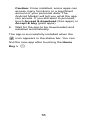
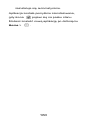
Caution: Once installed, some apps can
access many functions or a significant
amount of your personal data. The
Android Market will tell you what the app
can access. If you still want to proceed,
touch Accept & download (free apps) or
Accept & buy (paid apps).
6. Wait for the app to be downloaded and
installed automatically.
The app is successfully installed when the
icon appears in the status bar. You can
find the new app after touching the Home
Key > .

19
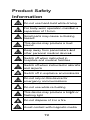
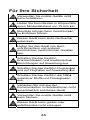
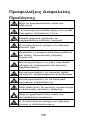
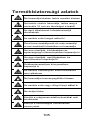
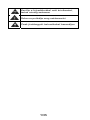
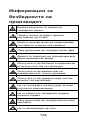
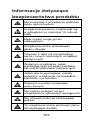
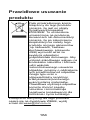
Product Safety
Information
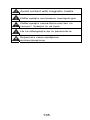
Do not use hand-held while dri
For body-worn operation main
t
separation of 15 mm
Small parts may cause a choki
hazard
This device may produce a lou
sound
Keep away from pacemakers
a
other personal medical device
s
Switch off when instructed in
hospitals and medical facilities
Switch off when instructed in a
i
and airports
Switch off in explosive environ
m
Do not rely on this device for
emergency communications
Do not use while re-fuelling
This device may produce a bri
g
flashing light
Do not dispose of it in a fire
Avoid contact with magnetic m
ving
t
ain a
ng
d
a
nd
s
i
rcrafts
m
ents
g
ht or
edia

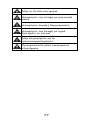
20
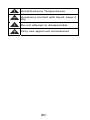
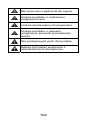
Avoid Extreme Temperatures
Avoid any contact with liquid, keep it
dry
Do not attempt to disassemble
Only use approved accessories
Strona się ładuje...
Strona się ładuje...
Strona się ładuje...
Strona się ładuje...
Strona się ładuje...
Strona się ładuje...
Strona się ładuje...
Strona się ładuje...
Strona się ładuje...
Strona się ładuje...
Strona się ładuje...
Strona się ładuje...
Strona się ładuje...
Strona się ładuje...
Strona się ładuje...
Strona się ładuje...
Strona się ładuje...
Strona się ładuje...
Strona się ładuje...
Strona się ładuje...
Strona się ładuje...
Strona się ładuje...
Strona się ładuje...
Strona się ładuje...
Strona się ładuje...
Strona się ładuje...
Strona się ładuje...
Strona się ładuje...
Strona się ładuje...
Strona się ładuje...
Strona się ładuje...
Strona się ładuje...
Strona się ładuje...
Strona się ładuje...
Strona się ładuje...
Strona się ładuje...
Strona się ładuje...
Strona się ładuje...
Strona się ładuje...
Strona się ładuje...
Strona się ładuje...
Strona się ładuje...
Strona się ładuje...
Strona się ładuje...
Strona się ładuje...
Strona się ładuje...
Strona się ładuje...
Strona się ładuje...
Strona się ładuje...
Strona się ładuje...
Strona się ładuje...
Strona się ładuje...
Strona się ładuje...
Strona się ładuje...
Strona się ładuje...
Strona się ładuje...
Strona się ładuje...
Strona się ładuje...
Strona się ładuje...
Strona się ładuje...
Strona się ładuje...
Strona się ładuje...
Strona się ładuje...
Strona się ładuje...
Strona się ładuje...
Strona się ładuje...
Strona się ładuje...
Strona się ładuje...
Strona się ładuje...
Strona się ładuje...
Strona się ładuje...
Strona się ładuje...
Strona się ładuje...
Strona się ładuje...
Strona się ładuje...
Strona się ładuje...
Strona się ładuje...
Strona się ładuje...
Strona się ładuje...
Strona się ładuje...
Strona się ładuje...
Strona się ładuje...
Strona się ładuje...
Strona się ładuje...
Strona się ładuje...
Strona się ładuje...
Strona się ładuje...
Strona się ładuje...
Strona się ładuje...
Strona się ładuje...
Strona się ładuje...
Strona się ładuje...
Strona się ładuje...
Strona się ładuje...
Strona się ładuje...
Strona się ładuje...
Strona się ładuje...
Strona się ładuje...
Strona się ładuje...
Strona się ładuje...
Strona się ładuje...
Strona się ładuje...
Strona się ładuje...
Strona się ładuje...
Strona się ładuje...
Strona się ładuje...
Strona się ładuje...
Strona się ładuje...
Strona się ładuje...
Strona się ładuje...
Strona się ładuje...
Strona się ładuje...
Strona się ładuje...
Strona się ładuje...
Strona się ładuje...
Strona się ładuje...
Strona się ładuje...
Strona się ładuje...
Strona się ładuje...
Strona się ładuje...
Strona się ładuje...
Strona się ładuje...
Strona się ładuje...
Strona się ładuje...
Strona się ładuje...
Strona się ładuje...
Strona się ładuje...
Strona się ładuje...
Strona się ładuje...
Strona się ładuje...
Strona się ładuje...
Strona się ładuje...
Strona się ładuje...
Strona się ładuje...
Strona się ładuje...
Strona się ładuje...
Strona się ładuje...
Strona się ładuje...
Strona się ładuje...
Strona się ładuje...
Strona się ładuje...
Strona się ładuje...
Strona się ładuje...
Strona się ładuje...
Strona się ładuje...
Strona się ładuje...
Strona się ładuje...
Strona się ładuje...
-
 1
1
-
 2
2
-
 3
3
-
 4
4
-
 5
5
-
 6
6
-
 7
7
-
 8
8
-
 9
9
-
 10
10
-
 11
11
-
 12
12
-
 13
13
-
 14
14
-
 15
15
-
 16
16
-
 17
17
-
 18
18
-
 19
19
-
 20
20
-
 21
21
-
 22
22
-
 23
23
-
 24
24
-
 25
25
-
 26
26
-
 27
27
-
 28
28
-
 29
29
-
 30
30
-
 31
31
-
 32
32
-
 33
33
-
 34
34
-
 35
35
-
 36
36
-
 37
37
-
 38
38
-
 39
39
-
 40
40
-
 41
41
-
 42
42
-
 43
43
-
 44
44
-
 45
45
-
 46
46
-
 47
47
-
 48
48
-
 49
49
-
 50
50
-
 51
51
-
 52
52
-
 53
53
-
 54
54
-
 55
55
-
 56
56
-
 57
57
-
 58
58
-
 59
59
-
 60
60
-
 61
61
-
 62
62
-
 63
63
-
 64
64
-
 65
65
-
 66
66
-
 67
67
-
 68
68
-
 69
69
-
 70
70
-
 71
71
-
 72
72
-
 73
73
-
 74
74
-
 75
75
-
 76
76
-
 77
77
-
 78
78
-
 79
79
-
 80
80
-
 81
81
-
 82
82
-
 83
83
-
 84
84
-
 85
85
-
 86
86
-
 87
87
-
 88
88
-
 89
89
-
 90
90
-
 91
91
-
 92
92
-
 93
93
-
 94
94
-
 95
95
-
 96
96
-
 97
97
-
 98
98
-
 99
99
-
 100
100
-
 101
101
-
 102
102
-
 103
103
-
 104
104
-
 105
105
-
 106
106
-
 107
107
-
 108
108
-
 109
109
-
 110
110
-
 111
111
-
 112
112
-
 113
113
-
 114
114
-
 115
115
-
 116
116
-
 117
117
-
 118
118
-
 119
119
-
 120
120
-
 121
121
-
 122
122
-
 123
123
-
 124
124
-
 125
125
-
 126
126
-
 127
127
-
 128
128
-
 129
129
-
 130
130
-
 131
131
-
 132
132
-
 133
133
-
 134
134
-
 135
135
-
 136
136
-
 137
137
-
 138
138
-
 139
139
-
 140
140
-
 141
141
-
 142
142
-
 143
143
-
 144
144
-
 145
145
-
 146
146
-
 147
147
-
 148
148
-
 149
149
-
 150
150
-
 151
151
-
 152
152
-
 153
153
-
 154
154
-
 155
155
-
 156
156
-
 157
157
-
 158
158
-
 159
159
-
 160
160
-
 161
161
-
 162
162
-
 163
163
-
 164
164
-
 165
165
-
 166
166
-
 167
167
-
 168
168


Powiązane artykuły
-
ZTE Grand X In Instrukcja obsługi
-
ZTE BLADE G Instrukcja obsługi
-
-
ZTE Kis 3 Instrukcja obsługi
-
ZTE Grand Grand S Flex Skrócona instrukcja obsługi
-
ZTE BLADE V Instrukcja obsługi
-
-
-
ZTE Kis Lite Instrukcja obsługi
Inne dokumenty
-
Archos Power 40 Power Skrócona instrukcja obsługi
-
 Archos Neon 40 Neon Skrócona instrukcja obsługi
-
 Mode d'Emploi 45b Neon Skrócona instrukcja obsługi
-
Archos Power 50 Power Instrukcja obsługi
-
 Mode d'Emploi 50e Neon Skrócona instrukcja obsługi
-
Kruger Matz KM0468 Instrukcja obsługi
-
Sony HDR CX520VE Instrukcja obsługi
-
Sony HDR-TG7VE Instrukcja obsługi
-
Sony HDR-XR500VE Instrukcja obsługi


