
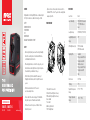
CROSSLINE LASER
SMART-X / SMART-X G
P R O - L10 91
P R O - L10 9 2
www.firma-pro.pl
CONTENTS
Congratulations on choosing a PRO product - a reliable and tough
tool for professional users, suitable for various types of work.
SAFETY
PRODUCT OVERVIEW
SPECIFICATION
USE
MAINTENANCE
WARRANTY AND SERVICE SUPPORT
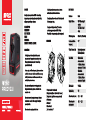
1. Power button / line selection
2. Plus button (laser brightness increase)
3. Minus button (operating time increase)
4. Laser window
5. Lock switch
6. Battery compartment
7. 1/4" mounting thread
SPECIFICATION
Laser Class Class II
Laser Wavelength 635~640nm for Red beam
515~520nm for Green
beam
Leveling Accuracy ±0,3mm/1m (±1,5mm/5m)
Leveling/Compensation
Range
4°±1°
Working Distance (Line) 15m for Red beam
25m for Green beam
Operating Time Red Beam :
First gear: about 40 Hours
Tenth gear: about 180
Hours Green beam:
First gear: about 10 Hours
Tenth gear: about 40
Hours
Power Source 4×1.5V AA
IP Rating IP54
Operation Temperature
Range -10°C ~ 50°C℃
Storage Temperature
Range -25°C ~ 70°C
1
2
3
45
6
7
SAFETY
- Before using the product, please read the safety and handling
instructions carefully. All users must know and follow these
recommendations and instructions.
- When using the product, be careful not to expose your eyes to
the emitted laser beam (red light source). Long term exposure
to laser beams may be hazardous to the eyes.
- Do not look directly into the beam with the naked eye or
through optical instruments, and do not position the laser at
eye level.
- Do not disassemble the laser tool. There are no
user-serviceable parts inside.
- The laser must not be altered in any way. Tool modification
may result in exposure to hazardous laser radiation.
- Do not use the laser in the presence of children or allow
children to operate it.
PRODUCT OVERVIEW
- Exposure to a class 2 laser beam is considered safe for a
maximum of 0.25 seconds. The eyelid reflexes usually provide
adequate protection.

USE
Make sure the lock switch is in the position before inserting
two AA batteries correctly. The lock switch should be in the
position when carrying the laser level and storing. These are
important recommendations!
1. Self-leveling mode
Turn the lock switch to the position - vertical and horizontal
laser beam lights up and the tool starts self-leveling. The signal
light is green. If the indicator light turns red and the lines are
flashing, it means the lines are not level - please set the device
closer to the level because the self-leveling range is about 4°.
Briefly press the power button - the vertical line is turned off and
only the horizontal line is displayed. Short press the power button
again - the horizontal line tuns off and only the vertical line is
displayed. Press the power button again - both horizontal and
vertical lines are displayed. In this way the operating modes
of the device can be changed. After switching the lock to
position, the device turns off.
2. Locked Mode:
When the lock switch is in the position, long press the
button - the vertical and horizontal laser beam lights up and
flashes every 5 seconds, the indicator is red. When the button
is pressed briefly - the vertical line is turned off and only the
horizontal line is displayed, flashing every 5 seconds. Briefly
press the button again - the vertical line is on, flashing every 5
seconds and the horizontal line is off. Briefly press the button
again, the horizontal line and the vertical line are both displayed,
both flashing every 5 seconds. In this way the operating modes
MAINTENANCE
- The device is factory sealed and calibrated to the specified
accuracy.
- It is recommended to perform an accuracy check before first
use and periodic checks during further use, especially when
high precision is required. Do not short any battery terminals
or charge alkaline batteries or dispose of batteries in fire.
- Do not mix old and new batteries. Replace all batteries at the
same time with new batteries of the same brand and type.
- Keep the batteries out of the reach of children.
- Remove the batteries if the device will not be used for 3
months or more.
- Do not store the device in direct sunlight or exposed to high
temperatures. The housing and some internal parts are made
of plastic and may be deformed at high temperatures.
- Exterior plastic parts may be cleaned with a damp cloth.
Although these parts are solvent resistant, NEVER use
solvents. Use a soft, dry cloth to remove moisture from the
tool before storage.
- Do not dispose of this product with household waste.
- Always dispose of batteries in accordance with local
regulations.
WARRANTY AND SERVICE SUPPORT
For warranty and service support, please contact your local
dealer.
of the device can be changed. In the Locked Mode you can tilt the
device as you like. Press and hold the power button to turn off
the device.
3. Energy saving mode:
In the self-leveling and locked mode the laser light can gradually
become brighter by shortly pressing the + button. The light
brightness is divided into 10 levels. After a long press, the light
switches to the brightest level, which the laser signals by pulsing.
Briefly press the – button to gradually reduce the light intensity.
The brightness of the light is divided into 10 levels. Press and
hold the minus button to move to the lowest intensity level.
Flashing indicates when the lowest level is reached. The energy
saving mode has a memory function - the set brightness level is
remembered when the device is turned off.
4. Pulse mode:
In self-leveling mode, long press the power button to enter pulse
mode. The green lamp will flashe continuously. In this mode the +
and – power saving settings do not work.
Note: If the indicator is red and flashes frequently,
it means that the battery is weak and the battery needs
to be replaced.
PRO sp. z o.o.
ul. Strażacka 76,
43-382 Bielsko-Biała, POLAND
tel. +48 33 818 39 09, fax +48 33 818 32 22
www.firma-pro.pl

Klasa lasera Klasa II
Długość fali lasera 635~640nm dla wiązki
czerwonej
515~520nm dla wiązki
zielonej
Dokładność poziomu ±0,3mm/1m (±1,5mm/5m)
Poziomowanie/Zakres
kompensacji
4°±1°
Odległość robocza (linia) 15m dla wiązki czerwonej
25m dla wiązki zielonej
Czas działania Wiązka czerwona:
pierwsze ustawienie:
ok. 40 godzin, dziesiąte
ustawienie: ok. 180 godzin
Wiązka zielona:
pierwsze ustawienie:
ok. 10 godzin, dziesiąte
ustawienie: ok. 40 godzin
Źródło zasilania 4×1.5V AA
Stopień ochrony IP54
Zakres temperatur pracy -10°C ~ 50°C
Zakres temperatur
przechowywania -25°C ~ 70°C
1
2
3
45
6
7
WZÓR
PRECYZJI

OBSŁUGA
Przed prawidłowym włożeniem czterech baterii AA, należy
upewnić się, że przełącznik blokady znajduje się w pozycji .
Przełącznik blokady powinien znajdować się w pozycji podczas
przenoszenia poziomicy laserowej oraz przechowywania.
Sątoważne zalecenia!
1. Tryb samoczynnego poziomowania
Ustawić przełącznik blokady w pozycji pionowa i pozioma
wiązka lasera zapala się i urządzenie rozpoczyna samoczynne
poziomowanie. Lampka sygnalizacyjna ma kolor zielony.
Jeślilampka sygnalizacyjna zapala się na czerwono, a linia
migocze, oznacza to, że linie nie są wypoziomowane, należy
ustawić wtedy poziomicę bliżej poziomu, ponieważ zakres
samoczynnego poziomowania wynosi około 4°. Krótko nacisnąć
przycisk zasilania, linia pozioma zostaje wyłączona, a linia pionowa
jest nadal wyświetlana. Ponownie nacisnąć krótko przycisk
zasilania, linia pionowa jest wyłączona, a linia pozioma jest
wyświetlana. Ponownie nacisnąć przycisk zasilania, wyświetlana
jest ilinia pozioma i linia pionowa. W ten sposób można zmieniać
tryby działania urządzenia. Po przełączeniu blokady do pozycji
następuje wyłączenie poziomicy.
2. Tryb blokady:
Gdy przełącznik blokady znajduje się w pozycji należy dłużej
nacisnąć przycisk, pionowa i pozioma wiązka lasera zapala się
imigocze co 5 sekund, wskaźnik jest zapalony na czerwono.
Pokrótkim naciśnięciu przycisku, linia pozioma zostaje wyłączona,
a linia pionowa jest nadal wyświetlana i migocze co 5 sekund.
Krótko nacisnąć ponownie przycisk, linia pozioma jest włączona,
a linia pionowa zostaje wyłączona, migocząc co 5 sekund.
Krótkonacisnąć ponownie przycisk, linia pozioma i linia pionowa
UWAGA: pulsowanie czerwonego światła z dużą
częstotliwością oznacza niski poziom naładowania baterii -
należy wymienić baterie.
KONSERWACJA
- Narzędzie laserowe jest pieczętowane i kalibrowane
fabryczniez określoną dokładnością.
GWARANCJA I WSPARCIE SERWISOWE
W celach gwarancyjnych oraz wsparcia serwisowego należy
skontaktować się z lokalnym sprzedawcą urządzenia.
są obie wyświetlane, migocząc co 5 sekund. W ten sposób można
zmieniać tryby działania urządzenia. W trybie blokady można
dowolnie przechylać poziomicę. Wcisnąć i przytrzymać przycisk
zasilania, aby wyłączyć poziomicę.
3. Tryb oszczędzania energii:
W trybie samoczynnego poziomowania i w trybie blokady, krótko
wcisnąć przycisk +, światło laserowe stopniowo staje się coraz
jaśniejsze, jasność światła jest podzielona na 10 poziomów, po
dłuższym naciśnięciu światło osiąga najjaśniejszy poziom, co
laser sygnalizuje pulsowaniem; krótko naciskać przycisk -, aby
stopniowo zmniejszać intensywność światła. Jasność światła
jest podzielona na 10 poziomów. Nacisnąć i przytrzymaj przycisk
minus, aby przejść do najniższego poziomu intensywności.
Osiągnięcie najniższego poziomu jest sygnalizowane pulsowaniem.
Tryb oszczędzania energii posiada funkcję pamięci, ustawiony
poziom jasności jest zapamiętywany po wyłączeniu urządzenia.
4. Tryb impulsowy:
W trybie samoczynnego poziomowania należy dłużej przytrzymać
przycisk zasilania, aby przejść do trybu impulsowego. Zielona
lampka pulsuje przez cały czas. W tym trybie, nie działają
ustawienia + i – oszczędzania energii.
- Zaleca się przeprowadzenie kontroli dokładności przed
pierwszym użyciem oraz okresowej kontroli podczas dalszego
użytkowania, szczególnie w przypadku, gdy wymagana jest
duża precyzja.
- Nie wolno zwierać biegunów baterii, próbować ładować baterii
alkalicznych lub wyrzucać ich do ognia.
- Nie należy mieszać starych i nowych baterii. Wymieniać
wszystkie baterie jednocześnie na nowe baterie tej samej
marki i typu.
- Trzymać baterie poza zasięgiem dzieci.
- Wyjąć baterie, jeśli urządzenie nie będzie używane przez
3miesiące lub dłużej.
- Nie przechowywać narzędzia laserowego w miejscu
nasłonecznionym lub narażonym na wysokie temperatury.
- Obudowa i niektóre części wewnętrzne są wykonane z tworzyw
sztucznych i mogą ulec deformacji w wysokiej temperaturze.
- Zewnętrzne części plastikowe można czyścić wilgotną
ściereczką. Chociaż części te są odporne na rozpuszczalniki,
NIGDY nie używać rozpuszczalników do czyszczenia.
Dousuwania wilgoci z narzędzia po zakończeniu pracy,
należyużyć miękkiej, suchej szmatki.
- Nie usuwać produktu ze zmieszanymi odpadami
gospodarczymi.
- Baterie należy zawsze utylizować zgodnie z obowiązującymi
przepisami.
PRO sp. z o.o.
ul. Strażacka 76,
43-382 Bielsko-Biała, POLSKA
tel. +48 33 818 39 09, fax +48 33 818 32 22
www.firma-pro.pl
-
 1
1
-
 2
2
-
 3
3
-
 4
4


w innych językach
- English: Pro Smart-XG Owner's manual
Powiązane artykuły
Inne dokumenty
-
CONDTROL Laser krzyżowy Omniliner 3D Instrukcja obsługi
-
-
 XTline XT130518 Instrukcja obsługi
-
CONDTROL 7-2-105 Instrukcja obsługi
-
-
-
CONDTROL NEO G200 Laser Distance Meter Vector Instrukcja obsługi
