
You should read these user instructions carefully before
using the appliance
Przed uruchomieniem urządzenia należy koniecznie
dokładnie przeczytać niniejszą instrukcję obsługi
ROLLING MACHINE HENDI
WAŁKOWNICA ELEKTRYCZNA
DO PIZZY HENDI
Item: 226599
226612
User manual
Instrukcja obsługi

2
INDEX
CHAPTER 1. GENERAL INFORMATION ......................................................... 3
CHAPTER 2. INSTALLATION .......................................................................... 6
CHAPTER 3. FUNCTIONING........................................................................... 7
CHAPTER 4. USE ............................................................................................ 7
CHAPTER 5. REGULATIONS .......................................................................... 8
CHAPTER 6. MAINTENANCE ......................................................................... 8
CHAPTER 7. EQUIPMENT DISPOSAL ............................................................ 9
Keep this manual with the appliance.
Zachowaj instrukcję urządzenia.
For indoor use only.
Do użytku wewnątrz pomieszczeń.

3
EN
EMISSION: 2010
The manufacturer is not under any obligation to notify
of any future modifications of the product.
All rights of this document are reserved and no al-
teration of re-productions can be made without per-
mission of the manufacturer.
INTRODUCTION
This manual is specifically for the installation, use
and maintenance of Rolling machines, so to enable
the user to use the product in the best way.
It is important that the manual is kept in good condi-
tion and should stay with the equipment at all times,
including sale to another person, for security in the
use of the equipment.
The manual includes:
• Chapters
• Paragraphs
• Notes
The manual is divided into the following chapters:
CHAPTER 1: General information.
CHAPTER 2: Installation.
CHAPTER 3: Functioning.
CHAPTER 4: Usage.
CHAPTER 5: Regulations.
CHAPTER 6: Maintenance.
CHAPTER 7: Demolition of the equipment.
CHAPTER 8: After sale service.
CHAPTER 1. GENERAL INFORMATION
1.2. CHARACTERISTICS OF THE EQUIPMENT
Rolling machines has been designed for food use
only. This equipment is suitable for making dough
for baking and for cakes, it makes easier the crea-
tion of disk shapes for: pizza, bread, buns, cakes,
etc.,
maintaining the essential characteristics of the
dough
itself.
Every rolling machine consist of a steel structure
with a pair of rollers with their own safety system.
The rollers runs thanks to an electric motor started
by a switch supplied by an electric plug, one slide
and,in addiction, a foot pedal to start/stop the equip-
ment can be used if connected to the dedicated plug.

4
EN
1.3. TECHNICAL FEATURES
Model HENDI 226599 HENDI 226612
Equipment dimensions 480x335x(H)430 mm 645x360x(H)430 mm
Approx. Net Weight 18 kg 27 kg
Working temperature +15°C – +45°C +15°C – +45°C
Approx. Dough weight 80 – 210 g 210 – 700 g
Pizza diameter Ø140 – 300 mm Ø260 – 450 mm
The thickness of the dough 0 – 4 mm 0 – 4 mm
Voltage 230 V, 1 N, 50 Hz 230 V, 1 N, 50 Hz
Total Power 250 W 370 W
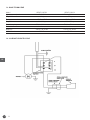
1.4. ELECTRIC DIAGRAMS

5
EN
1.5. INFORMATION REGARDING ACOUSTIC NOISES
The acoustic pressure level well-pondered A measured on an equal equipment, turned out to be steady and
lower of 70 dB (A).
1.6. GENERAL SECURITY INDICATIONS
Although the equipment has been manufactured in
compliance with the security, electrical, mechanical
and hygienic regulations in force at the time of man
-
ufacturing, it can be dangerous if:
• Used in cases and conditions different to those
described by the manufacturer.
• Modifications of the proportionate covers.
• Inattention to the instructions of:
Installation – Functioning – Usage – Maintenance.
IMPORTANT
Installations and maintenance have to be carried out by qualified personnel authorised by the manufacturer
who is not responsible for any mistaken installation or manumission.
1.7. SECURITY INDICATIONS
IMPORTANT
Carefully read the instructions before using the equipment.
WARNING
To avoid dangerous conditions and/or possible injuries caused by. Electric current, mechanical parts, fire
or hygiene problems, you must follow the safety warnings step by step.
• Keep in order your working area.
Disorder can cause dangerous accidents.
• Consider environnemental conditions.
Do not use the equipment in humid, wet or badly lit
environments, close to inflammable liquids or gas.
• Keep away from children and not authorised per-
sonnel.
Do not permit them to go near the equipment or
the working area.
• Only use the equipment with the correct voltage.
Normal usage gives better results.
• Dress in adequate way.
Do not wear hanging clothes or any items which
can be caught in the equipment. Use non-slip
shoes. For hygiene and safety keep your hair tied
back and wear protective gloves.
• Protect the cable.
Do not pull the cable to extract the plug. Do non
leave the cable near high temperatures, sharp ob-
ject, water or solvents.
• Avoid insecure positions.
Find the best surface to ensure the equipment is
balanced.
• Always pay maximum attention.
Do not be distracted when using the equipment.
• Take the plug off.
When the equipment is not in use, before cleaning,
maintenance and moving it.
• Do not use further extensions.
• Check that the equipment is not damaged.
Before using the equipment, carefully check that
all security devices are working.
Check that: the mobile parts are not blocked,
there are not any parts damaged, all the parts
have been set-up correctly and all the conditions
that could influence the regular functioning of the
equipment are in working order.
• Repairing the equipment by qualified personnel.
The repairs can only be carried out by qualified
people, using original spare parts. The non-com-
pliance with these rules can represent danger for
the user.

6
EN
CHAPTER 2. INSTALLATION
2.1. INSTRUCTIONS FOR THE USER
The environmental conditions in which the equip-
ment must be installed must follow these charac-
teristics:
• install in a dry place
• keep away from water and heat sources
• ensure an adequate ventilation and lighting (corre-
sponding
to hygiene and security rules following
the existing laws).
The surface must be Horizontal, no objects should
obstruct the normal ventilation of the equipment.
IMPORTANT
The user’s electric power supply must be provided
with an automatic differential switch which has to
be suitable to the equipment and have a distance
between the contacts of at least 3 mm.
It is particularly important to have a good ground
system.
Check that the electrical data of the user’s electric
system corresponds to the equipment requirements
stated on the rating plat and on the above technical
characteristics (1.3).
2.2. INSTALLATION METHODS
The equipment is delivered in a closed package.
After having taken out the equipment from the pack-
aging, proceed as follows:
• Position the equipment in the corresponding location.
• Remove protection film avoiding contact with
utensils that can damage the surfaces.
NOTE
All the material belonging to the packaging must be disposed in conformity of the local law in force.
2.3. ELECTRICAL CONNECTION
The connection of the equipment to the electrical power supply must be made through the provided cable
and plug.
2.4. POSITIONING OF THE EQUIPMENT
The plug must be accessible without any kind of movement.
The cable connecting the equipment to the wail plug must not be pulled tightly is must be kept always in
order.

7
EN
CHAPTER 3. FUNCTIONING
3.1. CONTROL DEVICES
The equipment is provided with the following control devices:
On the front:
• Start (1)
• Stop (0)
• Foot pedal (2) (Manual operation mode – use foot-pedal in this mode)
3.2. FUNCTIONAL VERIFICATION
After electrical connection to the socket, the equipment is ready for the functional verification.
Start: press the button (1), the equipment starts.
Stop: press the button (0), the equipment stops.
Start the equipment without dough and let it run for 1 minute to make sure it is functioning properly.
CHAPTER 4. USE
Before every working-cycle always make sure that
the equipment is perfectly cleaned, in particular those
surfaces that get in touch with the dough. If neces-
sary clean the equipment as indicated in the follow-
ing chapter.
4.1. USE OF THE EQUIPMENT
TO START
Push the button in position 1; the equipment starts
the two rollers and it is now ready to be used.
Before introducing the dough previously left to rise
(at least 6 to 8 hours) open the rollers using the han-
dle (in position 3-4).The dough needs to be floured
and squashed slightly to get through the rollers.
When the dough comes out it will be in an oval shape
and you will notice reduction of thickness. Towards
the end of this step, you need to support with your
hand the dough until it come out completely. At this
stage rotate the dough in a transversal way of about
90° and put it trough the rollers once more (in posi-
tion 1-2). You will finally get an almost perfect disk
shape dough that can be easily enhanced with few
finishing touches by hand.
TO STOP
Press the button (0).
4.2. USAGE OF THE FOOT PEDAL (OPTION)
The foot pedal will only be installed by request of
customer.
The foot pedal is a convenient alternative to the start
and stop button and it makes possible to keep the
equipment on during the time needed.
This pedal is connected to the equipment by intro-
ducing the plug on the side if the equipment.
TO START
Pressing the button (2), the equipment does not start but it is on hold.
Pressing slowly the foot pedal, rollers start moving and the equipment is ready for use.

8
EN
TO STOP
Taking the foot off of the foot pedal the equipment stops working.
CHAPTER 5. REGULATIONS
Regulating the equipment can only be recommended
as there are different characteristics of: the dough,
the weight, the thickness, the size and the shape of
the disk.
Therefore the correct regulating of the equipment
must be made by experimenting.
The equipment is provided with medium size regula-
tion.
5.1. HOW TO REGULATE THE THICKNESS
IMPORTANT
All the regulations have to be done when the equipment is off.
With this equipment, you can reach different dough thicknesses; just by turning the knob you can unblocked
them pulling the black lever.
The thickness can be modified turning the knob:
• (-) turning clockwise for minimum thickness
• (+) turning anti-clockwise for maximum thickness.
CHAPTER 6. MAINTENANCE
WARNING
Before carrying out any kind of maintenance or
cleaning you must take out the plug.
In any case of mal-functioning or damages of the
equipment you must apply for authorised assis
-
tance from the manufacturer (See chapter 8).
6.1. CLEANING
Cleaning must be done every time the equipment
has been used following all the rules to prevent mal-
functioning of the equipment and for hygienic pur-
poses.
Using a proper bush, first clean the residue of flour
and dough. Release the springs, loosen the dough
scrapers then turn the regulating levers in position,
maximum opening of the rollers.
Clean very carefully the equipment and all the parts,
also the disassembled parts, using a sponge or a
cloth dampen with tepid water and detergent. Rinse
out very well to completely remove the detergent.
Dry with blotting paper, then clean first the surface
in contact with the dough and then all the equipment
with a clean and soft cloth soaked with a specific dis-
infectant for alimentary use.
WARNING
It is important not to use chemical abrasive or corro-
sive products. Absolutely avoid using running water,
non-smooth tools such as steel wool, sponges, etc...
These can damage the surface and compromise the
hygienically safety.
Mount everything in this order: the scraping dough
pieces, the springs, the slides and the protections.
Check that all pieces have been correctly positioned
and fixed.

9
EN
6.2. LUBRIFICATION OF SHAFTS AND ROLLERS
It is necessary to grease shafts and rollers every
year. Take the protection, the slanted wall, the
springs and the dough-scrapers off; unscrew the fix-
ing screws and take off first the back-panel and then
the stands; take off the rollers and the joints. Clean
all these parts accurately by means of a sponge,
warm water and food detergent, rinse thoroughly
and dry it with absorbing paper. Grease both the
shafts and the back on and fix all the parts, starting
from the last taken-off piece.
6.3. POSSIBLES ANOMALIES
Malfunctioning Cause Solution
The equipment does not run Lack of electric power supply Check the user’s electrical system
The foot pedal is connected to
the equipment
Step the foot pedal
CHAPTER 7. EQUIPMENT DISPOSAL
Actuation of the directives 2002/95/CE, 2002/96/CE and 2003/108/CE, about the dangerous substances
use reduction in the electric and electronic equipment, as well as the refuse selling.
The barred garbage symbol included on the machine
shows the needs that the machinery at the end of its
useful life is sold in appropriate centers. The pre-
sent machine rubbish collection at the end of its life
is organized and managed from the producer. The
user that will be able to get rid of the present machi-
ne will have so to contact the producer and follow the
new adopted system to allow the equipment rubbish
collection reached at the life end. The adequate rub-
bish collection for the equipment successive star-
ting dismissed to the recycling, to the treatment and
to the environmentally compatible selling contribu-
tes to prevent possible negative effects on the
environment and on the health and favors the reuse
and/or material recycling of the equipment.
In the machine dangerous substances are not pre-
sent.

10
PL
SPIS TREŚCI
CZĘŚĆ 1. INFORMACJE OGÓLNE ................................................................ 11
CZĘŚĆ 2. INSTALACJA ................................................................................. 14
CZĘŚĆ 3. DZIAŁANIE ................................................................................... 15
CZĘŚĆ 4. OBSŁUGA ..................................................................................... 15
CZĘŚĆ 5. REGULACJA ................................................................................. 16
CZĘŚĆ 6. KONSERWACJA ............................................................................ 16
CZĘŚĆ 7. UTYLIZACJA URZĄDZENIA .......................................................... 17

11
PL
WYDANIE: 2010
Producent nie jest zobowiązany do informowania
o dalszych zmianach produktu.
Wszystkie prawa do niniejszego dokumentu są za-
strzeżone, zmiany i kopiowanie instrukcji bez zezwo-
lenia producenta są wzbronione.
WPROWADZENIE
Niniejsza instrukcja dotyczy instalacji, eksploatacji
i konserwacji wałkownic w sposób umożliwiający
użytkownikowi najlepsze wykorzystanie ich możli-
wości.
Instrukcję należy zachować w dobrym stanie i w po-
bliżu urządzenia, a w przypadku sprzedaży przeka-
zać kolejnemu użytkownikowi w celu zapewnienia
bezpiecznej eksploatacji.
Instrukcja składa się z:
• Części
• Punktów
• Uwag
Niniejsza instrukcja składa się z następujących części:
CZĘŚĆ 1: Informacje ogólne
CZĘŚĆ 2: Instalacja
CZĘŚĆ 3: Działanie
CZĘŚĆ 4: Eksploatacja
CZĘŚĆ 5: Regulacja
CZĘŚĆ 6: Konserwacja
CZĘŚĆ 7: Utylizacja urządzenia
CZĘŚĆ 8: Serwis posprzedażowy
CZĘŚĆ 1. INFORMACJE OGÓLNE
1.2. CHARAKTERYSTYKA URZĄDZENIA
Wałkownice przeznaczone są wyłącznie do obróbki
żywności. Urządzenie służy do przygotowywania
ciasta, ułatwia formowanie placków do pizzy, chleba
,
bułek, ciast itp., utrzymując przy tym podstawowe
parametry ciasta.
Każda wałkownica składa się ze stalowej ramy i pary
wałków z własnym systemem bezpieczeństwa. Wał-
ki poruszane są za pomocą silnika elektrycznego
zasilanego z wtyczki, ślizgacza i pedału służącego
do uruchomienia/zatrzymania urządzenia, podłą-
czanego do specjalnego gniazda.

12
PL
1.3. DANE TECHNICZNE
Model HENDI 226599 HENDI 226612
Wymiary urządzenia 480x335x(H)430 mm 645x360x(H)430 mm
Przybliżona masa netto 18 kg 27 kg
Temperatura robocza +15°C – +45°C +15°C – +45°C
Przybliżona masa ciasta 80 – 210 g 210 – 700 g
Średnica pizzy Ø140 – 300 mm Ø260 – 450 mm
Grubość ciasta 0 – 4 mm 0 – 4 mm
Napięcie 230 V, 1 N, 50 Hz 230 V, 1 N, 50 Hz
Moc całkowita 250 W 370 W
1.4. SCHEMATY ELEKTRYCZNE

13
PL
1.5. INFORMACJE DOTYCZĄCE HAŁASU
Poziom ciśnienia akustycznego mierzony na identycznym urządzeniu był stały i nie przekraczał 70 dB (A).
1.6. OGÓLNE INFORMACJE DOTYCZĄCE BEZPIECZEŃSTWA:
Chociaż urządzenie wykonano zgodnie z przepisami
dotyczącymi bezpieczeństwa, instalacji elektrycz-
nych i higieny obowiązującymi w momencie wytwo-
rzenia, może stanowić zagrożenie w przypadku:
• Stosowania w warunkach innych niż zalecone
przez producenta,
• Modyfikacji osłon,
• Nieprzestrzegania instrukcji:
instalacji - działania - obsługi - konserwacji.
WAŻNE
Instalację i konserwację musi przeprowadzić wykwalifikowany personel upoważniony przez producenta,
który nie ponosi odpowiedzialności za błędy w instalacji.
1.7. WSKAZÓWKI DOTYCZĄCE BEZPIECZEŃSTWA
WAŻNE
Przed użyciem urządzenia należy dokładnie przeczytać instrukcję obsługi.
OSTRZEŻENIE
Aby uniknąć niebezpieczeństw lub możliwych obrażeń spowodowanych przez prąd elektryczny, części
mechaniczne, pożar lub problemy z higieną, należy ściśle stosować się do ostrzeżeń bezpieczeństwa.
• Utrzymywać obszar roboczy w czystości.
Nieporządek może prowadzić do niebezpiecznych
wypadków.
• Zwracać uwagę na otoczenie.
Nie używać urządzenia w środowisku wilgotnym,
mokrym lub źle oświetlonym, w pobliżu łatwopal
-
nych cieczy lub gazów.
• Przechowywać z dala od dzieci i nieuprawionych
pracowników.
Nie zezwalać na ich dostęp do urządzenia ani ob-
szaru roboczego.
• Używać urządzenia wyłącznie przy odpowiednim
napięciu.
Zapewnia to lepsze wyniki pracy.
• Należy zakładać odpowiednią odzież.
Nie zakładać luźnej odzieży ani wiszących przed-
miotów, które mogą zostać złapane przez urzą-
dzenie. Należy nosić antypoślizgowe obuwie. W
celu zapewnienia higieny należy związywać włosy
i nosić rękawice ochronne.
• Chronić przewód zasilania
Nie ciągnąć za przewód, aby odłączyć wtyczkę.
Nie umieszczać przewodu w miejscach o wysokiej
temperaturze, w pobliżu ostrych przedmiotów,
wody albo rozpuszczalników.
• Unikać niezabezpieczonego położenia urządzenia.
Umieścić urządzenie na powierzchni gwarantują-
cej jego stabilność.
• Zawsze zachowywać maksymalną ostrożność.
Podczas obsługi skoncentrować się na urządzeniu.
• Odłączać wtyczkę
Gdy urządzenie nie jest używane, przed czyszcze-
niem, konserwacją i przenoszeniem.
• Nie używać przedłużaczy.
• Sprawdzić, czy urządzenie nie jest uszkodzone.
Przed przystąpieniem do użytkowania urządzenia
sprawdzić, czy wszystkie zabezpieczenia działają.
Sprawdzić, czy ruchome części urządzenia nie są
zablokowane, czy nie występują uszkodzenia czę-
ści, czy wszystkie części poprawnie skonfiguro-
wano i czy wszystkie warunki, które mogą mieć
wpływ na działanie urządzenia są odpowiednie.
• Naprawy urządzenia mogą przeprowadzać wy-
łącznie wykwalifikowani pracownicy.
Urządzenie mogą naprawiać wyłącznie wykwalifi-
kowane osoby, używając oryginalnych części.
Nieprzestrzeganie niniejszych zasad może stano-
wić zagrożenie dla użytkownika.

14
PL
CZĘŚĆ 2. INSTALACJA
2.1. INSTRUKCJA DLA INSTALATORA
Warunki instalacji urządzenia:
• instalować w suchym miejscu
• instalować z dala od źródeł wody i ciepła
• zapewnić odpowiednią wentylację i oświetlenie
odpowiadające obowiązującym przepisom doty-
czącym higieny i bezpieczeństwa.
Powierzchnia instalacji urządzenia musi być pozio-
ma, urządzenie musi mieć zapewnioną odpowiednią
wentylację.
WAŻNE
Instalacja elektryczna musi być wyposażona w au-
tomatyczny wyłącznik różnicowo-prądowy, przy
czym minimalna odległość między stykami musi
wynosić przynajmniej 3 mm.
Szczególne znaczenie ma odpowiedni system uzie-
mienia.
Sprawdzić, czy parametry instalacji elektrycznej odpowiadają wymogom urządzenia określonym na ta-
bliczce znamionowej przedstawionej w pkt. charakterystyka techniczna (1.3).
2.2. SPOSÓB INSTALACJI
Urządzenie dostarczane jest w zamkniętym opako
-
waniu.
Po rozpakowaniu urządzenia należy wykonać nastę-
pujące czynności:
• Ustawić urządzenie w odpowiednim miejscu.
• Zdjąć folię ochronną unikając kontaktu ostrych
narzędzi z powierzchnią urządzenia.
UWAGA
Wszystkie materiały opakowaniowe należy zutylizować zgodnie z obowiązującymi przepisami.
2.3. PODŁĄCZENIE DO INSTALACJI ELEKTRYCZNEJ
Urządzenie należy podłączyć do zasilania za pomocą dostarczonego kabla z wtyczką.
2.4. UMIEJSCOWIENIE URZĄDZENIA
Dostęp do wtyczki musi był łatwy, niewymagający
przesuwania urządzenia.
Kabel zasilający podłączony do gniazdka ściennego
nie może być naciśnięty i musi być utrzymany w od-
powiednim stanie.

15
PL
CZĘŚĆ 3. DZIAŁANIE
3.1. ELEMENTY STEROWANIA
Urządzenie wyposażone jest w następujące elementy sterowania:
Z przodu:
• Start (1)
• Stop (0)
• Pedał (2) (tryb ręczny – wymaga zastosowania pedału)
3.2. SPRAWDZENIE DZIAŁANIA
Po podłączeniu do gniazdka urządzenie jest gotowe do sprawdzenia działania.
Start: nacisnąć przycisk (1), urządzenie zostanie uruchomione.
Stop: nacisnąć przycisk (0), urządzenie zostanie zatrzymane.
Uruchomić urządzenie, odczekać 1 minutę pracy urządzenia, sprawdzając, czy działa poprawnie.
CZĘŚĆ 4. OBSŁUGA
Przed rozpoczęciem cyklu roboczego zawsze spraw-
dzać, czy urządzenie jest czyste, w szczególności
dotyczy to powierzchni mających kontakt z ciastem.
W razie potrzeby wyczyścić urządzenie zgodnie z na-
stępną częścią.
4.1. OBSŁUGA URZĄDZENIA
URUCHOMIENIE
Nacisnąć przycisk 1, urządzenie uruchomi dwa wałki,
jest gotowe do pracy.
Przed położeniem wyrośniętego ciasta (minimum
6-8 godzin) otworzyć wałki za pomocą uchwytu (po-
łożenie 3-4). Ciasto należy oprószyć mąką i delikat-
nie ścisnąć, aby przeszło przez wałki. Po przejściu
przez wałki ciasto będzie miało owalny kształt i wi-
doczne będzie zmniejszenie grubości. Przed całko-
witym przejściem ciasta należy chwycić je dłonią.
Następnie obrócić ciasto o ok. 90° i ponownie podać
na wałki (położenie 1-2). W efekcie uzyskany zostanie
niemal idealne koło, które można poprawić ręcznie.
WYŁĄCZANIE
Nacisnąć przycisk (0).
4.2. KORZYSTANIE Z PEDAŁU (OPCJA)
Pedał nożny instalowany jest wyłącznie na żądanie
klienta.
Pedał to wygodna alternatywa dla przycisku uru-
chamiania i zatrzymywania, umożliwia ciągłą pracę
urządzenia przez potrzebny czas.
Pedał podłączony jest do urządzenia za pomocą
gniazda z boku.
URUCHOMIENIE
Nacisnąć przycisk (2) - urządzenie nie zostanie uruchomione, ale przełączone w stan gotowości.
Powoli naciskać pedał, wałki zaczną się obracać i urządzenie będzie gotowe do pracy.

16
PL
WYŁĄCZANIE
Zdjęcie stopy z pedału powoduje zatrzymanie urządzenia.
CZĘŚĆ 5. REGULACJA
Regulacja ustawień urządzenia zależy od zastosowa-
neg
o
ciasta, jego masy, grubości, wielkości i kształt
u
dysku.
Odpowiednią regulację urządzenia można osiągnąć
metoda prób i błędów.
Urządzenie dostarczane jest z ustawieniami średnimi.
5.1. REGULACJA GRUBOŚCI
WAŻNE
Wszystkie zmiany ustawień należy przeprowadzać przy wyłączonym urządzeniu.
Urządzenie pozwala na zmianę grubości ciasta, wystarczy obrócić pokrętło. Aby odblokować pokrętło, na-
leży pociągnąć czarną dźwignię.
Grubość ciasta można zmienić obracając pokrętło:
• (-) obrót w prawo zmniejsza grubość.
• (+) obrót w lewo zwiększa grubość.
CZĘŚĆ 6. KONSERWACJA
OSTRZEŻENIE
Przed przystąpieniem do czynności konserwacyj
-
nych lub czyszczenia należy odłączyć wtyczkę od
gniazdka.
W przypadku nieprawidłowego działania lub awarii
urządzenia należy zwrócić się do autoryzowanego
serwisu producenta (patrz część 8).
6.1. CZYSZCZENIE
Mycie należy przeprowadzać po każdym użyciu
urządzenia, przestrzegając wszystkich zasad mają-
cych na celu uniknięcie awarii urządzenia oraz ze
względów higienicznych.
Najpierw należy usunąć pozostałości mąki i ciasta
odpowiednią szczotką. Zwolnić sprężyny, poluzować
skrobaki, następnie obrócić dźwignie regulujące do
maksymalnego otwarcia wałków.
Dokładnie wyczyścić urządzenie i wszystkie części
(także zdemontowane) za pomocą gąbki albo ście-
reczki, letniej wody i detergentu. Dokładnie spłukać,
aby usunąć detergent. Osuszyć ręcznikiem papiero-
wym, najpierw wyczyścić powierzchnię mającą kon-
takt z ciastem, następnie pozostałą część urządze-
nia wyczyścić za pomocą miękkiej ściereczki ze
środkiem dezynfekującym do urządzeń mających
kontakt z żywnością.
OSTRZEŻENIE
Nie używać chemicznych środków ściernych ani
powodujących korozję. Nie myć pod bieżącą wodą,
z użyciem ściernych przedmiotów, np. wełny stalo-
wej, szorstkich gąbek itp. Mogą one uszkodzić po-
wierzchnię i obniżyć bezpieczeństwo higieniczne.
Zamontować części w następującej kolejności: skro-
baki, sprężyny, ślizgacze i osłony.
Sprawdzić, czy wszystkie elementy zostały popraw-
nie zamontowane i zamocowane.

17
PL
6.2. SMAROWANIE WAŁÓW I WAŁKÓW
Raz w roku należy smarować wały i wałki. Zdjąć
osłony, ukośną płytę, sprężyny i skrobaki, odkręcić
śruby mocujące i zdjąć najpierw panel tylny, a na-
stępnie stojaki. Zdjąć wałki i łączenia. Dokładnie
umyć wszystkie te części gąbką, ciepłą wodą i deter-
gentem dopuszczonym do kontaktu z żywnością, do-
kładnie spłukać i osuszyć ręcznikiem papierowym.
Nasmarować oba wały i zamocować wszystkie czę-
ści z powrotem, zaczynając od ostatniej zdjętej.
6.4. MOŻLIWE USTERKI
Nieprawidłowe działanie Przyczyna Rozwiązanie
Urządzenie nie włącza się Brak zasilania Sprawdzić instalację elektryczną
Do urządzenia podłączony jest pedał Nacisnąć pedał stopą
CZĘŚĆ 7. UTYLIZACJA URZĄDZENIA
Wdrażanie dyrektyw 2002/95/WE, 2002/96/WE oraz 2003/108/WE w sprawie ograniczenia stosowania
niebezpiecznych substancji w sprzęcie elektrycznym i elektronicznym i unieszkodliwiania odpadów.
Symbol odpadu zakazanego umieszczony na maszy-
nie oznacza konieczność utylizacji urządzenia po za-
kończeniu eksploatacji w specjalnym zakładzie.
Obecnie odbiór urządzeń do złomowania po zakoń-
czeniu ich okresu eksploatacji jest organizowany
i zarządzany przez producenta. Chcąc usunąć urzą-
dzenie po zakończeniu używania, użytkownik musi
skontaktować się z producentem, a następnie postę-
pować zgodnie z nowo przyjętym systemem zbiorki
odpadów obowiązującym w czasie, gdy okres eks-
ploatacji urządzenia zostanie zakończony. Utylizacja
odpadów właściwa dla urządzeń poddawanych recy-
klingowi, przetwarzaniu lub złomowaniu przyczynia
się do zapobiegania ewentualnym negatywnym
skutkom dla środowiska oraz zdrowia, a także za-
chęca do korzystania z surowców wtórnych lub recy-
klingu materiałów wchodzących w skład produktu.
W urządzeniu nie występują substancje niebezpieczne.

18

19

Hendi B.V.
Steenoven 21
3911 TX Rhenen, The Netherlands
Tel: +31 (0)317 681 040
Fax: +31 (0)317 681 045
Email: [email protected]
Hendi Polska Sp. z o.o.
ul. Magazynowa 5
62-023 Gądki, Poland
Tel: +48 61 6587000
Fax: +48 61 6587001
Email: [email protected]
Hendi Food Service Equipment GmbH
Gewerbegebiet Ehring 15
5112 Lamprechtshausen, Austria
Tel: +43 (0) 6274 200 10 0
Fax: +43 (0) 6274 200 10 20
Email: offi[email protected]
Find Hendi on internet:
www.hendi.eu
www.facebook.com/HendiFoodServiceEquipment
www.linkedin.com/company/hendi-food-service-equipment-b.v.
www.youtube.com/HendiEquipment
Hendi Food Service Equipment Romania S.R.L.
Str. 13 decembrie 94A, Hala 14
Brașov 500164 RO, Romania
Tel: +40 268 320330
Fax: +40 268 320335
Email: offi[email protected]o
Hendi UK Ltd.
Central Barn, Hornby Road
Lancaster, LA2 9JX, United Kingdom
Tel: +44 (0) 333 0143200
Email: [email protected]o.uk
Hendi HK Ltd.
1208, 12/F Exchange Tower
33 Wang Chiu Road, Kowloon Bay, Hong Kong
Tel: +852 2154 2618
Email: [email protected]
© 2017 Hendi BV Rhenen - The Netherlands Ver: 09-04-2018
- Changes, printing and typesetting errors reserved.
- Producent zastrzega sobie prawo do zmian
oraz błędów drukarskich w instrukcji.
-
 1
1
-
 2
2
-
 3
3
-
 4
4
-
 5
5
-
 6
6
-
 7
7
-
 8
8
-
 9
9
-
 10
10
-
 11
11
-
 12
12
-
 13
13
-
 14
14
-
 15
15
-
 16
16
-
 17
17
-
 18
18
-
 19
19
-
 20
20


Hendi 226612 Instrukcja obsługi
- Typ
- Instrukcja obsługi
w innych językach
- English: Hendi 226612 User manual
Powiązane artykuły
-
Hendi 226636 Instrukcja obsługi
-
Hendi 617595 Instrukcja obsługi
-
Hendi 226346 Instrukcja obsługi
-
-
-
-
-
-
-
Hendi 975305 Instrukcja obsługi