Silvercrest SDG 800 A1 Operating Instructions Manual
- Typ
- Operating Instructions Manual

4
Parní vařič
Návod k obsluze
Parni kuhalnik
Navodila za uporabo
Pároló
Használati utasítás
KITCHEN TOOLS
Steamer SDG 800 A1
Prístroj na parné dusenie
Návod na obsluhu
Urządzenie do gotowania
na parze
Instrukcja obsługi
Steamer
Operating instructions
KOMPERNASS GMBH
BURGSTRASSE 21 · D-44867 BOCHUM
www.kompernass.com
ID-Nr.: SDG 800 A1-08/11-V1
IAN: 71108
Dampfgarer
Bedienungsanleitung
CV_71108_SDG800A1_LB4.qxd 26.09.2011 15:09 Uhr Seite 1

1
2
3
4
5
6
7
8
9
10
11
12
15
14
13
16
17
18
19
A
B
20
21
22
SDG 800 A1
CV_71108_SDG800A1_LB4.qxd 26.09.2011 15:09 Uhr Seite 4

5 GB
Table of contents
Introduction
Intended Use ................................................................................................................... Page 6
Technical Data ................................................................................................................ Page 6
Scope of Supply .............................................................................................................. Page 6
Description of Components ............................................................................................ Page 7
Safety ............................................................................................................................. Page 7
Use Original Accessories .............................................................................................. Page 8
Prior to Initial Use ................................................................................................ Page 8
Initial Operation .................................................................................................... Page 8
Setting the clock .............................................................................................................. Page 9
Using Immediate-Start Function ..................................................................................... Page 9
Using Delay-Start Function ............................................................................................. Page 10
Keep-Warm Mode .......................................................................................................... Page 10
Using Several Steam Trays ............................................................................................. Page 10
Useful tips ........................................................................................................................ Page 11
Steaming chart ............................................................................................................... Page 11
Storing the Steamer in a Space-Saving Way ................................................................ Page 14
Descaling the Base of the Appliance / Water Tank ...................................................... Page 15
Cleaning and maintenance .......................................................................... Page 15
Service ........................................................................................................................... Page 15
Warranty ..................................................................................................................... Page 16
Disposal ........................................................................................................................ Page 16
Declaration of Conformity / Manufacturer.................................... Page 17
Recipes .......................................................................................................................... Page 17

6 GB
Introduction
Steamer SDG 800 A1
Q
Introduction
We are pleased that you have chosen
this product. Fold out the page with the
pictures and familiarise yourself with the
functions of the appliance before the initial operation.
For this, read the following instruction manual and
the safety advices carefully. Only use the appliance
as described and for the stated ranges of use. Keep
this instruction manual safely. Hand out all documents
to third persons when passing on the appliance.
Q
Intended Use
The appliance is designed for steaming food. The
steamer may only be used in dry and confined spac
es.
Other uses or modifications of the appliance are not
intended and harbour considerable risks. For dam-
age arising from not intended use, the manufacturer
does not assume liability. This appliance is intended
exclusively for use in domestic households.
Do not use the appliance for commercial purposes!
Q
Technical Data
Type designation SDG 800 A1
Nominal voltage: 220–240 V∼, 50 Hz
Nominal power: 800 W
Volume steam trays: 3 l
Volume rice bowl: 1 l
Dimensions: approx. 31.5 x 39.7 x 23.2 cm
(W x H x D)
Weight: 2.05 kg
Q
Scope of Supply
Check the scope of supply for completeness as well
as the intactness of the product and all com ponents
immediately after unpacking.
1 Base of the appliance
1 Turbo ring
1 Condensate collection basin
3 Steam trays
1 Rice bowl (1 l)
1 Cover
1 Instruction manual
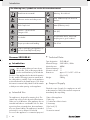
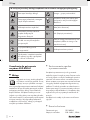
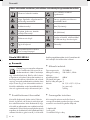
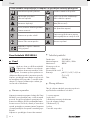
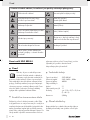
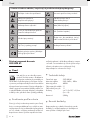
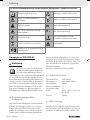
The following icons / symbols are used in this instruction manual:
Read instruction manual! Warning - Hot surfaces!
Observe caution and safety notes!
Keep children away from electrical
devices!
Risk of explosion!
W
Watts (Effective power)
Caution – electric shock!
Danger to life!
V
~
Volt (AC)
Food-safe!
Check that the device, mains lead
and plug are in good condition!
Proper procedure and handling. Risk of fire!
Dispose packaging and appliance in
an environmentally-friendly way!

7 GB
Introduction / Safety
Q
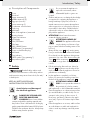
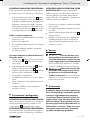
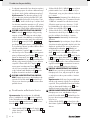
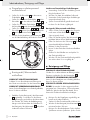
Description of Components
1
Cover
2
Rice bowl
3
Upper steam tray (3)
4
Middle steam tray (2)
5
Egg cups (recesses)
6
Lower steam tray (1)
7
Condensate collection basin
8
Turbo ring
9
MIN mark
10
Base of the appliance / water tank
11
Heating element
12
Water level indicator
13
LCD-display
14
ON / OFF button
15
Pilot lamp
16
PLUS / MINUS button
17
PROG button (“programming”)
18
Power cord with mains plug
19
MAX mark
20
Time indicator
21
PROG symbol (“programming”)
22
Keep-warm symbol
Q
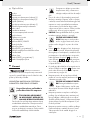
Safety
Read all safety advices and
instructions. Non-observance of the safety advices
and instructions may cause electric shock, fire and /
or bad injuries.
KEEP ALL SAFETY ADVICES AND
INSTRUCTIONS FOR THE FUTURE!
Avoid injuries and damage of
the electrical appliance:
DANGER OF LIFE AND ACCI-
DENT FOR BABIES AND
CHILDREN! Never leave children
unsupervised with the packing material and
the product. There is the hazard of choking by
packing material and the hazard of life by burns.
Children often underrate the risks. Always keep
children away from the product.
Do not operate the appliance in
explosive environments, where
inflammable liquids or gases are
located.
Children and persons, not having the knowledge
or experience in operating the appliance or
having handicaps of physical, sensorial or
mental nature must not operate the appliance
without supervision or instruction by a person,
responsible for their safety. Children must be
supervised in order to ensure that they do not
play with the appliance.
ATTENTION! Never leave the steamer
unattended during operation.
ATTENTION! HAZARD OF
BURNS! The appliance will become
very hot during use. Beware of get-
ting in contact with the ascending steam or the
hot food.
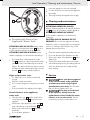
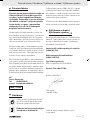
Always lift the cover
1
slowly, turning away
from you and let the steam exhaust backwards.
Do not bend over the appliance during steam
generation. Use oven cloths when touching the
cover
1
and the steam trays
3
,
4
,
6
. Use
a long fork or tongs when checking if the food
is done.
Pull the mains plug after each use. Never let
the cord
18
hang down over the edge of the
work surface so that the appliance can not be
pulled down accidentally.
Let the appliances completely cool down,
before you remove the remaining water from
the base of the appliance / water tank
10
.
ATTENTION! HAZARD OF
FIRE! Do not operate the steamer in
the proximity of or below curtains,
wall cupboards or other inflammable materials.
Place the appliance on a heat resistant surface
(no varnished tables, no table cloths). Do not
operate it in the vicinity of other sources of
heat (oven, gas flame). Otherwise, the appli-
ance and / or pieces of furniture may be dam-
aged.
Place the appliance on an even, stable surface
at a safe distance to walls and cupboards in
order to avoid any damage caused by steam
rising.

8 GB
Safety / Prior to Initial Use / Initial Operation
Always fill the base of the appliance / water
tank
10
with sufficient water for the period of
steaming. Do not cover the base of the appli-
ance / water tank
10
with aluminium foil or
any other material. If not observed, this can
lead to an overheating of the appliance.
Damage of the appliance is the consequence.
Never immerse the appliance in water and
always pull the mains plug before cleaning or
transporting it.
FOOD-SAFE! The taste and smell
of your food are not detrimentally
affected by this product.
Avoid the hazard of
life by electric shock:
Make sure that the details on the rating label
are in conformity with your mains voltage.
Only connect the unit to alternating current.
Do not at all operate this unit with an external
timer or a separate telecontrol system.
Check the power cord
18
regularly
for damage or deterioration.
Do not operate the appliance when the power
cord
18
or the mains plug is damaged.
ATTENTION! A damaged power cord
18
presents a hazard of life by electric shock.
Have appliances, which do not work faultlessly
or which are damaged, immediately and only
checked and repaired by the after-sales service.
Do not use the power cord
18
for unplugging
the appliance. Keep the power cord
18
away
from hot surfaces, sharp edges and mechanical
forces. Damaged or entangled cords
18
increase
the risk of an electric shock.
Do not operate the appliance outside. Never
let the power cord
18
become wet or damp
during operation.
Unplug the power cord
18
when you are not
operating the appliance.
Q
Use Original Accessories
Only use accessories and additional equipment
stated in the instruction manual. The use of other
products or accessories than recommended
in the instruction manual may present a risk of
injuries for you.
Q
Prior to Initial Use
Clean all detachable parts prior to the initial use
with warm soapy water and dry them carefully.
Wipe the interior of the base of the appliance /
water tank
10
with a damp cloth.
Q
Initial Operation
Observe the mains voltage. The mains voltage of
the power source must be in conformity with the
details on the rating label of the appliance. Appli-
ances declared with 230 V can also be operated
with 220 V.
Place the base of the appliance
10
on a stable,
even surface.
Then place the black turbo ring
8
onto the
heating element
11
mounted in the centre.
Make sure that the larger side faces downwards.
Now fill the base of the appliance / water tank
10
with cold water up to the MAX mark
19
.
Note: Consider that the base of the appliance /
water tank
10
has to be filled with water at
least up to the MIN mark
9
.
ATTENTION! HAZARD OF BURNS!
Make sure that the water does not exceed the
MAX mark
19
. Otherwise, hot water may spurt
out of the appliance during operation.
ATTENTION! Do not add anything like sea-
sonings etc. to the water. This may affect the
steam flow and / or damage the surface of the
base of the appliance / water tank
10
and the
heating element
11
.
Now place the black condensate collection
basin
7
onto the base of the appliance
10
.
Make sure that the semi-circular elevation
points to the front towards the keypad and is

9 GB
Initial Operation
level. Thus, the turbo ring
8
will be kept in
position.
Place the food in the steam trays
3
,
4
,
6
.
Ensure that all parts are positioned correctly
before switching on the appliance.
ATTENTION! Never use bowls or other parts,
not especially produced for this appliance.
Otherwise, there may be the risk of injuries
and / or damage of the appliance.
Now place the steam trays
3
,
4
,
6
in
1–2–3 succession (please see the markings on
the handles) on top of the condensate collection
basin
7
.
Place the cover
1
centrically so that the upper
steam tray
3
is completely closed and no
steam can exhaust.
Connect the mains plug
18
to a suitable socket.
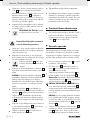
The LC display
13
shows “45” (see Fig. B).
Now your steamer is ready for use.
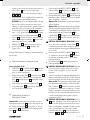
Q
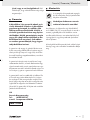
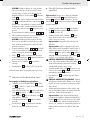
Setting the clock
Proceed as follows:
Simultaneously press the PROG
17
and ON /
OFF
14
buttons for 2–3 seconds. A signal
tone will be heard on releasing the buttons.
Press the PLUS button
16
to increase the time
indicator
20
by 10 minutes each time. Press the
MINUS button
16
to reduce the time indicator
20
by 1 minute each time.
Press the PROG button
17
to confirm your setting.
The LCD-display
13
will now show the current
clock time (clock time mode).
Q
Using Immediate-Start Function
Note: Consider that the base of the appliance /
water tank
10
has to be filled with water at least
up to the MIN mark
9
. Ensure that the turbo ring
8
in addition to the condensate collection basin
7
has been correctly positioned.
Press the ON / OFF button
14
. The LCD dis-
play
13
will show the factory-set steaming time
of 45 minutes (see Fig. B).
Press the PLUS / MINUS button
16
to increase
the steaming time in 5-minute steps or decrease
it in 1-minute steps.
Note: The maximum steaming time is 90 minutes.
Note: Be aware that you might have to replen-
ish water when the steaming time is longer.
Use the openings on the sides of the conden-
sate collection basin
7
for refilling. If the base
of the appliance / water tank
10
is filled up to
the MAX mark
19
, it will be sufficient for approx.
1 hour of steaming.
ATTENTION! HAZARD OF BURNS!
Make sure that the water does not exceed the
MAX mark
19
. Otherwise, hot water may spurt
out of the steamer during operation.
Press the ON / OFF button
14
. The device sounds
a beep. The red indicator light
15
comes on
and the device starts the steaming process.
The LCD-display
13
will indicate the remaining
steaming time.
ATTENTION! HAZARD OF BURNS! The
appliance will become hot during use. Beware
of getting in contact with the ascending steam
or any components.
If the set steaming time is elapsed, the appli-
ance will automatically switch back to the
keep-warm mode (see “keep-warm mode”).
Note: You can increase the steaming time at
any time in 5-minute steps or decrease it in
1-minute steps by pressing the PLUS / MINUS
button
16
. As soon as the steaming time is set
manually to “0”, the device switches automati-
cally into the warm mode (see “Warm mode”).
ATTENTION! HAZARD OF BURNS!
Always lift the cover
1
slowly, turning away
from you and let the steam exhaust backwards.
Do not bend over the appliance during steam
generation. Use oven cloths when touching the
cover
1
and the steam trays
3
,
4
,
6
. Use
a long fork or tongs when checking if the food
is done.
Press the ON / OFF button
14
to terminate the
steaming process prematurely or to switch off the
appliance. The indicator on the LCD-display
13
switches back to the time indicator
20
again
(see Fig. A).
Note: If the supply of water is used up during
use, a signal tone will sound. The steaming pro-

10 GB
Initial Operation
cess gets stopped. The indicator on the LCD-
display
13
switches back to the time indicator
20
again (see Fig. A). Therefore, regularly
check the water level on the water level indica-
tor
12
and replenish sufficient water in good time!
ATTENTION! HAZARD OF BURNS!
Make sure that the water does not exceed the
MAX mark
19
. Otherwise, hot water may spurt
out of the steamer during operation.
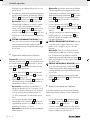
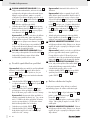
Q
Using Delay-Start Function
Note: Consider that the base of the appliance /
water tank
10
has to be filled with water at least up
to the MIN mark
9
. Ensure that the turbo ring
8
as well as the condensate collection basin
7
are
positioned correctly.
Press the PROG button
17
. In the LCD-display
13
,
the time indicator
20
as well as the PROG sym-
bol
21
(see Fig. A) will appear.
Press the PLUS / MINUS button
16
, to increase
the delay time in 10-minute steps or decrease it
in 1-minute steps to achieve the desired delay.
Note: The set delay time refers to the current
clock time. That means if you set a delay time
of 30 minutes at 13:00, the steaming process
will start at 13:30. The maximum delay time is
24 hours.
Press the PROG button
17
again.
Press the PLUS / MINUS button
16
to increase
the steaming time in 5-minute steps or decrease
it in 1-minute steps.
Note: The maximum steaming time is 90 minutes.
Note: Be aware that you might have to replen-
ish water when the steaming time is longer. Use
the openings on the sides of the condensate
collection basin
7
for refilling. If the base of
the appliance / water tank
10
is filled up to
the MAX mark
19
, it will be sufficient for approx.
1 hour of steaming.
Press the PROG button
17
again. In the LCD-
display
13
the time indicator
20
as well as the
PROG symbol
21
will appear. The delay-start
is now activated.
If the set delay time is elapsed, a signal tone
will sound, the pilot lamp
15
will glow red and
the appliance will start the steaming process
automatically.
ATTENTION! HAZARD OF BURNS!
The appliance will become hot during use.
Beware of getting in contact with the ascending
steam or any components.
Note: The device starts to beep as soon as
the water in the reservoir is exhausted. The
steaming process is interrupted. Check the
water level in the reservoir regularly by referring
to the water level indicator
12
and add more
water in good time.
ATTENTION! HAZARD OF BURNS!
Make sure that the water does not exceed the
MAX mark
19
. Otherwise, hot water may spurt
out of the steamer during operation.
Press the PROG button
17
to terminate the
delay start. The PROG symbol
21
in the LCD-
display
13
will go out.
Q
Keep-Warm Mode
If the steaming time is elapsed, the appliance will
automatically switch over to keep-warm mode.
- In the LCD-display
13
the time indicator
20
as
well as the keep-warm symbol
22
will appear.
- The pilot lamp
15
will glow green.
- The water is heated repeatedly in cycles in
the warm mode to keep the food warm at a
temperature of approx. 60–70 °C.
ATTENTION! HAZARD OF BURNS! The
appliance will become hot during use. Beware
of getting in contact with the ascending steam
or any components.
- The keep-warm mode will remain active until
the supply of water is used up or you press a
button.
Press the ON / OFF button
14
to terminate the
keep-warm mode.
Q
Using Several Steam Trays
Place the largest items of food or those with the
longest steaming time into the bottom steaming
basket
6
.

11 GB
Initial Operation
Please note that the steaming times in the up-
per
3
and middle steam tray
4
increase by
5–10 minutes. Consider this when setting the
steaming time.
Taste of foods can spread through condensed
water. Therefore, generally place meat and fish
in the lower steam tray
6
. Let the lower steam
tray
6
empty if you want to prepare food with
longer steaming time first. Place then fish or meat
in the lower steam tray
6
at the desired time.
ATTENTION! HAZARD OF BURNS!
Always lift the cover
1
slowly, turning away
from you and let the steam exhaust backwards.
Do not bend over the appliance during steam
generation. Use oven cloths when touching the
cover
1
and the steam trays
3
,
4
,
6
. Use
a long fork or tongs when checking if the food
is done.
Place the food with the longer steaming time in
the lower steam tray
6
, if you want to prepare
food with different steaming times. Carefully
remove the cover
1
and place the next steam
tray
3
,
4
on top of the lower when the steam-
ing time is that of the food to be steamed.
Place the cover
1
carefully on top again.
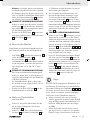
Useful tips
The steaming times shown in the chart are only
approximate. Times can vary according to the size
of food, quantities in the steaming trays
3
,
4
,
6
,
the freshness of food and personal tastes. When
you are more familiar with the steamer, you can
adjust the steaming times.
Please note that one layer of food will steam
more quickly than several layers. Therefore, the
steaming time increases with the quantity of
food, e.g. 1000 g of cauliflower florets require
longer than 500 g.
Make sure that all pieces are of a similar size.
So you achieve an optimal result. If pieces are
of different sizes and have to be layered, place
the smaller pieces on top.
Do not cram food into the steam trays
3
,
4
,
6
. Leave enough room between the pieces to
ensure a good supply of steam circulation.
When steaming larger amounts, stir the food
with a long-handled spoon after half of the
steaming time.
Never steam frozen meat, poultry or seafood.
Always thaw everything completely first. Other-
wise the ingredients might not be fully cooked.
All of the times shown in the steaming chart
apply to their use with cold water. To slightly
reduce steaming times, use warm (not boiling)
water.
The rice bowl
2
is an ideal container for
steaming other food such as fruit, vegetables,
puddings etc.
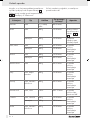
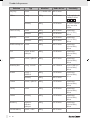
Q
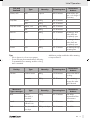
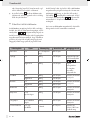
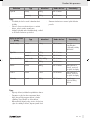
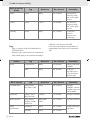
Steaming chart
The steaming times shown in the chart are only ap-
proximate. Times can vary according to the size of
food, quantities in the steaming trays
3
,
4
,
6
,
the freshness of foods and personal tastes. There-
fore, we recommend checking the condition with a
long utensil (fork or skewer) towards the end of the
set steaming time. The steaming times apply to the
quantities shown in the chart. If not specified other-
wise, all steaming times refer to the use of the lower
steam tray
6
. Food in the upper
3
and middle
steam trays
4
requires 5–10 minutes longer.
All times shown in the chart apply to their use with
cold water.

12 GB
Initial Operation
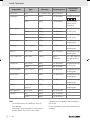
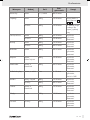
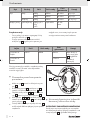
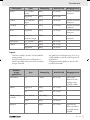
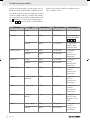
Vegetables Type Quantity Steaming time
Recommen-
dations
Artichokes fresh 2–3, medium size 50–55 minutes
Asparagus fresh 400 g 15–20 minutes lay flat in steam tray
3
,
4
,
6
frozen 400 g 15–20 minutes criss-cross 2nd
layer to allow
steam flow
Beans, green fresh 400 g 25–30 minutes stir halfway through
steaming time
frozen 400 g 35–40 minutes
Broccoli fresh 400 g 15–20 minutes stir halfway through
steaming time
frozen 400 g 20–25 minutes
Brussels sprouts fresh 400 g 20–25 minutes stir halfway through
steaming time
Cabbage fresh, chopped 400 g 35–40 minutes stir halfway through
steaming time
Carrots fresh, sliced 400 g 20–25 minutes stir halfway through
steaming time
Corn on the cob fresh, whole 2 pieces approx.
15 minutes
turn 180° halfway
through steaming
time
Cauliflower fresh, florets 400 g 15–20 minutes stir halfway through
steaming time
frozen 400 g 20–25 minutes
Green squashes fresh, in slices 400 g 15–20 minutes stir halfway through
steaming time
Mushrooms fresh 200 g 15–20 minutes stir halfway through
steaming time
Peas frozen 400 g 15–20 minutes stir halfway through
steaming time
Potatoes peeled and
chopped
900 g 25–30 minutes stir halfway through
steaming time
New potatoes fresh, whole 400 g 30–35 minutes
Spinach fresh 250 g 10–15 minutes
frozen 400 g 15–20 minutes
Tips:
- Cut off thick stems from cauliflower, broccoli
and cabbage.
- Steam leafy, green vegetables for the shortest
possible time as they loose colour easily.
- Salt and season vegetables after steaming for
best results.
- Frozen vegetables need not be thawed before
steaming.

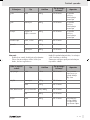
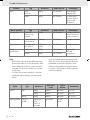
13 GB
Initial Operation
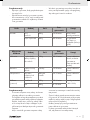
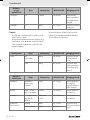
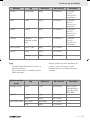
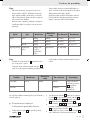
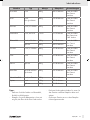
Fish and
Seafood
Type Quantity Steaming time
Recommen-
dations
Lobster, tails fresh 2 pieces 20–25 minutes meat will be opa-
que; cook longer if
necessary
Fish, fillets frozen 250 g 10–15 minutes
fresh 250 g 10–15 minutes
Fish, thick steaks salmon, cod 250 / 400 g 10–15 minutes
tuna 400 g 15–20 minutes
Mussels fresh 400 g 10–15 minutes steaming is done
when shells are
completely open
Oysters fresh 6 pieces 15–20 minutes steaming is done
when shells are
completely open
Prawns fresh 400 g 10–15 minutes stir halfway through
steaming time
Tips:
- Fish is done as its colour turns opaque.
- Frozen fish may be steamed without defrosting
if separated before steaming and the cooking
time is extended.
- Add lemon wedges and herbs while steaming
to improve flavour.
Poultry Type Quantity Steaming time
Recommen-
dations
Chicken boneless breast 400 g 15–20 minutes remove skin before
cooking
drumsticks 400 g 20–30 minutes after steaming,
brown skin under
grill if desired
Meat and
Type sausages
Type Quantity Steaming time
Recommen-
dations
Beef in slices,
fillet steak or
roast beef
250 g 10–15 minutes trim all fat;
steamed beef has
a firm texture
Lamb chops with or
without bones
4 chops 15–20 minutes trim all fat
Pork fillet, loin steaks or
loin chops
400 g or 4 chops 10–15 minutes trim all fat

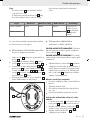
14 GB
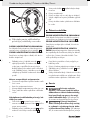
Initial Operation
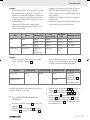
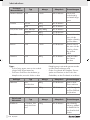
Meat and
Type sausages
Type Quantity Steaming time
Recommen-
dations
Sausages
(pre-cooked)
beef or pork
sausages
(e.g. “frankfurter”)
400 g 10–15 minutes pierce skins before
steaming
knackwurst 400 g approx. 15 minutes
Tips:
- Steaming has the advantage of allowing all
the fat to drip away during cooking. Due to the
gentle heat only choose tender, lean cuts of
meat and trim all fat. Meat suitable for grilling
is ideal for steaming.
- Serve steamed meat and poultry with flavour-
some sauces or marinade before steaming.
- Thoroughly cook all food before serving.
Pierce with a long object (knife or skewer) to
check if done.
- Sausages must be completely cooked before
steaming.
- Use fresh herbs while steaming to add flavour.
Rice Type Quantity
Amount of
water
Steaming
time
Recommen-
dations
Rice white 200 g 300 ml 25 minutes Serves 2
300 g 600 ml 35 minutes Serves 4
brown 300 g 600 ml 40 minutes Serves 4–6
Rice pudding pudding rice 100 g rice +
30 g caster
sugar
warm milk 75–80 minutes
Eggs Quantity
Amount of
water
Steaming
time
Recommen-
dations
soft-boiled max. 6 400 ml 8 minutes sit eggs in the egg
cups
5
(recesses
in the steam trays)
hard-boiled 15 minutes
For cooking soft-boiled eggs, set 10 minutes
steaming time and take out the eggs timely.
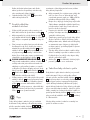
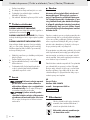
Q
Storing the Steamer in a
Space-Saving Way
Place the rice dish
2
in the lower steaming
basket
6
.
Place the lower steaming basket
6
with the
rice dish
2
into the middle steaming basket
4
.
Place both the steaming baskets
6
,
4
and the
rice dish
2
into the upper steaming basket
3
.
Place the steaming baskets
3
,
4
,
6
and
the rice dish
2
on the condensate collection
dish
7
and place the lid
1
on top.
Wind the mains lead with mains plug
18
around
the cable tidy on the bottom of the device.
Tips:
- Use the rice bowl
2
and add the required
amount of water together with the rice.
- For menu cooking always place the rice bowl
2
in the topmost steam tray as the flavours of the
other foods may spread through the condensed
water.

15 GB
Initial Operation / Cleaning and maintenance / Service
18
Q
Descaling the Base of the
Appliance / Water Tank
ATTENTION! RISK OF INJURY! Always switch
the appliance off and pull the mains
18
plug prior
to all occupations with the electrical appliance.
ATTENTION! HAZARD OF BURNS! Let the
steamer completely cool down before descaling it.
Descale the base of the appliance / water
tank
10
regularly in order to maintain the steam
generation and to extend the lifespan of the ap-
pliance. The amount of limescale deposit caused
will depend on the water hardness type. Descale
the tank
10
after every seventh to tenth use.
Slight and persistent scale:
For slight scale, use a cloth moistened with
vinegar.
Wipe the scaled areas with it.
Use correspondingly more vinegar for persistent
scale.
Then rinse and dry the appliance thoroughly.
Descale the base of the appliance /
water tank:
Place the turbo ring
8
with the upside down
on the heating element
11
(larger side faces
upwards).
Fill the base of the appliance / water tank
10
with cold water up to the MAX mark
19
.
Fill the inside of the turbo ring
8
with usual
decalcifier.
Do not heat the appliance.
Leave the appliance to descale overnight.
Pour the decalcifier out and rinse the appliance
thoroughly.
Then wipe and dry the appliance thoroughly.
Q
Cleaning and maintenance
ATTENTION! HAZARD OF INJURY!
Always switch the appliance off and pull the mains
plug
18
prior to all occupations with the appliance.
ATTENTION! HAZARD OF BURNS!
Let the steamer completely cool down before
cleaning it.
CAUTION! RISK OF DAMAGE TO THE
PRODUCT! Do not use any aggressive cleaning
materials, such as scouring powder, scouring pads,
steel wool, washing soda or bleach. They could
damage the housing surface.
Clean the steamer regularly, best after every use.
Do not at all immerse the appliance in water.
Wipe out the base of the appliance
10
with a
damp cloth.
Clean all the demountable parts in hot water
with a little detergent using a washing-up brush.
Then rinse all the parts thoroughly and dry
them carefully.
Q
Service
Have your device repaired
at the service centre or by qualified
specialist personnel using original
manufacturer parts only. This will ensure
that your device remains safe to use.
If the plug or lead needs
to be replaced, always have the
replacement carried out by the manu-
facturer or its service centre. This will
ensure that your device remains safe to use.

16 GB
Warranty / Disposal
Q
Warranty
The warranty for this appliance is for 3 year
s
from the date of purchase. The appliance
has been manufactured with care and me-
ticulously examined before delivery.
Please
retain your receipt as proof of purchase. In
the event of a warranty claim, please
make
contact by telephone with our Service
Department. Only in this way can a post-
free despatch for your goods be assured.
The warranty covers only claims for material and
maufacturing defects, but not for transport damage,
for wearing parts or for damage to fragile components,
e.g. buttons or batteries. This product is for private use
only and is not intended for commercial use.
The warranty is void in the case of abusive and im-
proper handling, use of force and internal tamper-
ing not carried out by our authorized service branch.
Your statutory rights are not restricted in any way
by this warranty.
The warranty period will not be extended by repairs
made unter warranty. This applies also to replaced
and repaired parts. Any damage and defects extant
on purchase must be reported immediately after
unpacking the appliance, at the latest, two days after
the purchase date. Repairs made after the expiration
of the warranty period are subject to payment.
GB
Service Great Britain
Tel.: 0871 5000 720
(0,10 GBP/Min.)
e-mail: [email protected]
IAN 71108
Q
Disposal
The packaging is wholly composed of
environmentally-friendly materials that can
be disposed of at a local recycling centre.
Do not dispose of electrical
equipment in the household
waste!
In accordance with European Directive 2002 / 96 / EC
(covering waste electrical and electronic equipment)
and its transposition into national legislation, worn out
electrical power tools must be collected separately
and taken for environmentally compatible recycling.
Contact your local refuse disposal authority for more
details of how to dispose of your worn out electrical
devices.

17 GB
Declaration of Conformity / Manufacturer / Recipes
Q
Declaration of Conformity /
Manufacturer
We, Kompernaß GmbH, Burgstr. 21, D-44867
Bochum, Germany, hereby declare that this product
complies with the following standards, normative
documents and EU directives:
EU Low Voltage Directive
(2006 / 95 / EC)
Electromagnetic Compatibility
(2004 / 108 / EC)
Type / Device description:
Steamer SDG 800 A1
Serial number: IAN 71108
Bochum, 30.09.2011
Semi Uguzlu
- Quality Manager -
We reserve the right to make technical modifications
in the course of further development.
Recipes
Asparagus cream soup
(4 portions)
Ingredients
500 g fresh asparagus
250 ml water
50 g butter
20 g flour
2 egg yokes
6 Tbsp white wine
250 ml cream
Salt, pepper, nutmeg
Quantity of liquid in water reservoir:
Maximum filling level
1. Peel the asparagus, cut it into small pieces and
cook
it in the steaming basket for about 25 minutes.
2. Melt the butter in pan on the hob, stir in the
flour and allow it to cook for a short while to
form a light roux.
3. Add the asparagus liquor from the condensate
collection dish and the water to the roux. Let the
mixture cook for 5 minutes, stirring continuously.
4. Remove pan from the heat and thicken the soup
with two egg yokes.
5. Stir in the cream and the white wine. Season the
soup with salt, pepper and nutmeg.
6. Place the hot pieces of asparagus from the
steam
cooker into the soup.
Chicken fillets with tomato and potato
(4 portions)
Ingredients
4 small fillets of chicken
1 tomato
1 clove of garlic
4 small slices of Emmental cheese
800 g small potatoes
½ tsp oregano
1 bunch of dill
Quantity of liquid in water reservoir:
Maximum filling level

18 GB
Recipes
1. Wash and dice the tomatoes. Thinly slice the
garlic. Pull the dill off the stems and chop it up.
2. Peel the potatoes, place them in the top steam-
ing basket and sprinkle them generously with dill.
3. Wash the chicken fillets and dab them dry. Place
the chicken fillets in the bottom steaming basket.
4. Place the tomatoes and the garlic on top of the
chicken fillets.
5. Cook the potatoes for about 40 minutes and
the chicken fillets for about 35 minutes in the
steam cooker.
6. Use a large oven dish for the fillets and potatoes.
7. Place a slice of Emmental on each of the fillets.
Season each portion well with oregano.
8. Heat the dish in the oven for between 10–15
minutes at 200 °C. The cheese should be melt-
ed and runny.
Germknödel (giant yeast dumplings)
(3 portions)
Ingredients
for the dough:
180 g flour
1 egg
75 ml milk
30 g sugar
30 g margarine
15 g dried yeast
For the filling:
3 Tbsp plum purée
2 Tbsp rum
1 tsp cinnamon
For the topping:
150 g butter
3 Tbsp poppy seeds
3 Tbsp sugar
Quantity of liquid in water reservoir:
Maximum filling level
1. Make a dough out of the flour, egg, milk, yeast,
sugar and margarine. Let it rise for 30 minutes.
2. Mix the plum purée with rum and cinnamon.
3. Divide the dough into 3 equally sized portions
and press them flat.
4. Place a teaspoonful of plum purée on each of
the portions and then form them into dumplings.
5. Then place each of the dumplings into a steam-
ing dish.
6. Let the dumplings rise for about a further 10
minutes. Then steam them in the steam cooker
for about 30 minutes.
7. Melt the butter in a pan shortly before the end
of the cooking time. Stir in the cream and the
poppy seeds.
8. Serve the Germknödel on a plate and cover
them with poppy-seed sauce.
Filled quark dumplings
(20 small dumplings / portions)
Ingredients
for the dough:
250 g quark (low-fat curd cheese)
1 egg
1 pinch of salt
5 Tbsp breadcrumbs
6–8 Tbsp flour
2 Tbsp oil
For the filling:
1 full-milk chocolate (or plum purée if preferred)
For the sautéed breadcrumbs:
Approx. 20 g butter
Approx. 30 g breadcrumbs
Quantity of liquid in water reservoir:
Maximum filling level
1. Knead the quark, egg, salt, breadcrumbs and oil
together to form a smooth dough. Allow the
dough
to rest for a short while so that it is easier to
work.
2. Cut the dough into 20 evenly sized portions. Fill
each portion with a maximum of one half-square
of full-milk chocolate. Form the dough portions
into dumplings with a diameter of about 4 cm.
Ensure that the chocolate is still in the centre of
the dumpling so that it cannot run out when
heated.

19 GB
Recipes
3. Place the dumplings about 1 cm apart in the
steaming basket. Cook the dumplings for about
6 minutes in the steam cooker.
4. Sauté the breadcrumbs in a pan with butter.
Turn the dumplings in the sautéed breadcrumbs
until they are covered with breadcrumbs.
Sea trout and vegetables
(2 portions)
Ingredients
Sea trout, up to 300 g
1 pepper, red or yellow
1 clove of garlic
1 carrot
½ onion
For the sauce:
3 Tbsp natural yogurt
1 Tbsp dried dill
3 Tbsp crème-fraîche
Salt, pepper
3 Tbsp lemon juice
Quantity of liquid in water reservoir:
Maximum filling level
1. Thoroughly wash the sea trout. Sprinkle salt and
pepper on to the sea trout, inside and out.
2. Wash and clean the vegetables and cut them
into 1 x 1 cm cubes.
3. Fill the fish with vegetables.
4. P
lace the fish into the rice container. If the fish d
oes
not fit in the rice container, cut the fish in two
before cooking. Place the rest of the vegetables
in the rice container and sprinkle the vegetables
with a little dill. Cook the fish with the vegeta-
bles in the steam cooker for 25–30 minutes.
5. Mix the yogurt, crème-fraîche, lemon juice and
a small portion of the dill into a paste. Season
the mixture with salt and pepper. Add the mix-
ture to the fish and vegetables in the steam
cooker for the final 10–15 minutes.
6. Peel the potatoes and cook them in the steam
cooker in an additional steaming basket. Serve
the potatoes as an accompaniment to the fish.
Vegetable-mozzarella casserole
(4–6 portions)
Ingredients
250 g carrots, peeled
250 g medium potatoes, peeled and halved
250 g broccoli, florets only
250 g cauliflower, florets only
1 large courgette (whole)
400 g mozzarella
For the sauce:
1 tsp instant vegetable stock
½ tsp nutmeg, grated
½ tsp freshly ground pepper
150 g cream
1 large pinch of mustard
Quantity of liquid in water reservoir:
Maximum filling level
1. Wash the broccoli and cauliflower florets and
the courgette. Place the broccoli and cauliflower
florets in the bottom steaming basket. Wash and
peel the carrots. Peel and halve the potatoes.
Place the potatoes and carrots in the bottom
steaming basket. Cook the vegetables for 25–
30 minutes in the steam cooker. Cut the cour-
gette into 1 cm thick slices and place them in
the top steaming basket after about 15 minutes.
2. Allow the vegetables to cool for about 5 min
utes,
long enough for you to be able to touch them
for cutting. Cut the potatoes and carrots into
1 cm thick slices. Cut the broccoli and the cauli-
flower florets into 2 x 2 cm pieces.
3. Use a large oven dish for the vegetables.
4. Mix the cream, pepper, portion of nutmeg,
mustard and instant vegetable stock.
5. Pour the sauce over the vegetables, covering
them evenly.
6. Thinly slice the mozzarella. Distribute the moz-
zarella over the vegetables.
7. Cover the oven dish. Heat the dish in the oven
for between 10–15 minutes. The cheese should
be melted and runny.

20

21 PL
Spis zawartości
Wstęp
Zastosowanie zgodne z przeznaczeniem ..................................................................Strona 22
Dane techniczne ...........................................................................................................Strona 22
Zakres dostawy .............................................................................................................Strona 23
Opis części ....................................................................................................................Strona 23
Bezpieczeństwo ................................................................................................... Strona 23
Zastosowanie oryginalnych akcesoriόw .....................................................................Strona 24
Przed pierwszym uruchomieniem .......................................................Strona 25
Uruchomienie
Ustawienie czasu ..........................................................................................................Strona 25
Zastosowanie funkcji natychmiastowego startu ..........................................................Strona 25
Zastosowanie opόźnionego startu ..............................................................................Strona 26
Tryb utrzymywania temperatury ..................................................................................Strona 27
Zastosowanie kilku misek parowych ...........................................................................Strona 27
Przydatne rady ..............................................................................................................Strona 28
Tabela czasόw gotowania ........................................................................................... Strona 28
Oszczędne przechowywanie parowaru ..................................................................... Strona 32
Usuwanie kamienia z jednostki bazowej / zbiornika wody ....................................... Strona 32
Czyszczenie i pielęgnacja ............................................................................ Strona 33
Serwis ..........................................................................................................................Strona 33
Gwarancja ...............................................................................................................Strona 33
Utylizacja ..................................................................................................................Strona 34
Deklaracja zgodności / Producent .......................................................Strona 34
Przepisy ...................................................................................................................... Strona 35

22 PL
Wstęp
Urządzenie do gotowania
na parze SDG 800 A1
Q
Wstęp
Ogromnie nas cieszy, że zdecydowaliście
się Państwo na niniejszy produkt. Proszę
rozłożyć stronę z rysunkami oraz zapo-
znać się przed pierwszym zastosowaniem z funkcjami
urządzenia. W tym celu należy przeczytać uważnie
następującą instrukcję obsługi oraz wskazόwki
bezpieczeństwa. Urządzenie należy stosować
jedynie w sposόb podany oraz w podanych zakre-
sach zastosowania. Proszę starannie przechowywać
niniejszą instrukcję. W przypadku przekazania
urządzenia osobie trzeciej, należy jej udostępnić
wszystkie posiadane dokumente.
Q
Zastosowanie zgodne
z przeznaczeniem
Urządzenie przeznaczone jest do gotowania
artykułόw żywnościowych na parze. Parowar wolno
stosować jedynie w suchych i zamkniętych pomiesz-
czeniach. Inne zastosowanie oraz zmiany na pro-
dukcie uważane są za sprzeczne z postanowieniami
i mogą być skutkiem wystąpienia zagrożenia wy-
padkiem. Za szkody powstałe na wskutek zastoso-
wania sprzecznego z postanowieniami producent
nie przejmuje odpowiedzialności. Urządzenie służy
wyłącznie do prac w prywatnych warunkach do-
mowych.
Urządzenie nie nadaje się do zastosowań komer-
cyjnych!
Q
Dane techniczne
Oznaczenie typu: SDG 800 A1
Napięcie nominalne: 220–240 V
~
, 50 Hz
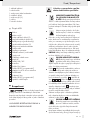
W niniejszej instrukcji obsługi urządzenia zastosowano następujące piktogramy:
Przeczytać instrukcję obsługi! Uwaga – gorące powierzchnie!
Przestrzegaj wskazówek ostrzegaw-
czych i bezpieczeństwa!
Urządzenie elektryczne należy prze-
chowywać w miejscu niedostępnym
dla dzieci!
Niebezpieczeństwo wybuchu!
W
Watt (Moc skuteczna)
Ostrzeżenie przed porażeniem
prądem elektrycznym!
Zagrożenie dla życia!
V
~
Volt (Napięcie przemienne)
Produkt stosowny dla artykułów
spożywczych!
Zwracać uwagę na nienaruszony stan
urządzenia, kabla sieciowego oraz
wtyczki sieciowej!
To jest prawidłowy sposób
postępowania!
Niebezpieczeństwo pożaru!
Opakowanie i urządzenie przekaż
do utylizacji zgodnie z przepisami
o ochronie środowiska!
Strona się ładuje...
Strona się ładuje...
Strona się ładuje...
Strona się ładuje...
Strona się ładuje...
Strona się ładuje...
Strona się ładuje...
Strona się ładuje...
Strona się ładuje...
Strona się ładuje...
Strona się ładuje...
Strona się ładuje...
Strona się ładuje...
Strona się ładuje...
Strona się ładuje...
Strona się ładuje...
Strona się ładuje...
Strona się ładuje...
Strona się ładuje...
Strona się ładuje...
Strona się ładuje...
Strona się ładuje...
Strona się ładuje...
Strona się ładuje...
Strona się ładuje...
Strona się ładuje...
Strona się ładuje...
Strona się ładuje...
Strona się ładuje...
Strona się ładuje...
Strona się ładuje...
Strona się ładuje...
Strona się ładuje...
Strona się ładuje...
Strona się ładuje...
Strona się ładuje...
Strona się ładuje...
Strona się ładuje...
Strona się ładuje...
Strona się ładuje...
Strona się ładuje...
Strona się ładuje...
Strona się ładuje...
Strona się ładuje...
Strona się ładuje...
Strona się ładuje...
Strona się ładuje...
Strona się ładuje...
Strona się ładuje...
Strona się ładuje...
Strona się ładuje...
Strona się ładuje...
Strona się ładuje...
Strona się ładuje...
Strona się ładuje...
Strona się ładuje...
Strona się ładuje...
Strona się ładuje...
Strona się ładuje...
Strona się ładuje...
Strona się ładuje...
Strona się ładuje...
Strona się ładuje...
Strona się ładuje...
Strona się ładuje...
Strona się ładuje...
Strona się ładuje...
Strona się ładuje...
Strona się ładuje...
Strona się ładuje...
Strona się ładuje...
Strona się ładuje...
Strona się ładuje...
Strona się ładuje...
Strona się ładuje...
Strona się ładuje...
Strona się ładuje...
Strona się ładuje...
Strona się ładuje...
Strona się ładuje...
Strona się ładuje...
Strona się ładuje...
Strona się ładuje...
Strona się ładuje...
Strona się ładuje...
Strona się ładuje...
Strona się ładuje...
Strona się ładuje...
Strona się ładuje...
Strona się ładuje...
Strona się ładuje...
Strona się ładuje...
Strona się ładuje...
Strona się ładuje...
Strona się ładuje...
Strona się ładuje...
Strona się ładuje...
Strona się ładuje...
Strona się ładuje...
Strona się ładuje...
Strona się ładuje...
-
 1
1
-
 2
2
-
 3
3
-
 4
4
-
 5
5
-
 6
6
-
 7
7
-
 8
8
-
 9
9
-
 10
10
-
 11
11
-
 12
12
-
 13
13
-
 14
14
-
 15
15
-
 16
16
-
 17
17
-
 18
18
-
 19
19
-
 20
20
-
 21
21
-
 22
22
-
 23
23
-
 24
24
-
 25
25
-
 26
26
-
 27
27
-
 28
28
-
 29
29
-
 30
30
-
 31
31
-
 32
32
-
 33
33
-
 34
34
-
 35
35
-
 36
36
-
 37
37
-
 38
38
-
 39
39
-
 40
40
-
 41
41
-
 42
42
-
 43
43
-
 44
44
-
 45
45
-
 46
46
-
 47
47
-
 48
48
-
 49
49
-
 50
50
-
 51
51
-
 52
52
-
 53
53
-
 54
54
-
 55
55
-
 56
56
-
 57
57
-
 58
58
-
 59
59
-
 60
60
-
 61
61
-
 62
62
-
 63
63
-
 64
64
-
 65
65
-
 66
66
-
 67
67
-
 68
68
-
 69
69
-
 70
70
-
 71
71
-
 72
72
-
 73
73
-
 74
74
-
 75
75
-
 76
76
-
 77
77
-
 78
78
-
 79
79
-
 80
80
-
 81
81
-
 82
82
-
 83
83
-
 84
84
-
 85
85
-
 86
86
-
 87
87
-
 88
88
-
 89
89
-
 90
90
-
 91
91
-
 92
92
-
 93
93
-
 94
94
-
 95
95
-
 96
96
-
 97
97
-
 98
98
-
 99
99
-
 100
100
-
 101
101
-
 102
102
-
 103
103
-
 104
104
-
 105
105
-
 106
106
-
 107
107
-
 108
108
-
 109
109
-
 110
110
-
 111
111
-
 112
112
-
 113
113
-
 114
114
-
 115
115
-
 116
116
-
 117
117
-
 118
118
-
 119
119
-
 120
120
-
 121
121


Silvercrest SDG 800 A1 Operating Instructions Manual
- Typ
- Operating Instructions Manual
w innych językach
- Deutsch: Silvercrest SDG 800 A1
- slovenčina: Silvercrest SDG 800 A1
Powiązane artykuły
Inne dokumenty
-
 Russell Hobbs 23560-56 Instrukcja obsługi
-
Amica PT3012 Instrukcja obsługi
-
-
Clatronic DG 3665 Instrukcja obsługi
-
Philips HD9160/00 Instrukcja obsługi
-
-
Tefal VC700316 Instrukcja obsługi
-
Zelmer 37Z011 Instrukcja obsługi
-
-
Gallet CUV 968 Instrukcja obsługi
