LD Systems Roadboy 65 HS Instrukcja obsługi
- Typ
- Instrukcja obsługi

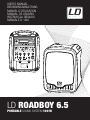
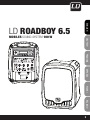
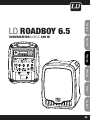
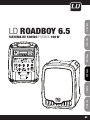
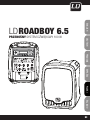
LD ROADBOY 6.5
PORTABLE SOUND SYSTEM 100 W
USER´S MANUAL
BEDIENUNGSANLEITUNG
MANUEL D`UTILISATION
MANUAL DE USUARIO
INSTRUKCJA OBSŁUGI
MANUALE D‘ USO
MODEL: LDRB65
SERIAL NO:
Adam Hall GmbH

2
ENGLISHDEUTSCHFRANCAIS
FRANCAISFRANCAIS
FRANCAISFRANCAIS
ESPAÑOLPOLSKIITALIANO
You‘ve made the right choice!
We have designed this product to operate reliably over many years. LD Systems stands for this with its name and
many years of experience as a manufacturer of high-quality audio products.
Please read this User‘s Manual carefully, so that you can begin making optimum use of your LD Systems product
quickly.
You can find more information about LD SYSTEMS at our Internet site WWW.LD-SYSTEMS.COM

LD ROADBOY 6.5
MOBILES SOUND-SYSTEM 100 W
3
ITALIANO
POLSKI
ESPAÑOL
FRANCAIS
FRANCAIS
FRANCAIS
FRANCAIS
FRANCAIS
DEUTSCH
ENGLISH
MODEL: LDRB65
SERIAL NO:
Adam Hall GmbH

4
ENGLISHDEUTSCHFRANCAIS
FRANCAISFRANCAIS
FRANCAISFRANCAIS
ESPAÑOLPOLSKIITALIANO
PREVENTIVE MEASURES:
1. Please read these instructions carefully.
2. Keep all information and instructions in a safe place.
3. Follow the instructions.
4. Observe all safety warnings. Never remove safety warnings or other information from the equipment.
5. Use the equipment only in the intended manner and for the intended purpose.
6. Use only sufficiently stable and compatible stands and/or mounts (for fixed installations). Make certain that wall
mounts are properly installed and secured. Make certain that the equipment is installed securely and cannot fall down.
7. During installation, observ e the applicable safety regulations for your country.
8. Never install and operate the equipment near radiators, heat registers, ovens or other sources of heat. Make
certain that the equipment is always installed so that is cooled sufficiently and cannot overheat.
9. Never place sources of ignition, e.g., burning candles, on the equipment.
10. Ventilation slits must not be blocked.
11. Do not use this equipment in the immediate vicinity of water (does not apply to special outdoor equipment -
in this case, observe the special instructions noted below. Do not expose this equipment to flammable materials,
fluids or gases.
12. Make certain that dripping or splashed water cannot enter the equipment. Do not place containers filled with
liquids, such as vases or drinking vessels, on the equipment.
13. Make certain that objects cannot fall into the device.
14. Use this equipment only with the accessories recommended and intended by the manufacturer.
15. Do not open or modify this equipment.
16. After connecting the equipment, check all cables in order to prevent damage or accidents, e.g., due to
tripping hazards.
17. During transport, make certain that the equipment cannot fall down and possibly cause property damage and
personal injuries.
18. If your equipment is no longer functioning properly, if fluids or objects have gotten inside the equipment or
if it has been damaged in anot her way, switch it off immediately and unplug it from the mains outlet (if it is a
powered device). This equipment may only be repaired by authorized, qualified personnel.
19. Clean the equipment using a dry cloth.
20. Comply with all applicable disposal laws in your country. During disposal of packaging, please separate
plastic and paper/cardboard.
21. Plastic bags must be kept out of reach of children.
FOR EQUIPMENT THAT CONNECTS TO THE POWER MAINS:
22. CAUTION: If the power cord of the device is equipped with an earthing contact, then it must be connected to
an outlet with a protective ground. Never deactivate the protective ground of a power cord.
23. If the equipment has been exposed to strong fluctuations in temperature (for example, after transport), do
not switch it on immediately. Moisture and condensation could damage the equipment. Do not switch on the
equipment until it has reached room temperature.
24. Before connecting the equipment to the power outlet, first verify that the mains voltage and frequency match
the values specified on the equipment. If the equipment has a voltage selection switch, connect the equipment to
the power outlet only if the equipment values and the mains power values match. If the included power cord or
power adapter does not fit in your wall outlet, contact your electrician.
25. Do not step on the power cord. Make certain that the power cable does not become kinked, especially at the
mains outlet and/or power adapter and the equipment connector.
26. When connecting the equipment, make certain that the power cord or power adapter is always freely
accessible. Always disconnect the equipment from the power supply if the equipment is not in use or if you want

5
ITALIANO
POLSKI
ESPAÑOL
FRANCAIS
FRANCAIS
FRANCAIS
FRANCAIS
FRANCAIS
DEUTSCH
ENGLISH
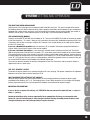
SAFETY:
to clean the equipment. Always unplug the power cord and power adapter from the power outlet at the plug or
adapter and not by pulling on the cord. Never touch the power cord and power adapter with wet hands.
27. Whenever possible, avoid switching the equipment on and off in quick succession because otherwise this
can shorten the useful life of the equipment.
28. IMPORTANT INFORMATION: Replace fuses only with fuses of the same type and rating. If a fuse blows repea-
tedly, please contact an authorised service centre.
29. To disconnect the equipment from the power mains completely, unplug the power cord or power adapter
from the power outlet.
30. If your device is equipped with a Volex power connector, the mating Volex equipment connector must be
unlocked before it can be removed. However, this also means that the equipment can slide and fall down if
the power cable is pulled, which can lead to personal injuries and/or other damage. For this reason, always be
careful when laying cables.
31. Unplug the power cord and power adapter from the power outlet if there is a risk of a lightning strike or
before extended periods of disuse.
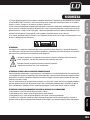
CAUTION
RISK OF ELECTRIC SHOCK
DO NOT OPEN
CAUTION:
Never remove the cover, because otherwise there may be a risk of electric shock. There are no user serviceable
parts inside. Have repairs carried out only by qualified service personnel.
The lightning flash with arrowhead symbol within an equilateral triangle is intended to alert the user
to the presence of uninsulated “dangerous voltage” within the product’s enclosure that may be of
sufficient magnitude to constitute a risk of electrical shock.
The exclamation mark within an equilateral triangle is intended to alert the user to the presence of
important operating and maintenance instructions.
CAUTION – HIGH VOLUME LEVELS WITH AUDIO PRODUCTS!
This equipment is intended for professional use. Therefore, commercial use of this equipment is subject to the
respectively applicable national accident prevention rules and regulations. As a manufacturer, Adam Hall is
obligated to notify you formally about the existence of potential health risks.
Hearing damage due to high volume and prolonged exposure: When in use, this product is capable of producing
high sound-pressure levels (SPL) that can lead to irreversible hearing damage in performers, employees, and
audience members. For this reason, avoid prolonged exposure to volumes in excess of 90 dB.
CAUTION! IMPORTANT INFORMATION ABOUT LIGHTING PRODUCTS
1. Do not look into the beam from a distance of less than 40 cm.
2. Do not stare into the beam for extended periods at short-to-medium distances.
3. Do not view the beam directly with optical instruments such as magnifiers.
4. Under some circumstances, stroboscopic effects may trigger epileptic seizures in sensitive individuals! For this
reason, persons who suffer from epilepsy should always avoid places where strobe lights are used.

1
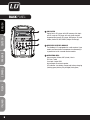
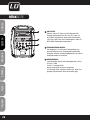
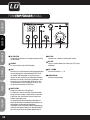
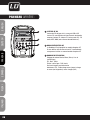
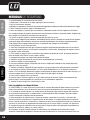
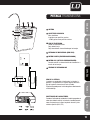
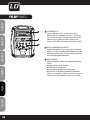
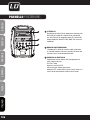
CD-PLAYER
Digital Slot-In CD-player with USB memory stick input
and SD card slot. CD player with anti shock function.
Supported file formats (CD-player, USB-player, SD-card
reader). Audio CD, MP3, WMA. (Subject to change!)
2
WIRELESS RECEIVER MODULE
The Roadboy 6.5 is equipped with a radio receiver. If you
need to use two wireless microphones simultaneously,it
is possible to install a second receiver module.
3
OPERATING AREA
Volume control: Master, MIC (wired), Line-in
EQ: Bass, Treble
Line input / output RCA
Active output for external speaker
LED indicator: Low battery charge (red), battery charging
(flashing green), battery fully charged (static green)
BACK PANEL:
6
ENGLISHDEUTSCHFRANCAIS
FRANCAISFRANCAIS
FRANCAISFRANCAIS
ESPAÑOLPOLSKIITALIANO
1
2
3
MODEL: LDRB65
SERIAL NO:
Adam Hall GmbH

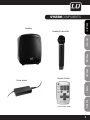
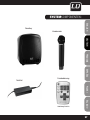
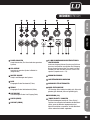
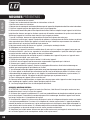
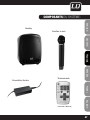
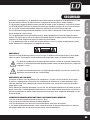
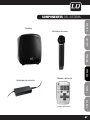
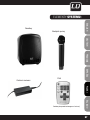
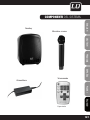
Roadboy
Handheld Transmitter
Remote Control
Power supply
similar to this image
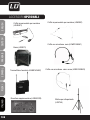
SYSTEM COMPONENTS:
7
ITALIANO
POLSKI
ESPAÑOL
FRANCAIS
FRANCAIS
FRANCAIS
FRANCAIS
FRANCAIS
DEUTSCH
ENGLISH

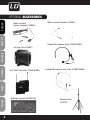
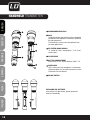
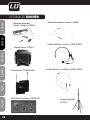
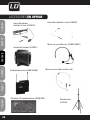
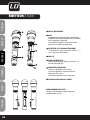
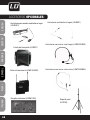
Carrying Case (LDSB21)
Belt Pack Transmitter (LDWS1616BP)
Headset Microphone, skin colour (LDWS100MH3)
Headset Microphone, black (LDWS100MH1)
Additional receiver (LDRM102R)
Speaker stand
(LDST40)
Water-resistant
Aerobic-Headset (LDHSAE1)
Water-resistant Headset (LDHSM1)
OPTIONAL ACCESSORIES:
8
ENGLISHDEUTSCHFRANCAIS
FRANCAISFRANCAIS
FRANCAISFRANCAIS
ESPAÑOLPOLSKIITALIANO

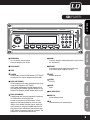
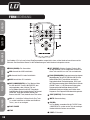
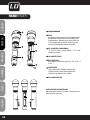
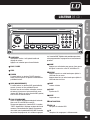
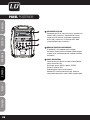
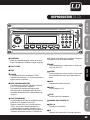
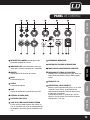
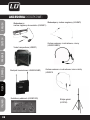
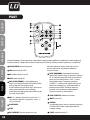
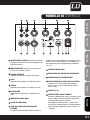
1
POWER/VOL
On / Off switch, volume control
Press the button to turn on/off.
2
PLAY/PAUSE
3
STOP
4
FOLDER
In Play mode, use the FOLDER buttons (LEFT/RIGHT)
to select the first track of the previous/next folder.
5
SKIP (LEFT/RIGHT)
In Play mode you can select the previous/next track
using the SKIP-buttons (LEFT/RIGHT).
In Play mode, holding down the SKIP-buttons acts as
Fast Forward (Fast Forward, right SKIP-button) or Fast
Reverse (Fast Reverse, left SKIP-button) within a track.
6
PROG (PROGRAM)
Programming your own play sequence of tracks on
CD, USB memory stick and SD card.
As soon as you press the PROG button, "PROG"
appears on the display above the track run-time,
and the track number indicator flashes. Select the
track number by using the VOLUME control for the
first program item and confirm your selection with
SHUF. Repeat this process to create a program. The
program will be launched automatically.
7
MODE
Press this button to switch between the signal source
SD, USB and CD.
8
REPEAT
Press button once to repeat the current track.
Press button twice to repeat all tracks.
9
SHUF
Random playback
10
EJECT
Eject CD
11
MUTE
Mute
12
SD CARD SLOT
13
USB 2.0
Slot for Memory Stick
14
IR
Infrared receiver for remote control
CD-PLAYER:
9
ITALIANO
POLSKI
ESPAÑOL
FRANCAIS
FRANCAIS
FRANCAIS
FRANCAIS
FRANCAIS
DEUTSCH
ENGLISH
12
13
14
1
2
3
4
5
6
7
8
9
10
11

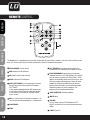
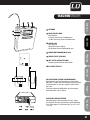
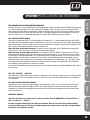
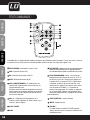
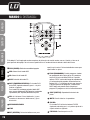
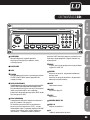
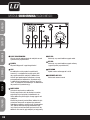
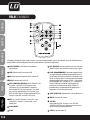
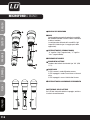
1
PWR (POWER): On/Off switch
2
USB: Select the USB interface.
3
SD: Select the SD-card interface.
4
DISC: Select the CD-ROM drive.
5
SKIP (LEFT/RIGHT): In Play mode you can select
the previous/next track using the SKIP-buttons
(LEFT/RIGHT).
In Play mode, holding down the SKIP-buttons acts
as Fast Forward (Fast Forward, right SKIP-button)
or Fast Reverse (Fast Reverse, left SKIP-button)
within a track.
6
VOL +/- : Volume level. Press the Plus button (+) to
increase the volume and the Minus (-) to decrease it.
7
PLAY/PAUSE
8
STOP
The Roadboy 6.5 is equipped with two remote-controllable infrared receiver modules, one on the front and one on the
back. This allows you to use the remote control both in front of and behind the speaker.
REMOTECONTROL:
9
RPT (REPEAT): Press button once to repeat the
current track. Press button twice to repeat all tracks.
10
PROG (PROGRAM) Programming your own play
sequence of tracks on CD, USB memory stick and SD
card. As soon as you press the PROG button, "PROG"
appears on the display above the track run-time, and
the track number indicator flashes. Select the track
number by using the VOLUME control for the first
program item and confirm your selection with SHUF
Repeat this process to create a program. The
program will be launched automatically.
11
SHUF (SHUFFLE): Random playback
12
MUTE: Mute
13
FOLDER:
In Play mode, use the FOLDER buttons (LEFT/
RIGHT) to select the first track of the previous/next
folder.
14
EJECT: Eject CD
10
ENGLISHDEUTSCHFRANCAIS
FRANCAISFRANCAIS
FRANCAISFRANCAIS
ESPAÑOLPOLSKIITALIANO
7
8
9
12
13
14
6
5
4
3
2
1
11
10
USB
ST OP RPT
PROG SHUF
MU TE
SD
DI SC
FOLDER
4
3
2
1
8
7
10
12
13
5
6
9
11
14

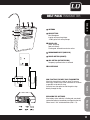
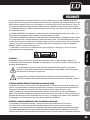
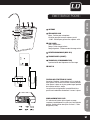
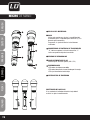
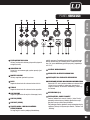
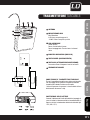
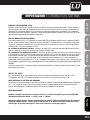
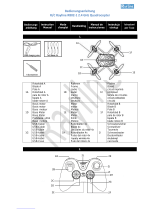
1
ANTENNA
2
GAIN SETTING
Mic: Microphone
0: guitar with passive pickups
-10 dB: guitar with active pickups
3
POWER-LED
Green: Operating
Red: Low Battery
Flashing red: Infrared transmission active
4
MICROPHONE INPUT (MINI XLR)
5
POWER BUTTON (ON/OFF)
6
ASC BUTTON (ACTIVATE SYNC)
Frequency synchronisation via infrared
7
IR INTERFACE
HOW TO ATTACH THE BELT PACK TRANSMITTER
Attach the transmitter to a belt or strap. To ensure a
secure grip, slide the clip of the transmitter as far down
as possible on the belt or strap.
Guitarists have the option to slide the guitar strap
directly through the clip.
REPLACING THE BATTERIES
If the battery status indicator is flashing red, you should
replace the batteries immediately (see figure on the left).
Please insert 2 "AA" alkaline batteries (LR6, 1.5 V).
BELT PACK TRANSMITTER:
11
ITALIANO
POLSKI
ESPAÑOL
FRANCAIS
FRANCAIS
FRANCAIS
FRANCAIS
FRANCAIS
DEUTSCH
ENGLISH
5
6
2
3
4
1
7

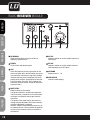
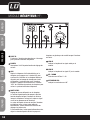
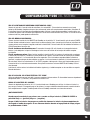
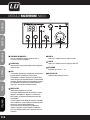
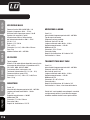
RADIO RECEIVER MODULE:
1
IR WINDOW
Sends infrared signals to the transmitter for
frequency synchronisation.
2
POWER
On/Off switch and volume control.
3
ASC
Select the frequency for the transmission on the
receiver and then press the ASC-button to synchro-
nise transmitter and receiver. Align the IR window
(infrared interface) of the microphone with the IR
window of the receiver. (Synchronisation with Belt
Pack Transmitter: Press the "ASC" button on the
transmitter and the receiver in order to enable the
synchronisation.)
4
MUTE LEVEL
Squelch setting on the receiver:
The squelch function is used for noise reduction,
if the transmitter is turned off or the receiver does
not receive a sufficiently strong signal from the
transmitter.
The squelch value (mute level) of the receiver is
already correctly adjusted at the factory. Normally,
no further adjustment is required.
However, should a readjustment be necessary, set
the squelch value to a level that does not generate
any noise in the receiver when the transmitter is
switched off.
5
AF LED
Indicates whether or not the module receives an
audio signal.
6
RF LED
Indicates whether or not the module receives a
radio frequency signal (RF signal).
7
UP/DOWN
Select channel 1 - 16
8
LED DISPLAY
Channel number display
12
ENGLISHDEUTSCHFRANCAIS
FRANCAISFRANCAIS
FRANCAISFRANCAIS
ESPAÑOLPOLSKIITALIANO
8
7
6
5 4
3
2
1
7

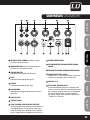
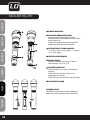
OPERATING AREA:
1
POWER SWITCH
main power switch (On/Off
switch for the whole system)
2
LED INDICATOR
lights up red when the system is
in operation (turned on).
3
MASTER VOLUME
Master volume control of the system
4
BASS
Tone controls for the bass range (low)
5
TREBLE
The treble tone control (treble)
6
LINE VOLUME
Line-In volume control
7
LINE-IN (CINCH)
8
LINE-OUT (CINCH)
9
6.3 MM JACK FOR EXTERNAL SPEAKER
You can connect an additional passive loudspeaker
in this output. When this output is used, the sound
comes from both the Roadboy and the additional
passive external speaker (Impedance min. 4 Ω).
10
MICROPHONE INPUT
11
MICROPHONE VOLUME CONTROL
12
CONNECTION FOR POWER SUPPLY
13
BATTERY STATUS INDICATOR
LED Indicator: Low battery charge (red), battery
charging (flashing green), battery fully charged
(static green)
14
FUSE (3 A)
15
'VOICE PRIORITY' SWITCH
During music playback, the "Voice Priority" function
causes an automatic reduction of the volume of the
music whenever the microphone is spoken into.
As soon as you stop talking, the music volume will
automatically increase again. This function is also
called "Talkover" (or "Ducking").
13
ITALIANO
POLSKI
ESPAÑOL
FRANCAIS
FRANCAIS
FRANCAIS
FRANCAIS
FRANCAIS
DEUTSCH
ENGLISH
9
10 11 12 13 14 15 1 2
8 7 6 5 4 3

HANDHELD TRANSMITTER:
1
MICROPHONE HEAD GRILL
2
GAIN
This button controls the sensitivity of the microphone
(rotation to the left reduces the sensitivity, rotation to
the right increases it).
The sensitivity is factory set to the optimum level
(for most applications).
3
RF SWITCH (RADIO SIGNAL)
"H" stands for "High" (strong signal), "L" for "Low"
(weak signal).
4
IR INTERFACE
5
BATTERY COMPARTMENT
Please insert 2 "AA" alkaline batteries (LR6, 1.5 V).
6
POWER/ASC
LED is static green: the microphone is switched on
LED flashes green: the infrared transmission is active
LED flashes red: Low Battery
7
ON/OFF SWITCH
REPLACING THE BATTERIES
If the battery LED light flashes, please replace the
batteries immediately.
14
ENGLISHDEUTSCHFRANCAIS
FRANCAISFRANCAIS
FRANCAISFRANCAIS
ESPAÑOLPOLSKIITALIANO
1
4
5
6
7
2
3

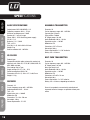
SYSTEM SETTING AND OPERATION:
THE INPUT FOR WIRED MICROPHONES
Connect the 6.3 mm jack plug of your microphone cable to the MIC Jack input. This input is located on the back of
the Roadboy. Make sure that the other end of the cable is properly connected to the microphone. If your microphone is
equipped with a power switch, please turn it off. Set the optimal microphone level by turning the MIC gain control (in
relation to the line level). If the microphone volume is set too high, it can cause distortion (overdrive).
THE RADIO RECEIVER MODULE
To begin, set the MASTER VOLUME of the Roadboy to "0". Then turn the POWER-VOL-button of the receiver module
to the central position ("12 o'clock"). Now you can synchronise the transmitter (Handheld microphone or Belt Pack
Transmitter) with the built-in receiver, using the ASC-function. Press the ASC button on the radio receiver module;
the ASC LED flashes red.
If you use a Handheld Transmitter: the infrared sensor (IR) is located in the battery compartment below the
capsule. Hold it close to the IR sensor of the receiver module.
If you use a Belt Pack Transmitter: it is also necessary to enable the ASC function on the Belt Pack Transmitter.
Hold the infrared sensor of the Belt Pack Transmitter ("IR", on the back) close to the IR window of the receiver module.
The synchronisation will take a few seconds. If you have installed a second radio module (optional), please make sure
that both modules do not operate on the same frequency (see frequency list). This will avoid interference. The flashing
of the "RF" LED indicates that your system is working properly and that the synchronisation was successful. Now you
can set the MASTER volume of your Roadboy to the desired volume level.
The maximum distance between the wireless microphone (or Belt Pack Transmitter) and the receiver module is
approximately 60 m in open space.
THE "EXT. SPEAKER" OUTPUT
To connect an external speaker, use a speaker cable with a 6.3 mm jack plug. The speaker should have an impedance
between 4 and 8 Ohm and a minimum capacity of 25 W.
HOW TO CHARGE THE BATTERY OF THE ROADBOY
When you want to operate the system without battery or while charging the battery, connect the power supply
provided with the Roadboy (16 V / 3 A). The charging time is 8 hours. When the battery is fully charged, the charging
process stops automatically. You can also operate the Roadboy while connected to the power supply.
IMPORTANT INFORMATION!
If you re-insert or replace the battery, it is ESSENTIAL that you observe the polarity! Red = + (plus) //
black = - (minus).
Recharge the battery fully at every opportunity. Never completely discharge a rechargeable lead
battery or store it in discharged or semi-charged condition. During extended periods of disuse and
storage, the battery must be recharged fully at regular intervals.
15
ITALIANO
POLSKI
ESPAÑOL
FRANCAIS
FRANCAIS
FRANCAIS
FRANCAIS
FRANCAIS
DEUTSCH
ENGLISH

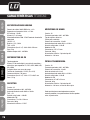
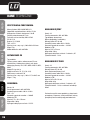
BASIC SPECIFICATIONS
Output power: MAX 100 W RMS / 4 Ω
Frequency response: 80 Hz - 15 kHz
Maximum sound pressure: 110 dB
Speaker: 6.5 - inch full range
Power: 200 V - 250 V Switching power supply
DC 16 V / 3 A
Batteries: 12 V / 2,6 AH
THD: <0,5 %
Size (W x H x D): 300 x 200 x 230 mm
Weight: 5 kg
Receiver module: 863 - 865 MHz
CD PLAYER
Product type:
Compact disc digital audio system with mechanic &
electronic anti-shock CD, CD-R, MP3, WMA, USB, SD,
MP3, WMA available.
Disc loading: Slot-in Type
Supply voltage: DC 12 V (10 ~ 16 V)
Power consumption: Within 5 W
Dimensions (W x H x D): 160 x 147,4 x 68,5 mm
Weight: 1.2 kg
RECEIVER
Channels: 16
Carrier frequency range: 863 - 865 MHz
Audio bandwidth: 60 Hz - 16 kHz
THD: <1%
Signal/noise ratio: > 100 dB
Modulation: FM
Dimensions: 73 x 36 x 120 mm
Net weight: 100 g
Power requirements: 12 V DC
HANDHELD TRANSMITTER
Channels: 16
Carrier frequency range: 863 - 865 MHz
Capsule type: Dynamic
Polar pattern: Cardioid
RF Output power: 10 mW
Audio Bandwidth: 60 Hz - 16 kHz
Signal/noise ratio: > 102 dB
Modulation: FM
Dimensions: 235 x 54 mm
Net weight: 280 g
Power requirements: 2 x "AA" batteries
Battery Life: >10 hours
BELT PACK TRANSMITTER
Channels: 16
Carrier frequency range: 863 - 865 MHz
RF Output power: 10 mW
Max. input level: 6 mV
Audio Bandwidth: 60 Hz - 16 kHz
Signal/noise ratio: > 102 dB
Modulation: FM
Dimensions: 85 x 65 x 24 mm
Net weight: 80 g
Power requirement: 2 x "AA" batteries
Battery Life: >10 hours, depending on batteries
Since all our products are constantly controlled and
improved, technical changes are possible without prior
notice.
SPECIFICATIONS:
16
ENGLISHDEUTSCHFRANCAIS
FRANCAISFRANCAIS
FRANCAISFRANCAIS
ESPAÑOLPOLSKIITALIANO

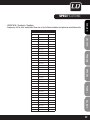
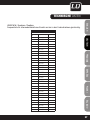
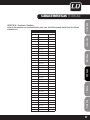
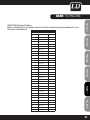
SPECIFICATIONS:
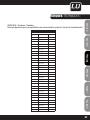
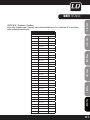
LDWS1616 / Roadman / Roadboy
Frequency list for inter modulation free use of up to three wireless microphones simultaneously.
17
ITALIANO
POLSKI
ESPAÑOL
FRANCAIS
FRANCAIS
FRANCAIS
FRANCAIS
FRANCAIS
DEUTSCH
ENGLISH
Nr.
1 863,100 X
2 863,900
3 864,500
4 864,900
5 863,200
6 863,300
7 863,400
8 863,500
9 863,600
10 863,700 X
11 863,800
12 864,000
13 864,100 X
14 864,200
15 864,300
16 864,400
Frequenz (MHz) Gleichzeitig

18
ENGLISHDEUTSCHFRANCAIS
FRANCAISFRANCAIS
FRANCAISFRANCAIS
ESPAÑOLPOLSKIITALIANO
MANUFACTURER‘S WARRANTY
This warranty covers the Adam Hall, LD Systems, Defender, Palmer, and Cameo brands.
It applies to all products distributed by Adam Hall.
This warranty declaration does not affect the statutory warranty claims against the manufacturer, but expands
them with additional warranty claims vis-a-vis Adam Hall.
Adam Hall warrants that the Adam Hall product that you have purchased from Adam Hall or from an Adam Hall
authorized reseller is free from defects in materials or workmanship under normal use for a period of 2 or 5 years
(please inquire on a product-by-product basis) from the date of purchase.
The warranty period begins on the date on which the product was purchased, proof of which must be produced
(through presentation of the invoice or the delivery note with the date of purchase) in the event of a warranty claim.
Should products of the brands named above be in need of repair within the limited warranty period, you are entitled
to warranty service according to the terms and conditions stated here.
During the Limited Warranty Period, Adam Hall will repair or replace the defective component parts or the product.
In the event of repair or replacement during the Limited Warranty Period, the replaced original parts and/or pro-
ducts become property of Adam Hall.
In the unlikely event that the product which you purchased has a recurring failure, Adam Hall has the right, at its
discretion, to replace the defective product with another product, provided that the new product is at least equi-
valent to the product being replaced with regard to the technical specifications.
Adam Hall does not warrant that the operation of this product will be uninterrupted or error-free. Adam Hall is not
responsible for damage that occurs as a result of your failure to follow the instructions included with the Adam Hall
branded product. The manufacturer‘s warranty does not cover – expendable parts (e. g., rechargeable batteries)
- products from which the serial number has been removed or with a serial number that has been damaged as a
result of an accident - damage due to improper use, user error or other external reasons
- damage to devices operated outside the usage parameters stated in the documentation included with the product
- damage due to the use of replacement parts not manufactured, sold or recommended by Adam Hall,
- damage due to modification or servicing by anyone other than Adam Hall.
These terms and conditions constitute the complete and exclusive warranty agreement between you and Adam
Hall regarding the Adam Hall branded product you have purchased.
MANUFACTURER´S DECLARATIONS:

19
ITALIANO
POLSKI
ESPAÑOL
FRANCAIS
FRANCAIS
FRANCAIS
FRANCAIS
FRANCAIS
DEUTSCH
ENGLISH
MANUFACTURER´S DECLARATIONS:
LIMITATION OF LIABILITY
If your Adam Hall branded hardware product fails to work as warranted above, your sole and exclusive remedy
shall be repair or replacement. Adam Halls’ maximum liability under this limited warranty is expressly limited to
the lesser of the price you have paid for the product or the cost of repair or replacement of any components that
malfunction under conditions of normal use.
Adam Hall is not liable for any damages caused by the product or the failure of the product, including any lost
profits or savings or special, incidental, or consequential damages. Adam Hall is not liable for any claim made by
a third party or made by you for a third party.
This limitation of liability applies whether damages are sought, or claims are made, under this Limited Warranty
or as a tort claim (including negligence and strict product liability), a contract claim, or any other claim, and
cannot be rescinded or changed by anyone. This limitation of liability will be effective even if you have advised
Adam Hall or an authorized representative of Adam Hall of the possibility of any such damages, but not, however,
in the event of claims for damages in connection with personal injuries.
This manufacturer‘s warranty grants you specific rights; depending on jurisdiction (nation or state), you may be
be entitled to additional claims. You are advised to consult applicable state or national laws for a full determina-
tion of your rights.
REQUESTING WARRANTY SERVICE
To request warranty service for the product, contact Adam Hall or the Adam Hall authorized reseller from which
you purchased the product.
EC DECLARATION OF CONFORMITY
The equipment marketed by Adam Hall complies (where applicable) with the essential requirements and other
relevant specifications of Directives 1999/5/EC (R&TTE), 2004/108/EC (EMC) und 2006/95/EC (LVD). Additional
information can be found at www.adamhall.com.

20
ENGLISHDEUTSCHFRANCAIS
FRANCAISFRANCAIS
FRANCAISFRANCAIS
ESPAÑOLPOLSKIITALIANO
MANUFACTURER´S DECLARATIONS:
PROPER DISPOSAL OF THIS PRODUCT
(Valid in the European Union and other European countries with waste separation)
This symbol on the product, or the documents accompanying the product, indicates that this appliance may not
be treated as household waste. This is to avoid environmental damage or personal injury due to uncontrolled
waste disposal. Please dispose of this product separately from other waste and have it recycled to promote
sustainable economic activity.
Household users should contact either the retailer where they purchased this product, or their local government
office, for details on where and how they can recycle this item in an environmentally friendly manner.
Business users should contact their supplier and check the terms and conditions of the purchase contract. This
product should not be mixed with other commercial wastes for disposal .
ENVIRONMENTAL PROTECTION AND ENERGY CONSERVATION
Energy conservation is an active contribution to environmental protection. Please turn off all unneeded electrical
devices. To prevent unneeded devices from consuming power in standby mode, disconnect the mains plug.
Adam Hall GmbH, all rights reserved. The technical data and the functional product characteristics can be subject
to modifications. The photocopying, the translation, and all other forms of copying of fragments or of the integrlity
of this user’s manual is prohibited.
Strona się ładuje...
Strona się ładuje...
Strona się ładuje...
Strona się ładuje...
Strona się ładuje...
Strona się ładuje...
Strona się ładuje...
Strona się ładuje...
Strona się ładuje...
Strona się ładuje...
Strona się ładuje...
Strona się ładuje...
Strona się ładuje...
Strona się ładuje...
Strona się ładuje...
Strona się ładuje...
Strona się ładuje...
Strona się ładuje...
Strona się ładuje...
Strona się ładuje...
Strona się ładuje...
Strona się ładuje...
Strona się ładuje...
Strona się ładuje...
Strona się ładuje...
Strona się ładuje...
Strona się ładuje...
Strona się ładuje...
Strona się ładuje...
Strona się ładuje...
Strona się ładuje...
Strona się ładuje...
Strona się ładuje...
Strona się ładuje...
Strona się ładuje...
Strona się ładuje...
Strona się ładuje...
Strona się ładuje...
Strona się ładuje...
Strona się ładuje...
Strona się ładuje...
Strona się ładuje...
Strona się ładuje...
Strona się ładuje...
Strona się ładuje...
Strona się ładuje...
Strona się ładuje...
Strona się ładuje...
Strona się ładuje...
Strona się ładuje...
Strona się ładuje...
Strona się ładuje...
Strona się ładuje...
Strona się ładuje...
Strona się ładuje...
Strona się ładuje...
Strona się ładuje...
Strona się ładuje...
Strona się ładuje...
Strona się ładuje...
Strona się ładuje...
Strona się ładuje...
Strona się ładuje...
Strona się ładuje...
Strona się ładuje...
Strona się ładuje...
Strona się ładuje...
Strona się ładuje...
Strona się ładuje...
Strona się ładuje...
Strona się ładuje...
Strona się ładuje...
Strona się ładuje...
Strona się ładuje...
Strona się ładuje...
Strona się ładuje...
Strona się ładuje...
Strona się ładuje...
Strona się ładuje...
Strona się ładuje...
Strona się ładuje...
Strona się ładuje...
Strona się ładuje...
Strona się ładuje...
Strona się ładuje...
Strona się ładuje...
Strona się ładuje...
Strona się ładuje...
Strona się ładuje...
Strona się ładuje...
Strona się ładuje...
Strona się ładuje...
Strona się ładuje...
Strona się ładuje...
Strona się ładuje...
Strona się ładuje...
Strona się ładuje...
Strona się ładuje...
Strona się ładuje...
Strona się ładuje...
Strona się ładuje...
Strona się ładuje...
Strona się ładuje...
Strona się ładuje...
-
 1
1
-
 2
2
-
 3
3
-
 4
4
-
 5
5
-
 6
6
-
 7
7
-
 8
8
-
 9
9
-
 10
10
-
 11
11
-
 12
12
-
 13
13
-
 14
14
-
 15
15
-
 16
16
-
 17
17
-
 18
18
-
 19
19
-
 20
20
-
 21
21
-
 22
22
-
 23
23
-
 24
24
-
 25
25
-
 26
26
-
 27
27
-
 28
28
-
 29
29
-
 30
30
-
 31
31
-
 32
32
-
 33
33
-
 34
34
-
 35
35
-
 36
36
-
 37
37
-
 38
38
-
 39
39
-
 40
40
-
 41
41
-
 42
42
-
 43
43
-
 44
44
-
 45
45
-
 46
46
-
 47
47
-
 48
48
-
 49
49
-
 50
50
-
 51
51
-
 52
52
-
 53
53
-
 54
54
-
 55
55
-
 56
56
-
 57
57
-
 58
58
-
 59
59
-
 60
60
-
 61
61
-
 62
62
-
 63
63
-
 64
64
-
 65
65
-
 66
66
-
 67
67
-
 68
68
-
 69
69
-
 70
70
-
 71
71
-
 72
72
-
 73
73
-
 74
74
-
 75
75
-
 76
76
-
 77
77
-
 78
78
-
 79
79
-
 80
80
-
 81
81
-
 82
82
-
 83
83
-
 84
84
-
 85
85
-
 86
86
-
 87
87
-
 88
88
-
 89
89
-
 90
90
-
 91
91
-
 92
92
-
 93
93
-
 94
94
-
 95
95
-
 96
96
-
 97
97
-
 98
98
-
 99
99
-
 100
100
-
 101
101
-
 102
102
-
 103
103
-
 104
104
-
 105
105
-
 106
106
-
 107
107
-
 108
108
-
 109
109
-
 110
110
-
 111
111
-
 112
112
-
 113
113
-
 114
114
-
 115
115
-
 116
116
-
 117
117
-
 118
118
-
 119
119
-
 120
120
-
 121
121
-
 122
122
-
 123
123
-
 124
124


LD Systems Roadboy 65 HS Instrukcja obsługi
- Typ
- Instrukcja obsługi
w innych językach
Powiązane artykuły
-
LD Systems U508 BPH Instrukcja obsługi
-
LD Systems Roadman 102 Headset B6 Instrukcja obsługi
-
LD LD ROADMAN 102 Instrukcja obsługi
-
LD LDHP550E Instrukcja obsługi
-
-
-
LD Systems Roadboy 65 HS B6 Instrukcja obsługi
-
-
-
LD WS10002 Instrukcja obsługi
Inne dokumenty
-
LD Play 15A Instrukcja obsługi
-
Palmer PBC400AA Instrukcja obsługi
-
Defender Mini Instrukcja obsługi
-
 AlienPro MU-100 Instrukcja obsługi
-
 PYLE Audio PWMA1080I Instrukcja obsługi
-
Defender Micro Instrukcja obsługi
-
-
OK. OPK 500BT-B Instrukcja obsługi
-
 Rayline R804 Instrukcja obsługi


