LD Systems RJ10 Road Jack 10 Portable Speaker Instrukcja obsługi
- Typ
- Instrukcja obsługi

USER´S MANUAL
BEDIENUNGSANLEITUNG
MANUEL D`UTILISATION
MANUAL DE USUARIO
INSTRUKCJA OBSŁUGI
MANUALE D‘ USO
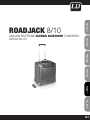
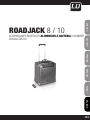
ROADJACK 8 / 10
BATTERY POWERED BLUETOOTH LOUDSPEAKER WITH MIXER
LDRJ8 / LDRJ10

2
ENGLISHDEUTSCHFRANCAIS
FRANCAISFRANCAIS
FRANCAISFRANCAIS
ESPAÑOLPOLSKIITALIANO
You‘ve made the right choice!
We have designed this product to operate reliably over many years. LD Systems stands for this with its name and
many years of experience as a manufacturer of high-quality audio products.
Please read this User‘s Manual carefully, so that you can begin making optimum use of your LD Systems product
quickly.
You can find more information about LD SYSTEMS at our Internet site WWW.LD-SYSTEMS.COM
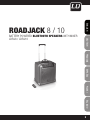
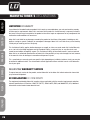
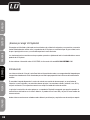
Introduction
The active 2-way systems from the Road Jack series are equipped for easy transportation with integrated
wheels and a pull-out handle. The built-in battery provides for a period of up to 20 hours of continuous operation.
The mixer provides three separately controllable input channels, a 2-band EQ, an adjustable echo and a controller
for the overall volume. Through the combo-, 6.3 mm jack, RCA and 3.5 mm TRS mini jacks, a variety of input
sources can be connected.
The outstanding feature is the built-in Bluetooth player that allows wireless streaming of audio content to the
system. In addition, USB memory and SD cards can be used as storage media.
Both systems are supplied with a handy IR remote control and a convenient tripod adapter.

3
ITALIANO
POLSKI
ESPAÑOL
FRANCAIS
FRANCAIS
FRANCAIS
FRANCAIS
FRANCAIS
DEUTSCH
ENGLISH
ROADJACK 8 / 10
BATTERY POWERED BLUETOOTH SPEAKERS WITH MIXER
LDRJ8 / LDRJ10

4
ENGLISHDEUTSCHFRANCAIS
FRANCAISFRANCAIS
FRANCAISFRANCAIS
ESPAÑOLPOLSKIITALIANO
Avoid direct sunlight!
PREVENTIVE MEASURES:
1. Please read these instructions carefully.
2. Keep all information and instructions in a safe place.
3. Follow the instructions.
4. Observe all safety warnings. Never remove safety warnings or other information from the equipment.
5. Use the equipment only in the intended manner and for the intended purpose.
6. Use only sufficiently stable and compatible stands and/or mounts (for fixed installations). Make certain that wall
mounts are properly installed and secured. Make certain that the equipment is installed securely and cannot fall down.
7. During installation, observ e the applicable safety regulations for your country.
8. Never install and operate the equipment near radiators, heat registers, ovens or other sources of heat. Make certain
that the equipment is always installed so that is cooled sufficiently and cannot overheat.
9. Never place sources of ignition, e.g., burning candles, on the equipment.
10. Ventilation slits must not be blocked.
11. Do not use this equipment in the immediate vicinity of water (does not apply to special outdoor equipment -
in this case, observe the special instructions noted below. Do not expose this equipment to flammable materials,
fluids or gases.
12. Make certain that dripping or splashed water cannot enter the equipment. Do not place containers filled with
liquids, such as vases or drinking vessels, on the equipment.
13. Make certain that objects cannot fall into the device.
14. Use this equipment only with the accessories recommended and intended by the manufacturer.
15. Do not open or modify this equipment.
16. After connecting the equipment, check all cables in order to prevent damage or accidents, e.g., due to
tripping hazards.
17. During transport, make certain that the equipment cannot fall down and possibly cause property damage and
personal injuries.
18. If your equipment is no longer functioning properly, if fluids or objects have gotten inside the equipment or
if it has been damaged in anot her way, switch it off immediately and unplug it from the mains outlet (if it is a
powered device). This equipment may only be repaired by authorized, qualified personnel.
19. Clean the equipment using a dry cloth.
20. Comply with all applicable disposal laws in your country. During disposal of packaging, please separate
plastic and paper/cardboard.
21. Plastic bags must be kept out of reach of children.
FOR EQUIPMENT THAT CONNECTS TO THE POWER MAINS:
22. CAUTION: If the power cord of the device is equipped with an earthing contact, then it must be connected to
an outlet with a protective ground. Never deactivate the protective ground of a power cord.
23. If the equipment has been exposed to strong fluctuations in temperature (for example, after transport), do
not switch it on immediately. Moisture and condensation could damage the equipment. Do not switch on the
equipment until it has reached room temperature.
24. Before connecting the equipment to the power outlet, first verify that the mains voltage and frequency match
the values specified on the equipment. If the equipment has a voltage selection switch, connect the equipment to
the power outlet only if the equipment values and the mains power values match. If the included power cord or
power adapter does not fit in your wall outlet, contact your electrician.
25. Do not step on the power cord. Make certain that the power cable does not become kinked, especially at the
mains outlet and/or power adapter and the equipment connector.
26. When connecting the equipment, make certain that the power cord or power adapter is always freely
accessible. Always disconnect the equipment from the power supply if the equipment is not in use or if you want

5
ITALIANO
POLSKI
ESPAÑOL
FRANCAIS
FRANCAIS
FRANCAIS
FRANCAIS
FRANCAIS
DEUTSCH
ENGLISH
To prevent possible hearing damage, avoid listening at high volume levels over long periods of time.
Even exposure to short bursts of loud noise can result in hearing loss. Please keep the volume
constantly at a comfortable level.
Avoid direct sunlight!
SAFETY:
to clean the equipment. Always unplug the power cord and power adapter from the power outlet at the plug or
adapter and not by pulling on the cord. Never touch the power cord and power adapter with wet hands.
27. Whenever possible, avoid switching the equipment on and off in quick succession because otherwise this
can shorten the useful life of the equipment.
28. IMPORTANT INFORMATION: Replace fuses only with fuses of the same type and rating. If a fuse blows repea-
tedly, please contact an authorised service centre.
29. To disconnect the equipment from the power mains completely, unplug the power cord or power adapter
from the power outlet.
30. If your device is equipped with a Volex power connector, the mating Volex equipment connector must be
unlocked before it can be removed. However, this also means that the equipment can slide and fall down if
the power cable is pulled, which can lead to personal injuries and/or other damage. For this reason, always be
careful when laying cables.
31. Unplug the power cord and power adapter from the power outlet if there is a risk of a lightning strike or
before extended periods of disuse.
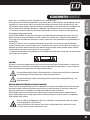
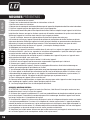
CAUTION
RISK OF ELECTRIC SHOCK
DO NOT OPEN
CAUTION:
Never remove the cover, because otherwise there may be a risk of electric shock. There are no user serviceable
parts inside. Have repairs carried out only by qualified service personnel.
The lightning flash with arrowhead symbol within an equilateral triangle is intended to alert the user
to the presence of uninsulated “dangerous voltage” within the product’s enclosure that may be of
sufficient magnitude to constitute a risk of electrical shock.
The exclamation mark within an equilateral triangle is intended to alert the user to the presence of
important operating and maintenance instructions.
CAUTION – HIGH VOLUME LEVELS WITH AUDIO PRODUCTS!
This equipment is intended for professional use. Therefore, commercial use of this equipment is subject to the
respectively applicable national accident prevention rules and regulations. As a manufacturer, Adam Hall is
obligated to notify you formally about the existence of potential health risks.
Hearing damage due to high volume and prolonged exposure: When in use, this product is capable of producing
high sound-pressure levels (SPL) that can lead to irreversible hearing damage in performers, employees, and
audience members. For this reason, avoid prolonged exposure to volumes in excess of 90 dB.

6
ENGLISHDEUTSCHFRANCAIS
FRANCAISFRANCAIS
FRANCAISFRANCAIS
ESPAÑOLPOLSKIITALIANO
+6-6
+6-6
+6-6 +6-6
LOW 1 2 3 LOW 1 2 3
3
5
5
6
2
1
4
8
7
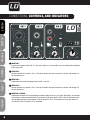
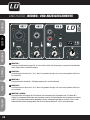
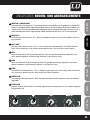
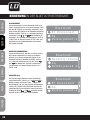
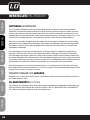
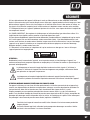
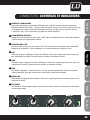
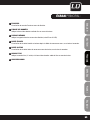
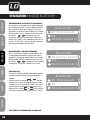
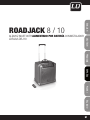
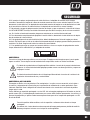
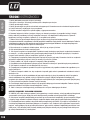
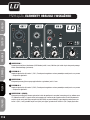
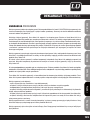
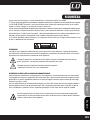
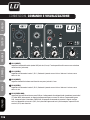
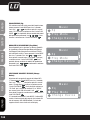
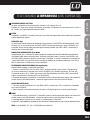
CONNECTIONS, CONTROLS, AND INDICATORS:
1
INPUT CH 1
Balanced microphone input (XLR / 6.3 mm jack combo) It is also possible to use an unbalanced microphone
cable (mono jack).
2
LEVEL CH 1
Volume controller for channel 1 (CH 1). Turning the knob to the right increases the volume and turning it to
the left decreases it.
3
INPUT CH 2
Unbalanced instrument/microphone input with 6.3 mm jack.
4
LEVEL CH 2
Volume controller for channel 2 (CH 2). Turning the knob to the right increases the volume and turning it to
the left decreases it.
5
INPUT CH 3 (CINCH)
Unbalanced line input (RCA) for connecting an external audio source (e.g., CD player, MP3 player). An incoming
stereo signal is mono summed internally. To activate the RCA input, switch 8 (MP3 / AUX) on the control panel
must be depressed, the incoming signal is now on channel 3 (CH 3). If the socket of the mini-jack input is in
use, the RCA jacks of channel 3 (CH 3) are muted.

7
ITALIANO
POLSKI
ESPAÑOL
FRANCAIS
FRANCAIS
FRANCAIS
FRANCAIS
FRANCAIS
DEUTSCH
ENGLISH
+6-6 +6-6
+6-6 +6-6
LOW 1 2 3 LOW 1 2 3
109 11 12
13
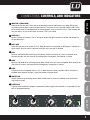
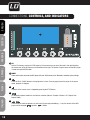
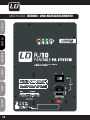
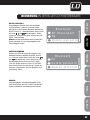
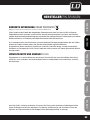
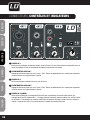
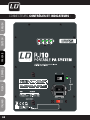
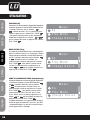
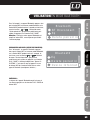
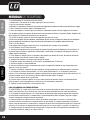
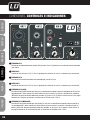
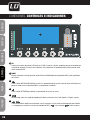
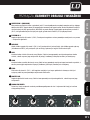
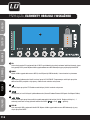
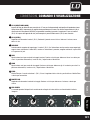
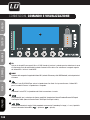
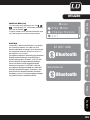
CONNECTIONS, CONTROLS, AND INDICATORS:
6
INPUT CH 3 (MINI-JACK)
Unbalanced line input with 3.5mm jack for connecting an external audio source (e.g. laptop, MP3 player).
An incoming stereo signal is mono summed internally. To activate the mini-jack input, switch 8 (MP3 / AUX)
on the control panel must be depressed, the incoming signal is now on channel 3 (CH 3). If the socket of the
mini-jack input is in use, the RCA jacks of channel 3 (CH 3) are muted.
7
LEVEL CH 3
Volume controller for channel 3 (CH 3). Turning the knob to the right increases the volume and turning it to
the left decreases it.
8
MP3 / AUX
Select the input source for channel 3 (CH 3). When the switch is not pressed, the MP3 player is selected as a
signal source, when the switch is pressed, the RCA or mini-jack input is selected.
9
LOW
Equalizer low band for the summing channel (Master). When turned to the left, levels are lowered, when
turned to the right, they are raised. In the centre position (resting point), the equalizer is inactive.
10
HIGH
Equalizer high band for the summing channel. When turned to the left, levels are lowered, when turned to the
right, they are raised. In the centre position (resting point), the equalizer is inactive.
11
ECHO
Echo effect for the microphone channel 1 (CH 1). When the control knob is turned to the left, the effect is
disabled, when turned to the right, it raises the volume of the echo effect.
12
MASTER VOL
Volume control for the summing channel. When turned to the left, levels are lowered, when turned to the
right, they are raised.
13
POWER LED
Lights up when the device is properly connected to a power supply and is turned on, or is operated with the
built-in rechargeable battery.
CONNECTIONS, CONTROLS, AND INDICATORS:

8
ENGLISHDEUTSCHFRANCAIS
FRANCAISFRANCAIS
FRANCAISFRANCAIS
ESPAÑOLPOLSKIITALIANO
+6-6 +6-6
+6-6 +6-6
LOW 1 2 3
LOW 1 2 3
15
16
17
14
18
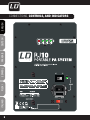
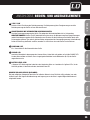
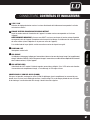
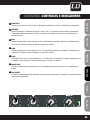
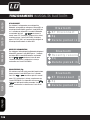
CONNECTIONS, CONTROLS, AND INDICATORS:

9
ITALIANO
POLSKI
ESPAÑOL
FRANCAIS
FRANCAIS
FRANCAIS
FRANCAIS
FRANCAIS
DEUTSCH
ENGLISH
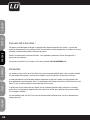
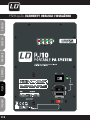
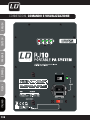
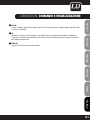
CONNECTIONS, CONTROLS, AND INDICATORS:
14
115 V / 230 V
Switch for setting the operating voltage. The mains voltage of your power supplier and the operating voltage
of the device must be the same!
15
IEC POWER SOCKET WITH INTEGRAL FUSE HOLDER
Used to power the device. An appropriate power cord is included in the delivery.
IMPORTANT INFORMATION: BEFORE using this equipment, make certain that the mains voltage of your
energy supplier and the operating voltage of the device match! Always replace the fuse with a fuse of the
same type and rating according to the supply voltage (see label on the rear panel)!
If the fuse blows repeatedly, please contact an authorised service centre.
16
POWER ON / OFF
On / Off switch for the power supply of the device.
17
CHARGE-LED
Lights up while charging the internal battery. When the battery is fully charged, the CHARGE LED goes out. To
charge the battery, an appropriate power cord must be connected to the power socket (No. 24) of the device.
18
BATTERY LEVEL LEDS
4-segment LED meter displays the charge status of the built-in battery. When all three green LEDs are lit, the
battery is fully charged. The battery is discharged when the red LED is lit.
NOTE TO BATTERY CARE (LEAD BATTERY)
Recharge the battery fully at every opportunity. Never completely discharge a rechargeable lead battery or store
it in discharged or semi-charged condition. During extended periods of disuse and storage, the battery must be
recharged fully at regular intervals.
CONNECTIONS, CONTROLS, AND INDICATORS:

10
ENGLISHDEUTSCHFRANCAIS
FRANCAISFRANCAIS
FRANCAISFRANCAIS
ESPAÑOLPOLSKIITALIANO
+6-6 +6-6
+6-6 +6-6
LOW 1 2 3 LOW 1 2 3
2220 21
19
23 24 24
25
26
27
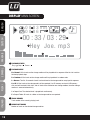
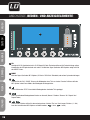
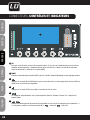
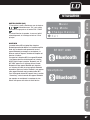
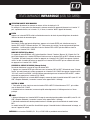
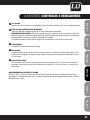
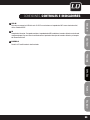
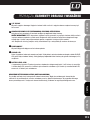
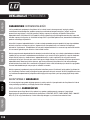
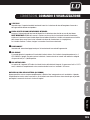
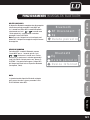
CONNECTIONS, CONTROLS, AND INDICATORS:
19
SD
Slot for SD memory card up to 32 GB capacity. Please make sure you insert the card in the right direction:
the contact row of the SD memory card should be to the right. The choice of signal source for the MP3 player
is made using the MODE button.
20
MODE
Choice of the signal source for the MP3 player (SD card / USB memory stick / Bluetooth), and other system settings.
21
Press the PLAY / PAUSE button to start playback of a track. Pressing again places the player in the pause
mode, playback is stopped. .
22
Playback of the current track is stopped by pressing the STOP button.
23
Six different playback modes are available for selection (Normal / Random / Browse / All / Repeat One /
Repeat Folder).
24
Press briefly to select the previous or next track. By pressing and holding (> 1 sec) the volume of the MP3
player can be changed ( = quieter, = louder).

11
ITALIANO
POLSKI
ESPAÑOL
FRANCAIS
FRANCAIS
FRANCAIS
FRANCAIS
FRANCAIS
DEUTSCH
ENGLISH
CONNECTIONS, CONTROLS, AND INDICATORS:
25
USB IN
Slot for USB memory stick up to 32 GB capacity. The choice of signal source for the MP3 player is made
using the MODE button.
26
IR
Infrared interface. In order to control the MP3 player via the supplied remote control, be sure to position the
infrared port of the remote control in direct visual contact with the infrared port of the Road Jack speaker.
27
DISPLAY
Multifunctional LC display with backlight.
CONNECTIONS, CONTROLS, AND INDICATORS:

12
ENGLISHDEUTSCHFRANCAIS
FRANCAISFRANCAIS
FRANCAISFRANCAIS
ESPAÑOLPOLSKIITALIANO
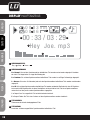
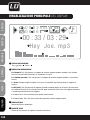
Hey Joe. mp3
00 : 33 / 03 : 29
0003
0006
BAS
2 56
MP3
3
5
6
2
1
4
10
98
7
11
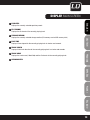
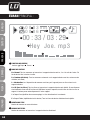
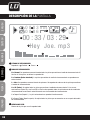
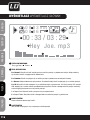
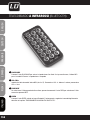
DISPLAY MAIN SCREEN:
1
PLAYBACK STATUS
Play = , Stop = , Pause =
2
PLAYBACK MODE
N = Normal. All the tracks on the storage medium will be played back in sequence. After the last track has
finished, playback stops.
R = Random. All the tracks on the storage medium will be played back in random order.
I = Browse. The first 10 seconds of each track contained on the storage medium are played in sequence.
A = All. All the tracks on the storage media will be repeated. If an SD memory card and a USB memory
stick are both inserted in their slots, after all tracks have finished on one storage medium, the other storage
medium is accessed automatically.
1 = Repeat One. The selected track is played back continuously.
F = Repeat Folder. All tracks in a folder on the storage medium are repeated.
3
TRACK NUMBER
Track number of the currently playing track.
4
NUMBER OF TRACKS
Number of tracks on the selected storage medium.

13
ITALIANO
POLSKI
ESPAÑOL
FRANCAIS
FRANCAIS
FRANCAIS
FRANCAIS
FRANCAIS
DEUTSCH
ENGLISH
DISPLAY MAIN SCREEN:
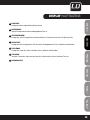
5
EQUALIZER
Displays the currently selected equalizer presets.
6
FILE FORMAT
Displays the file format of the currently playing track.
7
STORAGE MEDIUM
Displays the currently selected storage medium (SD memory card or USB memory stick).
8
PLAY TIME
Display of time elapsed for the currently playing track in minutes and seconds.
9
TRACK LENGTH
Display of total track duration for the currently playing track in minutes and seconds.
10
TRACK NAME
Displays the track name (if identified) and the file format for the currently playing track.
11
AUDIOANALIZER
DISPLAY MAIN SCREEN:

14
ENGLISHDEUTSCHFRANCAIS
FRANCAISFRANCAIS
FRANCAISFRANCAIS
ESPAÑOLPOLSKIITALIANO
Music
Eq
Play Mode
Change Device
Music
Eq
Play Mode
Change Device
Music
Eq
Play Mode
Change Device
Music
Play Mode
Change Device
Exit
00 : 00 : 00
NOR
BT NOT LINK
00 : 00 : 00
NOR
Smartphone
BT NOT LINK
Bluetooth
Bluetooth
Smartphone
Music
Eq
Play Mode
Change Device
Music
Eq
Play Mode
Change Device
Music
Eq
Play Mode
Change Device
Music
Play Mode
Change Device
Exit
00 : 00 : 00
NOR
BT NOT LINK
00 : 00 : 00
NOR
Smartphone
BT NOT LINK
Bluetooth
Bluetooth
Smartphone
Music
Eq
Play Mode
Change Device
Music
Eq
Play Mode
Change Device
Music
Eq
Play Mode
Change Device
Music
Play Mode
Change Device
Exit
00 : 00 : 00
NOR
BT NOT LINK
00 : 00 : 00
NOR
Smartphone
BT NOT LINK
Bluetooth
Bluetooth
Smartphone
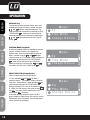
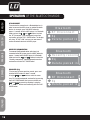
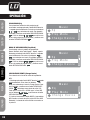
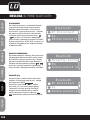
OPERATION:
EQUALIZER (Eq)
To select one of seven equalizer presets, press and
hold the MODE button for about 1 second. Using the
and buttons, select the menu item "Eq"
(bright background) and confirm by pressing the PLAY
/ PAUSE button . Now you can activate one of
seven equalizer presets by selecting it using the keys
and and confirm with the PLAY / PAUSE
button .
PLAYBACK MODE (Play Mode)
Six different playback modes are available for selection
(Normal / Random / Browse / All / Repeat One /
Repeat Folder). Press and hold the MODE button for
about 1 second. Using the and buttons,
select the menu item "Play Mode" (bright background)
and confirm by pressing the PLAY / PAUSE button
. Now you can activate one of six playback
modes by selecting it using the keys and
and confirm with the PLAY / PAUSE button .
SOURCE SELECTION (Change Device)
Choice of signal source for the MP3 player.
1. Press and hold the MODE button for about 1
second. Using the and buttons, select the
menu item "Change Device" (bright background) and
confirm by pressing the PLAY / PAUSE button .
Now you can select "SD Card" for SD memory card,
or "UDISK" for USB memory stick using the keys
and as a signal source, and press the PLAY /
PAUSE button to confirm.
2. By briefly pressing the MODE button, the MP3
player changes its signal source (SD card slot / slot for
USB memory sticks / Bluetooth). The activated signal
source is shown on the display.

15
ITALIANO
POLSKI
ESPAÑOL
FRANCAIS
FRANCAIS
FRANCAIS
FRANCAIS
FRANCAIS
DEUTSCH
ENGLISH
Music
Eq
Play Mode
Change Device
Music
Eq
Play Mode
Change Device
Music
Eq
Play Mode
Change Device
Music
Play Mode
Change Device
Exit
00 : 00 : 00
NOR
BT NOT LINK
00 : 00 : 00
NOR
Smartphone
BT NOT LINK
Bluetooth
Bluetooth
Smartphone
Music
Eq
Play Mode
Change Device
Music
Eq
Play Mode
Change Device
Music
Eq
Play Mode
Change Device
Music
Play Mode
Change Device
Exit
00 : 00 : 00
NOR
BT NOT LINK
00 : 00 : 00
NOR
Smartphone
BT NOT LINK
Bluetooth
Bluetooth
Smartphone
Music
Eq
Play Mode
Change Device
Music
Eq
Play Mode
Change Device
Music
Eq
Play Mode
Change Device
Music
Play Mode
Change Device
Exit
00 : 00 : 00
NOR
BT NOT LINK
00 : 00 : 00
NOR
Smartphone
BT NOT LINK
Bluetooth
Bluetooth
Smartphone
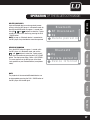
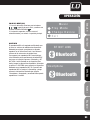
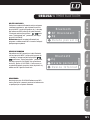
OPERATION:
EXITING THE MENU (Exit)
1. To exit the menu, using the buttons and
select the menu item "Exit" and confirm using the
PLAY / PAUSE button .
2. After about 8 seconds, the menu is automatically
exited and the display will change to the main display.
.
BLUETOOTH
The MP3 player is equipped with Bluetooth, meaning
that audio files from another Bluetooth device (e.g.
Smartphone) can be played back on the Road Jack
Speaker (maximum distance between the two devices
is about 10 metres).
To pair the MP3 player with a Bluetooth device and
connect to it, press briefly on the MODE button until
"Bluetooth" and "BT NOT LINK" appears in the display.
Activate Bluetooth on your Bluetooth device and search
on the user interface for available devices. Select "LD
SYSTEMS" and pair your Bluetooth device with the MP3
player. In the MP3 player display, "Connecting" appears
and your Bluetooth device is then displayed (e.g.
smartphone), and is therefore paired and connected.
The playback can now start.

16
ENGLISHDEUTSCHFRANCAIS
FRANCAISFRANCAIS
FRANCAISFRANCAIS
ESPAÑOLPOLSKIITALIANO
Bluetooth
BT Disconnect
Eq
Delete paired in
Bluetooth
BT Disconnect
Eq
Delete paired in
Bluetooth
Recently reconne
Eq
Delete paired in
Bluetooth
BT Disconnect
Eq
Delete paired in
Bluetooth
Eq
Delete paired in
Device Informat
Bluetooth
BT Disconnect
Eq
Delete paired in
Bluetooth
BT Disconnect
Eq
Delete paired in
Bluetooth
Recently reconne
Eq
Delete paired in
Bluetooth
BT Disconnect
Eq
Delete paired in
Bluetooth
Eq
Delete paired in
Device Informat
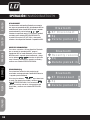
OPERATION OF THE BLUETOOTH MODE:
BT DISCONNECT
To terminate the connection to a Bluetooth device, in
order to connect the MP3 player to another Bluetooth
device, for example, press the MODE button for
approx. 1 second, while the MP3 player is in Bluetooth
mode, and use the and buttons to select
the "BT Disconnect" (light background) menu item
and confirm with the PLAY / PAUSE button. The display
will show "BT NOT LINK" and you can now connect
another Bluetooth device to the MP3 player.
RECENTLY RECONNECTION
To reconnect the Bluetooth device, which was last
connected to the MP3 player, press the MODE button for
approx. 1 second, while the MP3 player is in Bluetooth
mode, and use the and buttons to select the
"Recently reconnection" (light background) menu item
and confirm with the PLAY / PAUSE button.
EQUALIZER (Eq)
To select one of seven equalizer presets, press and
hold the MODE button for about 1 second.
Using the and buttons, select the menu
item "Eq" (bright background) and confirm by pressing
the PLAY / PAUSE button. Now you can activate one
of seven equalizer presets by selecting it using the
and buttons and confirming with the PLAY /
PAUSE button.
Bluetooth
BT Disconnect
Eq
Delete paired in
Bluetooth
BT Disconnect
Eq
Delete paired in
Bluetooth
Recently reconne
Eq
Delete paired in
Bluetooth
BT Disconnect
Eq
Delete paired in
Bluetooth
Eq
Delete paired in
Device Informat

17
ITALIANO
POLSKI
ESPAÑOL
FRANCAIS
FRANCAIS
FRANCAIS
FRANCAIS
FRANCAIS
DEUTSCH
ENGLISH
Bluetooth
BT Disconnect
Eq
Delete paired in
Bluetooth
BT Disconnect
Eq
Delete paired in
Bluetooth
Recently reconne
Eq
Delete paired in
Bluetooth
BT Disconnect
Eq
Delete paired in
Bluetooth
Eq
Delete paired in
Device Informat
Bluetooth
BT Disconnect
Eq
Delete paired in
Bluetooth
BT Disconnect
Eq
Delete paired in
Bluetooth
Recently reconne
Eq
Delete paired in
Bluetooth
BT Disconnect
Eq
Delete paired in
Bluetooth
Eq
Delete paired in
Device Informat
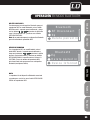
OPERATION OF THE BLUETOOTH MODE:
DELETE PAIRED INFO
A paired Bluetooth device can be unpaired (remove
pairing), while the MP3 player is in Bluetooth mode, by
pressing the MODE button for approx. 1 second, then
using the and buttons to select the "Delete
paired info" menu item. Confirm by pressing the PLAY
/ PAUSE button.
NOTE: As long as a Bluetooth device is connected to
the MP3 player, the paired device cannot be unpaired.
DEVICE INFORMATION
Press the MODE button for approx. 1 second, while
the MP3 player is in Bluetooth mode, and use the
and buttons to select the "Delete paired"
menu item and confirm by pressing the PLAY / PAUSE
button. The display now shows "Name: LD SYSTEMS“.
This name appears on the MP3-player of the Road
Jack speakers on your Bluetooth device (smartphone,
tablet).
NOTE:
The playback of the connected Bluetooth device can
be interrupted by pressing the PLAY / PAUSE button of
the MP3 player and started again.

18
ENGLISHDEUTSCHFRANCAIS
FRANCAISFRANCAIS
FRANCAISFRANCAIS
ESPAÑOLPOLSKIITALIANO
3
5
6
2
1
4
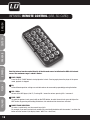
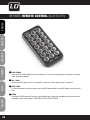
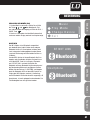
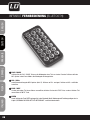
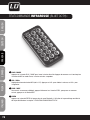
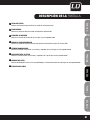
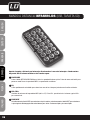
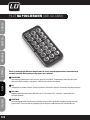
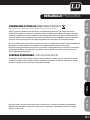
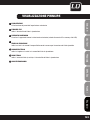
7
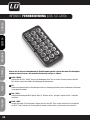
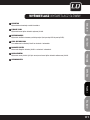
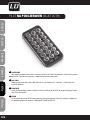
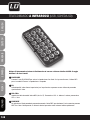
Point the infrared remote control directly at the infrared sensor installed on the USB slot infrared
sensor. The maximum range is about 8 metres.
1
PLAY / PAUSE
Press the PLAY / PAUSE button to start playback of a track. Pressing again places the player in the pause
mode, playback is stopped.
2
EQ
Seven different equalizer settings are available and can be accessed by repeatedly pressing the button.
3
VOL- / VOL+
Volume of the MP3 player (0 to 15). Pressing VOL- lowers the volume, pressing VOL+ increases it.
4
PREV / NEXT
To select the previous track, press briefly on the PREV button; to select the next track, press briefly on the
NEXT button. By pressing and holding the buttons, fast rewind and fast forward are activated.
5
DIRECT TRACK SELECTION
To select a track directly, use the numeric keys 0 to 9
For example: If you want to select track number 29, press briefly the button with the number 2, and then the
button with the number 9 (the display shows "0029" for a short time).
INFRARED REMOTE CONTROL (USB, SD-CARD):

19
ITALIANO
POLSKI
ESPAÑOL
FRANCAIS
FRANCAIS
FRANCAIS
FRANCAIS
FRANCAIS
DEUTSCH
ENGLISH
6
ENTER
Press the ENTER button to enter the menu to select the equalizer, the playback mode and the signal source.
EQUALIZER (Eq)
To select one of the seven equalizer presets, press the ENTER button, and using the PREV and NEXT buttons,
select the menu item "Eq" (bright background) and confirm by pressing the PLAY / PAUSE button. Now you
can activate one of seven equalizer presets by selecting it using the PREV and NEXT buttons, and confirm by
pressing the PLAY / PAUSE button.
PLAYBACK MODE (Play Mode)
Six different playback modes are available for selection (Normal / Random / Browse / All / Repeat One /
Repeat Folder). Press the ENTER button, and using the PREV and NEXT buttons, select the menu item "Play
Mode" (bright background) and confirm by pressing the PLAY / PAUSE button. Now you can activate one of
six playback modes by selecting it using the PREV and NEXT buttons, and confirm by pressing the PLAY /
PAUSE button.
SOURCE SELECTION (Change Device)
Choice of the signal source for the MP3 player.
1. Press the ENTER button, and using the PREV and NEXT buttons, select the menu item "Change Device"
(bright background) and confirm by pressing the PLAY / PAUSE button. Now you can select "SD Card" for SD
memory card, or "UDISK" for USB memory stick using the PREV and NEXT buttons, and confirm by pressing
the PLAY / PAUSE button.
2. By briefly pressing the MODE button, the MP3 player changes its signal source (SD card slot / slot for USB
memory sticks / Bluetooth). The activated signal source is shown on the display.
EXITING THE MENU (Exit)
1. To exit the menu, using the PREV and NEXT buttons, select the menu item "Exit" and confirm by pressing
the PLAY / PAUSE button.
2. After about 8 seconds, the menu is automatically exited and the display will change to the main display.
7
MODE
1. By briefly pressing the MODE button, the MP3 player changes its signal source (SD card slot / slot for USB
memory sticks / Bluetooth). The activated signal source is shown on the display.
2. Press this button for about 2 seconds, and the MP3 player is turned on or off.
The MP3 player may be turned on and off only by means of infrared remote control, not on the device itself
NOTE: The CHANNEL (CH-, CH+) and PICK SONG buttons have no function.
INFRARED REMOTE CONTROL (USB, SD-CARD): INFRARED REMOTE CONTROL (USB, SD-CARD):

20
ENGLISHDEUTSCHFRANCAIS
FRANCAISFRANCAIS
FRANCAISFRANCAIS
ESPAÑOLPOLSKIITALIANO
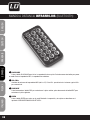
2
4
1
3
5
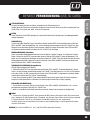
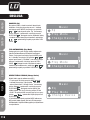
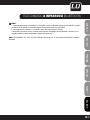
INFRARED REMOTE CONTROL (BLUETOOTH):
1
PLAY / PAUSE
Press the PLAY / PAUSE button to start the playback of a track. Pressing again places the player in the pause
mode, playback is stopped.
2
VOL- / VOL+
Volume of the MP3 player (0 to 15). Pressing VOL- lowers the volume, pressing VOL+ increases it.
3
PREV / NEXT
To select the previous track on an album, press the PREV button briefly, or the NEXT button to select the next
track.
4
ENTER
Pressing the ENTER button will take you to the Bluetooth menu. Operation and adjustment are carried out as
described in detail in the chapter "OPERATING IN THE BLUETOOTH MODE".
Strona się ładuje...
Strona się ładuje...
Strona się ładuje...
Strona się ładuje...
Strona się ładuje...
Strona się ładuje...
Strona się ładuje...
Strona się ładuje...
Strona się ładuje...
Strona się ładuje...
Strona się ładuje...
Strona się ładuje...
Strona się ładuje...
Strona się ładuje...
Strona się ładuje...
Strona się ładuje...
Strona się ładuje...
Strona się ładuje...
Strona się ładuje...
Strona się ładuje...
Strona się ładuje...
Strona się ładuje...
Strona się ładuje...
Strona się ładuje...
Strona się ładuje...
Strona się ładuje...
Strona się ładuje...
Strona się ładuje...
Strona się ładuje...
Strona się ładuje...
Strona się ładuje...
Strona się ładuje...
Strona się ładuje...
Strona się ładuje...
Strona się ładuje...
Strona się ładuje...
Strona się ładuje...
Strona się ładuje...
Strona się ładuje...
Strona się ładuje...
Strona się ładuje...
Strona się ładuje...
Strona się ładuje...
Strona się ładuje...
Strona się ładuje...
Strona się ładuje...
Strona się ładuje...
Strona się ładuje...
Strona się ładuje...
Strona się ładuje...
Strona się ładuje...
Strona się ładuje...
Strona się ładuje...
Strona się ładuje...
Strona się ładuje...
Strona się ładuje...
Strona się ładuje...
Strona się ładuje...
Strona się ładuje...
Strona się ładuje...
Strona się ładuje...
Strona się ładuje...
Strona się ładuje...
Strona się ładuje...
Strona się ładuje...
Strona się ładuje...
Strona się ładuje...
Strona się ładuje...
Strona się ładuje...
Strona się ładuje...
Strona się ładuje...
Strona się ładuje...
Strona się ładuje...
Strona się ładuje...
Strona się ładuje...
Strona się ładuje...
Strona się ładuje...
Strona się ładuje...
Strona się ładuje...
Strona się ładuje...
Strona się ładuje...
Strona się ładuje...
Strona się ładuje...
Strona się ładuje...
Strona się ładuje...
Strona się ładuje...
Strona się ładuje...
Strona się ładuje...
Strona się ładuje...
Strona się ładuje...
Strona się ładuje...
Strona się ładuje...
Strona się ładuje...
Strona się ładuje...
Strona się ładuje...
Strona się ładuje...
Strona się ładuje...
Strona się ładuje...
Strona się ładuje...
Strona się ładuje...
Strona się ładuje...
Strona się ładuje...
Strona się ładuje...
Strona się ładuje...
Strona się ładuje...
Strona się ładuje...
Strona się ładuje...
Strona się ładuje...
Strona się ładuje...
Strona się ładuje...
Strona się ładuje...
Strona się ładuje...
Strona się ładuje...
Strona się ładuje...
Strona się ładuje...
Strona się ładuje...
Strona się ładuje...
Strona się ładuje...
Strona się ładuje...
Strona się ładuje...
Strona się ładuje...
Strona się ładuje...
Strona się ładuje...
Strona się ładuje...
Strona się ładuje...
Strona się ładuje...
Strona się ładuje...
Strona się ładuje...
Strona się ładuje...
Strona się ładuje...
Strona się ładuje...
Strona się ładuje...
Strona się ładuje...
Strona się ładuje...
Strona się ładuje...
Strona się ładuje...
Strona się ładuje...
Strona się ładuje...
Strona się ładuje...
Strona się ładuje...
-
 1
1
-
 2
2
-
 3
3
-
 4
4
-
 5
5
-
 6
6
-
 7
7
-
 8
8
-
 9
9
-
 10
10
-
 11
11
-
 12
12
-
 13
13
-
 14
14
-
 15
15
-
 16
16
-
 17
17
-
 18
18
-
 19
19
-
 20
20
-
 21
21
-
 22
22
-
 23
23
-
 24
24
-
 25
25
-
 26
26
-
 27
27
-
 28
28
-
 29
29
-
 30
30
-
 31
31
-
 32
32
-
 33
33
-
 34
34
-
 35
35
-
 36
36
-
 37
37
-
 38
38
-
 39
39
-
 40
40
-
 41
41
-
 42
42
-
 43
43
-
 44
44
-
 45
45
-
 46
46
-
 47
47
-
 48
48
-
 49
49
-
 50
50
-
 51
51
-
 52
52
-
 53
53
-
 54
54
-
 55
55
-
 56
56
-
 57
57
-
 58
58
-
 59
59
-
 60
60
-
 61
61
-
 62
62
-
 63
63
-
 64
64
-
 65
65
-
 66
66
-
 67
67
-
 68
68
-
 69
69
-
 70
70
-
 71
71
-
 72
72
-
 73
73
-
 74
74
-
 75
75
-
 76
76
-
 77
77
-
 78
78
-
 79
79
-
 80
80
-
 81
81
-
 82
82
-
 83
83
-
 84
84
-
 85
85
-
 86
86
-
 87
87
-
 88
88
-
 89
89
-
 90
90
-
 91
91
-
 92
92
-
 93
93
-
 94
94
-
 95
95
-
 96
96
-
 97
97
-
 98
98
-
 99
99
-
 100
100
-
 101
101
-
 102
102
-
 103
103
-
 104
104
-
 105
105
-
 106
106
-
 107
107
-
 108
108
-
 109
109
-
 110
110
-
 111
111
-
 112
112
-
 113
113
-
 114
114
-
 115
115
-
 116
116
-
 117
117
-
 118
118
-
 119
119
-
 120
120
-
 121
121
-
 122
122
-
 123
123
-
 124
124
-
 125
125
-
 126
126
-
 127
127
-
 128
128
-
 129
129
-
 130
130
-
 131
131
-
 132
132
-
 133
133
-
 134
134
-
 135
135
-
 136
136
-
 137
137
-
 138
138
-
 139
139
-
 140
140
-
 141
141
-
 142
142
-
 143
143
-
 144
144
-
 145
145
-
 146
146
-
 147
147
-
 148
148
-
 149
149
-
 150
150
-
 151
151
-
 152
152
-
 153
153
-
 154
154
-
 155
155
-
 156
156
-
 157
157
-
 158
158
-
 159
159
-
 160
160


LD Systems RJ10 Road Jack 10 Portable Speaker Instrukcja obsługi
- Typ
- Instrukcja obsługi
w innych językach
- español: LD Systems RJ10 Road Jack 10 Portable Speaker Manual de usuario
- italiano: LD Systems RJ10 Road Jack 10 Portable Speaker Manuale utente
- Deutsch: LD Systems RJ10 Road Jack 10 Portable Speaker Benutzerhandbuch
- français: LD Systems RJ10 Road Jack 10 Portable Speaker Manuel utilisateur
- English: LD Systems RJ10 Road Jack 10 Portable Speaker User manual
Powiązane artykuły
Inne dokumenty
-
LD Play 15A Instrukcja obsługi
-
Blaupunkt PP15DAB Instrukcja obsługi
-
LD Systems Roadman 102 Headset B6 Instrukcja obsługi
-
LD LDMIX102G3 Instrukcja obsługi
-
-
Blaupunkt Toronto 410 BT Instrukcja obsługi
-
-
-
Denver TSP-303 Instrukcja obsługi
-
NGS WILDDISCO Instrukcja obsługi