
1
Keep this Product ID Number and use when contacting Customer Service:
OWNER’S MANUAL
MODEL N° 1558
COPY

2
Save this owner’s manual for future reference and in the event that
the manufacturer has to be contacted.
**U.S. and Canada customers ONLY**
IF ASSISTANCE IS NEEDED,
DO NOT CONTACT THE STORE!
CALL OUR CUSTOMER SERVICE DEPARTMENT at
1 (800) 225-3865
HOURS: 7:00 a.m. to 5:00 p.m. Monday through Friday (Mountain Standard Time)
**Call us or visit our Web site for Saturday hours**
Lifetime Products, Inc.
10#PYt'SFFQPSU$FOUFS#MEH%$MFBSGJFME6UBI
**For customers outside the U.S. or Canada, please contact the store for assistance.**
REGISTER YOUR LIFETIME PRODUCT TODAY!
-*'&5*.&4130.*4&50:06
We invite you to read our privacy policy at www.lifetime.com
REGISTER today!
At Lifetime, we are committed to providing innovative and quality products. While registering, you will
have the opportunity to give us your feedback. Your input is valuable to us.
t:PVDBOBMTPPQUJOUPSFDFJWFOFXQSPEVDUOPUJmDBUJPOTPSQSPNPUJPOT
t*OUIFVOMJLFMZFWFOUPGBQSPEVDUSFDBMMPSTBGFUZNPEJmDBUJPOZPVSSFHJTUSBUJPO
provides the information we need to notify you directly.
t3FHJTUSBUJPOJTGBTUFBTZBOEDPNQMFUFMZWPMVOUBSZ
Maintaining your privacy is our long-standing policy at Lifetime. And you can rest as-
sured that Lifetime will not sell or provide your personal data to other third parties, or
allow them to use your personal data for their own purposes.
REGISTER YOUR PRODUCT ONLINE AT WWW.LIFETIME.COM
*/4536$5*0/'
COPY

3
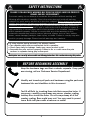
Most injuries are caused by misuse and/or not following instructions. Use caution when using this product.
To ensure safety, do not attempt to assemble this product without reading and
GPMMPXJOHBMMJOTUSVDUJPOTDBSFGVMMZ$IFDLUIFFOUJSFCPYBOEJOTJEFBMMQBDLJOH
materials for parts and/or additional instruction material. Before beginning assembly,
identify and inventory all parts and hardware using the parts and hardware lists and
JEFOUJmFSTJOUIJTEPDVNFOU Proper and complete assembly, use and supervision
BSFFTTFOUJBMGPSQSPQFSPSJFOUBUJPOBOEUPSFEVDFUIFSJTLPGBDDJEFOUPSJOKVSZ"
IJHIQSPCBCJMJUZPGTFSJPVTJOKVSZFYJTUTJGUIJTQSPEVDUJTOPUJOTUBMMFENBJOUBJOFE
and/or operated properly. Failure to comply with any of the warnings in this
JOTUSVDUJPONBOVBMNBZSFTVMUJOTFSJPVTQFSTPOBMJOKVSJFTTVDIBTDVUTCSPLFO
CPOFTOFSWFEBNBHFQBSBMZTJTCSBJOJOKVSZPSEFBUI'BJMVSFUPDPNQMZNBZBMTP
result in property damage. Please heed all warnings and cautions.
'"*-63&50'0--085)&4&8"3/*/(4.":3&46-5*/4&3*064*/+63:031301&35:
DAMAGE AND WILL VOID WARRANTY.
t*GVTJOHBMBEEFSEVSJOHBTTFNCMZVTFFYUSFNFDBVUJPO
t5XPDBQBCMFBEVMUTBSFSFDPNNFOEFEGPSUIJTPQFSBUJPO
t$IFDLCBTFEBJMZGPSMFBLBHF-FBLTNBZDBVTFQSPEVDUUPGBMM
t"TTFNCMFUIFQPMFTFDUJPOTQSPQFSMZ'BJMVSFUPEPTPDPVMEDBVTFUIFQPMF
sections to separate during play or transport.
SAFETY INSTRUCTIONS
BEFORE BEGINNING ASSEMBLY
Keep the hardware bags and their contents separate. If any parts
are missing, call our Customer Service Department.
Identify and inventory all parts and hardware using the parts and
IBSEXBSFMJTUTBOEJEFOUJmFSTJOUIJTEPDVNFOU
5FTUmUBMM#PMUTCZJOTFSUJOHUIFNJOUPUIFJSSFTQFDUJWFIPMFT*G
OFDFTTBSZDBSFGVMMZTDSBQFBXBZBOZFYDFTTQPXEFSDPBUJOH
buildup from inside the holes. Do not scrape away all of the
QPXEFSDPBUJOH#BSFNFUBMNBZSVTU:PVNBZOFFEUPQPVOE
some Bolts into place with a hammer or mallet.

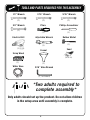
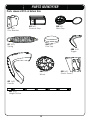
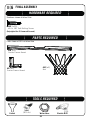
TOOLS AND PARTS REQUIRED FOR THIS ASSEMBLY
*Two adults required to
complete assembly*
Only adults should set up the product. Do not allow children
in the setup area until assembly is complete.
Adjustable Wrench
Phillips Screwdriver
(1)
'VOOFM
(1)
w8SFODI
(2)
Scrap Wood
(1)
Sand
(375 lb)
(1)
Pliers
Rubber Mallet
(1)
w8SFODI
(2)
Water Hose
(1)
(1)
w8SFODI
(2)
(1)
Electric Drill
w8SFODI
(2)
w"MMFO8SFODI
(1, included)

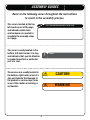
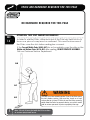
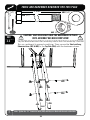
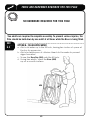
5
This area is located at the top,
left-hand corner of the page
and indicates which tools
and hardware are needed to
complete the assembly steps
on a page.
Note:
!
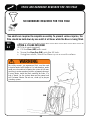
Refer to the following areas throughout the instructions
to assist in the assembly process:
This area is usually located in the
bottom, left-hand corner of a step
and indicates that special attention
is needed to perform a particular
part of a step.
These areas are usually located in
the bottom, right-hand corner of a
step and indicate that damage to
the product or serious injury may
occur if the caution or warning is
not heeded.
WARNING
ASSEMBLY GUIDES
TOOLS AND HARDWARE REQUIRED FOR THIS PAGE
CAUTION

6
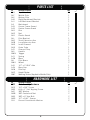
PARTS LIST
ID Item Description Qty
"-) Top Pole 1
"-' Middle Pole 1
"-& Bottom Pole 1
AJK 3JHIU#BDLCPBSE#SBDLFU 1
AJJ -FGU#BDLCPBSE#SBDLFU 1
AJI #BDLCPBSE 1
AJX Corner Frame Guard 2
AJQ Center Frame Guard 1
"-9 Rim 1
AKZ Net 1
"-% Plastic Guard 1
"-- 1PMF#SBDLFU 1
AKC 4IPSU&YUFOTJPO"SN 2
AKB -POH&YUFOTJPO"SN 2
AKQ Inner Channel 1
"-# Outer Tube 1
AJS Channel Stop 1
AKI Handle 1
AMN Trigger 1
"+: Spring 2
AJM Base 1
"-* Pole Brace 2
AMU Wheel 2
AJD wYw"YMF 1
AJN Base Cap 1
"-. Pole Cap 1
AKP )FJHIU4UJDLFS 1
AMT 8BSOJOH4UJDLFS"QQMJFEUP.JEEMF1PMF 1
ID Item Description Qty
BCO Pole Assembly Hardware
ADS wYw4DSFX 2
ABZ Yw4FMG5BQQJOH4DSFX 2
AAF 3/8” Washer 2
ABB w$FOUFSMPDL/VU 2
ABE wYw)FY#PMU 2
ABR wYw4QBDFS 2
CIH %PNFE$PVOUFSTJOL8BTIFS 2
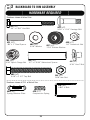
HARDWARE LIST

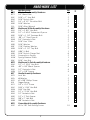
HARDWARE LIST
ID Item Description Qty
BCQ Pole to Base Assembly Hardware
BTS w#BSSFM/VU 1
AAE wYw)FY#PMU 2
AAO w/ZMPDL/VU 2
BZP wYw4IPVMEFS#PMU 1
ABD 5/16” Washer
$$- 3/16” Allen Wrench 2
BCS Backboard & Rim Assembly Hardware
AAS wYw)FY#PMU 2
ABS wYw(BMWBOJ[FE4QBDFS 2
ABC wYw$BSSJBHF#PMU 2
ACS wYw4UFFM4QBDFS 2
AAB w$FOUFSMPDL/VU 2
AAJ w)FY5/VU 2
ABD 5/16” Washer 2
ABF 7/16” Rubber Washer 2
ABG wYw5BQ#PMU 2
BNP w6#PMU 1
ABK w/ZMPDL'MBOHF/VU 6
AJW Compression Spring 2
AOW Spring Retainer Plate 1
AAV 5/16” Jam Nut 2
BCR Backboard to Pole Assembly Hardware
AAD wYw)FY#PMU
"#- wYw#MBDL4QBDFS
AAX w$FOUFSMPDL/VU
ABN wYw4QBDFS
BCT Handle Assembly Hardware
APS -PDL5BC 1
AEA #6 Washer 2
ADS Yw1IJMMJQT4DSFX 2
AQI Trigger Spring 1
"$: wYw4DSFX 2
AAC wYw)FY#PMU 1
AAN 5/16” Cap Nut 1
AAD wYw)FY#PMU 1
AAX w$FOUFSMPDL/VU 1
ABO wYw1PMZ4QBDFS 2
AAZ wYw)FY#PMU 1
ABB w$FOUFSMPDL/VU 1
BCU Frame Guard Assembly Hardware
ADP Yw4FMG%SJMMJOH4DSFX 10

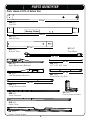
8
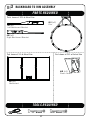
Parts shown at 10% of Actual Size
ALHY
Top Pole
"-'Y
Middle Pole
ALEY
Bottom Pole
PARTS IDENTIFIER
"++Y
-FGU#BDLCPBSE#SBDLFU
"+,Y
3JHIU#BDLCPBSE#SBDLFU
34 1/8
”
43 ”
3/8
43 ”
3/8
27 5/8”
AKCY
4IPSU&YUFOTJPO"SN
ALIY
Pole Brace
Warning Sticker
30 1/16”
AKBY
-POH&YUFOTJPO"SN
AKQY
Inner Channel
ALBY
Outer Tube
21 3/4 ”
"+%Y
wYw"YMF
"+9Y
Corner Frame Guard
"+2Y
Center Frame Guard
21 1/8”

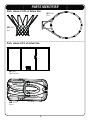
9
AKZY
Net
"-9Y
Rim
"+*Y
#BDLCPBSE
"+.Y
Base
Parts shown at 5% of Actual Size
Parts shown at 10% of Actual Size
PARTS IDENTIFIER

10
Parts shown at 25% of Actual Size
PARTS IDENTIFIER
AMUY
Wheel
AKIY
Handle
ALDY
Plastic Guard
"+4Y
Channel Stop
"+:Y
Spring
ALMY
Pole Cap
AMNY
Trigger
"+/Y
Base Cap
ALLY
1PMF#SBDLFU
AKPY
)FJHIU4UJDLFS

11
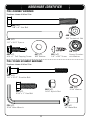
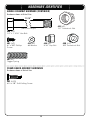
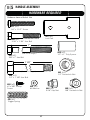
HARDWARE IDENTIFIER
POLE ASSEMBLY HARDWARE
Hardware shown at Actual Size
POLE TO BASE ASSEMBLY HARDWARE
Hardware shown at Actual Size
ADSY
wYw4DSFX
ABZY
Yw4FMG5BQQJOH4DSFX
ABBY
w$FOUFSMPDL/VU
""'Y
3/8” Washer
ABEY
wYw)FY#PMU
ABRY
wYw4QBDFS
BTSY
w#BSSFM/VU
AAEY
wYw)FY#PMU
AAOY
w/ZMPDL/VU
BZPY
wYw4IPVMEFS#PMU
ABDY
5/16” Washer
CIHY
Domed Counter
TJOL8BTIFS
CCLY
3/16” Allen Wrench

12
HARDWARE IDENTIFIER
AABY
w$FOUFS
MPDL/VU
ABGY
wYw5BQ#PMU
BACKBOARD TO RIM ASSEMBLY HARDWARE
Hardware shown at Actual Size
Hardware shown at 25% of Actual Size
"+8Y
Compression Spring
BNPY
w6#PMU
AOWY
Spring Retainer Plate
ABSY
wYw(BMWBOJ[FE4QBDFS
ACSY
wYw4UFFM4QBDFS
""+Y
w)FY5/VU
ABDY
5/16” Washer
"#'Y
7/16” Rubber Washer
ABKY
w/ZMPDL'MBOHF/VU
AAVY
5/16”Jam Nut
AASY
wYw)FY#PMU
ABCY
wYw$BSSJBHF#PMU

13
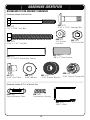
HARDWARE IDENTIFIER
HANDLE ASSEMBLY HARDWARE
Hardware shown at Actual Size
APSY
-PDL5BC
ACYY
wYw4DSFX
AACY
wYw)FY#PMU
w
(Not actual length)
ABOY
wYw1PMZ4QBDFS
AAZY
wYw)FY#PMU
AADY
wYw)FY#PMU
w
(Not actual length)
""9Y
w$FOUFSMPDL/VU
ABLY
wYw#MBDL4QBDFS
ABNY
wYw4QBDFS
BACKBOARD TO POLE ASSEMBLY HARDWARE
Hardware shown at Actual Size

HARDWARE IDENTIFIER
HANDLE ASSEMBLY HARDWARE (CONTINUED)
Hardware shown at Actual Size
AEAY
#6 Washer
ADSY
Yw1IJMMJQT
Screw
AQIY
Trigger Spring
AANY
5/16” Cap Nut
""9Y
w$FOUFSMPDL/VU
ABBY
w$FOUFSMPDL/VU
AADY
wYw)FY#PMU
'3".&(6"3%"44&.#-:)"3%8"3&
Hardware shown at Actual Size
ADPY
Yw4FMG%SJMMJOH4DSFX
w
(Not actual length)

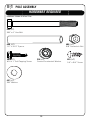
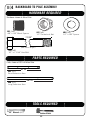
15
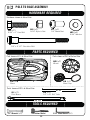
POLE ASSEMBLY
HARDWARE REQUIRED
SEC
1
Hardware shown at Actual Size
ADSY
wYw4DSFX
ABZY
Yw4FMG5BQQJOH4DSFX
ABBY
w$FOUFSMPDL/VU
""'Y
3/8” Washer
ABEY
wYw)FY#PMU
ABRY
wYw4QBDFS
CIHY
%PNFE$PVOUFSTJOL8BTIFS

16
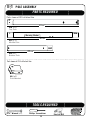
POLE ASSEMBLY
PARTS REQUIRED
TOOLS REQUIRED
SEC
1
Parts shown at 10% of Actual Size
Phillips Screwdriver
Scrap Wood
ALHY
Top Pole
"-'Y
Middle Pole
ALEY
Bottom Pole
43 ”
3/8
43 ”
3/8
27 5/8”
Warning Sticker
ALLY
1PMF#SBDLFU
Part shown at 25% of Actual Size
w8SFODIY
Electric Drill

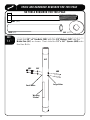
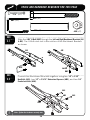
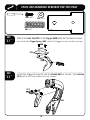
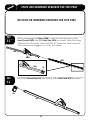
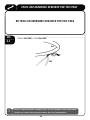
TOOLS AND HARDWARE REQUIRED FOR THIS PAGE
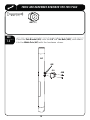
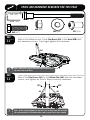
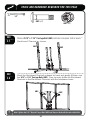
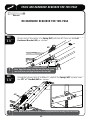
Insert the wYw)FY#PMUT"#& with the w8BTIFST""' into the
.JEEMF1PMF"-' as shown. Then slide the wYw4QBDFST"#3 onto
UIF)FY#PMUT
SEC
1.1
"-'
ABE
ABR
Warning
Sticker
""'
Large Holes
Small Holes
""'Y
ABEY
ABRY
/0500-43&26*3&%'035)*41"(&

18
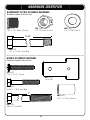
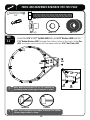
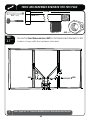
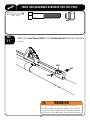
TOOLS AND HARDWARE REQUIRED FOR THIS PAGE
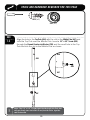
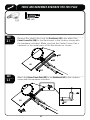
Place the Pole Bracket (ALL) onto the wYw)FY#PMUT"#&, and attach
it to the .JEEMF1PMF"-' with the hardware shown.
SEC
1.2
"-'
ABB
ALL
ABE
Y
ABBY

19
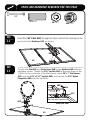
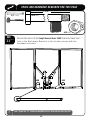
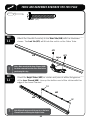
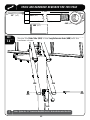
TOOLS AND HARDWARE REQUIRED FOR THIS PAGE
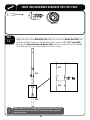
ADSY
Align the hole in the Top Pole (ALH) with the slot in the .JEEMF1PMF"-' and
slide the Top Pole over the Middle Pole. Insert a wYw4DSFX"%4
through the Domed Countersink Washer (CIH) and the small hole in the Top
Pole and into the slot in the Middle Pole as shown.
SEC
1.3
ALH
"-'
Note: The 1/4” x 3/4” Screw should be fl ush with the Pole, but
will spin freely once installed. Do not jam the Poles together
until instructed.
!
ADS
ALH
"-'
CIHY
CIH

20
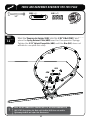
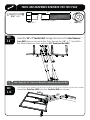
TOOLS AND HARDWARE REQUIRED FOR THIS PAGE
Align the hole in the .JEEMF1PMF"-' with the slot in the Bottom Pole (ALE) and
slide the Middle Pole over the Bottom Pole. Insert a wYw4DSFX"%4
through the Domed Countersink Washer (CIH) and the small hole in the Middle
Pole and into the slot in the Bottom Pole as shown.
SEC
Note: The 1/4” x 3/4” Screw should be fl ush with the Pole, but
will spin freely once installed. Do not jam the Poles together
until instructed.
!
"-'
ALE
ADSY
CIHY
ADS
"-'
ALE
CIH
Strona się ładuje...
Strona się ładuje...
Strona się ładuje...
Strona się ładuje...
Strona się ładuje...
Strona się ładuje...
Strona się ładuje...
Strona się ładuje...
Strona się ładuje...
Strona się ładuje...
Strona się ładuje...
Strona się ładuje...
Strona się ładuje...
Strona się ładuje...
Strona się ładuje...
Strona się ładuje...
Strona się ładuje...
Strona się ładuje...
Strona się ładuje...
Strona się ładuje...
Strona się ładuje...
Strona się ładuje...
Strona się ładuje...
Strona się ładuje...
Strona się ładuje...
Strona się ładuje...
Strona się ładuje...
Strona się ładuje...
Strona się ładuje...
Strona się ładuje...
Strona się ładuje...
Strona się ładuje...
Strona się ładuje...
Strona się ładuje...
Strona się ładuje...
Strona się ładuje...
-
 1
1
-
 2
2
-
 3
3
-
 4
4
-
 5
5
-
 6
6
-
 7
7
-
 8
8
-
 9
9
-
 10
10
-
 11
11
-
 12
12
-
 13
13
-
 14
14
-
 15
15
-
 16
16
-
 17
17
-
 18
18
-
 19
19
-
 20
20
-
 21
21
-
 22
22
-
 23
23
-
 24
24
-
 25
25
-
 26
26
-
 27
27
-
 28
28
-
 29
29
-
 30
30
-
 31
31
-
 32
32
-
 33
33
-
 34
34
-
 35
35
-
 36
36
-
 37
37
-
 38
38
-
 39
39
-
 40
40
-
 41
41
-
 42
42
-
 43
43
-
 44
44
-
 45
45
-
 46
46
-
 47
47
-
 48
48
-
 49
49
-
 50
50
-
 51
51
-
 52
52
-
 53
53
-
 54
54
-
 55
55
-
 56
56


w innych językach
- English: Lifetime 1558 Owner's manual
Powiązane artykuły
Inne dokumenty
-
LG 49LH541V Instrukcja obsługi
-
Luxor LOTM Instrukcja obsługi
-
Fieldmann FDHP 202000-E Instrukcja obsługi
-
Yamaha PC412 Instrukcja obsługi
-
Krups YY1800FD Instrukcja obsługi
-
-
Lightolier IS_CD12 Instrukcja obsługi
-
Duronic PM131 Instrukcja obsługi
-
 Home Plow by Meyer 25000 Instrukcja obsługi
-
Aruba AP-60-MNT TEMPLATE - Template instrukcja
