
A
B
C
D
E
F
G
H
J x 17
K x 32
(+ 2 extra)
L x 2
M x 2
P x 4 Q x 4
R x 9
S x 8
T x 2
V x 2 W x 2
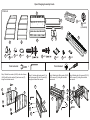
Open Charging Assembly Guide
Part List
Tools Included: Tools Needed:+
X
C
D
R
R
R
A
B
L
M
Q
P
L
M
Q
P
Step 1: Attach the casters (L & M) to the side frames
(A & B) with the lock washer (Q) and acorn nut (P),
using the included wrench.
Step 2: Combine the back panel (C) to
the bottom panel (D) with 3 screws (R),
using the included hex wrench.
Step 3: Attach side (B) to panels (C & D)
with 3 screws (R), using the included
hex wrench.
Step 4: Attach side (A) to panels (C & D)
with 3 screws (R), using the included
hex wrench.
R
R
R
R
R
R
A
B
C
D
C
D

Step 5: Attach the power tray panels (E & F) to
the main unit with 2 screws (S), using a screw driver.
Step 6: Attach the bottom power tray panel (G)
with 2 screws (S) from below, using a screw driver.
Attach the 2 power strip brackets
(T,V,& W) to the panel (G) with a screw driver.
Step 7: Push the power strip (X) into the brackets.
Step 8: Install the power tray back panel (H)
with 4 screws (S), using a screw driver.
Step 8: Attach the 32 cable clips (K)
to the main unit.
Step 9: Install the 17 plastic dividers (J)
to the main unit. You have completed assembly.
F
E
S
S
V
W
G
S
H
S
X
K
J
T
-
 1
1
-
 2
2


Luxor LOTM Instrukcja obsługi
- Typ
- Instrukcja obsługi
- Ten podręcznik jest również odpowiedni dla
w innych językach
- English: Luxor LOTM Operating instructions
Inne dokumenty
-
Lincoln Electric IDEALARC SP-200 Instrukcja obsługi
-
Dometic FRTA Assembly Instrukcja instalacji
-
H3C S5560S-52P-EI Instrukcja instalacji
-
Lifetime 90176 Instrukcja obsługi
-
Yamaha S12 Instrukcja obsługi
-
Wren Kitchens 2070 & 2250mm Walk-in Tower Unit Assembly Guide
-
Yamaha VXS5 Instrukcja obsługi
-
-