Triton TPL180 Instrukcja obsługi
- Kategoria
- Elektronarzędzia
- Typ
- Instrukcja obsługi

Version date: 10.08.21
tritontools.com
1500W Triple
Blade Planer 180mm
Operating & Safety Instructions
Bedienings- en
veiligheidsvoorschriften
Instruções de
Operação e Segurança
Instructions d’utilisation
et consignes de sécurité
Instrukcja obsługi
i bezpieczeństwa
Gebrauchs- und
Sicherheitsanweisung
Инструкции по эксплуатации и
правила техники безопасности
Istruzioni per l’uso
e la sicurezza
Instrucciones de
uso y de seguridad
TPL180
366649_OwnerManual.indd 2366649_OwnerManual.indd 2 10/08/2021 14:4310/08/2021 14:43

2
235
4
1
12
6
7910
11 8
13
21 20 1719 18
14
15 16
366649_OwnerManual.indd 2366649_OwnerManual.indd 2 10/08/2021 14:4410/08/2021 14:44

3
A
E
I
MII
B
F
J
N
III
C
G
K
IV
D
H
L
I
VVI
51 234
366649_OwnerManual.indd 3366649_OwnerManual.indd 3 10/08/2021 14:4410/08/2021 14:44

4
EN
Specification
Rating: 230V~50Hz, 1500W
No load speed: 15,000/min
Planing depth: 0 - 2mm
Planing width: 180mm
Blades: Reversible 180mm HSS steel blades, set of 3
Protection Class:
Dimensions (L x W x H): 525 x 275 x 170mm
Weight: 8.6kg
As part of our ongoing product development, specifications of
Triton products may alter without notice.
Sound pressure LPA:94dB(A)
Sound power LWA:105dB(A)
Uncertainty K: 3dB
Weighted vibration: 5.8m/s2 (main handle)
7.0m/s2 (front handle)
Uncertainty: 1.5m/s2 (main & front handle)
The sound intensity level for the operator exceeds 85dB(A)
and sound protection measures are necessary.
VVolts
~, a.c. Alternating current
A, mA Ampere, milli-Amp
n0No load speed
nRated speed
°Degrees
ØDiameter
Hz Hertz
, d.c. Direct current
W, kW Watt, kilowatt
/min or min-1 Operations per minute
rpm Revolutions per minute
dB(A) Decibel sound level
(A weighted)
m/s2Metres per second squared
(vibration magnitude)
Technical Abbreviations Key
Wear hearing protection
Wear eye protection
Wear breathing protection
Wear head protection
Wear hand protection
Read instruction manual
WARNING: Moving parts can cause crush and cut injuries
Warning: Sharp blades or teeth!
Always disconnect from the power supply when adjusting, changing accessories,
cleaning, carrying out maintenance and when not in use!
DO NOT use in rain or damp environments!
Caution!
Dust extraction required or recommended
Class II construction (double insulated for additional protection)
Conforms to relevant legislation and safety standards.
Environmental Protection
Waste electrical products should not be disposed of with household waste.
Please recycle where facilities exist. Check with your local authority or retailer
for recycling advice.
Description of Symbols
The rating plate on your tool may show symbols. These represent important information about
the product or instructions on its use.
Thank you for purchasing this Triton tool. This manual contains information necessary for
safe and effective operation of this product. This product has unique features and,
even if you are familiar with similar products, it is necessary to read this manual carefully
to ensure you fully understand the instructions. Ensure all users of the tool read and fully
understand this manual.
Original Instructions
Introduction
WARNING: Always wear ear protection where the sound level exceeds 85dB(A) and limit the
time of exposure if necessary. If sound levels are uncomfortable, even with ear protection, stop
using the tool immediately and check the ear protection is correctly fitted and provides the
correct level of sound attenuation for the level of sound produced by your tool.
WARNING: User exposure to tool vibration can result in loss of sense of touch, numbness,
tingling and reduced ability to grip. Long-term exposure can lead to a chronic condition. If
necessary, limit the length of time exposed to vibration and use anti-vibration gloves. Do not
operate the tool with hands below a normal comfortable temperature, as vibration will have a
greater effect. Use the figures provided in the specification relating to vibration to calculate the
duration and frequency of operating the tool.
Sound and vibration levels in the specification are determined according to international
standards. The figures represent normal use for the tool in normal working conditions.
A poorly maintained, incorrectly assembled, or misused tool, may produce increased levels of
noise and vibration. www.osha.europa.eu provides information on sound and vibration levels
in the workplace that may be useful to domestic users who use tools for long periods of time.
366649_OwnerManual.indd 4366649_OwnerManual.indd 4 10/08/2021 14:4410/08/2021 14:44

5
EN
General Safety
WARNING Read all safety warnings and all instructions. Failure to follow the warnings and
instructions may result in electric shock, fire and/or serious injury.
Save all warnings and instructions for future reference.
The term “power tool” in the warnings refers to your mains-operated (corded) power tool or
battery-operated (cordless) power tool.
1) Work area safety
a) Keep work area clean and well lit. Cluttered or dark areas invite accidents.
b) Do not operate power tools in explosive atmospheres, such as in the presence of
flammable liquids, gases or dust. Power tools create sparks which may ignite the dust
or fumes.
c) Keep children and bystanders away while operating a power tool. Distractions can
cause you to lose control.
2) Electrical safety
a) Power tool plugs must match the outlet. Never modify the plug in any way. Do not
use any adapter plugs with earthed (grounded) power tools. Unmodified plugs and
matching outlets will reduce risk of electric shock.
b) Avoid body contact with earthed or grounded surfaces, such as pipes, radiators,
ranges and refrigerators. There is an increased risk of electric shock if your body is
earthed or grounded.
c) Do not expose power tools to rain or wet conditions. Water entering a power tool will
increase the risk of electric shock.
d) Do not abuse the cord. Never use the cord for carrying, pulling or unplugging the
power tool. Keep cord away from heat, oil, sharp edges or moving parts. Damaged or
entangled cords increase the risk of electric shock.
e) When operating a power tool outdoors, use an extension cord suitable for outdoor
use. Use of a cord suitable for outdoor use reduces the risk of electric shock.
f) If operating a power tool in a damp location is unavoidable, use a residual current
device (RCD) protected supply. Use of an RCD reduces the risk of electric shock.
3) Personal safety
a) Stay alert, watch what you are doing and use common sense when operating a
power tool. Do not use a power tool while you are tired or under the influence of
drugs, alcohol or medication. A moment of inattention while operating power tools may
result in serious personal injury.
b) Use personal protective equipment. Always wear eye protection. Protective equipment
such as dust mask, non-skid safety shoes, hard hat, or hearing protection used for
appropriate conditions will reduce personal injuries.
c) Prevent unintentional starting. Ensure the switch is in the off-position before
connecting to power source and/or battery pack, picking up or carrying the tool.
Carrying power tools with your finger on the switch or energising power tools that have the
switch on invites accidents.
d) Remove any adjusting key or wrench before turning the power tool on. A wrench or a
key left attached to a rotating part of the power tool may result in personal injury.
e) Do not overreach. Keep proper footing and balance at all times. This enables better
control of the power tool in unexpected situations.
f) Dress properly. Do not wear loose clothing or jewellery. Keep your hair, clothing and
gloves away from moving parts. Loose clothes, jewellery or long hair can be caught in
moving parts.
g) If devices are provided for the connection of dust extraction and collection facilities,
ensure these are connected and properly used. Use of dust collection can reduce
dust-related hazards.
h) Do not let familiarity gained from frequent use of tools allow you to become
complacent and ignore tool safety principles. A careless action can cause severe
injury within a fraction of a second.
4) Power tool use and care
a) Do not force the power tool. Use the correct power tool for your application. The
correct power tool will do the job better and safer at the rate for which it was designed.
b) Do not use the power tool if the switch does not turn it on and off. Any power tool
that cannot be controlled with the switch is dangerous and must be repaired.
c) Disconnect the plug from the power source and/or the battery pack from the power
tool before making any adjustments, changing accessories, or storing power tools.
Such preventive safety measures reduce the risk of starting the power tool accidentally.
d) Store idle power tools out of the reach of children and do not allow persons
unfamiliar with the power tool or these instructions to operate the power tool.
Power tools are dangerous in the hands of untrained users.
e) Maintain power tools. Check for misalignment or binding of moving parts, breakage
of parts and any other condition that may affect the power tool’s operation. If
damaged, have the power tool repaired before use. Many accidents are caused by
poorly maintained power tools.
f) Keep cutting tools sharp and clean. Properly maintained cutting tools with sharp cutting
edges are less likely to bind and are easier to control.
g) Use the power tool, accessories and tool bits etc. in accordance with these
instructions, taking into account the working conditions and the work to be
performed. Use of the power tool for operations different from those intended could
result in a hazardous situation.
h) Keep handles and grasping surfaces dry, clean and free from oil and grease.
Slippery handles and grasping surfaces do not allow for safe handling and control of
the tool in unexpected situations.
5) Service
a) Have your power tool serviced by a qualified repair person using only identical
replacement parts. This will ensure that the safety of the power tool is maintained.
Additional Safety for Electric Planers
WARNING!
• Wait for the cutter to stop before setting the tool down. An exposed rotating cutter
may engage the surface leading to possible loss of control and serious injury.
• Hold the power tool by insulated gripping surfaces only, because the cutter may
contact its own cord. Cutting a “live” wire may make exposed metal parts of the power
tool “live” and could give the operator an electric shock.
• Use clamps or another practical way to secure and support the workpiece to a
stable platform. Holding the work by your hand or against the body leaves it unstable and
may lead to loss of control.
• If the replacement of the supply cord is necessary, this has to be done by the
manufacturer or his agent in order to avoid a safety hazard.
• It is strongly recommended that the tool always be supplied via a residual current
device with a rated residual current of 30 mA or less.
Use appropriate respiratory protection: Use of this tool can generate dust containing
chemicals known to cause cancer, birth defects or other reproductive harm. Some wood
contains preservatives such as copper chromium arsenate (CCA) which can be toxic.
When sanding, drilling, or cutting these materials extra care should be taken to avoid
inhalation and minimise skin contact.
IMPORTANT
• Use suitable detectors to determine if utility lines are hidden in the work area or call
the local utility company for assistance. Contact with electric lines can lead to fire and
electric shock. Damaging a gas line can lead to explosion. Penetrating a water line causes
property damage or may cause an electric shock.
• Do not reach into the chip ejector with your hands. They could be injured by
rotating parts.
• A dust mask and dust extraction system are strongly recommended during usage to
protect the operator against dust. Electric planers generate a large quantity of dust and
some materials will produce toxic dust.
• Use only sharp blades. Handle the blades very carefully.
a) Check the voltage of the tool rating label matches the voltage of the mains supply
b) Ensure all nails, screws etc are removed from the workpiece before commencing
the task. Otherwise, damage to the blade or planer could occur, causing a safety hazard
c) Ensure all cloth, cord, rags, string and similar items are removed from the work
area. To prevent entanglement in the planer mechanism
d) Ensure that the blade installation bolts are securely tightened before operation
e) Before using the planer on a workpiece, switch on and allow it to run for a while.
Check for vibration or wobbling that could indicate a badly installed, or a poorly
balanced blade
f) Allow the machine to reach full speed before making contact with the workpiece
and starting cutting
g) Operate the planer only when controlled by both hands and is correctly held before
switching on
h) Ensure the planer is at least 200mm away from your face and body
i) Wait until the blades reach full speed before cutting
j) Shavings may jam in the chute when cutting damp wood. Switch off, disconnect
from the power supply and clean out the chips with a stick. Never put your finger into the
chip chute
k) ALWAYS switch off and allow the blades to come to a complete standstill before
attempting any adjustments, cleaning or carrying out maintenance
l) ALWAYS disconnect from the power supply when leaving the machine unattended
m) When not in use, disconnect from the power source and place the front base on a
wooden block so that the blades are not in contact with anything
n) Replace all blades at the same time, otherwise the resulting imbalance will cause
vibration and shorten the service life of planer and blades
366649_OwnerManual.indd 5366649_OwnerManual.indd 5 10/08/2021 14:4410/08/2021 14:44

6
EN
Cutting tool safety
WARNING. Before connecting a tool to a power source (mains switch power point receptacle,
outlet, etc.) be sure that the voltage supply is the same as that specified on the nameplate of
the tool. A power source with a voltage greater than that specified for the tool can result in
serious injury to the user, and damage to the tool. If in doubt, do not plug in the tool. Using a
power source with a voltage less than the nameplate rating is harmful to the motor.
Use the correct cutting tool
• Ensure the cutting tool is suitable for the job. Do not assume a tool is suitable without
checking the product literature before use
Protect your eyes
• Always wear appropriate eye protection when using cutting tools
• Spectacles are not designed to offer any protection when using this product; normal
lenses are not impact resistant and could shatter
Protect your hearing
• Always wear suitable hearing protection when tool noise exceeds 85dB
Protect your breathing
• Ensure that yourself, and others around you, wear suitable dust masks
Protect your hands
• Do not allow hands to get close to the cutting wheel or blades. Use a suitable push stick
for shorter workpieces with appropriate power tools
Be aware of others around you
• It is the responsibility of the user to ensure that other people in the vicinity of the work
area are not exposed to dangerous noise or dust and are also provided with suitable
protective equipment
Hidden objects
• Inspect the workpiece and remove all nails and other embedded objects before cutting
• Do not attempt to cut material that contains embedded objects unless you know that the
cutting tool fitted to your machine is suitable for the job
• Walls may conceal wiring and piping, car body panels may conceal fuel lines, and
long grass may conceal stones and glass. Always check the work area thoroughly
before proceeding
Beware of projected waste
• In some situations, waste material may be projected at speed from the cutting tool. It is
the user’s responsibility to ensure that other people in the work area are protected from
the possibility of projected waste
Fitting cutting tools
• Ensure cutting tools are correctly and securely fitted and check that wrenches / adjusters
are removed prior to use
• Only use cutting tools recommended for your machine
• Do not attempt to modify cutting tools
• Ensure blades are sharp, in good condition and correctly fitted
• Do not attempt to resharpen blades that are not suitable for resharpening, these may
include specially hardened blades or blades made from hardened alloys typically
containing tungsten
• Blades that can be resharpened should be resharpened only according the blade
manufacturer’s instructions. These may include a limited number of times the blade can
be resharpened
• Sharpened blades should be more thoroughly inspected before use and replaced
immediately if there is any doubt about their condition and suitability for use
• In the event blades encounter an embedded object in use that the blades are not suitable
for, blades should be replaced immediately
Direction of feed
• Always feed work into the blade or cutter against the direction of movement of the blade
or cutter
Beware of heat
• Cutting tools and workpieces may become hot in use. Do not attempt to change tools until
they have been allowed to cool completely
Control dust / swarf
• Do not allow dust or swarf to build up. Sawdust is a fire hazard, and some metal swarf
is explosive
• Be especially careful when cutting wood and metal. Sparks from metal cutting are a
common cause of wood dust fires
• Where possible, use a dust extraction system to ensure a safer working environment
Product Familiarisation
1. Front Handle
2. Power Indicator
3. ON/OFF Trigger Switch
4. Trigger Safety Lock
5. Main Handle
6. Fixed Rear Base
7. Fence Attachment Point (x 4)
8. Drive Belt Cover
9. Front Handle Lock Lever
10. Fence Attachment Point (x 4)
11. Movable Front Base
12. Depth Adjustment Knob
13. Front Handle Set Screw
14. Blade Barrel
15. Reversible Blades
16. Clamping Screw (x 5)
17. Blade Spanner
18. Dust/Chip Extraction Port
19. Dust Extraction Adaptor
20. Combined Parallel and Bevel Fence Guide
21. Fence Attachment Knob (x 2)
Intended Use
Large hand-held electric planer for heavy duty planing tasks on hard and softwood timber.
Unpacking Your Tool
• Carefully unpack and inspect your tool. Fully familiarise yourself with all its features
and functions
• Ensure that all parts of the tool are present and in good condition. If any parts are missing
or damaged, have such parts replaced before attempting to use this tool
Before Use
WARNING: Always disconnect this tool from the power supply before attaching or
removing accessories, or making any adjustments.
Adjusting the front handle
1. Hinge out the Front Handle Lock Lever (9) (Image A) and move the Front Handle (1)
to one of four positions to best suit the task (Image B)
2. Hinge back lever to secure the Front Handle in the selected position
Note: If necessary, the lever action mechanism can be adjusted using the Front Handle Set
Screw (13) (Image C).
Combined parallel and bevel fence guide
1. Fit the Combined Parallel and Bevel Fence Guide (20) to the base by screwing the Fence
Attachment Knobs (21) into the Fence Attachment Points (7) and (10) (Image D)
2. Loosen the two wing nuts and set the angle of the fence if you wish to use it as a guide for
making bevel cuts (Image E)
3. When set at right angles to the planer base, the fence provides a guide to help control
the planing action
Note: The fence can be fitted to either side of the base.
Note: The angle graduations marked on the fence are approximate only. For accurate bevel
cutting it is necessary to measure the angle of the fence, make a trial cut and adjust if
necessary.
Shavings extraction
IMPORTANT: It is highly recommended that a workshop vacuum cleaner or other dust
extraction system is used with this product. The tool produces a large amount of waste
material in use and an active extraction system is required for optimal operation.
1. The Dust/Chip Extraction Port (18) allows connection to a vacuum dust extraction system
2. Using the Dust Extraction Adaptor (19) permits a dust extraction system to be connected to
the Dust/Chip Extraction Port (Image F)
3. To fit the Dust Extraction Adaptor, insert it into the Dust/Chip Extraction Port and twist it
clockwise until it locks into position
366649_OwnerManual.indd 6366649_OwnerManual.indd 6 10/08/2021 14:4410/08/2021 14:44

7
EN
Adjusting the depth of cut
Note: The Power Indicator (2) lights up when the tool is connected to a live mains supply.
This is a quick indicator of a live power connection to the tool for normal use but it is
important also to check manually that the power tool is disconnected from the mains when
making adjustments or installing or removing blades.
1. Rotate the Depth Adjustment Knob (12) clockwise for a deeper cut and anti-clockwise for
a shallower cut
2. The numbers on the ring under the Depth Adjustment Knob indicate the depth of cut.
There are 8 click stop positions from 0.25-2mm that increment by 0.25mm
3. If it is necessary to plane to a precise depth, plane a scrap piece of wood, measure the
difference in thickness and adjust the setting if necessary
4. To check accuracy and tolerance of the Movable Front Base (11) set the depth adjustment
knob to the ‘0’ position so the blade can be measured against the Fixed Rear Base (6) and
Movable Front Base (11). The Fixed Rear Base, blade and Movable Front Base should be at
the same level at the ‘0’ position
5. After use, always move the depth adjustment knob to the ‘P’ parked position. This protects
the blade by moving the Movable Front Base so that the blade is not in contact with the
surface the planer is resting on
Operation
Switching ON & OFF
WARNING: Before plugging the machine into the mains power point always check that
the On/Off Trigger Switch (3) and Trigger Safety Lock (4) work properly. Before switching on,
ensure that the blade drum or blade is not making contact with any surface.
1. Plug in the machine, push in the Trigger Safety Lock (4) (Image G) and pull the ON/OFF
Trigger Switch (3) (Image H)
2. Stop the tool by simply releasing the ON/OFF Trigger Switch
3. In order to restart the machine, it is necessary to operate both the Trigger Safety Lock (4)
and the ON/OFF Trigger Switch (3). This is an important safety feature that helps prevent
accidental operation of the planer
CAUTION: Please note that the planer blades continue to spin for some time after switching off
the planer. Wait until the motor has completely stopped before setting down the tool to prevent
damage to the planer blades or the surface.
• If resting the planer on its side, do not rest it on the vented side. This will prevent dust or
chips from contaminating the motor
• When the planer is not to be used for a short period, set the depth control knob to the ‘P’
(parked) position and ensure both bases (6) and (11) are resting on the same level surface
Planing
1. Rest the Movable Front Base (11) flat on the workpiece surface without the blades making
any contact with the workpiece
2. Switch on the tool and wait for the blades to reach full speed
3. Move the tool gently forward, applying pressure on the front of the tool, using one hand on
the Front Handle (1) at the start of planing. Apply pressure at the rear of the tool using the
other hand on the Main Handle (5) towards the end of the planing stroke
Note: It is important to understand that the Movable Front Base dictates how much of the
blade is exposed to the wood and this requires the user to apply downward pressure on both
the front and back of the tool evenly during use.
4. Push the planer beyond the edge of the workpiece without tilting it downwards or upwards
Tip: Treat the material as if it is slightly longer than it actually is - the planing action will
continue until the blades have well passed the end of the workpiece.
5. The rate of planing and the depth of cut determine the quality of the finish. For rough
cutting, the depth of cut can be increased; however to achieve a good finish, the depth of
cut should be reduced and the tool advanced more slowly
Note: Planing is easier if the workpiece is inclined slightly away from the operator so that
planing is performed ‘downhill’.
WARNING: The planer is very heavy and not practical or safe to be used for vertical planing or
other similar applications.
CAUTION: Moving the machine too fast may cause a poor quality of cut and can damage the
blades or the motor. Moving the machine too slowly may burn or mark the cut
• The proper feed rate will depend on the type of material being cut and the depth of the cut
• Practise first on a scrap piece of material to gauge the correct feed rate and the cut
dimensions
CAUTION: Always use two hands to hold the planer
CAUTION: Where possible, clamp the workpiece to the bench
Chamfering
1. To perform a chamfered cut as shown in (Fig. I), first align the ‘v’ groove (Fig. II) in the
Movable Front Base (11) of the planer with the corner edge of the workpiece.
2. Run the planer along the corner edge.
Maintenance
WARNING: Always ensure that the tool is switched off and the plug is removed from the
mains power point before making any adjustments or maintenance procedures.
• Inspect the supply cord of the tool, prior to each use, for damage or wear. Repairs should
be carried out by an authorised Triton service centre. This advice also applies to extension
cords used with this tool
Regularly check that all the fixing screws are tight. They may vibrate loose over time.
Cleaning
1. Keep the tool’s air vents unclogged and clean at all times
2. Remove dust and dirt regularly. Cleaning is best done with compressed air or a dry,
soft-to-medium brush like a paint brush
CAUTION: Wear protective goggles when cleaning the tool.
3. Re-lubricate all moving parts at regular intervals
4. Never use caustic agents to clean plastic parts
CAUTION: Do not use cleaning agents to clean the plastic parts of the tool. A mild detergent on
a damp cloth is recommended. Water must never come into contact with the tool. Ensure the
tool is thoroughly dry before using it.
Removing & installing planer blades
WARNING: Ensure the blade Clamping Screws (16) are tightened securely in the correct
order shown in image M. Incorrect and/or insufficient tightening could cause serious injury
to the operator.
This planer is fitted with HSS reversible blades. Blades can be reversed when blunt. After both
sides of the blades have been used they should be discarded.
WARNING: These blades cannot be re-sharpened.
Removing a planer blade
CAUTION: The blades are very sharp. Take care when handling them
1. Using the supplied Blade Spanner (17), loosen the 5 Clamping Screws (16) (Image I)
2. Line up the Blade Barrel (14) with the side indentation so the required Reversible Blade
(15) can be removed, then carefully slide out the blade (Image J)
Installing a planer blade
WARNING: Only use HSS planer blades compatible with this tool. Using incorrect blades
that are not HSS could cause serious injury to the operator.
1. The blades are reversible with a cutting edge on both sides. If a blade edge is worn or
damaged, the blade can be removed and placed back the other way around
2. Slide a good blade face up into the blade support block of the Blade Barrel (14)
Note: If only one blade is damaged, it can be replaced without the need to replace the
other two blades. When blades are worn, they must be replaced as a set of three to prevent
unbalanced operation with consequential dangerous vibration and possible damage to the tool
Note: The ridge along the blade should be on the blade face on the opposite side to the
Clamping Screws (16).
When installing blades:
1. First clean out all chips or foreign matter adhering to the Blade Barrel (14) and the
blades themselves
2. Use blades of the same dimensions and weight, or the barrel will oscillate and vibrate
causing poor planing action and possibly a machine breakdown
3. Tighten the Clamping Screws (16) in the order shown in Image M when attaching the
blades to the planer. A loose clamping screw could be extremely dangerous
4. Tighten to a torque value of 10Nm (±0.5); do not over-tighten
5. Repeat for the two remaining blades
6. Regularly check to see they are tightened securely
IMPORTANT: Once all adjustments have been made to the blades, it is important to re-check
that the clamping screws are secure. After a short period of work activity check that they
remain tight and at a torque value of 10Nm (±0.5). Carry out another check after a reasonable
period of use.
IMPORTANT: The planer is designed so that the blades are correctly aligned if placed flush into
the barrel slots and tightened correctly.
• When inserting new blades it is essential they sit square in their slot; that they are fully
inserted; and that the cutting edges are absolutely level, i.e. parallel to the surface of
the rear base
• A metal ruler can be placed on the rear base at 3 different positions to ensure the blade
is level
• Only when the blade is level with the rear base should the clamping screws be tightened
• A further check of the Movable Front Base (11) position can be made by setting the Depth
Adjustment Knob (12) to ‘0’ and placing the ruler across both the Movable Front Base
and Rear Fixed Base (6) (Image K). This provides a reference to the accuracy of the front
base position
• Blade must be positioned centrally on the drum (Image L)
WARNING: If the blades protrude or are not square, they could hit the casing with serious risk
to the operator and others in the vicinity.
Note: The planing surface will end up rough and uneven unless the blades are set and
secured properly.
366649_OwnerManual.indd 7366649_OwnerManual.indd 7 10/08/2021 14:4410/08/2021 14:44

8
EN
Troubleshooting
Symptom Possible Cause Solution
No power
Mains plug not inserted into socket or switched on Plug in and switch on
Fuse blown in plug or circuit breaker
tripped in consumer unit Replace fuse or reset circuit breaker
RCD connected and not reset Reset RCD
Extension lead overloaded and thermal
protection has operated
Replace extension lead or unwind cable fully from reel to
allow maximum current use and reset thermal protection
Power lead or power lead connection to
tool or mains plug damaged Requires repair at an authorised Triton service centre
Power tool fault Requires repair at an authorised Triton service centre
Motor does not start Carbon brushes worn Brushes need replacing by an authorised
Triton service centre
Power tool fault Requires repair at authorised Triton service centre
Rough finish on wood after planing
Worn blade or blades Replace all blades
Damaged blade or blades Replace one or more blades
Wood is wet Allow wood to dry
Depth of cut incorrect
Worn or damaged blades Replace blades
Poorly fitted blade or blades Re-fit blade or blades
Incorrect blades fitted Replace blades with correct type
Barrel not rotating Broken drive belt Replace belt
Vibration or abnormal noise STOP using tool immediately
Re-check all user accessible parts are secure and
correctly fitted first and if not solved contact an
authorised Triton service centre
The examples below show proper and improper settings:
• Correct setting - clean smooth cut (Fig. III).
• Nicks in surface – as caused by the edge of one or all blades not being parallel to the
surface of the rear base (Fig. IV).
• Gouging at start – as caused by the edge of one or all blades not protruding enough in
relation to the surface of the rear base (Fig. V).
• Gouging at end – as caused by the edge of one or all blades protruding too far in relation
to the surface of the rear base (Fig. VI).
(a) Movable Front Base (11) which is altered by the Depth Adjustment Knob (12)
(b) Fixed Rear Base (6)
Drive belt replacement
1. Replace the drive belt by first taking out the three cross-head screws that secure the Drive
Belt Cover (8) on the left-hand side of the planer when viewed from the rear (Image N)
Note. The front screw is longer than the other two. Take care to replace this screw in the same
hole when replacing the cover.
2. Remove the damaged belt by pulling it sideways off the top pulley and turning the bottom
pulley by hand. Use a soft brush to clean the pulleys and the surrounding area
Note: Wear eye protection when cleaning out the pulley area.
3. With the six continuous ‘v’ profiles on the inside, place the new belt over the bottom
pulley. Half-fit the other end of the belt on the top pulley, then roll the belt in place whilst
turning the pulley
4. Check the belt runs evenly by manually turning the belt
5. Replace the Drive Belt Cover and the three fixing screws, ensuring the longer screw is
located in the hole at the front of the cover
6. Plug the machine back into the power outlet and switch the tool on and run for a minute to
make sure that the motor and belt are operating correctly
Brushes
• Over time the carbon brushes inside the motor may become worn
• Excessively worn brushes may cause loss of power, intermittent failure, or visible sparking
• If you suspect that the brushes may be worn, have them replaced at an authorised
service centre
Disposal
Always adhere to national regulations when disposing of power tools that are no longer
functional and are not viable for repair.
• Do not dispose of power tools, or other waste electrical and electronic equipment (WEEE),
with household waste
• Contact your local waste disposal authority for information on the correct way to dispose of
power tools
366649_OwnerManual.indd 8366649_OwnerManual.indd 8 10/08/2021 14:4410/08/2021 14:44

9
EN
Australian Warranty Information
You may wish to register your product at www.tritontools.com but you are not under any
obligation to do so.
Our goods come with guarantees that cannot be excluded under the Australian
Consumer Law.
You are entitled to a replacement or refund for a major failure and for compensation for
any other reasonably foreseeable loss or damage. You are also entitled to have the goods
repaired or replaced if the goods fail to be of acceptable quality and the failure does not
amount to a major failure.
This product is guaranteed against faulty materials and workmanship for 3 YEARS from
thedate of purchase. Please retain your receipt as proof of purchase.
This warranty does not cover defects caused by or resulting from:
(a) misuse, abuse or neglect;
(b) trade, professional or hire use;
(c) repairs attempted by anyone other than our authorised repair centres; or
(d) damage caused by foreign objects, substances or accident.
Warranty Exclusions
Wearing parts, consumable items or service-related parts required when performing
normal and regular maintenance of this product are not covered by the warranty unless
it is found to be defective by an Authorised Service Centre.
Distributed in Australia by Carbatec:
Carbatec Pty Ltd, 128 Ingleston Road, Wakerley, QLD 4161
Enquiries
Email: callcentre@carbatec.com.au
Freecall number: 1800 658 111
The Carbatec policy is one of continuous improvement and the company reserves the
right to alter designs, colours and specifications without notice.
Guarantee
To register your guarantee visit our web site at
tritontools.com* and enter your details.
Purchase Record
Date of Purchase: ___ / ___ / ____
Model: TPL180
Retain your receipt as proof of purchase
Triton Precision Power Tools guarantees to the purchaser of this product that if any part
proves to be defective due to faulty materials or workmanship within 3 YEARS from
the date of original purchase, Triton will repair, or at its discretion replace, the faulty
part free of charge.
This guarantee does not apply to commercial use nor does it extend to normal wear and
tear or damage as a result of accident, abuse or misuse.
* Register online within 30 days.
Terms & conditions apply.
This does not affect your statutory rights
366649_OwnerManual.indd 9366649_OwnerManual.indd 9 10/08/2021 14:4410/08/2021 14:44

10
NL
Technische afkortingen en symbolen
Specificaties
WAARSCHUWING: Bij een geluidsintensiteit van 85 dB(A) of hoger is het dragen van
gehoorbescherming en het limiteren van de blootstellingstijd vereist. Bij oncomfortabel
hoge geluidsniveaus, zelfs met het dragen van gehoorbescherming, stopt u het gebruik
van de machine onmiddellijk. Controleer de pasvorm en het geluiddempingsniveau
van de bescherming.
WAARSCHUWING: Blootstelling aan trilling resulteert mogelijk in gevoelloosheid, tinteling en
een vermindert gripvermogen. Langdurige blootstelling kan leiden tot chronische condities.
Limiteer de blootstellingsduur en draag anti-vibratie handschoenen. Vibratie heeft een grotere
invloed op handen met een temperatuur lager dan een normale, comfortabele temperatuur.
Maak gebruik van de informatie in de specificaties voor het bereken van de gebruiksduur en
frequentie van de machine.
Geluid- en trillingsniveaus in de specificatie zijn vastgesteld volgens EN60745 of een
gelijksoortige internationale norm. De waarden gelden voor een normaal gebruik in normale
werkomstandigheden. Een slecht onderhouden, onjuist samengestelde of onjuist gebruikte
machine produceert mogelijk hogere geluids- en trillingsniveaus. www.osha.europa.eu biedt
informatie met betrekking tot geluids- en trillingsniveaus op de werkplek wat mogelijk nuttig is
voor regelmatige gebruikers van machines.
Draag gehoorbescherming
Draag een veiligheidsbril
Draag een stofmasker
Draag een veiligheidshelm
Draag handschoenen
Lees de handleiding
WAARSCHUWING: Bewegende delen kunnen ernstig letsel veroorzaken.
Waarschuwing: scherpe bladen of tanden!
Ontkoppel de machine van de stroombron voor het maken van aanpassingen, het
verwisselen van accessoires, het schoonmaken, het uitvoeren van onderhoudt en
wanneer de machine niet in gebruik is!
Gebruik niet de regen of in vochtige omstandigheden!
Voorzichtig!
Stofontginning vereist of aanbevolen
Beschermingsklasse II (dubbel geïsoleerd)
Voldoet aan de relevante wetgeving en veiligheidsnormen
Milieubescherming
Elektrische producten mogen niet met het normale huisvuil worden weggegooid.
Indien de mogelijkheid bestaat, dient u het product te recyclen. Vraag de
plaatselijke autoriteiten of winkelier om advies betreffende recyclen.
Beschrijving symbolen
Op het gegevensplaatje van uw gereedschap kunnen zich symbolen bevinden. Deze
vertegenwoordigen belangrijke productinformatie en gebruiksinstructies.
Introductie
Hartelijk dank voor de aanschaf van dit Triton- gereedschap. Deze instructies bevatten informatie
die u nodig hebt voor een veilige en doeltreffende bediening van dit product. Dit product heeft
unieke kenmerken. Zelfs als u bekend bent met gelijksoortige producten dient u deze handleiding
zorgvuldig door te lezen, zodat u in staat bent alle voordelen te benutten. Houd deze handleiding
bij de hand en zorg ervoor dat alle gebruikers van dit gereedschap de handleiding hebben
gelezen en volledig hebben begrepen.
Vertaling van de originele instructies
Spanning: 230 V ~ 50/60 Hz, 1500 W
Onbelaste snelheid: 15.000 min-1
Schaafdiepte: 0 - 2 mm
Schaafbreedte: 180 mm
Schaafbladen: omkeerbare 180 mm HSS staal bladen, 3 pk.
Beschermingsklasse:
Afmetingen (L x B x H): 525 x 275 x 170 mm
Gewicht: 8,6 kg
Met het oog op onze aanhoudende productontwikkeling kunnen de specificaties
van Triton producten zonder voorafgaande kennisgeving worden gewijzigd.
Geluidsdruk LPA:94 dB(A)
Geluidsvermogen LWA:105 dB(A)
Onzekerheid K: 3 dB
Trilling: 5,8 m/s2 (hoofdhandvat)
7,0 m/s² (voorhandvat)
Onzekerheid: 1,5 m/s² (hoofd- en voorhandvat)
De geluidsintensiteit voor de bediener kan 85 dB(A)
overschrijden en de gehoorbescherming is noodzakelijk.
VVolt
~, a.c. Wisselspanning
A, mA Ampère, milliampère
n0Onbelaste snelheid
nSnelheid
°Graden
ØDiameter
Hz Hertz
, d.c. Gelijkspanning
W, kW Watt, kilowatt
/min of min-1 Operaties per minuut
rpm Revoluties per minuut
dB(A) Decibel geluidsniveau (A)
m/s2Meters per seconde (trilling)
366649_OwnerManual.indd 10366649_OwnerManual.indd 10 10/08/2021 14:4510/08/2021 14:45

11
NL
Algemene veiligheid voor
elektrisch gereedschap
WAARSCHUWING Lees alle bediening- en veiligheidsvoorschriften. Het niet opvolgen van
alle voorschriften die hieronder vermeld staan, kan resulteren in een elektrische schok, brand
en/of ernstig letsel.
WAARSCHUWING: De machine is niet geschikt voor gebruik door personen met een
verminderde mentale of fysieke gesteldheid of een gebrek aan ervaring, tenzij de persoon
wordt begeleid of geïnstrueerd door een persoon verantwoordelijk voor de veiligheid
Bewaar deze voorschriften voor toekomstig gebruik.
De term “elektrisch gereedschap” in alle hieronder vermelde waarschuwingen heeft
betrekking op uw elektrische gereedschap dat op de stroom is aangesloten (met een snoer) of
met een accu wordt gevoed (snoerloos).
1) Veiligheid in de werkruimte
a) Houd de werkruimte schoon en zorg voor een goede verlichting. Rommelige en
donkere ruimtes leiden vaak tot ongelukken.
b) Werk niet met elektrisch gereedschap in explosieve omgevingen, bijvoorbeeld in
de aanwezigheid van ontvlambare vloeistoffen, gassen of stof. Elektrisch
gereedschap brengt vonken teweeg die stof of dampen kunnen doen ontbranden.
c) Houd kinderen en omstanders uit de buurt wanneer u elektrisch gereedschap
bedient. Door afleiding kunt u de controle over het gereedschap verliezen.
2) Elektrische veiligheid
a) De stekkers van het elektrische gereedschap moeten passen bij het stopcontact.
Pas de stekker niet aan. Gebruik geen adapterstekkers bij geaard elektrisch
gereedschap. Het gebruik van ongewijzigde stekkers en passende stopcontacten
vermindert het risico op een elektrische schok.
b) Vermijd lichamelijk contact met geaarde oppervlakken zoals pijpen, radiatoren,
fornuizen en koelkasten. Het risico op een elektrische schok neemt toe als uw lichaam
geaard wordt.
c) Laat elektrisch gereedschap niet nat worden. Wanneer elektrisch gereedschap nat
wordt, neemt het risico op een elektrische schok toe.
d) Beschadig het snoer niet. Gebruik het snoer nooit om het elektrisch gereedschap
te dragen, te trekken of om de stekker uit het stopcontact te trekken.
Houd het snoer uit de buurt van hitte, olie, scherpe randen of bewegende delen.
Een beschadigde of in de knoop geraakte snoer verhoogt het risico op een elektrische
schok toe.
e) Wanneer u elektrisch gereedschap buiten gebruikt, maak dan gebruik van een
verlengsnoer dat geschikt is voor gebruik buitenshuis. Gebruik een verlengsnoer dat
geschikt is voor gebruik buitenshuis om het risico op een elektrische schok te
verminderen.
f) Indien het onvermijdelijk is elektrisch gereedschap te gebruiken in een vochtige
omgeving, gebruik dan een energiebron met een aardlekschakelaar
(Residual Currency Device). Het gebruik van een RCD vermindert het risico op een
elektrische schok.
3) Persoonlijke veiligheid
a) Blijf alert en gebruik uw gezonde verstand wanneer u elektrisch gereedschap
bedient. Gebruik het elektrisch gereedschap niet wanneer u vermoeid bent of onder
invloed bent van drugs, alcohol of medicijnen. Onoplettendheid tijdens het bedienen
van elektrisch gereedschap kan leiden tot ernstig letsel.
b) Maak gebruik van persoonlijke bescherming. Draag altijd een veiligheidsbril.
Passende bescherming voor de omstandigheden, zoals een stofmasker, niet-slippende
veiligheidsschoenen een helm of gehoorbescherming, vermindert het risico op
persoonlijk letsel.
c) Zorg ervoor dat het apparaat niet per ongeluk wordt gestart. Controleer of de
schakelaar in de ‘uit’ stand staat voordat u de stekker in het stopcontact steekt.
Het dragen van elektrisch gereedschap met uw vinger op de schakelaar of het aansluiten
op de stroom van elektrisch gereedschap met de schakelaar ingeschakeld kan tot
ongelukken leiden.
d) Verwijder alle stel- of moersleutels voordat u het elektrische gereedschap
inschakelt. Een moer- of stelsleutel die zich op een draaiend onderdeel van het
elektrische gereedschap bevindt, kan leiden tot letsel.
e) Reik niet te ver. Blijf altijd stevig en in balans staan. Zo houdt u meer controle over het
elektrische gereedschap in onverwachte situaties.
f) Draag geschikte kleding. Draag geen loshangende kleding of sieraden. Houd haren,
kleding en handschoenen uit de buurt van bewegende delen. Loshangende kleding,
sieraden en los hangende haren kunnen vast komen te zitten in bewegende delen.
g) Als er onderdelen voor stofafvoer- en stofverzameling worden meegeleverd, sluit
deze dan aan en gebruik deze op de juiste wijze. Het gebruik van deze onderdelen kan
het risico op stof gerelateerde ongelukken verminderen.
4) Gebruik en verzorging van elektrisch gereedschap
a) Forceer elektrisch gereedschap niet. Gebruik elektrisch gereedschap dat geschikt
is voor het werk dat u wilt uitvoeren. Geschikt elektrisch gereedschap werkt beter en
veiliger op een passende snelheid.
b) Gebruik het elektrische gereedschap niet als de schakelaar van het apparaat niet
in- en uitschakelt. Elektrisch gereedschap dat niet bediend kan worden met de
schakelaar is gevaarlijk en moet gerepareerd worden.
c) Haal de stekker uit het stopcontact voordat u instellingen aanpast, toebehoren
verwisselt of het elektrische gereedschap opbergt. Dergelijke voorzorgsmaatregelen
verminderen het risico op het per ongeluk starten van het elektrische gereedschap.
d) Berg elektrisch gereedschap dat niet in gebruik is op buiten bereik van kinderen
en laat mensen die niet bekend zijn met het elektrische gereedschap of met deze
instructies het elektrische gereedschap niet bedienen. Elektrisch gereedschap is
gevaarlijk in de handen van onervaren gebruikers.
e) Onderhoud uw elektrisch gereedschap. Controleer op foutieve uitlijning of het
vastslaan van bewegende delen, gebroken onderdelen en elke andere afwijking
die de werking van het elektrische gereedschap zou kunnen beïnvloeden. Indien
het elektrische gereedschap beschadigd is, moet u het laten repareren voordat u
het weer gebruikt. Veel ongelukken worden veroorzaakt door slecht onderhouden
elektrisch gereedschap.
f) Houd snijwerktuigen scherp en schoon. Goed onderhouden snijwerktuigen met
scherpe messen slaan minder snel vast en zijn gemakkelijker te bedienen.
g) Gebruik het elektrische gereedschap, de accessoires en onderdelen, etc.
volgens deze instructies en volgens bestemming voor het specifieke type elektrisch
gereedschap, en houd daarbij rekening met de werkomstandigheden en het uit te
voeren werk. Gebruik van elektrisch gereedschap voor werkzaamheden die verschillen
van die waarvoor het apparaat bestemd is, kan leiden tot gevaarlijke situaties.
5) Onderhoud
a) Laat uw elektrische gereedschap onderhouden door een gekwalificeerde vakman
en gebruik alleen identieke vervangstukken. Zo bent u er zeker van dat de veiligheid
van het elektrische gereedschap gewaarborgd blijft.
Schaafmachine veiligheid
WAARSCHUWING
• Wacht tot het schaafblad volledig stilstaat voordat u de machine neerlegt. Een
roterend schaafblad kan in het werkstuk grijpen wat kan leiden tot controleverlies en
ernstig persoonlijk letsel
Let op: Bovenstaande waarschuwing geld enkel voor schaafmachines zonder automatisch
sluitende beschermkap
• Houdt de machine te allen tijde bij de geïsoleerde oppervlakken vast. Wanneer het
schaafblad door het stroomsnoer of enige andere stroomdraden snijdt komen de metalen
onderdeel mogelijk onder stroom te staan wat kan leiden tot elektrische schok
• Zet het werkstuk met gebruik van klemmen of andere hulpmiddelen op een stevig
werkoppervlak vast. Wanneer u het werkstuk in uw hand vasthoudt of tegen uw lichaam
klemt, is de kans op ongelukken extreme groot
• Laat het stroomsnoer wanneer nodig door de fabrikant vervangen om de kans op
gevaren en persoonlijk letsel te voorkomen
• Het is aanbevolen de machine te gebruiken met een aardlekschakelaar met een
maximale lekstroom van 30 mA
Maak gebruik van een geschikt stofmasker: Het gebruik van de machine produceert
mogelijk stoffen die kankerverwekkend zijn, kunnen leiden tot aangeboren afwijkingen en
andere gezondheidsproblemen. Sommige houtsoorten bevatten koper-chroom arseenzouten
(CCA), welke giftig kunnen zijn. Ben extra voorzichtig bij het bewerken van deze houtsoorten.
Voorkom inhalering en minimaliseer huidcontact
BELANGRIJK
• Gebruik geschikte detectors om te controleren of het werkgebied verborgen
stroomdraden bevat. Contact met stroomdraden kan resulteren in brand en elektrische
schok. Het beschadigen van gasleidingen kan resulteren in explosies. Het penetreren van
waterleidingen resulteert in waterschade
• Reik niet in de spaanuitvoering met uw handen. Uw handen komen mogelijk in contact
met de roterende onderdelen
• Een stofmasker en stof ontginningssysteem zijn aanbevolen om de gebruiker te
beschermen tegen zaagsel/schaafsel. Elektrische schaafmachine produceren grote
hoeveelheden (giftig) zaagsel/schaafsel
• Maak enkel gebruik van scherpe schaafbladen. Hanteer de bladen erg voorzichtig
a) Controleer of vereiste spanning van de machine overeenkomt met de spanning van
de stroombron
b) Zorg ervoor dat alle schroeven, spijkers etc. uit het werkstuk verwijdert zijn voordat
de taak wordt uitgevoerd. Zo niet, raakt de machine mogelijk beschadigt wat resulteert
in veiligheidsgevaren
c) Zorg ervoor dat alle draden, doeken, kabels, etc. uit het werkgebied verwijdert zijn.
Zo voorkomt u de kans op verstrengeling
d) Controleer voor elk gebruik of de bladbouten goed vast zitten
e) Laat de machine, voordat deze in contact wordt gebracht met het werkstuk, voor
een korte periode vrij lopen. Overtollige trilling en wiebelen kan duiden op een foutieve
opzet of een onjuist uitgebalanceerd schaafblad
f) Laat de machine op volledige snelheid komen voordat deze in contact wordt
gebracht met het werkstuk
g) Houdt de schaafmachine met beide handen vast
h) Houdt de schaafmachine op minimaal 20 cm afstand van uw gezicht en lichaam
366649_OwnerManual.indd 11366649_OwnerManual.indd 11 10/08/2021 14:4510/08/2021 14:45

12
NL
i) Wacht tot de schaafbladen volledig op snelheid zijn
j) Vochtig schaafsel verstopt de stofkoker mogelijk. Schakel de machine uit, haal de
stekker uit het stopcontact en verwijder het hout met een stokje.
k) Schakel de machine uit en laat de bladen volledig tot stilstand komen voordat enig
onderhoud of schoonmaak wordt uitgevoerd
l) Wanneer de machine onbeheerd achtergelaten wordt, haalt u de stekker
uit het stopcontact
m) Wanneer de machine niet gebruikt wordt, haalt u de stekker uit het stopcontact
en plaatst u de voorste basis op een houten blok zodat de bladen geen
voorwerpen raken
n) Vervang beide bladen tegelijkertijd waardoor de balans en gebruiksduur behouden
worden en overmatige trilling uitgesloten wordt
Snijwerktuig veiligheid
WAARSCHUWING: Voordat u de machine op de stroombron aansluit, controleert u of de
spanning gelijk is aan de spanning weergegeven op het gegevensplaatje van de laminaatzaag.
De aansluiting op een stroombron met een hogere spanning kan resulteren in serieuze
verwondingen aan de gebruiker en beschadigingen aan de machine. Een lagere spanning is
schadelijk voor de motor. Sluit de machine bij enige twijfel niet aan
Gebruik het juiste gereedschap
• Zorg ervoor dat uw gereedschap geschikt is voor de klus. Raadpleeg altijd eerst de
gebruiksaanwijzing van het product. Neem niet zonder meer aan dat het gereedschap
geschikt is
Bescherm uw ogen
• Draag bij het gebruik van snijwerktuigen altijd geschikte oogbescherming
• Een gewone bril is niet ontworpen om bescherming te bieden bij het gebruik van dit
product. Normale lenzen zijn niet schokvast en kunnen versplinteren
Bescherm uw gehoor
• Draag altijd geschikte gehoorbescherming bij gereedschap dat een geluidsniveau van
meer dan 85 dB produceert
Bescherm uw luchtwegen
• Bij werk waarbij stof vrijkomt, moet altijd een geschikt gezicht- of stofmasker worden
gedragen. Wees voorzichtig dat u anderen om u heen niet blootstelt aan stof
Bescherm uw handen
• Houd uw handen uit de buurt van zaagbladen, snijschijven en boor bits. Bij het werken met
kleine werkstukken maakt u gebruik van een duwstok
Denk aan anderen om u heen
• Het is de verantwoordelijkheid van de gebruiker om ervoor te zorgen dat andere mensen
in de nabijheid van het werkgebied niet worden blootgesteld aan gevaarlijk geluid en
stof. Zorg ervoor dat alle personen die het nodig hebben voorzien worden van geschikte
persoonlijke beschermingsmiddelen
Verborgen voorwerpen
• Inspecteer het werkstuk en verwijder alle spijkers en andere voorwerpen
• Zaag geen werkstukken met vastzittende voorwerpen, tenzij de machine en het zaagblad
hiertoe in staat zijn
• Let op voor verborgen voorwerpen. Muren verbergen mogelijk bedradingen en
pijpleidingen, autopanelen verbergen mogelijk brandstofleidingen en gras verbergt
mogelijk stenen en glas. Controleer het werkstuk grondig voordat u gaat zagen
Wees voorzichtig met rondvliegend afval
• In sommige gevallen wordt het afval met grote snelheid door het gereedschap
opgeworpen. Zorg ervoor dat er geen andere personen in de werkomgeving zijn.
Als het nodig is om andere personen dichtbij te hebben, draagt de gebruiker
er de verantwoordelijkheid voor dat ze zijn uitgerust met de juiste persoonlijke
beschermingsmiddelen.
Het monteren van zaagbladen
• Zorg ervoor dat de zaagbladen goed zijn aangebracht en vastgezet voordat het
gereedschap wordt gebruikt. Stel vast dat steeksleutels en andere stelmiddelen vóór
gebruik zijn verwijderd.
• Gebruik uitsluitend zaagbladen die zijn aanbevolen voor uw machine.
• Probeer zaaggereedschap niet te wijzigen
• Zorg ervoor dat de bladen scherp zijn, in goede staat verkeren en juist gemonteerd zijn
• Bladen die niet te slijpen zijn, waaronder hardmetalen bladen, dienen niet scherp geslepen
worden wanneer bot
• Bij het slijpen van bladen die scherp geslepen mogen worden, volgt u de instructies van
de bladfabrikant op. Deze bladen zijn mogelijk een bepaald aantal keer te slijpen
• Geslepen balden dienen nauwkeuriger geïnspecteerd te worden voordat de machine
gebruikt wordt. Vervang de bladen wanneer u vermoedt dat deze niet geschikt zijn
voor gebruik
• Vervang bladen wanneer deze tijdens gebruik in contact komen met een verborgen,
ongeschikt voorwerp
Richting van aanvoer
• Voer het werkstuk uitsluitend aan in het zaagblad of het gereedschap tegen de richting
van de beweging van het zaagblad of het gereedschap in.
Wees voorzichtig met hitte
• Denk er aan dat het zaaggereedschap en de werkstukken tijdens het werk heet
kunnen worden. Probeer niet om iets aan te passen voordat het gereedschap
helemaal is afgekoeld.
Beheers afval
• Voorkom een ophoping van zaagsel en spanen. Zaagsel veroorzaakt brandgevaar, en
sommige soorten metaalspanen zijn explosief.
• Wees vooral voorzichtig met machines die worden gebruikt voor het zagen van hout
en metaal. Vonken bij het zagen van metaal veroorzaken vaak brand in stof en zaagsel.
• Gebruik waar mogelijk een stofafvoersysteem om voor een veiligere werkomgeving
te zorgen.
Onderdelenlijst
1. Voorhandvat
2. Stroomindicator
3. Aan-/uit trekker schakelaar
4. Trekker schakelaar vergrendeling
5. Hoofdhandvat
6. Vaste achtervoet
7. Geleider bevestigingspunt (x 4)
8. Aandrijfriem beschermkap
9. Voorhandvat vergrendelhendel
10. Geleider bevestigingspunt (x 4)
11. Beweegbare voorvoet
12. Diepte verstelknop
13. Voorhandvat stelschroef
14. Bladcilinder
15. Omkeerbare bladen
16. Klemschroeven (x 5)
17. Blad moersleutel
18. Stofpoort
19. Stofpoort adapter
20. Combinatie parallel-/afschuiningsgeleider
21. Geleider bevestigingsknop (x 2)
Gebruiksdoel
Grote elektrische schaafmachine voor ‘Heavy-Duty’ schaafwerk op harde en
zachte houtsoorten
Het uitpakken van uw gereedschap
• Pak uw toestel / gereedschap uit. Inspecteer het en zorg dat u met alle kenmerken en
functies vertrouwd raakt
• Controleer of alle onderdelen aanwezig zijn en in goede staat verkeren. Als er onderdelen
ontbreken of beschadigd zijn, zorg dan dat deze vervangen worden voor u dit toestel /
gereedschap gebruikt
Voor gebruik
WAARSCHUWING: Ontkoppel de machine van de stroombron voordat u accessoires
wisselt of enige aanpassingen maakt
Het aanpassen van het voorhandvat
1. Verlos de vergrendelhendel (9) (Afbeelding A) en plaats het voorhandvat (1) in één van de
vier posities, het meest geschikt voor het uit te voeren werk (Afbeelding B)
2. Vergrendel het handvat met behulp van de hendel (9)
Let op: het hendel mechanisme kan met behulp van de voorhandvat stelschroef (13) versteld
worden (Afbeelding C)
Combinatie parallel-/afschuiningsgeleider
1. Bevestig de combinatie parallel-/afschuiningsgeleider (20) op de voet door de
bevestigingsknoppen (21) op de bevestigingspunten (7 en 10) te schroeven (Afbeelding D)
2. Draai de twee vleugelmoeren los en stel de hoek van de geleider als gewenst voor het
maken van de schaafsneden (Afbeelding E)
3. De geleider dient als ondersteuning bij het onder controle houden van de schaafmachine
Let op: De geleider kan aan beide zijden van de voet bevestigd worden
Let op: De hoekgradaties op de geleider zijn enkel te gebruiken als hulplijn. Voor nauwkeurige
schaafsneden meet u de hoek van de geleider, maakt u een oefensnede en past u de hoek
wanneer nodig aan
366649_OwnerManual.indd 12366649_OwnerManual.indd 12 10/08/2021 14:4510/08/2021 14:45

13
NL
Stofontginning
Let op: Het is aangeraden gebruik te maken van een stofzuiger of ander ontginningssysteem.
De machine produceert tijdens gebruik een grote hoeveelheid afvalmateriaal
1. De stofpoort (18) is mogelijk op een ontginningssysteem aan te sluiten
2. Het gebruik van de adapter (19) creëert een ontginningssysteem dat aangesloten kan
worden op de stofpoort (Afbeelding F)
3. Plaats de adapter in de stofpoort en draai deze rechtsom om deze in plaats
te vergrendelen
Het verstellen van de schaafdiepte
Let op: De stroomindicator (2) lichtje brand wanneer de machine is aangesloten op een
stroombron. Dit is een snelle indicator. Toch is het erg belangrijk de aansluiting op de
stroombron lichamelijk te controleren.
1. Roteer de diepte verstelknop (12) rechtsom voor een diepte schaafsnede en linksom voor
een ondiepere schaafsnede
2. De nummers op de ring onder de knop geven de diepte van de schaafsnede aan. De 8
klikstanden hebben een dieptebereik van 0,25 – 2 mm met verhogingen van 0,25 mm.
3. Bij het schaven van nauwkeurige dieptes, schaaft u een stuk afvalmateriaal, meet u het
dikteverschil en past u de schaafdiepte instelling wanneer nodig aan
4. Om de nauwkeurigheid van de voorvoet (11) te controleren, stelt u de diepte verstelknop
op ‘0’ zodat het blad tegen de achtervoet (6) en voorvoet (11) gemeten kan worden. De
achtervoet, het blad en de voorvoet horen allen gelijk op de ‘0’-markeringen te vallen
5. Plaats de diepte verstelknop na gebruik in de ‘P’ positie. Het blad komt zo niet in contact
met het oppervlak waarop de machine rust, zodat het blad niet beschadigd
Bediening
Het in- uitschakelen van de machine
WAARSCHUWING: Voordat de schaafmachine wordt aangesloten op een stroombron
controleert u of de trekker schakelaar (3) en de trekker schakelaar vergrendeling (4) juist
functioneren. Voordat de machine wordt ingeschakeld, zorgt u ervoor dat het blad en de
bladcilinder niet in contact komen met enig oppervlak.
1. Verbindt de machine met de stroombron, druk de trekker schakelaar vergrendeling (4)
(Afbeelding G) in en druk de trekker schakelaar (3) in (Afbeelding H)
2. Om de machine te stoppen laat u de trekker schakelaar simpelweg los
3. Om de machine te herstarten is het nodig zowel de vergrendelknop als de trekker
schakelaar te bedienen. Deze belangrijke veiligheidsfunctie voorkomt plotselinge
inschakeling van de schaafmachine.
LET OP: Nadat de schaafmachine is uitschakelt, zullen de bladen voor enige tijd door blijven
draaien. Wacht tot de motor volledig tot stilstand gekomen is voordat u de machine neerlegt,
om schade aan de bladen en het oppervlak te voorkomen.
• Wanneer u de machine op de zij wilt rusten, doe dit dan niet op de zijde met de
ventilatieopeningen. Zo voorkomt u de ingang van zaagsel en stof in de motor
• Wanneer de machine voor korte tijd niet gebruikt wordt, zet u de diepte verstelknop in de
‘P’ stand. Zorg er tevens voor dat beide voeten op hetzelfde oppervlakniveau rusten
Schaven
1. Rust de voorvoet (11) plat op het werkstuk zonder dat de bladen in contact komen met
het werkstuk
2. Schakel de machine in en wacht tot de bladen de volle snelheid bereikt hebben
3. Beweeg de machine langzaam voorwaarts waarbij u aan het begin van de schaafsnede
druk op de voorzijde van de machine uitoefent met één hand op het voorhandvat (1) en
druk op de achterzijde van de machine, aan het eind van de schaafsnede uitoefent met de
andere hand op het hoofdhandvat (5)
Let op: Het is belangrijk te begrijpen dat de voorvoet (11) de hoeveelheid blad op het werkstuk
bepaald, wat druk op zowel de voor- als achtervoet vereist
4. Duw de machine voorbij het einde van het werkstuk zonder deze omhoog of omlaag
te kantelen
Tip: Behandel het werkstuk alsof het iets langer is dan het werkelijk is, waardoor de
schaafsnede op de juiste manier wordt afgemaakt
5. De schaafsnelheid en schaafdiepte bepalen de kwaliteit van de schaafsnede. Voor grove
schaafsneden kan de schaafdiepte vergroot worden. Voor een fijne afwerking vermindert u
de schaafdiepte en beweegt u de machine langzaam vooruit
Let op: Schaven is gemakkelijk wanneer u het werkstuk licht van u af kantelt zodat u “naar
beneden” schaaft
WAARSCHWUING: De schaafmachine is erg zwaar wat verticaal gebruik erg
onpraktisch maakt
LET OP: Het te snel voorwaarts bewegen van de machine resulteert mogelijk in een slechte
schaafkwaliteit en kan de bladen en de motor beschadigen. Het te langzaam voorwaarts
bewegen van de machine brand of markeert mogelijk de schaafsnede
• De juiste snelheid hangt af van het te schaven materiaal en de schaafdiepte
• Oefen op een stuk afvalmateriaal voor de juiste schaafsnelheid en –diepte
LET OP: Houdt de schaafmachine te allen tijde met beide handen vast
LET OP: Klem het werkstuk wanneer mogelijk op de werkbank vast
Afschuinen
1. Voor het maken afschuiningen als afgebeeld in (Fig.I), lijnt u de V-groef (Fig. II) in de
voorvoet(11) met de hoek-rand van het werkstuk uit
2. Beweeg de machine over de rand
Onderhoud
WAARSCHUWING: Haal de stekker uit het stopcontact voor u de machine schoonmaakt
of onderhoud uitvoert
• Inspecteer het stroomsnoer voor elk gebruik op slijtage en beschadiging. Reparaties
dienen uitgevoerd worden bij een geautoriseerd Triton service center. Dit geld tevens voor
verlengsnoeren, gebruikt met de machine
• Controleer regelmatig of alle bevestigingsschroeven goed vast zitten. Deze kunnen door de
trillingen van de machine mogelijk los raken
Schoonmaak
1. Houd de ventilatiegaten vrij en schoon
2. Verwijder stof en vuil regelmatig. Maak daarbij gebruik van droge perslucht of een zachte
borstel
LET OP: Draag bij het schoonmaken van de machine een veiligheidsbril.
3. Smeer alle bewegende onderdelen regelmatig.
4. Gebruik geen bijtende stoffen bij het schoonmaken van plastic onderdelen.
LET OP: Gebruik geen hardnekkige schoonmaakmiddelen voor het schoonmaken van plastic
onderdelen. Een licht schoonmaakmiddel op een vochtige doek is aanbevolen. De machine
mag niet in contact komen met water. Zorg ervoor dat de machine droog is voordat deze
gebruikt wordt.
Het verwijderen en bevestigen van schaafbladen
WAARSCHUWING: Zorg ervoor dat de klemschroeven (16) stevig en in de juiste volgorde
aangespannen zijn zoals weergegeven in afbeelding M. Het incorrecte en / of onvoldoende
aanspannen kan de bediener ernstig letsel veroorzaken.
Uw schaafmachine is voorzien van omkeerbare HSS bladen. De bladen kunnen wanneer bot
omgedraaid worden. Wanneer beide zijden van de bladen bot zijn vervangt u de bladen
WAARSCHUWING: De bladen kunnen niet geslepen worden
Het afnemen van een schaafblad
LET OP: De bladen zijn er scherp, hanteer voorzichtig
1. Draai de vijf klemschroeven (16) met behulp van de sleutel (17) los
2. Lijn de bladtrommel (14) met de zij-snede uit zodat het benodigde omkeerbare blad (15)
voorzichtig verwijderd kan worden
Het bevestigen van een schaafblad
WAARSCHUWING: Gebruik alleen HSS schaafbladen die compatibel zijn met dit gereedschap.
Het gebruik van onjuiste bladen die geen HSS zijn, kan de bediener ernstig letsel veroorzaken.
1. De schaafbladen zijn voorzien van twee snijranden. Wanneer één zijde van het schaafblad
versleten is, kan deze omgedraaid worden
2. Schuif een scherp blad met scherpe zijde omhoog in het steunblok van de cilinder (14)
Let op: Wanneer één van de bladen beschadigd is kan alleen dit blad vervangen worden.
Wanneer één van de bladen versleten is, horen alle drie de bladen vervangen te worden. Zo
voorkomt u een niet gebalanceerd gebruik met gevaarlijke trillingen en mogelijke schade aan
de machine
Let op: De richel langs het schaafblad hoort aan de tegenovergestelde zijde van de
klemschroeven (16) te zitten.
Bij het plaatsen van een schaafblad:
1. Verwijder alle schaafspaanders uit de cilinder (14) en de schaafbladen zelf
2. Gebruik vervangende schaafbladen met gelijke afmetingen en een gelijk gewicht.
Bij het gebruik van andere bladen zal de cilinder trillen wat resulteert in een slecht
schaafresultaat en een mogelijke beschadiging aan de machine
3. Draai de klemschroeven (16) goed vast in de juiste volgorde zoals weergegeven in
afbeelding M bij het aanbrengen van de bladen op de schaafmachine. Het gebruik van de
machine met losse klemschroeven is erg gevaarlijk.
4. Span aan met een koppel van 10 Nm (±0.5); overschrijd deze waarde niet
5. Herhaal dit voor de andere twee schaafbladen
6. Check regelmatig of de schroeven goed vast zitten
WAARSCHUWING: Na het maken van aanpassingen aan de schaafbladen draait u de
klemschroeven vast. Na korte gebruiksperiodes controleert u de schroeven, dat wil zeggen dat
u moet controleren of ze aangespannen blijven met een koppel van 10 Nm (±0,5). Controleer
daarna nog eens na een redelijke gebruiksperiode.
LET OP: De schaafbladen horen juist uitgelijnd te zijn wanneer deze recht in de gleuf geplaatst
worden en juist vastgezet worden.
• Bij het plaatsen van nieuwe schaafbladen is het belangrijk dat deze recht in de gleuven
zitten, volledig ingevoegd zijn en dat de snijranden parallel aan het oppervlak van de
achtervoet liggen.
366649_OwnerManual.indd 13366649_OwnerManual.indd 13 10/08/2021 14:4510/08/2021 14:45

14
NL
Probleemopsporing
Probleem Mogelijke oorzaak Oplossing
Geen stroom
Machine is niet aangesloten op de stroombron Sluit de machine op de stroombron aan
Zekering gesprongen of stroombreker ingesprongen Reset stroombreker
Aardlekschakelaar niet gereset Reset aardlekschakelaar
Verlengsnoer overbelast en thermische
bescherming ingesprongen
Vervang verlengsnoer of rol volledig uit voor optimaal
stroomgebruik en reset thermische bescherming
Beschadigde snoersnoeraansluiting Reparatie door bevoegd persoon vereist
Beschadigde machine Reparatie door bevoegd persoon vereist
Motor start niet Versleten koolstofborstels Laat de koolstofborstels door een bevoegd persoon vervangen
Beschadigde machine Reparatie door bevoegd persoon vereist
Ruw schaafoppervlak
Versleten schaafbladen Vervang schaafbladen
Beschadigde bladen Vervang schaafbladen
Hout is nat Droog het hout
Onjuiste schaafdiepte
Versleten of beschadigde schaafbladen Vervang schaafbladen
Onjuist bevestigde schaafbladen Herbevestig schaafbladen
Onjuiste bladen bevestigd Vervang schaafbladen met juiste schaafbladen
Cilinder roteert niet Kapotte aandrijfriem Vervang aandrijfriem
Trilling en/of abnormaal geluid Stop het gebruik van de machine
Check of alle bevestigingen goed vast zitten.
Wanneer het probleem niet is opgelost neemt u
contact met een Triton service center
• Gebruik een metalen liniaal op 3 verschillende plaatsen op de achtervoet om te
controleren of het schaafblad evenwijdig ligt.
• De klemschroeven mogen alleen aangedraaid worden wanneer het schaafblad
evenwijdig ligt
• Zet de diepte verstelknop (12) op de ‘0’ stand en plaats een liniaal over de beide voeten
(11 en 6) heen om de positie van de voorvoet te controleren
• Schaafbladen dienen centraal op de cilinder geplaats te worden
WAARSCHUWING: Als de schaafbladen uitsteken of niet recht zitten, kunnen deze de
behuizing van de machine raken wat resulteert in serieuze gevaren voor de gebruiker en
omstanders.
Let op: Juist bevestigde schaafbladen resulteren in een fijn en even schaafoppervlak
De voorbeelden laten juiste en onjuiste instellingen zien:
• Juiste instelling – Soepele fijne schaafsnede (Fig. III)
• Inkepingen in het werkstuk – één of meerdere schaafbladranden liggen niet parallel aan
het oppervlak van de achtervoet (Fig. IV)
• Inkepingen aan het begin van de schaafsnede – één of meerdere schaafbladen schaven
niet diep genoeg in vergelijking met de hoogte van de achtervoet (Fig. V)
• Inkepingen aan het eind van de schaafsnede – één of meerder schaafbladen schaven te
diep in vergelijking met de hoogte van de achtervoet (Fig.VI)
(a) Beweegbare voorvoet (11) wordt aangepast met de diepte verstelknop (12)
(b) Vaste achtervoet (6)
Het vervangen van de aandrijfriem
1. Om de aandrijfriem te vervangen schroeft u de drie kruiskopschroeven los zodat
de beschermkap (8) aan de linker kant van de machine afgenomen kan
worden (Afbeelding N)
Let op: De voorste schroef is langer dan de andere twee. Let hierbij op bij het vastdraaien
van de schroeven.
2. Neem de beschadigde riem van de machine door deze zijwaarts van het bovenwiel te
trekken en het onder-wiel met de hand te roteren. Gebruik een zachte borstel om dor
gebied schoon te maken
Let op: Draag hierbij een veiligheidsbril
3. Let bij het plaatsen van de nieuwe riem op de zes V-groeven aan de binnenzijde.
4. Controleer of de riem gelijk loopt door deze handmatig te roteren
5. Plaats de beschermkap terug op de machine en draai de bevestigingsschroeven vast
6. Sluit de machine op de stroombron aan, schakel de machine in en laat deze voor een
aantal minuten lopen om zeker te zijn van een juiste riemwerking
Koolstofborstels
• Na verloop van tijd zullen de koolborstels in de motor verslijten
• Bij overmatige slijtage van de borstels kan de motor minder goed presteren, niet meer
starten, of overmatig vonken.
• Indien u vermoedt dat de borstels versleten zijn, laat ze dan bij een erkend
servicecentrum vervangen
Verwijdering
Bij de verwijdering van elektrische machines neemt u de nationale voorschriften in acht.
• Elektrische en elektronische apparaten en accu’s mogen niet met uw huishoudelijk afval
worden weggegooid
• Neem contact op met uw gemeente voor informatie betreffende de verwijdering van
elektrisch gereedschap
366649_OwnerManual.indd 14366649_OwnerManual.indd 14 10/08/2021 14:4510/08/2021 14:45

15
NL
Garantie
Om uw garantie te registreren, gaat u naar onze website op tritontools.com* en voert
u uw gegevens in.
Aankoopgegevens
Datum van aankoop: ___ / ___ / ____
Model: TPL180
Bewaar uw aankoopbon als aankoopbewijs rt pr
Triton Precision Power Tools garandeert de koper van dit product dat indien een onderdeel
defect is vanwege fouten in materiaal of uitvoering binnen 3 jaar na de datum van de
oorspronkelijke aankoop, Triton het defecte onderdeel gratis repareert of, naar eigen
inzicht, vervangt.
Deze garantie heeft geen betrekking op commercieel gebruik en strekt zich niet uit tot
normale slijtage of schade ten gevolge van een ongeluk, verkeerd gebruik of misbruik.
* Registreer online binnen 30 dagen.
Algemene voorwaarden van toepassing.
366649_OwnerManual.indd 15366649_OwnerManual.indd 15 10/08/2021 14:4510/08/2021 14:45

16
FR
Abréviations pour les
termes techniques
Caractéristiques techniques
Tension : 230 V~50 Hz, 1 500 W
Vitesse à vide : 15 000 tr/min
Profondeur de rabotage : 0 – 2 mm
Largeur de rabotage : 180 mm
Fers : Réversibles, en acier HSS, 180 mm, lot de 3
Classe de protection :
Dimensions (L x l x H) : 525 x 275 x 170 mm
Poids : 8,6 kg
Du fait de l’évolution constante de nos produits, les caractéristiques
des produits Triton peuvent changer sans notification préalable.
Pression acoustique LPA : 94 dB(A)
Puissance acoustique LWA : 105 dB(A)
Incertitude K : 3 dB
Vibration pondérée : 5,8 m/s2 (poignée principale)
7,0 m/s2 (poignée avant)
Incertitude : 1,5 m/s2 (poignée principale et avant)
L’intensité sonore peut dépasser 85 dB(A) et il est nécessaire
que l’utilisateur porte des protections auditives.
ATTENTION : Portez toujours des protections sonores lorsque le niveau d’intensité est
supérieur à 85 dB(A) et limitez le temps d’exposition si nécessaire. Si l’intensité sonore
devient inconfortable, même avec les protections, arrêtez immédiatement d’utiliser l’appareil,
vérifiez que les protections sont bien en places et adaptés avec le niveau sonore produit
par l’appareil.
ATTENTION : L’exposition de l’utilisateur aux vibrations peut engendrer une perte du toucher,
des engourdissements, des picotements et ainsi réduire la capacité de préhension. De longues
expositions peuvent également provoquer ces symptômes de façon chronique. Si nécessaire,
limitez le temps d’exposition aux vibrations et portez des gants anti-vibrations. N’utilisez pas
cet appareil lorsque la température de vos mains est en dessous des températures normales,
car l’effet vibratoire en est accentué. Référez-vous au cas de figures des caractéristiques
relatives aux vibrations pour calculer le temps et fréquence d’utilisation de l’appareil.
Les niveaux sonores et vibratoires des caractéristiques techniques sont déterminés en
fonction de la norme EN60745 ou autres normes internationales. Ces données correspondent
à un usage normale de l’appareil, et ce dans des conditions de travail normales. Un appareil
mal entretenu, mal assemblé ou mal utilisé peut augmenter les niveaux sonores et vibratoires.
Pour plus d’informations sur la directive des émissions sonores et vibratoires, visitez le site
http://osha.europa.eu/fr.
Port de protection auditive
Port de lunettes de sécurité
Port de masque respiratoire
Port de casque
Port de gants
Lire le manuel d’instructions
ATTENTION : les pièces mobiles peuvent engendrer des écrasements
et des coupures.
ATTENTION : lames ou dents coupantes !
Débranchez toujours l’appareil avant d’effectuer un réglage, changer
d’accessoire, de le nettoyer, de l’entretenir, ou lorsqu’il n’est plus utilisé.
NE PAS utiliser sous la pluie ou dans un environnement humide !
Attention !
Extraction de la poussière requise ou recommandée
Double isolation pour une protection supplémentaire
Conforme à la règlementation et aux normes européennes de
sécurité pertinentes
Protection de l’environnement
Les produits électriques usagés ne doivent pas être jetés avec les ordures
ménagères. Veuillez les recycler dans les centres prévus à cet effet. Pour de plus
amples informations, veuillez contacter votre municipalité ou point de vente.
Description des symboles
La plaque signalétique figurant sur votre outil peut présenter des symboles. Ces symboles
constituent des informations importantes relatives au produit ou des instructions concernant
son utilisation.
Introduction
Nous vous remercions d’avoir choisi cet équipement Triton. Ces instructions contiennent
les informations nécessaires pour vous en garantir un fonctionnement efficace et en toute
sécurité. Veuillez lire attentivement ce manuel pour vous assurer de tirer pleinement avantage
des caractéristiques uniques de votre nouvel équipement. Gardez ce manuel à portée de main
et assurez-vous que tous les utilisateurs l’aient lu et bien compris avant toute utilisation.
Conservez-le pour toute référence ultérieure.
Traduction des instructions originales
VVolt
~, a.c. Courant alternatif
A, mA Ampère, Milliampère
n0Vitesse à vide
nVitesse nominale
°Degrés
ØDiamètre
Hz Hertz
, d.c. Courant continu
W, kW Watt, Kilowatt
/min o min-1 (opérations) par minute
rpm Tours par minute
dB(A) Puissance acoustique en
décibel (A pondéré)
m/s2
Mètres par seconde
au carré (magnitude
des vibrations)
366649_OwnerManual.indd 16366649_OwnerManual.indd 16 10/08/2021 14:4510/08/2021 14:45

17
FR
Consignes générales de sécurité
AVERTISSEMENT : Veuillez lire toutes les consignes de sécurité et toutes les
instructions. Le non-respect des instructions et consignes de sécurité peut entraîner un
risque de décharge électrique, d’incendie et/ou se traduire par des blessures graves.
AVERTISSEMENT : Cet appareil n’est pas prévu pour être utilisé par des personnes
(enfants y compris) ayant des capacités mentales ou physiques réduites ou manquant
d’expérience à moins qu’ils soient supervisés ou qu’une personne responsable de leur
sécurité leur donne des instructions concernant l’utilisation de cet appareil.
Veuillez conserver ces instructions et consignes de sécurité pour référence ultérieure.
L’expression « appareil/outil électrique » employée dans les présentes consignes recouvre
aussi bien les appareils filaires à brancher sur secteur que les appareils sans fils fonctionnant
avec batterie.
1. Sécurité sur la zone de travail
a. Maintenir une zone de travail propre et bien éclairée. Des zones encombrées et mal
éclairées sont sources d’accidents.
b. Ne pas utiliser d’outils électriques dans des environnements explosifs, tels qu’à
proximité de liquides, de gaz ou de poussières inflammables. Les outils électriques
produisent des étincelles susceptibles d’enflammer la poussière ou les vapeurs présentes.
c. Éloigner les enfants et toute personne se trouvant à proximité pendant l’utilisation
d’un outil électrique. Ceux-ci pourraient vous distraire et vous faire perdre la maîtrise
de l’appareil.
2. Sécurité électrique
a. Les prises des outils électriques doivent correspondre aux prises du secteur. Ne
modifiez jamais la prise en aucune façon. N’utilisez jamais d’adaptateur avec les
outils électriques mis à la terre. Des prises non modifiées, adaptées aux boîtiers de prise
de courant, réduiront les risques de décharge électrique.
b. Éviter le contact corporel avec les surfaces mises à la terre telles que tuyaux,
radiateurs, cuisinières et réfrigérateurs. Le risque de décharge électrique est plus
important si votre corps est mis à la terre.
c. Ne pas exposer votre outil électrique à la pluie ou à l’humidité. L’infiltration d’eau dans
un outil électrique augmentera le risque de décharge électrique.
d. Ne pas maltraiter le cordon électrique. N’utilisez jamais le cordon électrique pour
porter, tirer ou débrancher l’outil électrique. Conservez le cordon électrique à l’écart
de la chaleur, de l’essence, de bords tranchants ou de pièces en mouvement. Un
cordon électrique endommagé ou entortillé accroît le risque de décharge électrique.
e. Au cas où l’outil électroportatif serait utilisé à l’extérieur, servez-vous d’une rallonge
appropriée à une utilisation en extérieur. Cela réduit le risque de décharge électrique.
f. Si une utilisation de l’outil dans un environnement humide ne peut être évitée, utilisez
une alimentation protégée par un disjoncteur différentiel. L’utilisation d’un disjoncteur
différentiel réduit le risque de décharge électrique.
3. Sécurité des personnes
a. Rester vigilant et faire preuve de sens lors de la manipulation de l’outil. Ne pas utiliser
d’outil électrique en état de fatigue ou sous l’influence de drogues, d’alcool ou de
médicaments. Un moment d’inattention pendant l’utilisation d’un outil électrique peut se
traduire par des blessures graves.
b. Porter des équipements de protection. Porter toujours des lunettes de protection. Le
port d’équipements de protection tels que des masques à poussières, des chaussures de
sécurité antidérapantes, un casque de sécurité ou des protections antibruit, selon le travail
à effectuer, réduira le risque de blessures aux personnes.
c. Éviter tout démarrage accidentel. S’assurer que l’interrupteur marche-arrêt soit en
position d’arrêt (Off) avant de brancher l’outil sur l’alimentation secteur. Porter un outil
électrique tout en maintenant le doigt posé sur l’interrupteur ou brancher un outil électrique
dont l’interrupteur est sur la position de marche (On) est source d’accidents.
d. Enlever toute clé ou tout instrument de réglage avant de mettre l’outil électrique en
marche. Une clé ou un instrument de réglage laissé fixé à un élément en rotation de l’outil
électrique peut entraîner des blessures physiques.
e. Ne pas essayer d’atteindre une zone hors de portée. Se tenir toujours en position
stable et conserver l’équilibre. Cela permet de mieux contrôler l’outil électrique dans des
situations inattendues.
f. Porter des vêtements appropriés. Ne pas porter de vêtements amples ou des bijoux
pendants. Les vêtements amples, les bijoux pendants ou les cheveux longs peuvent être
happés par les pièces en mouvement.
g. Si l’outil est pourvu de dispositifs destinés au raccord d’équipements d’extraction et
de récupération de la poussière/sciure, s’assurer qu’ils soient bien fixés et utilisés
correctement. L’utilisation de ces dispositifs peut réduire les risques dus à la poussière.
4. Utilisation et entretien des outils électriques
a. Ne pas surcharger l’outil électrique. Utiliser l’outil électrique approprié au travail
à effectuer. Un outil électrique adapté et employé au rythme pour lequel il a été conçu
permettra de réaliser un travail de meilleure qualité et dans de meilleures conditions
de sécurité.
b. Ne pas utiliser un outil électrique dont l’interrupteur marche-arrêt est hors service.
Tout outil électrique dont la commande ne s’effectue plus par l’interrupteur marche-arrêt
est dangereux et doit être réparé.
c. Débrancher l’outil électrique avant d’effectuer tout réglage, changement
d’accessoire ou avant de le ranger. De telles mesures préventives réduiront les risques
de démarrage accidentel.
d. Ranger les outils électriques inutilisés hors de portée des enfants et ne pas
permettre l’utilisation de ces outils aux personnes novices ou n’ayant pas
connaissance de ces instructions. Les outils électriques sont dangereux dans les
mains d’utilisateurs inexpérimentés.
e. Veiller à l’entretien des outils électriques. Vérifier que les éléments rotatifs soient bien
alignés et non grippés. S’assurer de l’absence de pièces cassées ou endommagées
susceptibles de nuire au bon fonctionnement de l’outil. Si l’outil électrique est
endommagé, le faire réparer avant toute utilisation. De nombreux accidents sont causés
par l’utilisation d’outils électriques mal entretenus.
f. Garder les outils de coupe affûtés et propres. Des outils de coupe bien entretenus, aux
tranchants bien affûtés, sont moins susceptibles de se gripper et sont plus faciles
à contrôler.
g. Utiliser l’outil électrique, les accessoires et les outils à monter, etc., conformément
à ces instructions et selon l’utilisation prévue pour le type d’outil donné, en tenant
compte des conditions de travail et de la tâche à réaliser. Toute utilisation de cet outil
électrique autre que celle pour laquelle il a été conçu peut entraîner des situations à risque
et entraînerait une annulation de sa garantie.
5. Entretien
a. Ne faire réparer l’outil électrique que par un réparateur qualifié utilisant uniquement
des pièces de rechange identiques. Cela permettra d’assurer la sécurité continue de
cet outil électrique.
Consignes de sécurités
supplémentaires relatives aux
rabots électriques
WARNING!
• Attendez que l’outil de coupe soit totalement arrêté avant de le déposer. Un outil de
coupe en rotation peut pénétrer la surface et entraîner une perte de contrôle et causer
des blessures sérieuses.
• Tenez l’outil par ses surfaces de préhension isolées lorsqu’il y a un risque que
l’accessoire de coupe rentre en contact avec des fils électriques cachés ou son
propre câble d’alimentation. Lorsqu’un accessoires de coupe rentre en contact avec
un fil sous tension les parties métalliques de l’outil peuvent être mises sous tension et
exposer l’utilisateur à un choc électrique.
• Immobilisez la pièce de travail sur une surface stable. Maintenir la pièce de travail à la
main ou contre le corps peut engendrer une perte de contrôle.
• S’il est nécessaire de remplacer le cordon d’alimentation, cela doit être fait par le
fabricant ou un de ses agents agréés pour éviter tout danger.
• Il est fortement recommandé d’alimenter l’outil à travers un disjoncteur différentiel
(RCD) dont le courant résiduel nominale est de 30 mA ou moins.
Utilisez une protection respiratoire appropriée : La poussière générée par cet outil peut
contenir des produits chimiques connus pour être une cause de cancers, de malformations
congénitales ou autres anomalies de la reproduction. Certains bois contiennent des
conservateurs tels que l’arséniate de cuivre et de chrome (CCA) qui peut être toxique. Lors
du ponçage, perçage et lors de la coupe de ces matériaux, des précautions supplémentaires
doivent être prises pour éviter l’inhalation et minimiser les contacts avec la peau.
IMPORTANT
• Utilisez un instrument spécifiquement conçu pour détecter la présence de raccords
électriques ou de tuyauterie dans la surface de travail ou bien adressez-vous à
votre fournisseur d’énergie local. Si le fer venait à entrer en contact avec un câble
électrique sous tension, cela pourrait entraîner un incendie ou un choc électrique pour
l’utilisateur. Tout dommage occasionné sur un tuyau d’alimentaion en gaz pourrait
être à l’origine d’une explosion. Toute conduite d’eau percée pourrait occasionner des
dommages sur votre propriété et constituer un risque de choc électrique.
• N’essayez pas d’atteindre l’éjecteur de copeaux avec vos mains. Les parties rotatives
pourraient vous blesser sérieusement.
• Il est vivement recommandé de porter un masque à poussières et d’utiliser un
système d’extraction des poussières. Les rabots électriques génèrent une quantité
importante de poussièrs et certaines essences de bois produisent des poussières
toxiques.
• N’utilisez que des fers parfaitement aiguisés. Soyez particulièrement attentif lors de la
manipulation des fers.
a) Vérifiez que la tension de l’outil indiquée sur l’étiquette apposée sur celui-ci est
compatible avec la tension de secteur.
b) Assurez-vous que tous les clous, vis, etc. ont été retirés de la surface de travail
avant de commencer à raboter. Dans le cas contraire vous risquez d’endommager les
fers du rabot, voire même de causer des accidents.
c) Veillez à retirer tous tissus, câbles, ficelles ou tous objets similaires, qui pourraient
entraver le bon fonctionnement du mécanisme du rabot.
366649_OwnerManual.indd 17366649_OwnerManual.indd 17 10/08/2021 14:4510/08/2021 14:45

18
FR
d) Vérifiez que les boulons de fixation des fers sont bien serrés avant utilisation.
e) Avant d’utiliser l’outil sur une pièce, mettez-le en marche, et laissez-le tourner
pendant quelque instants, examinez-le pour relever la présence éventuelle de vibrations
ou de jeu, qui indiquerait une mauvaise installation ou un rabot mal équilibré.
f) Laissez le rabot atteindre sa vitesse maximale avant de le mettre en contact avec
votre pièce de travail.
g) Tenez l’appareil fermement des deux mains, tenez-le correctement avant de le
mettre en marche.
h) Assurez-vous que le rabot soit placé à au moins 200 mm de vous.
i) Attendez que les lames aient atteint leur vitesse maximale avant de commencer
à couper.
j) Lors de l’utilisation sur du bois humide, les copeaux risquent de se coincer dans la
goulotte. Après avoir débranché l’outil, nettoyez les copeaux avec un bâtonnet l’appareil.
k) Arrêtez TOUJOURS l’outil et laissez les fers s’arrêter complètement avant
d’effectuer des réglages, le nettoyage ou l’entretien.
l) Lorsque le rabot n’est plus utilisé ou laissé sans surveillance, débranchez-le de sa
source d’alimentation.
m) Pour ranger le rabot, placer la base frontale contre un morceau de bois pour que les
fers ne se soient pas en contact avec quelconques surfaces.
n) Remplacez toujours les deux fers en même temps, faute de quoi vous risquez de
déséquilibrer l’appareil, en donnant lieu à des vibrations et en risquant de réduire la durée
de vie de l’appareil.
Consignes de sécurité relatives aux
outils de coupe
AVERTISSEMENT : Avant de brancher l’outil sur l’alimentation de secteur, vérifiez bien que
la tension d’alimentation soit la même que celle indiquée sur la plaque signalétique de l’outil.
Une alimentation électrique dont la tension est supérieure à celle indiquée sur l’outil risque
d’entraîner des blessures chez l’utilisateur et des dommages sur l’outil. En cas de doute, ne
branchez pas l’outil. L’utilisation d’une source de courant dont la tension est inférieure à celle
indiquée sur l’outil peut endommager le moteur
Utilisation de l’ outil de coupe approprié
• Assurez-vous que votre outil de coupe convient au travail entrepris. Référez-vous toujours
à la notice d’utilisation, ne présumez pas qu’un outil est approprié à la tâche sans faire
de vérification préalable.
Protection oculaire
• Portez toujours des protections oculaires appropriées lors de l’utilisation d’outils de coupe.
• Les lunettes ordinaires n’ont pas pour fonction de fournir une protection efficace à
l’utilisation de ce produit. Des verres normaux ne résistent pas aux impacts et
pourraient éclater.
Protection auditive
• Portez toujours des protections auditives appropriées lorsque le niveau sonore
dépasse 85 dB.
Protection respiratoire
• Assurez-vous de porter, ainsi que toute personne à proximité, un masque
antipoussière approprié.
Protection des mains
• Ne placez pas vos mains près des accessoires de coupe. Utilisez un bâton poussoir
adapté pour les petites pièces à travailler avec l’outil électroportatif adapté.
Tenez compte des personnes autour de vous
• Il relève de l’utilisateur de s’assurer que les personnes se trouvant à proximité de la
zone de travail ne soient pas exposées à des niveaux sonores dangereux ou à des
concentrations de poussières dangereuses et qu’ils disposent de protections appropriés.
Objets cachés
• Avant d’effectuer une coupe, vérifiez qu’aucun corps étranger ne se trouve dans la pièce
de travail.
• Ne coupez aucun matériau comportant des corps étrangers à moins d’être certain que
l’accessoire installé sur votre appareil convient à ce travail.
• Des fils électriques et des tuyaux peuvent être dissimulés dans les murs, des durites de
carburant peuvent être dissimulées dans les panneaux de carrosserie et l’herbe haute
peut dissimuler des pierres et du verre. Vérifiez toujours minutieusement la zone de travail
avant de commencer la coupe.
Attention aux projections de débris
• Dans certains cas, des débris peuvent être projetés de l’outil de coupe à grande vitesse.
Assurez-vous qu’aucune autre personne ne se trouve à proximité de la zone de travail.
Si la présence d’autres personnes à proximité de la zone de travail est nécessaire,
l’utilisateur a la responsabilité de s’assurer qu’elles sont munies d’équipements de
protection appropriés.
Installation d’accessoires de coupe
• Assurez-vous que les accessoires de coupe sont correctement et solidement installés
avant utilisation et que les clés ou tout autre outil de réglage ont été retirées.
• Utilisez uniquement des accessoires de coupe recommandés pour votre appareil.
• N’effectuez aucune modification sur l’accessoire.
• Assurez-vous que les lames sont aiguisées, en bon état et correctement installées.
• N’essayez pas d’affûter les lames n’étant pas prévue pour être affûtées, cela peut inclure
les lame trempées, ou les lames en alliage trempé, contenant en général du tungstène
• Les lames pouvant être réaffûtées doivent être réaffûtées en suivant les instructions du
fabricant de la lame. Cela peut inclure un nombre limité de sessions d’affûtage de
la lame.
• Les lames aiguisées devraient être inspectées de plus près avant de les utiliser et
remplacer immédiatement si vous avez un doute à propos de son état et sa compatibilité
avec la tâche.
• Si la lame rentre en contact avec un objet caché avec lequel elle n’est pas compatible
pendant l’utilisation, la lame devrait être remplacée immédiatement.
Sens d’avancée
• Faites avancer la pièce de travail vers la lame ou la fraise, et ce dans le sens inverse au
sens de la lame ou de la fraise.
Attention à la chaleur
• Sachez que les outils de coupe ainsi que les pièces de travail peuvent chauffer pendant
l’utilisation de l’appareil. Ne tentez pas de changer d’accessoire tant que l’appareil n’a pas
complètement refroidi.
Contrôle poussières/copeaux
• Ne laissez pas poussières ou copeaux de métal s’accumuler. La sciure constitue un risque
d’incendie et certains copeaux métalliques sont explosifs.
• Faites particulièrement attention lors de la coupe du bois ou du métal à l’aide de machines
électriques. Les étincelles provoquées par la coupe du métal sont une cause courante
d’incendie des poussières de bois.
• Lorsque cela est possible, utilisez un système d’extraction de la poussière pour assurer un
environnement de travail plus sûr.
Descriptif du produit
1. Poignée avant
2. Indicateur de mise sous tension
3. Gâchette marche/arrêt
4. Verrouillage de sécurité de la gâchette
5. Poignée principale
6. Semelle arrière fixe
7. Point de fixation du guide (x4)
8. Cache de la courroie
9. Levier de verrouillage de la poignée avant
10. Point de fixation du guide (x4)
11. Semelle avant mobile
12. 1Molette de réglage de la profondeur
13. 1Vis de la poignée avant
14. Cylindre de coupe
15. Fers réversibles
16. Vis de fixation (x5)
17. Clé de changement des fers
18. Tubulure d’extraction poussières/copeaux
19. Adaptateur d’extraction des poussières
20. Guide parallèle et de biseau combiné
21. Molette de fixation du guide (x2)
Usage conforme
Grand rabot électrique pour des effectuer des tâches de rabotages intensives sur bois durs
et tendres.
Déballage
• Déballez le produit avec soin. Veillez à retirer tout le matériau d’emballage et familiarisez-
vous avec toutes les caractéristiques du produit.
• Si des pièces sont endommagées ou manquantes, faites-les réparer ou remplacer avant
d’utiliser l’appareil.
Avant utilisation
ATTENTION : Assurez-vous que l’outil est éteint et débranché de la source d’alimentation
avant de procéder à la pose ou au retrait d’un accessoire, ou de réaliser toute opération de
réglage, de nettoyage ou d’entretien.
Réglage de la poignée avant
1. Sortez le levier de verrouillage de la poignée avant (9) (Image A) et positionnez la poignée
avant (1) sur une des 4 positions en fonction de la tâche à réaliser.
2. Remettez le levier dans sa position originale pour fixer la position de la poignée avant
en place.
Remarque : Si nécessaire, le mécanisme d’action du levier peut être réglé à l’aide la vis de la
poignée avant (13) (Image C).
366649_OwnerManual.indd 18366649_OwnerManual.indd 18 10/08/2021 14:4510/08/2021 14:45

19
FR
Guide parallèle et de biseau combiné
1. Assemblez le guide parallèle et de biseau combiné (20) sur la semelle en vissant les
molettes de fixation du guide (21) sur les points de fixation du guide (7 et 10) (Image D).
2. Desserrez les deux écrous papillon et sélectionnez l’angle du guide voulu pour effectuer
un rabotage en biseau (Image E).
3. Installé à angle droit par rapport à la base, le guide sert à mieux contrôler le rabotage.
Remarque : Le guide peut être placé indifféremment d’un côté comme de l’autre de
la semelle.
Remarque : Les graduations du guide sont à titre d’indication uniquement. Pour des
rabotages en biseau précis, il est nécessaire de mesurer l’angle, d’effectuer des essais, et
d’ajuster si besoin.
Extraction des copeaux
IMPORTANT : Il est vivement recommandé d’utiliser un système d’aspiration/extraction des
poussières avec cet appareil car il produit une grande quantité de poussières et de copeaux.
1. L’orifice d’extraction poussière /copeaux (18) permet de fixer un système d’aspiration/
extraction de la poussière.
2. Avec l’adaptateur (19) fourni, vous pouvez brancher un système d’extraction de la
poussière sur l’orifice (Image F).
3. Pour fixer l’adaptateur, insérez-le dans l’orifice en le faisant tourner jusqu’à ce qu’il soit
bien en position.
Réglage de la profondeur de coupe
Remarque : L’indicateur de mise sous tension (2) s’allume lorsque l’appareil est branché sur
le secteur, ce qui permet de vérifier rapidement s’il est sous tension ou pas. Cependant vérifiez
quand même au niveau de la prise avant de procéder à tout réglage ou à toute installation ou
changement de fer.
1. Faites tourner la molette de réglage de la profondeur (12) dans le sens horaire pour un
rabotage plus profond et dans le sens antihoraire pour un rabotage moins profond.
2. La molette de réglage permet d’établir la profondeur sur 8 positions prédéfinies tous les
0,25 mm, jusqu’à 2,0 mm.
3. Pour un rabotage précis, essayez d’abord sur des chutes, mesurez la différence
d’épaisseur et modifiez le réglage si nécessaire.
4. Pour vérifier la précision et la tolérance de la semelle avant mobile (11), mettez la molette
de réglage de la profondeur sur la position ’0’ de façon à ce que le réglage des fers se
fasse en fonction de la semelle arrière fixe (6) et de la semelle avant (11). Les fers et les
deux semelles doivent être de niveau lorsque la molette est sur la position ‘0’.
5. Après chaque utilisation, remettez la molette de profondeur sur la position ‘P’. Cela
protégera le fer de tout contact avec la semelle avant et de tout contact avec la surface
sur laquelle le rabot est posé.
Instructions d’utilisation
Mise en marche et arrêt
AVERTISSEMENT : Avant de brancher la machine, vérifiez toujours que la gâchette
marche/arrêt (3) et le verrouillage de sécurité (4) fonctionnent bien. Avant de mettre en
marche, vérifiez que le fer n’est pas en contact avec une surface.
1. Branchez la machine, appuyez sur le verrouillage de sécurité de la gâchette (4) (Image G)
et appuyez sur la gâchette marche/arrêt (3) (Image H).
2. Pour arrêter la machine, relâchez simplement la gâchette marche/arrêt.
3. Pour redémarrer, il est nécessaire d’appuyer simultanément sur le verrouillage de sécurité
de la gâchette (4) et sur la gâchette (3). C’est une mesure de sécurité primordiale pour
éviter d’endommager le fer ou la surface.
ATTENTION : Les fers du rabot continuent toujours de tourner pendant un bref instant après
avoir éteint le rabot. Attendez l’arrêt complet du moteur avant de reposer le rabot pour éviter
tout endommagement des fers ou de la surface.
• Si vous posez le rabot sur le côté, ne le reposez pas sur les évents d’aération pour éviter
que la poussière ou les copeaux n’aillent dans le moteur.
• Lorsque le rabot n’est pas utilisé pendant un certain temps, mettez la molette de réglage
de la profondeur sur ‘P’, pour être sûr que les deux semelles reposent sur une surface
de niveau égal.
Raboter
1. Posez à plat la semelle avant mobile (11) sur la pièce de travail sans que les fers n’y
soient en contact.
2. Mettez en marche l’appareil et attendez que les fers aient atteint leur vitesse maximale
de rotation.
3. Faites avancer doucement le rabot vers l’avant, en faisant pression sur la poignée avant
(1) au début du rabotage, puis en faisant pression sur la poignée principale (5) vers la fin
de la course de rabotage.
Remarque : Il est important de comprendre que la semelle avant mobile (11) contrôle le
degré d’exposition des fers sur le bois, ce qui nécessite d’appliquer une pression vers le bas
identique sur l’avant et l’arrière de la machine pendant l’utilisation.
4. Poussez le rabot pour le faire sortir de la pièce de travail sans l’incliner, que ce soit vers
le haut ou vers le bas.
Conseil : Faites comme si la pièce de travail était légèrement plus longue. De cette façon vous
sortirez les fers de la pièce de travail tout en conservant la même course de rabotage.
5. La vitesse et la profondeur de rabotage déterminent la qualité de finition. Pour un rabotage
grossier, vous pouvez augmenter la profondeur de coupe, par contre, pour obtenir une
bonne finition, réduisez la profondeur et l’avancée doit être plus lente.
Remarque : Lorsque le rabot est en face de vous, il est plus facile de raboter si la pièce de
travail est légèrement inclinée vers le bas à l’opposé de vous.
ATTENTION : Ce rabot est très lourd. Par conséquent il n’est ni sûr ni pratique de l’utiliser pour
effectuer un rabotage à la verticale, ni toute autre opération similaire.
ATTENTION : Déplacer la machine trop vite peut donner un rabotage de mauvaise qualité
et peut endommager les fers ou le moteur. Un rabotage trop lent peut faire apparaitre des
marques de rabotage et des brûlures.
• La vitesse de rabotage idéale dépend du type de matériau et de la profondeur de rabotage.
• Faites des essais sur des chutes pour évaluer les réglages du rabotage.
ATTENTION : Utilisez toujours vos deux mains pour tenir le rabot.
ATTENTION : Si possible, fixez la pièce de travail sur un établi.
Chanfreiner
1. Pour effectuer un chanfrein, (Fig. I), alignez la rainure en ‘V’ (Fig. II) de la semelle avant
mobile (11) avec l’arête de la pièce de travail.
2. Déplacez le rabot le long de l’arête.
Entretien
Avertissement : Pensez TOUJOURS à débrancher l’appareil avant procéder à toute
opération d’inspection, d’entretien ou de nettoyage.
• Vérifiez le câble d’alimentation de l’appareil avant chaque utilisation, à la recherche de
tout signe de dommage ou d’usure. Toute réparation doit être réalisée par un centre agréé
Triton. Ceci s’applique également pour les rallonges utilisées avec cet appareil.
• Vérifiez régulièrement que toutes les vis de fixations soient toujours bien serrées. Elles
peuvent devenir lâches au cours du temps à cause des vibrations.
Nettoyage
1. Ne laissez jamais les orifices de ventilation se boucher.
2. Éliminez toujours la poussière et les impuretés. Utilisez une brosse souple ou un chiffon
sec pour le nettoyage. Si possible, nettoyez les orifices de ventilation à l’air comprimé
propre et sec.
ATTENTION : portez des lunettes de protection lors du nettoyage.
3. Lubrifiez régulièrement les parties mobiles.
4. N’utilisez jamais de produits caustiques sur les parties en plastique.
ATTENTION : N’utilisez pas d’agents de nettoyage sur les parties en plastique de l’appareil. Il
est recommandé d’utiliser un détergent doux sur un chiffon humide. L’appareil ne doit jamais
être en contact avec de l’eau. Assurez-vous que le rabot soit complètement sec
avant utilisation.
Retrait et pose des fers du rabot
AVERTISSEMENT : Assurez-vous que les vis de fixation (16) soient parfaitement serrées
et qu’elles soient fixées en respectant le bon ordre tel qu’illustré à l’image. Le non-respect de
cette consigne pourrait occasionner de graves blessures à l’opérateur.
Votre rabot possède des fers en acier HSS réversibles. En cas d’usure de l’un des tranchants,
l’autre peut être utilisé. Si les deux tranchants sont émoussés, le fer doit être jeté.
AVERTISSEMENT : Ces fers ne peuvent pas être affûtés.
Retrait d’un fer de rabot
ATTENTION : Ces fers sont très tranchants. Faites extrêmement attention en les manipulant.
1. Utilisez la clé de changement des fers (17) pour desserrer les cinq vis de fixation (16)
(Image I).
2. Faites coïncider le cylindre de coupe (14) avec le creux situé sur le côté de manière à
pouvoir retirer les fers réversibles (15), puis, faites délicatement sortir le fer en le faisant
coulisser (Image J).
Pose d’un fer de rabot
AVERTISSEMENT : Seuls des fers en acier HSS compatibles avec ce rabot doivent être
utilisés. Le recours à des fers inadaptés ou autres qu’en acier HSS pourrait occasionner de
graves blessures à l’opérateur.
1. es fers sont réversibles et possèdent donc deux tranchants. Si l’un des tranchants est usé
ou endommagé, il est possible de simplement tourner le fer pour utiliser l’autre tranchant.
2. Faites glisser le fer, tranchant vers le haut dans le support du fer, dans le cylindre de
coupe (14).
Remarque : Si l’un des fers est usé, il peut être remplacé sans avoir à remplacer les autres.
Si plusieurs fers sont usés, ils doivent être tous changés pour éviter un rabotage irrégulier qui
peut provoquer des vibrations dangereuses et endommager l’outil.
Remarque : La strie située sur la longueur du fer doit se trouver sur la face du fer détournée
des vis de fixation (16).
Lors de la pose des fers :
1. Commencez par enlever et nettoyer les impuretés accumulées sur le cylindre de coupe
(14) et sur les fers eux-mêmes.
366649_OwnerManual.indd 19366649_OwnerManual.indd 19 10/08/2021 14:4510/08/2021 14:45

20
FR
Si mon appareil ne fonctionne pas
Problème Cause possible Solution
Pas d’alimentation
Le câble d’alimentation n’est pas branché Brancher correctement l’appareil
Le fusible ou le disjoncteur à a sauté Remplacer le fusible ou rétablir le disjoncteur
Le disjoncteur différentiel RCD a sauté Réinitialiser le disjoncteur différentiel RCD
La rallonge est en surcharge et la protection
thermique s’est déclenchée
Changer la rallonge ou la dérouler complètement,
ou réinitialiser la protection thermique
Cordon d’alimentation ou prise endommagé(e) Réparation auprès d’un centre agrée Triton
Défaillance au niveau de l’outil Réparation auprès d’un centre agréé Triton
Le moteur ne démarre pas Les balais de charbons sont usés Faire changer les balais auprès d’un
centre centre agréé Triton
Défaillance au niveau de l’outil Réparation auprès d’un centre agréé Triton
Rabotage grossier
Fer(s) usé(s) Remplacer tous les fers
Fer(s) endommagé(s) Remplacer les fers endommagés
Le bois est humide Laisser sécher le bois
Profondeur de rabotage incorrecte
Fers usés ou endommagés Remplacer les fers
Fers mal positionnés Replacer les fers correctement
Fers inaproppriés Installer des fers compatibles
Le cylindre ne tourne pas Courroie cassée Changer la courroie
Vibration ou bruits anormaux ARRÊTEZ immédiatement d’utiliser le rabot
Vérifier que toutes les pièces accessibles à l’utilisateur soient
bien fixées. En cas de défaillance, contacter
un centre agréé de réparation Triton.
2. Utilisez des fers de même dimension et de même poids, sinon le cylindre pourrait osciller
et vibrer, ce qui engendrerait un rabotage de mauvaise qualité et pourrait éventuellement
endommager l’appareil.
3. Serrez les vis de fixation (16) avec precaution en procédant en suivant l’ordre illustré sur
l’image M . À noter qu’un serrage lâche peut s’avérer extrêmement dangereux.
4. Serrez à un couple équivalent à 10 Nm ((±0,5) en veillant toutefois à ne pas
serrer excessivement.
5. Répétez cette procédure sur les deux fers restants.
6. Vérifiez régulièrement que les vis soient bien serrées.
IMPORTANT : Vérifiez toujours le serrage des vis de fixation après l’installation des fers et les
réglages. Après une courte période de travail, revérifiez que les vis soient bien serrées sur un
couple de serrage de 10 Nm (± 0,5). Ensuite faites une nouvelle vérification après une période
de travail raisonnable.
IMPORTANT : Le rabot est conçu pour que les fers soient bien alignés s’ils sont de niveau dans
les fentes du cylindre et bien serrés.
• Lorsque vous insérez de nouveaux fers, il est indispensable qu’ils soient posés d’équerre
dans leur rainure et que les tranchants soient absolument de niveau, c’est-à-dire
parallèles par rapport à la semelle arrière.
• Vous pouvez vérifier le parallélisme avec un réglet, en trois points le long de la
semelle arrière.
• Ne serrez les vis de fixation qu’une fois que les fers sont de niveau.
• Une autre vérification peut être effectuée avec la semelle avant mobile (11) en mettant
la molette de profondeur (12) sur ‘0’ et en plaçant un réglet à travers la semelle avant
mobile et la semelle arrière fixe (Image K). Cela donne également une indication de la
précision de la semelle avant.
• Blade must be positioned centrally on the drum (Image L).
ATTENTION : Si les fers ressortent ou ne sont pas positionnés d’équerre, ils peuvent entrer
en contact avec le boîtier, avec un sérieux risque de blesser l’utilisateur ou les personnes
aux alentours.
Remarque : Le rabotage sera grossier et irrégulier si les fers ne sont pas posés correctement.
Les exemples ci-dessous illustrent des réglages corrects et incorrects :
• Réglage correct : rabotage propre et lisse (Fig. III).
• Entailles dans la surface : L’un des fers, voire chacun d’eux, n’est pas parallèle avec la
semelle arrière (Fig. IV).
• Talon en début de rabotage : L’un des fers, voire chacun d’eux, ne ressort pas
suffisamment par rapport à la semelle arrière (Fig. V).
• Talon en fin de rabotage : L’un des fers, voire chacun d’eux, ressort trop par rapport à la
semelle arrière (Fig. VI).
(a) Semelle avant mobile (11) réglable par la molette de profondeur (12).
(b) Semelle arrière fixe (6).
Changer la courroie de transmission
1. Pour remplacer la courroie, retirez dans un premier temps les trois vis qui maintiennent le
cache de la courroie (8), sur le côté gauche du rabot (vu depuis l’arrière) (Image N).
Remarque : La vis sur l’avant est plus longue que les deux autres. Assurez-vous d’utiliser les
bonnes vis pour remettre le cache.
2. Enlevez la courroie usée en tirant dessus au niveau de la roue supérieure tout en faisant
tourner manuellement la roue inférieure. Utilisez une brosse souple pour nettoyer les
roues et autour.
Remarque : Portez des lunettes de protection lors du nettoyage.
3. Placez la courroie crantée sur la poulie inférieure, puis l’autre extrémité de la courroie
jusqu’à moitié. Puis faites rouler la courroie pour qu’elle se mette parfaitement en place.
4. Vérifiez manuellement que la courroie tourne de façon régulière.
5. Replacez le cache et revissez les trois vis en vous assurant de placer la vis la plus longue
dans le trou situé sur l’avant du cache.
6. Branchez la machine, et mettez-la en marche pendant une minute pour être sûr que le
moteur et la courroie fonctionnent correctement.
Remplacement les balais de charbon
• Avec le temps, les balais de charbon du moteur s’usent. Ce processus d’usure est accéléré
si la machine est surchargée ou utilisée dans des environnements poussiéreux.
• Si les balais sont excessivement usés, le rendement du moteur peut diminuer, la machine
peut ne pas démarrer ou une quantité anormale d’étincelles peut être observée.
• Si vous soupçonnez une usure des balais, faites-les remplacer dans un centre
d’entretien agréé.
Traitement des déchets
Lorsque l’appareil n’est plus en état de fonctionner et qu’il n’est pas réparable, recyclez
l’appareil conformément aux régulations nationales.
• Ne jetez pas les outils électriques, batteries et autres équipements électriques ou
électroniques (DEEE) avec les ordures ménagères.
• Contactez les autorités locales compétentes en matière de gestion des déchets pour vous
informer de la procédure à suivre pour recycler les outils électriques.
366649_OwnerManual.indd 20366649_OwnerManual.indd 20 10/08/2021 14:4510/08/2021 14:45
Strona jest ładowana ...
Strona jest ładowana ...
Strona jest ładowana ...
Strona jest ładowana ...
Strona jest ładowana ...
Strona jest ładowana ...
Strona jest ładowana ...
Strona jest ładowana ...
Strona jest ładowana ...
Strona jest ładowana ...
Strona jest ładowana ...
Strona jest ładowana ...
Strona jest ładowana ...
Strona jest ładowana ...
Strona jest ładowana ...
Strona jest ładowana ...
Strona jest ładowana ...
Strona jest ładowana ...
Strona jest ładowana ...
Strona jest ładowana ...
Strona jest ładowana ...
Strona jest ładowana ...
Strona jest ładowana ...
Strona jest ładowana ...
Strona jest ładowana ...
Strona jest ładowana ...
Strona jest ładowana ...
Strona jest ładowana ...
Strona jest ładowana ...
Strona jest ładowana ...
Strona jest ładowana ...
Strona jest ładowana ...
Strona jest ładowana ...
Strona jest ładowana ...
Strona jest ładowana ...
Strona jest ładowana ...
Strona jest ładowana ...
Strona jest ładowana ...
-
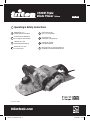 1
1
-
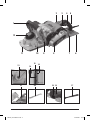 2
2
-
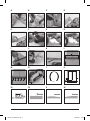 3
3
-
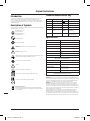 4
4
-
 5
5
-
 6
6
-
 7
7
-
 8
8
-
 9
9
-
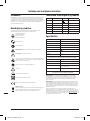 10
10
-
 11
11
-
 12
12
-
 13
13
-
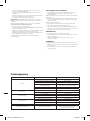 14
14
-
 15
15
-
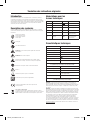 16
16
-
 17
17
-
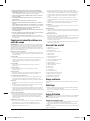 18
18
-
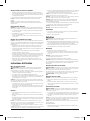 19
19
-
 20
20
-
 21
21
-
 22
22
-
 23
23
-
 24
24
-
 25
25
-
 26
26
-
 27
27
-
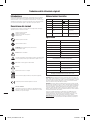 28
28
-
 29
29
-
 30
30
-
 31
31
-
 32
32
-
 33
33
-
 34
34
-
 35
35
-
 36
36
-
 37
37
-
 38
38
-
 39
39
-
 40
40
-
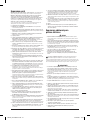 41
41
-
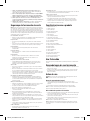 42
42
-
 43
43
-
 44
44
-
 45
45
-
 46
46
-
 47
47
-
 48
48
-
 49
49
-
 50
50
-
 51
51
-
 52
52
-
 53
53
-
 54
54
-
 55
55
-
 56
56
-
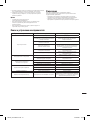 57
57
-
 58
58


Triton TPL180 Instrukcja obsługi
- Kategoria
- Elektronarzędzia
- Typ
- Instrukcja obsługi
w innych językach
- español: Triton TPL180 Manual de usuario
- italiano: Triton TPL180 Manuale utente
- Deutsch: Triton TPL180 Benutzerhandbuch
- português: Triton TPL180 Manual do usuário
- français: Triton TPL180 Manuel utilisateur
- Nederlands: Triton TPL180 Handleiding
Inne dokumenty
-
Makita N1923B Instrukcja obsługi
-
 XTline XT102750 Instrukcja obsługi
-
Sparky Group P 3180 Instrukcja obsługi
-
-
Parkside 317249 1904 Translation Of The Original Instructions
-
-
-
Parkside PEH 30 A1 ELECTRIC PLANER Instrukcja obsługi
-
-
