Parkside PEH 30 A1 ELECTRIC PLANER Instrukcja obsługi
- Typ
- Instrukcja obsługi

ELECTRIC PLANER PEH 30 A1
STRUG ELEKTRYCZNY
Wskazówki dotyczące obsługi i bezpieczeństwa
Tłumaczenie oryginalnej instrukcji obsługi
ELEKTRIČNI SKOBELJ
Navodila za upravljanje in varnostna opozorila
Prevod originalnega navodila za uporabo
ELEKTRICKÝ HOBLÍK
Pokyny pro obsluhu a bezpečnostní pokyny
Překlad originálního provozního návodu
ELEKTRICKÝ HOBLÍK
Pokyny pre obsluhu a bezpečnostné pokyny
Preklad originálneho návodu na obsluhu
ELECTRIC PLANER
Operation and Safety Notes
Translation of original operation manual
ELEKTROMOS GYALU
Kezelési és biztonsági utalások
Az originál használati utasítás fordítása
ELEKTROHOBEL
Bedienungs- und Sicherheitshinweise
Originalbetriebsanleitung
4

GB Operation and Safety Notes Page 5
PL Wskazówki dotyczące obsługi i bezpieczeństwa Strona 15
HU Kezelési és biztonsági utalások Oldal 25
SI Navodila za upravljanje in varnostna opozorila Stran 35
CZ Pokyny pro obsluhu a bezpečnostní pokyny Strana 45
SK Pokyny pre obsluhu a bezpečnostné pokyny Strana 55
DE / AT / CH Bedienungs- und Sicherheitshinweise Seite 65
Before reading, unfold both pages containing illustrations and familiarise yourself with all functions of the
device.
Przed przeczytaniem proszę rozłożyć obie strony z ilustracjami, a następnie proszę zapoznać się z
wszystkimi funkcjami urządzenia.
Olvasás előtt kattintson az ábrákat tartalmazó mindkét oldalra és végezetül ismerje meg a készülék minde-
gyik funkcióját.
Pred branjem obe strani s slikami odprite navzven in se nato seznanite z vsemi funkcijami naprave.
Před čtením si odklopte obě dvě strany s obrázky a potom se seznamte se všemi funkcemi přístroje.
Pred čítaním si odklopte obidve strany s obrázkami a potom sa oboznámte so všetkými funkciami prístroja.
Klappen Sie vor dem Lesen die beiden Seiten mit den Abbildungen aus und machen Sie sich anschließend
mit allen Funktionen des Gerätes vertraut.

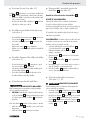
111 12 313 14 2 3
5
6
7
89
B
9 16
4
A
15
10
5 5

C
H
J
6
D
9
26
17
E
9
221817 21
19
I
G
2324 25
F
5423
45°
20
5

5 GB
Introduction
Proper use ......................................................................................................................Page 6
Features and equipment ...............................................................................................Page 6
Included items ...............................................................................................................Page 7
Technical data ...............................................................................................................Page 7
General safety advice for electrical power tools
1. Workplace safety .....................................................................................................Page 7
2.
Electrical safety .........................................................................................................Page 7
3. Personal safety ..........................................................................................................Page 8
4.
Careful handling and use of electrical power tools ...............................................Page 8
Safety advice relating specifically to power planers ..................................................Page 9
Original accessories / attachments ..............................................................................Page 10
Preparing for use
Switching On / Off ........................................................................................................Page 10
Setting the cutting depth ...............................................................................................Page 10
Vacuum extraction of dust / debris (see Fig. A) ..........................................................Page 10
Parking shoe (see Figs. B / C) .......................................................................................Page 10
The planing process ......................................................................................................Page 11
Chamfering edges (see Fig. H) ....................................................................................Page 11
Using the guide fence (see Fig. I) ................................................................................Page 11
Using the rebate depth stop (see Fig. J) ......................................................................Page 11
Replacing a planer blade .............................................................................................Page 11
Removing and installing a planer blade (see Fig. D) .................................................Page 11
Replacing a drive belt (see Figs. F + G) ......................................................................Page 12
Maintenance and cleaning .........................................................................Page 12
Service centre .......................................................................................................Page 12
Warranty ................................................................................................................... Page 12
Disposal ......................................................................................................................Page 13
Declaration of Conformity / Manufacturer..................................Page 13
Table of contents

6 GB
Electric planer PEH 30 A1
Introduction
Please make sure you familiarise your-
self fully with the way the device works
before you use it for the first time and
that you understand how to handle electrical power
tools correctly. To help you do this please read the
accompanying operating instructions. Keep these
instructions in a safe place. If you pass the device
on to anyone else, please ensure that you also
pass on all the documentation.
Proper use
The device is suitable for planing wood in the form
of beams or boards or the like if the workpiece is
held securely in a fixed position. The device is also
suitable for chamfering edges and for rebating.
Any other use or modification to the device shall be
considered as improper use and could give rise to
considerable risk of accident. The manufacturer will
not accept liability for loss or damage arising from
improper use. Not suitable for commercial use.
Features and equipment
1
Safety lock-out
2
ON / OFF switch
3
Planing debris removal port (right / left selectable)
4
Belt cover
5
Belt cover screws
6
Guide fence
7
Guide fence fixing screws
8
Fixing nut for setting rebate width
9
Sole
10
V-groove
11
Rebate depth stop fixing screw
12
Rebate depth stop
13
Rotary control for setting planing depth
14
Cutting depth scale
15
Reducer piece
16
Parking shoe
17
Blade shaft
18
Cutting element
19
Plane blade fixing screws
20
Plane blade
21
Side blade shaft guard
22
Allen key
23
Drive belt
24
Large belt wheel
25
Small belt wheel
26
Open spanner
The following pictograms are used in these operating instructions / on the device:
Read instruction manual!
n
0
Design no-load speed
Observe caution and safety notes! Safety class II
Caution – electric shock!
Danger to life!
Wear hearing protection, dust
protection mask, protective glasses
and protective gloves.
Explosive material!
Keep children away from
electrical power tools!
V
~
Volt (AC)
Check that the device, mains lead
and plug are in good condition!
W
Watts (Effective power)
Dispose packaging and appliance in
an environmentally-friendly way!
Introduction

7 GB
Included items
1 Electric planer PEH 30 A1
1 Guide fence
1 Rebate depth stop
1 Allen key
1 Open spanner
1 Reducer piece
1 Operating instructions
Technical data
Rated voltage: 230 V
~
50 Hz
Rated power: 750 W
Design no-load speed: n
0
13000 rpm
Planing depth: 0 - 3.0 mm
Planing width: 82 mm
Protection class: II /
Noise and vibration data:
Measured values for noise are determined in accor-
dance with EN 60745. The A-weighted noise level
of the electrical power tool are typically:
Sound pressure level: 88,93 dB(A)
Sound power level: 102,93 dB(A)
Uncertainty K: 3 dB
Wear ear protection!
Evaluated acceleration, typical:
Hand / arm vibration a
h
= 5,644 m / s
2
Uncertainty K = 1,5 m / s
2
WARNING!
The vibration level given in these
instructions has been measured in accordance with
a standardised measurement procedure specified
in EN 60745 and can be used to compare devices.
Different uses of the device give rise to different vibra-
tion levels and in many cases they may exceed the
values given in these instructions. It is easy to under-
estimate the vibration load if the electrical power
tool is used regularly in particular circumstances.
Note: If you wish to make an accurate assessment
of the vibration loads experienced during a particular
period of working, you should also take into account
the intervening periods of time when the device is
switched off or is running but is not actually in use.
This can result in a much lower vibration load over
the whole of the period of working.
General safety advice for
electrical power tools
WARNING!
Read all the safety advice
and instructions! Failure to observe the safety
advice and instructions may result in electric shock,
fire and / or serious injury.
Keep all the safety advice and instructions
in a safe place for future reference!
The term “electrical tool” used in the safety advice
refers to electrical tools powered by mains electricity
(by means of a mains lead) and electrical tools
powered by rechargeable batteries (without a
mains lead).
1.
Workplace safety
a) Keep your working area clean and
well lit. Untidy or poorly lit working areas
can lead to accidents.
b)
Do not work with the device
in potentially explosive envi-
ronments in which there are
inflammable liquids, gases or dusts.
Electrical power tools create sparks, which can
ignite dusts or fumes.
c)
Keep children and other
people away while you are
operating the electrical tool.
Distractions can cause you to lose control of
the device.
2.
Electrical safety
a)
The mains plug on the device must match
the mains socket. The plug must not
be modified in any way. Do not use
an adapter plug with devices fitted
with a protective earth. Unmodified
Introduction / General safety advice for electrical power tools

8 GB
plugs and matching sockets reduce the risk of
electric shock.
b) Avoid touching earthed surfaces such
as pipes, radiators, ovens and refrig-
erators with any part of your body.
There is an increased risk of electric shock if
your body is earthed.
c) Keep the device away from rain or
moisture. Water entering an electrical device
increases the risk of electric shock.
d)
Do not use the mains lead for
any purpose for which it was
not intended, e.g. to carry the
device, to hang up the device or to pull
the mains plug out of the mains socket.
Keep the mains lead away from heat,
oil, sharp edges or moving parts of
the device. Damaged or tangled mains
leads increase the risk of electric shock.
e) When working outdoors with an
electrical power tool always use ex-
tension cables that are also approved
for use outdoors. The use of an extension
cable suitable for outdoor use reduces the risk
of electric shock.
f) Use a residual current device (RCD)
for protection if operating the electri-
cal power tool in a moist environment
is unavoidable. The use of an RCD reduces
the risk of electric shock.
3. Personal safety
a) Remain alert at all times, watch what
you are doing and always proceed
with caution. Do not use the device if
you are tired or under the influence of
drugs, alcohol or medication. One mo
ment
of carelessness when using the device can lead
to serious injury.
b)
Wear personal protective
equipment and always wear
safety glasses. The wearing of
personal protective equipment such as dust
masks, non-slip safety shoes, safety helmets or
ear protectors, appropriate to the type of elec-
trical power tool used and work undertaken,
reduces the risk of injury.
c) Avoid unintentional operation of the
device. Check that the electrical power
tool is switched off before you connect
it to the mains, pick it up or carry it.
Accidents can happen if you carry the device
with your finger on the ON / OFF switch or with
the device switched on.
d) Remove any setting tools or spanners
before you switch the device on. A tool
or spanner left attached to a rotating part of a
device can lead to injury.
e) Avoid placing your body in an unnat-
ural position. Keep proper footing
and balance at all times. By doing this
you will be in a better position to control the
device in unforeseen circumstances.
f) Wear suitable clothing. Do not wear
loose clothing or jewellery. Keep your
hair, clothing and gloves clear of mov-
ing parts. Loose clothing, jewellery or long
hair can become trapped in moving parts.
g) If vacuum dust extraction and collection
devices are fitted do not forget to
check
that they are properly connected and
correctly used. The use of these devices
reduces the hazard presented by dust.
4.
Careful handling and use
of electrical power tools
a) Do not overload the device. Always
use an electrical power tool that is
intended for the task you are under-
taking. By using the right electrical power
tool for the job you will work more safely and
achieve a better result.
b) Do not use an electrical power tool if
its switch is defective. An electrical power
tool that can no longer be switched on and off
is dangerous and must be repaired.
c) Pull the mains plug from the socket
before you make any adjustments to
the device, change accessories or when
the device is put away. This precaution is
General safety advice for electrical power tools

9 GB
intended to prevent you from unintentionally
starting the device.
d) When not in use always ensure that
electrical power tools are kept out of
reach of children. Do not let anyone use
the device if he or she is not familiar
with it or has not read the instructions
and advice. Electrical power tools are dan-
gerous when they are used by inexperienced
people.
e)
Look after the device carefully. Check
that moving parts are working prop-
erly and move freely. Check for any
parts that are broken or damaged
enough to detrimentally affect the
functioning of the device. Have dam-
aged parts repaired before you use
the device. Many accidents have their origins
in poorly maintained electrical power tools.
f) Keep cutting tools clean and sharp.
Carefully maintained cutting tools with sharp
cutting edges are less likely to jam and are
easier to control.
g) Use the electrical power tool, accesso-
ries, inserted tools etc. in accordance
with these instructions and advice, and
the stipulations drawn up for this par-
ticular type of device. In doing this, take
into account the working conditions
and the task in hand. The use of electrical
power tools for purposes other than those in-
tended can lead to dangerous situations.
Safety advice relating
specifically to power
planers
Wait until the blade shaft
17
has com-
pletely stopped moving before you
put the device down. An exposed blade
shaft may catch on the surface and lead to loss
of control or serious injury.
Do not place your fingers in the planer
debris removal port
3
. Danger of injury
from rotating parts.
Always switch on the device before
placing it against the workpiece. Oth-
erwise the device could kick back if the planer
blade gets snagged in the workpiece.
When working always keep the sole
9
flat against the workpiece. Otherwise
you could be injured if the plane tilts.
Never plane over metal objects. Other-
wise the planer blade / blade shaft
17
could
be damaged.
Secure the workpiece. Use clamps or a
vice to grip the workpiece firmly. This is much
safer than holding it with your hand.
Do not plane materials containing
asbestos. Asbestos is a known carcinogen.
The dust generated while
planing could be hazardous
to health, inflammable or
explosive. Wear a dust mask and use a suit-
able dust / debris vacuum extraction device.
Some dusts are known carcinogens.
When planing wood for long periods
and in particular when working on
materials that give rise to dusts that
are hazardous to health, the planer
must be connected to a suitable exter-
nal dust extraction device.
Do not use the power planer if its
mains lead is damaged. Damaged mains
leads increase the risk of electric shock.
Never support yourself by placing
your hands near or in front of the
device or on the workpiece surface.
If you slip you could be injured.
If a dangerous situation arises, pull
the mains plug immediately out of the
mains socket.
When taking a break from your
work, before carrying out any tasks
on the device itself (e.g. changing the
plane blade) or when you are not us-
ing the device, always pull the mains
plug out of the mains socket.
Always work with the mains lead lead-
ing away from the rear of the device.
Use sharp planer blades only.
Do not soak the materials or the sur-
face you are about to work on with
liquids containing solvents.
Avoid contact with rotating parts.
General safety advice for electrical power tools

10 GB
Never use the device for a purpose
for which it was not intended or with
non-original parts / accessories.
Hold the device securely when work-
ing. Ensure that you are standing in a stable,
well-balanced position.
Always keep the device clean, dry
and free from oil or grease.
O
riginal accessories / attachments
Use only the accessories and attach-
ments detailed in the operating instruc-
tions. The use of attachments or accessories
other than those recommended here could
lead to you suffering an injury.
Preparing for use
Switching On / Off
Switching on:
First press the safety lock-out
1
.
Then press and keep pressed the ON / OFF
switch
2
.
Switching off:
Release the ON / OFF switch
2
.
Note: For safety reasons the ON / OFF switch
2
cannot be locked in the ON position.
Setting the cutting depth
The rotary control
13
can be used to set the cutting
depth in steps from 0 – 3.0 mm according to the
cutting depth scale
14
.
Vacuum extraction of dust /
debris (see Fig. A)
WARNING!
DANGER OF INJURY!
Before you carry out any work on the device always
pull the mains plug out of the mains socket.
Planing debris removal port (right / left
selectable):
Release the planing debris removal port
3
by
turning it against the direction of the arrow (out
of the “Lock” position).
Pull the planing debris removal port
3
out of
the device.
The planing debris removal port
3
can be set
to face left or right in the planer.
Push the planing debris removal port
3
into
the device.
Lock the planing debris removal port
3
by
turning it into the “Lock” position.
External vacuum extraction:
If necessary fit the reducer piece
15
when using
a dust extraction system, e.g. a workshop dust
extraction system.
The vacuum cleaner / dust extraction device used
must be suitable for the material being planed.
Connection:
Place the reducer piece
15
firmly on to the
planing debris removal port
3
.
Push the hose of a suitable dust extraction device
approved for that purpose (e.g. a workshop
vacuum cleaner) on to the planing debris remov-
al port
3
or the reducer piece
15
.
Removal:
Pull the hose of the dust extraction device off
the planing debris removal port
3
or off the
reducer piece
15
.
Pull off the reducer piece
15
, if fitted.
Parking shoe (see Figs. B / C)
The parking shoe
16
allows you to lay the device
down without the risk of damaging the workpiece.
When planing, the parking shoe
16
swings up and
exposes the rear part of the sole
9
.
General safety advice for electrical power tools / Preparing for use

11 GB
The planing process
CAUTION! DANGER OF KICKBACK!
Always switch on the device before placing it
against the workpiece.
Set the required cutting depth.
Switch on the device.
Always place the front part of the sole
9
down
first on to the workpiece.
Guide the device with even forward movement
over the surface being planed.
Move the device forward at a slow rate and
ensure that the contact pressure acts evenly on
the sole
9
. Moving forward at too great a rate
results in a poorer surface quality and can lead
to blocking of the planing debris removal port.
Chamfering edges (see Fig. H)
The V-grooves
10
in the front sole
9
allow the de-
vice to be used for simple chamfering of workpiece
edges.
Use the V-groove most appropriate to your
desired chamfer width.
Place the planer with the V-groove
10
on the
workpiece edge and guide the planer along
the edge.
Using the guide fence (see Fig. I)
Attach the guide fence
6
to the device with
the fixing screw
7
.
Release the fixing nut
8
and set the guide at
the desired distance.
Retighten the fixing nut
8
.
Exert some slight sideways pressure when guid-
ing the planer with the guide fence.
Using the rebate depth stop
(see Fig. J)
Attach the rebate depth stop
12
to the device
with the fixing screw
11
.
Set the desired rebate depth with the rebate
depth stop
12
.
Make the required number of passes with the
planer until desired rebate depth is achieved.
Replacing a planer blade
WARNING!
DANGER OF INJURY!
Before you carry out any work on the device al-
ways pull the mains plug out of the mains socket.
CAUTION! The sharp cutting edges of the
planer blade
20
present an injury hazard!
Never touch the cutting edges of the planer
blade
20
.
The planer blade
20
has two cutting edges and it
can be fitted either way around.
Replace the planer blade
20
when both cutting
edges are blunt.
Do not resharpen the planer blades
20
.
Removing and installing a
planer blade
20
(see Fig. D)
Reversing or replacing a planer blade
20
IMPORTANT INFORMATION:
Do not release the two Allen keys. They are used to
adjust the height of the blade shaft.
Adjustment is necessary only if you wish to use a
different planer blade type e.g. a profiled blade.
Always replace both blades at the same time to
avoid out of balance forces.
NOTE: If you only release one blade first then you
can use the factory-fitted second blade for orientation
when you fit the new blade.
1. Release the 3 bolts of the cutting element
18
using the supplied open spanner
26
.
Press the removable side guard into the slot in
the housing.
2. Push the cutting element
18
sideways out from
the blade shaft
17
.
3. Push the planer blade
20
sideways out from
the cutting element
18
.
4. Reassembly is carried out in the reverse order
with a reversed or new planer blade.
Preparing for use

12 GB
5.
Planer blades
20
can be obtained from the service
address indicated (see section about warranty).
Replacing a drive belt
(see Figs. F + G)
WARNING!
DANGER OF INJURY!
Before you carry out any work on the device always
pull the mains plug out of the mains socket.
Release the screws
5
and remove the belt
cover
4
.
Remove the worn drive belt
23
.
First place the new drive belt
23
on to the small
belt wheel
25
and then pull the drive belt
23
on to the large belt wheel
24
by rotating it.
Put the belt cover
4
back into position and
fasten it into place with the screws
5
.
Maintenance and cleaning
WARNING!
DANGER OF INJURY!
Before you carry out any work on the device al-
ways pull the mains plug out of the mains socket.
Always keep the device and the ventilation
slots clean. This way you will work more safely
and produce better results.
Clean out the planing debris removal port
3
regularly.
Clean out a blocked planing debris removal
port using suitable means (e.g. piece of wood,
air under pressure, etc.).
Use a dry cloth to clean the housing.
Remove any adhering planing dust with a nar-
row paint brush.
In no circumstances use sharp objects, or petrol,
solvents or cleaning agents that might attack
plastic. Do not allow any liquids to enter the
inside of the device.
Service centre
WARNING!
Have your device repaire
d
only by qualified specialist personnel
using original manufacturer parts
only. This will ensure that your device remains
safe to use.
WARNING!
If the plug or mains lead
needs to be replaced, always have
the replacement carried out by the
manufacturer or its service centre. This
will ensure that your device remains safe to use.
Warranty
The warranty for this appliance is for 3
years from the date of purchase. The ap-
pliance has been manufactured with care
and meticulously examined before deliv-
ery. Please retain your receipt as proof
of purchase. In the event of a warranty
claim, please make contact by telephone
with our Service Department. Only in this
way can a post-free despatch for your
goods be assured.
The warranty covers only claims for material and
maufacturing defects, but not for transport damage,
for wearing parts or for damage to fragile compo-
nents, e.g. buttons or batteries. This product is for
private use only and is not intended for commercial
use.
The warranty is void in the case of abusive and im-
proper handling, use of force and internal tamper-
ing not carried out by our authorized service branch.
Your statutory rights are not restricted in any way
by this warranty.
The warranty period will not be extended by repairs
made unter warranty. This applies also to replaced
and repaired parts. Any damage and defects extant
on purchase must be reported immediately after
unpacking the appliance, at the latest, two days after
the purchase date. Repairs made after the expiration
of the warranty period are subject to payment.
GB
DES UK LTD
Tel.: 0871 5000 700 (£ 0.10 / minute)
e-mail: [email protected]
Preparing for use / Maintenance and cleaning / Service centre / Warranty

13 GB
Disposal
The packaging is wholly composed of
environmentally-friendly materials that can
be disposed of at a local recycling centre.
Do not dispose of electrical power
tools with the household rubbish!
In accordance with European Directive
2002 / 96 / EC (covering waste electrical and elec-
tronic equipment) and its transposition into national
legislation, worn out electrical power tools must be
collected separately and taken for environmentally
compatible recycling.
Contact your local refuse disposal authority for
more details of how to dispose of your worn out
electrical devices.
Declaration of Conformity /
Manufacturer
We, Kompernaß GmbH, the person responsible for
documents: Mr Felix Becker, Burgstr. 21, D-44867
Bochum, Germany, hereby declare that this product
complies with the following standards, normative
documents and EU directives:
Machinery Directive
(2006 / 42 / EC)
EU Low Voltage Directive
(2006 / 95 / EC)
Electromagnetic Compatibility
(2004 / 108 / EC)
Applicable harmonized standards
EN 60745-1:2009
EN 60745-2-14:2009
EN 55014-1:2006
EN 55014-2/A2:2008
EN 61000-3-2:2006
EN 61000-3-3:2008
IEC 60745-1/A2:2003
IEC 60745-2-14:2003
Type / Device description:
Electric planer PEH 30 A1
Date of manufacture (DOM): 10 - 2010
Serial number: IAN 56292
Bochum, 31.10.2010
Hans Kompernaß
- Managing Director -
We reserve the right to make technical modifica-
tions in the course of further development.
Disposal / Declaration of Conformity / Manufacturer

14

15 PL
Spis zawartości
Wstęp
Użytkowanie zgodne z przeznaczeniem ....................................................................Strona 16
Wyposażenie ...............................................................................................................Strona 16
Zakres dostawy .............................................................................................................Strona 17
Dane techniczne ...........................................................................................................Strona 17
Ogólne wskazówki bezpieczeństwa dla
elektronarzędzi
1. Bezpieczeństwo miejsca pracy ................................................................................Strona 17
2.
Bezpieczeństwo elektryczne ....................................................................................Strona 18
3. Bezpieczeństwo osób ..............................................................................................Strona 18
4.
Staranne obchodzenie się i użytkowanie narzędzi elektrycznych........................Strona 19
Specyficzne wskazówki bezpieczeństwa odnoszące się ostruga elektrycznego ...Strona 19
Oryginalne wyposażenie / przyrządy dodatkowe ....................................................Strona 20
Uruchomienie
Włączanie / wyłączanie ...............................................................................................Strona 20
Ustawianie głębokości strugania .................................................................................Strona 20
Wyciąg wiórów / pyłów (patrz rys. A) ........................................................................Strona 21
Podstawka do odstawiania (Rys. B / C) ......................................................................Strona 21
Proces strugania ............................................................................................................Strona 21
Fazowanie krawędzi (patrz rys. H) .............................................................................Strona 21
Użycie prowadnicy równoległej (patrz rys. I) .............................................................Strona 21
Użycie ogranicznika głębokości wręgu (patrz rys. J) .................................................Strona 21
Wymiana noży strugarskich .........................................................................................Strona 22
Wyjmowanie / zakładanie noży strugarskich (Rys. D) ...............................................Strona 22
Wymiana paska napędowego (patrz rys. F + G) ......................................................Strona 22
Konserwacja i czyszczenie.........................................................................Strona 22
Serwis ..........................................................................................................................Strona 23
Gwarancja ...............................................................................................................Strona 23
Utylizacja ..................................................................................................................Strona 23
Deklaracja zgodności / Producent .......................................................Strona 24

16 PL
Wstęp
Strug elektryczny PEH 30 A1
Wstęp
Przed pierwszym uruchomieniem należy
zapoznać się z działaniem urządzenia
i nauczyć się właściwego obchodzenia
się z elektronarzędziami. W tym celu należy prze-
czytać poniższą instrukcję. Instrukcję należy starannie
przechowywać. W razie przekazania urządzenia
osobom trzecim należy dać również niniejszą in-
strukcję obsługi.
Użytkowanie zgodne z
przeznaczeniem
Urządzenie jest przeznaczone do strugania mate-
riałów drzewnych jak belki lub deski po ich uprzed-
nim nieruchomym zamocowaniu. Ponadto nadaje
się ono do fazowania krawędzi oraz wykonywania
wręgów. Każde inne zastosowanie urządzenia lub
przeprowadzenie w nim zmian jest uznawane za
niezgodne z przeznaczeniem i kryje w sobie po-
ważne zagrożenie nieszczęśliwym wypadkiem. Za
szkody powstałe wskutek niezgodnego z przezna-
czeniem użytkowania producent nie ponosi żadnej
odpowiedzialności. Urządzenie nie jest przezna-
czone do użytku zawodowego.
Wyposażenie
1
Blokada włączenia
2
Włącznik / Wyłącznik
3
Wyrzutnik wiórów (do wyboru w prawo / w lewo)
4
Osłona paska
5
Śruby osłony paska
6
Prowadnica równoległa
7
Śruba mocująca prowadnicy równoległej
8
Nakrętka ustalająca do ustawiania szerokości
wręgu
9
Płoza struga
10
Rowek V
11
Śruba mocująca dla ogranicznika głębokości
wręgu
12
Ogranicznik głębokości wręgu
13
Pokrętło regulacyjne głębokości strugania
14
Podziałka głębokości strugania
15
Redukcja
16
Podstawka do odstawiania
17
Wałek nożowy
18
Element mocujący
W niniejszej instrukcji obsługi urządzenia zastosowano następujące piktogramy:
Przeczytaj instrukcję obsługi!
n
0
Wymiarowa liczba obrotów
biegu luzem
Przestrzegaj wskazówek
ostrzegawczych i bezpieczeństwa!
Klasa bezpieczeństwa II
Ostrzeżenie przed porażeniem prądem
elektrycznym! Zagrożenie dla życia!
Zakładać okulary ochronne, ochronniki
słuchu, maskę przeciwpyłową i rękawice
ochronne.
Niebezpieczeństwo wybuchu!
Dzieci trzymać z daleka od narzędzia
elektrycznego!
V
~
Volt (Napięcie przemienne)
Zwracać uwagę na nienaruszony stan
urządzenia, kabla sieciowego oraz
wtyczki sieciowej!
W
Watt (Moc skuteczna)
Opakowanie i urządzenie przekaż
do utylizacji zgodnie z przepisami o
ochronie środowiska!

17 PL
Wstęp / Ogólne wskazówki bezpieczeństwa dla elektronarzędzi
19
Śruby mocujące noży strugarskich
20
Noże strugarskie
21
Boczna osłona wałka nożowego
22
Klucz imbusowy sześciokątny
23
Pasek napędowy
24
Duże koło pasowe
25
Małe koło pasowe
26
Klucz maszynowy płaski
Zakres dostawy
1 Strug elektryczny PEH 30 A1
1 Prowadnica równoległa
1 Ogranicznik głębokości wręgu
1 Klucz imbusowy sześciokątny
1 Klucz maszynowy płaski
1 Redukcja
1 Instrukcja obsługi
Dane techniczne
Napięcie nominalne 230 V
~
50 Hz
Moc nominalna 750 W
Liczba obrotów biegu
jałowego 13000 obr. / min
Głębokość strugania 0 - 3,0 mm
Szerokość strugania 82 mm
Klasa ochrony II /
Informacje dotyczące hałasu i wibracji:
Wartość pomiarowa hałasu wyznaczona zgodnie
z EN 60745. Poziom hałasu elektronarzędzia wg
oceny A wynosi typowo:
Poziom ciśnienia hałasu: 88,93 dB(A)
Pozom mocy hałasu: 102,93 dB(A)
Niepewność pomiaru K: 3 dB
Zakładać ochronniki słuchu!
Określone przyśpieszenie, typowe:
Przenoszenie wibracji a
h
= 5,644 m / s
2
Niepewność K = 1,5 m / s
2
OSTRZEŻENIE!
Podany w niniejszych instruk-
cjach poziom drgań wyznaczony został za pomocą
metody pomiarowej określonej w normie EN 60745 i
może zostać użyty do porównania urządzeń.
Poziom wibracji będzie się różnił w zależności od
zastosowania elektronarzędzia i w niektórych
przypadkach może przekroczyć wartość podaną
w niniejszej instrukcji. Obciążenie drganiami może
być mniej uciążliwe, jeśli elektronarzędzie będzie
regularnie trzymane w ten sposób.
Wskazówka: Celem dokładnego oszacowania
obciążenia wibracjami w okresie określonego okresu
czasu pracy należy uwzględnić również te okresy, w
których urządzenie jest wyłączone lub wprawdzie
jest włączone, ale w rzeczywistości nie pracuje.
Może to przyczynić się do znacznej redukcji ob-
ciążenia wibracjami w całym okresie czasu pracy.
Ogólne wskazówki
bezpieczeństwa dla
elektronarzędzi
OSTRZEŻENIE!
Przeczytaj wszystkie
wskazówki dotyczące bezpieczeństwa
oraz instrukcje! Zaniedbania w przestrzeganiu
wskazówek dotyczących bezpieczeństwa oraz w
przestrzeganiu instrukcji mogą spowodować pora-
żenie prądem elektrycznym, pożar i / lub ciężkie
obrażenia ciała.
Przechowuj na przyszłość wszystkie
wskazówki dotyczące bezpieczeństwa
oraz instrukcje!
Używany we wskazówkach dotyczących bezpie-
czeństwa termin „narzędzie elektryczne“ odnosi
się do narzędzi elektrycznych zasilanych z sieci (z
kablem sieciowym) oraz do narzędzi elektrycznych
zasilanych
z akumulatorów (bez kabla sieciowego).
1.
Bezpieczeństwo miejsca pracy
a) Utrzymywać stanowisko pracy w czy-
stości i dobrze oświetlone. Niepor ządek
i nieoświetlone obszary robocze mogą prowa-
dzić do wypadków.

18 PL
Ogólne wskazówki bezpieczeństwa dla elektronarzędzi
b) Nie pracuj przy użyciu urzą-
dzenia w otoczeniu zagrożo-
nym eksplozją, w którym
znajdują się palne ciecze, gazy lub
pyły. Urządzenia elektryczne wytwarzają
iskry, które mogą zapalić pył lub pary.
c)
Podczas użytkowania urzą-
dzenia elektrycznego trzymaj
dzieci i inne osoby z daleka
od urządzenia. Przy odchyleniu możesz
stracić kontrolę nad urządzeniem.
2.
Bezpieczeństwo elektryczne
a) Wtyk sieciowy urządzenia musi
pasować do wtykowego gniazdka
sieciowego. W żaden sposób nie wol-
no zmieniać wtyku sieciowego urzą-
dzenia. Nie używaj żadnych wtyków
adapterowych razem z urządzeniami
wyposażonymi w uziemienie ochron
ne.
Niezmienione wtyki sieciowe i pasujące wtykowe
gniazdka sieciowe zmniejszają ryzyko poraże-
nia prądem elektrycznym.
b) Unikaj kontaktu fizycznego z powier-
zchniami uziemionymi takimi jak
powierzchnie rur, grzejników, kuchni
elektrycznych i lodówek. Istnieje podwyż-
szone niebezpieczeństwo porażenia prądem
elektrycznym, gdy twoje ciało jest uziemione.
c) Trzymaj urządzenie z daleka od desz-
czu i wilgoci. Wniknięcie wody do urządzenia
elektrycznego zwiększa ryzyko porażenia prą-
dem elektrycznym.
d)
Nie używaj kabla sieciowego w
sposób sprzeczny z jego prze-
znaczeniem, tj. do noszenia
urządzenia, zawieszania urzą dzenie
lub do wyciągania wtyku sieciowego
z wtykowego gniazdka sieciowego.
Trzymaj kabel z daleka od gorąca,
oleju, ostrych krawędzi lub porusza-
jących się części urządzeń. Uszkodzone
lub poplątane kable zwiększają ryzyko pora-
żenia prądem elektrycznym.
e)
Gdy pracujesz z urządzeniem elektrycz-
nym na dworze używaj wyłącznie
przedłużaczy, które są dopuszczone
również do pracy na dworze. Użycie
przedłużacza przystosowanego do stosowania
na dworze zmniejsza ryzyko porażenia prądem
elektrycznym.
f) Jeśli praca elektronarzędzia w otocze-
niu wilgotnym jest nie do uniknięcia,
należy zastosować wyłącznik prądu
uszkodzeniowego. Zastosowanie wyłącz-
nika prądu uszkodzeniowego zapobiega nie-
bezpieczeństwu porażenia prądem elektrycz
nym.
3. Bezpieczeństwo osób
a) Bądź stale uważny, zwracaj uwagę
na to co robisz i postępuj rozsądnie w
trakcie pracy z narzędziem elektrycz-
nym. Nie używaj narzędzia, gdy jesteś
zmęczony lub znajdujesz się pod
wpływem narkotyków, alkoholu lub
lekarstw. Chwila nieuwagi przy użytkowaniu
urządzenia może prowadzić do poważnych
obrażeń ciała.
b)
Noś osobiste wyposażenie
ochronne i zawsze okulary
ochronne. Noszenie osobistego
wyposażenia ochronnego takiego jak maska
przeciwpyłowa, buty antypoślizgowe, kask
ochronny lub ochrona słuchu stosownie do
sposobu użytkowania narzędzia elektrycznego
zmniejsza ryzyko obrażeń ciała.
c) Unikaj niezamierzonego uruchomienia.
Upewnij się, że narzędzie elektryczne
jest wyłączone zanim podłączysz je
do zasilania prądowego, uchwycisz je
lub będziesz je przenosił. Jeżeli podczas
przenoszenia urządzenia będziesz trzymał
palec na przełączniku WŁĄCZ. / WYŁĄCZ.
lub jeżeli urządzenie jest włączone, to może
to prowadzić do nieszczęśliwych wypadków.
d) Usuń narzędzia do nastawiania urzą-
dzenia lub klucze płaskie zanim włą-
czysz urządzenie. Narzędzie lub klucz,
który znajduje się w obracającej się części
urządzenia może prowadzić do obrażeń ciała.
e) Unikaj nienormalnej postawy ciała.
Zadbaj o pewne stanowisko i w każdej

19 PL
Ogólne wskazówki bezpieczeństwa dla elektronarzędzi
chwili utrzymuj równowagę. Dzięki temu
będziesz mógł lepiej kontrolować urządzenie,
zwłaszcza w nieoczekiwanych sytuacjach.
f) Noś odpowiednią odzież. Nie noś ob-
szernej odzieży ani biżuterii. Trzymaj
włosy, odzież i rękawice z daleka od
poruszających się części. Luźna odzież,
biżuteria lub długie włosy mogą zostać uchwy-
cone przez poruszające się części.
g) Jeżeli zostaną zamontowane urzą-
dzenia do odsysania i wychwytywania
pyłu, to upewnij się, że są one podłą-
czone i że będą prawidłowo używane.
Używanie tych urządzeń zmniejsza zagrożenie
wywoływane pyłem.
4.
Staranne obchodzenie
się i użytkowanie narzędzi
elektrycznych
a) Nie przeciążaj urządzenia. Używaj
do swojej pracy przeznaczonego do
niej narzędzia elektrycznego. Za pomo-
cą odpowiedniego narzędzia elektrycznego
pracujesz lepiej i bezpieczniej w danym zakre-
sie robót.
b) Nie używaj żadnego narzędzia elek-
trycznego, którego przełącznik jest
uszkodzony. Narzędzie elektryczne, które
nie daje się już więcej włączyć lub wyłączyć,
jest niebezpieczne i musi zostać naprawione.
c) Zanim przeprowadzisz nastawy urzą-
dzenia, wymienisz części osprzętu lub
odłożysz urządzenie wyciągnij wtycz-
kę sieciową z sieciowego gniazdka
wtykowego. Ten środek ostrożności zapo-
biega niezamierzonemu startowi urządzenia.
d) Przechowuj nieużywane narzędzia
elektryczne poza zasięgiem dzieci. Nie
pozwól na użytkowanie urządzenia
osobom, które nie są z nim obznajo-
mione lub nie przeczytały niniejszych
instrukcji. Narzędzia elektryczne są niebez-
pieczne, gdy są używane przez osoby niedo-
świadczone.
e) Pielęgnuj starannie urządzenie.
Sprawdź, czy ruchome części urzą-
dzenia funkcjonują nienagannie i nie
zakleszczają się, czy części urządzenia
nie są złamane lub uszkodzone w ta-
kim stopniu, że funkcjonowanie urzą-
dzenia jest uszczuplone. Zleć naprawę
uszkodzonych części przed użyciem
urządzenia. Przyczyną wielu wypadków są
źle konserwowane narzędzia elektryczne.
f) Utrzymuj narzędzia tnące w stanie
ostrym i czystym. Starannie pielęgnowane
narzędzia tnące o ostrych krawędziach tną-
cych mniej zakleszczają się i dają się łatwiej
prowadzić.
g) Używaj narzędzia elektrycznego,
osprzętu, narzędzi wymiennych itp.
odpowiednio do niniejszych instrukcji
i w taki sposób, jaki jest zalecany dla
tego specjalnego typu urządzenia.
Uwzględniaj przy tym warunki robo-
cze i wykonywane czynności. Użycie
narzędzi elektrycznych do innych zastosowań
niż to przewidziano może prowadzić do nie-
bezpiecznych sytuacji.
Specyficzne wskazówki
bezpieczeństwa odnoszące
się ostruga elektrycznego
Urządzenie można odkładać dopiero
po zatrzymaniu się wałka nożowego
17
. Odsłonięty wałek nożowy może zahaczyć
o powierzchnie i doprowadzić do utraty kon-
troli nad urządzeniem, jak również do ciężkich
obrażeń ciała.
Nie należy wkładać palców do wyrzut-
nika wiórów
3
. Istnieje niebezpieczeństwo
skaleczenia przez wirujące części.
Urządzenie można przykładać do
przedmiotu obrabianego tylko w sta-
nie włączonym. W przeciwnym razie istnieje
niebezpieczeństwo odrzutu spowodowane za-
czepieniem noża strugarskiego o obrabiany
przedmiot.
Podczas pracy płoza struga
9
winna
przylegać płasko. W przeciwnym razie ist-
nieje niebezpieczeństwo powstania obrażeń
na skutek zakleszczenia się struga.

20 PL
Ogólne wskazówki bezpieczeństwa dla elektronarzędzi / Uruchomienie
Nie należy nigdy strugać na przedmio-
tach metalowych. W ten sposób można
uszkodzić nóż strugarski / wałek nożowy
17
.
Unieruchomić obrabiany przedmiot.
Należy użyć urządzeń mocujących / imadła,
aby zamocować obrabiany przedmiot. W ten
sposób jest on pewniej utrzymywany niż ręką.
Nie wolno strugać materiałów zawie-
rających azbest. Azbest uważany jest jako
materiał powodujący zachorowanie na raka.
Pyły powstające w czasie
obróbki mogą być szkodliwe
dla zdrowia, palne lub wybu-
chowe. Zakładać maskę chroniącą przed pyłem
oraz używać odpowiedni wyciąg do pyłów /
wiórów; niektóre pyły uważane są jako powo-
dujące zachorowanie na raka.
W przypadku obróbki przez dłuższy
okres czasu drewna i innych materia-
łów, których pyły są szkodliwe dla
zdrowia należy podłączyć urządzenie
do odpowiedniej zewnętrznej instala-
cji wyciągowej.
Nie należy używać struga elektrycz-
nego, gdy kabel zasilający jest uszko-
dzony. Niesprawne kable zwiększają ryzyko
porażenia prądem elektrycznym.
W żadnym wypadku nie należy opie-
rać rąk obok lub przed urządzeniem
lub na obrabianej powierzchni. Istnieje
niebezpieczeństwo powstania obrażeń na skutek
obsunięcia.
W razie niebezpieczeństwa natychm
iast
wyciągnąć wtyczkę kabla zasilającego
z gniazdka sieciowego.
Wyciągać wtyczkę kabla zasilającego
z gniazdka sieciowego w razie nie-
bezpieczeństwa, na okres przerw w
pracy, jeśli urządzenie nie jest używa-
ne oraz przed przystąpieniem do ja-
kichkolwiek prac na urządzeniu (np.
wymiana noży strugarskich).
Kabel zasilający należy zawsze
prowadzić z tyłu urządzenia.
Używać tylko naostrzonych noży
strugarskich.
Nie należy nasączać materiałów lub
obrabianych powierzchni płynami
zawierającymi rozpuszczalniki.
Unikać dotykania wirujących części.
Nie należy nigdy używać urządzenia
niezgodnie z przeznaczeniem, stoso-
wać tylko oryginalne części zamienne /
wyposażenie.
Trzymać mocno urządzenie w czasie
pracy. Dbać o pewną postawę.
Urządzenie winno być zawsze czyste,
suche i nie może być zanieczyszczone
olejem i smarami.
Oryginalne wyposażenie /
przyrządy dodatkowe
Należy stosować tylko wyposażenie i
przyrządy dodatkowe wymienione w
instrukcji obsługi. Użycie innych części lub
wyposażenia niż te, które są zalecane, może
oznaczać niebezpieczeństwo powstania obra
żeń.
Uruchomienie
Włączanie / wyłączanie
Włączanie:
Nacisnąć najpierw blokadę włączenia
1
.
Nacisnąć i przytrzymać wciśnięty włącznik /
wyłącznik
2
.
Wyłączanie:
Zwolnić włącznik / wyłącznik
2
.
Wskazówka: Ze względu na bezpieczeństwo
włącznika / wyłącznika
2
nie można unierucha-
miać (blokować).
Ustawianie głębokości strugania
Za pomocą pokrętła
13
można bezstopniowo nasta-
wiać głębokość strugania od 0 - 3,0 mm używając
przy tym podziałki głębokości strugania
14
.
Strona się ładuje...
Strona się ładuje...
Strona się ładuje...
Strona się ładuje...
Strona się ładuje...
Strona się ładuje...
Strona się ładuje...
Strona się ładuje...
Strona się ładuje...
Strona się ładuje...
Strona się ładuje...
Strona się ładuje...
Strona się ładuje...
Strona się ładuje...
Strona się ładuje...
Strona się ładuje...
Strona się ładuje...
Strona się ładuje...
Strona się ładuje...
Strona się ładuje...
Strona się ładuje...
Strona się ładuje...
Strona się ładuje...
Strona się ładuje...
Strona się ładuje...
Strona się ładuje...
Strona się ładuje...
Strona się ładuje...
Strona się ładuje...
Strona się ładuje...
Strona się ładuje...
Strona się ładuje...
Strona się ładuje...
Strona się ładuje...
Strona się ładuje...
Strona się ładuje...
Strona się ładuje...
Strona się ładuje...
Strona się ładuje...
Strona się ładuje...
Strona się ładuje...
Strona się ładuje...
Strona się ładuje...
Strona się ładuje...
Strona się ładuje...
Strona się ładuje...
Strona się ładuje...
Strona się ładuje...
Strona się ładuje...
Strona się ładuje...
Strona się ładuje...
Strona się ładuje...
Strona się ładuje...
Strona się ładuje...
Strona się ładuje...
-
 1
1
-
 2
2
-
 3
3
-
 4
4
-
 5
5
-
 6
6
-
 7
7
-
 8
8
-
 9
9
-
 10
10
-
 11
11
-
 12
12
-
 13
13
-
 14
14
-
 15
15
-
 16
16
-
 17
17
-
 18
18
-
 19
19
-
 20
20
-
 21
21
-
 22
22
-
 23
23
-
 24
24
-
 25
25
-
 26
26
-
 27
27
-
 28
28
-
 29
29
-
 30
30
-
 31
31
-
 32
32
-
 33
33
-
 34
34
-
 35
35
-
 36
36
-
 37
37
-
 38
38
-
 39
39
-
 40
40
-
 41
41
-
 42
42
-
 43
43
-
 44
44
-
 45
45
-
 46
46
-
 47
47
-
 48
48
-
 49
49
-
 50
50
-
 51
51
-
 52
52
-
 53
53
-
 54
54
-
 55
55
-
 56
56
-
 57
57
-
 58
58
-
 59
59
-
 60
60
-
 61
61
-
 62
62
-
 63
63
-
 64
64
-
 65
65
-
 66
66
-
 67
67
-
 68
68
-
 69
69
-
 70
70
-
 71
71
-
 72
72
-
 73
73
-
 74
74
-
 75
75


Parkside PEH 30 A1 ELECTRIC PLANER Instrukcja obsługi
- Typ
- Instrukcja obsługi
w innych językach
Powiązane artykuły
Inne dokumenty
-
Triton TPL180 Instrukcja obsługi
-
Bosch GHO 15-82 Specyfikacja
-
Scheppach CPL60-20Li Translation Of Original Instruction Manual
-
Bosch GHO 15-82 Professional Instrukcja obsługi
-
Sparky Group P 282 Instrukcja obsługi
-
-
Makita N1923B Instrukcja obsługi
-
Bosch GHO 40-82 C Professional Specyfikacja
-
Bosch GHO 26-82 Instrukcja obsługi
-