Simplicity 1696109-00 Instrukcja obsługi
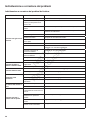
- Kategoria
- Spulchniacze trawnika
- Typ
- Instrukcja obsługi
Ten podręcznik jest również odpowiedni dla

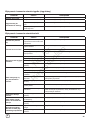
Mfg. No. Description
1696109-00 EMT17538RDF
1696110-00 EMT1838RDF
1696111-00 ELT17538RDF
1696112-00 ELT1838RDF
1696113-00 Regent, 17538RDF
1696114-00 Regent, 1838RDF
885750
Revision C
Rear Discharge
Lawn Tractor
en
Operator’s Manual
Bedienungsanleitung
de
Manuale dell’operatore
fr
it
Manuel de l’opérateur
cs
Návod k obsluze
Gebruikershandleiding
nl
pl
Instrukcja obsugi
Not for
Reproduction

2
Not for
Reproduction

6
A
B
7
A
5
A
D
B
C
3
en
Not for
Reproduction

4
A
A
B
A
10
11
12
B
C
8
9
A
C
E
A
G
G
F
H
B
D
E
Not for
Reproduction

5
en
15
C
13
16
B
A
C
A
B
D
14
A
Not for
Reproduction

6
Not for
Reproduction

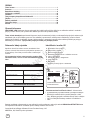
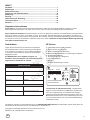
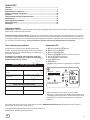
CONTENTS
Front Cover ..........................................................................................................1
Illustrations .......................................................................................................... 3
Operator Safety ...................................................................................................8
Features and Controls ......................................................................................16
Operation ...........................................................................................................19
Safety Interlock System Tests ..........................................................................19
Maintenance ......................................................................................................24
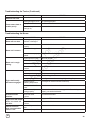
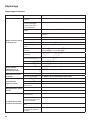
Troubleshooting ................................................................................................ 28
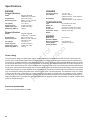
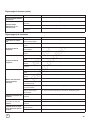
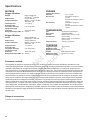
Speci cations ....................................................................................................30
Warranty .............................................................................................................31
General Information
Thank you for purchasing this quality-built riding mower. When operated and maintained according to the instructions in
this manual, your product will provide many years of dependable service.
This manual contains safety information to make you aware of the hazards and risks associated with riding mowers and
how to avoid them. This riding mower is designed and intended only for cutting grass and is not intended for any other
purpose. It is important that you read and understand these instructions thoroughly before attempting to start or operate
the equipment. Save these original instructions for future reference.
The Illustrated Parts List for this machine can be downloaded from BRIGGSandSTRATTON.com. Please provide model
and serial number when ordering replacement parts.
Copyright © 2012 Briggs & Stratton Power Products Group, LLC
Milwaukee, WI, All rights reserved.
7
en
Record your model name/number, manufacturer’s
identi cation numbers, and engine serial numbers in the space
provided for easy access. These numbers can be found in the
locations shown.
When contacting your authorized dealer for replacement
parts, service, or information you MUST have these
numbers.
A. Manufacturer’s Identi cation Number
B. Manufacturer’s Serial Number
C. Manufacturer’s Name and Address
D. Maximum Engine Speed in Rotations per Minute
E. Power Rating in Kilowatts
F. Mass of Unit in Kilograms
G. CE Compliance Logo
H. Year of Manufacture
I. Guaranteed Sound Power in Decibels
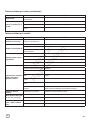
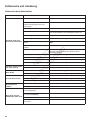
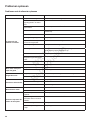
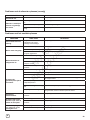
PRODUCT REFERENCE DATA
Model Description Name/Number
Unit MFG Number Unit SERIAL Number
Mower Deck MFG Number Mower Deck SERIAL Number
Dealer Name Date Purchased
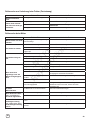
ENGINE REFERENCE DATA
Engine Make Engine Model
Engine Type/Spec Engine Code/Serial Number
CE Identi cation Tag
Product Reference Data
C
B
A
D
E
F
G
H
I
MODEL NO. xxxxxxx
SERIAL NO. xxxxxxxxxx
20xx
x.x kW
xxxx min
-1
xxx
dB
xxx kg
XXXXXXXXXXXXXXXXXXXXXX
XXXXXXXXXXXXXXXXX
“Vibration measurement uncertainty – machine vibration
was recorded using methods and procedures outlined in
the appropriate International Standards in e ect at the time
of manufacture. The uncertainties due to the measurement
may result in a variance of up to 5% from the published
value shown in the Declaration of Conformity.”
Not for
Reproduction

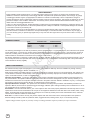
WARNING
Certain components in this product and its related ac-
cessories contain chemicals known to the State of California to
cause cancer, birth defects, or other reproductive harm. Wash
hands after handling.
WARNING
Battery posts, terminals, and related accessories contain
lead and lead compounds - chemicals known to the State of
California to cause cancer, birth defects, or other reproductive
harm. Wash hands after handling.
WARNING
The engine exhaust from this product contains chemicals
known to the State of California to cause cancer, birth defects, or
other reproductive harm.
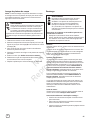
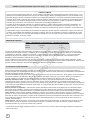
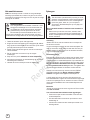
Important Safety Instructions
SAVE THESE INSTRUCTIONS - This manual contains impor-
tant instructions that should be followed during the initial set-up,
the operation, and the maintenance of the equipment. Save
these original instructions for future reference.
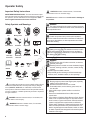
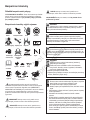
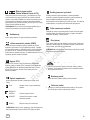
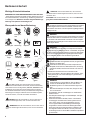
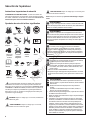
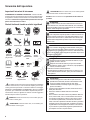
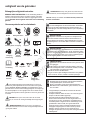
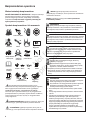
The safety alert symbol is used to identify safety informa-
tion about hazards that can result in personal injury. A signal
word (DANGER, WARNING, or CAUTION) is used with the
alert symbol to indicate the likelihood and the potential severity
of injury. In addition, a hazard symbol may be used to represent
the type of hazard.
NOTICE indicates a situation that could result in damage to
the product.
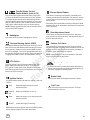
Fire
Moving Parts Shock
Stop
Toxic Fumes
Kickback
Explosion
On/O
Choke
Fuel
Hot SurfaceHazardous
Chemical
Wear Eye
Protection
Read
Manual
Fast
Slow
Oil
Safety Symbols and Meanings
WARNING
Running engine gives o carbon monoxide, an odorless,
colorless, poison gas.
Breathing carbon monoxide can cause headache, fatigue,
dizziness, vomiting, confusion, seizures, nausea, fainting
or death.
• Operate equipment ONLY outdoors.
• Keep exhaust gas from entering a con ned area through
windows, doors, ventilation intakes, or other openings.
Roll-Over
Hazard
Amputation
Hazard
Fuel
Shut-O
Operator Safety
8
DANGER indicates a hazard which, if not avoided, will
result in death or serious injury.
WARNING indicates a hazard which, if not avoided,
could result in death or serious injury.
WARNING
Running engines produce heat. Engine parts, especially
mu er, become extremely hot.
Severe thermal burns can occur on contact.
Combustible debris, such as leaves, grass, brush, etc.
can catch re.
• Allow mu er, engine cylinder and ns to cool before
touching.
• Remove accumulated debris from mu er area and
cylinder area.
• It is a violation of California Public Resource Code, Section
4442, to use or operate the engine on any forest-covered,
brush-covered, or grass-covered land unless the exhaust
system is equipped with a spark arrester, as de ned in
Section 4442, maintained in e ective working order. Other
states or federal jurisdictions may have similar laws. Con-
tact the original equipment manufacturer, retailer, or dealer
to obtain a spark arrester designed for the exhaust system
installed on this engine.
CAUTION indicates a hazard which, if not avoided,
could result in minor or moderate injury.
Not for
Reproduction

Operating Safety
Power equipment is only as safe as the operator. If it is
misused, or not properly maintained, it can be dangerous!
Remember, you are responsible for your safety and that of those
around you. Use common sense, and think through what you are
doing. If you are not sure that the task you are about to perform
can be safely done with the equipment you have chosen, ask a
professional: contact your local authorized dealer.
Read the Manual
The operator’s manual contains important safety information you
need to be aware of BEFORE you operate your unit as well as
DURING operation.
Safe operating techniques, an explanation of the product’s features
and controls, and maintenance information is included to help you
get the most out of your equipment investment.
Be sure to completely read the Safety Rules and Information found
on the following pages. Also completely read the Operation section.
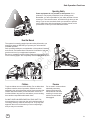
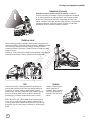
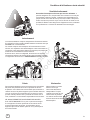
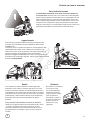
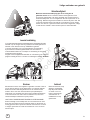
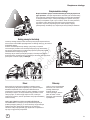
Children
Tragic accidents can occur with children. Do not allow them
anywhere near the area of operation. Children are often
attracted to the unit and mowing activity. Never assume that
children will remain where you last saw them. If there is a
risk that children may enter the area where you are mowing,
have another responsible adult watch them.
DO NOT GIVE CHILDREN RIDES ON THIS UNIT! This
encourages them to come near the unit in the future while it
is running, and they could be seriously hurt. They may then
approach the unit for a ride when you are not expecting it,
and you may run over them.
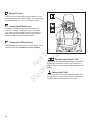
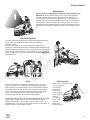
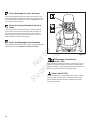
Reverse
Do not mow in reverse unless
absolutely necessary.
Always look down and
behind before and while
traveling in reverse even
with the mower blades
disengaged.
Safe Operation Practices
9
en
Not for
Reproduction

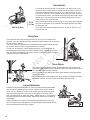
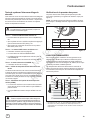
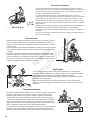
3.5 ft
(1,5 m)
20.0 ft (6,0 m)
Slope Operation
You could be seriously injured or even killed if you use this unit on too
steep an incline. Using the unit on a slope that is too steep or where you
don’t have adequate traction can cause you to lose control or roll over.
A good rule of thumb is to not operate on any slope you cannot back up
(in 2-wheel drive mode). You should not operate on inclines with a slope
greater than a 3.5 foot rise over a 20 foot length. Always drive up and
down slopes: never cross the face.
Also note that the surface you are driving on can greatly impact stability
and control. Wet grass or icy pavement can seriously a ect your ability
to control the unit.
If you feel unsure about operating the unit on an incline, don’t do it. It’s
not worth the risk.
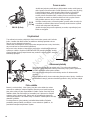
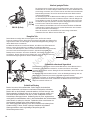
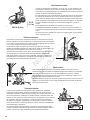
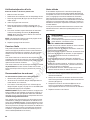
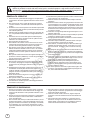
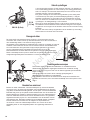
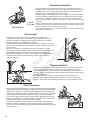
Moving Parts
This equipment has many moving parts that can injure you or someone else.
However, if you are seated in the seat properly and follow all the rules in this book,
the unit is safe to operate.
The mower deck has spinning mower blades that can amputate hands and feet.
Do not allow anyone near the equipment while it is running!
To help you, the operator, use this equipment safely, it is equipped with an
operator-present safety system. Do NOT attempt to alter or bypass the system.
See your dealer immediately if the system does not pass all the safety interlock
system tests found in this manual.
Thrown Objects
This unit has spinning mower blades. These blades can pick up and throw
debris that could seriously injure a bystander. Be sure to clean up the area to
be mowed BEFORE you start mowing.
Do not operate this unit without the entire grass catcher or discharge guard
(de ector) in place.
Do not allow anyone in the mowing area while the unit is running! If someone
does enter the area, shut the unit o immediately until they leave.
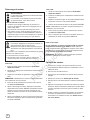
Fuel and Maintenance
Gasoline is extremely fl ammable. Its vapors are also extremely fl ammable
and can travel to distant ignition sources. Gasoline must only be used as
a fuel, not as a solvent or cleaner. Fuel should never be stored any place
where its vapors can build up or travel to an ignition source like a pilot
light. Fuel belongs in an approved, plastic, sealed gas can, or in the tractor
fuel tank with the cap securely closed. Spilled fuel needs to be cleaned up
immediately.
Proper maintenance is critical to the safety and performance of your unit.
Be sure to perform the maintenance procedures listed in this manual and be
sure to periodically test the safety system.
10
Not for
Reproduction

GENERAL OPERATION
1. Read, understand, and follow all instructions in the
manual and on the unit before starting.
2. Do not put hands or feet near rotating parts or under
the machine. Keep clear of the discharge opening at
all times.
3. Only allow responsible adults, who are familiar with
the instructions, to operate the unit (local regulations
can restrict operator age).
4. Clear the area of objects such as rocks, toys, wire,
etc., which could be picked up and thrown by the
blade(s).
5. Be sure the area is clear of other people before mow-
ing. Stop the unit if anyone enters the area.
6. Never carry passengers.
7. Do not mow in reverse unless absolutely necessary.
Always look down and behind before and while travel-
ling in reverse.
8. Never direct discharge material toward anyone. Avoid
discharging material against a wall or obstruction. Ma-
terial may ricochet back toward the operator. Stop the
blade(s) when crossing gravel surfaces.
9. Do not operate the machine without the entire grass
catcher, discharge guard (de ector), or other safety
devices in place.
10. Slow down before turning.
11. Never leave a running unit unattended. Always dis-
engage the PTO, set parking brake, stop engine, and
remove keys before dismounting.
12. Disengage blades (PTO) when not mowing. Shut o
engine and wait for all parts to come to a complete
stop before cleaning the machine, removing the grass
catcher, or unclogging the discharge guard.
13. Operate the machine only in daylight or good arti cial
light.
14. Do not operate the unit while under the in uence of
alcohol or drugs.
15 Watch for tra c when operating near or crossing
roadways.
16. Use extra care when loading or unloading the unit into
a trailer or truck.
17. Always wear eye protection when operating this unit.
18. Data indicates that operators, age 60 years and
above, are involved in a large percentage of power
equipment-related injuries. These operators should
evaluate their ability to operate the equipment safely
enough to protect themselves and others from injury.
19. Follow the manufacturer’s recommendations for wheel
weights or counterweights.
20. Keep in mind the operator is responsible for accidents
occurring to other people or property.
21. All drivers should seek and obtain professional and
practical instruction.
22. Always wear substantial footwear and trousers. Never
operate when barefoot or wearing sandals.
23. Before using, always visually check that the blades
and blade hardware are present, intact, and secure.
Replace worn or damaged parts.
24. Disengage attachments before: refueling, removing an
attachment, making adjustments (unless the adjust-
ment can be made from the operator’s position).
25. When the machine is parked, stored, or left unat-
tended, lower the cutting means unless a positive me-
chanical lock is used.
26. Before leaving the operator’s position for any reason,
engage the parking brake (if equipped), disengage the
PTO, stop the engine, and remove the key.
27. To reduce re hazard, keep the unit free of grass,
leaves, & excess oil. Do not stop or park over dry
leaves, grass, or combustible materials.
Read these safety rules and follow them closely. Failure to obey these rules could result in loss of control
of unit, severe personal injury or death to you, or bystanders, or damage to property or equipment. This
mowing deck is capable of amputating hands and feet and throwing objects. The triangle in text signi-
es important cautions or warnings which must be followed.
TRANSPORTING AND STORAGE
1. When transporting the unit on an open trailer, make
sure it is facing forward, in the direction of travel. If the
unit is facing backwards, wind lift could damage the
unit.
2. Always observe safe refueling and fuel handling prac-
tices when refueling the unit after transportation or
storage.
3. Never store the unit (with fuel) in an enclosed poorly
ventilated structure. Fuel vapors can travel to an ig-
nition source (such as a furnace, water heater, etc.)
and cause an explosion. Fuel vapor is also toxic to
humans and animals.
4. Always follow the engine manual instructions for stor-
age preparations before storing the unit for both short
and long term periods.
5. Always follow the engine manual instructions for
proper start-up procedures when returning the unit to
service.
6. Never store the unit or fuel container inside where
there is an open ame or pilot light, such as in a water
heater. Allow unit to cool before storing.
11
en
Not for
Reproduction

CHILDREN
Tragic accidents can occur if the operator is not alert to the
presence of children. Children are often attracted to the unit
and the mowing activity. Never assume that children will
remain where you last saw them.
1. Keep children out of the mowing area and under the
watchful care of another responsible adult.
2. Be alert and turn unit o if children enter the area.
3. Before and during reverse operation, look behind and
down for small children.
4. Never carry children, even with the blade(s) o . They
may fall o and be seriously injured or interfere with
safe unit operation. Children who have been given
rides in the past may suddenly appear in the mowing
area for another ride and be run over or backed over
by the machine.
5. Never allow children to operate the unit.
6. Use extra care when approaching blind corners,
shrubs, trees, or other objects that may obscure vi-
sion.
EMISSIONS
1. Engine exhaust from this product contains chemicals
known, in certain quantities, to cause cancer, birth de-
fects, or other reproductive harm.
2. Look for the relevant Emissions Durability Period and
Air Index information on the engine emissions label.
SLOPE OPERATION
Slopes are a major factor related to loss-of-control and tip-
over accidents, which can result in severe injury or death.
Operation on all slopes requires extra caution. If you cannot
back up the slope or if you feel uneasy on it, do not operate
on it.
Control of a walk-behind or ride-on machine sliding on a
slope will not be regained by the application of the brake.
The main reasons for loss of control are: insu cient tire grip
on the ground, speed too fast, inadequate braking, the type
of machine is unsuitable for its task, lack of awareness of
the ground conditions, incorrect hitching and load distribu-
tion.
1. Mow up and down slopes, not across.
2. Watch for holes, ruts, or bumps. Uneven terrain could
overturn the unit. Tall grass can hide obstacles.
3. Choose a slow speed so that you will not have to stop
or change speeds while on the slope.
4. Do not mow on wet grass. Tires may loose traction.
5. Always keep unit in gear especially when traveling
down slopes. Do not shift to neutral and coast down-
hill.
6. Avoid starting, stopping, or turning on a slope. If tires
lose traction, disengage the blade(s) and proceed
slowly straight down the slope.
7. Keep all movement on slopes slow and gradual. Do
not make sudden changes in speed or direction,
which could cause the machine to rollover.
8. Use extra care while operating machines with grass
catchers or other attachments; they can a ect the sta-
bility of the unit. Do not use on steep slopes.
9. Do not try to stabilize the machine by putting your foot
on the ground (ride-on units).
10. Do not mow near drop-o s, ditches, or embankments.
The mower could suddenly turn over if a wheel is over
the edge of a cli or ditch, or if an edge caves in.
11. Do not use grass catchers on steep slopes.
12. Do not mow slopes you cannot back up them.
13. See your authorized dealer/retailer for recommenda-
tions of wheel weights or counterweights to improve
stability.
14. Remove obstacles such as rocks, tree limbs, etc.
15. Use slow speed. Tires may lose traction on slopes
even through the brakes are functioning properly.
16. Do not turn on slopes unless necessary, and then,
turn slowly and gradually downhill, if possible.
TOWED EQUIPMENT (RIDEON UNITS)
1. Tow only with a machine that has a hitch designed for
towing. Do not attach towed equipment except at the
hitch point.
2. Follow the manufacturer’s recommendations for
weight limit for towed equipment and towing on
slopes.
3. Never allow children or others in or on towed equip-
ment.
4. On slopes, the weight of the towed equipment may
cause loss of traction and loss of control.
5. Travel slowly and allow extra distance to stop.
6. Do not shift to neutral and coast down hill.
12
WARNING
Never operate on slopes greater than 17.6 percent
(10°) which is a rise of 3-1/2 feet (106 cm) vertically in
20 feet (607 cm) horizontally.
When operating on slopes use additional wheel
weights or counterweights. See your dealer/retailer to
determine which weights are available and appropriate
for your unit.
Select slow ground speed before driving onto slope.
In addition to front weights, use extra caution when
operating on slopes with rear-mounted grass catchers.
Mow UP and DOWN the slope, never across the face,
use caution when changing directions and DO NOT
START OR STOP ON SLOPE.
Not for
Reproduction

SERVICE AND MAINTENANCE
Safe Handling of Gasoline
1. Extinguish all cigarettes, cigars, pipes, and other
sources of ignition.
2. Use only approved gasoline containers.
3. Never remove the gas cap or add fuel with the engine
running. Allow the engine to cool before refueling.
4. Never fuel the machine indoors.
5. Never store the machine or fuel container where there
is an open ame, spark, or pilot light such as near a
water heater or other appliance.
6. Never ll containers inside a vehicle or on a truck bed
with a plastic bed liner. Always place containers on
the ground away from your vehicle before lling.
7. Remove gas-powered equipment from the truck or
trailer and refuel it on the ground. If this is not possi-
ble, then refuel such equipment on a trailer with a por-
table container, rather than from a gasoline dispenser
nozzle.
8. Keep nozzle in contact with the rim of the fuel tank or
container opening at all times until fueling is complete.
Do not use a nozzle lock-open device.
9. If fuel is spilled on clothing, change clothing immedi-
ately.
10. Never over- ll the fuel tank. Replace gas cap and
tighten securely.
11. Use extra care in handling gasoline and other fuels.
They are ammable and vapors are explosive.
12. If fuel is spilled, do not attempt to start the engine but
move the machine away from the area of spillage and
avoid creating any source of ignition until fuel vapors
have dissipated.
13. Replace all fuel tank caps and fuel container caps se-
curely.
Service & Maintenance
1. Never run the unit in an enclosed area where carbon
monoxide fumes may collect.
2. Keep nuts and bolts, especially blade attachment
bolts, tight and keep equipment in good condition.
3. Never tamper with safety devices. Check their proper
operation regularly and make necessary repairs if they
are not functioning properly.
4. Keep unit free of grass, leaves, or other debris build-
up. Clean up oil or fuel spillage. and remove any fuel-
soaked debris. Allow machine to cool before storage.
5. If you strike an object, stop and inspect the machine.
Repair, if necessary, before restarting.
6. Never make adjustments or repairs with the engine
running.
7. Check grass catcher components and the discharge
guard frequently and replace with manufacturer’s rec-
ommended parts, when necessary.
8. Mower blades are sharp. Wrap the blade or wear
gloves, and use extra caution when servicing them.
9. Check brake operation frequently. Adjust and service
as required.
10. Maintain or replace safety and instructions labels, as
necessary.
11. Do not remove the fuel lter when the engine is hot as
spilled gasoline may ignite. Do not spread fuel line
clamps further than necessary. Ensure clamps grip
hoses rmly over the lter after installation.
12. Do not use gasoline containing METHANOL, gasohol
containing more than 10% ETHANOL, gasoline addi-
tives, or white gas because engine/fuel system dam-
age could result.
13. If the fuel tank must be drained, it should be drained
outdoors.
14. Replace faulty silencers/mu ers.
15. Use only factory authorized replacement parts when
making repairs.
16. Always comply with factory speci cations on all set-
tings and adjustments.
17. Only authorized service locations should be utilized for
major service and repair requirements.
18. Never attempt to make major repairs on this unit un-
less you have been properly trained. Improper service
procedures can result in hazardous operation, equip-
ment damage and voiding of manufacturer’s warranty.
19. On multiple blade mowers, take care as rotating one
blade can cause other blades to rotate.
20. Do not change engine governor settings or over-
speed the engine. Operating the engine at excessive
speed can increase the hazard of personal injury.
21. Disengage drive attachments, stop the engine, re-
move the key, and disconnect the spark plug wire(s)
before: clearing attachment blockages and chutes,
performing service work, striking an object, or if the
unit vibrates abnormally. After striking an object, in-
spect the machine for damage and make repairs be-
fore restarting and operating the equipment.
22. Never place hands near the moving parts, such as a
hydro pump cooling fan, when the tractor is running.
(Hydro pump cooling fans are typically located on top
of the transaxle).
23. Units with hydraulic pumps, hoses, or motors: WARN-
ING: Hydraulic uid escaping under pressure may
have su cient force to penetrate skin and cause
serious injury. If foreign uid is injected into the skin
it must be surgically removed within a few hours by a
doctor familiar with this form of injury or gangrene may
result. Keep body and hands away from pin holes or
nozzles that eject hydraulic uid under high pressure.
Use paper or cardboard, and not hands, to search for
leaks. Make sure all hydraulic uid connections are
tight and all hydraulic hoses and lines are in good con-
dition before applying pressure to the system. If leaks
occur, have the unit serviced immediately by your au-
thorized dealer.
24. WARNING: Stored energy device. Improper re-
lease of springs can result in serious personal injury.
Springs should be removed by an authorized techni-
cian.
25. Models equipped with an engine radiator: WARNING:
Stored energy device. To prevent serious bodily injury
from hot coolant or steam blow-out, never attempt to
remove the radiator cap while the engine is running.
Stop the engine and wait until it is cool. Even then,
use extreme care when removing the cap.
13
en
Not for
Reproduction

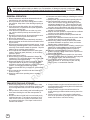
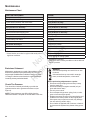
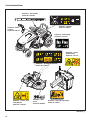
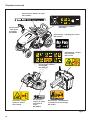
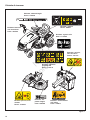
Safety Decals
Decal - Main Panel CE
Part No. 1723175
Decal - Roll Release
Part No. 7101935
Decal - Danger, Rotating
Blades
Part No. 1720389
Decal - Danger,
Discharge Tube
Part No. 1721107
Decal - Height of Cut
Part No. 1730264
Decal - Drawbar Warning
Part No. 729677
Decal - Ignition
Switch
Part No. 885749
1723175
(
)
20
LB
(
)
34
LB
_
_
20 HR
AH
CCA
@18°C
Pb
Pb
885627
885540
190
17
Figure 1
14
Decal - Battery
Part No. 885627
Decal - Mower
Cutting Width
Part No. 885624
Not for
Reproduction

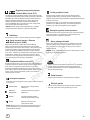
Warning: Read Operator’s Manual.
Read and understand the Operator’s
Manual before using this machine.
Danger: Thrown Objects.
This machine is capable of throwing
objects and debris. Keep bystanders
away.
Warning: Remove Key Before
Servicing.
Remove the key and consult technical
literature before performing repairs or
maintenance.
Danger: Machine Rollover.
Do not use this machine on slopes
greater than 10°.
Danger: Thrown Objects.
Do not operate without rst
connecting the discharge tube.
Danger: Dismemberment.
This machine can amputate limbs.
Keep bystanders and children away
when engine is running.
Danger: Dismemberment.
This mower deck can amputate limbs.
Keep hands and feet away from
blades.
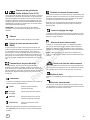
Safety Icons
15
en
Not for
Reproduction

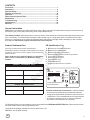
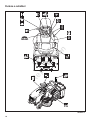
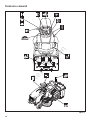
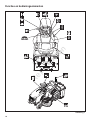
Features and Controls
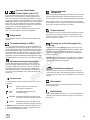
Figure 2
16
Not for
Reproduction

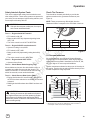
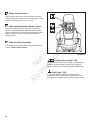
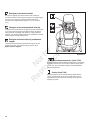
Headlights
This switch turns the tractor headlights on and o .
Reverse Mowing Option RMO
The Reverse Mowing Option allows for mowing (or use of
other PTO driven attachments) while traveling in reverse.
If you choose to mow in reverse, turn the RMO key after
the PTO is engaged. The L.E.D. light will illuminate, and
the operator can then mow in reverse. Each time the PTO
is engaged the RMO needs to be reactivated if desired.
PTO Switch
The PTO (Power Take-O ) switch engages and disen-
gages attachments that use the PTO. To engage the
PTO, pull UP on the switch. Push DOWN to disengage.
Note that the operator must be seated rmly in the tractor
seat for the PTO to function.
Ground Speed Pedals
The tractor’s forward ground speed is controlled by the
forward ground speed control pedal. The tractor’s reverse
ground speed is controlled by the reverse ground speed
control pedal.
Depressing either pedal will increase ground speed. Note
that the further down the pedal is depressed, the faster the
tractor will travel.
Seat Adjustment Lever
The seat can be adjusted forward and back. Move the
lever, position the seat as desired, and release the lever to
lock the seat into position.
Catcher Full Alarm
The “catcher full” alarm sounds when the grass catcher
has been lled with cut grass. When the alarm sounds, dis-
engage the PTO, travel to the area in which you desire to
dump the grass, then empty the catcher.
NOTE: When using the unit for leaf collection, the alarm
may not be activated by dry leaves.
17
en
Ignition Switch
The ignition switch starts and stops the engine, it has four
positions:
OFF Stops the engine and shuts o the
electrical system.
LIGHTS Allows the headlights to turn on.
ON
RUN Allows the engine to run and powers the
electrical system.
START Cranks the engine for starting.
NOTE: Never leave the ignition switch in the RUN position
with the engine stopped. This drains the battery.
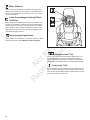
Throttle/Choke Control
Choke-A-Matic Intek 4175
This controls the engine speed and choke (See Figure
2). Move the throttle/choke control to the FAST position
to increase engine speed, and to the SLOW position to
decrease engine speed. Move the throttle/ choke control
past the FAST position to the CHOKE position to start a
cold engine. A warm engine may not require choking.
NOTE: Always operate the rider with the throttle/ choke
control in the FAST position.
Parking Brake Knob
This is used to lock the parking brake when the tractor is
stopped. Fully depressing the brake pedal and pulling up
on the knob engages the parking brake.
Brake Pedal
Depressing the brake pedal applies the tractor brake.
Fuel Tank
Pull up tractor hood to access the fuel tank. Turn cap
counterclockwise to remove.
Not for
Reproduction

18
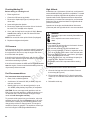
Throttle Control Intek 7180
This controls the engine speed (See Figure 3). Move the
throttle control forward to increase engine speed and
back to decrease engine speed. Always operate at FULL
throttle.
Choke Intek 7180
Close the choke for cold starting. Open the choke once
the engine starts. A warm engine may not require chok-
ing. Move the lever forward to close the choke.
Figure 3
Mower Lift Lever
This controls the mower cutting height. Pull lever to lower
the height and pull up to raise the height. The cutting height
is adjustable between 2,5 cm (1,0”) and 8,9 cm (3,5”).
Catcher Open/Close Lever
This opens the catcher so that it may be emptied and
closes it for mowing. To empty the catcher, extend the
grass catcher handle and pull forward on the handle. To
close, push the lever backward until the catcher closes
and locks. Release the grass catcher handle.
Transmission Release Lever
This deactivates the transmission so that the tractor can be
pushed by hand. See Pushing the Tractor By Hand.
Not for
Reproduction

Test 1 — Engine should NOT crank if:
• PTO switch is ON, OR
• Brake pedal is NOT fully depressed (parking brake
OFF), OR
• The cruise control lever is NOT in NEUTRAL.
Test 2 — Engine SHOULD crank and start if:
• Operator is sitting in seat, AND.
• PTO switch is OFF, AND
• Brake pedal is fully depressed (parking brake ON),
AND
• The cruise control lever is in NEUTRAL.
Test 3 — Engine should SHUT OFF if:
• Operator rises o seat.
Test 4 — Check Mower Blade Stopping Time
Mower blades and mower drive belt should come to a
complete stop within ve seconds after electric PTO
switch is turned OFF. If mower drive belt does not stop
within ve seconds, see an authorized dealer.
Test 5 — Check Reverse Mow Option RMO
• Engine should shut o if reverse travel is attempted if
the PTO has been switched on and RMO has not been
activated.
• RMO light should illuminate when RMO has been acti-
vated.
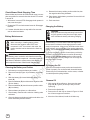
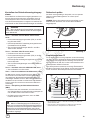
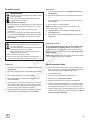
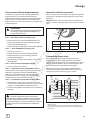
Oil Recommendations
We recommend the use of Briggs & Stratton Warranty
Certi ed oils for best performance. Other high-quality de-
tergent oils are acceptable if classi ed for service SF, SG,
SH, SJ or higher. Do not use special additives.
Outdoor temperatures determine the proper oil viscosity for
the engine. Use the chart to select the best viscosity for the
outdoor temperature range expected.
* Below 40°F (4°C) the use of SAE 30 will result in hard starting.
** Above 80°F (27°C) the use of 10W-30 may cause increased oil
consumption. Check oil level more frequently.
Safety Interlock System Tests
This unit is equipped with safety interlock switches and
other safety devices. These safety systems are present for
your safety: do not attempt to bypass safety switches, and
never tamper with safety devices.
Operation
19
en
WARNING
If the unit does not pass a safety test, do not oper-
ate it. See an authorized dealer.
WARNING
Mowing in reverse can be hazardous to bystand-
ers. Tragic accidents can occur if the operator is not alert
to the presence of children. Never activate the RMO if
children are present. Children are often attracted to the unit
and the mowing activity.
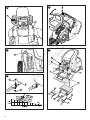
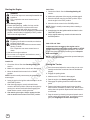
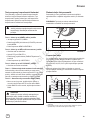
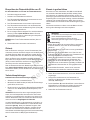
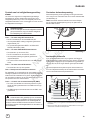
Size PSI bar
15 x 6,0 14 0,96
20 x 8,0 10 0,68
Figure 4
Check Tire Pressure
Tires should be checked periodically to provide the
optimum traction and to guarantee the best cut (see
Figure 4).
NOTE: These pressures may di er slightly from the
“Maximum In ation” stamped on the side walls of the tires.
Not for
Reproduction

Oil Pressure
If the oil pressure is too low, a pressure switch (if equipped)
will either stop the engine or activate a warning device on
the equipment. If this occurs, stop the engine and check
the oil level with the dipstick.
If the oil level is below the ADD mark, add oil until it reaches
the FULL mark. Start the engine and check for proper pres-
sure before continuing to operate.
If the oil level is between the ADD and FULL marks, do not
start the engine. Contact an authorized dealer to have the
oil pressure problem corrected.
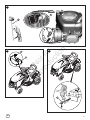
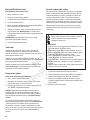
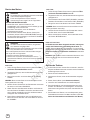
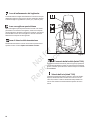
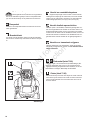
1. Pull up tractor hood to access the fuel tank.
2. Clean the fuel cap area of dirt and debris. Remove
the fuel cap (A, Figure 6).
3. Fill the fuel tank (B) with fuel. To allow for expansion
of the fuel, do not ll above the bottom of the fuel tank
neck.
4. Reinstall the fuel cap.
20
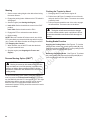
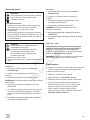
Checking/Adding Oil
Before adding or checking the oil
• Place engine level.
• Clean the oil ll area of any debris.
1. Remove the dipstick (A, Figure 5) and wipe with a
clean cloth.
2. Insert and tighten the dipstick.
3. Remove the dipstick and check the oil level. It should
be at the FULL mark (B) on the dipstick.
4. If low, add oil slowly into the engine oil ll (C). Do not
over ll. After adding oil, wait one minute and then
recheck the oil level.
NOTE: Do not add oil at the quick oil drain (if equipped).
5. Replace and tighten the dipstick.
High Altitude
At altitudes over 1,524 meters (5,000 feet), a minimum 85
octane/85 AKI (89 RON) gasoline is acceptable. To remain
emissions compliant, high altitude adjustment is required.
Operation without this adjustment will cause decreased
performance, increased fuel consumption, and increased
emissions. See an authorized dealer for high altitude ad-
justment information.
Operation of the engine at altitudes below 762 meters
(2,500 feet) with the high altitude kit is not recommended.
Fuel Recommendations
Fuel must meet these requirements:
• Clean, fresh, unleaded gasoline.
• A minimum of 87 octane/87 AKI (91 RON). High alti-
tude use, see below.
• Gasoline with up to 10% ethanol (gasohol) or up to
15% MTBE (methyl tertiary butyl ether) is acceptable.
CAUTION: Do not use unapproved gasolines, such as
E85. Do not mix oil in gasoline or modify the engine to run
on alternate fuels. This will damage the engine compo-
nents and void the engine warranty.
To protect the fuel system from gum formation, mix a fuel
stabilizer into the fuel. See the Storage section. All fuel is
not the same. If starting or performance problems occur,
change fuel providers or change brands. This engine is
certi ed to operate on gasoline. The emissions control sys-
tem for this engine is EM (Engine Modi cations).
WARNING
Fuel and its vapors are extremely ammable and
explosive.
Fire or explosion can cause severe burns or
death.
When Adding Fuel
• Turn engine o and let engine cool at least 3 minutes
before removing the fuel cap.
• Fill fuel tank outdoors or in well-ventilated area.
• Do not over ll fuel tank. To allow for expansion of the
fuel, do not ll above the bottom of the fuel tank neck.
• Keep fuel away from sparks, open ames, pilot lights,
heat, and other ignition sources.
• Check fuel lines, tank, cap, and ttings frequently for
cracks or leaks. Replace if necessary.
• If fuel spills, wait until it evaporates before starting
engine.
Not for
Reproduction
Strona jest ładowana ...
Strona jest ładowana ...
Strona jest ładowana ...
Strona jest ładowana ...
Strona jest ładowana ...
Strona jest ładowana ...
Strona jest ładowana ...
Strona jest ładowana ...
Strona jest ładowana ...
Strona jest ładowana ...
Strona jest ładowana ...
Strona jest ładowana ...
Strona jest ładowana ...
Strona jest ładowana ...
Strona jest ładowana ...
Strona jest ładowana ...
Strona jest ładowana ...
Strona jest ładowana ...
Strona jest ładowana ...
Strona jest ładowana ...
Strona jest ładowana ...
Strona jest ładowana ...
Strona jest ładowana ...
Strona jest ładowana ...
Strona jest ładowana ...
Strona jest ładowana ...
Strona jest ładowana ...
Strona jest ładowana ...
Strona jest ładowana ...
Strona jest ładowana ...
Strona jest ładowana ...
Strona jest ładowana ...
Strona jest ładowana ...
Strona jest ładowana ...
Strona jest ładowana ...
Strona jest ładowana ...
Strona jest ładowana ...
Strona jest ładowana ...
Strona jest ładowana ...
Strona jest ładowana ...
Strona jest ładowana ...
Strona jest ładowana ...
Strona jest ładowana ...
Strona jest ładowana ...
Strona jest ładowana ...
Strona jest ładowana ...
Strona jest ładowana ...
Strona jest ładowana ...
Strona jest ładowana ...
Strona jest ładowana ...
Strona jest ładowana ...
Strona jest ładowana ...
Strona jest ładowana ...
Strona jest ładowana ...
Strona jest ładowana ...
Strona jest ładowana ...
Strona jest ładowana ...
Strona jest ładowana ...
Strona jest ładowana ...
Strona jest ładowana ...
Strona jest ładowana ...
Strona jest ładowana ...
Strona jest ładowana ...
Strona jest ładowana ...
Strona jest ładowana ...
Strona jest ładowana ...
Strona jest ładowana ...
Strona jest ładowana ...
Strona jest ładowana ...
Strona jest ładowana ...
Strona jest ładowana ...
Strona jest ładowana ...
Strona jest ładowana ...
Strona jest ładowana ...
Strona jest ładowana ...
Strona jest ładowana ...
Strona jest ładowana ...
Strona jest ładowana ...
Strona jest ładowana ...
Strona jest ładowana ...
Strona jest ładowana ...
Strona jest ładowana ...
Strona jest ładowana ...
Strona jest ładowana ...
Strona jest ładowana ...
Strona jest ładowana ...
Strona jest ładowana ...
Strona jest ładowana ...
Strona jest ładowana ...
Strona jest ładowana ...
Strona jest ładowana ...
Strona jest ładowana ...
Strona jest ładowana ...
Strona jest ładowana ...
Strona jest ładowana ...
Strona jest ładowana ...
Strona jest ładowana ...
Strona jest ładowana ...
Strona jest ładowana ...
Strona jest ładowana ...
Strona jest ładowana ...
Strona jest ładowana ...
Strona jest ładowana ...
Strona jest ładowana ...
Strona jest ładowana ...
Strona jest ładowana ...
Strona jest ładowana ...
Strona jest ładowana ...
Strona jest ładowana ...
Strona jest ładowana ...
Strona jest ładowana ...
Strona jest ładowana ...
Strona jest ładowana ...
Strona jest ładowana ...
Strona jest ładowana ...
Strona jest ładowana ...
Strona jest ładowana ...
Strona jest ładowana ...
Strona jest ładowana ...
Strona jest ładowana ...
Strona jest ładowana ...
Strona jest ładowana ...
Strona jest ładowana ...
Strona jest ładowana ...
Strona jest ładowana ...
Strona jest ładowana ...
Strona jest ładowana ...
Strona jest ładowana ...
Strona jest ładowana ...
Strona jest ładowana ...
Strona jest ładowana ...
Strona jest ładowana ...
Strona jest ładowana ...
Strona jest ładowana ...
Strona jest ładowana ...
Strona jest ładowana ...
Strona jest ładowana ...
Strona jest ładowana ...
Strona jest ładowana ...
Strona jest ładowana ...
Strona jest ładowana ...
Strona jest ładowana ...
Strona jest ładowana ...
Strona jest ładowana ...
Strona jest ładowana ...
Strona jest ładowana ...
Strona jest ładowana ...
Strona jest ładowana ...
Strona jest ładowana ...
Strona jest ładowana ...
Strona jest ładowana ...
Strona jest ładowana ...
Strona jest ładowana ...
Strona jest ładowana ...
Strona jest ładowana ...
Strona jest ładowana ...
Strona jest ładowana ...
Strona jest ładowana ...
Strona jest ładowana ...
Strona jest ładowana ...
Strona jest ładowana ...
Strona jest ładowana ...
Strona jest ładowana ...
Strona jest ładowana ...
Strona jest ładowana ...
Strona jest ładowana ...
Strona jest ładowana ...
Strona jest ładowana ...
-
 1
1
-
 2
2
-
 3
3
-
 4
4
-
 5
5
-
 6
6
-
 7
7
-
 8
8
-
 9
9
-
 10
10
-
 11
11
-
 12
12
-
 13
13
-
 14
14
-
 15
15
-
 16
16
-
 17
17
-
 18
18
-
 19
19
-
 20
20
-
 21
21
-
 22
22
-
 23
23
-
 24
24
-
 25
25
-
 26
26
-
 27
27
-
 28
28
-
 29
29
-
 30
30
-
 31
31
-
 32
32
-
 33
33
-
 34
34
-
 35
35
-
 36
36
-
 37
37
-
 38
38
-
 39
39
-
 40
40
-
 41
41
-
 42
42
-
 43
43
-
 44
44
-
 45
45
-
 46
46
-
 47
47
-
 48
48
-
 49
49
-
 50
50
-
 51
51
-
 52
52
-
 53
53
-
 54
54
-
 55
55
-
 56
56
-
 57
57
-
 58
58
-
 59
59
-
 60
60
-
 61
61
-
 62
62
-
 63
63
-
 64
64
-
 65
65
-
 66
66
-
 67
67
-
 68
68
-
 69
69
-
 70
70
-
 71
71
-
 72
72
-
 73
73
-
 74
74
-
 75
75
-
 76
76
-
 77
77
-
 78
78
-
 79
79
-
 80
80
-
 81
81
-
 82
82
-
 83
83
-
 84
84
-
 85
85
-
 86
86
-
 87
87
-
 88
88
-
 89
89
-
 90
90
-
 91
91
-
 92
92
-
 93
93
-
 94
94
-
 95
95
-
 96
96
-
 97
97
-
 98
98
-
 99
99
-
 100
100
-
 101
101
-
 102
102
-
 103
103
-
 104
104
-
 105
105
-
 106
106
-
 107
107
-
 108
108
-
 109
109
-
 110
110
-
 111
111
-
 112
112
-
 113
113
-
 114
114
-
 115
115
-
 116
116
-
 117
117
-
 118
118
-
 119
119
-
 120
120
-
 121
121
-
 122
122
-
 123
123
-
 124
124
-
 125
125
-
 126
126
-
 127
127
-
 128
128
-
 129
129
-
 130
130
-
 131
131
-
 132
132
-
 133
133
-
 134
134
-
 135
135
-
 136
136
-
 137
137
-
 138
138
-
 139
139
-
 140
140
-
 141
141
-
 142
142
-
 143
143
-
 144
144
-
 145
145
-
 146
146
-
 147
147
-
 148
148
-
 149
149
-
 150
150
-
 151
151
-
 152
152
-
 153
153
-
 154
154
-
 155
155
-
 156
156
-
 157
157
-
 158
158
-
 159
159
-
 160
160
-
 161
161
-
 162
162
-
 163
163
-
 164
164
-
 165
165
-
 166
166
-
 167
167
-
 168
168
-
 169
169
-
 170
170
-
 171
171
-
 172
172
-
 173
173
-
 174
174
-
 175
175
-
 176
176
-
 177
177
-
 178
178
-
 179
179
-
 180
180
-
 181
181
-
 182
182
-
 183
183
-
 184
184
-
 185
185
-
 186
186
-
 187
187
-
 188
188


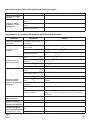
Simplicity 1696109-00 Instrukcja obsługi
- Kategoria
- Spulchniacze trawnika
- Typ
- Instrukcja obsługi
- Ten podręcznik jest również odpowiedni dla
w innych językach
- čeština: Simplicity 1696109-00 Uživatelský manuál
- italiano: Simplicity 1696109-00 Manuale utente
- Deutsch: Simplicity 1696109-00 Benutzerhandbuch
- français: Simplicity 1696109-00 Manuel utilisateur
- English: Simplicity 1696109-00 User manual
- Nederlands: Simplicity 1696109-00 Handleiding
Powiązane dokumenty
-
Simplicity 7800277 Instrukcja obsługi
-
-
-
-
-
-
-
-
-
Simplicity 2691070 Instrukcja obsługi
Inne dokumenty
-
STERWINS DYM1563QN Instrukcja obsługi
-
Murray LT-200 Series Instrukcja obsługi
-
Briggs & Stratton 83100 Instrukcja obsługi
-
Scheppach 5911247903 Instrukcja obsługi
-
Briggs & Stratton 120000 Quantum 675 Series Instrukcja obsługi
-
Efco EF 84/14,5 K Instrukcja obsługi
-
Wolf Garten EXPERT 105.220 H Original Operating Instructions
-
 EMAK EF 92/13 H Instrukcja obsługi
-
Kohler CH 395 Instrukcja obsługi
-
Efco APACHE 92 EVO Instrukcja obsługi
