
PORTABLE AIR CONDITIONER 3 IN 1 WITH WiFi
AIRE ACONDICIONADO PORTÁTIL 3 EN 1 CON WiFi
USER MANUAL
SILKAIR CONNECT


4
INDEX
ENGLISH
Security instructions 6
Features 8
Parts list 8
Control panel 8
Remote control 9
App connection 9
Protection functions 10
Installation and adjustment 10
Drainage instructions 12
Maintenance 13
Storage 13
Troubleshooting 14
ESPAÑOL
Instrucciones de seguridad 15
Características 17
Lista de partes 17
Panel de control 17
Mando a distancia 18
Conectar la app 18
Funciones de protección 19
Instalación y ajuste 19
Instrucciones de drenaje 21
Mantenimiento 22
Almacenamiento 22
Solución de problemas 23
PORTUGUÊS
Instruções de segurança 24
Lista de peças 26
Painel de controle 26
Características 26
Controle remoto 27
Conecte o aplicativo 27
Funções de proteção 28
Instalação e ajuste 28
Instruções de drenagem 30
Manutenção 31
Armazenamento 31
Solução de problemas 32
FRANÇAIS
Instructions de sécurité 33
Caractéristiques 35
Liste de pièces 35
Panneau de commande 35
Télécommande 36
Connecter l’application 36
Fonctions de protection 37
Installation et ajustement 37
Instructions de drainage 39
Maintenance 40
Stockage 40
Solution de problèmes 41
SILKAIR CONNECT

5
ITALIANO
Istruzioni di sicurezza 42
Lineamenti 44
Elenco delle parti 44
Pannello di controllo 44
Telecomando 45
Connetti l’app 45
Funzioni di protezione 46
Installazione e regolazione 46
Istruzioni di scarico 48
Manutenzione 49
Immagazzinamento 49
Risoluzione dei problemi 50
DEUTSCH
Sicherheitshinweise 51
Eigenschaften 53
Teileliste 53
Bedienfeld 53
Fernbedienung 54
Verbinde die app 54
Schutzfunktionen 55
Installation und einstellung 55
Abtropfen lassen anweisungen 57
Wartung 58
Lagerung 58
Fehlerbehebung 59
NEDERLANDS
Beveiligingsinstructies 60
Kenmerken 62
Lijst met onderdelen 62
Controlepaneel 62
Afstandsbediening 63
Verbind de app 63
Beschermingsfuncties 64
Installatie en afstelling 64
Afvoer instructies 66
Onderhoud 67
Opslag 67
Probleemoplossing 68
POLSKI
69
Funkcje 71
71
Panel sterowania 71
Zdalne sterowanie 72
72
Funkcje ochronne 73
Instalacja i regulacja 73
75
Konserwacja 76
Przechowywanie 76
77
INDEX
SILKAIR CONNECT

6ENGLISH
Thank you for choosing our air conditioner. Before using the appliance, and to ensure the
best use, carefully read these instructions.
The safety precautions enclosed herein reduce the risk of death, injury and electrical shock
when correctly adhered to. Keep the manual in a safe place for future reference, along with
the completed warranty card, purchase receipt and package. If applicable, pass these in-
structions on to the next owner of the appliance. Always follow basic safety precautions and
accident-prevention measures when using an electrical appliance. We assume no liability for
customer failing to comply with these requirements.
SECURITY INSTRUCTIONS
When using any electrical appliance, basic safety precautions should al-
ways be observed.
• The refrigerant used in mobile air conditioners is the environmentally
friendly hydrocarbon R290.This refrigerant is odorless, and compared to
the alternative refrigerant, the R290 is an ozone-free refrigerant, and its
effect is very low.
• Please read the instructions before use and repair.
• The drawings provided in this manual may not be the same as the physi-
cal objects. Please refer to the physical objects.
• Do not use means to accelerate the defrosting process or to clean, other
than those recommended by the manufacturer.
• The appliance shall be stored in a room without continuously operating
or an operating electric heater.)
• Do not pierce or burn.
• Be aware that refrigerants may not contain an odour.
•
area larger than 11 m².
• Keep any required ventilation openings clear of obstruction.
• Servicing shall be performed only as recommended by the manufacturer.
• The appliance shall be stored in a well-ventilated area where the room
• Any person who is involved with working on or breaking into a refrigerant
-
ted assessment authority, which authorises their competence to handle
refrigerants safely in accordance with an industry recognised assess-
• Maintenance and repair requiring the assistance of other skilled person-
nel shall be carried out under the supervision of the person competent in
• All working procedure that affects safety means shall only be carried by
competent persons.
Notes: The air conditioner is only suitable for indoor use, and is not suita-
ble for other applications.
ENGLISH

7
ENGLISH
• Follow local grid interconnection rules while installing the air conditioner
and ensure that it is properly grounded. If you have any question on electri-
cal installation, follow the instructions of the manufacturer, and if neces-
sary, ask a professional electrician to install it.
•
50 cm between the machine and the surrounding objects or walls.
• After the air conditioner is installed, ensure that the power plug is in-
orderly to prevent someone from being tripped or pulling out the plug.
• Do not put any object into the air inlet and outlet of the air conditioner.
Keep the air inlet and outlet free from obstructions.
• When drainage pipes are installed, ensure that the drainage pipes are
properly connected, and are not distorted or bended.
• While adjusting the upper and lower wind-guide strips of the air outlet,
pluck it with hands gently to avoid damaging wind-guide strips.
• When moving the machine, make sure that it is in an upright position.
•
and other heat sources.
• Don’t disassemble, overhaul and modify the machine arbitrarily, other-
wise it will cause a machine malfunction or even bring harm to persons
and properties. To avoid danger, if a machine failure occurs, ask the ma-
nufacturer or professionals to repair it.
• Do not install and use the air conditioner in the bathroom or other humid
environments.
• Do not pull the plug to turn off the machine.
• Do not place cups or other objects on the body to prevent water or other
liquids from spilling into the air conditioner.
•
air conditioner.
• Do not wipe or wash the air conditioner with chemical solvents such
as gasoline and alcohol. When you need to clean the air conditioner,
you must disconnect the power supply, and clean it with a half-wet soft
cloth. If the machine is really dirty, scrub with a mild detergent.
• The appliance can be used by children aged from 8 years and above
and persons with reduced physical, sensory or mental capabilities if
they have been given supervision or instruction concerning use of the
appliance in a safe way and understand the hazards involved. Children
shall not play with the appliance. Cleaning and maintenance shall not
be made by children without supervision.
• If the supply cord is damaged, it must be replaced by the manufactu-
hazard.
• The appliance shall be installed in accordance with national wiring re-
gulations.
• Do not operate your air conditioner in a wet room such as a bathroom or
laundry room.

8ENGLISH
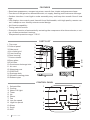
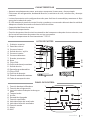
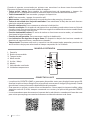
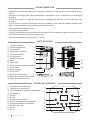
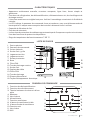
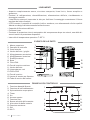
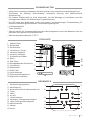
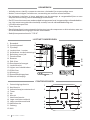
PARTS LIST
CONTROL PANEL
1. Top cover
2. Control panel
3. Side panel
4. Air outlet/grid
5. Front housing
6. Rear housing
7. Caster wheels
8. Base plate
9.
10. Continuous drainage hole
11. Air vent
12. Wrapping post
13.
14. Drainage hole
15. Windows sealing plate
16. Exhaust pipe
1.
2. Cooling
3. Water full light
4. Timer
5. Up
6. Power
7. Fan
8. Low fan speed
9. High fan speed
10. Sleep
11. Down
12. WiFi
FEATURES
• Brand new appearance, compact structure, smooth line, simple and generous shape.
•
•
pipe.
• LED displays the control panel, beautiful and fashionable, with high-quality remote con-
trol. It adopts a user-friendly remote control design.
•
• Timing switch function.
• Protection function of automatically restarting the compressor after three minutes, a vari-
ety of other protection functions.
• Temperature operation range: 7-35 C.
1
2
3
4
5
6
7
8
9
10
11
12
13
14
1615
1
2
3
4
5
6
7
8
9
10
11
12

9
ENGLISH
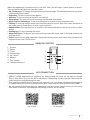
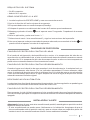
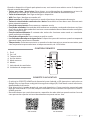
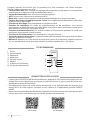
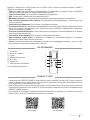
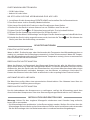
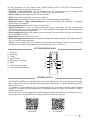
REMOTE CONTROL
APP CONNECTION
1. Screen
2. Power
3. Timer
4. Sleep mode
5. Up / Down
6. Modes
7. Fan speeds
8. Temperature unit
Then the device will get into standby status.
• Up / Down keys: To change temperature and time settings. (Temperature can’t be set while
• Power key: To turn on and off the device.
• WiFi key: To turn on and off the WiFi connection.
• Sleep mode: The unit will work on energy-saving and quiet mode.
• High /Low fan speed keys
• Fan key:
set under certain conditions, as anti-cold conditions.
• Dehumidier
speed.
• Cooling key: To start cooling the room.
• Water full light: The device will stop working when the water tank is full and needs to be
drained away.
• Timer
required time, from 1 to 24 hours.
• CREATE HOME application is available for Android and iOS (look for the app on Google
Play or App Store or scan the QR code below). Depending on the provider, there may be
costs involved in downloading the app.
• This appliance allows you to operate the appliance via your home network. A prerequisite
is a permanent WiFi (2.4 Gh) connection to your router and the free app CREATE HOME.
• We recommend disconnecting the appliance from the power supply when you are away
from home to prevent unintentional switching on while you are away.
OS iPhone OS Android
1
2
3
4
5
6
7
8
ºC ºF

10 ENGLISH
SYSTEM REQUERIMENTS
FROST PROTECTION FUNCTION
OVERFLOW PROTECTION FUNCTION
AUTOMATIC DEFROSTING
COMPRESSOR PROTECTION FUNCTION
HOW TO CONNECT TO THE APP
• iOs 8.0 or higher.
• Android 4.1 or higher.
In cooling, dehumidifying or economic power-saving mode, if the temperature of the exhaust
pipe is too low, the air conditioner will automatically enter protection status; if the tempera-
ture of the exhaust pipe rises to a certain temperature, it can automatically revert to normal
operation.
When water in the water tank exceeds the warning level, the machine will automatically
drainage pipe connecting the device or the water outlet to a sewer or other drainage area
to empty the water. After the water is emptied, the device will automatically return to the
original state.
The machine has automatic defrosting function. Defrosting can be achieved through a four-
way valve reversing system.
To increase the service life of the compressor, it has a 3-minute delay booting protection
function after the compressor is turned off.
Warning: Before using this portable air conditioner, keep it upright for at least two hours.
• The air conditioner can be easily moved in the room. In the moving process, ensure that
the air conditioner is in the upright position and the air conditioner should be placed on
environments.
1. Install the CREATE HOME app and create a user account.
2. Activate the WiFi function in the settings of your appliance.
3. The appliance must be in Standby mode.
4. Place the appliance at a distance of about 5 meters to your router.
5. Press and hold the button
6. Launch the app and select “ + ”.
7. Select the “air conditioner” menu and follow the instructions on the display.
8. Once the appliance has been successfully connected, the button lights up. Now you
can operate the appliance using the app.
PROTECTION FUNCTIONS
INSTALLATION AND ADJUSTMENT

11
ENGLISH
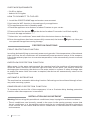
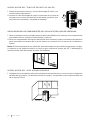
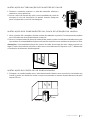
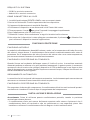
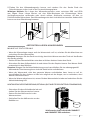
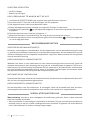
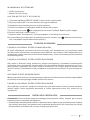
INSTALLATION OF THE HEAT PIPE
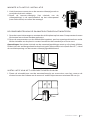
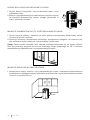
INSTALLATION OF THE WINDOW SEALING PLATE
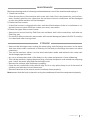
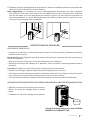
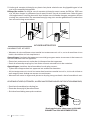
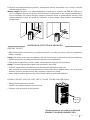
INSTALLATION OF THE APPLIANCE
1. Take out the outer connector assembly and the exhaust pipe
assembly, and remove the plastic bags;
2. insert the heat pipe assembly (the end of the exhaust joint)
into the back panel vent slot (push to the left) and complete
the assembly.
1. Half open the window and mount the window sealing plate assembly to the window. Com-
ponents can be placed in horizontal and vertical direction.
2. Pull the components of the window sealing plate assembly open, adjust their opening dis-
components of the assembly.
Notes
distorted nor have substantial turning (greater than 45°). Keep the ventilation of the exhaust
pipe not blocked.
1.
the distance between the body and walls or other objects shall be of at least 50 cm.
50 cm
50 cm

12 ENGLISH
the window sealing plate assembly.
Important Notice: The length of the exhaust hose shall be between 280 and 1,500mm, and
or replace it with other different hoses, or this may cause a malfunction. Exhaust host must
be not blocked; otherwise it may cause overheating.
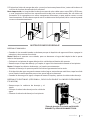
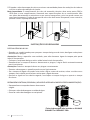
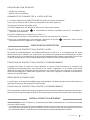
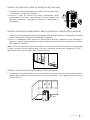
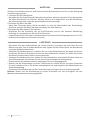
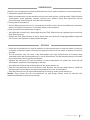
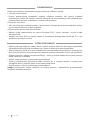
MANUAL DRAINAGE
CONTINUOUS DRAINAGE (OPTIONAL, ONLY APPLICABLE TO DEHUMIDIFYING MODE)
• When the air conditioner stops after the water tank is full, turn off the machine power and
unplug the power plug.
Notes: Please move the appliance carefully, so as not to spill the water in the water tank at
the bottom of the body.
• Place the water container below the side water outlet behind the body.
•
into the water container.
Notes: Keep the drainage cover and the water plug properly.
• During drainage, the body can be tilted slightly backwards.
• If the water tank cannot hold all the water, before it is full, stuff the water outlet with the
• When the water is discharged, stuff the water plug, and tighten the drainage cover.
• Unscrew the drainage cover, and unplug the
water plug.
• Set the drainage pipe into the water outlet.
• Connect the drainage pipe to the bucket.
DRAINAGE INSTRUCTIONS
*Drainage pipe not included in SILKAIR
CONNECT and CONNECT PRO.

13
ENGLISH
Before performing tasks of cleaning and maintenance, turn off the machine and unplug it.
1. Clean the surface:
• Clean the surface of the machine with a wet soft cloth. Don’t use chemicals, such as ben-
zene, alcohol, gasoline, etc; otherwise, the surface of the air conditioner will be damaged
or even the whole machine will be damaged.
• -
•
• ) and dry
it in the shade after rinsing clean.
• Unscrew the drainage cover, unplug the water plug, and discharge the water in the water
tank into other water containers or directly tilt the body to discharge the water into other
containers.
• Turn on the machine, adjust it to low-wind ventilation mode, and maintain this state until
the drainage pipe becomes
• dry, so as to keep the inside of the body in a dry state and prevent it from mildewing.
• Turn off the machine, unplug the power plug, and wrap the power cord around the wrapping
post; install the water plug and the drainage cover.
• Remove the exhaust pipe and keep it properly.
• Cover the air conditioner with a plastic bag. Put it in a dry place, keep it out of the reach of
children, and take dust control measures.
• Remove batteries of the remote control and keep them properly.
Note: ensure that the body is placed in a dry place and keep all machine components properly.
MAINTENANCE
STORAGE

14 ENGLISH
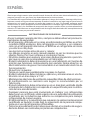
In compliance with Directives: 2012/19/EU and 2015/863/EU on the restriction of the use of dangerous
substances in electric and electronic equipment as well as their waste disposal. The symbol with the
crossed dustbin shown on the package indicates that the product at the end of its service life shall be
collected as separate waste. Therefore, any products that have reached the end of their useful life must
be given to waste disposal centres specialising in separate collection of waste electrical and electronic
equipment, or given back to the retailer at the time of purchasing new similar equipment, on a one for one
basis. The adequate separate collection for the subsequent start-up of the equipment sent to be recycled,
treated and disposed of in an environmentally compatible way contributes to preventing possible nega-
tive effects on the environment and health and optimises the recycling and reuse of components making
up the apparatus. Abusive disposal of the product by the user involves application of the administrative
sanctions according to the laws.
failure of the warranty, and may cause damage to users or their properties.
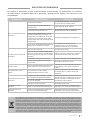
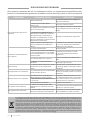
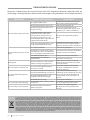
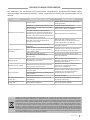
TROUBLESHOOTING
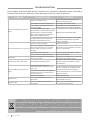
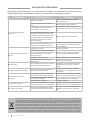
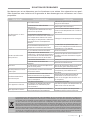
PROBLEM POSSIBLE CAUSE SOLUTION
The air conditioner does not
work.
There is no electricity. Turn it on after connecting it to a
socket with electricity.
The overflow indicator displays "FL". Discharge the water inside.
The ambient temperature is too
low or too high
Recommend to use the machine in at
the temperature of 7-35 0C (44-95 0F).
In cooling mode, the room
temperature is lower than the set
temperature; in heating mode,
the room temperature is higher
than the set temperature.
Change the set temperature.
In dehumidification mode, the
ambient temperature is low.
The machine is placed in a room with
an ambient temperature of greater
than 17 0C (62 0F).
The cooling effect is not good
There is direct sunlight. Pull the curtains.
Doors or windows are open; there
are a lot of people; or in cooling
mode, there are other sources
of heat.
Close doors and windows, and add
new air conditioner.
The filter screen is dirty. Clean or replace the filter screen.
The air inlet or outlet is blocked. Clear obstructions.
Big Noise The air conditioner is not placed
on a flat surface.
Put the air conditioner on a flat and
hard place (to reduce noise).
Compressor does not work. Overheat protection starts.
Wait for 3 minutes until the temper-
ature is lowered, and then restart
the machine.
The remote control does not
work.
The distance between the
machine and the remote control
is too far.
Let the remote control get close to
the air conditioner, and make sure
that the remote control directly
faces to the direction of the remote
control receiver.
The remote control is not aligned
with the direction of the remote
control receiver.
Batteries are dead. Replace batteries.
Displays 'E1'. The pipe temperature sensor is
abnormal.
Check the pipe temperature sensor
and related circuitry.
Displays 'E2' The room temperature sensor is
abnormal.
Check the room temperature sen-
sor and related circuitry.

15
ESPAÑOL
ESPAÑOL
Gracias por elegir nuestro aire acondicionado. Antes de utilizar este electrodoméstico y para
asegurar su mejor uso, por favor, lea detenidamente las instrucciones.
Las medidas de seguridad aquí indicadas reducen el riesgo de incendio, descarga eléctrica y
lesiones cuando se siguen correctamente. Guarde el manual en un lugar seguro para futuras
referencias, así como la garantía, el recibo de compra y la caja. Si procede, entregue estas
instrucciones al futuro propietario del electrodoméstico. Siempre siga las instrucciones bási-
cas de seguridad y las medidas de prevención de riesgos cuando utilice un electrodoméstico
eléctrico. El fabricante no se responsabilizará de ningún daño derivado del incumplimiento de
estas instrucciones por parte del usuario.
INSTRUCCIONES DE SEGURIDAD
Al usar cualquier aparato eléctrico, siempre se deben observar precaucio-
nes básicas de seguridad.
• El refrigerante utilizado en los aires acondicionados portátiles es el hid-
rocarburo R290 ecológico. Este refrigerante es inodoro y, en compara-
ción con el refrigerante alternativo, el R290 es un refrigerante sin ozono
y su efecto es muy bajo.
• Lea las instrucciones antes de usar y reparar.
• Los dibujos provistos en este manual pueden no ser los mismos que los
• No utilice medios para acelerar el proceso de descongelación o para lim-
piar que no sean los recomendados por el fabricante.
• El electrodoméstico debe almacenarse en una habitación sin fuentes de
ignición que funcionen continuamente (por ejemplo: llamas abiertas, un
electrodoméstico de gas en funcionamiento o un calentador eléctrico en
funcionamiento)
• No perforar ni quemar.
• Tenga en cuenta que posiblemente los gases no huelan.
• El electrodoméstico debe instalarse, operarse y almacenarse en una ha-
bitación con un área mayor a 11 m².
• Mantenga las aberturas de ventilación requeridas libres de obstrucciones.
• El mantenimiento se realizará solo según lo recomendado por el
fabricante.
• El electrodoméstico debe almacenarse en un área bien ventilada donde
-
ción del aire acondicionado.
• Cualquier persona que esté involucrada en trabajar con refrigerantes
acreditada por la industria que autorice su competencia para manejar
refrigerantes de manera segura.
• El mantenimiento y la reparación que requieran la asistencia de personal
-
• Todos los procedimientos de trabajo que afecten a los medios de seguri-
dad solo deben ser realizados por personas competentes.

16 ESPAÑOL
Notas: El aire acondicionado solo es adecuado para uso en interiores y no
es adecuado para otras aplicaciones.
• Siga las reglas de interconexión de la red local mientras instala el aire
acondicionado y asegúrese de que esté correctamente conectado a
tierra. Si tiene alguna pregunta sobre la instalación eléctrica, siga las
instrucciones del fabricante y, si es necesario, solicite a un electricista
profesional que la instale.
• Coloque la máquina en un lugar plano y seco y mantenga una distancia
superior a 50 cm entre la máquina y los objetos o paredes circundantes.
• Después de instalar el aire acondicionado, asegúrese de que el enchu-
corriente, y coloque el cable de alimentación de manera ordenada para
evitar que alguien se tropiece o desconecte el enchufe.
• No coloque ningún objeto en la entrada y salida de aire del aire acondicio-
nado. Mantenga la entrada y salida de aire libre de obstrucciones.
• Cuando se instalen tuberías de drenaje, asegúrese de que estén conec-
tadas correctamente y que no estén deformadas ni dobladas.
• Mientras ajusta las guías de salida de aire superior e inferior, tire de
ellas suavemente con las manos para evitar dañarlas.
• Al mover la máquina, asegúrese de que esté en posición vertical.
• -
tufas y otras fuentes de calor.
• -
rio, podría provocar un fallo en el funcionamiento de la máquina o incluso
dañar a personas y propiedades. Para evitar riesgos, si ocurre un fallo en la
máquina, solicite al fabricante o profesionales que la reparen.
• No instale ni use el aire acondicionado en el baño u otros ambientes húmedos.
• No tire del enchufe para apagar la máquina.
• No coloque tazas u otros objetos sobre el aparato para evitar acciden-
tes provocados por el agua u otros líquidos.
•
aire acondicionado.
• No limpie ni lave el aire acondicionado con solventes químicos como
gasolina y alcohol. Cuando necesite limpiar el aire acondicionado, debe
desconectar la fuente de alimentación y limpiarla con un paño suave
medio húmedo. Si la máquina está realmente sucia, frótela con un de-
tergente suave.
• El aparato puede ser utilizado por niños a partir de 8 años y personas
con capacidades físicas, sensoriales o mentales reducidas si se les ha
dado supervisión o instrucciones sobre el uso del aparato de manera
segura y entienden los riesgos involucrados. Los niños no deben jugar
con el aparato. La limpieza y el mantenimiento no deben ser realizados
por niños sin supervisión.
• Si el cable de alimentación está dañado, debe ser reemplazado por el
similar para evitar riesgos.
• El electrodoméstico debe instalarse de acuerdo con las regulaciones
nacionales de cableado.
• No utilice su aire acondicionado en una habitación húmeda, como un
baño o una lavandería.

17
ESPAÑOL
LISTA DE PARTES
PANEL DE CONTROL
1. Cubierta superior
2. Panel de control
3. Carcasa lateral
4. Salida de aire / rejilla
5. Carcasa trasera
6. Carcasa delantera
7. Ruedas pivotantes
8. Base
9. Filtro EVA
10.
11. Salida de aire
12. Pestañas guardacables
13. Filtro CON
14.
15. Placa de sellado de ventanas
16. Tubo de escape de calor
1.
2. Función de refrigeración
3. Luz indicadora de depósito de agua
lleno
4. Temporizador
5. Arriba
6. Encendido/Apagado
7. Función ventilador
8. Velocidad baja del ventilador
9. Velocidad alta del ventilador
10. Función noche
11. Abajo
12.
CARACTERÍSTICAS
• Aspecto completamente nuevo, estructura compacta, línea suave y forma simple.
•
continuo.
•
suave de la tubería de calor.
• El LED muestra el panel de control, bonito y moderno, con mando a ditancia de alta calidad.
Adopta un diseño de mando a distancia fácil de utilizar.
•
• Función de temporizador.
• Función de protección de reinicio automático del compresor después de tres minutos, una
de las varias funciones de protección con las que cuenta.
• Rango de temperatura de funcionamiento: 7-35 C.
1
2
3
4
5
6
7
8
9
10
11
12
13
14
1615
1
2
3
4
5
6
7
8
9
10
11
12

18 ESPAÑOL
MANDO A DISTANCIA
CONECTAR LA APP
1. Pantalla
2. Botón de encendido
3. Temporizador
4. Modo noche
5. Arriba / Abajo
6. Modos
7. Velocidades ventilador
8. Unidades temperatura
Cuando el aparato se enciende por primera vez, escuchará un breve tono de encendido.
Entonces el dispositivo entrará en estado de espera.
• Teclas arriba / abajo:
• Tecla de encendido: Para encender y apagar el dispositivo.
• WiFi:
• Modo noche: La unidad funcionará en modo de ahorro de energía y silencioso.
• Teclas de velocidad alta / baja del ventilador
más bajo automáticamente.
• Función calefacción: Para comenzar a calentar la habitación.
• Función ventilador:
aire alto o bajo. Pero es posible que no funcione según lo establecido en ciertas condiciones,
como las condiciones contra el frío.
• Función deshumidicadora: El resto de teclas no funcionan en este modo y el ventilador
funcionará a baja velocidad.
• Función de refrigeración: Para comenzar a enfriar la habitación.
• Luz indicadora de depósito de agua lleno: El dispositivo dejará de funcionar cuando el
depósito de agua esté lleno y necesite ser drenado.
• Temporizador: Presione esta tecla y cuando la luz del temporizador parpadee, presione las
teclas arriba o abajo para seleccionar el tiempo requerido, de 1 a 24 horas.
• La aplicación CREATE HOME se encuentra disponible tanto para Android como para iOS
(busque la aplicación en Google Play o App Store o escanee el código QR siguiente). Puede
que existan costes adicionales dependiendo del proveedor.
• Este aparato se utiliza a través de su red doméstica. Como requisito imprescindible, debe
HOME.
• Le recomendamos que desconecte el aparato de la red eléctrica cuando esté fuera de casa
para evitar que se ponga en marcha de manera accidental mientras esté fuera.
OS iPhone OS Android
1
2
3
4
5
6
7
8
ºC ºF

19
ESPAÑOL
REQUISITOS DEL SISTEMA
FUNCIÓN DE PROTECCIÓN CONTRA HELADAS
FUNCIÓN DE PROTECCIÓN CONTRA DESBORDAMIENTO
DESCONGELACIÓN AUTOMÁTICA
FUNCIÓN DE PROTECCIÓN CONTRA DESBORDAMIENTO
CÓMO CONECTARSE A LA APP
• iOs 8.0 o superior.
• Android 4.1 o superior.
-
cape de calor es demasiado baja, el aire acondicionado entrará automáticamente en estado
de protección. Si la temperatura del tubo de escape de calor se eleva a cierta temperatura,
puede volver automáticamente al funcionamiento normal.
Cuando el agua en el depósito de agua excede el nivel de advertencia, la máquina hará so-
nar automáticamente una alarma y la luz indicadora parpadeará. En este momento, debe
mover la tubería de drenaje que conecta el dispositivo o la salida de agua a una alcantarilla
u otra área de drenaje para vaciar el agua. Después de vaciar el agua, el dispositivo volverá
automáticamente al estado original.
La máquina tiene función de descongelación automática. La descongelación se puede lograr
a través de un sistema de inversión de válvula de cuatro vías.
Para aumentar la vida útil del compresor, el aire acondicionado tiene una función de protec-
ción del arranque para que el compresor descanse durante tres minutos después de haberse
apagado.
Advertencia: Antes de usar este aire acondicionado portátil, manténgalo en posición vertical
durante al menos dos horas.
• El aire acondicionado se puede mover fácilmente en la habitación. Asegúrese de que el
instale ni use el aire acondicionado en el baño u otros ambientes húmedos.
1. Instale la aplicación CREATE HOME y cree una cuenta de usuario.
2.
3. El aparato debe estar en modo de espera (Standby).
4. Coloque el aparato a una distancia del router de 5 metros aproximadamente.
5. Mantenga pulsado el botón en el aparato unos 5 segundos. Parpadeará de manera
rápida.
6. Abra la aplicación y pulse en el icono “ + ”.
7. Seleccione el menú “aire acondicionado” y siga las instrucciones de la pantalla.
8. Una vez el aparato se haya conectado de manera adecuada, se encenderá el botón . Ya
puede utilizar el aparato a través de la aplicación.
FUNCIONES DE PROTECCIÓN
INSTALACIÓN Y AJUSTE

20 ESPAÑOL
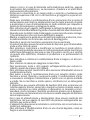
INSTALACIÓN DEL TUBO DE ESCAPE DE CALOR
INSTALACIÓN DE LOS COMPONENTES DE LA PLACA DE SELLADO DE VENTANAS
1. Saque el conector externo y el tubo de escape de calor, y re-
tire las bolsas de plástico;
2. inserte el tubo de escape de calor (el extremo de la junta de
escape) en la ranura de ventilación del panel posterior (em-
puje hacia la izquierda) y complete el montaje.
1. Abra la ventana hasta la mitad y monte la placa de sellado en la ventana. Los componentes
se pueden colocar en dirección horizontal y vertical.
2. Abra los componentes de la placa de sellado de la ventana, ajuste su distancia de apertura
para que ambos extremos del la placa entren en contacto con el marco de la ventana y
fíjelos.
Notas: El extremo plano de las juntas del tubo de escape de calor debe encajarse en su lugar.
La tubería no se puede torsionar ni tiene un giro sustancial (mayor de 45 °). Mantenga la
ventilación del tubo de escape de calor sin bloquear.
INSTALACIÓN DEL AIRE ACONDICIONADO
1. Coloque el aire acondicionado con la tubería de escape de calor y los accesorios instalados
delante de la ventana, y la distancia entre el cuerpo y las paredes u otros objetos debe ser
de al menos 50 cm.
50 cm
50 cm
Strona się ładuje...
Strona się ładuje...
Strona się ładuje...
Strona się ładuje...
Strona się ładuje...
Strona się ładuje...
Strona się ładuje...
Strona się ładuje...
Strona się ładuje...
Strona się ładuje...
Strona się ładuje...
Strona się ładuje...
Strona się ładuje...
Strona się ładuje...
Strona się ładuje...
Strona się ładuje...
Strona się ładuje...
Strona się ładuje...
Strona się ładuje...
Strona się ładuje...
Strona się ładuje...
Strona się ładuje...
Strona się ładuje...
Strona się ładuje...
Strona się ładuje...
Strona się ładuje...
Strona się ładuje...
Strona się ładuje...
Strona się ładuje...
Strona się ładuje...
Strona się ładuje...
Strona się ładuje...
Strona się ładuje...
Strona się ładuje...
Strona się ładuje...
Strona się ładuje...
Strona się ładuje...
Strona się ładuje...
Strona się ładuje...
Strona się ładuje...
Strona się ładuje...
Strona się ładuje...
Strona się ładuje...
Strona się ładuje...
Strona się ładuje...
Strona się ładuje...
Strona się ładuje...
Strona się ładuje...
Strona się ładuje...
Strona się ładuje...
Strona się ładuje...
Strona się ładuje...
Strona się ładuje...
Strona się ładuje...
Strona się ładuje...
Strona się ładuje...
Strona się ładuje...
Strona się ładuje...
Strona się ładuje...
Strona się ładuje...
-
 1
1
-
 2
2
-
 3
3
-
 4
4
-
 5
5
-
 6
6
-
 7
7
-
 8
8
-
 9
9
-
 10
10
-
 11
11
-
 12
12
-
 13
13
-
 14
14
-
 15
15
-
 16
16
-
 17
17
-
 18
18
-
 19
19
-
 20
20
-
 21
21
-
 22
22
-
 23
23
-
 24
24
-
 25
25
-
 26
26
-
 27
27
-
 28
28
-
 29
29
-
 30
30
-
 31
31
-
 32
32
-
 33
33
-
 34
34
-
 35
35
-
 36
36
-
 37
37
-
 38
38
-
 39
39
-
 40
40
-
 41
41
-
 42
42
-
 43
43
-
 44
44
-
 45
45
-
 46
46
-
 47
47
-
 48
48
-
 49
49
-
 50
50
-
 51
51
-
 52
52
-
 53
53
-
 54
54
-
 55
55
-
 56
56
-
 57
57
-
 58
58
-
 59
59
-
 60
60
-
 61
61
-
 62
62
-
 63
63
-
 64
64
-
 65
65
-
 66
66
-
 67
67
-
 68
68
-
 69
69
-
 70
70
-
 71
71
-
 72
72
-
 73
73
-
 74
74
-
 75
75
-
 76
76
-
 77
77
-
 78
78
-
 79
79
-
 80
80


w innych językach
- español: Create Silkair Connect Manual de usuario
- italiano: Create Silkair Connect Manuale utente
- Deutsch: Create Silkair Connect Benutzerhandbuch
- português: Create Silkair Connect Manual do usuário
- français: Create Silkair Connect Manuel utilisateur
- Nederlands: Create Silkair Connect Handleiding
Powiązane artykuły
Inne dokumenty
-
Woods AC CAPRI Silent 9K Operating Instructions Manual
-
Blaupunkt MBS0709E Instrukcja obsługi
-
Korona 82000 Instrukcja obsługi
-
-
Midea Envi 12H Instrukcja obsługi
-
Aiwa ACD-18KBTU Instrukcja obsługi
-
-
Haier AD18MS1ERAD Operating Manual And Instructions
-
-
Koenic KAC 3232 Instrukcja obsługi