Celexon Ecran sur cadre Home Cinema 180 x 135 cm Instrukcja obsługi
- Typ
- Instrukcja obsługi

Bedienungsanleitung
celexon HomeCinema Frame
Vielen Dank für den Kauf dieses Produkts.
Für eine optimale Leistung und Sicherheit lesen Sie diese Anweisungen bitte sorgfältig
durch, bevor Sie dieses Produkt anschließen oder betreiben. Bitte bewahren Sie diese
Anleitung für eine spätere Verwendung auf.
Version: 32422_061

1
Diese Bedienungsanleitung dient dazu, Sie mit der Funktionsweise dieses Produktes
vertraut zu machen. Bewahren Sie diese Anleitung daher gut auf, damit Sie jederzeit
darauf zugreifen können.
• Bitte beachten Sie vor der Montage das beiliegende Datenblatt mit weiteren
Sicherheits- und Verwendungshinweisen.
• Beginnen Sie nicht mit der Montage, bevor Sie die komplette Bedienungsanleitung
gelesen und diese verstanden haben.
• Dieses Produkt muss auf ebener, sauberer Fläche mit ausreichend Platz aufgebaut
werden.
• Führen Sie die Installation einer Rahmenleinwand zwingend mit einer weiteren
Person durch, um eine sichere Montage zu gewährleisten.
• Entnehmen die das Produkt der Verpackung und entfernen alle Verpackungs-
materialien. Achten Sie darauf, dass sich kein Verpackungsmaterial am oder im
Produkt bendet. Sollten Sie Verpackungsbeschädigungen feststellen, prüfen Sie
zusätzlich ob Beschädigungen am Produkt zu nden sind. Sollten Sie äußerliche
Beschädigungen an dem Gerät oder unerwartete unübliche Funktionsweisen fest-
stellen, darf das Produkt nicht weiter genutzt oder aufgebaut werden. Kontaktieren
Sie umgehend den Händler, bei dem Sie das Produkt gekauft haben oder celexon
direkt (Web: www.celexon.de, Mail: info@celexon.de) für weitere Informationen.
• Um einen störungsfreien Betrieb sicherzustellen, darf das Produkt ausschließlich in
Innenbereichen eingesetzt werden, es ist NICHT zur Nutzung im Freien geeignet.
• Die Nutzung des Gerätes und evtl. Zubehörteile ist Kindern unter 16 Jahren verbo-
ten.
• Sorgen Sie dafür, dass keine Kinder mit den Geräten spielen oder sich ohne Aufsicht
in der Nähe aufhalten.
• Ein Umbauen oder Verändern des Produktes beeinträchtigt die Produktsicherheit.
• Achtung Verletzungsgefahr! Verändern Sie das Produkt niemals eigenmächtig.
Führen Sie Reparaturen nie selbst aus!
• Dieses Produkt darf nur in unverändertem Originalzustand verwendet werden.
• Verwenden Sie das Produkt nicht in der Nähe von Geräten die Gase oder Wasser
auslassen oder in staubiger Umgebung.
• Behandeln Sie das Produkt sorgfältig. Es kann durch Stöße, Schläge oder Fall aus
bereits geringer Höhe beschädigt werden.
• Halten Sie das Produkt fern von Feuchtigkeit und Hitze.
• Tauchen Sie das Produkt niemals in Wasser oder andere Flüssigkeiten.
WARNHINWEISE

2
• Verwenden Sie das Produkt nur in seiner bestimmungsgemäßen Art und Weise. Eine
anderweitige Verwendung kann zu Beschädigungen am Produkt oder in dessen Um-
gebung führen.
• Ziehen Sie die Schrauben fest, aber überdrehen diese nicht. Ein zu festes Anziehen
(z.B. durch Verwendung eines Akkuschraubendrehers) kann Schäden verursachen
und den sicheren Halt der Leinwand beeinträchtigen.
• Hängende Lasten müssen mindestens zweimal jährlich auf Festigkeit und Tragfähig-
keit geprüft werden.
• Bei Nichtbeachtung obiger Anweisungen kann es zu Personenschäden und
Beschädigungen des Produktes oder Geräten die daran angeschlossen
sind kommen. Auch kann bei fehlerhafter Installation oder Verwendung die
Garantie erlöschen.
• Wenn Sie beim Verwenden des Produktes unsicher sind, kontaktieren Sie
Fachpersonal, Ihren Händler oder celexon direkt (Web: www.celexon.de,
Mail: info@celexon.de).
• Technische Änderungen und Irrtümer vorbehalten.
Der Hersteller übernimmt keine Verantwortung für Sachschäden oder Personenschäden,
wenn die Leinwand außerhalb der empfohlenen Spezikationen verwendet wird, oder
bei unsachgemäßer Installation. Verwenden Sie diese Leinwand nicht in der Nähe von
Heizungen oder Klimaanlagen. Montieren Sie das Produkt ebenfalls nicht in direktem
Sonnenlicht oder vor einem Fenster. Aufgrund der temperaturempndlichen PVC Ober-
äche kann es zu nachhaltiger Beschädigung des Projektionstuchs kommen.
Wir empfehlen Ihnen, nach der Lieferung ca. 2 Stunden mit der Montage zu warten. So
kann sich die Leinwand akklimatisieren; besonders wenn die Leinwand von kalter in eine
warme Umgebung gebracht wird.
Bitte vermeiden Sie jegliche Flecken auf der Tuchoberäche. Diese könnten sich mög-
licherweise nicht mehr entfernen lassen.
• Beachten Sie die Front-und Rückseite des Tuches bei der Anbringung
• Bitte kontrollieren Sie ALLE Teile vor dem Zusammenbau auf Schäden oder Kratzer!
• Die Leinwand darf NUR auf weichem, gepolstertem Untergrund zusammengebaut
werden. Die Rahmenbeschichtung kann andernfalls verkratzen.
• Für eine dauerhafte Planlage beachten Sie folgende Hinweise:
1. Berühren Sie das Projektionstuch nicht mit den Händen
2. Falten Sie das Projektionstuch nicht
3. Bemalen oder beschriften Sie nicht das Projektionstuch

3
Die Angaben in diesem Dokument können ohne vorherige Ankündigung durch
den Hersteller geändert werden. Änderungen werden jeweils in den folgenden
Versionen dieses Handbuchs ergänzt. Der Hersteller übernimmt keine Garantie
oder Gewährleistung auf die Richtigkeit der Angaben in diesem Dokument.
PFLEGEHINWEIS
Reinigen Sie die Leinwand NIEMALS mit Alkohol oder anderen Reinigungs-
mitteln, die Lösungsmittel enthalten. Benutzen Sie nur ein weiches und saube-
res Tuch. Mit einer milden Seifenlauge kann gegebenenfalls Schmutz von der
Oberäche entfernt werden. Vermeiden Sie unbedingt den Kontakt mit spitzen
oder scharfen Gegenständen. Diese könnten das Projektionstuch nachhaltig
beschädigen. Weitere Hinweise entnehmen Sie den beiliegenden Leinwand-
hinweisen.
HAFTUNGSAUSSCHLUSS
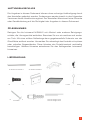
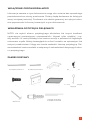
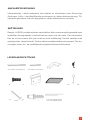
LIEFERUMFANG
2x Strebe Horizontal A
16x M5x8mm Schrauben
4x Ø4x40mm Wand-
schrauben
2x Strebe Vertikal B
2x Wandhalter
4x Kunststoffdübel
4x Eckverbinder C
1x Projektionstuch
2x PVC Stangen lang
2x PVC Stangen kurz
Spannfedern
1x Federspannwerkzeug

4
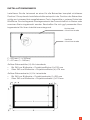
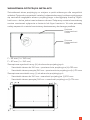
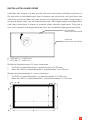
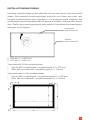
INSTALLATIONSHINWEIS
Installieren Sie die Leinwand an einer für alle Betrachter komplett sichtbaren
Position! Die optimale Installationshöhe entspricht der Position der Betrachter
mittig zur Leinwand bei ausgefahrenem Tuch: Augenhöhe = unteres Drittel der
Bildäche. Das beiliegende Montagematerial darf ausschließlich in Beton oder
massiven Stein eingebracht werden. Beschaffen Sie sich ggf. passendes Mon-
tagematerial für Ihren Installationsuntergrund. Horizontale
Aluminiumstrebe
Vertikale
Aluminiumstrebe
F = 65 mm (l <= 240cm)
F = 87 mm (l > 240cm)
Äußere Rahmenhöhe (H) für Leinwände
• Bis 240 cm Bildbreite = Projektionsäche (h)+130 mm
• Über 240 cm Bildbreite = Projektionsäche (h)+174 mm
Äußere Rahmenbreite (L) für Leinwände
• Bis 240 cm Bildbreite = Projektionsbreite (l)+130 mm
• Über 240 cm Bildbreite = Projektionsbreite (l)+174 mm

5
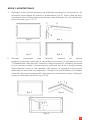
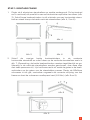
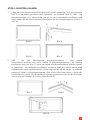
SCHRITT 1: MONTAGE RAHMEN
1. Legen sie die 4 Aluminiumstreben auf weichem Untergrund (2x Horizontal
& 2x Vertikal) je parallel zueinander im Rechteck aus (Abb.3). Schieben Sie
zwei Eckverbinder in jedes Ende einer horizontale Strebe und stecken die
beiden vertikalen Streben darauf (Abb.4,5 und 6).
2. Schieben Sie die verbleibenden beiden Eckverbinder in die untere
horizontale Strebe und schieben diese auf die vertikalen Streben wie in
Abb.7 (Hinweis: Die beiden Eckverbinder müssen zeitgleich und gleichmä-
ßig in die vertikalen Streben geschoben werden, führen Sie diesen Schritt
zu zweit aus). Richten Sie den Rahmen gerade aus, sodass die Löcher in
den Eckverbindern zu den Löchern der Streben passen. Setzen Sie die
M5x8mm Schrauben in jedes Loch, kontrollieren nochmals die korrekte
Ausrichtung des Rahmens und ziehen die Schrauben umlaufend fest (6-8
Nm) (Abb. 8 und 9).
Abb.7 Abb.8
Abb.9
Abb.3
Abb.5 Abb.6
Abb.4
A
B
C

6
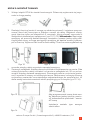
SCHRITT 2: MONTAGE TUCH
1. Führen Sie die PVC-Stangen in die Tuchtaschen ein. Es wird empfohlen
diesen Vorgang mit 2 Personen auszuführen.
2. Breiten Sie das Tuch aus (korrekte Seite beachten!) und befestigen zuerst
je zwei Spannhaken in jeder Ecke am Rahmen. Spannen Sie das Tuch zu-
erst nur in allen 4 Ecken. Fahren Sie umlaufend mit allen weiteren Federn
fort (Abb. 10, 11 und 12). Hinweis: Beim Spannen der Federn mit dem bei-
liegenden Werkzeug, stets mit einer Hand den Rahmen stützen und mit
der zweiten Hand die Feder ziehen bis diese im Tuch eingehakt werden
kann. Führen Sie diesen Schritt zu zweit aus. Das Tuch wirkt ggf. zu klein,
es muss merklich Spannung auf die Federn gebracht werden.
3. Messen Sie die Distanz zwischen den beiden Hängepunkten am Rahmen.
Die beiden Wandhalter sollten ca. je 50cm von außen zwischen zwei Fe-
dern am Rahmen positioniert werden. Markieren Sie das Maß an Ihrer
Wand (waagerecht) und bohren Löcher für die Wandhalter vor. Befestigen
Sie die Wandhalter mit dem für den Untergrund passenden Montagema-
terial. Hängen Sie die Leinwand zu zweit vorsichtig in die Halter ein (Abb.
13 & 14).
Abb.10
Abb.13
Abb.14
Abb.11 Abb.12
Um den Rahmen anzubringen, soll-
ten zwei Personen, jeder auf einer
Seite, den Rahmen gleichzeitig an-
heben und aufhängen.
Damit ist die Installation abge-
schlossen.
celexon Europe GmbH | Gutenbergstraße 2 | 48282 Emsdetten | DE

Operating instructions
celexon HomeCinema Frame
Thank you for purchasing this product.
For optimum performance and safety, please read these instructions carefully
before connecting or operating this product. Please retain these instructions for future
reference.
Version: 32422_061

1
The purpose of these operating instructions is to familiarise you with the operation of
this this product. Therefore, keep these instructions in a safe place so that you can access
them at any time.
• The purpose of these operating instructions is to familiarise you with the operation
of this this product. Therefore, keep these instructions in a safe place so that you
can access them at any time.
• Before installation, please refer to the enclosed data sheet for further safety and use
instructions.
• Do not begin installation until you have read and understood the complete
operating instructions.
• This product must be installed on a level, clean surface with sufcient space around
the installation area.
• It is mandatory to carry out the installation of a frame screen with another person
to ensure safe installation.
• Remove the product from its packaging and remove all packaging materials. Make
sure that there is no packaging material on or in the product. If you notice any
damage to the packaging, also check for damage to the product. If you notice
any external damage to the unit or unexpected unusual functioning, do not
continue to use or assemble the product. Immediately contact the dealer from
whom you purchased the product or celexon directly (Web: www.celexon.co.uk, Mail:
info@celexon.co.uk) for further information.
• To ensure trouble-free operation, the product must only be used indoors and is NOT
suitable for outdoor use.
• The use of the screen and accessories is forbidden to children under 16 years of age.
• Ensure that no children play with the screen or are in the vicinity without
supervision.
• Converting or modifying the product compromises product safety.
• Caution: Risk of injury! Never modify the product yourself. Never carry out repairs
yourself!
• This product may only be used in its original, unmodied condition.
• Do not use the product in the vicinity of devices that emit gases or water or in a
dusty environment.
• Handle the product with care. It can be damaged by knocks, blows or falling from a
• from even a small height.
• Keep the product away from moisture and heat.
WARNINGS

2
• Never immerse the product in water or other liquids.
• Use the product only in its intended manner. Other use may result in damage to the
product or its surrounding environment.
• Tighten the screws but do not overtighten them. Overtightening (e.g. by using
a cordless screwdriver) this can cause damage and affect the secure hold of the
screen.
• Suspended loads must be checked for strength and load-bearing capacity at least
twice a year.
• Failure to follow the above instructions may result in personal injury and damage
to the product or equipment attached to it. Incorrect installation or use may also
invalidate the
• warranty may be voided.
• If you are unsure about the use of the product, please contact your
specialist personnel, your dealer or celexon directly (Web: www.celexon.co.uk, Mail:
info@celexon.co.uk).
• Technical changes and errors expected.
The manufacturer accepts no responsibility for damage to property or personal
injury, if the screen is used outside the recommended specications, or in the event of
improper installation. Do not use this screen in the vicinity of heaters or air conditioners.
Also, do not mount the product in direct sunlight or in front of a window. Due to the
temperature-sensitive PVC surface, the projection screen fabric may be permanently
damaged.
We recommend that you wait approx. 2 hours after delivery before installing the
projection screen. This way you will allow the screen to acclimatise, especially when
moving from a cold to a warm environment (or vice versa).
Please avoid any stains on the surface of the screen. These may not be able to be
removed.
• Note the front and back of the fabric when attaching it.
• Please check ALL parts for damage or scratches before assembling!
• The screen may ONLY be assembled on a soft, padded surface. Otherwise the frame
coating may scratch.
• For permanent atness, please note the following:
1. Do not touch the projection surface with your hands
2. Do not fold the projection surface
3. Do not paint or write on the projection surface

3
The information in this document is subject to change without notice by the
manufacturer. Changes will be added to subsequent versions of this manual.
Errors expected.
CARE INSTRUCTIONS
NEVER clean the screen with alcohol or other cleaning agents containing
solvents. Use only a soft and clean cloth. If necessary, dirt can be removed
from the surface with a mild soap solution (max. 5%). It is essential to avoid
contact with pointed or sharp objects. These could permanently damage the
projection screen fabric. Further instructions can be found in the enclosed
projection screen instructions.
DISCLAIMER
IN THE BOX
2x Frame Horizontal A
16x M5x8mm screws
4x Ø4x40mm wall screws
2x Frame Vertical B
2x Wall Brackets
4x plastic dowels
4x Corner connector C
1x Projection screen fabric
2x PVC rods long
2x PVC rods short
Tension springs
1x Tension spring tool

4
INSTALLATION NOTES
Before installation, please check that all the parts listed above are included! If
parts are missing, contact the dealer from whom you purchased the product
and wait for the parts to arrive before completing the installation. Install the
screen in a position that is fully visible to all viewers! The optimum installation
height corresponds to the position of the viewers in the centre of the screen
with the screen fabric extended: eye level = lower third of the screen surface.
The enclosed mounting material is intended for a solid stone wall. If necessary,
obtain suitable mounting material for your Installation surface.
Horizontal
Aluminium frame
Vertical
Aluminium frame
F = 65 mm (l <= 240 cm)
F = 87 mm (l > 240 cm)
Outer frame height (H) for screens
• Up to 240 cm screen width = projection surface (h)+130 mm
• Over 240 cm screen width = projection surface (h)+174 mm
Outer frame width (L) for screens
• Up to 240 cm image width = projection width (l)+130 mm
• Over 240 cm image width = projection width (l)+174 mm

5
STEP 1: ASSEMBLY FRAME
1. Lay out the 4 aluminium struts on a soft surface (2x horizontal & 2x
vertical) parallel to each other in a rectangle (Fig. 3). Push two corner
connectors into each end of a horizontal frame piece and attach the two
vertical frame pieces onto it (Fig. 4, 5 and 6).
2. Slide the remaining two corner connectors into the lower
horizontal frame and push them onto the vertical frame as shown in Fig. 7.
(Note: The two corner connectors must be pushed into the vertical
frame at the same time and evenly, so do this step with help from a second
person). Align the frame so that the holes in the corner connectors match
the holes in the frame. Insert the M5x8mm screws into each hole, check
again that the frame is correct and tighten the screws all around (6-8 Nm)
(Fig. 8 and 9).
Fig. 7 Fig. 8
Fig. 9
Fig. 3
Fig. 5 Fig. 6
Fig. 4
A
B
C

6
STEP 2: FABRIC ATTACHMENT
1. Insert the PVC rods into the fabric pockets. It is recommended to carry out
this procedure with 2 people.
2. Spread out the fabric (observe the correct side!) and rst fasten two
tensioning hooks in each corner of the frame. Tension the fabric only in
all 4 corners at rst. Continue all the way round with all the other springs.
(Fig. 10, 11 and 12). Note: When tensioning the springs with the enclosed
tool, always use one hand and pull the spring with the second hand until it
can be hooked into the fabric. Carry out this step in pairs. The fabric may
seem too small, but it must be as you have to put a lot of tension on the
spring to achieve the atness required.
3. Measure the distance between the two hanging points on the frame.
The two wall brackets should each be positioned approx. 50cm from the
outer edge. Mark the measurement on your wall (horizontally) and pre-drill
holes for the wall brackets. Fix the wall brackets with the enclosed mounting
material. Carefully hang the screen into the brackets (Fig. 13 and 14).
Fig. 10
Fig. 13
Fig. 14
Fig. 11 Fig. 12
To mount the frame, two people
should lift it, one on each side. Lift
and hang the frame at the same
time onto the mounting brackets.
This completes the installation.
celexon Europe GmbH | Gutenbergstraße 2 | 48282 Emsdetten | DE

Manuel d’utilisation
Écran sur cadre celexon
Home Cinéma
Nous vous remercions d‘avoir acheté cet article.
Pour des performances et une sécurité optimales, veuillez lire attentivement ces
instructions avant d’installer ou d‘utiliser ce produit. Veuillez conserver ce manuel pour
une utilisation ultérieure.
Version: 32422_061

1
• Avant de procéder au montage, veuillez consulter la che technique jointe
contenant d‘autres consignes de sécurité et d‘utilisation.
• Ne commencez pas le montage avant d‘avoir lu et compris l‘intégralité du mode
d‘emploi.
• Ce produit doit être installé sur une surface plane et propre avec sufsamment
d‘espace autour de la surface de montage.
• Effectuez l‘installation avec une autre personne an de garantir un montage sûr.
• Retirez le produit de son emballage et enlevez tous les matériaux d‘emballage.
Veillez à ce qu‘aucun matériau d‘emballage ne se trouve sur ou dans le produit.
Si vous constatez des dommages sur l‘emballage, vériez également si le produit
est endommagé. Si vous constatez des dommages extérieurs sur le produit ou un
fonctionnement inattendu ou inhabituel, l’écran ne doit plus être utilisé. Contactez
immédiatement le revendeur chez qui vous avez acheté le produit ou directement
le fabricant celexon (Web : www.celexon.fr, Mail : info@celexon.fr) pour plus
d‘informations.
• Pour garantir un fonctionnement sans problème, le produit doit être utilisé
exclusivement à l‘intérieur, il n‘est PAS adapté à une utilisation en extérieur.
• L‘utilisation de l‘appareil et de ses accessoires est interdite aux enfants de moins
de 16 ans.
• Veillez à ce que les enfants ne jouent pas avec le produit et ne se trouvent pas à
proximité sans surveillance.
• Toute transformation ou modication du produit est interdite et porte atteinte à la
sécurité du produit !
• Attention au risque de blessure ! Ne démontez jamais le produit de votre propre
chef. N‘effectuez jamais de réparations vous-même !
• Ce produit ne doit être utilisé que dans son état d‘origine, non modié et non
endommagé.
• N‘utilisez pas le produit à proximité d‘appareils à gaz ou à eau ou dans un
environnement poussiéreux.
• Manipulez le produit avec soin. Il peut être endommagé par des chocs, des coups
ou des chutes, même de faible hauteur.
• Gardez le produit à l‘abri de l‘humidité et de la chaleur.
• Ne plongez jamais le produit dans l‘eau ou dans d‘autres liquides.
Ce mode d‘emploi a pour but de vous familiariser avec le fonctionnement de ce produit.
Conservez donc soigneusement ce manuel an de pouvoir le consulter à tout moment.
AVERTISSEMENTS

2
• N‘utilisez le produit que de la manière pour laquelle il a été conçu. Toute autre
utilisation peut entraîner des blessures corporelles, des dommages au produit ou à
son environnement.
• Lorsque vous serrez les vis, ne les serrez pas trop fort. Un serrage excessif (par
exemple à l‘aide d‘une visseuse électrique) peut entraîner des dommages et
compromettre la bonne tenue de l‘écran.
• Les charges suspendues doivent être contrôlées au moins deux fois par an pour
vérier leur solidité et leur capacité de charge.
• Les enfants ne doivent pas utiliser la toile ou jouer en dessous sans surveillance.
• Le non-respect des instructions ci-dessus peut entraîner des dommages corporels
et endommager le produit ou les appareils qui y sont raccordés. La garantie peut
également être annulée en cas d‘installation ou d‘utilisation incorrecte.
• Si vous avez des doutes sur l‘utilisation du produit, contactez le personnel
spécialisé, votre revendeur ou le fabricant celexon directement (Web :
www.celexon.fr, mail : info@celexon.fr).
• Sous réserve de modications techniques et d‘erreurs.
Le fabricant décline toute responsabilité en cas de dommages matériels ou corporels
si l‘écran est utilisé en dehors des spécications recommandées ou s‘il n‘est pas installé
correctement. N‘utilisez pas cet écran à proximité d‘un chauffage ou d‘un climatiseur.
N‘installez pas non plus le produit à la lumière directe du soleil ou devant une fenêtre.
En raison de la surface en PVC sensible à la température, la toile de projection peut être
endommagée de manière durable.
Nous vous recommandons d‘attendre environ 2 heures après la livraison avant de
procéder au montage. Cela permet à la toile de s‘acclimater ; en particulier lorsque la toile
est déplacée d‘un environnement froid vers un environnement chaud (ou inversement).
Veuillez éviter de faire des tâches sur la surface de la toile. Celles-ci pourraient ne plus
pouvoir être enlevées. Remontez toujours la toile après chaque utilisation.
• Notez l‘avant et l‘arrière de la toile lors de la mise en place.
• Veuillez vérier TOUTES les pièces avant l‘assemblage pour vous assurer qu‘elles ne
sont pas endommagées ou rayées !
• La toile doit être assemblée UNIQUEMENT sur une surface souple et rembourrée.
Dans le cas contraire, le revêtement du cadre peut se rayer.
• Pour une planéité durable, veuillez respecter les consignes suivantes :
1. Ne touchez pas la toile de projection avec les mains nues et sales (utilisez des
gants en tissu idéalement).
2. Ne pliez pas la toile de projection
3. Ne peignez ou n’écrivez pas sur la toile de projection.

3
Les informations contenues dans ce document peuvent être modiées sans
préavis par le fabricant. Les modications seront toujours ajoutées dans les
versions suivantes de ce manuel. Toute erreur est exclue.
CONSEIL D‘ENTRETIEN
Ne nettoyez JAMAIS la toile avec de l‘alcool ou d‘autres produits de nettoyage
contenant des solvants. Utilisez uniquement un chiffon doux et propre. Une
solution savonneuse douce (max. 5%) peut éventuellement éliminer la saleté
de la surface. Évitez absolument tout contact avec des objets pointus ou
tranchants. Ceux-ci pourraient endommager durablement la toile de projection.
Pour de plus amples informations, veuillez consulter les instructions relatives
à l‘écran.
AVIS DE NON-RESPONSABILITÉ
CONTENU DE LA LIVRAISON
2x Barre de cadre
horizontale A
16x Vis M5x8mm
4x Vis de xation murale
Ø4x40mm
2x Barre de cadre
verticale B
2x Crochets muraux
4x Chevilles en plastique
4x Équerre d‘angle C
1x Toile de projection
2x Barres en PVC longues
2x Barres en PVC courtes
Ressorts de tension
1x Outil de tension pour
ressort

4
Barre horizontale
en aluminium
Barre verticale en
aluminium
CONSEIL D‘INSTALLATION
Installez l‘écran dans une position entièrement visible pour tous les
spectateurs ! La hauteur d‘installation optimale est atteinte lorsque les
spectateurs se trouvent au centre de l‘écran (toile déployée) et que la hauteur
de leurs yeux = tiers inférieur de la surface de l‘image. Le matériel de montage
fourni est prévu pour un mur en pierre massif. Le cas échéant, procurez-vous le
matériel de montage adapté à votre support d‘installation.
Hauteur extérieure du cadre (H) pour les écrans de projection
• Jusqu‘à 240 cm de largeur d‘image = hauteur surface de projection (h)+130mm
• Plus de 240 cm de largeur d‘image = hauteur surface de projection (h)+174mm
Largeur extérieure du cadre (L) pour les écrans de projection
• Jusqu‘à 240 cm de largeur d‘image = largeur surface de projection (l)+130mm
• Plus de 240 cm de largeur d‘image = largeur surface de projection (l)+174mm
F = 65 mm (l ≤ 240cm)
F = 87 mm (l > 240cm)

5
Fig.3
Fig.5 Fig.6
Fig.4
A
B
C
ÉTAPE 1 : ASSEMBLAGE DU CADRE
1. Posez les 4 barres en aluminium sur une surface molle (2x horizontalement
& 2x verticalement) parallèlement les unes aux autres en rectangle (g.
3). Introduisez deux équerres d‘angle aux deux extrémités de la barre
horizontale supérieure et placez les deux barres verticales dessus (g. 4,
5 et 6).
2. Introduisez les deux équerres d‘angle restantes dans la barre horizontale
inférieure et faites-les glisser sur les barres verticales comme indiqué dans
la gure 7 (remarque : les deux équerres d‘angle doivent être introduites
simultanément et uniformément dans les barres verticales, effectuez
cette étape à deux). Alignez le cadre de manière à ce que les trous des
connecteurs d‘angle correspondent aux trous des équerres. Placez les
vis M5x- 8mm dans chaque trou, contrôlez encore une fois l‘alignement
correct du cadre et serrez les vis sur tout le pourtour (6-8 Nm) (g. 8 et 9).
Fig.7 Fig.8
Fig.9
Strona się ładuje...
Strona się ładuje...
Strona się ładuje...
Strona się ładuje...
Strona się ładuje...
Strona się ładuje...
Strona się ładuje...
Strona się ładuje...
Strona się ładuje...
Strona się ładuje...
Strona się ładuje...
Strona się ładuje...
Strona się ładuje...
Strona się ładuje...
Strona się ładuje...
Strona się ładuje...
Strona się ładuje...
Strona się ładuje...
Strona się ładuje...
Strona się ładuje...
Strona się ładuje...
Strona się ładuje...
Strona się ładuje...
Strona się ładuje...
Strona się ładuje...
Strona się ładuje...
Strona się ładuje...
Strona się ładuje...
Strona się ładuje...
Strona się ładuje...
Strona się ładuje...
Strona się ładuje...
Strona się ładuje...
Strona się ładuje...
Strona się ładuje...
Strona się ładuje...
-
 1
1
-
 2
2
-
 3
3
-
 4
4
-
 5
5
-
 6
6
-
 7
7
-
 8
8
-
 9
9
-
 10
10
-
 11
11
-
 12
12
-
 13
13
-
 14
14
-
 15
15
-
 16
16
-
 17
17
-
 18
18
-
 19
19
-
 20
20
-
 21
21
-
 22
22
-
 23
23
-
 24
24
-
 25
25
-
 26
26
-
 27
27
-
 28
28
-
 29
29
-
 30
30
-
 31
31
-
 32
32
-
 33
33
-
 34
34
-
 35
35
-
 36
36
-
 37
37
-
 38
38
-
 39
39
-
 40
40
-
 41
41
-
 42
42
-
 43
43
-
 44
44
-
 45
45
-
 46
46
-
 47
47
-
 48
48
-
 49
49
-
 50
50
-
 51
51
-
 52
52
-
 53
53
-
 54
54
-
 55
55
-
 56
56


Celexon Ecran sur cadre Home Cinema 180 x 135 cm Instrukcja obsługi
- Typ
- Instrukcja obsługi
w innych językach
- español: Celexon Ecran sur cadre Home Cinema 180 x 135 cm El manual del propietario
- italiano: Celexon Ecran sur cadre Home Cinema 180 x 135 cm Manuale del proprietario
- Deutsch: Celexon Ecran sur cadre Home Cinema 180 x 135 cm Bedienungsanleitung
- français: Celexon Ecran sur cadre Home Cinema 180 x 135 cm Le manuel du propriétaire
- Nederlands: Celexon Ecran sur cadre Home Cinema 180 x 135 cm de handleiding
Powiązane artykuły
-
Celexon Ecran de projection sur pied Mobil Expert double format 4:3/16:10 Instrukcja obsługi
-
-
-
-
-
-
-
-
-
