IMG Stage Line CD-292USB Instrukcja obsługi
- Kategoria
- Odtwarzacze CD
- Typ
- Instrukcja obsługi

CD-292USB Bestellnummer 21.2790
BEDIENUNGSANLEITUNG • INSTRUCTION MANUAL • MODE D’EMPLOI
ISTRUZIONI PER L’USO • GEBRUIKSAANWIJZING • MANUAL DE INSTRUCCIONES • INSTRUKCJA OBSŁUGI
SIKKERHEDSOPLYSNINGER • SÄKERHETSFÖRESKRIFTER • TURVALLISUUDESTA
PROFESSIONELLER DUAL-CD / MP3-SPIELER
PROFESSIONAL DUAL CD / MP3 PLAYER
LECTEUR CD / MP3 DOUBLE PROFESSIONNEL
LETTORE CD / MP3 DOPPIO PROFESSIONALE

2
wwwwww..iimmggssttaaggeelliinnee..ccoomm
Bevor Sie einschalten …
Wir wünschen Ihnen viel Spaß mit Ihrem neuen Gerät
von „img Stage Line“. Bitte lesen Sie diese Bedienungs-
anleitung vor dem Betrieb gründlich durch. Nur so lernen
Sie alle Funktionsmöglichkeiten kennen, vermeiden
Fehlbedienungen und schützen sich und Ihr Gerät vor
eventuellen Schäden durch unsachgemäßen Gebrauch.
Heben Sie die Anleitung für ein späteres Nachlesen auf.
Der deutsche Text beginnt auf der Seite 4.
Before switching on …
We wish you much pleasure with your new “img Stage
Line” unit. Please read these operating instructions care-
fully prior to operating the unit. Thus, you will get to know
all functions of the unit, operating errors will be pre-
vented, and yourself and the unit will be protected
against any damage caused by improper use. Please
keep the oper ating instructions for later use.
The English text starts on page 10.
Avant toute installation …
Nous vous souhaitons beaucoup de plaisir à utiliser cet
appareil “img Stage Line”. Lisez ce mode dʼemploi entiè-
rement avant toute utilisation. Uniquement ainsi, vous
pourrez apprendre lʼensemble des possibilités de fonc-
tionnement de lʼappareil, éviter toute manipulation erronée
et vous protéger, ainsi que lʼappareil, de dommages éven-
tuels engendrés par une utilisation inadaptée. Conser-
vez la notice pour pouvoir vous y reporter ultérieurement.
La version française se trouve page 16.
Prima di accendere …
Vi auguriamo buon divertimento con il vostro nuovo
apparecchio di “img Stage Line”. Leggete attentamente
le istruzioni prima di mettere in funzione lʼapparecchio.
Solo così potete conoscere tutte le funzionalità, evitare
comandi sbagliati e proteggere voi stessi e lʼapparecchio
da eventuali danni in seguito ad un uso improprio. Con-
servate le istruzioni per poterle consultare anche in
futuro.
Il testo italiano inizia a pagina 22.
D
A
CH
GB
Antes de la utilización …
Le deseamos una buena utilización para su nue vo apa-
rato “img Stage Line”. Por favor, lea estas in s trucciones
de uso atentamente antes de ha cer funcionar el aparato.
De esta manera conocerá todas las funciones de la uni-
dad, se pre vendrán errores de operación, usted y el apa-
rato estarán protegidos en contra de todo daño cau sado
por un uso inadecuado. Por favor, guarde las instruccio-
nes para una futura utilización.
La versión española comienza en la página 34.
Voor u inschakelt …
Wij wensen u veel plezier met uw nieuwe apparaat van
“img Stage Line”. Lees deze gebruikershandleiding gron-
dig door, alvorens het apparaat in gebruik te nemen.
Alleen zo leert u alle functies kennen, vermijdt u foutieve
bediening en behoedt u zichzelf en het apparaat voor
eventuele schade door ondeskundig gebruik. Bewaar de
handleiding voor latere raadpleging.
De Nederlandstalige tekst vindt u op pagina 28.
Przed uruchomieniem …
Życzymy zadowolenia z nowego produktu “img Stage
Line”. Dzięki tej instrukcji obsługi będą państwo w stanie
poznać wszystkie funkcje tego urządzenia. Stosując się
do instrukcji unikną państwo błędów i ewentualnego
uszkodzenia urządzenia na skutek nieprawidłowego
użytkowania. Prosimy zachować instrukcję.
Tekst polski zaczyna się na stronie 40.
Før du tænder …
Tillykke med dit nye “img Stage Line” produkt. Læs sik-
kerhedsanvisningerne nøje før ibrugtagning, for at
beskytte Dem og enheden mod skader, der skyldes for-
kert brug. Gem venligst denne betjeningsvejledning til
senere brug.
Sikkerhedsanvisningerne findes på side 46.
Innan du slår på enheten …
Vi önskar dig mycket glädje med din nya “img Stage
Line” produkt. Läs igenom säkerhetsföre skrifterna innan
en heten tas i bruk för att undvika skador till följd av
felaktig hantering. Behåll instruktionerna för framtida
bruk.
Säkerhetsföreskrifterna återfinns på sidan 46.
Ennen kytkemistä …
Toivomme Sinulle paljon miellyttäviä hetkiä uuden “img
Stage Line” laitteen kanssa. Ennen laitteen käyttöä pyy-
dämme Sinua huolellisesti tutustumaan turvallisuusoh-
jeisiin. Näin vältyt vahingoilta, joita virheellinen laitteen
käyttö saattaa aiheuttaa. Ole hyvä ja säilytä käyttöohjeet
myöhempää tarvetta varten.
Turvallisuusohjeet löytyvät sivulta 47.
F
B
CH
I
ENL
PL DK
SFIN
B

3
CUE 2MEMO / AUTO CUE1 FOLDER
A B / EDIT RELOOP / EXIT TRACK / TRIM/ LIST
PITCH
MT
CUE PLAY/ PAUSE PITCH BEND
PROG.
BPM / TAP
CONT./ LIST
TIME
SCRATCHCD / USBOPEN / CLOSE
SEARCH
RELAY
PRO DUAL
CD / MP3 PLAYER
CD-292USB
MSF
RemainSingleTRACK PITCH
Total
CUE MT
BPM
CD
CUE 2MEMO / AUTO CUE1 FOLDER
A B / EDIT RELOOP / EXIT TRACK / TRIM/ LIST
PITCH
MT
CUE PLAY/ PAUSE PITCH BEND
PROG.
BPM / TAP
CONT./ LIST
TIME
SCRATCHCD / USB
SEARCH
MSF
Single ElapseTRACK PITCH
Total
BPM
USB
OPEN / CLOSE
123
CUE 2MEMO / AUTO CUE1 FOLDER
A B / EDIT RELOOP / EXIT TRACK / TRIM/ LIST
PITCH
MT
CUE PLAY / PAUSE PITCH BEND
PROG.
BPM / TAP
CONT. / LIST
TIME
SCRATCHCD / USBOPEN / CLOSE
SEARCH
MSF
RemainSingleTRACK PITCH
Tot al
CUE MT
BPM
CD
MSF
RemainSingleTRACK PITCH
Tot al
CUE MT
BPM
CD
MSF
RemainSingle Cont. Elapse TotalTRACK PITCH
Total
CUE
FOLDER RELOOP
MT
PG
BPM
CD
USB TITLE
ALBUM
ARTIST
LASER KLASSE 1
CLASS LASER
LASER CLASSE 1
L
R
START/
PAUSE CUE
PLAY
LOCK
TACT
CONNECT TO
REMOTE CONTROL 2
LINE
OUT
START/
PAUSE
L
R
LINE
OUT
CONNECT TO
REMOTE CONTROL 1
230 V~/50Hz
WWW.IMGSTAGELINE.COM
PRO DUAL
CD / MP3 PLAYER
CD-292USB
32 33 34 35 36 37 38 39
4 5 6 7 8 9 10 11 12 13 14 15
ABCDEFGHIJ
16 17 18 19 20 21 22 23 24
KL MNO P Q RS
WWW.IMGSTAGELINE.COM
OPEN /
CLOSE
OPEN /
CLOSE
PRO DUAL
CD / MP3 PLAYER
CD-292USB
USB1 USB 2
25 26 27 28 29 30 31

4
D
A
CH
Auf der ausklappbaren Seite 3 finden Sie
alle beschriebenen Bedienelemente und An -
schlüsse.
Inhalt
1 Übersicht der Bedienelemente
und Anschlüsse . . . . . . . . . . . . . . . . . . 4
1.1 Bedienteil . . . . . . . . . . . . . . . . . . . . . . . . 4
1.2 Laufwerkteil Frontseite . . . . . . . . . . . . . . 5
1.3 Laufwerkteil Rückseite . . . . . . . . . . . . . . 5
2 Hinweise für den sicheren Gebrauch .5
3 Einsatzmöglichkeiten . . . . . . . . . . . . . . 5
4 Gerät aufstellen und anschließen . . . . . 6
5 Bedienung . . . . . . . . . . . . . . . . . . . . . . . 6
5.1 Musikstücke abspielen . . . . . . . . . . . . . . 6
5.2 Play-Liste laden . . . . . . . . . . . . . . . . . . . 6
5.3 Anzeige der Titelinformationen
und des Ruhemodus . . . . . . . . . . . . . . . 6
5.3.1 Grafische Laufzeitanzeige . . . . . . . . . . 7
5.3.2 Anzahl der Taktschläge pro Minute . . . 7
5.3.3 Ruhemodus . . . . . . . . . . . . . . . . . . . . . 7
5.4 Betriebsart wählen . . . . . . . . . . . . . . . . . 7
5.4.1 Fortlaufende Wiedergabe
und Einzeltitelwiedergabe . . . . . . . . . . 7
5.4.2 Relay-Betrieb – automatischer Start
der anderen Abspieleinheit
am Ende eines Titels . . . . . . . . . . . . . . 7
5.5 Anspielen eines Titels . . . . . . . . . . . . . . . 7
5.6 Schneller Vor- und Rücklauf . . . . . . . . . . 7
5.7 Genaues Anfahren
einer bestimmten Stelle . . . . . . . . . . . . . 7
5.8 Rücksprung zu einer bestimmten Stelle . 7
5.8.1 Tasten CUE 1 und CUE 2 . . . . . . . . . . 7
5.8.2 Taste CUE . . . . . . . . . . . . . . . . . . . . . . 7
5.9 Geschwindigkeit mit oder ohne
Tonhöhenverschiebung verändern . . . . . 8
5.10 Pitch Bend – Takt zwischen
zwei Musikstücken angleichen . . . . . . . . 8
5.11 Effekte . . . . . . . . . . . . . . . . . . . . . . . . . . 8
5.11.1 Scratch-Effekte . . . . . . . . . . . . . . . . . . 8
5.11.2 Leiereffekte . . . . . . . . . . . . . . . . . . . . . 8
5.11.3 Stottereffekte . . . . . . . . . . . . . . . . . . . . 8
5.11.4 Endlosschleife abspielen . . . . . . . . . . . 8
5.12 Eigene Titelfolge zusammenstellen . . . . 8
5.12.1 Titelfolge speichern und abspielen . . . 8
5.12.2 Titelfolge überprüfen . . . . . . . . . . . . . . 8
5.12.3 Titelfolge ergänzen oder löschen . . . . 9
6 Faderstart . . . . . . . . . . . . . . . . . . . . . . . 9
7 Firmware aktualisieren . . . . . . . . . . . . . 9
8 Pflege des Gerätes . . . . . . . . . . . . . . . . 9
9 Technische Daten . . . . . . . . . . . . . . . . . 9
1 Übersicht der Bedienelemente
und Anschlüsse
1.1 Bedienteil
1Bedienfeld der Abspieleinheit 1
Details siehe Abb. 2
2Taste RELAY zum automatischen Starten der
anderen Abspieleinheit am Ende eines Titels
(Kapitel 5.4.2)
3Bedienfeld der Abspieleinheit 2
Details siehe Abb. 2
4Taste OPEN / CLOSE zum Öffnen und
Schließen der CD-Schublade [wie die Tasten
(27, 29) am Laufwerkteil]
5Taste CD / USB zum Umschalten zwischen
CD und USB-Speicher: Die Abspieleinheit
muss dazu mit der Taste (20) auf Pause
geschaltet sein.
Sind zwei USB-Speicher angeschlossen,
nach dem Drücken der Taste CD / USB mit
der Taste oder (21) zwischen CD,
USB 1 und USB 2 wählen. Die Textzeile (O)
zeigt die Auswahl an. Zum Bestätigen die
Taste CD / USB abschließend drücken.
6Taste SCRATCH zum Ein- und Ausschalten
der Scratch-Funktion
Bei eingeschalteter Funktion (Taste leuchtet)
lassen sich mit dem Drehrad (16) Scratch-
Effekte erzeugen.
7Taste TIME zum Umschalten der Zeitan-
zeige (H, P)
bei der Anzeige „Remain“ (G)
Restzeit des laufenden Titels
bei der Anzeige „Elapse“ (E)
bereits gespielte Zeit des laufenden Titels
bei der Anzeige „Total Remain“
Restzeit der gesamten CD
(nicht bei MP3-Betrieb möglich)
Bei MP3-Betrieb lässt sich bei gedrückt
gehaltener Taste TIME mit der Taste oder
(21) die Textzeile (O) auf die Anzeige des
Titels, Albums, Interpreten (ID3-Tags) oder
Dateinamens umschalten.
8Taste CONT / LIST
1. zum Umschalten zwischen Einzeltitelwie-
dergabe [Anzeige „Single“ (C)] und fortlau-
fender Wiedergabe [Anzeige „Cont.“ (D)]
2. zum Laden von Play-Listen (Kap. 5.2)
9Taste MEMO / AUTO
1. zum Speichern von Cue-Punkten mit den
Tasten CUE 1 und CUE 2 (11)
2. um einen Titelabschnitt mit der Länge
eines Vielfachen oder eines Bruchteils der
Taktlänge als Schleife abzuspielen
(Kapitel 5.11.4)
10 Display, Details siehe Abb. 3
Awenn über den Ziffern „TRACK“ angezeigt
wird: Nummer des Musiktitels (im ange-
wählten Ordner);
wenn unter den Ziffern „FOLDER“ ange-
zeigt wird: Nummer des angewählten Ord-
ners
BWiedergabesymbol
CAnzeige „Single“: signalisiert die Betriebs-
art Einzeltitelwiedergabe
DAnzeige „Cont.“: signalisiert die Betriebsart
für fortlaufende Wiedergabe der Titel
EAnzeige „Elapse“: signalisiert, dass die be -
reits gespielte Zeit eines Titels angezeigt
wird
FAnzeige „Total“: signalisiert zusammen mit
der Anzeige „Remain“ (G), dass die Rest-
laufzeit der CD angezeigt wird
(nicht bei MP3-Betrieb möglich)
GAnzeige „Remain“: signalisiert, dass die
Restlaufzeit eines Titel angezeigt wird. Bei
der Anzeige „Total Remain“ wird die Rest-
laufzeit der CD angezeigt.
HBalkenanzeige zur Darstellung der relati-
ven Titellaufzeit
IAnzeige der Abweichung von der Normal-
geschwindigkeit in Prozent
JAnzeige „RELOOP“: signalisiert das Ab -
spielen einer Endlosschleife
KAnzeige „CD“ oder „USB“: zeigt an, ob eine
CD, der Anschluss USB 1 (26) oder USB 2
(30) angewählt ist. Bei angewähltem An -
schluss USB 2 blinkt die Anzeige „USB“.
LAnzeige “CUE”: erscheint, wenn die Ab -
spieleinheit am Cue-Punkt auf Pause steht
(Kapitel 5.4.1 und 5.8.2).
MBei MP3-Betrieb ist in diesem Feld ange-
geben, ob in der Textzeile (O) der Titel-,
Album- oder Künstlername des Musiktitels
angezeigt wird. Ist keine dieser Anzeigen
eingeblendet, wird der Dateiname ange-
zeigt (Kapitel 5.3).
NAnzahl der Titel auf der CD;
bei MP3-Betrieb:
Anzahl der Titel im angewählten Ordner
[Anzeige „TRACK“ über den Ziffern (A)]
oder Anzahl der Ordner [Anzeige „FOL-
DER“ unter den Ziffern (A)]
OTextzeile für zusätzliche Informationen
PLaufzeitanzeige, siehe auch Pos. E und G
QAnzeige der Taktschläge pro Minute
RAnzeige „PG“: blinkt, wenn eine eigene
Titelfolge programmiert oder abgespielt
wird
SAnzeige „MT“ (Master-Tempo): signalisiert
die Funktion für konstante Tonhöhe
(Kapitel 5.9)
11 Tasten CUE 1 und CUE 2
1. zum Speichern von zwei Cue-Punkten
[auch während des Abspielens möglich;
zum Speichern zuerst die Taste MEMO /
AUTO (9) drücken]
2. zum Springen auf die gespeicherten Cue-
Punkte
12 Taste FOLDER für den MP3-Betrieb
1. zum Umschalten zwischen der Namens-
anzeige des Titels und des Ordners in der
Textzeile (O)
Entsprechend zu der gewählten Einstel-
lung lässt sich mit den Tasten und
(21) ein Titel oder ein Ordner auswählen.
2. zum Laden von Play-Listen (Kap. 5.2)
3. zum Auswählen einer Partition auf einer
angeschlossenen Festplatte (Kap. 5.1)
13 Taste PROG zum Zusammenstellen und
Abspielen einer eigenen Titelfolge (Kapi-
tel 5.12)
14 Taste PITCH zum Aktivieren / Deaktivieren
des Geschwindigkeitsreglers (15) und zur
Auswahl des Ge schwindigkeitseinstellberei-
ches (8 %, 16 % oder 100 %)
Die Textzeile (O) zeigt kurz die gewählte Ein-
stellung an (Pitch 8 %, 16 %, 100, off).
15 Schieberegler zum Ändern der Abspielge-
schwindigkeit [ohne Änderung der Tonhöhe,
wenn die Taste MT (24) leuchtet]
Die Geschwindigkeit kann nur geändert wer-
den, wenn die Taste PITCH (14) leuchtet.
16 Drehrad REV / FWD
–für den schnellen Vor- und Rücklauf, wenn
die Taste SEARCH (17) gedrückt wurde
–zum Erzeugen von Scratch-Effekten, wenn
die Taste SCRATCH (6) gedrückt wurde

D
A
CH
5
–für die Funktion „Pitch Bend“ während der
Wiedergabe eines Titels (Kapitel 5.10)
–zum exakten Anfahren einer Stelle, wenn
die Abspieleinheit auf Pause geschaltet ist
–bei gedrückter Taste oder (21) zum
schnellen Anwählen von Titeln [Anzeige
„TRACK“ über den Ziffern (A)] oder Ord-
nern [Anzeige „FOLDER“ unter den Ziffern
(A)]
17 Taste SEARCH zum Ein- und Ausschalten
des schnellen Vor- / Rücklaufs mit dem Dreh-
rad (16)
18 Taste CUE zum Anspielen eines Titels
(Kap. 5.5) und für den Rücksprung zu
einer zuvor bestimmten Stelle (Kap. 5.8.2)
19 Tasten zum Speichern und zur Wiedergabe
einer Endlosschleife
Taste A zum Bestimmen des Startpunktes
eines Abschnittes für eine Endlosschleife
Taste B/ EDIT zum Bestimmen des Endpunk-
tes und gleichzeitigem Starten der Schleife;
zum Verschieben des Endpunktes die
Taste erneut drücken und den Endpunkt
mit dem Drehrad (16) einstellen
Taste RELOOP / EXIT zum Verlassen der
Endlosschleife oder zum erneuten Abspie-
len der Schleife
20 Taste zum Starten eines Titels und zum
Umschalten zwischen Wiedergabe und Pause
21 Tasten und
1. zur Titelanwahl, wenn „TRACK“ über den
Ziffern (A) angezeigt wird:
Taste zum Anwählen des nächsten
Titels
Taste zum Sprung an den Anfang des
gerade laufenden Titels. Durch mehrfa-
ches Drücken der Taste wird immer ein
Titel weiter zurückgesprungen.
Wird eine der Tasten gedrückt gehalten,
lassen sich die Titel mit dem Drehrad (16)
schnell anwählen.
2. bei MP3-Betrieb zum Anwählen eines Ord-
ners, wenn „FOLDER“ unter den Ziffern (A)
angezeigt wird [umschaltbar mit der Taste
FOLDER (12)]
Wird eine der Tasten gedrückt gehalten,
lassen sich die Ordner mit dem Drehrad
(16) schnell anwählen.
3. zum Anwählen einer CD oder eines USB-
Speichers, siehe auch Taste CD / USB (5)
4. zum Teilen oder Vervielfachen des Titelab-
schnitts einer Endlosschleife (Kapitel
5.11.4)
5. bei MP3-Betrieb und gedrückt gehaltener
Taste TIME (7) zum Umschalten der Text-
zeile (O) auf die Anzeige des Titels,
Albums, Interpreten (ID3-Tags) oder Datei-
namens
6. zum Auswählen einer Play-Liste (Kapi-
tel 5.2)
7. zum Auswählen einer Partition auf einer
angeschlossenen Festplatte (Kap. 5.1)
22 Tasten PITCH BEND zur Anpassung des
Taktes des gerade laufenden Titels an den
Takt eines auf der anderen Abspieleinheit
laufenden Musikstückes (Kapitel 5.10)
23 Taste TAP für den manuellen Zählmodus des
Beatcounters und zum Zurückschalten auf
den Automatikmodus (Kapitel 5.3.2)
24 Taste MT (Master-Tempo) zum Ein- und Aus-
schalten der Funktion für konstante Tonhöhe
(Kapitel 5.9)
1.2 Laufwerkteil Frontseite
25 CD-Schublade der Abspieleinheit 1
26 USB-Anschluss 1 zum Einstecken eines USB-
Sticks oder zum Anschluss einer Festplatte
27 Taste OPEN / CLOSE zum Öffnen und
Schließen der CD-Schublade 1 [wie Taste
(4) am Bedienteil]
28 Ein- / Ausschalter POWER mit darüberliegen-
der Betriebsanzeige (rote LED)
29 Taste OPEN / CLOSE zum Öffnen und
Schließen der CD-Schublade 2 [wie Taste
(4) am Bedienteil]
30 USB-Anschluss 2 zum Einstecken eines USB-
Sticks oder zum Anschluss einer Festplatte
31 CD-Schublade der Abspieleinheit 2
1.3 Laufwerkteil Rückseite
32 Audio-Ausgang LINE OUT der Abspielein-
heit 2 zum Anschluss an den Line-Eingang
z. B. eines Verstärkers oder Mischpults
33 3,5-mm-Klinkenbuchse START / PAUSE der
Abspieleinheit 2 für die Fernsteuerung der
Funktion Start/ Pause von einem Mischpult
aus
34 Umschalter für die Art der Fernsteuerung
über die Buchsen START / PAUSE (33, 38)
(Kapitel 6)
Position LOCK
für die Steuerung über einen Ein- / Aus-
schalter
Position TACT
für die Steuerung über einen Taster
Position CUE / PLAY
Über einen Steuerimpuls des Mischpults
wird die Abspieleinheit beim Aufziehen des
Mischpult-Faders vom Cue-Punkt [Auto-
Cue-Punkt oder mit der Taste CUE (18)
gesetzt] gestartet und beim Zuziehen des
Faders auf den Cue-Punkt zurückgesetzt.
35 Buchse zum Anschluss des Bedienteils:
mit der Buchse REMOTE CONTROL CON-
NECT TO MAIN UNIT 2 über eines der bei-
liegenden Anschlusskabel verbinden
36 Netzkabel zum Anschluss an eine Steckdose
(230 V~ / 50 Hz)
37 Buchse zum Anschluss des Bedienteils:
mit der Buchse REMOTE CONTROL CON-
NECT TO MAIN UNIT 1 über eines der bei-
liegenden Anschlusskabel verbinden
38 3,5-mm-Klinkenbuchse START / PAUSE der
Abspieleinheit 1 für die Fernsteuerung der
Funktion Start/ Pause von einem Mischpult
aus
39 Audio-Ausgang LINE OUT der Abspielein-
heit 1 zum Anschluss an den Line-Eingang
z. B. eines Verstärkers oder Mischpults
2 Hinweise für den
sicheren Gebrauch
Das Gerät entspricht allen relevanten Richtlinien
der EU und ist deshalb mit gekennzeichnet.
Beachten Sie auch unbedingt folgende Punkte:
GVorsicht! Blicken Sie bei geöffneter CD-
Schublade nicht in den CD-Schacht. Eventuell
austretende Laserstrahlen können zu Augen-
schäden führen.
GVerwenden Sie das Gerät nur im Innenbereich
und schützen Sie es vor Tropf- und Spritzwas-
ser, hoher Luftfeuchtigkeit und Hitze (zulässi-
ger Einsatztemperaturbereich 0 – 40 °C).
GStellen Sie keine mit Flüssigkeit gefüllten Ge -
fäße z. B. Trinkgläser, auf das Gerät.
GNehmen Sie das Gerät nicht in Betrieb und
ziehen Sie sofort den Netzstecker aus der
Steckdose,
1. wenn sichtbare Schäden am Gerät oder am
Netzkabel vorhanden sind,
2. wenn nach einem Sturz oder Ähnlichem der
Verdacht auf einen Defekt besteht,
3. wenn Funktionsstörungen auftreten.
Geben Sie das Gerät in jedem Fall zur Repa-
ratur in eine Fachwerkstatt.
GEin beschädigtes Netzkabel darf nur durch
eine Fachwerkstatt ersetzt werden.
G
Ziehen Sie den Netzstecker nie am Kabel aus
der Steckdose, fassen Sie immer am Stecker an.
GVerwenden Sie für die Reinigung nur ein tro-
ckenes, weiches Tuch, niemals Wasser oder
Chemikalien.
GWird das Gerät zweckentfremdet, nicht richtig
angeschlossen, falsch bedient oder nicht fach-
gerecht repariert, kann keine Haftung für
daraus resultierende Sach- oder Personen-
schäden und keine Garantie für das Gerät
übernommen werden. Ebenso kann keine
Haftung für durch Fehlbedienung oder durch
einen Defekt entstandene Datenverluste und
deren Folgeschäden übernommen werden.
3 Einsatzmöglichkeiten
Der CD / MP3-Spieler CD-292USB mit zwei Ab -
spieleinheiten ist speziell für den professionellen
DJ-Bereich konzipiert. Viele Funktionsmöglich-
keiten sind genau auf diesen Einsatzbereich ab -
gestimmt, z. B. Einzeltitelwiedergabe, automati-
scher Beatcounter, nahtlose Wiedergabe einer
Endlosschleife, Geschwindigkeitsänderung ohne
Tonhöhenänderung, Anti-Shock-Speicher.
Mit dem Gerät können Audio-CDs, selbst
gebrannte Audio-CDs (Audio CD-R) sowie CDs
mit Titeln im MP3-Format abgespielt werden.
Bei wiederbeschreibbaren CDs (CD-RW) kann
es jedoch je nach CD-Typ, verwendetem CD-
Brenner und Brennprogramm beim Abspielen zu
Problemen kommen.
Über die USB-Anschlüsse lassen sich auch
MP3-Dateien von einer Festplatte oder einem
USB-Stick abspielen. Die Abspieleinheiten kön-
nen unabhängig voneinander auf die USB-
Anschlüsse zugreifen, sodass der Betrieb auch
mit nur einem USB-Speicher möglich ist.
WARNUNG Das Gerät wird mit lebensge -
fährlicher Netzspannung versorgt.
Nehmen Sie deshalb niemals
selbst Eingriffe am Gerät vor. Es
besteht die Gefahr eines elektri-
schen Schlages.
Soll das Gerät endgültig aus dem
Betrieb genommen werden, übergeben
Sie es zur umweltgerechten Entsor-
gung einem örtlichen Recyclingbetrieb.

6
D
A
CH
4 Gerät aufstellen
und anschließen
Das Bedienteil und das Laufwerkteil sind für die
Montage in ein Rack für Geräte mit einer Breite
von 482 mm (19″) vorgesehen, können aber
auch als frei stehende Tischgeräte verwendet
werden. Das Laufwerkteil muss immer waage-
recht betrieben werden, während das Bedienteil
beliebig, z. B. auch geneigt, eingebaut werden
kann. Für den Rackeinbau werden für das
Bedien- und das Laufwerkteil jeweils 2 HE benö-
tigt (1 HE = 1 Höheneinheit = 44,45 mm).
Vor dem Anschließen von Geräten oder dem
Ändern bestehender Anschlüsse den CD / MP3-
Spieler und die anzuschließenden Geräte aus-
schalten.
1) Das Bedienteil und das Laufwerkteil mit den
beiden beiliegenden Anschlusskabeln ver-
binden:
Die Buchse CONNECT TO REMOTE CON-
TROL 2 (35) des Laufwerkteils mit der Buchse
REMOTE CONTROL CONNECT TO MAIN
UNIT 2 des Bedienteils verbinden und
die Buchse CONNECT TO REMOTE CON-
TROL 1 (37) des Laufwerkteils mit der Buchse
REMOTE CONTROL CONNECT TO MAIN
UNIT 1 des Bedienteils.
2) Die beiden Signalausgänge LINE OUT (32,
39) an je einen Eingang mit Line-Pegel z. B.
eines Mischpultes oder Verstärkers an schlie-
ßen (mögliche Beschriftung: Line, CD, Aux).
3) Die beiden Abspieleinheiten können über ein
Mischpult mit Faderstart-Funktion gestartet
und auf Pause geschaltet werden. Dazu die
Buchsen START / PAUSE (33, 38) über zwei
Kabel mit 3,5-mm-Klinkensteckern an die
entsprechenden Buchsen des Mischpultes
anschließen. Der CD-292USB muss auf die
Faderstartart des Mischpultes eingestellt
werden; siehe dazu Kapitel 6.
4) Zuletzt den Stecker des Netzkabels (36) in
eine Steckdose (230 V~ / 50 Hz) stecken.
5 Bedienung
Die Bedienung der beiden Abspieleinheiten ist
vollkommen identisch. Das Gerät mit dem Netz-
schalter POWER (28) einschalten. Das Display
(10) zeigt kurz „boot“ (Startvorgang) und WEL-
COME zur Begrüßung. Ist eine CD eingelegt, er -
scheinen nach dem Einlesevorgang im Display
Informationen zur CD. Befindet sich keine CD im
Laufwerk, wird „no dISC“ (keine CD) angezeigt.
Nach dem Betrieb das Gerät ausschalten.
Die folgenden Einstellungen bleiben für den
nächsten Betrieb gespeichert:
1. der gewählte Betriebsmodus (Einzeltitelwie-
dergabe / fortlaufende Wiedergabe, Kapi-
tel 5.4.1)
2. die gewählte Zeitanzeige (Restlaufzeit / be -
reits gespielte Zeit, Kapitel 5.3)
3. der gewählte Geschwindigkeitseinstellbereich
(Kapitel 5.9)
5.1 Musikstücke abspielen
1) Zum Einlegen einer CD die CD-Schublade
(25, 31) mit der Taste (4, 27 oder 29) öff-
nen. Die CD mit der Beschriftung nach oben
einlegen und die CD-Schublade mit der
Taste wieder schließen.
2) Zusätzlich oder alternativ kann jeweils ein
USB-Stick in die USB-Anschlüsse (26, 30)
gesteckt oder jeweils eine Festplatte mit den
USB-Anschlüssen verbunden werden. Zum
Umschalten zwischen CD und USB-Speicher
die Taste CD / USB (5) drücken. Die Abspiel-
einheit muss dazu auf Pause ge schaltet sein;
ggf. die Taste (20) drücken.
Sind zwei USB-Speicher angeschlossen,
nach dem Drücken der Taste CD / USB die
Signalquelle (CD, USB 1, USB 2) mit der
Taste oder (21) wählen. Die Textzeile (O)
zeigt die Auswahl an. Dabei wird die Signal-
quelle übersprungen, die momentan an ge-
wählt ist. Die Auswahl mit der Taste CD / USB
bestätigen.
Hinweise
1. Die angewählte Signalquelle wird auch im Dis-
playfeld (K) angezeigt:
„CD“ = CD-Laufwerk ist angewählt
„USB“ konstant eingeblendet = USB 1
„USB“ blinkt = USB 2
2. Eine Festplatte muss durch ein eigenes Netzge-
rät versorgt werden, wenn deren Stromaufnahme
mehr als 500 mA beträgt.
3. Sind auf einer Festplatte mehrere Partitionen an -
gelegt, können diese wie folgt ausgewählt wer-
den:
a) Die Taste FOLDER (12) so lange gedrückt
halten, bis im Display „PA-SEL“ (Partition
Selection) angezeigt wird.
b) Mit der Taste oder die Partition wählen.
Die Textzeile (O) zeigt jeweils den Namen an.
c) Zum Bestätigen die Taste FOLDER drücken.
3) Zum Starten des ersten Titels die Taste
(20) drücken. Während der Wiedergabe zeigt
das Display das Symbol (B). Das Abspie-
len kann jederzeit mit der Taste unterbro-
chen und wieder fortgesetzt werden.
4) Zum Anwählen eines anderen Titels die Tas-
ten und verwenden.
Taste : Zum nächsten Titel springen
Taste : An den Anfang des gerade laufen-
den Titels springen. Durch mehrfaches Drü-
cken der Taste wird immer ein Titel weiter
zurückgesprungen.
Wird eine der Tasten gedrückt gehalten, las-
sen sich die Titel mit dem Drehrad (16)
schnell anwählen.
5) Sind bei MP3-Betrieb die Musiktitel in ver-
schiedene Ordner einsortiert, zum Anwählen
eines Ordners die Taste FOLDER (12) drü-
cken. Das Display zeigt „FO-SEL“ (Folder
Selection) an und die Textzeile (O) den
Namen des Ordners. Die Ziffern (A) links
oben im Display zeigen jetzt die Nummer des
Ordners an und die Ziffern (N) unter „Total“
die Anzahl der vorhandenen Ordner.
Mit der Taste oder den Ordner auswäh-
len. Wird eine der Tasten gedrückt gehalten,
lassen sich die Ordner mit dem Drehrad (16)
schnell anwählen.
Zum Bestätigen der Auswahl die Taste FOL-
DER drücken; das Display zeigt wieder die
Laufzeitanzeige (P). Mit der Taste oder
den gewünschten Titel im Ordner wählen.
6) Soll eine andere CD eingelegt werden, zuerst
mit der Taste auf Pause schalten, sonst
lässt sich die CD-Schublade mit der Taste
nicht öffnen.
7) Vor dem Ausschalten des Gerätes immer die
CD-Schubladen mit den Tasten schließen,
um die Laser-Abtastsysteme vor Verschmut-
zung zu schützen. Erst dann das Gerät mit
dem Ein- / Ausschalter POWER abschalten.
5.2 Play-Liste laden
Zum Abspielen einer bestimmten Auswahl von
MP3-Dateien lassen sich auf einem Computer
erstellte Play-Listen mit der Dateiendung „wpl“,
„xml“ oder „m3u“ in den CD-292USB laden.
Wichtig: Eine Play-Liste und die dazugehörigen
MP3-Dateien müssen sich auf demselben Spei-
chermedium befinden. Die Play-Listen müssen
immer im Hauptverzeichnis (root directory) ge -
speichert sein.
1) Falls ein Titel abgespielt wird, mit der Taste
(20) auf Pause schalten.
2) Die Taste CONT / LIST (8) gedrückt halten
und mit der Taste oder (21) wählen,
nach welcher Dateiendung gesucht werden
soll. Die Textzeile (O) zeigt die Auswahl an
(M3U Scan, WPL Scan, XML Scan).
3) Die Taste FOLDER (12) drücken. Das Dis-
play zeigt „FO-SEL“ an und die Textzeile (O)
den Namen der ersten Play-Liste. Die Ziffern
(A) links oben im Display zeigen jetzt die
Nummer der Play-Liste an und die Ziffern (N)
unter „Total“ die Anzahl der vorhandenen
Play-Listen.
4) Die gewünschte Play-Liste mit der Taste
oder auswählen.
5) Zum Bestätigen der Auswahl die Taste FOL-
DER drücken. Nach dem Laden der Liste zeigt
das Display wieder die Laufzeitanzeige (P).
6) Zum Starten des ersten Titels der Play-Liste
die Taste drücken. Zum Anwählen ande-
rer Titel aus der Liste die Taste oder drü-
cken oder eine dieser Tasten gedrückt halten
und das Drehrad (16) betätigen.
7) Um die Titel wieder ohne Play-Liste abzu-
spielen, mit der Taste auf Pause schalten.
Die Taste CONT / LIST gedrückt halten und
die Taste oder (21) so oft drücken, bis
die Textzeile „Folder“ anzeigt. Nach dem
Lösen der Tasten zeigt das Display „SCAn“
und danach wieder die Laufzeitanzeige (P).
Es ist dann keine Play-Liste mehr geladen.
5.3 Anzeige der Titelinformationen
und des Ruhemodus
Das Display (10) gibt eine Vielzahl von Informa-
tionen an:
1. Nummer des gewählten Titels (A), wenn über
den Ziffern „TRACK“ angezeigt wird. Wird
unter den Ziffern „FOLDER“ angezeigt, ist die
Nummer des gewählten Ordners angegeben
[umschaltbar mit der Taste FOLDER (12)].
2. Anzahl der Titel (N) auf der CD oder, wenn
die Titel in verschiedene Ordner einsortiert
sind, die Anzahl der Titel im angewählten
Ordner
3. Laufzeit des gewählten Titels relativ (H) und
absolut (P); die Sekunden sind in 75 so ge-
nannte Frames unterteilt
Die Laufzeitanzeige lässt sich mit der Taste
TIME (7) umschalten:
Wird Elapse (E) angezeigt, ist die bereits
gespielte Zeit des Titels angegeben.
Wird Total Remain (F, G) angezeigt, ist die
Restzeit der gesamten CD angegeben
(nicht bei MP3-Betrieb möglich).
Wird Remain (G) angezeigt, ist die Restzeit
des Titels angegeben.
4. In der Textzeile (O) wird angezeigt:
– bei Standard-Audio-CDs mit CD-Text der
Titelname
– bei MP3-Betrieb der Dateiname
Die Textzeile lässt sich auf die Anzeige fol-
gender Informationen (ID3-Tags) um -
schalten. Dazu die Taste TIME gedrückt
halten und mit der Taste oder (21)
wählen:
Anzeige (M)
TITLE = Titelname
ALBUM = Albumname
ARTIST = Interpret
keine = Dateiname

7
5.3.1 Grafische Laufzeitanzeige
Zusätzlich zur numerischen Laufzeitanzeige (P)
stellt die Balkenanzeige (H) die Laufzeit, be -
zogen auf die Titeldauer, durch ihre Länge gra-
fisch dar (relative Zeitdarstellung). Die letzten
30 Sekunden eines Titels signalisiert der Balken
durch Blinken in voller Länge, wobei die letzten
15 Sekunden durch schnelleres Blinken ange-
zeigt werden.
5.3.2 Anzahl der Taktschläge pro Minute
Nach dem Anwählen eines Titels ermittelt der
Beatcounter automatisch die Anzahl der Takt-
schläge pro Minute. Nach kurzer Zeit erscheint
die Anzahl unten rechts im Display (Q). Kann der
Beatcounter keinen richtigen Wert ermitteln
(z. B. bei ruhigen Musiktiteln), lässt sich der Wert
auch manuell feststellen:
1) Die Taste BPM / TAP (23) im Takt der Musik
einige Male antippen (mindestens 4 ×). Die
Anzahl der Taktschläge wird angezeigt und
die Anzeige „BPM“ blinkt zur Kennzeichnung
des manuellen Zählmodus.
2) Zum Zurückschalten auf den automatischen
Zählmodus, die Taste BPM / TAP gedrückt
halten, bis die Anzeige „BPM“ nicht mehr
blinkt.
5.3.3 Ruhemodus
Stehen die beiden Abspieleinheiten länger als
15 Minuten auf Pause, schaltet das Gerät in
den Ruhemodus. Die Laser-Abtastsysteme sind
dann abgeschaltet und werden somit geschont.
Die Displays zeigen SLEEP (Schlaf) an und alle
beleuchteten Tasten erlöschen. Durch Betätigen
einer beliebigen Taste wird in den vorherigen
Betriebsmodus zurückgeschaltet.
5.4 Betriebsart wählen
5.4.1 Fortlaufende Wiedergabe
und Einzeltitelwiedergabe
Zum Umschalten zwischen Einzeltitelwieder-
gabe [Anzeige „Single“ (C)] und fortlaufender
Wiedergabe [Anzeige „Cont.“ (D)] die Taste
CONT / LIST (8) drücken.
A Bei der Einzeltitelwiedergabe schaltet das
Gerät nach jedem Abspielen eines Titels auf
Pause.
Dieser Modus ist speziell für DJ-Anwen -
dungen vorgesehen. Nach dem Anwählen
eines Titels steht die Abspieleinheit exakt an
der Stelle, an der die Musik beginnt (meis-
tens nicht bei dem Zeitindex 0 : 00 : 00, son-
dern einige Frames später, z. B. 0 : 00 : 15).
Diese Stelle wird automatisch als Startpunkt
(Auto-Cue-Punkt) gespeichert und im Dis-
play durch die Anzeige CUE (L) angegeben.
Nach dem Starten des Titels kann mit der
Taste CUE (18) auf diesen Startpunkt zu -
rückgesprungen werden. Nach dem Spielen
eines Titels schaltet das Gerät exakt an der
Stelle auf Pause, an der die Musik des
nächsten Titels beginnt. Diese Stelle ist dann
als neuer Startpunkt gespeichert.
B Bei der fortlaufenden Wiedergabe werden
alle Titel endlos nacheinander abgespielt,
d. h. nach dem letzten Titel startet wieder der
erste. Sind die Titel in verschiedene Ordner
einsortiert, werden jedoch nur die Titel des
angewählten Ordners wiederholt.
5.4.2 Relay-Betrieb – automatischer Start
der anderen Abspieleinheit
am Ende eines Titels
Am Ende eines Titels kann automatisch die
andere Abspieleinheit gestartet werden.
1) Beide Abspieleinheiten mit der Taste CONT /
LIST (8) auf Einzeltitelwiedergabe schalten,
sodass in den Displays „Single“ (C) ange-
zeigt wird.
2) Auf jeder Abspieleinheit einen Titel anwäh-
len.
3) Die Taste RELAY (2) betätigen. Die Taste
leuchtet.
4) Die Wiedergabe auf einer Abspieleinheit mit
der Taste (20) starten. Die andere Ab -
spieleinheit muss auf Pause geschaltet sein.
Sobald ein Titel zu Ende gespielt ist, schaltet
die Abspieleinheit auf Pause und die andere
startet. Der Vorgang wird bis zum Ausschal-
ten des Relay-Betriebs endlos wiederholt.
(Zum Ausschalten die Taste RELAY erneut
drücken.)
5) Während des Relay-Betriebs kann an jeder
Stelle eines Titels mit der Taste zusätzlich
die Wiedergabe von einer zur anderen Ab -
spieleinheit umgeschaltet werden.
Hinweis: Nachdem alle Titel eines Ordners abgespielt
wurden, wird nicht automatisch auf den nächste Ordner
gewechselt. Dies muss immer manuell erfolgen (Kapi-
tel 5.1, Bedienschritt 5).
5.5 Anspielen eines Titels
Mit der Taste CUE (18) lässt sich ein Titel an -
spielen, solange diese Taste gedrückt gehalten
wird. Nach dem Lösen der Taste springt das
Gerät auf den Titelanfang zurück und schaltet
auf Pause.
1) Die Abspieleinheit muss auf Einzeltitelwie-
dergabe geschaltet sein: Anzeige „Single“
(C). Wird „Cont.“ (D) angezeigt, die Taste
CONT / LIST (8) drücken.
2) Den Titel wählen (Kap. 5.1, Bedienschritte 4
und 5).
3) Durch Gedrückthalten der Taste CUE den
Titel anspielen.
4) Soll der Titel abgespielt werden, die Taste
(20) betätigen.
5.6 Schneller Vor- und Rücklauf
Soll ein Titel schnell vor- oder zurücklaufen,
zuerst die Taste SEARCH (17) drücken. In der
Textzeile (O) wird SEARCH angezeigt. Das
Drehrad REV / FWD (16) in die entsprechende
Richtung drehen. Die Vor- bzw. Rücklaufge-
schwindigkeit hängt von der Drehgeschwindig-
keit des Rads ab.
Hinweise: Im Pausenmodus wird nach einem Vor-
oder Rücklauf die momentane Stelle ständig wieder-
holt. Um das Wiederholen zu beenden, entweder die
Taste CUE (18) kurz drücken (neuer Cue-Punkt wird
gesetzt, Kap. 5.8.2) oder die Wiedergabe mit der
Taste (20) starten.
5.7 Genaues Anfahren
einer bestimmten Stelle
Eine Stelle im Titel lässt sich auf 1 Frame
(1⁄75 Sek.) genau anfahren, wenn z. B. die Wie-
dergabe nicht am Titelanfang, sondern ab einer
bestimmten Stelle starten soll.
1) Ist die gewünschte Stelle durch Abspielen
des Titels oder mit dem schnellen Vor-/ Rück-
lauf (Kap. 5.6) ungefähr erreicht, mit der
Taste (20) auf Pause schalten.
2) Durch Links- und Rechtsdrehen des Dreh -
rades (16) die Stelle genau anfahren. Zur
akustischen Kontrolle ist die eingestellte
Stelle ständig wiederholt zu hören.
3) Ist die gewünschte Stelle gefunden, die Taste
CUE (18) drücken. Damit ist die Stelle ge -
speichert und das wiederholte Abspielen
beendet. Mit der Taste kann nun die Wie-
dergabe ab diesem Punkt gestartet werden.
5.8 Rücksprung
zu einer bestimmten Stelle
Um schnell zu einer bestimmten Stelle springen
zu können, lassen sich mit den Tasten CUE 1
und CUE 2 (11) zwei Startpunkte (Cue-Punkte)
speichern, auch während des Abspielens eines
Titels (Fly-Cue).
Zusätzlich kann mit der Taste CUE (18) ein
weiterer Startpunkt bestimmt werden. Dieser
wird jedoch im Einzeltitelmodus beim Erreichen
oder Anwählen des nächsten Titels mit dem
Startpunkt des nächsten Titels überschrieben
[ggf. mit der Taste CONT / LIST (8) auf Gesamt -
titelwiedergabe umschalten].
Hinweis: Die gespeicherten Cue-Punkte werden ge -
löscht beim
– Anwählen eines anderen Ordners
– Umschalten zwischen CD, USB 1, USB 2
– Ausschalten des Gerätes
5.8.1 Tasten CUE 1 und CUE 2
1) Die Taste MEMO / AUTO (9) drücken, um die
Speicherung zu aktivieren. Die Taste leuch-
tet.
2) Entweder während der Wiedergabe die Taste
CUE 1 (11) drücken, wenn die gewünschte
Stelle erreicht ist (Fly-Cue) oder an der
gewünschten Stelle mit der Taste (20) auf
Pause schalten, die Stelle exakt mit dem
Drehrad (16) anfahren und dann die Taste
CUE 1 drücken. Diese blinkt einige Male und
leuchtet dann kontinuierlich. Die Taste
MEMO / AUTO erlischt. Die Wiedergabe ggf.
mit der Taste wieder starten.
3) Die Bedienschritte 1 und 2 für das Bestim-
men eines weiteren Cue-Punktes mit der
Taste CUE 2 wiederholen.
4) Mit den Tasten CUE 1 und CUE 2 kann nun
auf die zugehörigen Cue-Punkte gesprungen
werden: Die Wiedergabe startet sofort ab
dem jeweiligen Cue-Punkt.
5.8.2 Taste CUE
1) Während des Abspielens eines Titels mit der
Taste (20) auf Pause schalten, wenn die
Stelle erreicht ist, zu der später zurückge-
sprungen werden soll. Die Tasten und
CUE (18) blinken.
2) Bei Bedarf kann mit dem Drehrad (16) die
Stelle exakter angefahren werden (Kapi-
tel 5.7). Die angefahrene Stelle ist danach
fortlaufend zu hören.
3) Die Taste CUE drücken. Dadurch wird die
Stelle als Cue-Punkt gespeichert und im Dis-
play erscheint die Anzeige „CUE“ (L). Die
Taste CUE leuchtet jetzt kontinuierlich. Die
Taste blinkt weiter als Aufforderung, die
Wiedergabe zu starten.
4) Das Abspielen mit der Taste wieder star-
ten.
5) Mit der Taste CUE kann nun auf den Cue-
Punkt zurückgesprungen werden. Die Abspiel-
einheit steht dann auf Pause.
6) Mit der Taste die Wiedergabe starten oder
die Taste CUE so lange gedrückt halten, wie
der Titel gespielt werden soll. Nach dem
Lösen der Taste CUE springt die Abspielein-
heit zurück auf den Cue-Punkt und schaltet
auf Pause.
D
A
CH

D
A
CH
8
5.9 Geschwindigkeit mit oder ohne
Tonhöhenverschiebung verändern
Die Geschwindigkeit lässt sich mit dem Schiebe-
regler (15) bis zu ±100 % ändern:
+100 % = doppelte Geschwindigkeit
-
100 % = Stillstand
1) Den Einstellbereich mit der Taste PITCH (14)
wählen. Die Textzeile (O) zeigt kurz die Ein-
stellung an:
„Pitch 8 %“, „Pitch 16 %“, „Pitch 100“ oder
„Pitch off“, wenn der Geschwindigkeitsregler
wieder deaktiviert ist und der Titel mit der
Normalgeschwindigkeit abgespielt wird.
2) Die Geschwindigkeit mit dem Schieberegler
einstellen. Das Display zeigt die prozentuale
Abweichung von der Normalgeschwindigkeit
oben rechts (I) an. Die Anzahl der Takt-
schläge (Q) ändert sich entsprechend.
3) Mit dem Verändern der Geschwindigkeit
ändert sich auch proportional die Tonhöhe.
Soll jedoch die Tonhöhe konstant bleiben, die
Taste MT (24) drücken. Im Display erscheint
die Anzeige „MT“ (S). Zum Ausschalten der
Funktion die Taste MT erneut drücken.
5.10 Pitch Bend – Takt zwischen
zwei Musikstücken angleichen
Die Taktschläge von zwei Musikstücken mit dem-
selben Tempo lassen sich zeitlich genau über -
einander legen. Dadurch wird beim Überblenden
von einer zur anderen Abspieleinheit der Rhyth-
mus beim Tanzen nicht unterbrochen.
1) Zuerst das Tempo des Musikstückes, auf das
übergeblendet werden soll, mit dem Ge -
schwindigkeitsregler (15) an das Tempo des
laufenden Musikstückes angleichen. Dazu mit
dem Schieberegler die gleiche Anzahl von
Taktschlägen pro Minute einstellen, siehe An -
zeige (Q) unten rechts im Display.
2) Die Taktschläge des Musikstückes, auf das
übergeblendet werden soll, mit den Tasten
PITCH BEND (22) genau über die des lau-
fenden Musikstückes legen: Solange die
Taste +oder
-
gedrückt gehalten wird, läuft
der Titel schneller bzw. langsamer. Dadurch
verschieben sich die Taktschläge im Bezug
zu den Taktschlägen des laufenden Musik-
stückes.
3) Die Taktschläge können auch durch Drehen
des Drehrads (16) verschoben werden.
5.11 Effekte erzeugen
5.11.1 Scratch-Effekte
Zur Erzeugung von Scratch-Effekten (entspricht
dem manuellen Drehen eines Plattentellers) die
Taste SCRATCH (6) drücken und das Drehrad
(16) entsprechend vor- und zurückdrehen. Die
LED der Taste leuchtet und die Textzeile (O)
zeigt „SCRATCH“ an. Zum Ausschalten des
Effekts die Taste SCRATCH erneut drücken.
5.11.2 Leiereffekte
Falls die Funktion Master-Tempo (konstante
Tonhöhe) aktiviert ist [Anzeige „MT“ (S) im Dis-
play], diese mit der Taste MT (24) ausschalten.
Durch Hin- und Herdrehen des Drehrades (16)
wird die Abspielgeschwindigkeit abwechselnd
erhöht und verringert. Dadurch entsteht ein
Leiereffekt.
5.11.3 Stottereffekte
Die mit den Tasten CUE (18), CUE 1 und CUE 2
(11) gespeicherten Cue-Punkte (Kap. 5.8)
können auch zum Erzeugen von interessanten
Stottereffekten genutzt werden: Durch mehr -
faches kurzes Drücken einer dieser Tasten ent-
steht ein Stottereffekt. Dieser ist dabei umso ein-
drucksvoller, je geeigneter der Cue-Punkt ist
(z. B. Instrumenteneinsatz oder Anfang eines
Wortes).
5.11.4 Endlosschleife abspielen
Ein bestimmter Abschnitt eines Titels kann als
nahtlose Schleife beliebig oft wiederholt werden.
1) Mit der Taste (20) auf Wiedergabe schal-
ten. Ist der gewünschte Startpunkt der Schleife
erreicht (Punkt a in Abb. 6), die Taste A (19)
antippen.
Abb. 6 Endlosschleife abspielen
Tipp: Um den Startpunkt auf 1 Frame genau fest-
zulegen, zuerst mit der Taste auf Pause schal-
ten, mit dem Drehrad (16) den Punkt exakt einstel-
len und dann die Taste A drücken.
2) Ist beim Weiterspielen das gewünschte Ende
des Abschnitts erreicht (Punkt b in Abb. 6), die
Taste B/ EDIT (19) drücken. Der Abschnitt zwi-
schen den Punkten wird fortlaufend wiederholt.
Solange eine Endlosschleife abgespielt wird,
signalisiert das Display „RELOOP“ (J).
3) Um den Endpunkt zu verschieben oder um
ihn auf 1 Frame genau einzustellen, während
des Abspielens der Schleife die Taste B/ EDIT
drücken. Die Zeitanzeige (P) zeigt jetzt den
Zeitindex des Endpunktes an. Mit dem Dreh-
rad (16) den Endpunkt verschieben und mit
der Taste B/ EDIT den Endpunkt bestätigen.
4) Der Schleifenabschnitt kann aber auch geteilt
oder um ein Vielfaches verlängert werden.
Während die Schleife abgespielt wird, mit der
Taste oder (21) die Längenänderung
wählen. Die Textzeile (O) zeigt die Einstel-
lung an:
TRIM: 1⁄32, 1⁄16, 1⁄8, 1⁄4, 1⁄2, 1⁄1, 2⁄1, 4⁄1, 8⁄1, 16⁄1, 32⁄1
5) Um die Schleife zu verlassen und den Titel
weiterzuspielen, die Taste RELOOP / EXIT
(19) drücken. Zum erneuten Starten der
Schleife die Taste RELOOP / EXIT wieder
drücken.
Abb. 7 Schleife beenden und erneut starten
Hinweis: Eine gespeicherte Schleife wird gelöscht,
sobald beim Abspielen der nächste Titel erreicht ist
oder ein anderer Titel mit der Taste oder (21)
gewählt wird.
Abschnitt mit dem Bruchteil oder
Vielfachen einer Taktlänge
Die Länge eines Abschnitts für die Schleifenwie-
dergabe kann bei Titeln im 4⁄4 -Takt auch exakt
auf einen Bruchteil oder auf ein Vielfaches einer
Taktlänge eingestellt werden:
1⁄32, 1⁄16, 1⁄8, 1⁄4, 1⁄2, 1⁄1, 2⁄1, 4⁄1, 8⁄1, 16⁄1, 32⁄1
1) Die Taste MEMO / AUTO (9) gedrückt halten
und mit dem Drehrad (16) die Länge einstel-
len. Die Länge wird in der Textzeile (O) ange-
zeigt, z. B. „AUTO 2 / 1“ = zwei Taktlängen.
Nach dieser Einstellung leuchtet die Taste
MEMO / AUTO zur Signalisierung, dass auto-
matisch der Endpunkt eines Schleifenab-
schnitts gesetzt wird.
2) Den Startpunkt mit der Taste A (19) bestim-
men. Damit wird gleichzeitig die Endlos-
schleife gestartet und der Endpunkt entspre-
chend der Längeneinstellung gesetzt.
3) Die Länge des Schleifenabschnitts lässt sich
auch nachträglich, wie zuvor beschrieben
(Bedienschritt 3 oder 4), ändern.
5.12 Eigene Titelfolge zusammenstellen
Sollen nur ausgewählte Titel in einer bestimmten
Reihenfolge abgespielt werden, kann eine Folge
mit max. 99 Titeln programmiert werden.
5.12.1 Titelfolge speichern und abspielen
1) Falls ein Titel abgespielt wird, zuerst mit der
Taste (20) auf Pause schalten.
2) Mit der Taste PROG (13) in den Program-
miermodus schalten. Die Zeitanzeige (P)
schaltet auf die Anzeige des ersten Spei-
cherplatzes „P
-
01“ um. Die Anzeige „PG“
(R) blinkt schnell.
Hinweis: Soll dieser Modus sofort verlassen wer-
den, die Taste PROG so lange gedrückt halten, bis
das Display wieder die Laufzeit (P) anzeigt.
3) Den ersten Titel, der gespeichert werden soll,
mit der Taste oder (21) wählen (Kap.
5.1, Bedienschritte 4 und 5).
4) Zur Bestätigung der Titelwahl die Taste
PROG drücken. Der nächste Speicherplatz
„P
-
02“ wird angezeigt.
5) Die Bedienschritte 3 und 4 wiederholen, bis
alle Titel der Titelfolge gespeichert sind. Sind
99 Titel gespeichert und wird versucht, einen
weiteren Titel zu speichern, erscheint die
Meldung „FULL“.
6) Zum Abspielen der Titelfolge die Taste
drücken. Die Anzeige „PG“ (R) blinkt langsa-
mer. Die Titel werden in Abhängigkeit des
gewählten Betriebsmodus (Kapitel 5.4.1)
abgespielt. Zum Anwählen anderer Titel der
Titelfolge die Taste oder (mehrfach) drü-
cken.
7) Zum Zurückschalten auf den normalen Ab -
spielmodus mit der Taste auf Pause
schalten und die Taste PROG so lange ge -
drückt halten, bis die Anzeige „PG“ (R) nicht
mehr blinkt.
Um die Titelfolge erneut abzuspielen, auf
Pause schalten und die Taste PROG drü-
cken, sodass die Anzeige „PG“ wieder blinkt.
Die Titelfolge mit der Taste starten.
Hinweis: Solange die Anzeige „PG“ blinkt oder kon-
stant leuchtet, ist die Titelfolge abrufbar. Sie wird ge -
löscht z. B. beim Ausschalten des Gerätes.
5.12.2 Titelfolge überprüfen
1) Falls ein Titel abgespielt wird, zuerst mit der
Taste auf Pause schalten.
2) Wenn jetzt die Anzeige „PG“ blinkt, die Taste
PROG einmal drücken. Leuchtet die Anzeige
„PG“ konstant, die Taste PROG zweimal drü-
cken.
3) Mit der Taste oder die Speicherplätze
(P
-
01 … P
-
99) nacheinander anwählen.
Der jeweils gespeicherte Titel wird in der
Textzeile (O) angezeigt.
4) Zum Abspielen der Titelfolge die Taste
drücken.
ab
1.
PLAY PLAY
LOOP
2.
AB / EDIT
PLAY c
LOOP
1. 2.
RELOOP / EXITRELOOP / EXIT

5.12.3 Titelfolge ergänzen oder löschen
1) Falls ein Titel abgespielt wird, zuerst mit der
Taste auf Pause schalten.
2) Falls die Anzeige „PG“ blinkt, die Taste PROG
so lange gedrückt halten, bis „PG“ nicht mehr
blinkt.
3) Die Taste PROG kurz drücken, sodass „PG“
schnell blinkt und die Zeitanzeige (P) auf die
Anzeige des nächsten freien Speicherplatzes
„P
-
…“ umschaltet.
4) Entweder zum Löschen die Taste PROG so
lange drücken, bis das Display wieder die
Laufzeit (P) anzeigt oder zum Ergänzen
eines weiteren Titels diesen mit der Taste
oder wählen und mit der Taste PROG
bestätigen. Zum Abspielen der er gänzten
Titelfolge die Taste drücken.
6 Faderstart
Die Funktion Start/ Pause der Taste (20)
lässt sich von einem Mischpult mit Faderstart-
Funktion aus fernbedienen. Der Anschluss an
das Mischpult ist im Kapitel 4, Bedienschritt 3
be schrieben. Den Schiebeschalter (34) auf der
Laufwerkrückseite auf die Faderstartart des
Mischpultes einstellen:
LOCK = Steuerung über einen Ein- / Ausschalter
Für die meisten Mischpulte aus dem Sorti-
ment von „img Stage Line“ muss diese Schal-
terposition gewählt werden. Mit dem Aufzie-
hen des Faders wird ein Schalter im Mischpult
geschlossen, der das Abspielen startet. Beim
Zuziehen des Faders öffnet der Schalter und
schaltet die Abspieleinheit auf Pause.
Abb. 8 Faderstart über Ein- / Ausschalter
TACT = Steuerung über einen Taster
Wird der Taster das erste Mal durch das Auf-
ziehen des Faders betätigt, startet das
Abspielen. Wird der Taster zum zweiten Mal
durch das Zuziehen des Faders betätigt,
schaltet die Abspieleinheit auf Pause.
Abb. 9 Faderstart über Taster
CUE PLAY = Steuerung über einen Impuls
Beim Aufziehen des Faders wird durch einen
kurzen Steuerimpuls des Mischpultes die Wie-
dergabe ab dem Titelanfang (Auto-Cue-Punkt
Kap. 5.4.1) oder ab dem mit der Taste
CUE (18) gesetzten Cue-Punkt (Kap.
5.8.2) gestartet. Beim Schließen des Faders
springt die Abspieleinheit durch einen weite-
ren Steuerimpuls auf diesen Startpunkt zu -
rück und schaltet dort auf Pause.
Abb. 10 Faderstart über Steuerimpuls
7 Firmware aktualisieren
Ist im Internet eine neue Firmware verfügbar,
kann die Ihres Gerätes aktualisiert werden:
1) Auf der Homepage von „img Stage Line“
(www.imgstageline.com) unter der Rubrik
„SUPPORT“ auf „Software-Updates“ klicken.
Dann nach unten bis zur Rubrik „FIRM-
WARE-DOWNLOADS“ scrollen.
Dort zum Herunterladen auf das Symbol vor
„CD-292USB“ klicken.
Die heruntergeladene Software auf einen
USB-Stick kopieren.
2) Den CD-292USB mit dem Netzschalter (28)
ausschalten.
3) Den USB-Stick mit der neuen Firmware in die
linke USB-Buchse USB 1 (26) stecken.
4) An der linken Abspieleinheit die Taste PROG
(13) gedrückt halten und das Gerät wieder
einschalten. Die Taste PROG erst wieder
lösen, wenn im linken Display „UP dAt E“ an -
gezeigt wird.
5) Wenn nach dem Einlesevorgang in der Text-
zeile (O) „Ready“ erscheint, die Taste (20)
drücken, um die Firmware-Aktualisierung zu
starten. Anhand der Balkenanzeige (H) und
der Textzeile kann die Aktualisierung verfolgt
werden. Wird „Finish“ angezeigt, ist die Firm-
ware aktualisiert.
6) Das Gerät aus- und wieder einschalten.
8 Pflege des Gerätes
Das Gerät vor Staub, Vibrationen, Feuchtigkeit
und Hitze schützen (zulässiger Einsatztempera-
turbereich 0 – 40 °C). Für die Reinigung nur ein
weiches, trockenes Tuch verwenden, auf keinen
Fall Wasser oder Chemikalien.
Hinweis zu Tonaussetzern und Lesefehlern
Zigarettenrauch und Staub dringen leicht durch
alle Öffnungen des Gerätes und setzen sich
auch auf der Optik der Laser-Abtastsysteme ab.
Sollte dieser Belag zu Lesefehlern und Ton -
aussetzern führen, muss das Gerät in einer
Fachwerkstatt gereinigt werden. Diese Reini-
gung ist kostenpflichtig, auch während der
Garantiezeit!
9 Technische Daten
Frequenzbereich: . . . . . 20 – 20 000 Hz
Klirrfaktor: . . . . . . . . . . . < 0,1 %
Kanaltrennung: . . . . . . . > 80 dB
Dynamikumfang: . . . . . > 80 dB
Störabstand: . . . . . . . . . > 80 dB
Ausgang: . . . . . . . . . . . 2 V (Line-Pegel),
Cinch-Buchsen
lesbare Dateisysteme: . NTFS, FAT, HFS+
Anti-Shock-Speicher: . . 15 s
Stromversorgung: . . . . . 230 V~ / 50 Hz
Leistungsaufnahme: . . . max. 40 VA
Einsatztemperatur: . . . . 0 – 40 °C
Abmessungen (B×H×T)
Bedienteil: . . . . . . . . . 482 × 90 × 85 mm,
2 HE (Höheneinheiten)
Laufwerkteil: . . . . . . . 482 × 90 × 260 mm,
2 HE (Höheneinheiten)
Gewicht: . . . . . . . . . . . . 6,5 kg
Änderungen vorbehalten.
START /
PAUSE CUE
PLAY
LOCK
TACT
Start
Pause
START /
PAUSE CUE
PLAY
LOCK
TACT
1.×CuePlay
2.×Pause
START /
PAUSE CUE
PLAY
LOCK
TACT
1.×Start
2.×Pause
D
A
CH
9
Diese Bedienungsanleitung ist urheberrechtlich für MONACOR
®
INTERNATIONAL GmbH & Co. KG
geschützt. Eine Reproduktion für eigene kommerzielle Zwecke – auch auszugsweise – ist untersagt.

All operating elements and connections de -
scribed can be found on the fold-out page 3.
Contents
1 Operating Elements
and Connections . . . . . . . . . . . . . . . . 10
1.1 Control unit . . . . . . . . . . . . . . . . . . . . . . 10
1.2 Player mechanism unit, front panel . . . 11
1.3 Player mechanism unit, rear panel . . . . 11
2 Safety Notes . . . . . . . . . . . . . . . . . . . . 11
3 Applications . . . . . . . . . . . . . . . . . . . . 11
4 Setting up and Connecting the Unit .12
5 Operation . . . . . . . . . . . . . . . . . . . . . . . 12
5.1 Replaying music pieces . . . . . . . . . . . . 12
5.2 Loading the play list . . . . . . . . . . . . . . . 12
5.3 Indication of the title information
and the sleep mode . . . . . . . . . . . . . . . 12
5.3.1 Graphic indication of the playing time 12
5.3.2 Number of beats per minute . . . . . . . 13
5.3.3 Sleep mode . . . . . . . . . . . . . . . . . . . . 13
5.4 Selecting the operating mode . . . . . . . . 13
5.4.1 Continuous replay
and single title replay . . . . . . . . . . . . . 13
5.4.2 Relay mode – automatic start of the
other player unit at the end of a title . 13
5.5 Short replay of a title beginning . . . . . . 13
5.6 Fast forward and reverse run . . . . . . . . 13
5.7 Precise selection of a certain spot . . . . 13
5.8 Return to a certain spot . . . . . . . . . . . . 13
5.8.1 Buttons CUE1 and CUE2 . . . . . . . . . 13
5.8.2 Button CUE . . . . . . . . . . . . . . . . . . . . 13
5.9 Changing the speed with or
without displacing the pitch . . . . . . . . . 13
5.10 Pitch Bend – matching the beat
between two music pieces . . . . . . . . . . 13
5.11 Effects . . . . . . . . . . . . . . . . . . . . . . . . . . 14
5.11.1 Scratch effects . . . . . . . . . . . . . . . . . . 14
5.11.2 Droning effects . . . . . . . . . . . . . . . . . 14
5.11.3 Stutter effects . . . . . . . . . . . . . . . . . . 14
5.11.4 Replaying a continuous loop . . . . . . . 14
5.12 Compiling your personal title sequence 14
5.12.1 Storing and
replaying a title sequence . . . . . . . . . 14
5.12.2 Checking a title sequence . . . . . . . . . 14
5.12.3 Completing or
deleting a title sequence . . . . . . . . . . 14
6 Fader Start . . . . . . . . . . . . . . . . . . . . . . 14
7 Updating the Firmware . . . . . . . . . . . . 15
8 Maintenance of the Unit . . . . . . . . . . . 15
9 Specifications . . . . . . . . . . . . . . . . . . . 15
1 Operating Elements
and Connections
1.1 Control unit
1Control panel of player unit 1
For details see fig. 2
2Button RELAY for automatic start of the other
player unit at the end of a title
(chapter 5.4.2)
3Control panel of player unit 2
For details see fig. 2
4Button OPEN / CLOSE to open and close
the CD tray [like buttons (27, 29) at the
player mechanism]
5Button CD / USB to switch between CD and
USB storage medium: For this purpose the
player unit must be set to pause with the but-
ton (20).
If two USB memories are connected, after
pressing the button CD / USB select CD, USB 1
or USB 2 with the button or (21). The text
line (O) shows the selection. To confirm,
press the button CD / USB.
6Button SCRATCH to activate / deactivate the
scratch function
With the function activated (button lights up)
it is possible to create scratch effects with the
jog wheel (16)
7Button TIME to switch the time indication
(H, P)
for the indication “Remain” (G)
remaining playing time of the current title
for the indication “Elapse” (E)
time already played of the current title
for the indication “Total Remain”
remaining time of the entire CD
(not possible for MP3 mode)
For MP3 mode, with the button TIME kept
pressed, switch over the text line (O) to indi-
cate the title, album, artist (ID3 tags) or file
name with the button or (21)
8Button CONT / LIST
1. To switch over between single title replay
[indication “Single” (C)] and continuous
replay [indication “Cont.” (D)]
2. To load play lists (chapter 5.2)
9Button MEMO / AUTO
1. To store Cue points with the buttons CUE 1
and CUE 2 (11)
2. To replay a title section as a loop with the
length of a multiple or a fraction of the beat
length (chapter 5.11.4)
10 Display, for details see fig. 3
Awhen “TRACK” is indicated above the dig-
its: number of the music title (in the
selected folder);
when “FOLDER” is indicated below the
digits: number of the selected folder
Breplay symbol
C“Single”: indicates the single title replay
mode
D“Cont.”: indicates the continuous title
replay mode
Eindication “Elapse”: indicates that the time
already played of a title is shown
F“Total”: indicates together with “Remain”
(G) that the remaining time of the CD is
shown
(not possible for MP3 mode)
G“Remain”: indicates that the remaining time
of a title is shown. With “Total Remain” the
remaining time of the CD is shown
Hbargraph to show the relative playing time
of the title
Ideviation from the standard speed in per-
cent
J“RELOOP”: indicates the replay of a con-
tinuous loop
K“CD” or “USB”: indicates if a CD, the port
USB 1 (26) or USB 2 (30) has been
selected. With the port USB 2 selected, the
indication “USB” flashes.
L“CUE”: appears when the player unit is in
the pause mode at the Cue point
(chapters 5.4.1 and 5.8.2).
Mfor MP3 mode: this field indicates if the
name of the title, album or artist of the
music title is shown in the text line (O). If
none of these indications is inserted, the
file name is shown (chapter 5.3).
Nnumber of titles on the CD;
for MP3 mode:
number of the titles in the selected folder
[“TRACK” above the digits (A)]
or number of the folders [“FOLDER” below
the digits (A)]
Otext line for additional information
Pplaying time indication, also see items E
and G
Qindication of the beats per minute
R“PG”: flashes if a personal title sequence is
programmed or replayed
S“MT” (Master Tempo): indicates the func-
tion for constant pitch (chapter 5.9)
11 Buttons CUE 1 and CUE 2
1. to store two Cue points [also possible dur-
ing replay; to store, press the button
MEMO / AUTO (9) first]
2. to go to the stored Cue points
12 Button FOLDER for MP3 mode
1. to switch over between the name of the title
or folder in the text line (O),
according to the selected adjustment, a
title or a folder can be selected with the but-
tons and (21)
2. to load play lists (chapter 5.2)
3. to select a partition on a hard disk con-
nected (chapter 5.1)
13 Button PROG to compile and to replay a per-
sonal title sequence (chapter 5.12)
14 Button PITCH to activate / deactivate the
speed control (15) and to select the speed
adjusting range (8 %, 16 % or 100 %)
The text line (O) shortly indicates the select -
ed adjustment (pitch 8 %, 16 %, 100, off).
15 Sliding control to change the playing speed
[without changing the pitch when the button
MT (24) lights up]
The speed can only be changed when the
button PITCH (14) lights up.
16 Jog wheel REV / FWD
–for fast forward and reverse run when the
button SEARCH (17) has been pressed
–to create scratch effects when the button
SCRATCH (6) has been pressed
–for the function “Pitch Bend” during replay
of a title (chapter 5.10)
–to precisely select a spot when the player
unit is set to pause
10
GB

–with the button or (21) pressed for fast
selection of titles [“TRACK” above the dig-
its (A)] or folders [“FOLDER” below the dig-
its (A)]
17 Button SEARCH to activate / deactivate the
fast forward / reverse run with the jog wheel
(16)
18 Button CUE for shortly playing the title begin-
ning (chapter 5.5) and for return to a spot
defined before (chapter 5.8.2)
19 Buttons to store and to replay a continuous
loop
button A to define the starting point of a sec-
tion for a continuous loop
button B / EDIT to define the end point and
simultaneous start of the loop;
to displace the end point, press the button
again and adjust the end point with the jog
wheel (16)
button RELOOP / EXIT to exit the continuous
loop or to replay the loop
20 Button to start a title and to switch over
between replay and pause
21 Buttons and
1. for title selection when “TRACK” is indi-
cated above the digits (A):
button to select the next title
button to go to the beginning of the title
currently playing. Each time the button is
pressed, the unit always goes back one
title.
If one of the buttons is kept pressed, the
titles can quickly be selected with the jog
wheel (16).
2. for MP3 mode: to select a folder when
“FOLDER” is indicated below the digits (A)
[to be switched with the button FOLDER
(12)]
If one of the buttons is kept pressed, the
folders can quickly be selected with the jog
wheel (16).
3. to select a CD or a USB storage medium,
also see button CD / USB (5)
4. to divide or to multiply the title section of a
continuous loop (chapter 5.11.4)
5. for MP3 mode and with button TIME (7)
kept pressed: to switch over the text line
(O) to the indication of the title, album,
artist (ID3 tags) or file name
6. to select a play list (chapter 5.2)
7. to select a partition on a hard disk con-
nected (chapter 5.1)
22 Buttons PITCH BEND to adapt the beat of the
title currently playing to the beat of a music
piece playing on the other player unit
(chapter 5.10)
23 Button TAP for the manual counting mode of
the beat counter and to switch back to the
automatic mode (chapter 5.3.2)
24 Button MT (Master Tempo) to activate /
deactivate the function for constant pitch
(chapter 5.9)
1.2 Player mechanism, front side
25 CD tray of player unit 1
26 USB port 1 to insert a USB stick or to connect
a hard disk
27 Button OPEN / CLOSE to open and to close
the CD tray 1 [like button (4) on the control
unit]
28 On / off switch POWER with power LED (red)
above it
29 Button OPEN / CLOSE to open and close
the CD tray 2 [like button (4) on the control
unit]
30 USB port 2 to insert a USB stick or to connect
a hard disk
31 CD tray of player unit 2
1.3 Player mechanism, rear side
32 Audio output LINE OUT of the player unit 2
for connection to the line input e. g. of an
amplifier or mixer
33 3.5 mm jack START / PAUSE of the player
unit 2 for remote control of the function Start /
Pause from a mixer
34 Selector switch for the type of remote control
via the jacks START / PAUSE (33, 38)
[chapter 6]
position LOCK
for control via an on / off switch
position TACT
for control via a momentary pushbutton
position CUE / PLAY
Via a control pulse of the mixer the player
unit will be started from the Cue point [Auto
Cue point or set with the button CUE (18)]
when the fader of the mixer is advanced or
reset to the Cue point when the fader is
closed.
35 Jack for connection of the control part:
Connect it to the jack REMOTE CONTROL
CONNECT TO MAIN UNIT 2 via one of the
supplied connection cables
36 Mains cable for connection to a socket
(230 V~ / 50 Hz)
37 Jack for connection of the control part:
Connect it to the jack REMOTE CONTROL
CONNECT TO MAIN UNIT 1 via one of the
supplied connection cables
38 3.5 mm jack START / PAUSE of player unit 1
for remote control of the function Start / Pause
from a mixer
39 Audio output LINE OUT of the player unit 1
for connection to the line input e. g. of an
amplifier or mixer
2 Safety Notes
This unit corresponds to all relevant directives of
the EU and is therefore marked with .
Please observe the following items in any case:
GCaution! Never look into the CD mechanism
when the CD tray is open; laser beams may be
emitted causing eye damage.
GThe unit is suitable for indoor use only. Protect
it against dripping water and splash water,
high air humidity, and heat (admissible ambi-
ent temperature range 0 – 40 °C).
GDo not place any vessel filled with liquid on the
unit, e. g. a drinking glass.
GDo not operate the unit or immediately discon-
nect the plug from the mains socket
1. if there is visible damage to the unit or to the
mains cable,
2. if a defect might have occurred after the unit
was dropped or suffered a similar accident,
3. if malfunctions occur.
In any case the unit must be repaired by skilled
personnel.
GA damaged mains cable must be replaced by
skilled personnel only.
GNever pull the mains cable to disconnect the
mains plug from the socket; always seize the
plug.
GFor cleaning only use a dry, soft cloth; never
use water or chemicals.
GNo guarantee claims for the unit and no liabil-
ity for any resulting personal damage or mate-
rial damage will be accepted if the unit is used
for other purposes than originally intended, if it
is not correctly connected or operated, or not
repaired in an expert way. Likewise, no liability
will be accepted for operating errors or for data
loss caused by a defect and for any conse-
quential damage of this data loss.
GImportant for U. K. Customers!
The wires in this mains lead are coloured in ac -
cord ance with the following code:
blue = neutral
brown = live
As the colours of the wires in the mains lead of
this appliance may not correspond with the
coloured markings identifying the terminals in
your plug, proceed as follows:
1. The wire which is coloured blue must be
connected to the terminal which is marked
with the letter N or coloured black.
2. The wire which is coloured brown must be
connected to the terminal which is marked
with the letter L or coloured red.
3 Applications
The CD / MP3 player CD-292USB with two player
units has been specially designed for profes-
sional DJ applications. Many functional features
have precisely been matched to this range of
application, e. g. single title replay, automatic
beat counter, seamless replay of a continuous
loop, change of speed without displacing the
pitch, anti-shock memory.
The CD-292USB allows to replay audio
CDs, even CDs you have burnt yourself (audio
CD-R) and CDs with titles in MP3 format. How-
ever, problems in replaying rewritable CDs (CD-
RW) may occur depending on the CD type, the
CD burner, and the burning software used.
Via the USB ports, also MP3 files from a
hard disk or USB stick can be replayed. The
player units will be able to access the USB ports
independently of each other so that operation
with a single USB storage medium will also be
possible.
If the unit is to be put out of operation
definitively, take it to a local recycling
plant for a disposal which is not harmful
to the environment.
WARNING The unit is supplied with haz-
ardous mains voltage. Leave serv-
icing to skilled personnel only!
This may result in an electric
shock.
11
GB

4 Setting up and
Connecting the Unit
The control unit and the player mechanism unit
are designed for installation into a rack for units
with a width of 482 mm / 19″, however, they can
also be used as tabletop units. In any case, the
player mechanism unit must be operated in a
horizontal position while it is possible to install
the control unit as desired, e. g. also in an
inclined position. For rack installation, 2 rack
spaces each are required for the control unit and
for the player mechanism unit (1 rack space =
44.45 mm).
Prior to making or changing any connections,
switch off the CD / MP3 player and the units to be
connected.
1) Connect the control unit and the player mech-
anism unit via the two connection cables sup-
plied:
Jack CONNECT TO REMOTE CONTROL 2
(35) of the player mechanism unit to the jack
REMOTE CONTROL CONNECT TO MAIN
UNIT 2 on the control unit
Jack CONNECT TO REMOTE CONTROL 1
(37) of the player mechanism unit to the jack
REMOTE CONTROL CONNECT TO MAIN
UNIT 1 on the control unit.
2) Connect the two signal outputs LINE OUT
(32, 39) to one input each with line level e. g.
of a mixer or amplifier (possible lettering:
Line, CD, Aux).
3) The two player units can be started and set to
pause via a mixer with fader start function.
For this purpose, connect the jacks START /
PAUSE (33, 38) via two cables with 3.5 mm
plugs to the corresponding jacks of the mixer.
Set the CD-292USB to the type of fader start
of the mixer, see chapter 6.
4) Finally connect the plug of the mains cable
(36) to a mains socket (230 V~ / 50 Hz).
5 Operation
The operation of the two player units is identical.
Switch on the unit with the POWER switch (28).
The display (10) shortly shows “boot” (starting
procedure) and WELCOME. If a CD has been
inserted, after reading-in, the display shows
information about the CD. If there is no CD in the
player mechanism, “no diSC” (no CD) is dis-
played,
Switch off the unit after operation. The fol-
lowing adjustments remain stored for the next
operation:
1. the operating mode selected (single title
replay / continuous replay, chapter 5.4.1)
2. the time indication selected (remaining play-
ing time / time already played, chapter 5.3)
3. the speed adjusting range selected
(chapter 5.9)
5.1 Replaying music pieces
1) To insert a CD, open the CD tray (25, 31) with
the button (4, 27 or 29). Insert the CD with
the lettering facing upwards and close CD
tray with the button .
2) Additionally or alternatively, a USB stick each
can be inserted into the USB ports (26, 30) or
a hard disk each can be connected to the
USB ports. To switch over between CD and
USB storage medium, press the button CD /
USB (5). For this purpose, the player unit
must be set to pause; if required, press the
button (20).
If two USB storage media are connected,
after pressing the button CD / USB, select the
signal source (CD, USB 1, USB 2) with the
button or (21). The text line (O) shows
the selection. The signal source currently
selected is skipped. Confirm the selection
with the button CD / USB.
Notes
1. The selected signal source is also indicated in
the display field (K):
“CD” = CD player mechanism is selected
“USB” constantly inserted = USB 1
“USB” flashes = USB 2
2. A hard disk must be supplied with power by a
power supply unit of its own if its power con-
sumption is higher than 500 mA.
3. If several partitions are provided on a hard disk,
these can be selected as follows:
a) Keep the button FOLDER (12) pressed until
the display shows “PA-SEL” (Partition Selec-
tion).
b) With the button or select the partition.
The text line (O) shows the name in each
case.
c) To confirm, press the button FOLDER.
3) To start the first title, press the button (20).
While replaying, the display shows the sym-
bol (B). The replay can be interrupted and
continued at any time with the button .
4) To select another title, use the buttons and
.
Button : to go to the next title
Button : to go to the beginning of the title
currently playing. Each time the button is
pressed, the unit always goes back one more
title.
If one of the buttons is kept pressed, the titles
can quickly be selected with the jog wheel
(16).
5) For MP3 operation: If the music titles are
sorted in different folders, press the button
FOLDER (12) to select a folder. The display
shows “FO-SEL” (Folder Selection) and the
text line (O) shows the name of the folder.
The digits (A) on the top left of the display
now show the number of the folder and the
digits (N) under “Total” show the quantity of
the folders available.
Select the folder with the button or . If
one of the buttons is kept pressed, the folders
can quickly be selected with the jog wheel
(16).
To confirm the selection, press the button
FOLDER; the display shows the playing time
(P) again. Select the desired title in the folder
with the button or .
6) To insert another CD, first set the unit to
pause with the button , otherwise the CD
tray cannot be opened with the button .
7) Prior to switching off the unit, always close
the CD trays with the buttons to protect the
laser systems against impurities. Afterwards
switch off the unit with the POWER switch.
5.2 Loading the play list
To play a certain selection of MP3 files, it is pos-
sible to load play lists with the file extension
“wpl”, “xml” or “m3u” created on a computer into
the CD-292USB.
Important: The play list and the corresponding
MP3 files must be on the same storage medium.
The play lists must always be stored in the root
directory.
1) If a title is played, set the unit to pause with
the button (20).
2) Keep the button CONT / LIST (8) pressed and
select with the button or (21) which file
extension is searched for. The text line (O)
shows the selection (M3U Scan, WPL Scan,
XML Scan).
3) Press the button FOLDER (12). The display
shows “FO-SEL” and the text line (O) shows
the name of the first play list. The digits (A) on
the top left of the display now show the num-
ber of the play list and the digits (N) under
“Total” show the quantity of the play lists
available.
4) Select the desired play list with the button
or .
5) To confirm the selection, press the button
FOLDER. After loading the list, the display
shows the playing time indication again (P).
6) To start the first title of the play list, press the
button . To select other titles from the list,
press the button or or keep one of these
buttons pressed and actuate the jog wheel
(16).
7) To play the titles again without play list, set
the unit to pause with the button . Keep the
button CONT / LIST pressed and press the
button or (21) repeatedly until “Folder”
appears in the text line. After releasing the
buttons, the display shows “SCAn” and then
again the playing time indication (P). Then no
more play list is loaded.
5.3 Indication of the title information
and the sleep mode
The display (10) indicates a variety of informa-
tion:
1. The number of the selected title (A) if
“TRACK” is shown above the digits. If
“FOLDER” is shown below the digits, the
number of the selected folder is indicated
[switchable with the button FOLDER (12)].
2. Quantity of the titles (N) on the CD or, if the
titles are sorted in different folders, the quan-
tity of the titles in the selected folder
3. Playing time of the selected title: relative (H)
and absolute (P); the seconds can be divided
into 75 so-called frames
The playing time indication can be switched
over with the button TIME (7):
If Elapse (E) is shown, the time already
played of the title is indicated.
If Total Remain (F, G) is shown, the remain-
ing time of the entire CD is indicated
(not possible for MP3 mode).
If Remain (G) is shown, the remaining time of
the title is indicated.
4. The text line (O) shows:
– the title name for standard audio CDs with
CD text
– the file name for MP3 mode
The text line can be switched over to the
indication of the following information (ID3
tags). For this purpose keep the button
TIME pressed and select with the button
or (21):
Indication (M)
TITLE
ALBUM
ARTIST
none = file name
5.3.1 Graphic indication of the playing time
In addition to the numerical time indication (P),
the bargraph (H) will indicate the playing time
graphically by its length, in relation to the dura-
tion of the title (relative time presentation). The
last 30 seconds of a title will be indicated by
the bargraph flashing in its full length, the last
15 sec onds by even faster flashing.
12
GB

5.3.2 Number of beats per minutes
After selecting a title, the beat counter automati-
cally determines the number of beats per minute.
After a short time the number appears on the
right at the bottom of the display (Q). If the beat
counter cannot determine a correct value (e. g.
for quiet music titles), the value can also be
determined manually:
1) Shortly press the button BPM / TAP (23) sev-
eral times to the beat of the music (4 times as
a minimum). The number of beats appears
and the indication “BPM” flashes to show the
manual counting mode.
2) To switch back to the automatic counting
mode, keep the button BPM / TAP pressed
until the indication “BPM” stops flashing.
5.3.3 Sleep mode
If both player units are set to pause for more than
15 minutes, the unit is switched to the sleep
mode. The laser systems are then switched off
and are thus preserved. The displays show
SLEEP and all illuminated buttons will extin-
guish. By actuating any button the unit is
switched back to the previous operating mode.
5.4 Selecting the operating mode
5.4.1 Continuous replay and single title
replay
To switch over between single title replay [indi-
cation “Single” (C)] and continuous replay [indi-
cation “Cont.” (D)], press the button CONT / LIST
(8).
A For single title replay the unit is switched to
pause at the end of a title.
This mode is especially provided for DJ
applications. After selecting a title, the player
unit will be set to pause precisely on the spot
where the music starts (mostly not at the time
index 0:00:00 but some frames later, e. g.
0:00:15). This spot will be automatically
stored as a starting point (Auto Cue point)
and shown on the display by CUE (L). After
starting the title it is possible to return to this
starting point with the button CUE (18). After
replaying a title, the unit will be set to pause
precisely on the spot where the music of the
next title starts. This spot will then be stored
as a new starting point.
B For continuous replay all titles are played
continuously one after the other, i. e. after the
last title the first title restarts. However, if the
titles are sorted in different folders, only the
titles of the folder selected are repeated.
5.4.2 Relay mode – automatic start of the
other player unit at the end of a title
At the end of a title the other player unit can auto-
matically be started.
1) Set both player units to single title replay with
the button CONT / LIST (8), so that the dis-
plays show “Single” (C).
2) Select a title on each player unit.
3) Press the button RELAY (2). The button
lights up.
4) Start the replay on one player unit with the
button (20). The other player unit must be
set to pause. As soon as a title has been
played to the end, the player unit is set to
pause and the other player unit will start. This
procedure will be continuously repeated until
the relay mode is deactivated. (To switch off
this mode, actuate the button RELAY once
again.)
5) During the relay mode, on any spot of a title,
the replay can additionally be switched over
from one player unit to the other with the but-
ton .
Note: After all titles of a folder have been played to the
end, the unit does not change automatically to the next
folder. This must always be done manually (chapter
5.1, step 5).
5.5 Short replay of a title beginning
For short replay of a title beginning keep the but-
ton CUE (18) pressed. After releasing the button,
the unit will return to the title beginning and is set
to pause.
1) The player unit must be set to single title
replay: indication “Single” (C). If “Cont.” (D) is
shown, press the button CONT / LIST (8).
2) Select the title (chapter 5.1, steps 4 and 5).
3) By keeping the button CUE pressed, shortly
replay the title beginning.
4) To replay the title, press the button (20).
5.6 Fast forward and reverse run
For fast forward or reverse run of a title, first
press the button SEARCH (17). SEARCH will be
indicated in the text line (O). Turn the jog wheel
REV / FWD (16) into the corresponding direction.
The forward / reverse speed depends on the
turning speed of the wheel.
Notes: In the pause mode, the current spot is con-
stantly repeated after fast forward or reverse. To stop
the repeat, either press the button CUE (18) shortly
(new Cue point is set, chapter 5.8.2) or start the
replay with the button (20).
5.7 Precise selection of a certain spot
It will be possible to select a spot in a title with the
precision of 1 frame (1⁄75 second), e. g. for start-
ing the replay from a certain spot instead of start-
ing it from the beginning of a title.
1) When the desired spot is roughly reached by
replaying the title or by using fast forward /
reverse (chapter 5.6), set the unit to
pause with the button (20).
2) Precisely select the spot by turning the jog
wheel (16) clockwise and counter-clockwise.
For an acoustic check the adjusted spot will
be constantly repeated.
3) When the desired spot has been found,
shortly press the button CUE (18). Thus, the
spot will be stored and repeating will end. The
replay can now be started from this point with
the button .
5.8 Return to a certain spot
To be able to quickly go to a certain spot, two
starting points (Cue points) can be stored with
the buttons CUE 1 and CUE 2 (11), even during
the replay of a title (Fly Cue).
In addition, another starting point can be
defined with the button CUE (18), however, in
the single title replay mode, this point will be
overwritten with the starting point of the next title
when the next title is reached or selected [switch
over to total title replay with the button CONT /
LIST (8), if required].
Note: The Cue points stored will be deleted
– when selecting another folder
– when switching over between CD, USB 1, USB 2
– when switching off the unit
5.8.1 Buttons CUE 1 and CUE 2
1) Press the button MEMO / AUTO (9) to activate
the storage. The button will light up.
2) During replay, either press the button CUE 1
(11) when the desired spot is reached (Fly
Cue) or set the unit to pause at the desired
spot with the button (20), use the jog
wheel (16) to go to the precise spot, then
press the button CUE 1. It will flash several
times and then light up permanently. The but-
ton MEMO / AUTO will be extinguished. Re -
start the replay with the button , if re quired.
3) Repeat steps 1 and 2 for defining another
Cue point with the button CUE 2.
4) The buttons CUE 1 and CUE 2 can now be
used to return to the corresponding Cue
points: The replay starts immediately from
the respective Cue point.
5.8.2 Button CUE
1) While replaying a title, set the unit to pause
with the button (20) when the spot is
reached to which the unit is to return later.
The buttons and CUE (18) will flash.
2) If required, the spot can be selected more
precisely with the jog wheel (16) [chapter
5.7]. Then the current spot will be continu-
ously replayed.
3) Press the button CUE. Thus, the spot will be
marked as a Cue point and the display shows
“CUE” (L). The button CUE will light up per-
manently. The button will continue to flash
as a request to start the replay.
4) Restart the replay with the button .
5) It is now possible to return to the Cue point
with the button CUE. Then the player unit is
set to pause.
6) Start the replay with the button or keep the
button CUE pressed as long as the title is to
be played. After releasing the button CUE,
the player unit will go back to the Cue point
and will be set to pause.
5.9 Changing the speed with or
without displacing the pitch
The speed can be changed with the sliding con-
trol (15) up to ±100 %:
+100 % = double speed
-
100 % = standstill
1) Select the adjusting range with the button
PITCH (14). The text line (O) shortly shows
the adjustment:
“Pitch 8 %”, “Pitch 16 %”, Pitch 100” or “Pitch
off” when the speed control is deactivated
again and the title is replayed at standard
speed.
2) Adjust the speed with the sliding control. The
display will show the percentage deviation
from the standard speed on the top right (l).
The number of beats (Q) will change accord-
ingly.
3) When the speed is changed, the pitch will
also change proportionally. However, for a
constant pitch, press the button MT (24). The
display will show the indication “MT” (S). To
switch off the function, press the button MT
again.
5.10 Pitch Bend – Matching the beat
between two music pieces
The beats of two music pieces with the same
speed can be synchronized precisely. Thus, the
dancing rhythm will not be interrupted when
crossfading from one player unit to the other.
1) First use the speed control (15) to adapt the
speed of the music piece to which crossfad-
ing is desired to the speed of the current
music piece. For this purpose, set the same
number of beats per minute (BPM) with the
sliding control, see indication (Q) at the bot-
tom on the right of the display.
13
GB

2) Synchronize the beats of the music piece to
which crossfading is desired to the beats of
the current music piece with the buttons
PITCH BEND (22): As long as the button +or
-
is kept pressed, the replay of the title will be
faster or slower. Thus, the beats will be dis-
placed with respect to the beats of the current
music piece.
3) The beats will also be displaced when the jog
wheel (16) is turned.
5.11 Effects
5.11.1 Scratch effects
For creating scratch effects (corresponding to
manual turning of a turntable platter), press the
button SCRATCH (6) and turn the jog wheel (16)
back and forth accordingly. The LED of the but-
ton will light up and the text line (O) will show
“SCRATCH”. To deactivate the effect, press the
button SCRATCH once again.
5.11.2 Droning effects
If the function Master Tempo (constant pitch)
has been activated [indication “MT” (S) on the
display], deactivate it with the button MT (24).
Turn the jog wheel (16) back and forth to
increase or decrease the replay speed alter-
nately. This will create a droning effect.
5.11.3 Stutter effects
The Cue points stored with the buttons CUE
(18), CUE 1 and CUE 2 (11) [chapter 5.8]
can also be used to create interesting stutter
effects: When one of these buttons is shortly
pressed several times, a stutter effect will be cre-
ated. The more suitable the Cue point (e. g. start
of an instrument or beginning of a word), the
more impressive the effect.
5.11.4 Replaying a continuous loop
A certain section of a title can be repeated as a
seamless continuous loop as many times as
desired.
1) Switch to replay with the button (20).
When the desired starting point of the loop is
reached (point a in fig. 6), shortly actuate the
button A (19).
Fig. 6 Replaying a continuous loop
Hint: To define the starting point with the precision
of 1 frame, first set the unit to pause with the button
, precisely select the spot with the jog wheel (16),
then press the button A.
2) When the desired end of the section is
reached (point b in fig. 6) while the replay is
continued, press the button B / EDIT (19). The
section between the points will be continu-
ously repeated. As long as a continuous loop
is replayed, the display indicates “RELOOP”
(J).
3) To displace the end point or to define it with
the precision of 1 frame, press the button B/
EDIT during replay of the loop. The time indi-
cation (P) will now show the time index of the
end point. Displace the end point with the jog
wheel (16) and confirm the end point with the
button B / EDIT.
4) The loop section can also be divided or be
multiplied many times over. While the loop is
replayed, select the change of length with the
button or (21). The text line (O) shows
the adjustment:
TRIM: 1⁄32, 1⁄16, 1⁄8, 1⁄4, 1⁄2, 1⁄1, 2⁄1, 4⁄1, 8⁄1, 16⁄1, 32⁄1
5) To exit the loop and to continue the title
replay, press the button RELOOP / EXIT (19).
To restart the loop, press the button
RELOOP / EXIT again.
Fig. 7 Exit and restart of a continuous loop
Note: A stored loop is deleted as soon as the next title
is reached or another title is selected with the button
or (21) while replaying.
Section with a fraction or multiple of a beat length
For titles in 4⁄4 time, the length of a section for the
loop replay may be adjusted exactly to a fraction
or a multiple of the beat length:
1⁄32, 1⁄16, 1⁄8, 1⁄4, 1⁄2, 1⁄1, 2⁄1, 4⁄1, 8⁄1, 16⁄1, 32⁄1
1) Keep the button MEMO / AUTO (9) pressed
and adjust the length with the jog wheel (16).
The length is indicated in the text line (O),
e. g. “AUTO 2 / 1” = two beat lengths. After
this adjustment the button MEMO / AUTO
lights up to indicate that the end point of a
loop section is automatically set.
2) Define the starting point with button A (19).
Thus, the continuous loop is started at the
same time and the end point is set according
to the length adjustment.
3) The length of the loop section can also be
changed subsequently, as described above
(step 3 or 4).
5.12 Compiling your personal title
sequence
To replay only selected titles in a certain order, a
sequence of 99 titles as a maximum can be pro-
grammed.
5.12.1 Storing and replaying a title
sequence
1) If a title is replayed, first set the unit to pause
with the button (20).
2) Switch to the programming mode with the
button PROG (13). The time indication (P) is
switched to the indication of the first storage
location “P
-
01”. The indication “PG” (R)
flashes quickly.
Note: To exit this mode immediately, keep the but-
ton PROG pressed until the display shows the play-
ing time (P) again.
3) Select the first title to be stored with the but-
ton or (21) [chapter 5.1, steps 4
and 5].
4) To confirm the title selection, press the button
PROG. The next memory location “P
-
02” is
indicated.
5) Repeat the steps 3 and 4 until all titles of the
title sequence will be stored. If you try to store
another title after 99 titles have been stored,
the message “FULL” will appear.
6) To replay the title sequence, press the button
. The indication “PG” (R) flashes more
slowly. The titles are replayed depending on
the operating mode selected (chapter
5.4.1). To select other titles of the title se -
quence, press the button or (several
times).
7) To switch back to the standard replaying
mode, set the unit to pause with the button
and keep the button PROG pressed until the
indication “PG” (R) stops flashing.
To replay the title sequence once again,
set the unit to pause and press the button
PROG so that the indication “PG” flashes
again. Start the title sequence with the button
.
Note: As long as the indication “PG” flashes or con-
stantly lights up, the title sequence can be called. It is
deleted e. g. when switching off the unit.
5.12.2 Checking a title sequence
1) If a title is replayed, first set the unit to pause
with the button .
2) If the indication “PG” flashes now, press the
button PROG once. If the indication “PG”
lights constantly, press the button PROG
twice.
3) Select the storage locations (P
-
01 … P
-
99)
successively with the button or . The title
stored in each case is indicated in the text line
(O).
4) To replay the title sequence, press the button
.
5.12.3 Completing or deleting a title sequence
1) If a title is replayed, first set the unit to pause
with the button .
2) If the indication “PG” flashes, keep the button
PROG pressed until “PG” stops flashing.
3) Shortly press the button PROG so that “PG”
flashes quickly and the time indication (P) is
switched over to the indication of the next
free storage location “P
-
…”.
4) To delete the title sequence, press the button
PROG until the display indicates the playing
time (P) again. To complete the title se -
quence, select another title with the button
or and confirm with the button PROG. To
replay the completed title sequence, press
the button .
6 Fader Start
The function Start / Pause of the button (20)
can be remote-controlled via a mixer with fader
start function. The connection to the mixer is
described in chapter 4, step 3. Adjust the sliding
switch (34) on the rear side of the player mecha-
nism to the type of fader start of the mixer:
LOCK = control via an on / off switch
This switch position must be selected for
most mixers of the “img Stage Line” range.
By advancing the fader, a switch starting the
replay will be closed in the mixer. When the
fader is closed, the switch will open and thus
set the player unit to pause.
Fig. 8 Fader start via on / off switch
START /
PAUSE CUE
PLAY
LOCK
TACT
Start
Pause
PLAY c
LOOP
1. 2.
RELOOP / EXITRELOOP / EXIT
ab
1.
PLAY PLAY
LOOP
2.
AB / EDIT
14
GB

TACT = control via a momentary pushbutton
When the momentary pushbutton is actuated
for the first time by advancing the fader, the
replay will start. When the momentary push-
button is actuated for the second time by
closing the fader, the player unit will be set to
pause.
Fig. 9 Fader start via momentary pushbutton
CUE PLAY = control via a pulse
When the fader is advanced, the replay will
be started from the title beginning (Auto Cue
point chapter 5.4.1) or from the Cue point
set with the button CUE (18) [chapter
5.8.2] by a short control pulse of the mixer.
When the fader is closed, the player unit will
return to this starting point by another control
pulse and will be set to pause there.
Fig. 10 Fader start via control pulse
7 Updating the Firmware
If a new firmware is available on the Internet, the
firmware of your unit may be updated:
1) On the home page of “img Stage Line”
(www.imgstageline.com), click “Software
Updates” under “SUPPORT”. Then scroll
down to “FIRMWARE-DOWNLOADS”.
For downloading, click the icon in front of
“CD-292USB”.
Copy the software download onto a USB
stick.
2) Switch off the CD-292USB with the power
switch (28).
3) Insert the USB stick with the new firmware
into the left USB port USB 1 (26).
4) At the left player unit keep the button PROG
(13) pressed and switch on the player again.
Do not release the button PROG until the left
display shows “UP dAt E”.
5) After reading in, when “Ready” appears in the
text line (O), press the button (20) to start
the firmware update. By means of the bar-
graph indication (H) and the text line the
update can be observed. When “Finish” is
shown, the firmware has been updated.
6) Switch off the player and switch it on again.
8 Maintenance of the Unit
Protect the unit from dust, vibrations, humidity
and heat (admissible ambient temperature
range 0 – 40 °C). For cleaning only use a dry,
soft cloth, never use water or chemicals.
Note concerning sound interruptions and
reading errors
Cigarette smoke and dust will easily penetrate
through all openings of the unit and also settle on
the optics of the laser sampling system. This
deposit may cause reading errors and sound
interruptions, the unit must then be cleaned by
skilled personnel. This cleaning will be charged,
even during the warranty period!
9 Specifications
Frequency range: . . . . . 20 – 20 000 Hz
THD: . . . . . . . . . . . . . . . < 0.1 %
Channel separation: . . . > 80 dB
Dynamic range: . . . . . . > 80 dB
S / N ratio: . . . . . . . . . . . > 80 dB
Output: . . . . . . . . . . . . . 2 V (line level),
RCA jacks
Readable file systems: . NTFS, FAT, HFS+
Anti-shock memory: . . . 15 s
Power supply: . . . . . . . . 230 V~ / 50 Hz
Power consumption: . . . 40 VA max.
Ambient temperature: . . 0 – 40 °C
Dimensions (W × H × D)
Control unit: . . . . . . . 482 × 90 × 85 mm,
2 rack spaces
Player mechanism: . . 482 × 90 × 260 mm,
2 rack spaces
Weight: . . . . . . . . . . . . . 6.5 kg
Subject to technical modification.
START /
PAUSE CUE
PLAY
LOCK
TACT
1.×CuePlay
2.×Pause
START /
PAUSE CUE
PLAY
LOCK
TACT
1.×Start
2.×Pause
15
GB
All rights reserved by MONACOR
®
INTERNATIONAL GmbH & Co. KG. No part of this instruction
manual may be reproduced in any form or by any means for any commercial use.

Ouvrez le présent livret page 3, dépliable, de
manière à visualiser les éléments et branche-
ments.
Table des matières
1 Eléments et branchements . . . . . . . . 16
1.1 Unité de commande . . . . . . . . . . . . . . . 16
1.2 Face avant unité lecture . . . . . . . . . . . . 17
1.3 Face arrière unité lecture . . . . . . . . . . . 17
2 Conseils dʼutilisation et de sécurité .17
3 Possibilités dʼutilisation . . . . . . . . . . 17
4 Positionnement de lʼappareil
et branchements . . . . . . . . . . . . . . . . . 18
5 Utilisation . . . . . . . . . . . . . . . . . . . . . . 18
5.1 Lecture de morceaux de musique . . . . 18
5.2 Charger une liste de lecture . . . . . . . . . 18
5.3 Affichage des informations de titre
et du mode repos . . . . . . . . . . . . . . . . . 18
5.3.1 Affichage graphique de la durée . . . . 19
5.3.2 Nombre de beats par minute . . . . . . . 19
5.3.3 Mode repos . . . . . . . . . . . . . . . . . . . . 19
5.4 Sélection du mode de fonctionnement . 19
5.4.1 Lecture continue et
lecture titre par titre . . . . . . . . . . . . . . 19
5.4.2 Mode relais –
démarrage automatique de lʼautre
unité de lecture à la fin dʼun titre . . . . 19
5.5 Brève lecture du début dʼun titre . . . . . 19
5.6 Avance et retour rapides . . . . . . . . . . . 19
5.7 Positionnement précis à
un endroit donné . . . . . . . . . . . . . . . . . 19
5.8 Retour à un endroit donné . . . . . . . . . . 19
5.8.1 Touches CUE 1 et CUE 2 . . . . . . . . . 19
5.8.2 Touche CUE . . . . . . . . . . . . . . . . . . . 19
5.9 Modification de la vitesse avec ou sans
déplacement de la hauteur tonale . . . . 19
5.10 Pitch Bend – adaptation du rythme
entre deux morceaux de musique . . . . 20
5.11 Création dʼeffets . . . . . . . . . . . . . . . . . . 20
5.11.1 Effets Scratch . . . . . . . . . . . . . . . . . . 20
5.11.2 Effets bourdonnement . . . . . . . . . . . . 20
5.11.3 Effets bégaiement . . . . . . . . . . . . . . . 20
5.11.4 Lecture dʼune boucle continue . . . . . 20
5.12 Création dʼune suite personnelle
de titres . . . . . . . . . . . . . . . . . . . . . . . . . 20
5.12.1 Mémoriser et lire une suite de titres . 20
5.12.2 Vérification de la suite de titres . . . . . 20
5.12.3 Compléter ou effacer
une suite de titres . . . . . . . . . . . . . . . . . 20
6 Démarrage électrique . . . . . . . . . . . . . 21
7 Actualisation du Firmware . . . . . . . . . 21
8 Entretien de lʼappareil . . . . . . . . . . . . 21
9 Caractéristiques techniques . . . . . . . 21
1 Eléments et branchements
1.1 Unité de commande
1Panneau de commande pour lʼunité de lec-
ture 1
voir détails, schéma 2
2Touche RELAY pour un démarrage automa-
tique de lʼautre unité de lecture à la fin dʼun
titre (chapitre 5.4.2)
3Panneau pour lʼunité de lecture 2
voir détails, schéma 2
4Touche OPEN / CLOSE pour ouvrir et fer-
mer le tiroir CD [comme les touches (27,
29) sur la partie Lecteur]
5Touche CD / USB pour commuter entre CD et
support de mémoire USB ; pour ce faire,
lʼunité de lecture doit être commutée avec la
touche (20) sur Pause.
Si deux supports de mémoire USB sont
reliés, après avoir appuyé sur la touche CD /
USB, sélectionnez avec la touche ou
(21), entre CD, USB1 et USB2. La ligne de
texte (O) indique la sélection. Pour confirmer,
appuyez sur la touche CD / USB.
6Touche SCRATCH pour activer et désactiver
la fonction Scratch
Lorsque la fonction est activée (la touche
brille), on peut produire des effets Scratch
avec la molette (16).
7Touche TIME pour commuter lʼaffichage de
durée (H, P)
affichage “Remain” (G)
durée restante du titre
affichage “Elapse” (E)
durée déjà lue du titre
affichage “Total Remain”
durée restante de tout le CD
(pas possible en mode MP3)
En mode MP3, on peut commuter la ligne de
texte (O) sur lʼaffichage du titre, album, inter-
prète (ID3 Tags) ou le nom du fichier, si la
touche TIME est maintenue enfoncée et avec
la touche ou .
8Touche CONT / LIST
1. pour commuter entre la lecture titre par
titre [affichage “Single” (C)] et lecture conti-
nue [affichage “Cont.” (D)]
2. pour charger des listes de lecture (cha-
pitre 5.2)
9Touche MEMO / AUTO
1. pour mémoriser les points Cue avec les
touches CUE 1 et CUE 2 (11)
2. pour lire un segment de titre avec la lon-
gueur dʼun multiple ou dʼune fraction de
longueur de beats, sous forme de boucle
(chapitre 5.11.4).
10 Affichage, détails voir schéma 3
ASi au-dessus des chiffres “TRACK” est
visible : numéro du titre de musique (dans
le dossier sélectionné) ;
Si sous les chiffres, “FOLDER” est affiché :
numéro du dossier sélectionné.
BSymbole du mode lecture
CAffichage “Single” : indique le mode de
fonctionnement titre par titre
DAffichage “Cont.” : indique le mode de
fonctionnement de lecture continue de
tous les titres
EAffichage “Elapse” : indique la durée déjà
lue dʼun titre
FAffichage “Total” : indique avec lʼaffichage
“Remain” (G) la durée restante du CD
(pas possible en mode MP3)
GAffichage “Remain” : indique la durée res-
tante dʼun titre. Si “Total Remain” est affi-
ché, la durée restante du CD est mention-
née.
HBargraphe pour visualiser la durée relative
dʼun titre
IAffichage de la déviation de la vitesse
nominale en pourcentage
JAffichage “RELOOP” : indique la lecture
dʼune boucle continue
KAffichage “CD” ou “USB” : indique si un
CD, le port USB 1 (26) ou USB 2 (30) est
sélectionné. Si USB 2 est sélectionné,
“USB” clignote.
LAffichage “CUE” : sʼaffiche lorsque lʼunité
de lecture est en mode Pause au point Cue
(chapitre 5.4.1 et 5.8.2)
MEn mode MP3 : dans ce champ est indiqué
si le nom du titre, de lʼalbum, de lʼartiste du
morceau de musique est affiché dans la
ligne de texte (O). Si aucune de ces don-
nées ne sʼaffiche, le nom du fichier est indi-
qué (chapitre 5.3).
NNombre de titres sur le CD :
En mode MP3 :
nombre de titre dans le dossier sélectionné
[affichage “TRACK” au-dessus des chiffres
(A)]
ou nombre de dossiers [affichage “FOL-
DER” sous les chiffres (A)]
OLigne de texte pour des informations sup-
plémentaires
PAffichage de la durée, voir position E et G
QAffichage du nombre de beats par minute
RAffichage “PG” : clignote si une suite per-
sonnelle de titres est programmée ou lue
SAffichage “MT” (Master Tempo) : indique la
fonction pour une hauteur tonale constante
(chapitre 5.9)
11 Touches CUE 1 et CUE 2
1. Pour mémoriser deux points Cue [égale-
ment possible pendant la lecture ; pour
mémoriser, appuyez tout dʼabord sur la
touche MEMO / AUTO (9)]
2. pour aller aux points Cue mémorisés
12 Touche FOLDER pour le mode MP3
1. pour commuter entre lʼaffichage du nom du
titre et du dossier dans la ligne de texte (O)
Selon le réglage sélectionné, on peut choi-
sir un titre ou un dossier avec les touches
et (21).
2. pour charger des listes de lecture (cha-
pitre 5.2)
3. pour sélectionner une partition sur un
disque dur relié (chapitre 5.1)
13 Touche PROG pour constituer et lire une
suite de titres personnelle (chapitre 5.12)
14 Touche PITCH pour activer / désactiver le
réglage de vitesse (15) et pour sélectionner
la plage de réglage de la vitesse (8 %, 16 %,
100 %)
La ligne de texte (O) indique brièvement le
réglage sélectionné (Pitch 8 %, 16 %, 100,
off).
15 Potentiomètre à glissière pour modifier la
vitesse de lecture [sans modification de la
hauteur tonale lorsque la touche MT (24) brille]
La vitesse ne peut être modifiée que lorsque
la touche PITCH (14) brille.
16 Molette REV / FWD
–pour une avance et retour rapide lorsque la
touche SEARCH (17) a été enfoncée
–pour produire des effets Scratch lorsque la
touche SCRATCH (6) a été enfoncée
16
F
B
CH

17
F
B
CH
–pour la fonction “Pitch Bend” pendant la
lecture dʼun titre (chapitre 5.10)
–pour aller exactement à un endroit lorsque
lʼunité de lecture est commutée sur Pause
–lorsque la touche ou (21) est enfon-
cée, pour sélectionner rapidement des
titres [affichage “TRACK” au-dessus des
chiffres (A)] ou des dossiers [affichage
“FOLDER” sous les chiffres (A)]
17 Touche SEARCH pour activer et désactiver
lʼavance et retour avec la molette (16)
18 Touche CUE pour lire le début dʼun titre briè-
vement (chapitre 5.5) et pour revenir à un
endroit préalablement déterminé (chapi-
tre 5.8.2)
19 Touches pour mémoriser et lire une boucle
parfaite
touche A pour déterminer le point de départ
dʼun segment pour une boucle parfaite
touche B / EDIT pour déterminer le point de fin
et le démarrage simultané de la boucle ;
pour déplacer le point de fin, appuyez une
nouvelle fois sur la touche et réglez le point
de fin avec la molette (16)
touche RELOOP / EXIT pour quitter la boucle
parfaite ou lancer une nouvelle lecture de
la boucle
20 Touche pour démarrer un titre et commu-
ter entre lecture et Pause
21 Touches et
1. pour la sélection de titre lorsque “TRACK”
est affiché au-dessus des chiffres (A) :
touche pour sélectionner le titre suivant
touche pour revenir au début du titre en
cours de lecture. Par plusieurs pressions
sur la touche , on recule toujours dʼun
titre.
Si une des touches est maintenue enfon-
cée, sélectionnez les titres rapidement
avec la molette (16).
2. en mode MP3, pour sélectionner un dos-
sier lorsque “FOLDER” est affiché sous les
chiffres (A) [commutable avec la touche
FOLDER (12)]
Si une des touches est maintenue enfon-
cée, on peut sélectionner rapidement les
dossiers avec la molette (16).
3. pour sélectionner un CD ou un support de
mémoire USB, voir également touche CD /
USB (5)
4. pour diviser ou multiplier le segment de titre
dʼune boucle parfaite, (chapitre 5.11.4)
5. en mode MP3, et si la touche TIME (7) est
maintenue enfoncée, pour commuter la
ligne de texte (O) sur lʼaffichage du titre, de
lʼalbum, interprète (ID3 tags) ou nom du
dossier
6. pour sélectionner une liste de lecture
(chapitre 5.2)
7. pour sélectionner une partition sur un
disque dur relié (chapitre 5.1)
22 Touches PITCH BEND pour adapter le
rythme du titre en cours au rythme dʼun autre
titre lu sur lʼautre unité de lecture (chapi-
tre 5.10)
23 Touche TAP pour le mode manuel de comp-
tage du compteur de beats et pour revenir au
mode automatique (chapitre 5.3.2)
24 Touche MT (Master Tempo) pour activer et
désactiver la fonction pour la hauteur tonale
constante (chapitre 5.9)
1.2 Face avant unité lecture
25 Tiroir CD pour lʼunité de lecture 1
26 Port USB 1 pour insérer une clé USB ou
brancher un disque dur
27 Touche OPEN / CLOSE pour ouvrir et fer-
mer le tiroir CD 1 [comme touche (4) sur
lʼunité de commande]
28
Interrupteur POWER marche / arrêt avec témoin
de fonctionnement au dessus (LED rouge)
29 Touche OPEN / CLOSE pour ouvrir et fer-
mer le tiroir CD 2 [comme touche (4) sur
lʼunité de commande]
30 Port USB 2 pour insérer une clé USB ou
brancher un disque dur
31 Tiroir CD pour lʼunité de lecture 2
1.3 Face arrière unité lecture
32 Sortie audio LINE OUT de lʼunité de lecture 2
pour brancher à lʼentrée Ligne par exemple
un amplificateur ou une table de mixage
33 Prise jack 3,5 START / PAUSE de lʼunité de
lecture 2 pour la commande à distance de la
fonction Start / Pause depuis une table de
mixage
34 Commutateur pour le type de commande
à distance via les prises START / PAUSE
(33, 38), [chapitre 6]
position LOCK
pour la gestion via un interrupteur marche /
arrêt
position TACT
pour la gestion via un bouton poussoir
momentané
position CUE / PLAY
lʼunité de lecture est démarrée via une
impulsion de commande de la table de
mixage lorsquʼon pousse le fader de la
table de mixage à partir du point Cue [point
Auto Cue ou placé avec la touche CUE
(18)] et elle revient au point Cue lorsquʼon
tire le fader
35 Prise pour brancher lʼunité de commande :
reliez-la à la prise REMOTE CONTROL
CONNECT TO MAIN UNIT 2 via un des cor-
dons de branchement livrés
36 Cordon secteur à relier à une prise secteur
230 V~ / 50 Hz
37 Prise pour brancher lʼunité de commande :
reliez-la à la prise REMOTE CONTROL
CONNECT TO MAIN UNIT 1 via un des cor-
dons de branchement livrés
38 Prise jack 3,5 START / PAUSE de lʼunité de
lecture 1 pour la commande à distance de la
fonction Start / Pause dʼune table de mixage
39 Sortie audio LINE OUT de lʼunité de lecture 1
pour brancher à lʼentrée Ligne par exemple
dʼun amplificateur ou dʼune table de mixage
2 Conseils dʼutilisation
et de sécurité
Cet appareil répond à toutes les directives
nécessaires de lʼUnion européenne et porte
donc le symbole .
Respectez scrupuleusement les points suivants:
GAttention ! Ne regardez pas le compartiment
CD lorsque le tiroir CD est ouvert. Des rayon-
nements laser éventuellement émis pourraient
causer des troubles de la vision.
GLʼappareil nʼest conçu que pour une utilisation
en intérieur. Protégez-le de tout type de projec-
tions dʼeau, des éclaboussures, dʼune humidité
élevée de lʼair et de la chaleur (plage de tempé-
rature de fonctionnement autorisée : 0 – 40 °C).
GEn aucun cas, vous ne devez poser dʼobjet
contenant du liquide, p. ex. un verre, sur lʼap-
pareil.
GNe faites jamais fonctionner lʼappareil et
débranchez-le immédiatement lorsque :
1. des dommages visibles apparaissent sur
lʼappareil et sur le cordon secteur,
2. après une chute ou accident similaire...,
vous avez un doute au sujet de lʼétat de lʼap-
pareil.
3. des dysfonctionnements apparaissent.
Dans tous les cas, les dommages doivent être
réparés par un technicien spécialisé.
GTout cordon secteur endommagé doit être
remplacé impérativement par un technicien
spécialisé.
GNe débranchez jamais lʼappareil en tirant sur
le cordon secteur, tenez-le toujours par la
fiche.
GPour le nettoyage, utilisez un chiffon sec et
doux, en aucun cas de produits chimiques ou
dʼeau.
GNous déclinons toute responsabilité en cas de
dommages matériels ou corporels résultants
si lʼappareil est utilisé dans un but autre que
celui pour lequel il a été conçu, sʼil nʼest pas
correctement branché ou utilisé ou sʼil nʼest
pas réparé par une personne habilitée, en
outre, la garantie deviendrait caduque. De
même, aucune responsabilité ne saurait être
engagée en cas de pertes de données cau-
sées par une mauvaise manipulation ou par un
défaut, ou en cas de dégâts résultants.
3 Possibilités dʼutilisation
Le lecteur CD / MP3 CD-292USB avec deux uni-
tés de lecture est spécialement conçu pour une
utilisation DJ professionnelle. De nombreuses
fonctions sont précisément définies dans ce but,
par exemple lecture titre par titre, compteur auto-
matique de beats, lecture sans interruption
dʼune boucle, modification de la vitesse sans
modification de la hauteur tonale, mémoire anti-
chocs.
Il est possible de lire des CDs audio, des
CDs audio gravés et des CDs avec titres au for-
mat MP3. Pour des CD-RW (CDs réinscripti-
bles), des problèmes lors de la lecture peuvent
Lorsque lʼappareil est définitivement retiré
du service, vous devez le déposer dans
une usine de recyclage adaptée pour
contribuer à son élimination non polluante.
AVERTISSEMENT Cet appareil est alimenté par
une tension dangereuse. Ne
touchez jamais lʼintérieur de
lʼappareil et ne faites rien tom-
ber dans les ouïes de ventila-
tion, vous pourriez subir une
décharge électrique.

18
F
B
CH
survenir selon le type de CD, le graveur et le
logiciel de gravure utilisés.
Via les ports USB, on peut lire des fichiers
MP3 dʼun disque dur ou dʼune clé USB. Les uni-
tés de lecture peuvent accéder aux ports USB
indépendamment lʼune de lʼautre de telle sorte
que le fonctionnement est également possible
uniquement avec un seul support de mémoire
USB.
4 Positionnement de lʼappareil
et branchements
Lʼunité de commande et lʼunité de lecture sont
prévues pour une installation en rack pour des
appareils dʼune largeur de 482 mm (19″). Elles
peuvent également être directement posées sur
une table. Lʼunité de lecture doit toujours fonc-
tionner à lʼhorizontale alors que lʼunité de com-
mande peut, au choix, être intégrée, par exem-
ple de manière inclinée. Pour lʼinstallation en
rack, 2 unités (1 U = 1 unité = 44,45 mm) sont
nécessaires pour lʼunité de commande et lʼunité
de lecture respectivement.
Avant dʼeffectuer ou de modifier les branche-
ments, assurez-vous que le lecteur CD / MP3 et
les appareils à relier sont éteints.
1) Reliez lʼunité de commande et lʼunité de lec-
ture avec les deux cordons livrés :
reliez la prise CONNECT TO REMOTE
CONTROL 2 (35) de lʼunité de lecture à la
prise REMOTE CONTROL CONNECT TO
MAIN UNIT 2 de lʼunité de commande et
reliez la prise CONNECT TO REMOTE
CONTROL 1 (37) de lʼunité de lecture à la
prise REMOTE CONTROL CONNECT TO
MAIN UNIT 1 de lʼunité de commande.
2) Reliez les deux sorties de signal LINE OUT
(32, 39) à respectivement une entrée avec
niveau ligne, par exemple dʼune table de
mixage ou dʼun amplificateur (repérage pos-
sible : Line, CD, Aux).
3) Les deux unités de lecture peuvent être
démarrées via une table de mixage avec la
fonction démarrage électrique et être mises
sur Pause. Pour ce faire, branchez les prises
START / PAUSE (33, 38) via deux cordons
avec fiches jack 3,5 mâles aux prises corres-
pondantes de la table de mixage. Le CD-
292USB doit être réglé sur le démarrage élec-
trique de la table de mixage, voir chapitre 6.
4) Reliez le cordon secteur livré à la prise sec-
teur (36) puis à une prise 230 V~ / 50 Hz.
5 Utilisation
Lʼutilisation des deux unités de lecture est iden-
tique. Allumez lʼappareil avec lʼinterrupteur
POWER (28). Lʼaffichage (10) indique briève-
ment “boot” (processus de démarrage) et WEL-
COME. Si un CD est inséré, les informations sur
le CD sʼaffichent une fois le CD reconnu. Sʼil nʼy
a pas de CD dans le lecteur, “no dISC” (pas de
CD) sʼaffiche.
Après utilisation, éteignez lʼappareil. Les
réglages suivants sont mémorisés pour la pro-
chaine utilisation :
1. le mode de fonctionnement sélectionné (lec-
ture titre par titre / lecture continue, chapi-
tre 5.4.1).
2. lʼaffichage de durée sélectionné (durée res-
tante / durée déjà lue, chapitre 5.3)
3. la plage de réglage de vitesse sélectionnée
(chapitre 5.9)
5.1 Lecture de morceaux de musique
1) Pour insérer un CD, ouvrez le tiroir CD (25,
31) avec la touche (4, 27 ou 29). Insérez le
CD, inscription vers le haut et refermez le
tiroir CD avec la touche .
2) Vous pouvez relier, en plus ou à la place, une
clé USB aux ports USB (26, 30) ou un disque
dur avec ports USB. Pour commuter entre
CD et support de mémoire USB, appuyez sur
la touche CD / USB (5). Lʼunité de lecture doit
être mise sur Pause ; si besoin, appuyez sur
la touche (20).
Si deux supports de mémoire USB sont
branchés, sélectionnez la source de signal
(CD, USB 1, USB 2) avec la touche ou
(21), après avoir appuyé sur la touche CD /
USB. La ligne de texte (O) indique la sélec-
tion. La source de signal alors sélectionnée
est sautée. Confirmez la sélection avec la
touche CD / USB.
Conseils :
1. La source de signal sélectionnée est également
affichée dans le champ (K) :
“CD” = le lecteur CD est sélectionné
“USB” affiché tout le temps = USB 1
“USB” clignote = USB 2
2. Un disque dur doit être alimenté par une bloc
secteur propre dont la consommation doit être
supérieure à 500 mA.
3. Si plusieurs partitions existent sur un disque dur,
on peut les sélectionner comme suit :
a) Maintenez la touche FOLDER (12) enfoncée
jusquʼà ce que sur lʼaffichage “PA-SEL” (Parti-
tion Selection) soit visible.
b) Avec la touche ou , sélectionnez la parti-
tion. La ligne de texte (O) indique le nom.
c) Appuyez sur la touche FOLDER pour confirmer.
3) Pour démarrer le premier titre, appuyez sur la
touche (20). Pendant la lecture, lʼaffi-
chage indique le symbole (B). La lecture
peut être interrompue à tout moment avec la
touche puis être poursuivie.
4) Pour sélectionner un autre titre, utilisez les
touches et .
touche : pour aller au titre suivant
touche : aller au début du titre en cours
de lecture. Par plusieurs pressions sur la
touche, vous reculez toujours dʼun titre.
Si une des touches est maintenue enfoncée,
on peut sélectionner rapidement les titres
avec la molette (16).
5) Si en mode MP3, les titres de musique sont
listés dans différents dossiers, appuyez sur la
touche FOLDER (12) pour sélectionner un
dossier. Lʼaffichage indique “FO-SEL” (Fol-
der Selection) et la ligne de texte (O) indique
le nom du dossier. Les chiffres (A) en haut à
gauche de lʼaffichage indiquent maintenant le
numéro du dossier et les chiffres (N) sous
“Total”, le nombre de dossiers existants.
Avec la touche ou , sélectionnez le dos-
sier. Si une touche est maintenue enfoncée,
vous pouvez sélectionner rapidement les
dossiers avec la molette (16).
Pour confirmer la sélection, appuyez sur la
touche FOLDER ; lʼaffichage indique à nou-
veau lʼindication de durée (P). Avec la touche
ou , sélectionnez le titre voulu dans le
dossier.
6) Si un autre CD doit être inséré, commutez
tout dʼabord sur Pause avec la touche ,
sinon, vous ne pourrez pas ouvrir le tiroir
avec la touche .
7) Avant dʼéteindre lʼappareil, fermez toujours
les tiroirs CD avec les touches pour proté-
ger les systèmes laser des poussières. Etei-
gnez ensuite lʼappareil avec lʼinterrupteur
POWER.
5.2 Charger une liste de lecture
Pour lire une sélection donnée de fichiers MP3,
vous pouvez charger des listes de lecture créées
sur un ordinateur avec lʼextension “wpl”, “xml” ou
“m3u” dans le CD-292USB.
Important : Une liste de lecture et les fichiers
MP3 correspondants doivent être sur le même
support de mémoire. Les listes de lecture doi-
vent toujours être dans le répertoire principal
(root directory).
1) Si un titre est lu, passez sur Pause avec la
touche (20).
2) Maintenez la touche CONT / LIST (8) enfon-
cée et sélectionnez avec la touche ou
(21), quelle extension de fichier il faut recher-
cher. La ligne de texte (O) indique la sélec-
tion (M3U Scan, WPL Scan, XML Scan).
3) Appuyez sur la touche FOLDER (12). Lʼaffi-
chage indique “FO-SEL” et la ligne de texte
(O), le nom de la première liste de lecture.
Les chiffres (A) en haut à gauche sur lʼaffi-
chage indiquent maintenant le numéro de la
liste de lecture et les chiffres (N) sous “Total”
le nombre de listes de lecture existantes.
4) Sélectionnez la liste de lecture voulue avec la
touche ou .
5) Pour confirmer la sélection, appuyez sur la
touche FOLDER. Une fois la liste chargée,
lʼaffichage indique à nouveau lʼindication de
durée (P).
6) Pour démarrer le premier titre de la liste de
lecture, appuyez sur la touche . Pour sélec-
tionner dʼautres titres de la liste, appuyez sur
la touche ou ou maintenez une de ces
touches enfoncées et activez la molette (16).
7) Pour lire les titres sans liste de lecture, pas-
sez sur Pause avec la touche . Maintenez
la touche CONT / LIST enfoncée et appuyez
sur la touche ou (21) jusquʼà ce que la
ligne de texte indique “Folder”. Lorsque vous
relâchez la touche, lʼaffichage indique
“SCAn” puis à nouveau lʼaffichage de durée
(P). Plus aucune liste de lecture nʼest alors
chargée.
5.3 Affichage des informations de titre
et du mode repos
Lʼaffichage (10) indique de nombreuses informa-
tions :
1. numéro du titre sélectionné (A) si “TRACK”
est affiché au-dessus des chiffres. Si “FOL-
DER” est affiché sous les chiffres, le numéro
du dossier sélectionné est indiqué [commuta-
ble avec la touche FOLDER (12)].
2. nombre de titres (N) sur le CD ou si les titres
sont listés dans différents dossiers, le nom-
bre de titres dans le dossier sélectionné.
3. durée relative (H) et absolue (P) du titre
sélectionné : les secondes sont divisées en
75 frames.
On peut commuter lʼaffichage de durée avec
la touche TIME (7) :
Si Elapse (E) est affiché, la durée déjà lue du
titre est indiquée.
Si Total Remain (F, G) est affiché, la durée
restante de tout le CD (pas possible en
mode MP3) est indiquée.
Si Remain (G) est affiché, la durée restante
du titre est indiquée.
4. Dans la ligne de texte (O), sʼaffiche :
– pour des CDs audio standards avec texte
CD, le nom du titre
– en mode MP3, le nom du fichier
La ligne de texte peut être commutée sur
lʼaffichage des informations suivantes (ID3

19
F
B
CH
Tags). Maintenez la touche TIME enfon-
cée et sélectionnez avec la touche ou
(21) :
affichage (M) :
TITLE = nom du titre
ALBUM = nom de lʼalbum
ARTIST = interprète
aucun = nom du dossier
5.3.1 Affichage graphique de la durée
En plus de lʼaffichage numérique de la durée (P),
le bargraphe (H) indique par sa longueur gra-
phique, la durée en fonction de la durée du titre
(affichage relatif de la durée). Les dernières 30
secondes dʼun titre sont indiquées par un cligno-
tement du bargraphe dans toute sa longueur, les
dernières 15 secondes sont indiquées par un cli-
gnotement plus rapide.
5.3.2 Nombre de beats par minute
Une fois le titre sélectionné, le compteur de
beats indique automatiquement le nombre de
beats par minute. Après un bref délai, le nombre
sʼaffiche en bas à droite sur lʼaffichage (Q). Si le
compteur de beats ne peut pas déterminer de
valeur correcte (par exemple pour des titres de
musique calmes), on peut déterminer manuelle-
ment la valeur :
1) Appuyez sur la touche BPM / TAP (23) plu-
sieurs fois au rythme de la musique (4 × au
moins). Le nombre de beats est affiché, lʼin-
dication “BPM” clignote pour signaler le mode
de comptage manuel.
2) Pour revenir au mode de comptage automa-
tique, maintenez la touche BPM / TAP enfon-
cée jusquʼà ce que lʼaffichage “BPM” ne cli-
gnote plus.
5.3.3 Mode repos
Si les deux unités de lecture restent sur Pause
plus de 15 minutes, lʼappareil passe en mode
repos. Les systèmes laser sont désactivés et sont
ainsi économisés. Les affichages indiquent
SLEEP (sommeil) et toutes les touches éclairées
sʼéteignent. En activant une touche au choix, vous
revenez au mode de fonctionnement précédent.
5.4 Sélection du mode
de fonctionnement
5.4.1
Lecture continue et lecture titre par titre
Pour commuter entre lecture titre par titre [affi-
chage “Single” (C)] et lecture continue [affichage
“Cont.” (D)], appuyez sur la liste CONT / LIST (8).
A Pour la lecture titre par titre, lʼappareil com-
mute sur Pause après chaque titre lu.
Ce mode est spécialement prévu pour les
applications DJ. Une fois le titre sélectionné,
lʼunité de lecture est exactement à lʼendroit
où la musique commence (généralement pas
à lʼindex temps 0 : 00 : 00 mais quelques
frames plus loin, par exemple 0 : 00 : 15). Cet
endroit est automatiquement mémorisé
comme point de départ (point Auto Cue) et
signalé sur lʼaffichage par lʼindication CUE
(L). Après le démarrage du titre, on peut
revenir à ce point de démarrage avec la
touche CUE (18). Une fois le titre lu, lʼappa-
reil commute sur Pause exactement à lʼen-
droit où la musique du titre suivant com-
mence. Cet endroit est alors mémorisé
comme nouveau point de départ.
B Pour une lecture en continu, tous les titres
sont lus en continu les uns après les autres,
cʼest-à-dire quʼaprès le dernier titre, le pre-
mier titre redémarre. Si les titres sont listés
dans différents dossiers, seuls les titres du
dossier sélectionné sont répétés.
5.4.2 Mode relais
démarrage automatique de lʼautre
unité de lecture à la fin dʼun titre
A la fin dʼun titre, lʼautre unité de lecture peut
démarrer automatiquement.
1) Commutez les deux unités de lecture sur la
lecture titre par titre avec la touche CONT /
LIST (8) de telle sorte que les affichages
indique “Single” (C).
2) Sélectionnez un titre sur chaque unité de lec-
ture.
3) Activez la touche RELAY (2). La touche brille.
4) Démarrez la lecture sur une unité de lecture
avec la touche (20). Lʼautre unité de lec-
ture doit être sur Pause. Dès quʼun titre est ter-
miné, lʼunité de lecture commute sur Pause,
lʼautre démarre. Le processus est répété en
continu jusquʼà ce que le mode Relais soit
désactivé. (Pour le désactiver, appuyez une
nouvelle fois sur la touche RELAY).
5) Pendant le mode Relais, on peut en plus
commuter la lecture dʼune unité sur lʼautre, à
nʼimporte quel endroit dʼun titre avec la
touche .
Conseil : une fois tous les titres dʼun dossier lus, lʼap-
pareil ne commute pas automatiquement sur le dossier
suivant. Il faut le faire manuellement (chapitre 5.1,
point 5).
5.5 Brève lecture du début dʼun titre
Avec la touche CUE (18), on peut lire le début
dʼun titre brièvement tant que la touche est main-
tenue enfoncée. Une fois la touche relâchée,
lʼappareil revient au début du titre puis commute
sur Pause.
1) Lʼunité de lecture doit être mise sur la lec-
ture titre par titre : affichage “Single” (C). Si
“Cont.” (D) est affiché, appuyez sur la touche
CONT / LIST (8).
2) Sélectionnez le titre (chapitre 5.1, points 4
et 5).
3) En maintenant la touche CUE enfoncée, lisez
le titre.
4) Activez la touche (20) pour lire le titre.
5.6 Avance et retour rapides
Si un titre doit être lu plus vite vers lʼavant ou lʼar-
rière, appuyez tout dʼabord sur la touche
SEARCH (17). Dans la ligne de texte (O),
SEARCH est affiché. Tournez la molette REV /
FWD (16) dans le sens correspondant. La
vitesse dʼavance ou de retour dépend de la
vitesse de rotation de la molette.
Conseils : en mode Pause, lʼendroit en cours est
répété en continu après une avance ou un retour. Pour
arrêter la répétition, soit appuyez brièvement sur la
touche CUE (18) [nouveau point Cue déterminé,
chapitre 5.8.2] soit démarrez la lecture avec la
touche (20).
5.7 Positionnement précis
à un endroit donné
On peut aller à un endroit dans le titre avec une
précision de 1 frame (1⁄75 s), par exemple si la
lecture ne doit pas démarrer au début du titre
mais à un endroit donné.
1) Lorsque lʼendroit voulu est atteint approxima-
tivement pendant la lecture du titre ou avec
lʼavance / retour rapide (chapitre 5.6),
passez en Pause avec la touche (20).
2) En tournant la molette (16) vers la droite ou la
gauche, allez précisément à lʼendroit voulu.
Pour pouvoir effectuer un contrôle acous-
tique, lʼendroit réglé est répété en continu.
3) Lorsque lʼendroit voulu est trouvé, appuyez
sur la touche CUE (18). Lʼendroit est mémo-
risé, la lecture continue arrêtée. Avec la
touche , la lecture peut être maintenant
démarrée à partir de ce point.
5.8 Retour à un endroit donné
Pour pouvoir aller rapidement à un endroit
donné, vous pouvez mémoriser avec la touche
CUE 1 et CUE 2 (11), deux points de départ
(points Cue) même pendant la lecture dʼun titre
(Fly-Cue).
Vous pouvez déterminer en plus avec la
touche CUE (18), un autre point de départ. Il est
écrasé en mode titre par titre, lorsque le titre sui-
vant est atteint ou sélectionné, par le point de
départ du titre suivant [le cas échéant, avec la
touche CONT / LIST (8), commutez sur lecture de
tous les titres].
Conseil : les points Cue mémorisés sont effacés si :
– sélection dʼun autre dossier
– commutation entre CD, USB 1, USB 2
– arrêt de lʼappareil
5.8.1 Touches CUE 1 et CUE 2
1) Appuyez sur la touche MEMO / AUTO (9)
pour activer la mémorisation. La touche brille.
2) Soit pendant la lecture appuyez sur la touche
CUE 1 (11) lorsque le point voulu est atteint
(Fly-Cue) soit commutez sur Pause avec la
touche (20) à lʼendroit voulu, allez à lʼen-
droit exact avec la molette (16) puis appuyez
sur la touche CUE 1. Elle clignote plusieurs
fois puis brille en continu. La touche MEMO /
AUTO sʼéteint. Redémarrez la lecture si
besoin avec la touche .
3) Répétez les points 1 et 2 pour déterminer un
autre point Cue avec la touche CUE 2.
4) Avec les touches CUE 1 et CUE 2, on peut
maintenant sauter aux points Cue correspon-
dants : la lecture démarre immédiatement à
partir de chaque point Cue.
5.8.2 Touche CUE
1) Pendant la lecture dʼun titre, commutez sur
Pause avec la touche (20) lorsque lʼen-
droit où il faut revenir, est atteint. Les touches
et CUE (18) clignotent.
2) Si besoin, allez avec la molette (16) à lʼen-
droit exact (chapitre 5.7). Lʼendroit est
alors répété en continu.
3) Appuyez sur la touche CUE. Ensuite lʼendroit
est mémorisé comme point Cue, sur lʼaffi-
chage lʼindication “CUE” (L) est visible. La
touche CUE brille maintenant en continu. La
touche clignote pour inciter à démarrer la
lecture.
4) Redémarrez la lecture avec la touche .
5) Avec la touche CUE, on peut maintenant
revenir au point Cue. Lʼunité de lecture est
alors sur Pause.
6) Avec la touche , démarrez la lecture ou
maintenez la touche CUE enfoncée pour la
durée de lecture du titre. Lorsque vous relâ-
chez la touche CUE, lʼunité de lecture revient
au point Cue et passe sur Pause.
5.9 Modification de la vitesse avec
ou sans déplacement
de la hauteur tonale
La vitesse peut être modifiée avec le réglage à
glissières (15) jusquʼà ± 100%.
+100 % = vitesse doublée
-
100 % = repos
1) Sélectionnez la plage de réglage avec la
touche PITCH (14). La ligne de texte (O)
indique brièvement le réglage :
“Pitch 8 %”, “Pitch 16 %”, “Pitch 100” ou

“Pitch Off” si le réglage de vitesse est à nou-
veau désactivé et le titre est lu à vitesse nor-
male.
2) Réglez la vitesse avec le réglage. Lʼaffichage
indique la déviation en pourcentage de la
vitesse normale en haut à droite (I). Le nom-
bre de beats (Q) se modifie en conséquence.
3) La hauteur tonale se modifie également pro-
portionnellement avec la vitesse. Si la hau-
teur tonale doit rester constante, appuyez sur
la touche MT (24). Sur lʼaffichage “MT” (S)
est visible. Pour désactiver la fonction, ap -
puyez une nouvelle fois sur la touche MT.
5.10 Pitch Bend – adaptation du rythme
entre deux morceaux de musique
On peut faire coïncider le rythme de deux mor-
ceaux de musique avec le même tempo ; ainsi,
lors du passage dʼune unité de lecture à lʼautre,
le rythme pour la danse nʼest pas interrompu.
1) Tout dʼabord, adaptez le tempo du morceau
de musique sur lequel il faut entrer, au tempo
du morceau de musique en cours avec le
réglage de vitesse (15). Pour ce faire, avec le
réglage à glissières, réglez le même nombre
de beats par minute, voir indication (Q) en
bas à droite sur lʼaffichage.
2) Avec les touches PITCH BEND (22), posi-
tionnez les beats du morceau de musique sur
lequel il faut entrer, avec précision sur les
beats du morceau en cours : tant que la
touche +ou
-
est enfoncée, le titre va plus
vite ou plus lentement. Ainsi les beats se
déplacent selon les beats du morceau en
cours.
3) On peut également déplacer les beats en
tournant la molette (16).
5.11 Création dʼeffets
5.11.1 Effets Scratch
Pour produire des effets Scratch (correspond à
la rotation manuelle dʼun plateau de platine
disque), appuyez sur la touche SCRATCH (6) et
tournez la molette (16) vers lʼavant ou lʼarrière.
La LED de la touche brille, la ligne de texte (O)
indique “SCRATCH”. Pour désactiver lʼeffet,
appuyez une nouvelle fois sur la touche
SCRATCH.
5.11.2 Effets bourdonnement
Si la fonction Master Tempo (hauteur tonale
constante) est activée [affichage “MT” (S)], dés-
activez-la avec la touche MT (24). En tournant la
molette (16) dans un sens ou lʼautre, la vitesse
de lecture est augmentée et diminuée en alter-
nance. On obtient ainsi un effet bourdonnement.
5.11.3 Effets bégaiement
On peut utiliser les points Cue mémorisés avec
les touches CUE (18), CUE 1 et CUE 2 (11)
[chapitre 5.8] pour produire des effets
bégaiements intéressants : par plusieurs brèves
pressions sur une de ces touches, on obtient un
effet bégaiement. Il est dʼautant plus puissant
que le point Cue est adapté (par exemple utilisa-
tion dʼinstrument ou début dʼun mot).
5.11.4 Lecture dʼune boucle continue
On peut répéter un segment donné dʼun titre
sous forme de boucle continue.
1) Avec la touche (20), commutez sur lec-
ture. Lorsque le point de départ voulu de la
boucle est atteint (point a, schéma 6), ap -
puyez sur la touche A (19).
Schéma 6 lecture dʼune boucle continue
Remarque : pour déterminer avec précision le point
de départ sur 1 frame, passez tout dʼabord sur
Pause avec la touche , allez à lʼendroit exact
avec la molette (16) puis appuyez sur la touche A.
2) Lorsque lors de la lecture, la fin souhaitée du
segment est atteinte (point b sur le schéma
6), appuyez sur la touche B / EDIT (19). Le
segment entre les points est répété en
continu. Tant quʼune boucle continue est lue,
lʼaffichage indique “RELOOP” (J).
3) Pour déplacer le point de fin ou le régler avec
précision sur 1 frame, appuyez sur la touche
B / EDIT pendant la lecture. Lʼaffichage (P)
indique maintenant lʼindex temps du point de
fin. Avec la molette (16), déplacez le point de
fin et confirmez-le avec la touche B / EDIT.
4) Le segment de la boucle peut également être
divisé ou prolongé dʼun multiple. Pendant la
lecture de la boucle, avec la touche ou
(21), sélectionnez la modification de la lon-
gueur. La ligne de texte (O) indique le
réglage :
TRIM : 1⁄32, 1⁄16, 1⁄8, 1⁄4, 1⁄2, 1⁄1, 2⁄1, 4⁄1, 8⁄1, 16⁄1, 32⁄1
5) Pour quitter la boucle et reprendre la lecture
du titre, appuyez sur la touche RELOOP /
EXIT (19). Pour un nouveau démarrage de la
boucle, appuyez à nouveau sur la touche
RELOOP / EXIT.
Schéma 7 fin dʼune boucle et redémarrage
Remarque : une boucle mémorisée est effacée dès
que le titre suivant est atteint pendant la lecture ou
quʼun autre titre est sélectionné avec la touche ou
(21).
Segment fraction ou multiple d’une longueur de beats
La longueur dʼun segment pour la lecture dʼune
boucle peut être réglée pour des titres au rythme
4⁄4exactement sur une fraction ou un multiple
dʼune longueur de beats :
1⁄32, 1⁄16, 1⁄8, 1⁄4, 1⁄2, 1⁄1, 2⁄1, 4⁄1, 8⁄1, 16⁄1, 32⁄1
1) Maintenez la touche MEMO / AUTO (9) enfon-
cée et avec la molette (16), réglez la lon-
gueur. Elle est affichée dans la ligne de texte
(O), par exemple “AUTO 2 / 1” : deux lon-
gueurs de beats. Une fois ce réglage effec-
tué, la touche MEMO / AUTO brille pour indi-
quer que le point de fin dʼun segment de
boucle est automatiquement fixé.
2) Déterminez le point de départ avec la touche
A (19). La boucle continue est simultanément
démarrée et le point de fin est déterminé en
fonction du réglage de la longueur.
3) On peut, ultérieurement, modifier la longueur
du segment de la boucle comme décrit pré-
cédemment (point 3 ou 4).
5.12 Création dʼune suite personnelle
de titres
Si seuls des titres sélectionnés doivent être lus
dans un ordre déterminé, on peut programmer
une suite avec 99 titres au plus.
5.12.1 Mémoriser et lire une suite de titres
1) Si un titre est en cours de lecture, passez sur
Pause avec la touche (20).
2) Avec la touche PROG (13), passez en mode
programmation. Lʼaffichage de durée (P)
passe sur lʼindication du premier emplace-
ment de mémoire “P
-
01”. Lʼindication “PG”
(R) clignote rapidement.
Conseil : si vous devez quitter ce mode immédia-
tement, maintenez la touche PROG enfoncée
jusquʼà ce que lʼaffichage indique à nouveau la
durée (P).
3) Sélectionnez le premier titre à mémoriser
avec la touche ou (21) [chapitre 5.1,
points 4 et 5].
4) Pour confirmer la sélection de titre, appuyez
sur la touche PROG. Le prochain emplace-
ment de mémoire “P
-
02” est affiché.
5) Répétez les points 3 et 4 jusquʼà ce que tous
les titres de la suite soient programmés. Si 99
titres sont mémorisés, et si vous essayez
dʼen mémoriser un autre, le message “FULL”
sʼaffiche.
6) Pour lire la suite de titres, appuyez sur la
touche . Lʼaffichage “PG” (R) clignote len-
tement. Les titres sont lus selon le mode
de fonctionnement sélectionné (chapitre
5.4.1). Pour sélectionner dʼautres titres de la
suite, appuyez (plusieurs fois) sur la touche
ou .
7) Pour revenir au mode normal de lecture, pas-
sez en mode Pause avec la touche et
maintenez la touche PROG enfoncée jusquʼà
ce que lʼaffichage “PG” (R) ne clignote plus.
Pour lire une nouvelle fois la suite de titres,
mettez lʼappareil sur Pause, appuyez sur la
touche PROG jusquʼà ce que lʼaffichage “PG”
clignote à nouveau. Démarrez la suite de
titres avec la touche .
Conseil : tant que lʼaffichage “PG” clignote ou brille tout
le temps, la suite de titres est consultable. Elle est effa-
cée par exemple lorsquʼon éteint lʼappareil.
5.12.2 Vérification de la suite de titres
1) Si un titre est lu, passez tout dʼabord en mode
Pause avec la touche .
2) Si lʼindication “PG” clignote maintenant, ap -
puyez une fois sur la touche PROG. Si lʼindi-
cation “PG” brille en continu, appuyez deux
fois sur la touche PROG.
3) Avec la touche ou , sélectionnez les uns
après les autres les emplacements de
mémoire (P
-
01 … P
-
99). Le titre mémorisé
est affiché dans la ligne de texte (O).
4) Appuyez sur la touche pour lire la suite de
titres.
5.12.3
Compléter ou effacer une suite de titres
1) Si un titre est en cours de lecture, passez tout
dʼabord sur Pause avec la touche .
2) Si lʼindication “PG” clignote, maintenez la
touche PROG enfoncée jusquʼà ce que “PG”
ne clignote plus.
3) Appuyez brièvement sur la touche PROG de
telle sorte que “PG” clignote rapidement et
que lʼindication de temps (P) commute sur
lʼaffichage du prochain emplacement de
mémoire libre “P
-
…”.
PLAY c
LOOP
1. 2.
RELOOP / EXITRELOOP / EXIT
ab
1.
PLAY PLAY
LOOP
2.
AB / EDIT
20
F
B
CH
Strona się ładuje...
Strona się ładuje...
Strona się ładuje...
Strona się ładuje...
Strona się ładuje...
Strona się ładuje...
Strona się ładuje...
Strona się ładuje...
Strona się ładuje...
Strona się ładuje...
Strona się ładuje...
Strona się ładuje...
Strona się ładuje...
Strona się ładuje...
Strona się ładuje...
Strona się ładuje...
Strona się ładuje...
Strona się ładuje...
Strona się ładuje...
Strona się ładuje...
Strona się ładuje...
Strona się ładuje...
Strona się ładuje...
Strona się ładuje...
Strona się ładuje...
Strona się ładuje...
Strona się ładuje...
Strona się ładuje...
-
 1
1
-
 2
2
-
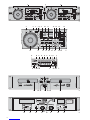 3
3
-
 4
4
-
 5
5
-
 6
6
-
 7
7
-
 8
8
-
 9
9
-
 10
10
-
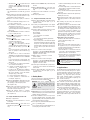 11
11
-
 12
12
-
 13
13
-
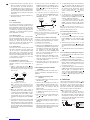 14
14
-
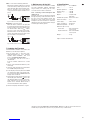 15
15
-
 16
16
-
 17
17
-
 18
18
-
 19
19
-
 20
20
-
 21
21
-
 22
22
-
 23
23
-
 24
24
-
 25
25
-
 26
26
-
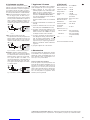 27
27
-
 28
28
-
 29
29
-
 30
30
-
 31
31
-
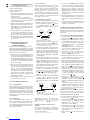 32
32
-
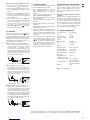 33
33
-
 34
34
-
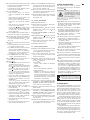 35
35
-
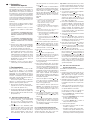 36
36
-
 37
37
-
 38
38
-
 39
39
-
 40
40
-
 41
41
-
 42
42
-
 43
43
-
 44
44
-
 45
45
-
 46
46
-
 47
47
-
 48
48


IMG Stage Line CD-292USB Instrukcja obsługi
- Kategoria
- Odtwarzacze CD
- Typ
- Instrukcja obsługi
w innych językach
- español: IMG Stage Line CD-292USB Manual de usuario
- Deutsch: IMG Stage Line CD-292USB Benutzerhandbuch
- français: IMG Stage Line CD-292USB Manuel utilisateur
- Nederlands: IMG Stage Line CD-292USB Handleiding
Powiązane artykuły
Inne dokumenty
-
Vonyx CDJ450 Instrukcja obsługi
-
 Power Dynamics PDX350 Instrukcja obsługi
-
AEG CTV 4807 DVD Instrukcja obsługi
-
Yamaha DTR2 Instrukcja obsługi
-
Monacor PAK-15DMP Instrukcja obsługi
-
 Ibiza DJM150BT-VHF Instrukcja obsługi
-
Silvercrest SDJ 100 A1 User Manual And Service Information
-
Clarion CZ309E Owner's Manual & Installation Manual
-
SFA SANICONDENS mini Instrukcja obsługi

