IMG Stage Line CD-340USB Instrukcja obsługi
- Kategoria
- Odtwarzacze CD
- Typ
- Instrukcja obsługi

BEDIENUNGSANLEITUNG • INSTRUCTION MANUAL • MODE D’EMPLOI
ISTRUZIONI PER L’USO • GEBRUIKSAANWIJZING • MANUAL DE INSTRUCCIONES • INSTRUKCJA OBSŁUGI
SIKKERHEDSOPLYSNINGER • SÄKERHETSFÖRESKRIFTER • TURVALLISUUDESTA
PROFESSIONELLER DUAL-CD/MP3-PLAYER
PROFESSIONAL DUAL CD/MP3 PLAYER
LECTEUR CD/MP3 DOUBLE PROFESSIONNEL
LETTORE CD/MP3 DOPPIO PROFESSIONALE
CD-340USB Best.-Nr. 21.2170

2
wwwwww..iimmggssttaaggeelliinnee..ccoomm
Bevor Sie einschalten …
Wir wünschen Ihnen viel Spaß mit Ihrem neuen Gerät
von „img Stage Line”. Bitte lesen Sie diese Bedienungs-
anleitung vor dem Betrieb gründlich durch. Nur so lernen
Sie alle Funktionsmöglichkeiten kennen, vermeiden
Fehlbedienungen und schützen sich und Ihr Gerät vor
eventuellen Schäden durch unsachgemäßen Gebrauch.
Heben Sie die Anleitung für ein späteres Nachlesen auf.
Der deutsche Text beginnt auf der Seite 4.
Before you switch on …
We wish you much pleasure with your new “img Stage
Line” unit. Please read these operating instructions
carefully prior to operating the unit. Thus, you will get to
know all functions of the unit, operating errors will be
prevented, and yourself and the unit will be protected
against any damage caused by improper use. Please
keep the operating instructions for later use.
The English text starts on page 4.
D
A
CH
GB
Avant toute installation …
Nous vous souhaitons beaucoup de plaisir à utiliser cet
appareil “img Stage Line”. Lisez ce mode d’emploi entière-
ment avant toute utilisation. Uniquement ainsi, vous pour-
rez apprendre l’ensemble des possibilités de fonction-
nement de l’appareil, éviter toute manipulation erronée et
vous protéger, ainsi que l’appareil, de dommages éven-
tuels engendrés par une utilisation inadaptée. Conservez
la notice pour pouvoir vous y reporter ultérieurement.
La version française se trouve page 15.
Prima di accendere …
Vi auguriamo buon divertimento con il vostro nuovo ap-
parecchio di “img Stage Line”. Leggete attentamente le
istruzioni prima di mettere in funzione l’apparecchio.
Solo così potete conoscere tutte le funzionalità, evitare
comandi sbagliati e proteggere voi stessi e l’apparecchio
da eventuali danni in seguito ad un uso improprio. Con-
servate le istruzioni per poterle consultare anche in
futuro.
Il testo italiano inizia a pagina 15.
F
B
CH
I
Voor u inschakelt …
Wij wensen u veel plezier met uw nieuwe apparaat van
“img Stage Line”. Lees deze gebruikershandleiding
grondig door, alvorens het apparaat in gebruik te nemen.
Alleen zo leert u alle functies kennen, vermijdt u foutieve
bediening en behoedt u zichzelf en het apparaat voor
eventuele schade door ondeskundig gebruik. Bewaar de
handleiding voor latere raadpleging.
De Nederlandstalige tekst vindt u op pagina 26.
Antes de la utilización …
Le deseamos una buena utilización para su nuevo apa-
rato “img Stage Line”. Por favor, lea estas instrucciones
de uso atentamente antes de hacer funcionar el aparato.
De esta manera conocerá todas las funciones de la
unidad, se prevendrán errores de operación, usted y el
aparato estarán protegidos en contra de todo daño cau-
sado por un uso inadecuado. Por favor, guarde las
instrucciones para una futura utilización.
El texto en español empieza en la página 26.
NL
B
E
Før du tænder …
God fornøjelse med dit nye “img Stage Line” produkt.
Læs venligst sikkerhedsanvisningen nøje, før du tager
produktet i brug. Dette hjælper dig med at beskytte pro-
duktet mod ukorrekt ibrugtagning. Gem venligst denne
betjeningsvejledning til senere brug.
Du finder sikkerhedsanvisningen på side 44.
Ennen kytkemistä …
Toivomme Sinulle paljon miellyttäviä hetkiä uuden “img
Stage Line” laitteen kanssa. Ennen laitteen käyttöä
Sinua huolellisesti tutustumaan turvallisuusohjeisiin.
Näin vältyt vahingoilta, joita virheellinen laitteen käyttö
saattaa aiheuttaa. Ole hyvä ja säilytä käyttöohjeet myöh-
empää tarvetta varten.
Turvallisuusohjeet löytyvät sivulta 45.
DK
FIN
Innan du slår på enheten …
Vi önskar dig mycket glädje med din nya “img Stage
Line” produkt. Läs igenom säkerhetsföreskrifterna noga
innan enheten tas i bruk. Detta kan förhindra att problem
eller fara för dig eller enheten uppstår vid användning.
Spara instruktionerna för framtida användning.
Säkerhetsföreskrifterna återfinns på sidan 44.
S
Przed uruchomieniem …
Życzymy zadowolenia z nowego produktu “img Stage
Line”. Dzięki tej instrukcji obsługi będą państwo w stanie
poznać wszystkie funkcje tego urządzenia. Stosując się
do instrukcji unikną państwo błędów i ewentualnego
uszkodzenia urządzenia na skutek nieprawidłowego
użytkowania. Prosimy zachować instrukcję.
Tekst polski zaczyna się na stronie 38.
PL

RELAY
PRO DUAL
CD/MP3 PLAYER
CD-340USB
OPEN
CLOSE
B/LOOP
EXIT
B/LOOP
EXIT
RELOOP
A
RELOOP
A
BOP
SEARCH
1 2 3
MEMO.
+10
4% 8% 16%
1234567890
MULTI
ON/
OFF
SAMPLER
REVERSE
SAM.
MT
PITCH
PITCH BEND
CARD EFFECT +10
4% 8% 16%
MULTI
ON/
OFF
MT
PITCH
PITCH BEND
SCRATCH
OPEN
CLOSE
SEARCH
REVERSESCRATCH
1234567890
B/LOOP
EXIT
B/LOOP
EXIT
RELOOP
A
RELOOP
A
BOP
1 2 3
MEMO.
+10
SAMPLER
SAM.
AC9V
500mA
USB
CONT./
SINGLE
TIME
STOP
OUTRO
CONT./
SINGLE
TIME
STOP
OUTRO
CARD EFFECT +10
MS F
SINGLE
REMAINMP3
PITCH
TRACK BPM
KEY
MS F
SINGLE
REMAIN
PITCH
TRACK BPM
A1
CLEAR STORE RECALL S.LOOP S.REV. S.MIX PC/CD USB/CD ID3 FOLDER CLEAR STORE RECALL S.LOOP S.REV. S.MIX PC/CD USB/CD ID3 FOLDER
AUTO/
MAN.
TAP
AUTO/
MAN.
TAP
nopqr s tuvw
MS F
TOTAL SINGLE CONT OUTRO
REMAINTOTALELAPSEDMP3
PITCH
TRACK BPM
A1 A2
KEY
DIR
3
34 56
➂
12
➃
PRO DUAL
CD/MP3 PLAYER
CD-340USB
31 32 33 34 35 36
➄
➀
CONNECT TO
REMOTE CONTROL 2
START/
PAUSE DIGITAL
OUT START/
PAUSE DIGITAL
OUT LINE
OUT
L
R
CONNECT TO
REMOTE CONTROL 1
LINE
OUT
L
R
LASER KLASSE 1
CLASS LASER
LASER CLASSE 1
WWW.IMGSTAGELINE.COM
PRO DUAL
CD/MP3 PLAYER
CD-340USB
CUE
PLAY
LOCK
TACT
230 V~/50Hz/35VA
abcdefghij k l m
37 38 39 40 41 42 43 44 45 46
OPEN
CLOSE
B/LOOP
EXIT
B/LOOP
EXIT
RELOOP
A
RELOOP
A
BOP
SEARCH
1 2 3
MEMO.
+10
4% 8% 16%
1234567890
MULTI
ON/
OFF
SAMPLER
REVERSE
SAM.
MT
PITCH
PITCH BEND
SCRATCH
CONT./
SINGLE
TIME
STOP
OUTRO
CARD EFFECT +10
MS F
SINGLE
REMAINMP3
PITCH
TRACK BPM
KEY
CLEAR STORE RECALL S.LOOP S.REV. S.MIX PC/CD USB/CD ID3 FOLDER
AUTO/
MAN.
TAP
78910 11 12 1314
➁
22 23 24 25 26 27 28 29 30
15
16
17
20
18
19
21

Bitte klappen Sie die Seite 3 heraus. Sie sehen
dann immer die beschriebenen Bedienelemente
und Anschlüsse.
Inhalt
1Übersicht der Bedienelemente und
Anschlüsse . . . . . . . . . . . . . . . . . . . . . . . . . 4
1.1 Steuereinheit . . . . . . . . . . . . . . . . . . . . . . . . 4
1.2 Laufwerkeinheit Frontseite . . . . . . . . . . . . . . 6
1.3 Laufwerkeinheit Rückseite . . . . . . . . . . . . . . 6
2Hinweise für den sicheren Gebrauch . . . . 7
3Einsatzmöglichkeiten . . . . . . . . . . . . . . . . 7
4Gerät aufstellen und anschließen . . . . . . 7
5Bedienung . . . . . . . . . . . . . . . . . . . . . . . . . 8
5.1 CD, Festplatte oder USB-Stick abspielen . . 8
5.1.1 Ordner bei MP3-Betrieb auswählen . . . . . 8
5.2 Anzeige der Titelnummer, Laufzeit,
Taktschläge pro Minute und
des Ruhemodus . . . . . . . . . . . . . . . . . . . . . . 9
5.2.1 Bargraf . . . . . . . . . . . . . . . . . . . . . . . . . . . 9
5.2.2 Beatcounter . . . . . . . . . . . . . . . . . . . . . . . . 9
5.2.3 Ruhemodus . . . . . . . . . . . . . . . . . . . . . . . . 9
5.3 Betriebsart wählen . . . . . . . . . . . . . . . . . . . . 9
5.3.1 Einzeltitelwiedergabe . . . . . . . . . . . . . . . . 9
5.3.2 Gesamttitelwiedergabe und
endlose Wiederholung aller Titel . . . . . . . . 9
5.3.3 Relay-Betrieb – automatischer Start des
anderen Laufwerks . . . . . . . . . . . . . . . . . . 9
5.4 Anspielen eines Titels . . . . . . . . . . . . . . . . 10
5.5 Funktion OUTRO . . . . . . . . . . . . . . . . . . . . 10
5.6 Schneller Vor- und Rücklauf . . . . . . . . . . . 10
5.7 Genaues Anfahren
einer bestimmten Stelle . . . . . . . . . . . . . . . 10
5.8 Sprung zu einer zuvor bestimmten Stelle . 11
5.8.1 Tasten CUE 1 bis 3 . . . . . . . . . . . . . . . . . 11
5.8.2 Speichern von Hot-Cue-Punkten . . . . . . . 11
5.8.3 Taste CUE . . . . . . . . . . . . . . . . . . . . . . . . 11
5.9 Stottereffekte erzeugen . . . . . . . . . . . . . . . 11
5.10 Endlosschleife abspielen . . . . . . . . . . . . . . 12
5.11 Geschwindigkeit mit oder ohne Tonhöhen-
verschiebung verändern . . . . . . . . . . . . . . 12
5.12 Pitch Bend – Takt zwischen 2 Musik-
stücken angleichen . . . . . . . . . . . . . . . . . . 12
5.13 Bedienung des Samplers . . . . . . . . . . . . . . 13
5.14 Titel rückwärts abspielen . . . . . . . . . . . . . . 13
5.15 Scratch-Effekte erzeugen . . . . . . . . . . . . . 13
6Faderstart über ein Mischpult . . . . . . . . . 13
7Pflege des Gerätes . . . . . . . . . . . . . . . . . . 14
8Technische Daten . . . . . . . . . . . . . . . . . . 14
Please take out page 3. Then you can always see
the operating elements and connections de-
scribed.
Contents
1Operating Elements and Connections . . . 4
1.1 Control unit . . . . . . . . . . . . . . . . . . . . . . . . . . 4
1.2 Player mechanism unit, front panel . . . . . . . 6
1.3 Player mechanism unit, rear panel . . . . . . . 6
2Safety Notes . . . . . . . . . . . . . . . . . . . . . . . . 7
3Applications . . . . . . . . . . . . . . . . . . . . . . . . 7
4Setting up and Connecting the Unit . . . . . 7
5Operation . . . . . . . . . . . . . . . . . . . . . . . . . . 8
5.1 Replaying a CD, hard disk, or USB stick . . . 8
5.1.1 Selecting a folder for MP3 mode . . . . . . . . 8
5.2 Indication of title number, playing time,
beats per minute, and sleep mode . . . . . . . . 9
5.2.1 Bar graph . . . . . . . . . . . . . . . . . . . . . . . . . 9
5.2.2 Beat counter . . . . . . . . . . . . . . . . . . . . . . . 9
5.2.3 Sleep mode . . . . . . . . . . . . . . . . . . . . . . . . 9
5.3 Selecting the operating mode . . . . . . . . . . . 9
5.3.1 Single title replay . . . . . . . . . . . . . . . . . . . . 9
5.3.2 Total title replay and
continuous repeat of all titles . . . . . . . . . . . 9
5.3.3 Relay mode – Automatic start
of the other player mechanism . . . . . . . . . 9
5.4 Short replay of a title beginning . . . . . . . . . 10
5.5 Function OUTRO . . . . . . . . . . . . . . . . . . . . 10
5.6 Fast forward and reverse . . . . . . . . . . . . . . 10
5.7 Precise selection of a certain spot . . . . . . . 10
5.8 Return to a spot previously defined . . . . . . 11
5.8.1 Buttons CUE 1 to 3 . . . . . . . . . . . . . . . . . 11
5.8.2 Storing Hot Cue points . . . . . . . . . . . . . . 11
5.8.3 Button CUE . . . . . . . . . . . . . . . . . . . . . . . 11
5.9 Creating stutter effects . . . . . . . . . . . . . . . . 11
5.10 Replaying a continuous loop . . . . . . . . . . . 12
5.11 Changing the speed with or
without displacing the pitch . . . . . . . . . . . . 12
5.12 Pitch Bend – Matching the beat
between 2 music pieces . . . . . . . . . . . . . . . 12
5.13 Operation of the sampler . . . . . . . . . . . . . 13
5.14 Reverse replay of a title . . . . . . . . . . . . . . 13
5.15 Creating scratch effects . . . . . . . . . . . . . . . 13
6Fader Start via a Mixer . . . . . . . . . . . . . . . 13
7Maintenance of the Unit . . . . . . . . . . . . . 14
8Specifications . . . . . . . . . . . . . . . . . . . . . . 14
4
GB
D
A
CH
1Operating Elements and Connections
Buttons with double function are marked on the unit
by the symbols for short actuation and for
longer actuation.
1.1 Control unit (figs. 1–3)
1Control panel for player mechanism 1 (details
see fig. 2)
2Control panel for player mechanism 2 (details
see fig. 2)
3Multifunctional display (details see fig. 3)
anumber of the title selected at the indication
“TRACK” (q) or number of the directory select-
ed at the indication “DIR” (r)
bnumber of titles on the CD or in the directory
selected
c“TOTAL” to indicate together with “CONT” (g)
that all titles of the CD or in the directory se-
lected will be continuously repeated, see item
11, button CONT./SINGLE
d“MP3”: to indicate the MP3 mode
e“SINGLE”: to indicate the single title replay
mode
f“ELAPSED”: to indicate that the time already
played of a title is displayed
g“CONT”: to indicate the total title replay mode,
see item 11, button CONT./SINGLE
h“TOTAL”: to indicate together with “REMAIN”
(i) that the remaining time of the CD is dis-
played (not in the MP3 mode)
i“REMAIN”: to indicate that the remaining time
of a title is displayed. If “TOTAL” (h) is addi-
tionally displayed, the total remaining time of
the CD is indicated.
j“OUTRO”: to indicate the function OUTRO,
see item 11, button CONT./SINGLE – OUTRO
ksymbol : will be displayed when a contin-
uous loop has been stored and will start flash-
ing when the loop is replayed (chapter 5.10)
1Übersicht der Bedienelemente und
Anschlüsse
Tasten mit Doppelfunktionen sind am Gerät durch
die Symbole für kurzes Drücken und für län-
geres Drücken gekennzeichnet.
1.1 Steuereinheit (Abb. 1– 3)
1Bedienfeld für Laufwerk 1 (Details siehe Abb. 2)
2Bedienfeld für Laufwerk 2 (Details siehe Abb. 2)
3Multifunktionsdisplay (Details siehe Abb. 3)
aNummer des angewähltes Titels bei der An-
zeige „TRACK“ (q) oder Nummer des ange-
wählten Ordners bei der Anzeige „DIR“ (r)
bAnzahl der Titel auf der CD oder im angewähl-
ten Ordner
cAnzeige „TOTAL“ signalisiert zusammen mit
„CONT“ (g), dass alle Titel der CD oder im an-
gewählten Ordner endlos wiederholt werden,
siehe Position 11 Taste CONT./SINGLE
dAnzeige „MP3“: signalisiert den MP3-Betrieb
eAnzeige „SINGLE“: signalisiert die Betriebsart
Einzeltitelwiedergabe
fAnzeige „ELAPSED“: signalisiert, dass die be-
reits gespielte Zeit eines Titels angezeigt wird
gAnzeige „CONT“: signalisiert die Betriebsart
Gesamttitelwiedergabe, siehe Position 11
Taste CONT./SINGLE
hAnzeige „TOTAL“: signalisiert zusammen mit
„REMAIN“ (i), dass die Restlaufzeit der CD
angezeigt wird (nicht bei MP3-Betrieb)
iAnzeige „REMAIN“: signalisiert, dass die Rest-
laufzeit eines Titels angezeigt wird. Ist im Dis-
play zusätzlich „TOTAL“ (h) angegeben, wird
die Restlaufzeit der CD angezeigt.
jAnzeige „OUTRO“: signalisiert die Funktion
OUTRO, siehe Position 11 Taste CONT./
SINGLE – OUTRO
kSymbol : wird angezeigt, wenn eine End-
losschleife gespeichert ist und blinkt, wenn die
Schleife abgespielt wird (Kapitel 5.10)

lAnzeige KEY: signalisiert die Funktion
Mastertempo, siehe Position 14 Taste MT
mAnzeige der mit dem Regler PITCH CON-
TROL (21) eingestellten Abweichung von der
Standardgeschwindigkeit (max. ±100%)
nSymbol für den Wiedergabemodus
oAnzeige des Betriebsmodus (CD, USB)
pSymbol für den Pausenmodus
qAnzeige „TRACK“ signalisiert, dass über ihr
die Titelnummer (a) angezeigt wird
rAnzeige „DIR“ signalisiert, dass über ihr die
Ordnernummer (a) angezeigt wird
sTextzeile für Zusatzinformationen (z.B. MP3-
Titel, Ordnername, gewählter Effekt)
tZeitanzeige; siehe Pos. 10 Taste TIME/STOP
uBargraf: stellt durch seine Länge die Zeitan-
zeige (t) grafisch dar
vAnzeige der Taktschläge pro Minute des lau-
fenden Titels
wSymbol : signalisiert, dass der Beatcounter
auf Automatik geschaltet ist (Kap. 5.2.2)
4Taste RELAY zum automatischen Starten des
anderen Laufwerks am Ende eines Titels oder
am Ende des letzten Titels (Kap. 5.3.3)
Die Funktion lässt sich nur aktivieren, wenn in
jedem Laufwerk eine CD eingelegt, ein USB-
Stick eingesteckt oder eine Festplatte ange-
schlossen und angewählt ist.
5USB-Anschluss Typ B (seitlich an der Steuerein-
heit) zum Anschluss an einen PC1)
6Stromversorgungsbuchse (9V~, 500mA)
Wird die Steuereinheit nur für den PC-Betrieb1)
verwendet (Laufwerkeinheit nicht angeschlos-
sen), muss hier zur Stromversorgung ein ent-
sprechendes Netzgerät angeschlossen werden.
7Taste SCRATCH zum Ein- und Ausschalten der
Scratch-Funktion
Bei eingeschalteter Funktion (die LED über der
Taste leuchtet) lassen sich mit dem Drehrad (23)
Scratch-Effekte erzeugen.
8Taste REVERSE zum Ein- und Ausschalten der
Rückwärtswiedergabe
9Taste OPEN/CLOSE zum Auswerfen der CD
(nicht während der Wiedergabe oder bei ange-
wähltem USB-Anschluss möglich)
10 Taste TIME/STOP:
wird die Taste 2 Sekunden gedrückt gehalten,
stoppt das Laufwerk;
zur Umschaltung der Zeitanzeige (t und u) die
Taste nur kurz antippen:
Grundeinstellung, Anzeige „REMAIN“ (i):
Restzeit des laufenden Titels
erster Tastendruck, Anzeige „ELAPSED“ (f):
bereits gespielte Zeit des laufenden Titels
nächster Tastendruck, „TOTAL REMAIN“ (h+i):
Restzeit der gesamten CD;
nicht bei MP3-Betrieb möglich
nächster Tastendruck, Anzeige „REMAIN“:
Zurückschalten auf die Grundeinstellung
11 Taste CONT./SINGLE – OUTRO zur Auswahl
des Betriebsmodus und zum Einschalten der
Funktion OUTRO
Grundeinstellung, Anzeige „SINGLE“ (e):
Einzeltitelwiedergabe; nach jedem gespielten
Titel schaltet das Gerät auf Pause
erster Tastendruck, Anzeige „CONT” (g):
fortlaufende Wiedergabe aller Titel
zweiter Tastendruck, Anzeige „CONT“ (g) und
„TOTAL“ (c): endlose Wiederholung aller Titel
der CD oder des angewählten Ordners
dritter Tastendruck, Anzeige „SINGLE“:
Zurückschalten auf die Grundeinstellung
Die Taste ca. 3 Sekunden gedrückt halten, bis im
Display „OUTRO“ (j) erscheint:
Einschalten der Funktion OUTRO zum Ab-
spielen der jeweils letzten 30 Sekunden der fol-
genden Titel
Die Funktion OUTRO kann nicht für MP3-Titel
genutzt werden. Zum Ausschalten der Funktion
die Taste OUTRO erneut ca. 3 Sek. gedrückt hal-
ten oder die Taste TIME/STOP (10) kurz drücken.
12 Zifferntasten
1. zum Anwählen einer Titelnummer
2. für Zusatzfunktionen, wenn vorher die Taste
MULTI (13) gedrückt wird (Beschriftung CLEAR
bis FOLDER über den Tasten beachten):
Taste 0zum Löschen aller Hot-Cue-Punkt-
Speicherplätze (Kap. 5.8.2)
Taste 1zum Speichern von Hot-Cue-Punkten
Taste 2zum Laden von Hot-Cue-Punkten
Taste 3zum Umschalten zwischen einmaliger
Wiedergabe und ständiger Wiederholung des
Samplers (Kap. 5.13)
Taste 4zum Umschalten zwischen Vorwärts-
und Rückwärtswiedergabe des Samplers
Taste 5zum Umschalten zwischen Misch- und
Einfügemodus des Samplers
Taste 6zum Umschalten2) zwischen PC-Be-
trieb1) und CD-Wiedergabe
Taste 7zum Umschalten2) zwischen USB-An-
schluss (31) und CD-Wiedergabe
Taste 8zum Anzeigen von Titel, Album, Inter-
pret (ID3 Tags) bei MP3-Betrieb, wenn diese
Informationen vorhanden sind
Taste 9zum Umschalten zwischen Titel- und
Ordneranwahl bei MP3-Betrieb (Kap. 5.1.1)
13 Taste MULTI für Zusatzfunktionen in Verbindung
mit den Zifferntasten (12)
Nach dem Drücken der Taste MULTI leuchtet die
LED über der Taste und signalisiert, dass jetzt
eine Zusatzfunktion aktiviert werden kann. Die
LED erlischt nach dem Aktivieren einer Zusatz-
funktion oder dem erneuten Drücken der Taste
MULTI.
lKEY: to indicate the function master
tempo, see item 14, button MT
mindication of the deviation from the standard
speed (max. ±100%) adjusted with the PITCH
CONTROL (21)
nsymbol for the replay mode
oindication of the operating mode (CD, USB)
psymbol for the pause mode
q“TRACK” to indicate that the number of the
title (a) is displayed above it
r“DIR” to indicate that the number of the direc-
tory (a) is displayed above it
stext line for additional information (e.g. MP3
title, directory name, effect selected)
ttime indication; see item 10, button TIME/
STOP
ubar graph; to indicate the time (t) graphically
by its length
vnumber of beats per minute of the current title
wsymbol ; to indicate that the beat counter is
switched to automatic mode (chapter 5.2.2)
4Button RELAY for automatic start of the other
player mechanism at the end of a title or at the
end of the last title (see chapter 5.3.3)
This function can only be activated with a CD in-
serted, with a USB stick connected, or with a
hard disk connected and selected in both player
mechanisms.
5USB port, type B (at the side of the control unit)
for connection to a PC1)
6Power supply jack (9V~, 500mA)
If a control unit is only used for the PC mode1)
(player mechanism unit not connected), a corre-
sponding power supply unit must be connected
here for power supply.
7Button SCRATCH to activate/deactivate the
scratch function
With the function activated (LED above the but-
ton will light up), scratch effects can be created
with the rotary wheel (23).
8Button REVERSE to activate/deactivate the
reverse replay
9Button OPEN/CLOSE for ejecting the CD (not
possible during the replay or with the USB port
selected)
10 Button TIME/STOP:
if the button is kept pressed for 2 seconds, the
player mechanism will stop;
to switch to the time indication (t and u), just
actuate the button shortly:
basic setting, indication “REMAIN” (i):
remaining time of the current title
1st actuation of button, indication “ELAPSED” (f):
time already played of the current title
next actuation of button, “TOTAL REMAIN” (h + i):
remaining time of the entire CD;
not possible in the MP3 mode
next actuation of button, indication “REMAIN”:
return to the basic setting
11 Button CONT./SINGLE – OUTRO to select the
operating mode and to activate the function
OUTRO
basic setting, indication “SINGLE” (e):
single title replay; after each title played, the
unit is set to pause
1st actuation of button, indication “CONT” (g):
continuous replay of all titles
2nd actuation of button, indication “CONT” (g)
and “TOTAL” (c):
continuous repeat of all titles of the CD or of
the directory selected
3rd actuation of button; indication “SINGLE”:
return to the basic setting
Keep the button pressed for approx. 3 seconds
until “OUTRO” (j) appears on the display.
Activation of the function OUTRO for replaying
the last 30 seconds each of the following titles
The function OUTRO cannot be used for MP3
titles. To deactivate the function, keep the button
pressed for approx. 3 seconds once again or
shortly actuate the button TIME/STOP (10).
12 Numerical keys
1. for selecting a title number
2. for additional functions when the button
MULTI (13) is pressed beforehand (note the
lettering CLEAR to FOLDER above the keys):
key 0for deleting all storage locations of Hot
Cue points (chapter 5.8.2)
key 1for storing Hot Cue points
key 2for loading Hot Cue points
key 3for switching between single replay and
continuous repeat of the sampler (chapter 5.13)
key 4for switching between forward and
reverse replay of the sampler
key 5for switching between mixing mode and
insertion mode of the sampler
key 6for switching2) between PC mode1) and
CD replay
key 7for switching2) between USB port (31)
and CD replay
key 8for indicating title, album, artist (ID3
tags) in the MP3 mode if this information is
available
key 9for switching between title selection and
folder selection in the MP3 mode (chapter
5.1.1)
13 Button MULTI for additional functions in con-
nection with the numerical keys (12)
After pressing the button MULTI, the LED above
the button will light up to indicate that it will be
possible to activate an additional function. The
LED will be extinguished when an additional
function is activated or when the button MULTI is
pressed again.
5
GB
D
A
CH
1)Für den PC-Betrieb wird eine spezielle Software benötigt.
2)Zum Umschalten muss sich das Laufwerk im Stoppmodus
befinden; ggf. die Taste TIME/STOP (10) 2 Sek. gedrückt
halten.
1)For the PC mode, a special software is required.
2)For switching over, the player mechanism must be in the
stop mode; keep the button TIME/STOP (10) pressed for
2seconds, if required.

14 Taste MT zum Ein- und Ausschalten der Funk-
tion Mastertempo (Tonhöhe bleibt beim Ändern
der Geschwindigkeit konstant, siehe Kap. 5.11)
15 LEDs zur Anzeige des mit der Taste PITCH (16)
gewählten Geschwindigkeitseinstellbereiches
Blinken = der Regler PITCH CONTROL (21) ist
nicht aktiviert
konstantes Leuchten = der Regler wurde mit der
Taste ON/OFF (17) aktiviert
Blinken oder leuchten alle LEDs, ist der 100-%-
Bereich angewählt.
16 Taste PITCH zur Auswahl des Geschwindigkeits-
einstellbereiches: 4%, 8%, 16%,
zusätzlich bei Standard-Audio-CDs 100% (nicht
bei MP3-Betrieb)
17 Taste ON/OFF zum Aktivieren und Deaktivieren
des Reglers PITCH CONTROL (21)
18 Tasten PITCH BEND zur Synchronisation des
Taktes eines Titels auf dem Laufwerk 1 an den
eines Titels auf dem Laufwerk 2
Solange eine der Tasten betätigt wird, ist die
Geschwindigkeit 16% niedriger bzw. höher.
19 Taste MEMO zum Speichern von Cue-Punkten
mit den Tasten CUE 1–3 (30) und zum Spei-
chern eines Titelabschnitts im Sampler
20 Taste SAM. (Sampler) zur Speicherung und Wie-
dergabe eines Titelabschnitts bis 10 Sekunden,
siehe Kapitel 5.13
21 Schieberegler PITCH CONTROL zum Ändern
der Geschwindigkeit (bei eingeschalteter Funk-
tion Mastertempo ohne Änderung der Tonhöhe,
siehe Kap. 5.11); die Einstellung des Reglers ist
nur bei gedrückter Taste ON/OFF (17) wirksam
22 Taste SEARCH, um das Drehrad REV/FWD (23)
auf die Funktion „schneller Vor-/Rücklauf“ umzu-
schalten; bei aktivierter Funktion leuchtet die
blaue LED neben der Taste
Hinweis: Wird das Drehrad im Wiedergabemo-
dus 8 Sekunden nicht betätigt, erlischt die blaue
LED und das Rad dient wieder für die Funktion
„Pitch Bend“
23 Drehrad REV/FWD
1. blaue LED neben der Taste SEARCH (22) aus:
für die Funktion „Pitch Bend“ und im Pausen-
modus zum exakten Anfahren einer bestimm-
ten Stelle
2. Taste SEARCH gedrückt, blaue LED leuchtet:
für den schnellen Vor- und Rücklauf
3. Taste SCRATCH gedrückt, rote LED über der
Taste leuchtet; blaue LED neben der Taste
SEARCH aus:
zum Erzeugen von Scratch-Effekten
4. Beim Laden von Hot-Cue-Punkten zur Aus-
wahl des Speicherplatzes (siehe Kap. 5.8.2)
24 Tasten zum Speichern und zur Wiedergabe von
zwei Endlosschleifen:
Taste A zum Bestimmen des Startpunktes einer
Schleife
Taste B/LOOP – EXIT zum Bestimmen des End-
punktes einer Endlosschleife und gleichzeiti-
gem Starten der Schleife; zum Verlassen der
Schleife die Taste erneut drücken
Taste RELOOP zum erneuten Abspielen der
Schleife
25 Taste BOP zum Zurückspringen und sofortigem
Starten der Wiedergabe ab dem Anfang eines
gerade laufenden Titels oder ab einem zuvor mit
der Taste CUE (26) gewählten Startpunkt
Durch mehrfaches kurzes Drücken dieser Taste
lassen sich Stottereffekte erzeugen.
26 Taste CUE zum Anspielen eines Titels und für
den Rücksprung zu einer zuvor bestimmten
Stelle (siehe Kapitel 5.4 bzw. 5.8.3)
27 Tasten TRACK zur Titelanwahl
Taste +10, um 10 Titel vorzuspringen
Taste zum Anwählen des nächsten Titels
Taste zum Sprung an den Anfang des gerade
laufenden Titels. Durch mehrfaches Drücken
der Taste wird immer ein Titel weiter zu-
rückgesprungen.
28 Taste zum Umschalten zwischen Wieder-
gabe und Pause
29 Taste BPM für manuellen Zählmodus des Beat-
counters (siehe Kap. 5.2.2)
30 Tasten CUE 1–3 zum Speichern und Anwählen
von bis zu drei Cue-Punkten (auch im Wiederga-
bemodus möglich); zum Speichern zuerst die
Taste MEMO (19) drücken
1.2 Laufwerkeinheit Frontseite (Abb. 4)
31 USB-Anschluss (Typ A) zum Einstecken eines
USB-Sticks oder zum Anschluss einer Festplatte
32 Betriebsanzeige
33 CD-Schublade
34 Taste zum Öffnen und Schließen der CD-
Schublade (nicht während der Wiedergabe oder
bei angewähltem USB-Anschluss möglich)
35 Ein-/Ausschalter POWER
36 Betriebsanzeige
1.3 Laufwerkeinheit Rückseite (Abb. 5)
37 3,5-mm-Mono-Klinkenbuchse für die Fernsteue-
rung der Funktion „Start/Pause“ des Laufwerks 2
von einem Mischpult aus – siehe Kapitel 6
38 digitaler Audioausgang DIGITAL OUT von Lauf-
werk 2
39 analoger Audioausgang LINE OUT mit Line-
Pegel von Laufwerk 2
40 Buchse zum Anschluss der Steuereinheit:
mit der Buchse REMOTE CONTROL/CON-
NECT TO MAIN UNIT 2 über eines der beilie-
genden Anschlusskabel verbinden
41 Netzkabel zum Anschluss an eine Steckdose
(230V~/50Hz)
42 Umschalter für die Art der Fernsteuerung über
die Buchsen START/PAUSE (37 und 43) – siehe
Kapitel 6
Position LOCK
für die Steuerung über einen Ein-/Ausschalter
Position TACT
für die Steuerung über einen Taster
14 Button MT to activate/deactivate the function
master tempo (pitch will remain constant when
the speed is changed, see chapter 5.11)
15 LEDs to indicate the speed adjusting range se-
lected with the button PITCH (16)
flashing = PITCH CONTROL (21) not activated
constant lighting = control activated with the but-
ton ON/OFF (17)
If all LEDs flash or light up, the 100% range is
selected.
16 Button PITCH to select the speed adjusting
range: 4%, 8%, 16%,
additionally for standard audio CDs 100% (not in
the MP3 mode)
17 Button ON/OFF to activate and deactivate the
PITCH CONTROL (21)
18 Buttons PITCH BEND to synchronize the beat of
a title on player mechanism 1 with a title on
player mechanism 2
As long as one of the buttons is actuated, the
speed will be 16% lower or higher.
19 Button MEMO to store Cue points with the but-
tons CUE 1–3 (30) and to store a title section in
the sampler
20 Button SAM. (sampler) to store and replay a title
section of up to 10 seconds, see chapter 5.13
21 Sliding control PITCH CONTROL to change the
speed (with the function master tempo activated,
the pitch will not be changed, see chapter 5.11);
the adjustment of the control will only be effective
with the button ON/OFF (17) pressed
22 Button SEARCH to switch the rotary wheel
REV/FWD (23) to the function “fast forward/
reverse”; with the function activated, the blue
LED next to the button will light up
Note: If the rotary wheel is not actuated for
8seconds in the replay mode, the blue LED will
be extinguished and the wheel will serve again
for the function “Pitch Bend”
23 Rotary wheel REV/FWD
1. blue LED next to the button SEARCH (22)
extinguished:
for the function “Pitch Bend” and in the pause
mode for precisely selecting a certain spot
2. button SEARCH pressed, blue LED lights up:
for fast forward/reverse
3. button SCRATCH pressed; red LED above the
button lights up; blue LED next to the button
SEARCH extinguished:
for creating scratch effects
4. for loading Hot Cue points to select the stor-
age location (see chapter 5.8.2)
24 Buttons to store and replay two continuous
loops:
button A for defining the starting point of a loop
button B/LOOP – EXIT for defining the end point
of a continuous loop and simultaneous start of
the loop; to exit the loop, press the button
once again
button RELOOP for replaying a loop once again
25 Button BOP for return and immediate start of the
replay from the beginning of a current title or
from a starting point previously defined with the
button CUE (26)
By repeated short actuation of this button, stutter
effects can be created.
26 Button CUE for short replay of a title beginning
and return to a spot previously defined (see
chapter 5.4 or 5.8.3)
27 Buttons TRACK for title selection
button +10 for advancing 10 titles
button for selecting the next title
button for returning to the beginning of the
current title. With each actuation of the button
, the unit will go back another title.
28 Button to switch between replay and pause
29 Button BPM for the manual counting mode of the
beat counter (see chapter 5.2.2)
30 Buttons CUE 1–3 to store and select up to three
Cue points (also possible in the replay mode); for
storing, press the button MEMO (19) first
1.2 Player mechanism unit, front panel (fig. 4)
31 USB port (type A) for connecting a USB stick or a
hard disk
32 Power LED
33 CD tray
34 Button to open and close the CD tray (not pos-
sible during the replay or with the USB port
selected)
35 POWER switch
36 Power LED
1.3 Player mechanism unit, rear panel (fig. 5)
37 3.5mm mono jack for remote control of the func-
tion “Start/Pause” of player mechanism 2 from a
mixer – see chapter 6
38 Digital audio output DIGITAL OUT of player
mechanism 2
39 Analog audio output LINE OUT with line level of
player mechanism 2
40 Jack for connecting the control unit:
connect it to the jack REMOTE CONTROL/
CONNECT TO MAIN UNIT 2 via one of the
cables supplied
41 Mains cable for connection to a socket (230V~/
50Hz)
42 Selector switch for the type of remote control via
the jacks START/PAUSE (37 and 43) – see
chapter 6
position LOCK
for control via an on/off switch
position TACT
for control via a momentary pushbutton switch
position CUE/PLAY
Via a control pulse sent by the mixer, the CD
player will be started from the Cue point/reset
to the Cue point and switched to pause when
the fader of the mixer is advanced/closed.
43 3.5mm mono jack for remote control of the func-
tion “Start/Pause” of player mechanism 1 from a
mixer – see chapter 6
6
GB
D
A
CH

Position CUE/PLAY
Der CD-Player wird bei Auf-/Zuziehen des
Mischpult-Faders über einen vom Mischpult
gesendeten Steuerimpuls vom Cue-Punkt aus
gestartet/auf den Cue-Punkt zurückgesetzt
und auf Pause geschaltet.
43 3,5-mm-Mono-Klinkenbuchse für die Fernsteue-
rung der Funktion „Start/Pause“ des Laufwerks 1
von einem Mischpult aus – siehe Kapitel 6
44 digitaler Audioausgang DIGITAL OUT von Lauf-
werk 1
45 analoger Audioausgang LINE OUT mit Line-
Pegel von Laufwerk 1
46 Buchse zum Anschluss der Steuereinheit:
mit der Buchse REMOTE CONTROL/CON-
NECT TO MAIN UNIT 1 über eines der beilie-
genden Anschlusskabel verbinden
2Hinweise für den sicheren Gebrauch
Das Gerät entspricht allen erforderlichen Richtlinien
der EU und ist deshalb mit gekennzeichnet.
Beachten Sie auch unbedingt die folgenden Punkte:
●Verwenden Sie das Gerät nur im Innenbereich.
Schützen Sie es vor Tropf- und Spritzwasser,
hoher Luftfeuchtigkeit und Hitze (zulässiger Ein-
satztemperaturbereich 0–40°C).
●Stellen Sie keine mit Flüssigkeit gefüllten Gefäße,
z.B. Trinkgläser, auf das Gerät.
●Die im Gerät entstehende Wärme muss durch
Luftzirkulation abgegeben werden. Decken Sie
die Lüftungsöffnungen nicht ab.
●Nehmen Sie das Gerät nicht in Betrieb und ziehen
Sie sofort den Netzstecker, wenn:
1. sichtbare Schäden am Gerät oder an der Netz-
anschlussleitung vorhanden sind,
2. nach einem Sturz oder Ähnlichem der Verdacht
auf einen Defekt besteht,
3. Funktionsstörungen auftreten.
Geben Sie das Gerät in jedem Fall zur Reparatur
in eine Fachwerkstatt.
●Eine beschädigte Netzanschlussleitung darf nur
durch eine Fachwerkstatt ersetzt werden.
●Ziehen Sie den Netzstecker nie am Kabel aus der
Steckdose, fassen Sie immer am Stecker an.
●Wird das Gerät zweckentfremdet, nicht richtig
angeschlossen, falsch bedient oder nicht fachge-
recht repariert, kann keine Haftung für daraus
resultierende Sach- oder Personenschäden und
keine Garantie für das Gerät übernommen werden.
3Einsatzmöglichkeiten
Der CD/MP3-Player CD-340USB mit zwei Laufwer-
ken ist speziell für den professionellen DJ-Bereich
konzipiert. Viele Funktionsmöglichkeiten sind genau
auf diesen Einsatzbereich abgestimmt, z.B. Einzel-
titelwiedergabe, automatischer Beatcounter, naht-
lose Wiedergabe von zwei Endlosschleifen oder
Speichern von 765 Hot-Cue-Punkten.
Auf dem CD-340USB lassen sich Standard-
Audio-CDs (CD-DA= compact disc digital audio) und
CDs mit Titeln im MP3-Format abspielen, auch selbst
gebrannte CDs (Audio CD-R). Bei wiederbeschreib-
baren CDs (CD-RW) kann es jedoch je nach CD-Typ,
verwendetem CD-Brenner und Brennprogramm
beim Abspielen zu Problemen kommen. Über die
USB-Schnittstelle lassen sich auch MP3-Dateien
von einer Festplatte oder von einem USB-Stick
abspielen.
Der CD/MP3-Player ist mit einem Anti-Schock-
Speicher ausgestattet, der Störungen beim Abtas-
ten der CD durch Stöße oder Vibrationen bis 10 Se-
kunden ausgleichen kann.
4Gerät aufstellen und anschließen
Die Steuer- und die Laufwerkeinheit sind für die
Montage in ein Rack (482mm/19") vorgesehen,
können aber auch als frei stehende Tischgeräte ver-
wendet werden. Die Laufwerkeinheit muss auf jeden
Fall waagerecht betrieben werden, während die
Steuereinheit beliebig, z.B. auch geneigt, eingebaut
werden kann. Für den Einbau in ein Rack werden für
die Steuereinheit 3HE und die Laufwerkeinheit 2 HE
benötigt (HE = Höheneinheit = 44,45mm).
Vor dem Anschluss bzw. vor dem Verändern von
Anschlüssen den CD/MP3-Player und die anzu-
schließenden Geräte ausschalten.
1) Die Steuer- und die Laufwerkeinheit mit den bei-
den beiliegenden Anschlusskabeln verbinden:
Buchse CONNECT TO REMOTE CONTROL 2
(40) der Laufwerkeinheit mit Buchse REMOTE
CONTROL/CONNECT TO MAIN UNIT 2 der
Steuereinheit und
Buchse CONNECT TO REMOTE CONTROL 1
(46) der Laufwerkeinheit mit Buchse REMOTE
CONTROL/CONNECT TO MAIN UNIT 1 der
Steuereinheit.
2) Sind an Ihrem Mischpult oder Verstärker Digital-
eingänge vorhanden, diese an die gelben Cinch-
Buchsen DIGITAL OUT (38 und 44) anschließen.
Bei Geräten ohne Digitaleingang die Stereo-
Ausgänge LINE OUT (39 und 45) – L= linker Ka-
nal, R = rechter Kanal – über Cinch-Kabel mit
den CD-Player-Eingängen am Mischpult oder am
Verstärker verbinden.
3) Die Laufwerke des CD-340USB können über ein
Mischpult mit Faderstart-Funktion gestartet und
auf Pause geschaltet werden. Zum Anschluss
der Steuerverbindung siehe Kapitel 6.
4) Zuletzt den Netzstecker des Anschlusskabels
(41) in eine Steckdose (230V~/50Hz) stecken.
Soll das Gerät endgültig aus dem Betrieb
genommen werden, übergeben Sie es zur
umweltgerechten Entsorgung einem örtli-
chen Recyclingbetrieb.
WARNUNG Das Gerät wird mit lebensgefähr-
licher Netzspannung (230V~) ver-
sorgt. Nehmen Sie deshalb niemals
selbst Eingriffe am Gerät vor und ste-
cken Sie nichts durch die Lüftungsöff-
nungen! Es besteht die Gefahr eines
elektrischen Schlages.
44 Digital audio output DIGITAL OUT of player
mechanism 1
45 Analog audio output LINE OUT with line level of
player mechanism 1
46 Jack for connecting the control unit:
connect it to the jack REMOTE CONTROL/
CONNECT TO MAIN UNIT 1 via one of the
connection cables supplied
2Safety Notes
This unit corresponds to all required directives of the
EU and is therefore marked with .
Please observe the following items in any case:
●The unit is suitable for indoor use only. Protect it
against dripping water and splash water, high air
humidity, and heat (admissible ambient tempera-
ture range 0–40°C).
●Do not place any vessel filled with liquid on the
unit, e.g. a drinking glass.
●The heat generated within the unit must be carried
off by air circulation. Never cover the air vents.
●Do not operate the unit or immediately disconnect
the plug from the mains socket
1. if there is visible damage to the unit or to the
mains cable,
2. if a defect might have occurred after the unit
was dropped or suffered a similar accident,
3. if malfunctions occur.
In any case the unit must be repaired by skilled
personnel.
●Adamaged mains cable must be replaced by
skilled personnel only.
●Never pull the mains cable to disconnect the
mains plug from the socket; always seize the plug.
●No guarantee claims for the unit and no liability for
any resulting personal damage or material
damage will be accepted if the unit is used for
other purposes than originally intended, if it is not
correctly connected, operated, or not repaired in
an expert way.
●Important for U.K. Customers!
The wires in this mains lead are coloured in
accordance with the following code:
blue = neutral
brown = live
As the colours of the wires in the mains lead of this
appliance may not correspond with the coloured
markings identifying the terminals in your plug,
proceed as follows:
1. The wire which is coloured blue must be con-
nected to the terminal in the plug which is
marked with the letter N or coloured black.
2. The wire which is coloured brown must be con-
nected to the terminal which is marked with the
letter L or coloured red.
3Applications
The CD/MP3 player CD-340USB with two player
mechanisms has been specially designed for pro-
fessional DJ applications. Many functional features
have precisely been matched to this range of ap-
plication, e.g. single title replay, automatic beat
counter, seamless replay of two continuous loops, or
storage of 765 Hot Cue points.
The CD-340USB allows to replay standard audio
CDs (CD-DA = compact disc digital audio) and CDs
with titles in MP3 format, even CDs you have burnt
yourself (audio CD-R). However, problems in replay-
ing rewritable CDs (CD-RW) may occur depending
on the CD type, the CD burner, and the burning soft-
ware used. Via the USB interface, MP3 files from a
hard disk or from a USB stick can also be replayed.
The CD/MP3 player is provided with an anti-
shock memory which is able to compensate shocks
or vibrations of up to 10 seconds occurring during
the CD sampling.
4Setting up and Connecting the Unit
The control unit and the player mechanism unit are
designed for installation into a rack (482mm/19"),
however, they can also be used as table top units. In
any case, the player mechanism unit must be
operated in a horizontal position while it is possible
to install the control unit as desired, e.g. also in an
inclined position. For rack installation, 3 rack spaces
are required for the control unit and 2 rack spaces for
the player mechanism unit (rack space = 44.45mm).
Prior to making or changing any connections,
switch off the CD/MP3 player and the units to be
connected.
1) Connect the control unit and the player mecha-
nism unit via the two connection cables supplied:
Jack CONNECT TO REMOTE CONTROL 2 (40)
of the player mechanism unit to the jack RE-
MOTE CONTROL/CONNECT TO MAIN UNIT 2
on the control unit
Jack CONNECT TO REMOTE CONTROL 1 (46)
of the player mechanism unit to the jack RE-
MOTE CONTROL/CONNECT TO MAIN UNIT 1
on the control unit
2) In case of digital inputs provided on the mixer or
amplifier, connect those to the yellow phono
jacks DIGITAL OUT (38 and 44).
In case of units without digital input, connect
the stereo outputs LINE OUT (39 and 45) – L =
left channel and R = right channel – via cables
with phono connectors to the inputs for the CD
player on the mixer or amplifier.
3) The player mechanisms of the CD-340USB can
be started or set to pause via a mixer with fader
If the unit is to be put out of operation de-
finitively, take it to a local recycling plant for
a disposal which is not harmful to the envi-
ronment.
WARNING The unit is supplied with hazardous
mains voltage (230V~). Leave servic-
ing to skilled personnel only and do
not insert anything into the air vents!
This may result in an electric shock.
7
GB
D
A
CH

5Bedienung
Die Bedienung der beiden Laufwerke ist vollkom-
men identisch.
5.1 CD, Festplatte oder USB-Stick abspielen
1) Den CD/MP3-Player mit dem Ein-/Ausschalter
POWER (35) einschalten. Ist eine CD eingelegt,
erscheinen nach dem Einlesevorgang im Display
(3) Informationen zum ersten Titel (Kap. 5.2). Ist
keine CD eingeschoben, wird (keine
CD) angezeigt.
2) Zum Einlegen einer CD die CD-Schublade (33)
mit der Taste (9 oder 34) öffnen. Im Display er-
scheint (offen). Die CD mit der Beschrif-
tung nach oben einlegen und die CD-Schublade
mit der Taste wieder schließen.
Soll nach dem Einlegen der CD der erste Titel
abgespielt werden, die CD-Schublade mit der
Taste (28) schließen.
3) Zusätzlich oder alternativ kann ein USB-Stick in
den USB-Anschluss (31) gesteckt oder eine Fest-
platte mit dem USB-Anschluss verbunden wer-
den. Zum Umschalten auf den USB-Anschluss
zuerst das Laufwerk mit der Taste TIME/STOP
(10) auf Stopp schalten. [Die Taste 2 Sek. gedrückt
halten, bis die Textzeile (s) STOP anzeigt.] Dann
die Taste MULTI (13) drücken und anschließend
die Zifferntaste 7 – USB/CD (12). Unten links im
Display wird (o) angezeigt. Zum Zurück-
schalten auf die CD die gleichen Tasten erneut
betätigen; das Display zeigt wieder an.
Hinweise
a) Solange der USB-Anschluss angewählt ist,
lässt sich die CD-Schublade auf der gleichen
Laufwerkseite nicht öffnen.
b) Bevor ein USB-Stick oder eine Festplatte vom
Gerät getrennt wird, muss das Laufwerk mit
der Taste TIME/STOP in den Stoppmodus
geschaltet werden. Anderenfalls können Fehl-
funktionen auftreten, die sich nur durch Aus-
und Wiedereinschalten des CD/MP3-Players
beheben lassen.
4) Zum Starten mit dem ersten Titel die Taste
(28) drücken (falls die CD-Schublade mit der
Taste geschlossen wurde). Während der Wie-
dergabe zeigt das Display das Symbol (n).
5) Zum Anwählen eines anderen Titels
a) die Titelnummer mit den Zifferntasten (12) an-
wählen oder
b) die Tasten TRACK (27) verwenden
Taste +10: 10 Titel weiterspringen
Taste : zum nächsten Titel springen
Taste : an den Anfang des gerade laufen-
den Titels springen. Durch weiteres Drücken
der Taste wird immer ein Titel weiter zu-
rückgesprungen.
Zum Überspringen mehrerer Titel die Taste
bzw. gedrückt halten.
6) Das Abspielen kann jederzeit mit der Taste
unterbrochen werden. Im Display erscheint das
Pausensymbol (p). Die Tasten und CUE
(26) blinken. Zum Weiterspielen die Taste er-
neut drücken.
7) Nach dem Einschalten steht das Gerät immer
auf Einzeltitelwiedergabe: Das Display zeigt
„SINGLE“ (e). Ist ein Titel zu Ende gespielt,
schaltet das Gerät am Anfang des nächsten
Titels auf Pause. Soll jedoch ein Titel nach dem
anderen kontinuierlich gespielt werden, mit der
Taste CONT./SINGLE (11) auf Gesamttitelwie-
dergabe schalten (siehe auch Kapitel 5.3.2).
8) Soll eine andere CD eingelegt werden, zuerst mit
der Taste auf Pause schalten, sonst lässt
sich die CD-Schublade mit der Taste nicht öff-
nen.
9) Vor dem Ausschalten des Gerätes immer die CD-
Schubladen mit den Tasten schließen, um die
Laser-Abtastsysteme vor Verschmutzung zu
schützen. Erst dann das Gerät mit dem Ein-/Aus-
schalter POWER abschalten.
5.1.1 Ordner bei MP3-Betrieb auswählen
Sind auf dem Tonträger (CD, Festplatte, USB-Stick)
mehrere Ordner mit Musikdateien vorhanden, las-
sen sich diese folgendermaßen anwählen:
1) Zuerst die Taste MULTI (13) drücken und dann
die Zifferntaste 9 – FOLDER (12). Im Display
erscheint anstelle der Anzeige „TRACK“ (q) jetzt
„DIR“ (r). Zusätzlich wird (folder select =
Ordneranwahl) angezeigt. Der Name des ange-
wählten Ordners erscheint in der Textzeile (s).
2) Mit der Taste oder (27) den gewünschten
Ordner anwählen. Dabei werden die Ordner in
folgender Reihenfolge durchlaufen und numme-
riert:
mit Titel auf der ohne Titel auf der
Hauptebene Hauptebene
Abb. 6 Ordnernummerierung
Die Ordnernummer (a) wird über der Anzeige
„DIR“ (r) angegeben. Befinden sich Titel auf der
Hauptebene, sind diese dem Ordner „ROOT“ mit
der Nr. 1 zugeordnet.
3) Nach der Ordnerauswahl mit der Taste MULTI
und der Zifferntaste 9 auf die Titelanwahl zurück-
schalten. Der erste Titel im Ordner ist angewählt.
Zum Anwählen anderer Titel die Zifferntasten
(12) oder die Tasten TRACK (27) betätigen.
ROOT 1
234
5
6
7
8
910
11
Title A
Title B
Title C
…
123
4
5
6
7
89
10
11
12
13
start function. For making the control connection
see chapter 6.
4) Finally connect the mains plug of the connection
cable (41) to a mains socket (230V~/50Hz).
5Operation
The operation of the two player mechanisms is iden-
tical.
5.1 Replaying a CD, hard disk, or USB stick
1) Switch on the CD/MP3 player with the POWER
switch (35). When a CD is inserted, information
concerning the first title (chapter 5.2) will be indi-
cated on the display (3) after the CD has been
read in. When no CD is inserted, (no
CD) will be displayed.
2) To insert a CD, open the CD tray (33) with the
button (9 or 34). The display will show .
Insert the CD with the lettering facing upwards
and close the CD tray with the button .
For playing the first title after inserting the CD,
close the CD tray with the button (28).
3) Additionally or alternatively, a USB stick or a hard
disk can be connected to the USB port (31). To
switch to the USB port, first set the player mecha-
nism to stop with the button TIME/STOP (10).
[Keep the button pressed for 2 seconds until the
text line (s) shows STOP.] Press the button
MULTI (13) and then the numerical key 7 –
USB/CD (12). In the lower left corner of the dis-
play, (o) will be indicated. To return to the
CD, actuate the same buttons once again; the
display will indicate again.
Notes
a) As long as a USB port is selected, it is not
possible to open the CD tray on the same side
of the player mechanism.
b) Before disconnecting a USB stick or a hard
disk from the unit, set the player mechanism
to stop with the button TIME/STOP, otherwise
malfunctions may occur which can only be
eliminated by switching off the CD/MP3 player
and switching it on again.
4) To start the CD with the first title, press the but-
ton (28) [if the CD tray was closed with the
button ]. While the CD is replayed, the symbol
(n) is displayed.
5) To select another title
a) select the title number with the numerical keys
(12) or
b) use the buttons TRACK (27)
button +10: for advancing 10 titles
button : for selecting the next title
button : for returning to the beginning of the
current title. With each actuation of the button
, the unit will go back another title.
To skip several titles, keep the button or
pressed.
6) The replay can be interrupted at any time with the
button . The pause symbol (p) will be dis-
played. The buttons and CUE (26) will start
flashing. To continue, press the button once
again.
7) After switching on, the unit is always set to single
title replay: “SINGLE” (e) is displayed. If a title is
played to the end, the unit is set to pause at the
beginning of the next title. However, for contin-
uous replay of one title after the other, set the unit
to total title replay with the button CONT./
SINGLE (11) [also see chapter 5.3.2].
8) For inserting another CD, first set the unit to
pause with the button , otherwise it will not be
possible to open the CD tray with the button .
9) Prior to switching off the unit, always close the
CD trays with the buttons to protect the laser
sampling systems from impurities. Then switch
off the unit with the POWER switch.
5.1.1Selecting a folder for MP3 mode
With several folders of music files on a sound carrier
(CD, hard disk, USB stick), select them as follows:
1) First press the button MULTI (13) and then the
numerical key 9 – FOLDER (12). Instead of
“TRACK” (q), “DIR” (r) will appear on the display.
In addition, (folder select) will be indica-
ted. The name of the folder selected will appear
in the text line (s).
2) Select the desired folder with the button or
(27). For this purpose, the sequence and num-
bering of the folders will be as follows:
with title in without title in
the root directory the root directory
Fig. 6 Numbering of folders
The folder number (a) is shown above the indication
“DIR” (r). If there are titles in the root directory, these
titles are assigned to the folder “ROOT” with the
number 1.
3) After selecting the folder, switch back to the title
selection with the button MULTI and the numeri-
cal key 9. The first title in the folder is selected. To
select other titles, actuate the numerical keys
(12) or the buttons TRACK (27).
ROOT 1
234
5
6
7
8
910
11
Title A
Title B
Title C
…
123
4
5
6
7
89
10
11
12
13
8
GB
D
A
CH

5.2 Anzeige der Titelnummer, Laufzeit, Takt-
schläge pro Minute und des Ruhemodus
In der Grundeinstellung nach dem Einschalten gibt
das Display folgende Informationen an:
1. die Anzahl der Titel (b) auf der CD oder im ange-
wählten Ordner
2. die angewählte Titelnummer (a)
3. die Restlaufzeit des angewählten Titels nume-
risch (t) und grafisch (u); die Sekunden sind in 75
sogenannte Frames (F) unterteilt
4. bei MP3-Titeln erscheint die Anzeige MP3 (d) im
Display und der Dateiname des angewählten
Titels in der Textzeile (s) [max. 30 Zeichen]
Sind bei einer MP3-Datei Angaben zum Titel,
Interpreten und Album gespeichert (ID3 Tags),
können diese in der Textzeile angezeigt werden.
Durch Drücken der Taste MULTI (13) und danach
der Zifferntaste 8 – ID3 (12) lässt sich die Text-
zeile in folgender Reihenfolge umschalten:
[Title] = Titel
[Album] = Name des Albums
[Artist] = Interpret
[File] = Dateiname
Die Laufzeitanzeige (t + u) lässt sich durch mehr-
faches kurzes Betätigen der Taste TIME/STOP (10)
umschalten (wird die Taste länger gedrückt, schaltet
das Laufwerk auf Stopp):
erster Tastendruck
die bereits gespielte Zeit des momentanen Titels;
Anzeige „ELAPSED“ (f)
weiterer Tastendruck
die Restzeit der gesamten CD; Anzeige „TOTAL
REMAIN“ (h + i) – nicht bei MP3-Betrieb möglich
weiterer Tastendruck
Grundeinstellung (Anzeige der Restzeit des lau-
fenden Titels); Anzeige „REMAIN“ (i)
5.2.1 Bargraf
Zusätzlich zur numerischen Laufzeitanzeige (t) stellt
der Bargraf (u) die Laufzeit grafisch durch seine
Länge dar. Die letzten 30 Sekunden eines Titels sig-
nalisiert der Bargraf durch Blinken in seiner vollen
Länge, wobei die letzten 15 Sekunden durch ein
schnelleres Blinken angezeigt werden.
5.2.2 Beatcounter
Nach dem Starten eines Titels ermittelt der Beat-
counter automatisch die Anzahl der Taktschläge pro
Minute. Nach kurzer Zeit erscheint die Anzahl unten
rechts im Display im Feld BPM (v). Kann der Beat-
counter keinen richtigen Wert ermitteln (z.B. bei
ruhigen Musiktiteln), in den manuellen Modus schal-
ten:
1) Die Taste BPM (29) 3 Sek. gedrückt halten, bis
das Symbol (w) erlischt.
2) Die Taste BPM im Takt der Musik einige Male
drücken, sodass die Anzahl der Taktschläge an-
gezeigt wird.
3) Zum Zurückschalten auf den automatischen
Zählmodus die Taste BPM erneut 3 Sek. ge-
drückt halten, bis das Symbol wieder er-
scheint.
5.2.3 Ruhemodus
Stehen beide CD-Laufwerke länger als 30 Minuten
auf Pause, schaltet das Gerät automatisch in den
Ruhemodus. Die beiden Laser-Abtastsysteme sind
dann abgeschaltet und werden somit geschont. Das
Display zeigt (Schlaf) und alle beleuchteten
Tasten sowie alle LEDs an der Steuereinheit er-
löschen. Durch Betätigen einer beliebigen Taste
wird in den vorherigen Betriebsmodus zurückge-
schaltet.
Hinweis: Steht ein Laufwerk auf Stopp, schaltet das
Gerät nicht in den Ruhemodus.
5.3 Betriebsart wählen
5.3.1 Einzeltitelwiedergabe
Nach dem Einschalten des CD/MP3-Players ist
immer die Einzeltitelwiedergabe aktiviert, die spezi-
ell für DJ-Anwendungen vorgesehen ist:
1. Das Display signalisiert „SINGLE“ (e).
2. Nach dem Einlesen des Tonträgers (CD, USB-
Stick, Festplatte) und nach dem Anwählen eines
Titels steht der CD/MP3-Player exakt an der
Stelle, an der die Musik beginnt (und nicht bei
Zeitindex 0:00:00).
Diese Stelle wird automatisch als Startpunkt
gespeichert. Das Display signalisiert dabei kurz
. Nach dem Starten des Titels kann mit der
Taste BOP(25) oder der Taste CUE (26) auf die-
sen Startpunkt zurückgesprungen werden.
3. Nach dem Spielen eines Titels schaltet das Gerät
exakt an der Stelle auf Pause, an der die Musik
des nächsten Titels beginnt. Diese Stelle ist dann
als neuer Startpunkt gespeichert.
5.3.2 Gesamttitelwiedergabe und
endlose Wiederholung aller Titel
1) Soll ein Titel nach dem anderen kontinuierlich
abgespielt werden, mit der Taste CONT./SINGLE
(11) auf Gesamttitelwiedergabe schalten. Das
Display springt von „SINGLE“ (e) auf „CONT“ (g)
um. Die Wiedergabe endet am Ende des letzten
Titels auf der CD oder am Ende des letzten Titels
im angewählten Ordner.
2) Sollen alle Titel auf der CD oder im angewählten
Ordner endlos wiederholt werden, die Taste
CONT./SINGLE erneut drücken. Im Display er-
scheint zusätzlich „TOTAL“ (c).
3) Zum Zurückschalten auf Einzeltitelwiedergabe
die Taste CONT./SINGLE noch einmal betätigen.
5.3.3 Relay-Betrieb – automatischer Start des
anderen Laufwerks
Am Ende eines Titels oder am Ende des letzten
Titels kann automatisch das andere Laufwerk ge-
startet werden. Zuerst auf jeder Laufwerkseite ent-
weder eine CD einlegen, einen USB-Stick ein-
stecken oder eine Festplatte anschließen. (Zum
Anwählen des USB-Anschlusses siehe Kapitel 5.1,
Bedienschritt 3.) Dann erst die Taste RELAY (4)
betätigen. Die LED über der Taste blinkt.
5.2 Indication of title number, playing time,
beats per minute, and sleep mode
In the basic setting after switching on, the following
information will be displayed:
1. the number of titles (b) on the CD or in the folder
selected
2. the title number selected (a)
3. the remaining time of the title selected, both
numerically (t) and graphically (u); the seconds
are divided into 75 so-called frames (F)
4. for MP3 titles, the indication MP3 (d) will appear
on the display and the file name of the title select-
ed in the text line (s) [30 characters max.]
If, in case of an MP3 file, information on the title,
artist, and album (ID3 tags) is stored, this infor-
mation may be indicated in the text line. When
the button MULTI (13) is pressed and then the
numerical key 8 – ID3 (12), it will be possible to
switch over the text line in the following order:
[Title]
[Album]
[Artist]
[File]
By repeated short actuation of the button TIME/
STOP(10), it will be possible to switch over the play-
ing time indication (t + u) [if the button is pressed for
a longer time, the player mechanism will stop]:
1st actuation of button:
the time already played of the current title; indica-
tion “ELAPSED” (f)
next actuation of button:
the remaining time of the entire CD; indication
“TOTAL REMAIN” (h + i) – not possible in the
MP3 mode
next actuation of button:
basic setting (indication of the remaining time of
the current title); indication “REMAIN” (i)
5.2.1 Bar graph
In addition to the numerical time indication (t), the
bar graph (u) will indicate the playing time graphi-
cally by its length. The last 30 seconds of a title will
be indicated by the bar graph flashing in its full
length, the last 15 seconds by even faster flashing.
5.2.2 Beat counter
After the start of a title, the beat counter will auto-
matically determine the number of beats per minute.
After a short time, the number will appear in the
lower right corner of the display in the field BPM (v).
If the beat counter is not able to determine a useful
value (e.g. in case of calm music titles), switch to
the manual mode:
1) Keep the button BPM (29) pressed for 3 seconds
until the symbol (w) disappears.
2) Press the button BPM several times to the beat of
the music so that the number of beats will be indi-
cated.
3) To return to the automatic counting mode, keep
the button BPM pressed again for 3 seconds until
the symbol reappears.
5.2.3 Sleep mode
If both CD player mechanisms are set to pause for a
period exceeding 30 minutes, the unit will automati-
cally go to sleep mode. In this case, both laser sam-
pling systems will be switched off in order to protect
and save them. will be displayed and all illu-
minated buttons and all LEDs on the control unit will
be extinguished. By actuation of any button, the unit
will return to the previous operating mode.
Note: With a player mechanism set to stop, the unit
will not go to sleep mode.
5.3 Selecting the operating mode
5.3.1 Single title replay
After switching on the CD/MP3 player, the single
title replay specially provided for DJ applications is
always activated:
1. The display will indicate “SINGLE” (e).
2. After reading in the sound carrier (CD, USB stick,
hard disk) and after selecting a title, the CD/MP3
player will be precisely on the spot where the
music starts (not at the time index 0:00:00).
This spot will automatically be stored as a
starting point. The display will shortly indicate
. After starting the title, it will be possible to
return to this starting point with the button BOP
(25) or the button CUE (26).
3. After replaying a title, the unit will be set to pause
precisely on the spot where the music of the next
title starts. This spot will then be stored as a new
starting point.
5.3.2 Total title replay and continuous repeat of
all titles
1) For continuous replay of one title after the other,
switch to total title replay with the button CONT./
SINGLE (11). The display will switch from
“SINGLE” (e) to “CONT” (g). The replay will stop
at the end of the last title on the CD or at the end
of the last title in the folder selected.
2) For continuous repeat of all titles on the CD or in
the folder selected, press the button CONT./
SINGLE once again. The display will additionally
indicate “TOTAL” (c).
3) To return to single title replay, actuate the button
CONT./SINGLE once again.
5.3.3 Relay mode – Automatic start of the other
player mechanism
At the end of a title or at the end of the last title, the
other player mechanism can be started automati-
cally. In each player mechanism, either insert a CD
or connect a USB stick or hard disk. (To select the
USB port, see chapter 5.1, operating step 3.) Then
actuate the button RELAY (4). The LED above the
button will flash.
9
GB
D
A
CH

AStart des anderen Laufwerks am Ende eines Titels
1) Beide Laufwerke mit der Taste CONT./SINGLE
(11) auf Einzeltitelwiedergabe schalten:
„SINGLE“ (e) muss in beiden Displays angezeigt
werden.
2) Die Wiedergabe auf einem Laufwerk mit der
Taste (28) starten. Das andere Laufwerk
muss auf Pause geschaltet sein (Anzeige ).
Sobald der Titel zu Ende gespielt ist, schaltet die-
ses Laufwerk auf Pause und das andere Lauf-
werk startet. Der Vorgang wird bis zum Ausschal-
ten des Relay-Betriebs endlos wiederholt. (Zum
Ausschalten die Taste RELAY erneut drücken.)
3) An jeder Stelle eines Titels kann mit der Taste
zusätzlich die Wiedergabe von einem zum
anderen Laufwerk umgeschaltet werden.
4) Wird bei dem auf Pause stehenden Laufwerk eine
andere CD eingelegt, anschließend wieder den
Relay-Betrieb mit der Taste RELAY aktivieren. Vor
dem Wechseln eines USB-Sticks oder einer Fest-
platte unbedingt zuvor das Laufwerk mit der Taste
TIME/STOP (10) in den Stoppmodus schalten
(Taste 2 Sek. gedrückt halten)!
Hinweis: Wird in dieser Betriebsart die Taste CUE
(26) des wiedergebenden Laufwerks betätigt, wech-
selt die Wiedergabe zum anderen Laufwerk. Wird
an dem auf Pause stehenden Laufwerk die Taste
CUE gedrückt gehalten, erfolgt die Wiedergabe von
diesem Laufwerk so lange, bis die Taste gelöst wird.
BStart des anderen Laufwerks am Ende des letzten
Titels
1) Beide Laufwerke mit der Taste CONT./SINGLE
(11) auf Gesamttitelwiedergabe schalten:
„CONT“ (g) muss in beiden Displays angezeigt
werden, ohne dass „TOTAL“ (c) erscheint.
2) Ein Laufwerk auf Stopp schalten: Die Taste TIME/
STOP (10) so lange gedrückt halten, bis die Text-
zeile (s) STOP anzeigt.
3) Die Wiedergabe auf dem anderen Laufwerk mit
der Taste (28) starten. Nach dem Abspielen
des letzten Titels auf der CD, auf dem USB-Stick,
auf der Festplatte oder im angewählten Ordner
startet das andere Laufwerk. Der Vorgang wie-
derholt sich bis zum Ausschalten des Relay-
Betriebs. (Zum Ausschalten die Taste RELAY er-
neut drücken.)
4) Wird bei dem auf Stopp stehenden Laufwerk die
CD, der USB-Stick oder die Festplatte gewechselt,
anschließend wieder den Relay-Betrieb mit der
Taste RELAY aktivieren und das Laufwerk mit der
Taste TIME/STOP in den Stoppmodus schalten.
5.4 Anspielen eines Titels
Mit der Taste CUE (26) lässt sich ein Titel anspielen,
solange diese Taste gedrückt gehalten wird. Nach
dem Loslassen der Taste CUE springt das Gerät auf
den Titelanfang zurück und schaltet auf Pause.
1) Wenn die Betriebsart Gesamttitelwiedergabe ein-
geschaltet ist [Anzeige „CONT“ (g)], das Laufwerk
mit der Taste (28) auf Pause schalten.
2) Den gewünschten Titel mit den Zifferntasten (12)
oder den Tasten TRACK (27) wählen.
3) Sobald die Laufzeit (t) des Titels im Display er-
scheint, kann der Titel durch Gedrückthalten der
Taste CUE angespielt werden.
5.5 Funktion OUTRO
Die Funktion OUTRO dient zum Abspielen der je-
weils letzten 30 Sekunden der folgenden Titel. Sie
kann jedoch nicht für MP3-Titel genutzt werden.
1) Zum Einschalten der Funktion die Taste CONT./
SINGLE – OUTRO (11) ca. 3 Sekunden gedrückt
halten, bis im Display „OUTRO“ (j) angezeigt wird.
2) Den gewünschten Titel mit den Zifferntasten (12)
oder den Tasten TRACK (27) wählen. Steht das
Laufwerk auf Pause, die Wiedergabe mit der
Taste (28) starten. Die letzten 30 Sekunden
des Titels werden abgespielt.
3) Zum Ausschalten der Funktion OUTRO entweder
die Taste TIME/STOP (10) kurz betätigen oder die
Taste CONT./SINGLE – OUTRO erneut ca. 3 Sek.
gedrückt halten, bis im Display „OUTRO“ erlischt.
5.6 Schneller Vor- und Rücklauf
Soll ein Titel schnell vor- oder zurücklaufen, zuerst
die Taste SEARCH (22) drücken. Die blaue LED
neben der Taste leuchtet auf und in der Textzeile (s)
des Displays wird kurz „SEARCH“ angezeigt. Das
Drehrad REV/FWD (23) in die entsprechende Rich-
tung drehen. Die Vor- bzw. Rücklaufgeschwindigkeit
hängt von der Drehgeschwindigkeit des Rads ab.
Hinweise
a) Im Pausenmodus wird nach einem Vor- oder
Rücklauf die momentane Stelle ständig wieder-
holt, bis die Wiedergabe mit der Taste (28)
gestartet oder die Taste CUE (26) zweimal kurz
gedrückt wird.
b) Wird das Drehrad im Wiedergabemodus 8 Sek.
nicht betätigt, erlischt die blaue LED und das Rad
dient wieder für die Funktion „Pitch Bend“
(Kap.5.12).
5.7 Genaues Anfahren einer bestimmten
Stelle
Zum exakten Anfahren einer Stelle bis auf 1 Frame
(1/75 Sekunde) genau bei eingeschalteter Pause das
Drehrad REV/FWD (23) entsprechend drehen.
Sollte die blaue LED neben der Taste SEARCH (22)
leuchten, ist die Funktion „schneller Vor-/Rücklauf“
aktiviert. Diese zuvor mit der Taste SEARCH aus-
schalten. Nach dem Drehen wird die momentane
Stelle so lange wiederholt, bis die Taste (28)
gedrückt oder die Taste CUE (26) kurz zweimal
angetippt wird.
AStart of the other player mechanism at the end of a
title
1) Set both player mechanisms to single title replay
with the button CONT./SINGLE (11):
“SINGLE” (e) must appear on both displays.
2) Start the replay on one player mechanism with
the button (28). The other player mechanism
must be set to pause (indication ). As soon as
the title has been played to the end, this player
mechanism is set to pause and the other player
mechanism will start. This procedure will be con-
tinuously repeated until the relay mode is deac-
tivated. (To switch off this mode, actuate the but-
ton RELAY once again.)
3) On any spot of a title, the replay can additionally
be switched from one player mechanism to the
other with the button .
4) If another CD is inserted in the player mechanism
set to pause, reactivate the relay mode with the
button RELAY. Prior to changing a USB stick or a
hard disk, always set the player mechanism to
stop with the button TIME/STOP (10) [keep the
button pressed for 2 seconds]!
Note: If the button CUE (26) of the replaying player
mechanism is actuated in this operating mode, the
replay will change to the other player mechanism. If
the button CUE is kept pressed on the player
mechanism set to pause, the replay from this player
mechanism will continue until the button is released.
BStart of the other player mechanism at the end of
the last title
1) Set both player mechanisms to total title replay
with the button CONT./SINGLE (11):
“CONT” (g) must appear on both displays, how-
ever, “TOTAL” (c) must not appear.
2) Set one player mechanism to stop: Keep the but-
ton TIME/STOP (10) pressed until the text line
(s) shows STOP.
3) Start the replay on the other player mechanism
with the button (28). At the end of the last title
on the CD, on the USB stick, on the hard disk, or
in the folder selected, the other player mecha-
nism will start. This procedure will be contin-
uously repeated until the relay mode is deactivat-
ed. (To deactivate the mode, actuate the button
RELAY once again.)
4) If the CD, the USB stick, or the hard disk is
changed in the player mechanism set to stop,
reactivate the relay mode with the button RELAY
and set the player mechanism to stop with the
button TIME/STOP.
5.4 Short replay of a title beginning
Keep the button CUE (26) pressed for short replay
of a title beginning. After releasing the button CUE,
the unit will return to the title beginning and is set to
pause.
1) If the total title replay mode has been activated
[indication “CONT” (g)], set the player mecha-
nism to pause with the button (28).
2) Select the desired title with the numerical keys
(12) or with the buttons TRACK (27).
3) As soon as the playing time (t) of the title appears
on the display, it is possible to shortly play the title
beginning by keeping the button CUE pressed.
5.5 Function OUTRO
The function OUTRO serves for replay of the last
30 seconds each of the following titles. However, it
cannot be used for MP3 titles.
1) To activate the function, keep the button CONT./
SINGLE – OUTRO (11) pressed for approx. 3 sec-
onds until “OUTRO” (j) appears on the display.
2) Select the desired title with the numerical keys
(12) or the buttons TRACK (27). If the player
mechanism is set to pause, start the replay with
the button (28). The last 30 seconds of the
title will be replayed.
3) To deactivate the function OUTRO, either shortly
actuate the button TIME/STOP (10) or keep the
button CONT./SINGLE – OUTRO pressed again
for approx. 3 seconds until “OUTRO” disappears
from the display.
5.6 Fast forward and reverse
For fast forward or reverse of a title, first press the
button SEARCH (22). The blue LED next to the
button will light up and “SEARCH” will shortly be
indicated in the text line (s) of the display. Turn the
rotary wheel REV/FWD (23) in the corresponding
direction. The forward/reverse speed depends on
the turning speed of the wheel.
Notes
a) In the pause mode, the current spot is constantly
repeated after fast forward or reverse until the
replay is started with the button (28) or the
button CUE (26) is shortly pressed twice.
b) If the rotary wheel is not actuated for 8 seconds in
the replay mode, the blue LED will be extin-
guished and the wheel will serve again for the
function “Pitch Bend” (chapter 5.12).
5.7 Precise selection of a certain spot
To precisely select a spot to 1 frame (1/75 second),
turn the rotary wheel REV/FWD (23) correspond-
ingly in the pause mode. If the blue LED next to the
button SEARCH (22) lights up, the function “fast for-
ward/reverse” is activated. Switch it off beforehand
with the button SEARCH. After turning, the current
spot will be constantly repeated until the button
(28) is pressed or the button CUE (26) is shortly
pressed twice.
10
GB
D
A
CH

5.8 Sprung zu einer zuvor bestimmten Stelle
Um schnell zu einer bestimmten Stelle springen zu
können, lassen sich mit den Tasten CUE 1 bis 3 (30)
drei Startpunkte (Cue-Punkte) speichern.
Zusätzlich kann mit der Taste CUE (26) ein
weiterer Startpunkt bestimmt werden. Dieser wird
jedoch im Einzeltitelmodus beim Erreichen oder
Anwählen des nächsten Titels mit dem Anfangs-
punkt des nächsten Titels überschrieben (ggf. auf
Gesamttitelwiedergabe umschalten – Kap. 5.3.2).
Hinweis: Wird ein Titel rückwärts abgespielt (Kap.
5.14), kann kein Cue-Punkt gespeichert werden.
5.8.1 Tasten CUE 1 bis 3
1) Zuerst die Taste MEMO (19) drücken, um die Spei-
cherung zu aktivieren. Die Taste MEMO leuchtet.
2) Entweder während der Wiedergabe eines Titels
eine der Tasten CUE 1 bis 3 drücken, wenn die
gewünschte Stelle erreicht ist (Fly-Cue) oder an
der gewünschten Stelle mit der Taste (28) auf
Pause schalten, die Stelle exakt mit dem Drehrad
(23) anfahren und dann eine der CUE-Tasten
(30) drücken. Diese blinkt einige Male und leuch-
tet dann kontinuierlich. Die Taste MEMO erlischt.
3) Die Bedienschritte 1 und 2 für das Bestimmen
weiterer Cue-Punkte wiederholen.
4) Mit den CUE-Tasten (30) kann nun auf die zu-
gehörigen Cue-Punkte gesprungen werden.
5.8.2 Speichern von Hot-Cue-Punkten
Beim Öffnen der CD-Schublade oder Ausschalten
des Gerätes werden die Cue-Punkte gelöscht. Für
Standard-Audio-CDs (CD-DA) können die mit den
CUE-Tasten (30) festgelegten Cue-Punkte jedoch
dauerhaft als Hot-Cue-Punkte gespeichert werden.
Dazu sind 255 Speicherplätze vorhanden. Auf
jedem Speicherplatz lassen sich die 3 momentanen
Cue-Punkte speichern, insgesamt also bis zu 765
Hot-Cue-Punkte. Nach dem erneuten Einlegen
einer Standard-Audio-CD kann der CD/MP3-Player
die dazugehörigen Cue-Punkte bereitstellen.
1) Bis zu drei Cue-Punkte bestimmen (Kap. 5.8.1).
2) Zum dauerhaften Speichern zuerst die Taste
MULTI (13) drücken und dann die Zifferntaste
1 – STORE (12). Die Textzeile (s) des Displays
zeigt kurz „Store 01/254“. Die Ziffer vor dem
Schrägstrich gibt an, wie viele Speicherplätze für
die eingelegte CD belegt wurden, die Ziffern da-
hinter wie viele Speicherplätze noch frei sind.
3) Zum Speichern weiterer Hot-Cue-Punkte für die
gleiche CD oder für andere CDs die Bedien-
schritte 1 und 2 wiederholen.
4) Zum Aufrufen von gespeicherten Hot-Cue-Punk-
ten das Laufwerk mit der Taste (28) auf
Pause schalten. Dann die Taste MULTI drücken
und anschließend die Zifferntaste 2 – RECALL.
Das Display zeigt „Recall 01/01“ an, wenn für die
CD nur ein Speicherplatz belegt wurde oder z.B.
„Recall 04/04“, wenn vier Speicherplätze für die
CD belegt wurden. Sind keine Hot-Cue-Punkte
für die CD gespeichert, erscheint kurz die An-
zeige „No Memory“.
5) Ist nur ein Speicherplatz für die CD belegt (An-
zeige „Recall 01/01“), mit dem Bedienschritt 6
fortfahren. Sind mindestens zwei Speicherplätze
belegt, mit dem Drehrad (23) den Speicherplatz
mit den gewünschten Hot-Cue-Punkten wählen,
z.B. „Recall 02/04“ = der zweite Speicherplatz
von insgesamt vier belegten Plätzen.
6) Zum Laden der Hot-Cue-Punkte die Taste drü-
cken. Das Display zeigt während des Ladens blin-
kend „Buffer CUE“ an. Die Tasten CUE (30) leuch-
ten auf und die Hot-Cue-Punkte sind verfügbar.
7) Wurden weitere Hot-Cue-Punkte für die gleiche
CD gespeichert und sollen diese geladen wer-
den, die Bedienschritte 4–6 wiederholen.
8) Die 255 Speicherplätze für die Hot-Cue-Punkte
können alle gemeinsam gelöscht werden, um
z.B. andere Hot-Cue-Punkte zu speichern. Dazu
erst die Taste MULTI drücken und dann die Zif-
ferntaste 0 – CLEAR. Die Textzeile (s) zeigt kurz
„Clear Memory“ an.
5.8.3 Taste CUE
1) Während des Abspielens eines Titels mit der Taste
(28) auf Pause schalten, wenn die Stelle
erreicht ist, zu der später zurückgesprungen wer-
den soll. Die Tasten und CUE (26) blinken.
2) Bei Bedarf kann mit dem Drehrad (23) die Stelle
exakter angefahren werden. Die momentane
Stelle ist fortlaufend zu hören.
3) Die Taste CUE (26) drücken und die Stelle wird
intern markiert. Die Taste CUE leuchtet jetzt kon-
tinuierlich. Die Taste blinkt weiter als Auffor-
derung die Wiedergabe zu starten.
4) Das Abspielen mit der Taste wieder starten.
5) Mit der Taste BOP (25) oder der Taste CUE auf
die markierte Stelle zurückspringen:
Bei Rücksprung mit der Taste BOP startet die
Wiedergabe sofort ab der markierten Stelle.
Bei Rücksprung mit der Taste CUE steht das
Laufwerk an der markierten Stelle auf Pause. Mit
der Taste die Wiedergabe starten oder die
Taste CUE gedrückt halten. Nach dem Lösen der
Taste CUE steht das Laufwerk wieder an der
markierten Stelle auf Pause.
5.9 Stottereffekte erzeugen
Die mit den Tasten CUE (26 und 30) gespeicherten
Cue-Punkte (Kap. 5.8) können auch zum Erzeugen
von interessanten Stottereffekten genutzt werden:
a) Durch mehrfaches kurzes Drücken einer der
Tasten CUE 1 bis 3 (30) entsteht ein Stottereffekt.
Dieser ist dabei umso effektiver, je geeigneter der
Cue-Punkt ist (z.B. Instrumenteneinsatz oder
Anfang eines Wortes).
b) Für einen Stottereffekt von dem mit der Taste
CUE (26) gespeicherten Cue-Punkt die Taste
BOP (25) mehrfach kurz drücken.
5.8 Return to a spot previously defined
To quickly find a desired spot, three starting points
(Cue points) can be stored with the buttons CUE 1
to 3 (30).
In addition, another starting point can be defined
with the button CUE (26), however, in the single title
replay mode, this point will be overwritten with the
starting point of the next title when the next title is
reached or when the next title is selected (switch to
total title replay, if required – chapter 5.3.2).
Note: In case of reverse replay of a title (chapter
5.14), it will not be possible to store a Cue point.
5.8.1 Buttons CUE 1 to 3
1) First press the button MEMO (19) to activate the
memory. The button MEMO will light up.
2) During replay of a title, either press one of the
buttons CUE 1 to 3 when the desired spot is
reached (Fly Cue) or set the unit to pause at the
desired spot with the button (28), use the
rotary wheel (23) to go to the precise spot, then
press one of the CUE buttons (30). It will flash
several times and then light permanently. The
button MEMO will be extinguished.
3) Repeat steps 1 and 2 for defining further Cue
points.
4) The CUE buttons (30) can now be used to return
to the corresponding Cue points.
5.8.2 Storing Hot Cue points
When the CD tray is open or when the unit is switched
off, the Cue points will be deleted. For standard
audio CDs (CD-DA), however, the Cue points
defined with the CUE buttons (30) can be perma-
nently stored as Hot Cue points. For this purpose,
255 storage locations are available. On each storage
location, the 3 current Cue points can be stored, i.e.
a maximum of 765 Hot Cue points. After reinserting
a standard audio CD, the CD/MP3 player will be able
to make the corresponding Cue points available.
1) Define up to three Cue points (chapter 5.8.1).
2) For permanent storage, first press the button
MULTI (13) and then the numerical key 1 –
STORE (12). The text line (s) of the display will
shortly show “Store 01/254”. The number on the
left of the slash will indicate the storage locations
reserved for the CD inserted; the numbers on the
right of it the storage locations still free.
3) For storing further Hot Cue points for the same
CD or other CDs, repeat steps 1 and 2.
4) For recalling stored Hot Cue points, set the
player mechanism to pause with the button
(28). Press the button MULTI and then the nu-
merical key 2 – RECALL. The display will show
“Recall 01/01” if only one storage location has
been reserved for the CD or e.g. “Recall 04/04”
if four storage locations have been reserved for
the CD. If no Hot Cue points have been stored for
the CD, “No Memory” will shortly be indicated.
5) If only one storage location has been reserved for
the CD (indication “Recall 01/01”), proceed with
operating step 6. If at least two storage locations
have been reserved, select the storage location
with the desired Hot Cue points with the rotary
wheel (23), e.g. “Recall 02/04” = the second
storage location of a total of four locations re-
served.
6) For loading the Hot Cue points, press the button
. While loading, the display will indicate “Buf-
fer CUE” by flashing. The buttons CUE (30) will
light up and the Hot Cue points will be available.
7) For loading further Hot Cue points stored for the
same CD, repeat steps 4–6.
8) The 255 storage locations for the Hot Cue points
can all be deleted together, e.g. for storing other
Hot Cue points. For this purpose, first press the
button MULTI and then the numerical key 0 –
CLEAR. The text line (s) will shortly show “Clear
Memory”.
5.8.3 Button CUE
1) While replaying a title, set the unit to pause with
the button (28) when the spot is reached to
which the unit is to return later. The buttons
and CUE (26) will flash.
2) If required, the spot can be selected more pre-
cisely with the rotary wheel (23). The current spot
will be continuously replayed.
3) Press the button CUE (26). Thus, the spot will be
internally marked. The button CUE will light per-
manently. The button will continue to flash as
a request to start the replay.
4) Restart the replay with the button .
5) It is now possible to return to the marked spot
with the button BOP (25) or the button CUE:
When returning with the button BOP, the
replay will start immediately from the marked
spot.
When returning with the button CUE, the
player mechanism will be set to pause at the
marked spot. Start the replay with the button
or keep the button CUE pressed. After releasing
the button CUE, the player mechanism will be set
to pause again on the marked spot.
5.9 Creating stutter effects
The Cue points stored with the buttons CUE (26 and
30) [chapter 5.8] can also be used for creating inter-
esting stutter effects:
a) When one of the buttons CUE 1 to 3 (30) is
shortly pressed several times, a stutter effect will
be created. The more suitable the Cue point (e.g.
start of a musical instrument or beginning of a
word), the more effective the stutter effect.
b) For a stutter effect starting from the Cue point
stored with the button CUE (26), shortly press the
button BOP (25) several times.
11
GB
D
A
CH

5.10 Endlosschleife abspielen
Ein bestimmter Abschnitt auf dem Tonträger (CD,
USB-Stick, Festplatte) kann als nahtlose Endlos-
schleife beliebig oft wiederholt werden. Zwei unab-
hängige Schleifen lassen sich mit den Tasten A und
B/LOOP – EXIT (24) speichern.
1) Mit der Taste (28) auf Wiedergabe schalten.
Ist der Startpunkt der gewünschten Schleife er-
reicht (Punkt a in Abb. 7), die Taste A antippen.
Im Display erscheint „A1“ bzw. „A2“ (k).
Abb. 7 Endlosschleife abspielen
2) Ist beim Weiterlaufen der Wiedergabe das ge-
wünschte Ende der Schleife erreicht (Punkt b),
die Taste B/LOOP – EXIT drücken. Der Abschnitt
zwischen den Punkten a und b wird fortlaufend
wiederholt. Im Display blinkt das Symbol (k).
3) Um die Schleife zu verlassen und den Titel wei-
terzuspielen, die Taste B/LOOP – EXIT erneut
drücken. Das Symbol hört auf zu blinken.
Durch Anwählen eines anderen Titels wird die
Schleife ebenfalls verlassen. Zum erneuten Ab-
spielen der Schleife die Taste RELOOP drücken.
Abb. 8 Endlosschleife beenden und erneut starten
Tipps
a) Zwischen dem Start- und dem Endpunkt einer
Endlosschleife müssen mindestens 10 Frames
liegen (= 0,13s), sonst wird die Schleife weder
gespeichert noch gestartet.
b) Der Start- und der Endpunkt einer Endlosschleife
lassen sich auch auf 1 Frame genau festlegen:
1) Beim Erreichen des Startpunktes zuerst mit
der Taste auf Pause schalten. Den Punkt
genau mit dem Drehrad (23) anfahren. Dann
die Taste Adrücken.
2) Jetzt entweder den Endpunkt direkt mit dem
Drehrad anfahren oder zuerst die Wiedergabe
mit der Taste starten, beim Erreichen des
Endpunktes wieder mit der Taste auf
Pause schalten und den Endpunkt genau mit
dem Drehrad anfahren.
3) Nachdem der Endpunkt eingestellt ist, die
Taste B/LOOP – EXIT betätigen. Die Endlos-
schleife startet.
c) Zum Speichern einer anderen Endlosschleife
den Start- und den Endpunkt mit den Tasten A
und B/LOOP – EXIT einfach neu festlegen.
5.11 Geschwindigkeit mit oder ohne Ton-
höhenverschiebung verändern
Die Geschwindigkeit lässt sich mit dem Schiebereg-
ler PITCH CONTROL (21) um max. ±100%, bei
MP3-Betrieb um max. 16% ändern:
+100% = doppelte Geschwindigkeit
-
100% = Stillstand
1) Den Einstellbereich mit der Taste PITCH (16)
wählen. Die LEDs (15) zeigen den Bereich an:
4%, 8%, 16%. Blinken alle drei LEDs, beträgt
der Einstellbereich 100%. Das Blinken der LEDs
signalisiert, dass der Regler PITCH CONTROL
nicht aktiviert ist.
2) Die Taste ON/OFF (17) drücken. Damit ist der
Regler PITCH CONTROL aktiviert und die ent-
sprechende LED (15) leuchtet konstant.
3) Die Geschwindigkeit mit dem Schieberegler
PITCH CONTROL verändern. Das Display zeigt
die prozentuale Abweichung von der Standardge-
schwindigkeit im Feld PITCH (m) an. Die Anzahl
der Taktschläge (v) ändert sich entsprechend.
4) Zwischen der mit dem Schieberegler eingestell-
ten Geschwindigkeit und der Standardgeschwin-
digkeit kann jederzeit mit der Taste ON/OFF (17)
umgeschaltet werden.
5) Mit dem Verändern der Geschwindigkeit ändert
sich auch proportional die Tonhöhe. Wird mit der
Taste MT (14) die Funktion Mastertempo einge-
schaltet, bleibt die Tonhöhe jedoch konstant. Im
Display erscheint die Anzeige KEY (l). Zum
Ausschalten der Funktion Mastertempo die Taste
MT erneut drücken.
Hinweis: Bei aktiviertem Mastertempo können je
nach eingestellter Geschwindigkeit verschiedene
Effekte auftreten. Diese sind systembedingt und
lassen sich zu interessanten Klangveränderun-
gen nutzen.
5.12 Pitch Bend – Takt zwischen 2 Musik-
stücken angleichen
Mit den Tasten PITCH BEND (18) lässt sich der Takt
eines Titels auf dem Laufwerk 1 an den Takt eines
Titels auf Laufwerk 2 anpassen (synchronisieren)
oder umgekehrt. Dadurch wird beim Überblenden
von einem zum anderen Titel der Rhythmus beim
Tanzen nicht unterbrochen.
1) Zuerst mit dem Regler PITCH CONTROL (21) die
Geschwindigkeit des laufenden Musikstückes an
die Geschwindigkeit des zweiten Musikstückes
angleichen. Dazu am besten mit dem Schiebe-
regler die gleiche Anzahl der Taktschläge auf bei-
den Laufwerken einstellen [siehe Feld BPM (v)
im Display].
2) Mit den Tasten PITCH BEND die Taktschläge bei-
der Musikstücke genau übereinander legen: So-
lange die Taste+oder
-
gedrückt gehalten wird,
läuft der Titel 16% schneller bzw. langsamer.
PLAY c
LOOP
RELOOP
B/LOOP
EXIT
ab
1.
PLAY PLAY
LOOP
2.
AB/LOOP
EXIT
5.10 Replaying a continuous loop
Acertain section on the sound carrier (CD, USB
stick, hard disk) can be repeated as a seamless con-
tinuous loop as many times as desired. Two inde-
pendent loops can be stored with the buttons A and
B/LOOP – EXIT (24).
1) Switch to replay with the button (28). When
the starting point of the desired loop is reached
(point a in fig. 7), shortly actuate the button A.
“A1” or “A2” (k) will appear on the display.
Fig. 7 Replaying a continuous loop
2) When the desired end of the loop (point b) is
reached while the replay is continued, press the
button B/LOOP – EXIT. The section between
point a and point b will be continuously repeated.
The symbol (k) will flash on the display.
3) To exit the loop and to continue the title replay,
press the button B/LOOP – EXIT once again.
The symbol will stop flashing. It is also pos-
sible to exit the loop by selecting another title. To
restart the loop, press the button RELOOP.
Fig. 8 Exit and restart of a continuous loop
Hints
a) At least 10 frames (= 0.13 seconds) must be be-
tween the starting point and the end point of
a continuous loop, otherwise the loop will be
neither stored nor started.
b) The starting point and the end point of a con-
tinuous loop can also be precisely defined to
1frame:
1) When the starting point is reached, first set the
unit to pause with the button . Precisely
select the point with the rotary wheel (23).
Then press the button A.
2) Now either select the end point directly with
the rotary wheel or start the replay with the
button . When the end point is reached, set
the unit to pause again with the button and
precisely select the end point with the rotary
wheel.
3) After defining the end point, actuate the button
B/LOOP – EXIT. The continuous loop will start.
c) To store another continuous loop, simply redefine
the starting point and the end point with the but-
tons A and B/LOOP – EXIT.
5.11 Changing the speed with or without dis-
placing the pitch
With the sliding control PITCH CONTROL (21), the
speed can be changed by ±100% max., in MP3
mode by 16 % max.:
+100% = double speed
-
100% = standstill
1) Select the adjusting range with the button PITCH
(16). The LEDs (15) will indicate the range: 4%,
8%, 16%. With all three LEDs flashing, the ad-
justing range is 100%. If the LEDs start flashing,
the PITCH CONTROL has not been activated.
2) Press the button ON/OFF (17). Thus, the PITCH
CONTROL will be activated and the correspond-
ing LED (15) will light permanently.
3) Change the speed with the sliding control PITCH
CONTROL. The display will show the percentage
deviation from the standard speed in the field
PITCH (m). The number of beats (v) will change
accordingly.
4) At any time, it will be possible to switch between
the speed adjusted with the sliding control and
the standard speed with the button ON/OFF (17).
5) When the speed is changed, the pitch will also
change proportionally. If the function master
tempo is activated with the button MT (14), the
pitch will remain constant. The indication
KEY (l) will appear on the display. To deactivate
the function master tempo, press the button MT
once again.
Note: With the master tempo activated, various
effects may occur according to the speed ad-
justed. These effects are system-dependent and
can be used for interesting sound modifications.
5.12 Pitch Bend – Matching the beat between
2 music pieces
With the buttons PITCH BEND (18), the beat of a
title in player mechanism 1 can be matched (syn-
chronized) to the beat of a title in player mechanism
2 or vice versa. Thus, the dancing rhythm will not
be interrupted when crossfading from one title to
another.
1) First match the speed of the current music piece
to the speed of the second music piece with the
PITCH CONTROL (21). For this purpose, it is
recommended to adjust the same number of
beats on both player mechanisms [see field BPM
(v) on the display].
2) Synchronize the beats of the two music pieces
with the buttons PITCH BEND: As long as the
button +or
-
is kept pressed, the title is played
16% faster or slower.
PLAY c
LOOP
RELOOP
B/LOOP
EXIT
ab
1.
PLAY PLAY
LOOP
2.
AB/LOOP
EXIT
12
GB
D
A
CH

3) Durch Drehen des Drehrads (23) kann ebenfalls
eine Geschwindigkeitsänderung zur Taktanpas-
sung erfolgen.*
5.13 Bedienung des Samplers
Der Sampler dient zur Speicherung und Wiedergabe
eines Titelabschnitts bis 10 Sekunden. Der gespei-
cherte Abschnitt lässt sich mit einer laufenden Wie-
dergabe mischen oder in diese einfügen.
1) Startpunkt setzen: Zuerst die Taste MEMO (19)
drücken und dann während der Wiedergabe
eines Titels die Taste SAM. (20), wenn der ge-
wünschte Startpunkt des Abschnitts erreicht ist.
Die Taste SAM. blinkt schnell.
2) Endpunkt setzen: Am Ende des gewünschten
Abschnitts die Taste SAM. erneut drücken. Die
Taste SAM. leuchtet jetzt kontinuierlich.
3) Sampler abspielen: Die Taste SAM. betätigen.
Während der Sampler abgespielt wird, blinkt die
Taste SAM. langsam. Am Ende der Sampler-
Wiedergabe leuchtet sie wieder kontinuierlich.
Die Sampler-Wiedergabe kann auch vorzeitig
durch erneutes Drücken der Taste SAM. beendet
werden. Der Sampler lässt sich während einer
laufenden Wiedergabe dazuschalten oder im
Pausenmodus alleine abspielen.
4) Soll der Sampler nicht nur einmal abgespielt wer-
den, sondern ständig erneut als Schleife, zuerst
die Taste MULTI (13) drücken und dann die Zif-
ferntaste 3 – S.LOOP (12). Die Textzeile (s) des
Displays zeigt kurz „Sam Loop“. Der Sampler
stoppt dann erst durch erneutes Drücken der
Taste SAM.
Zum Zurückschalten auf einmaliges Abspielen
die Taste MULTI und die Zifferntaste 3 erneut
drücken. Das Display zeigt kurz „Sam Single“ an.
5) Der Sampler lässt sich auch rückwärts abspielen.
Dazu die Taste MULTI drücken und dann die Zif-
ferntaste 4 – S.REV. Das Display zeigt kurz „Sam
Reverse“ an. Zum Zurückschalten auf Vorwärts-
wiedergabe die gleichen Tasten erneut betätigen
(Anzeige: „Sam Forward“).
6) Soll die Sampler-Wiedergabe in die laufende
Wiedergabe eines Titels eingefügt werden, also
nicht mit dieser gemischt werden, die Taste MULTI
drücken und dann die Zifferntaste 5 – S-MIX
(Anzeige: „Sam Insert“). Während der Sampler-
Wiedergabe stoppt die Wiedergabe des Titels
und läuft nach der Wiedergabe des Samplers
automatisch weiter. Zum Zurückschalten auf ge-
mischte Wiedergabe die Taste MULTI und die Zif-
ferntaste 5 erneut drücken (Anzeige: „Sam Mix“).
7) Um im Sampler einen anderen Titelabschnitt zu
speichern, die Bedienschritte 1 und 2 wiederho-
len.
Hinweis: Ein Titelabschnitt bleibt bis zum Ausschal-
ten des CD/MP3-Players im Sampler gespeichert.
Es kann darum auch eine andere CD eingelegt wer-
den, ohne dass der Sampler gelöscht wird.
5.14 Titel rückwärts abspielen
Soll die Wiedergabe rückwärts erfolgen, die Taste
REVERSE (8) drücken. Die LED über der Taste
leuchtet und das Display zeigt kurz „REVERSE“ an.
Zum Zurückschalten auf Vorwärtswiedergabe die
Taste REVERSE erneut drücken.
5.15 Scratch-Effekte erzeugen
Zur Erzeugung von Scratch-Effekten (entspricht
dem manuellen Drehen eines Plattentellers) die
Taste SCRATCH (7) drücken und das Drehrad (23)
entsprechend vor- und zurückdrehen.* Die LED
über der Taste leuchtet und das Display zeigt kurz
„SCRATCH“ an. Zum Ausschalten des Effekts die
Taste SCRATCH erneut drücken.
6Faderstart über ein Mischpult
Der CD-340USB lässt sich über ein Mischpult mit
Faderstart-Funktion fernbedienen. Den Schiebe-
schalter (42) auf der Laufwerkrückseite auf den Typ
des Mischpult-Faderstartschalters einstellen:
Position LOCK für Ein-/Ausschalter
Für die meisten Mischpulte aus dem Sortiment von
„img Stage Line“ muss diese Schalterposition ge-
wählt werden. Mit dem Aufziehen des zugehörigen
Mischpult-Faders wird ein Schalter im Mischpult
geschlossen, der den CD/MP3-Player startet. Beim
Zuziehen des Faders öffnet der Schalter und schal-
tet dadurch den CD/MP3-Player auf Pause.
Abb. 9 Faderstart über Ein-/Ausschalter
Position TACT für Taster
Wird der Taster das erste Mal durch das Aufziehen
des zugehörigen Faders am Mischpult betätigt, star-
tet der CD/MP3-Player. Wird der Taster zum zwei-
ten Mal durch das Zuziehen des Faders betätigt,
schaltet der CD/MP3-Player auf Pause.
Abb. 10 Faderstart über Taster
Position CUE PLAY für Steuerung über einen
Impuls
Beim Aufziehen des zugehörigen Mischpult-Faders
wird durch einen kurzen Steuerimpuls des Misch-
pults die Wiedergabe ab einem mit der Taste CUE
1.x Start
2.x Pause
Mixer
Start
Pause
Mixer
3) Achange of speed for matching the beat can also
be made by turning the rotary wheel (23).*
5.13 Operation of the sampler
The sampler serves for storing and replaying a title
section of up to 10 seconds. The section stored can
be mixed to a current replay or be inserted into it.
1) Setting the starting point: First press the button
MEMO (19) and then, during the replay of a title,
press the button SAM. (20) when the desired
starting point of the section is reached. The but-
ton SAM. will flash rapidly.
2) Setting the end point: At the end of the desired
section, press the button SAM. once again. The
button SAM. will now light permanently.
3) Replaying the sampler: Actuate the button SAM.
While the sampler is replayed, the button SAM.
will flash slowly. At the end of the sampler replay,
it will light permanently again. The sampler replay
can be stopped at any time by pressing the but-
ton SAM. again. The sampler can be added
during a current replay or played on its own in the
pause mode.
4) For replaying the sampler not only once but
repeatedly as a loop, first press the button MULTI
(13) and then the numerical key 3 – S.LOOP (12).
The text line (s) of the display will shortly show
“Sam Loop”. The sampler will not stop until the
button SAM. is pressed again.
To switch back to a single replay, press the
button MULTI and the numerical key 3 once
again. The display will shortly show “Sam Single”.
5) Reverse replay of the sampler is also possible.
For this purpose, press the button MULTI and
then the numerical key 4 – S.REV. The display
will shortly show “Sam Reverse”. To switch back
to forward replay, actuate the same buttons once
again (indication: “Sam Forward”).
6) For inserting the sampler replay into the current
replay of a title, i.e. when it is not mixed to this
title, press the button MULTI and then the numer-
ical key 5 – S-MIX (indication: “Sam Insert”).
During the sampler replay, the replay of the title
will stop and automatically continue after replay
of the sampler. To switch back to the mixed
replay, press the button MULTI and the numerical
key 5 once again (indication: “Sam Mix”).
7) To store another title section in the sampler,
repeat steps 1 and 2.
Note: A title section is stored in the sampler until the
CD/MP3 player is switched off. Therefore, it is also
possible to insert another CD without deleting the
sampler.
5.14 Reverse replay of a title
For reverse replay, press the button REVERSE (8).
The LED above the button will light up and the dis-
play will shortly show “REVERSE”. To switch back to
forward replay, press the button REVERSE once
again.
5.15 Creating scratch effects
For creating scratch effects (corresponding to
manual turning of a turntable platter), press the but-
ton SCRATCH (7) and turn the rotary wheel (23) for-
ward and backward accordingly.* The LED above
the button will light up and the display will shortly
show “SCRATCH”. To deactivate the effect, press
the button SCRATCH once again.
6Fader Start via a Mixer
The CD-340USB can be remote-controlled via a
mixer with fader start function. Adjust the type of
fader start switch of the mixer with the selector
switch (42) on the rear side of the player mecha-
nism:
Position LOCK for on/off switch
This switch position must be selected for most
mixers of the “img Stage Line” range. By advancing
the corresponding fader on the mixer, a switch start-
ing the CD/MP3 player will be closed in the mixer.
When the fader is closed, the switch will open and
thus set the CD/MP3 player to pause.
Fig. 9 Fader start via on/off switch
Position TACT for momentary pushbutton switch
When the momentary pushbutton switch is actuated
for the first time by advancing the corresponding
fader on the mixer, the CD/MP3 player will start.
When the momentary pushbutton switch is actuated
for the second time by closing the fader, the
CD/MP3 player will be set to pause.
Fig. 10 Fader start via momentary pushbutton switch
1.x Start
2.x Pause
Mixer
Start
Pause
Mixer
13
GB
D
A
CH
*Die blaue LED neben der Taste SEARCH (22) darf nicht leuchten, sonst dient das Drehrad für den schnellen Vor- und Rück-
lauf. Zuvor ggf. die blaue LED mit der Taste SEARCH ausschalten.
*The blue LED next to the button SEARCH (22) must not light up, otherwise the rotary wheel will serve for fast forward and
reverse. If required, switch off the blue LED with the button SEARCH beforehand.

(26) gespeicherten Cue-Punkt (siehe Kap. 5.8.3)
gestartet. Beim Schließen des Faders springt das
CD-Laufwerk durch einen weiteren Steuerimpuls
zurück zum Cue-Punkt und schaltet dort auf Pause.
Hinweis: Für die Steuerung Cue Play/Pause muss
vom CD/MP3-Player eine Audioverbindung von der
Buchse DIGITAL OUT (38, 44) oder LINE OUT (39,
45) zum Mischpult vorhanden sein (siehe Kapitel 4,
Bedienschritt 2), sonst ist die Steuerung vom Misch-
pult aus nicht möglich.
Abb. 11 Faderstart über Steuerimpuls
Damit es nicht zu einer Fehlfunktion kommen kann,
zuerst den CD/MP3-Player und das Mischpult aus-
schalten. Die entsprechende Faderstartbuchse am
Mischpult über ein Verbindungskabel (siehe Abb.9,
10 oder 11) an die Buchse START/PAUSE 1 (43)
bzw. START/PAUSE 2 (37) anschließen.
Ist das Mischpult mit einer Vorhörfunktion (Moni-
torfunktion) ausgestattet, kann trotz zugezogenem
Fader mit dem CD/MP3-Player ein Titel angespielt
und über einen Kopfhörer abgehört werden. Dazu
den CD/MP3-Player, wie im Kapitel 5.4 „Anspielen
eines Titels“ beschrieben, bedienen.
Hinweis: Die Steuerung über Mischpult-Fader ist
bei Relay-Betrieb (siehe Kap. 5.3.3) nicht sinnvoll,
weil unabhängig von den zugehörigen Fadern die
Wiedergabe automatisch am Ende eines Titels bzw.
am Ende des letzten Titels stoppt und das andere
Laufwerk startet.
7Pflege des Gerätes
Das Gerät vor Staub, Vibrationen, direktem Sonnen-
licht, Feuchtigkeit und Hitze schützen (zulässiger
Einsatztemperaturbereich 0–40°C). Für die Reini-
gung nur ein weiches, trockenes Tuch verwenden,
auf keinen Fall Wasser oder Chemikalien.
Hinweis zu Tonaussetzern und Lesefehlern
Zigarettenrauch dringt leicht durch alle Öffnungen
des Gerätes und setzt sich auch auf der Optik des
Laser-Abtastsystems ab. Dieser Belag kann zu
Lesefehlern und Tonaussetzern führen. Da sich
Zigarettenrauch nicht immer vermeiden lässt (z.B.
in der Diskothek), muss das Gerät dann in einer
Fachwerkstatt gereinigt werden. Diese Reinigung ist
kostenpflichtig, auch während der Garantiezeit!
8Technische Daten
Frequenzbereich: . . . . . . . 20–20000Hz
Klirrfaktor: . . . . . . . . . . . . . < 0,05%
Kanaltrennung: . . . . . . . . . > 65dB
Dynamikumfang: . . . . . . . . 96dB
Störabstand: . . . . . . . . . . . 80dB
Gleichlaufschwankungen: . nicht messbar,
quarzgenau
Ausgänge
LINE OUT (analog): . . . . 2V
DIGITAL OUT: . . . . . . . . 0,5Vss S/PDIF
Stromversorgung: . . . . . . . 230V~/50Hz
Leistungsaufnahme: . . . . . 35VA
Einsatztemperatur: . . . . . . 0–40°C
Abmessungen (BxHxT)
Laufwerk: . . . . . . . . . . . . 482 x 88 x 270 mm,
2Höheneinheiten
Steuereinheit: . . . . . . . . 482 x 133 x 80 mm,
3Höheneinheiten
Gewicht: . . . . . . . . . . . . . . 8kg
Änderungen vorbehalten.
1.x Cue Play
2.x Pause
Mixer
Position CUE PLAY for control via a pulse
When the corresponding mixer fader is advanced,
the replay from a Cue point stored with the button
CUE (26) [see chapter 5.8.3] will be started by a
short control pulse of the mixer. When the fader is
closed, the CD player mechanism will return to the
Cue point by another control pulse and will be set to
pause there.
Note: For the control Cue Play/Pause, there must
be an audio connection from the CD/MP3 player
between the jack DIGITAL OUT (38, 44) or LINE
OUT (39, 45) and the mixer (see chapter 4, step 2),
otherwise control from the mixer will not be possible.
Fig. 11 Fader start via control pulse
To prevent malfunction, first switch off the CD/MP3
player and the mixer. Connect the corresponding
fader start jack on the mixer via a cable (see fig. 9,
10, or 11) to the jack START/PAUSE 1 (43) or
START/PAUSE 2 (37).
If the mixer is equipped with a monitoring func-
tion, it is possible to shortly play the beginning of a
title with the CD/MP3 player despite a closed fader
and to monitor it via headphones. For this purpose,
operate the CD/MP3 player as described in the
chapter 5.4 “Short replay of a title beginning”.
Note: Control via mixer fader is pointless in the relay
mode (see chapter 5.3.3) as, regardless of the cor-
responding faders, the replay will automatically stop
at the end of a title or at the end of the last title and
the other player mechanism will start.
7Maintenance of the Unit
Protect the unit from dust, vibrations, direct sunlight,
humidity, and heat (admissible ambient temperature
range 0–40°C). For cleaning only use a dry, soft
cloth, never use water or chemicals.
Note concerning sound interruptions
and reading errors
Cigarette smoke will easily penetrate through all
openings of the unit and also settle on the optics of
the laser sampling system. This deposit may cause
reading errors and sound interruptions. As it will not
always be possible to prevent cigarette smoke (e.g.
in discothèques), the unit must then be cleaned by
skilled personnel. Please note that, in this case,
cleaning will be charged, even during the warranty
period!
8Specifications
Frequency range: . . . . . . . 20–20000Hz
THD: . . . . . . . . . . . . . . . . . < 0.05%
Channel separation: . . . . . > 65dB
Dynamic range: . . . . . . . . . 96dB
S/N ratio: . . . . . . . . . . . . . 80dB
Wow and flutter: . . . . . . . . not measurable,
quartz precision
Outputs
LINE OUT (analog): . . . . 2V
DIGITAL OUT: . . . . . . . . 0.5Vpp S/PDIF
Power supply: . . . . . . . . . . 230V~/50Hz
Power consumption: . . . . . 35VA
Ambient temperature: . . . . 0–40°C
Dimensions (W x H x D)
Player mechanism: . . . . 482 x 88 x 270mm,
2rack spaces
Control unit: . . . . . . . . . . 482 x 133 x 80mm,
3rack spaces
Weight: . . . . . . . . . . . . . . . 8kg
Subject to technical modification.
1.x Cue Play
2.x Pause
Mixer
14
GB
D
A
CH
Diese Bedienungsanleitung ist urheberrechtlich für MONACOR®INTERNATIONAL GmbH & Co. KG
geschützt. Eine Reproduktion für eigene kommerzielle Zwecke – auch auszugsweise – ist untersagt.
All rights reserved by MONACOR®INTERNATIONAL GmbH & Co. KG. No part of this instruction manual
may be reproduced in any form or by any means for any commercial use.

Ouvrez le présent livret page 3 de manière à
visualiser les éléments et branchements.
Table des matières
1Eléments et branchements . . . . . . . . . . . 15
1.1 Unité de commande . . . . . . . . . . . . . . . . . . 15
1.2 Unité lecteur, face avant . . . . . . . . . . . . . . 17
1.3 Unité lecteur, face arrière . . . . . . . . . . . . . . 17
2Conseils d’utilisation et de sécurité . . . . 18
3Possibilités d’utilisation . . . . . . . . . . . . . 18
4Positionnement de l’appareil
et branchements . . . . . . . . . . . . . . . . . . . 18
5Utilisation . . . . . . . . . . . . . . . . . . . . . . . . . 19
5.1 Lecture de CD, disque dur ou clé USB . . . 19
5.1.1 Sélection d’un répertoire en mode MP3 . 19
5.2 Affichage du numéro des titres,
de la durée, du nombre de beats
par minute et du mode repos (veille) . . . . . 20
5.2.1 Bargraphe . . . . . . . . . . . . . . . . . . . . . . . . 20
5.2.2 Compteur de beats . . . . . . . . . . . . . . . . . 20
5.2.3 Mode repos (veille) . . . . . . . . . . . . . . . . . 20
5.3 Sélection du mode de fonctionnement . . . . 20
5.3.1 Lecture titre par titre . . . . . . . . . . . . . . . . 20
5.3.2 Lecture de tous les titres et
répétition continue de tous les titres . . . . 21
5.3.3 Mode Relais – Démarrage auto-
matique du second lecteur . . . . . . . . . . . 21
5.4 Lecture des premières notes d’un titre . . . . 21
5.5 Fonction OUTRO . . . . . . . . . . . . . . . . . . . . 21
5.6 Avance et retour rapides . . . . . . . . . . . . . . 21
5.7 Positionnement précis à un endroit
donné . . . . . . . . . . . . . . . . . . . . . . . . . . . . . 22
5.8 Saut à un endroit préalablement
déterminé . . . . . . . . . . . . . . . . . . . . . . . . . . 22
5.8.1 Touches CUE 1 à 3 . . . . . . . . . . . . . . . . . 22
5.8.2 Mémorisation de points Hot Cue . . . . . . . 22
5.8.3 Touche CUE . . . . . . . . . . . . . . . . . . . . . . 22
5.9 Création d’effets “sampler (bégaiement)” . 23
5.10 Lecture d’une boucle continue . . . . . . . . . . 23
5.11 Modification de la vitesse avec ou
sans déplacement de la hauteur tonale . . . 23
5.12 Pitch Bend, adaptation du rythme
entre deux morceaux de musique . . . . . . . 24
5.13 Utilisation du sampler . . . . . . . . . . . . . . . . . 24
5.14 Lecture d’un titre en arrière . . . . . . . . . . . . 24
5.15 Création d’effets Scratch . . . . . . . . . . . . . . 24
6Démarrage électrique via
une table de mixage . . . . . . . . . . . . . . . . . 24
7Entretien de l’appareil . . . . . . . . . . . . . . . 25
8Caractéristiques techniques . . . . . . . . . . 25
1Eléments et branchements
Les touches avec double fonction sont repérées sur
l’appareil par les symboles pour une pression
brève et par pour une pression plus longue.
1.1 Unité de commande (schéma 1– 3)
1Eléments du lecteur 1 (voir détails schéma 2)
2Eléments du lecteur 2 (voir détails schéma 2)
3Affichage multifonctions
(voir schéma 3 pour plus de détails)
anuméro du titre sélectionné lorsque “TRACK”
(q) est affiché ou numéro du répertoire sélec-
tionné lorsque “DIR” (r) est affiché
bnombre de titres sur le CD ou dans le réper-
toire sélectionné
caffichage “TOTAL” : indique avec “CONT” (g)
que tous les titres du CD ou du répertoire
sélectionné sont répétés en continu, voir point
11 touche CONT./SINGLE
daffichage “MP3” ; indique le fonctionnement
MP3
eaffichage “SINGLE” : indique le mode de fonc-
tionnement lecture titre par titre
faffichage “ELAPSED” : indique que la durée
déjà lue d’un titre est affichée
gaffichage “CONT.” : indique le mode de fonc-
tionnement lecture de tous les titres, voir posi-
tion 11 touche CONT./SINGLE.
haffichage “TOTAL” : indique avec “REMAIN”
(i) que la durée restante du CD est affichée
(pas en mode MP3)
iaffichage “REMAIN” : indique que la durée
restante d’un titre est affichée ; si sur l’affi-
chage, “TOTAL (h) est indiqué en plus, la
durée restante de tout le CD est affichée
jaffichage “OUTRO” : indique la fonction
OUTRO, voir position 11 touche CONT./
SINGLE – OUTRO
ksymbole : s’affiche si une boucle continue
est mémorisée et clignote si la boucle est lue
(chapitre 5.10)
Vi preghiamo di aprire completamente la pagina 3.
Così vedrete sempre gli elementi di comando e i
collegamenti descritti.
Indice
1Elementi di comando e collegamenti . . . 15
1.1 Unità di comando . . . . . . . . . . . . . . . . . . . . 15
1.2 Unità lettore pannello frontale . . . . . . . . . . 17
1.3 Unità lettore pannello posteriore . . . . . . . . 17
2Avvertenze di sicurezza . . . . . . . . . . . . . 18
3Possibilità d’impiego . . . . . . . . . . . . . . . . 18
4Collocamento e collegamenti . . . . . . . . . 18
5Funzionamento . . . . . . . . . . . . . . . . . . . . 19
5.1 Riprodurre CD, disco rigido o USB stick . . 19
5.1.1 Selezionare la cartella con
funzionamento MP3 . . . . . . . . . . . . . . . . 19
5.2 Visualizzazione del numero del titolo,
della durata, del numero battute al minuto,
della modalità sleep . . . . . . . . . . . . . . . . . . 20
5.2.1 Diagramma a barre . . . . . . . . . . . . . . . . . 20
5.2.2 Beatcounter . . . . . . . . . . . . . . . . . . . . . . . 20
5.2.3 Modalità sleep . . . . . . . . . . . . . . . . . . . . . 20
5.3 Selezionare il modo di funzionamento . . . . 20
5.3.1 Riproduzione di un singolo titolo . . . . . . . 20
5.3.2 Riproduzione di tutti i titoli e
ripetizione senza fine di tutti i titoli . . . . . . 20
5.3.3 Funzionamento Relay –
avviamento automatico dell’altro lettore . 21
5.4 Riproduzione dell’inizio di un titolo . . . . . . . 21
5.5 Funzione OUTRO . . . . . . . . . . . . . . . . . . . 21
5.6 Avanzamento/ritorno veloce . . . . . . . . . . . 21
5.7 Posizionarsi con esattezza
su un determinato punto . . . . . . . . . . . . . . 21
5.8 Salto ad un punto fissato precedentemente . 22
5.8.1 Tasti CUE 1 a 3 . . . . . . . . . . . . . . . . . . . . 22
5.8.2 Memorizzare di punti hot-cue . . . . . . . . . 22
5.8.3 Tasto CUE . . . . . . . . . . . . . . . . . . . . . . . . 22
5.9 Produrre effetti balbuziente . . . . . . . . . . . . 22
5.10 Riprodurre un loop senza fine . . . . . . . . . . 23
5.11 Modificare la velocità con o senza
modifica dell’altezza del suono . . . . . . . . . 23
5.12 Pitch bend – adattare il ritmo fra
due brani musicali . . . . . . . . . . . . . . . . . . . 23
5.13 Funzionamento del sampler . . . . . . . . . . . . 24
5.14 Riproduzione all’indietro di un titolo . . . . . . 24
5.15 Generare effetti scratch . . . . . . . . . . . . . . . 24
6Avviamento tramite fader dal mixer . . . . 24
7Manutenzione . . . . . . . . . . . . . . . . . . . . . . 25
8Dati tecnici . . . . . . . . . . . . . . . . . . . . . . . . 25
1Elementi di comando e collegamenti
Sull’apparecchio, i tasti con funzione doppia sono
contrassegnati con i simboli per una pressione
breve o con per una pressione più lunga.
1.1 Unità di comando (figg. 1–3)
1Comandi del lettore 1 (per i particolari vedi fig. 2)
2Comandi del lettore 2 (per i particolari vedi fig. 2)
3Display multifunzionale (vedi fig. 3)
anumero del titolo selezionato con l’indicazione
“TRACK” (q) oppure numero della cartella
selezionata con l’indicazione “DIR” (r)
bnumero globale dei titoli sul CD o nella cartella
selezionata
cindicazione “TOTAL”, insieme a “CONT” (g)
segnala che tutti i titolo del CD o nella cartella
selezionata saranno ripetuti senza fine, vedi
posizione 11 tasto CONT./SINGLE
dindicazione “MP3”: segnala il funzionamento
MP3
eindicazione “SINGLE”: segnala la modalità di
riproduzione di un singolo titolo
findicazione “ELAPSED”: segnala che viene
indicato il tempo già trascorso di un titolo
gindicazione “CONT”: segnala la modalità di
riproduzione di tutti i titoli, vedi posizione 11,
tasto CONT./SINGLE
hindicazione “TOTAL”: segnala insieme a
“REMAIN” (i), che viene indicato il tempo
restante del CD (non con funzionamento
MP3)
iindicazione “REMAIN”: segnala che viene
indicato il tempo restante di un titolo. Se sul
display si vede anche “TOTAL” (h), viene indi-
cato il tempo restante del CD.
jindicazione “OUTRO”: segnala la funzione
OUTRO, vedi pos. 11, tasto CONT./SINGLE –
OUTRO
ksimbolo : si vede se è memorizzato un
loop senza fine, lampeggia durante la riprodu-
zione senza fine (capitolo 5.10)
15
I
F
B
CH

lsymbole : s’affiche si la fonction Master-
tempo est activée, voir position 14, touche MT
maffichage de la déviation de la vitesse stan-
dard (max. ±100%) réglée avec le réglage
PITCH CONTROL (21)
nsymbole pour le mode lecture
oaffichage du mode de fonctionnement (CD,
USB)
psymbole pour le mode Pause
qaffichage “TRACK” : indique que le numéro de
titre (a) est affiché au-dessus
raffichage “DIR” indique que le numéro de
répertoire (a) est affiché au-dessus
sligne de texte pour des informations complé-
mentaires (par exemple titre MP3, nom du
répertoire, effet choisi)
taffichage de durée : voir position 10 touche
TIME/STOP
ubargraphe : indique par sa longueur, la durée
(t) graphiquement
vaffichage du nombre de beats par minute du
titre en cours
wsymbole : s’affiche si le compteur de beats
est commuté sur automatique (chapitre 5.2.2)
4Touche RELAY pour un démarrage automatique
de l’autre lecteur à la fin d’un titre ou à la fin du
dernier titre (voir chapitre 5.3.3)
La fonction ne peut être activée que si, dans
chacun des lecteurs, un CD est inséré, une clé
USB est insérée ou un disque dur est relié et
sélectionné.
5Connexion USB type B (sur le côté de l’unité de
commande) pour brancher à un PC1)
6Prise alimentation (9V~, 500mA)
Si l’unité de commande n’est utilisée que pour le
fonctionnement PC1) (unité de lecture non
reliée), une alimentation adéquate doit être bran-
chée ici pour l’alimentation.
7Touche SCRATCH pour allumer et éteindre la
fonction Scratch
Si la fonction est activée (la LED au-dessus de la
touche brille), on peut produire des effets
Scratch avec la molette (23).
8Touche REVERSE pour activer/désactiver la
lecture arrière
9Touche OPEN/CLOSE pour éjecter le CD
(pas possible pendant la lecture ou si la con-
nexion USB est choisie)
10 Touche TIME/STOP : si la touche est maintenue
enfoncée plus de 2 secondes, le lecteur s’arrête ;
pour commuter l’affichage de la durée (t et u),
enfoncez la touche brièvement :
réglage de base : affichage “REMAIN” (i) :
durée restante du titre en cours
1. pression : affichage “ELAPSED” (f) :
affichage de la durée déjà lue du titre en cours
pression suivante : affichage “TOTAL REMAIN”
(h + i) : affichage de la durée restante de tout
le CD. Impossible en mode MP3.
pression suivante : affichage “REMAIN” :
retour au réglage de base
11 Touche CONT./SINGLE – OUTRO : sélection du
mode de fonctionnement et activation de la fonc-
tion OUTRO
réglage de base : affichage “SINGLE” (e) :
lecture titre par titre ; après chaque titre lu,
l’appareil passe sur Pause.
1. pression : affichage “CONT” (g) :
lecture continue de tous les titres
2. pression : affichage “CONT” (g) et “TOTAL”
(c) : répétition continue de tous les titres du
CD ou du répertoire choisi
3. pression : affichage “SINGLE” :
retour au réglage de base
Maintenez la touche enfoncée pendant 3 secon-
des environ jusqu’à ce que “OUTRO” (j) s’affiche :
Activation de la fonction OUTRO pour lire res-
pectivement les 30 dernières secondes des titres
suivants. La fonction OUTRO ne peut pas être
utilisée pour des titres MP3. Pour désactiver la
fonction, maintenez la touche OUTRO enfoncée
pendant 3 secondes environ ou appuyez briève-
ment sur la touche TIME/STOP (10).
12 Touches numériques
1. pour sélectionner le numéro de titre
2. pour des fonctions supplémentaires si au
préalable la touche MULTI (13) a été enfoncée
(attention à l’inscription CLEAR jusqu’à
FOLDER au-dessus des touches) :
touche 0pour effacer tous les emplacements
de mémoire des points Hot Cue (chapitre
5.8.2)
touche 1pour mémoriser les points Hot Cue
touche 2pour charger les points Hot Cue
touche 3pour commuter entre une lecture uni-
que et une répétition continue du sampler
(chapitre 5.13)
touche 4pour commuter entre lecture avant et
lecture arrière du sampler
touche 5pour commuter entre mode mixage
et mode insertion du sampler
touche 6pour commuter2) entre le mode PC1)
et la lecture de CD
touche 7pour commuter2) entre la connexion
USB (31) et la lecture CD
touche 8pour afficher titre, album, interprète
(ID3 Tags) en mode MP3 si ces informations
existent
touche 9pour commuter entre sélection de titre
et de répertoire en mode MP3 (chapitre 5.1.1)
13 Touche MULTI pour des fonctions supplémentai-
res en liaison avec les touches numériques (12)
Après une pression sur la touche MULTI, la LED
au-dessus de la touche brille et indique que
lindicazione KEY: segnala la funzione
Mastertempo, vedi posizione 14 tasto MT
mindica la deviazione della velocità standard
(max. ±100%) impostato con il regolatore
PITCH CONTROL (21)
nsimbolo per la modalità di riproduzione
oindicazione della modalità di funzionamento
(CD, USB)
psimbolo per la modalità di pausa
qindicazione “TRACK” segnala che sopra di
essa viene indicato il numero del titolo (a)
rindicazione “DIR” segnala che sopra di essa
viene indicato il numero della cartella (a)
sriga di testo per informazioni supplementari
(p.es. titoli MP3, nome cartella, effetto sele-
zionato)
tindicazione del tempo; vedi pos. 10 tasto
TIME/STOP
udiagramma a barre; con la sua lunghezza offre
una rappresentazione grafica del tempo (t)
vindica i numeri di battute al minuto del titolo
attuale
wsimbolo : segnala che il beatcounter è mes-
so su automatico (cap. 5.2.2)
4Tasto RELAY per l’avvio automatico dell’altro let-
tore alle fine di un titolo o alla fine dell’ultimo
titolo (vedi cap. 5.3.3).
La funzione può essere attivata solo se in en-
trambi i lettori è inserito un CD, se è inserita un
USB stick o se e collegato e selezionato un disco
rigido.
5Porta USB tipo B (sul lato dell’unità di comando)
per il collegamento con un PC1)
6Presa di alimentazione (9V~, 500mA)
Se l’unità di comando viene usata solo per il fun-
zionamento con PC1) (unità lettore non colle-
gata), occorre collegare qui un alimentatore per
l’alimentazione di corrente.
7Tasto SCRATCH per attivare e disattivare la fun-
zione scratch
Con la funzione attivata (il LED sopra il tasto
rimane acceso), con la manopola (23) si pos-
sono generare degli effetti scratch.
8Tasto REVERSE per attivare e disattivare la
riproduzione all’indietro
9Tasto OPEN/CLOSE per espellere il CD
(non è possibile durante la riproduzione oppure
se è scelto la connessione USB)
10 Tasto TIME/STOP:
se si tiene premuto per 2 secondi, il lettore si
arresta;
per commutare l’indicazione del tempo (t + u)
premere il tasto solo brevemente:
impostazione base, indicazione “REMAIN” (i):
tempo restante del titolo corrente
prima pressione del tasto, indicazione
“ELAPSED” (f):
tempo già passato del titolo corrente
pressione successiva del tasto, indicazione
“TOTAL REMAIN” (h + i):
tempo restante dell’intero CD;
non è possibile con funzionamento MP3
pressione successiva del tasto, indicazione
“REMAIN”:
ritorno all’impostazione base
11 Tasto CONT./SINGLE – OUTRO per selezionare
la modalità di funzionamento e per attivare la
funzione OUTRO
Impostazione base, indicazione “SINGLE” (e):
riproduzione di un titolo singolo; dopo ogni
titolo riprodotto, il lettore va in pausa
prima pressione del tasto, indicazione “CONT” (g):
riproduzione continua di tutti i titoli
seconda pressione del tasto, indicazione
“CONT” (g) e “TOTAL” (c): riproduzione senza
fine di tutti i titoli del CD o della cartella sele-
zionata
terza pressione del tasto, indicazione “SINGLE”:
ritorno all’impostazione base
Tener premuto il tasto per 3 secondi ca., finché il
display indica OUTRO (j):
attivazione della funzione OUTRO per riprodurre
gli ultimi 30 secondi dei titoli successivi
La funzione OUTRO non può essere sfruttata
per i titoli MP3. Per disattivare la funzione tenere
premuto ancora per 3 secondi circa il tasto
OUTRO oppure premere brevemente il tasto
TIME/STOP (10).
12 Tasti numerici
1. per selezionare il numero di un titolo
2. per funzioni supplementari se prima viene
premuto il tasto MULTI (13) [notare le indica-
zioni da CLEAR a FOLDER sopra i tasti]:
Tasto 0per cancellare tutti i punti hot-cue
memorizzati (cap. 5.8.2)
Tasto 1per memorizzare dei punti hot-cue
Tasto 2per caricare dei punti hot-cue
Tasto 3per cambiare far riproduzione unica e
ripetizione continua del sampler (cap. 5.13)
Tasto 4per cambiare fra riproduzione in avanti
e all’indietro del sampler
Tasto 5per cambiare fra modalità di miscela-
zione e inserimento del sampler
Tasto 6per cambiare2) fra funzionamento con
PC1) e riproduzione CD
Tasto 7per cambiare2) fra connessione USB
(31) e riproduzione CD
Tasto 8per indicare titolo, albo, interprete (tag
ID3) con funzionamento PM3, se queste infor-
mazioni sono presenti
Tasto 9per cambiare fra selezione titolo e car-
tella con funzionamento MP3 (cap. 5.1.1)
13 Tasto MULTI per funzioni supplementari insieme
ai tasti numerici (12)
Dopo aver premuto il tasto MULTI, il LED sopra il
16
I
F
B
CH
1)Pour le fonctionnement PC, un logiciel spécifique est in-
dispensable.
2)Pour commuter, le lecteur doit être en mode Arrêt, si
besoin maintenez la touche TIME/STOP (10) enfoncée
2 secondes.
1)Per il funzionamento con PC è richiesto un software spe-
ciale.
2)Per cambiare, il lettore deve trovarsi nella modalità di Stop;
eventualmente tenere premuto per 2 sec. il tasto TIME/
STOP (10).

maintenant une fonction supplémentaire peut
être activée. La LED s’éteint après l’activation
d’une fonction supplémentaire ou une nouvelle
pression sur la touche MULTI.
14 Touche MT pour activer/désactiver la fonction
Mastertempo (la hauteur tonale reste constante
si on modifie la vitesse, voir chapitre 5.11)
15 LEDs d’affichage de la plage de réglage de
vitesse sélectionnée avec la touche PITCH (16)
clignotent : le réglage PITCH CONTROL (21)
n’est pas activé
brillent en continu : le réglage a été activé avec la
touche ON/OFF (17)
Si toutes les LEDs clignotent ou brillent, la plage
100% est sélectionnée.
16 Touche PITCH pour sélectionner la plage de
réglage de vitesse : 4%, 8%, 16%,
en plus pour des CDs audio standards 100%
(pas en mode MP3)
17 Touche ON/OFF pour activer/désactiver le
réglage PITCH CONTROL (21)
18 Touches PITCH BEND pour synchroniser le
rythme d’un titre sur le lecteur 1 avec un titre sur
le lecteur 2. Tant qu’une des touches est activée,
la vitesse est 16% plus faible ou plus élevée.
19 Touche MEMO pour mémoriser les points Cue
avec les touches CUE 1–3 (30) et pour mémori-
ser un segment de titre dans le sampler
20 Touche SAM. (sampler) pour mémoriser et lire
un segment de titre jusqu’à 10 secondes, voir
chapitre 5.13
21 Potentiomètre PITCH CONTROL pour modifier
la vitesse (si la fonction Mastertempo est activée,
aucune modification de la hauteur tonale, voir
chapitre 5.11) ; le réglage du potentiomètre n’est
actif que si la touche ON/OFF (17) est enfoncée.
22 Touche SEARCH pour commuter la molette
REV/FWD (23) sur la fonction “avance et retour
rapides” ; si la fonction est activée, la LED bleue
à côté de la touche brille.
Conseil : Si la molette n’est pas activée en mode
lecture pendant 8 secondes, la LED bleue
s’éteint et la molette sert à nouveau pour la fonc-
tion “Pitch Bend”.
23 Molette REV/FWD
1. LED bleue à côté de la touche SEARCH (22)
éteinte : pour la fonction “Pitch Bend” et en
mode Pause pour aller à un endroit donné.
2. Touche SEARCH enfoncée, la LED bleue
brille : pour l’avance et le retour rapides
3. Touche SCRATCH enfoncée, la LED rouge
au-dessus de la touche brille ; la LED bleue à
côté de la touche SEARCH s’éteint : pour pro-
duire des effets Scratch
4. Si on charge des points Hot Cue, pour sélec-
tionner l’emplacement de mémoire (chapitre
5.8.2)
24 Touches pour mémoriser et lire deux boucles
continues :
touche A : pour déterminer le point de départ
d’une boucle
touche B/LOOP – EXIT : pour déterminer le point
de fin d’une boucle continue et pour démarrer
simultanément la boucle ; pour quitter la
boucle, enfoncez la touche une nouvelle fois.
touche RELOOP pour une nouvelle lecture de la
boucle
25 Touche BOP pour un retour en arrière et un
démarrage immédiat de la lecture au début du
titre en cours ou à partir d’un point préalablement
sélectionné avec la touche CUE (26). Par plu-
sieurs pressions brèves, vous pouvez produire
des effets “sampler (bégaiement)”.
26 Touche CUE pour lire les premières notes d’un
titre et pour le retour à un endroit préalablement
déterminé (voir chapitre 5.4/5.8.3).
27 Touches TRACK pour la sélection de titres :
touche +10 : pour sauter 10 titres
touche pour sélectionner le titre suivant
touche pour revenir au début du titre en
cours. Par plusieurs pressions sur la touche
, on recule toujours d’un titre.
28 Touche pour commuter entre lecture et
Pause
29 Touche BPM pour le mode de comptage manuel
du compteur de beats (voir chapitre 5.2.2)
30 Touches CUE 1–3 pour mémoriser et sélec-
tionner jusqu’à 3 points Cue (possible aussi en
mode lecture) : pour mémoriser, enfoncez tout
d’abord la touche MEMO (19).
1.2 Unité lecteur, face avant (schéma 4)
31 Connexion USB (type A) pour insérer une clé
USB ou brancher un disque dur
32 Témoin de fonctionnement
33 Tiroir CD
34 Touche pour ouvrir et fermer le tiroir CD
(impossible pendant la lecture ou si la connexion
USB est sélectionnée)
35 Interrupteur POWER Marche/Arrêt
36 Témoin de fonctionnement
1.3 Unité lecteur, face arrière (schéma 5)
37 Prise jack 3,5 mono femelle pour la commande à
distance de la fonction “Start/Pause” (Marche/
Pause) du lecteur 2 depuis une table de mixage –
voir chapitre 6
38 Sortie audio digitale DIGITAL OUT du lecteur 2
39 Sortie audio analogique LINE OUT avec niveau
ligne du lecteur 2
40 Prise pour brancher l’unité de commande : à
relier à la prise REMOTE CONTROL/CONNECT
TO MAIN UNIT 2 via un des cordons de bran-
chement livrés
41 Cordon secteur à relier à une prise secteur
230V~/50Hz
tasto rimane acceso e segnala che ora è stata
attivata una funzione supplementare. Il LED si
spegne dopo l’attivazione della funzione supple-
mentare o dopo una nuova pressione del tasto
MULTI.
14 Tasto MT per attivare e disattivare la funzione
mastertempo (l’altezza del suono rimane inva-
riata se si cambia la velocità, vedi cap. 5.11)
15 LED per segnalare il campo della velocità sele-
zionato con il tasto PITCH (16)
lampeggiano = il regolatore PITCH CONTROL
(21) non è stato attivato
rimangono accesi = il regolatore è stato attivato
con il tasto ON/OFF (17).
Se tutti i LED lampeggiano o sono accesi, il
campo di regolazione è 100%
16 Tasto PITCH per selezionare il campo di im-
postazione della velocità: 4%, 8%, 16%,
in più con CD audio standard: 100% (non per
MP3)
17 Tasto ON/OFF per attivare e disattivare il regola-
tore PITCH CONTROL (21)
18 Tasti PITCH BEND per sincronizzare il ritmo di
un titolo nel lettore 1 con quello di un titolo nel let-
tore 2.
Mentre si spinge uno dei tasti, la velocità
aumenta o si riduce del 16%.
19 Tasto MEMO per memorizzare dei punti cue con
i tasti CUE 1–3 (30) e per memorizzare un
estratto del titolo nel sampler
20 Tasto SAM. (sampler/campionatore) per memo-
rizzare e riprodurre un estratto del titolo fino a
10 secondi, vedi capitolo 5.13
21 Cursore PITCH CONTROL per modificare la
velocità (se è attiva la funzione Mastertempo,
l’altezza del suono con cambia, vedi cap. 5.11);
l’impostazione del regolatore ha effetto solo se il
tasto ON/OFF (17) è premuto
22 Tasto SEARCH, per attivare nella manopola
REV/FWD (23) la funzione “Avanzamento/
ritorno veloce”; se la funzione è attiva, il LED blu
vicino al tasto è acceso.
N. B.: Se nella modalità di riproduzione, la mano-
pola non viene azionata per 8 secondi, il LED blu
si spegne e la manopola serve di nuovo per la
funzione “Pitch Bend”
23 Manopola REV/FWD
1. LED blu vicino al tasto SEARCH (20) è
spento:
per la funzione “Pitch Bend” e nella pausa per
posizionarsi su un determinato punto
2. Tasto SEARCH premuto, il LED blu è acceso:
per l’avanzamento/ritorno veloce
3. Tasto SCRATCH premuto, il LED rosso sopra
il tasto è acceso; il LED blu di fianco al tasto
SEARCH è spento:
per generare degli effetti scratch
4. Durante il caricamento dei punti hot-cue per
selezionare la memoria (vedi cap. 5.8.2)
24 Tasti per memorizzare e riprodurre due loop
senza fine:
tasto A per determinare il punto di partenza del
loop
tasto B/LOOP – EXIT per determinare il punto
finale del loop e per avviare il loop; per abban-
donare il loop premere di nuovo il tasto
tasto RELOOP per la nuova riproduzione di un
loop
25 Tasto BOP per ritornare all’inizio del titolo cor-
rente con riproduzione immediata dello stesso
oppure per la riproduzione da un punto selezio-
nato precedentemente con il tasto CUE (26)
Premendo più volte il tasto si può produrre un
particolare effetto “balbuziente” con ripetuti inizi
di un brano.
26 Tasto CUE per riprodurre l’inizio di un titolo e per
ritornare su un punto marcato precedentemente
(vedi capp. 5.4 e 5.8.3)
27 Tasti TRACK per selezionare un titolo
Tasto +10 per saltare 10 titoli in avanti
Tasto per selezionare il titolo successivo
Tasto per tornare all’inizio del titolo corrente.
Con ogni ulteriore pressione del tasto si salta
indietro di un titolo.
28 Tasto per cambiare fra riproduzione e pausa
29 Tasto BPM per il conteggio manuale del beat-
counter (vedi cap. 5.2.2)
30 Tasti CUE 1–3 per memorizzare e selezionare
un massimo di 3 punti cue (possibile anche nella
modalità di riproduzione); per la memorizzazione
premere dapprima il tasto MEMO (19)
1.2 Unità lettore pannello frontale (fig. 4)
31 Porta USB (tipo A) per inserire un USB stick o
per collegare un disco rigido
32 Spia di funzionamento
33 Cassetto CD
34 Tasto per aprire e chiudere il cassetto CD (non
è possibile durante la riproduzione oppure con
connessione USB selezionata)
35 Interruttore on/off POWER
36 Spia di funzionamento
1.3 Unità lettore pannello posteriore (fig. 5)
37 Presa jack mono 3,5mm per il telecomando
della funzione “Start/Pausa” del lettore 2 tramite
un mixer – vedi cap. 6
38 Uscita audio DIGITAL OUT del lettore 2
39 Uscita audio analogica LINE OUT con livello
Line del lettore 2
40 Presa di collegamento per l’unità di comando:
collegarla con la presa gialla REMOTE CON-
TROL/CONNECT TO MAIN UNIT 2 tramite uno
dei cavi di collegamento in dotazione
41 Cavo rete per una presa (230V~/50Hz)
42 Commutatore per il tipo di telecomando tramite le
prese START/PAUSE (37 e 43) – vedi capitolo 6
posizione LOCK
per il comando tramite un interruttore on/of
17
I
F
B
CH

42 Commutateur pour le type de commande à
distance via les prises START/PAUSE (37 et 43),
voir chapitre 6
position LOCK :
pour la commande via un interrupteur mar-
che/arrêt
position TACT :
pour la commande via un bouton poussoir
momentané
position CUE/PLAY :
Via une impulsion de commande envoyée
depuis la table de mixage, le lecteur CD est
démarré à partir du point Cue/ remis au point
Cue et mis sur Pause lorsque le fader de la
table de mixage est ouvert/fermé.
43 Prise jack 3,5 mono femelle pour la commande à
distance de la fonction “Start/Pause” (Marche/
Pause) du lecteur 1 depuis une table de mixage –
voir chapitre 6
44 Sortie audio digitale DIGITAL OUT du lecteur 1
45 Sortie audio analogique LINE OUT avec niveau
ligne du lecteur 1
46 Prise pour brancher l’unité de commande : à
relier à la prise REMOTE CONTROL/CONNECT
TO MAIN UNIT 1 via un des cordons de bran-
chement livrés
2Conseils d’utilisation et de sécurité
Cet appareil répond à toutes les directives néces-
saires de l’Union Européenne et porte donc le sym-
bole .
Respectez scrupuleusement les points suivants :
●L’appareil n’est conçu que pour une utilisation en
intérieur. Protégez-le de tout type de projections
d’eau, des éclaboussures, d’une humidité élevée
de l’air et de la chaleur (plage de température de
fonctionnement autorisée : 0–40°C).
●En aucun cas, vous ne devez poser d’objet conte-
nant du liquide ou un verre sur l’appareil.
●La chaleur dégagée par l’appareil doit être éva-
cuée par une circulation d’air adéquate. En aucun
cas, les ouïes d’aération ne doivent être obturées.
●Ne le faites jamais fonctionner et débranchez-le
immédiatement lorsque :
1. des dommages sur l’appareil et sur le cordon
secteur apparaissent.
2. après une chute ou accident similaire...,
l’appareil peut présenter un défaut.
3. des dysfonctionnements apparaissent.
Dans tous les cas, les dommages doivent être
réparés par un technicien spécialisé.
●Tout cordon secteur endommagé ne doit être rem-
placé que par un technicien habilité.
●Ne débranchez jamais l’appareil en tirant sur le
cordon secteur, tenez-le toujours par la fiche.
●Nous déclinons toute responsabilité en cas de
dommages matériels ou corporels résultants si
l’appareil est utilisé dans un but autre que celui
pour lequel il a été conçu, s’il n’est pas correcte-
ment branché, utilisé ou n’est pas réparé par une
personne habilitée, en outre, la garantie devien-
drait caduque.
3Possibilités d’utilisation
Le lecteur CD/MP3 CD-340USB avec deux unités
de lecture est spécialement conçu pour une utilisa-
tion DJ professionnelle. De nombreuses possibilités
de fonctionnement sont précisément définies dans
ce but, p.ex. lecture titre par titre, compteur de beats
automatique, lecture sans interruption de deux
boucles continues ou mémorisation de 765 points
Hot Cue.
Sur le CD-340USB, il est possible de lire des
CDs audio standards (CD-DA = compact disc digital
audio) et des CDs avec titres au format MP3 et des
CD-R audio (gravés). En revanche, les CD-RW
(CDs réinscriptibles), peuvent rencontrer des pro-
blèmes lors de la lecture selon le type de CD, le gra-
veur et le logiciel de gravure utilisés. Via l’interface
USB, des fichiers MP3 d’un disque dur ou d’une clé
USB peuvent être lus.
Le lecteur CD/MP3 est doté d’une mémoire anti
chocs qui peut compenser les dysfonctionnements
causés par des chocs ou vibrations lors de la lecture
du CD jusqu’à 10 secondes.
4Positionnement de l’appareil et
branchements
Les unités de lecture et de commande sont prévues
pour une installation en rack 19" (= 482mm) mais
elles peuvent être directement posées sur une table.
L’unité de lecture doit, dans tous les cas, être placée
à l’horizontale ; l’unité de commande, peut être
installée comme souhaité, par exemple elle peut
également être placée de manière inclinée. Pour un
montage en rack, 3 unités sont nécessaires pour
l’unité de commande et 2 unités pour l’unité de
lecture (1 unité = 44,45mm).
Avant d’effectuer ou de modifier les branche-
ments, assurez-vous que le lecteur CD/MP3 et les
autres appareils reliés sont éteints.
1) Reliez l’unité de commande et l’unité de lecture
avec les deux cordons de liaison livrés :
Lorsque l’appareil est définitivement retiré
du service, vous devez le déposer dans
une usine de recyclage adaptée pour con-
tribuer à son élimination non polluante.
AVERTISSEMENT Cet appareil est alimenté
par une tension dangereuse
230V~. Ne touchez jamais
l’intérieur de l’appareil et ne
faites rien tomber dans les
ouïes de ventilation car, en cas
de mauvaise manipulation,
vous pourriez subir une dé-
charge électrique.
posizione TACT
per il comando tramite un pulsante
posizione CUE/PLAY
Tramite un impulso di comando inviato dal
mixer, il lettore viene avviato dal punto
cue/riportato sul punto cue e messo in pausa
se si apre/chiude il fader del mixer.
43 Presa jack mono 3,5 mm per il telecomando
della funzione “Start/Pausa” del lettore 1 tramite
un mixer – vedi cap. 6
44 Uscita audio DIGITAL OUT del lettore 1
45 Uscita audio analogica LINE OUT con livello
Line del lettore 1
46 Presa di collegamento per l’unità di comando:
collegarla con la presa REMOTE CONTROL/
CONNECTTO MAIN UNIT 1 tramite uno dei cavi
di collegamento in dotazione
2Avvertenze di sicurezza
L’apparecchio è conforme a tutte le direttive richie-
ste dell’UE e pertanto porta la sigla .
Si devono osservare assolutamente anche i
seguenti punti:
●Far funzionare l’apparecchio solo all’interno di
locali. Proteggerlo dall’acqua gocciolante e dagli
spruzzi d’acqua, da alta umidità dell’aria e dal
calore (temperatura d’impiego ammessa fra
0–40°C).
●Non posare contenitori pieni di liquidi, p.es.
bicchieri, sull’apparecchio.
●Dev’essere garantita la libera circolazione dell’a-
ria per dissipare il calore che viene prodotto all’in-
terno dell’apparecchio. Non coprire le fessure
d’aerazione.
●Non mettere in funzione l’apparecchio e staccare
subito la spina rete se:
1. l’apparecchio o il cavo rete presentano dei
danni visibili;
2. dopo una caduta o dopo eventi simili sussiste il
sospetto di un difetto;
3. l’apparecchio non funziona correttamente.
Per la riparazione rivolgersi sempre ad una offi-
cina competente.
●Il cavo rete, se danneggiato, può essere sostituito
solo dal costruttore o da un laboratorio autorizzato.
●Staccare il cavo rete afferrando la spina, senza
tirare il cavo.
●Nel caso di uso improprio, di collegamento sba-
gliato, di impiego scorretto o di riparazione non a
regola d’arte non si assume nessuna responsabi-
lità per eventuali danni consequenziali a persone
o a cose e non si assume nessuna garanzia per lo
strumento.
3Possibilità d’impiego
Il lettore CD/MP3, CD-340USB, con 2 lettori CD è
stato realizzato specialmente per un uso DJ profes-
sionale. Infatti, molte funzioni sono previste apposi-
tamente per quell’impiego, p.es. riproduzione di un
titolo singolo, il beatcounter automatico, la riprodu-
zione senza interruzione di due loop senza fine
oppure la memorizzazione di 765 punti hot-cue.
Con il CD-340USB si possono riprodurre CD
audio standard (CD-DA= compact disc digital audio)
e CD con titoli nel formato MP3, anche CD masteriz-
zati in proprio (Audio CD-R). Nei CD riscrivibili (CD-
RW) ci possono essere dei problemi durante la
riproduzione, a seconda del tipo di CD, del masteriz-
zatore e del programma di masterizzazione. Tramite
la porta USB si possono riprodurre dei file MP3 da
un disco rigido o da un USB stick.
Il lettore CD/MP3 è equipaggiato con una memo-
ria anti-shock che riesce a compensare colpi o
vibrazioni durante la scansione del CD per una
durata fino a 10 secondi.
4Collocamento e collegamenti
Le unità di comando e lettore sono previste per il
montaggio in un rack (482mm/19"), ma si possono
collocare anche liberamente su un tavolo. L’unità
lettore deve comunque essere collocata su un piano
perfettamente orizzontale. L’unità di comando in-
vece può essere montata a piacere, anche inclinata.
Per il montaggio in un rack, l’unità di comando
richiede 3 unità di altezza e l’unità lettore 2 unità di
altezza (1 unità di altezza = 44,45mm).
Prima di eseguire il collegamento o eventuali
modifiche, spegnere il lettore CD/MP3 e gli appa-
recchi da collegare.
1) Collegare l’unità di comando e il lettore mediante
i due cavi di collegamento in dotazione:
Presa CONNECT TO REMOTE CONTROL 2
(40) dell’unità lettore con la presa REMOTE
CONTROL/CONNECT TO MAIN UNIT 2 dell’u-
nità di comando e
presa CONNECT TO REMOTE CONTROL 1
(46) dell’unità lettore con la presa REMOTE
CONTROL/CONNECT TO MAIN UNIT 1 dell’u-
nità comando.
2) Se il vostro mixer o amplificatore è equipaggiato
con ingressi digitali, questi si possono collegare
con le prese RCA gialle DIGITAL OUT (38 e 44).
Nel caso di apparecchi senza ingressi digitali,
collegare le uscite stereo LINE OUT (39 e 45) – L
= canale sinistro e R = canale destro – con gli
ingressi per lettori CD del mixer o dell’amplifica-
tore servendosi di cavi con connettori RCA.
3) Le unità lettore del CD-340USB possono essere
avviate o messe in pausa tramite un mixer con
Se si desidera eliminare l’apparecchio defi-
nitivamente, consegnarlo per lo smalti-
mento ad un’istituzione locale per il
riciclaggio.
AVVERTIMENTO L’apparecchio funziona con
pericolosa tensione di rete
(230 V~). Non intervenire mai
al suo interno e non inserire
niente nelle fessure di aera-
zione! Esiste il pericolo di una
scarica elettrica.
18
I
F
B
CH

prise CONNECT TO REMOTE CONTROL 2 (40)
de l’unité de lecture à la prise REMOTE CON-
TROL/CONNECT TO MAIN UNIT 2 de l’unité de
commande et
prise CONNECT TO REMOTE CONTROL 1 (46)
de l’unité de lecture à la prise REMOTE CON-
TROL/CONNECT TO MAIN UNIT 1 de l’unité de
commande
2) Si la table de mixage ou l’amplificateur est dotée
d’entrées digitales, reliez-les aux prises jaunes
RCA DIGITAL OUT (38 et 44).
Sur les appareils dépourvus d’entrée digitale,
reliez les sorties stéréo LINE OUT (39 et 45) –
L= canal gauche et R = canal droit – via les cor-
dons RCA, aux entrées lecteur CD sur la table de
mixage ou l’amplificateur.
3) Les lecteurs du CD-340USB peuvent être
démarrés ou mis sur Pause via une table de
mixage avec fonction de démarrage électrique.
Voir chapitre 6 pour le branchement de la com-
mande.
4) Reliez enfin la fiche du cordon secteur (41) à une
prise 230V ~/50Hz.
5Utilisation
L’utilisation des deux lecteurs est en tout point iden-
tique.
5.1 Lecture de CD, disque dur ou clé USB
1) Avec l’interrupteur POWER (35), allumez le lec-
teur CD/MP3. Si un CD est inséré, diverses infor-
mations sur le premier titre apparaissent (cha-
pitre 5.2) après la reconnaissance du CD, sur
l’affichage (3). Si aucun CD n’est inséré,
(pas de CD) s’affiche.
2) Pour insérer un CD, ouvrez le tiroir CD (33) avec
la touche (9 ou 34) . Sur l’affichage,
(ouvert) s’affiche. Insérez le CD, inscription sur le
dessus et refermez le tiroir CD avec la touche .
Si après l’insertion du CD, le premier titre doit
être lu, fermez le tiroir CD avec la touche
(28).
3) En plus ou à la place, une clé USB peut être
placée dans la connexion USB (31) ou un disque
dur peut être relié à la connexion USB. Pour
commuter sur la connexion USB, mettez tout
d’abord le lecteur sur Arrêt avec la touche
TIME/STOP (10). [Maintenez la touche enfoncée
pendant deux secondes jusqu’à ce que la ligne
de texte (s) affiche STOP]. Ensuite, appuyez sur
la touche MULTI (13) puis sur la touche numéri-
que 7 – USB/CD (12). En bas à gauche sur l’af-
fichage, (o) s’affiche. Pour revenir au CD,
activez une nouvelle fois les mêmes touches ;
l’affichage indique à nouveau .
Conseil
a) Tant que la connexion USB est sélectionnée,
le tiroir CD sur le même côté du lecteur ne
peut être ouvert.
b) Avant de retirer la clé USB ou de débrancher
le disque dur de l’appareil, mettez le lecteur
sur Arrêt avec la touche TIME/STOP ; sinon,
des dysfonctionnements peuvent se produire,
ils ne pourront être résolus qu’en éteignant
puis rallumant le lecteur CD/MP3.
4) Pour démarrer avec le premier titre, enfoncez la
touche (28) [si le tiroir CD a été fermé avec la
touche ]. Pendant la lecture, l’affichage indique
le symbole (n).
5) Pour sélectionner un autre titre :
a) sélectionnez le numéro du titre avec les tou-
ches numériques (12) ou
b) utilisez les touches TRACK (27)
avec la touche +10, le lecteur fait un saut de
10 titres vers l’avant.
avec la touche , on avance toujours au titre
suivant.
avec la touche , vous revenez au début du
titre en cours de lecture. Par plusieurs pres-
sions sur la touche , vous reculez toujours
d’un titre.
Pour sauter plusieurs titres, maintenez la tou-
che ou enfoncée.
6) A tout moment, la lecture peut être interrompue
avec la touche ; sur l’affichage, le symbole
Pause (p) apparaît ; les touches et CUE
(26) clignotent. Pour poursuivre la lecture, enfon-
cez une nouvelle fois la touche .
7) Une fois allumé, l’appareil est toujours sur le
mode Lecture titre par titre ; l’affichage indique
“SINGLE “ (e). Si un titre est lu jusqu’à la fin, l’ap-
pareil passe sur Pause au début du titre suivant.
Si cependant, un titre doit être lu en continu
après l’autre, passez sur le mode lecture de tous
les titres avec la touche CONT./SINGLE (11)
(voir chapitre 5.3.2).
8) Si un autre CD doit être inséré, passez tout
d’abord en mode Pause avec la touche sinon
le tiroir CD ne peut s’ouvrir avec la touche .
9) Avant d’éteindre l’appareil, fermez toujours les
tiroirs CD avec les touches pour protéger les
systèmes laser de lecture de la poussière. Etei-
gnez alors l’appareil avec l’interrupteur POWER.
5.1.1 Sélection d’un répertoire en mode MP3
Si plusieurs répertoires avec des fichiers de
données musicales existent sur le support audio
(CD, disque dur, clé USB), on peut les sélectionner
de plusieurs manières :
1) Appuyez tout d’abord sur la touche MULTI (13)
puis sur la touche numérique 9 – FOLDER (12).
Sur l’affichage, s’affiche maintenant “DIR” (r ) à la
place de “TRACK” (q). En plus, (folder
select = sélection répertoire) s’affiche. Le nom du
répertoire sélectionné s’affiche dans la ligne de
texte (s).
2) Sélectionnez le répertoire voulu avec la touche
ou (27). Les répertoires défilent dans l’or-
dre suivant et sont numérotés :
funzione di avviamento con fader. Per il collega-
mento vedi capitolo 6.
4) Alla fine inserire la spina del cavo rete (41) in una
presa (230V~/50Hz).
5Funzionamento
Il funzionamento dei due lettori è perfettamente
identico.
5.1 Riprodurre CD, disco rigido o USB stick
1) Accendere il lettore CD/MP3 con l’interruttore
on/off POWER (35). Se è inserito un CD, dopo la
lettura si vedono sul display (3) delle informazioni
sul primo titolo (cap. 5.2). Se non è inserito nes-
sun CD, si vede (nessun CD).
2) Per inserire un CD, aprire il cassetto CD (33) con
il tasto (9 o 34). Sul display appare
(aperto). Introdurre il CD con la scritta rivolta in
alto e richiudere il cassetto con il tasto .
Se dopo l’introduzione del CD si deve ripro-
durre il primo titolo, chiudere il cassetto con il
tasto (28).
3) In più o in alternativa si può inserire un USB stick
nella porta USB (31) o con la stessa porta si può
collegare un disco rigido. Per passare alla con-
nessione USB occorre prima fermare il lettore
premendo il tasto TIME/STOP (10). [Tener pre-
muto il tasto per 2 sec., finché sulla riga di testo
(s) si legge STOP.] Quindi premere il tasto MULTI
(13) e successivamente il tasto numerico 7 –
USB/CD (12). In basso, a sinistra del display si
vede (o). Per ritornare al CD, azionare un’al-
tra volta gli stessi tasti; il display indica nuova-
mente .
N.B.
a) Finché è selezionata la connessione USB, il
cassetto CD del medesimo lato del lettore non
può essere aperto.
b) Prima di staccare un USB stick o un disco rigido
dall’apparecchio, il lettore deve essere portato
nella modalità di Stop con il tasto TIME/STOP.
Altrimenti si possono generare delle funzioni
errate che possono essere eliminate solo spe-
gnendo e riaccendendo il lettore CD/MP3.
4) Per iniziare con il primo titolo, premere il tasto
(28) [se il cassetto CD è stato chiuso con il
tasto ]. Durante la riproduzione, sul display è
visibile il simbolo (n).
5) Per selezionare un altro titolo
a) chiamare il numero del titolo con i tasti nume-
rici (12) oppure
b) usare i tasti TRACK (27)
tasto +10: saltare in avanti di 10 titoli
tasto : saltare al titolo successivo
tasto : saltare all’inizio del titolo attuale.
Premendo ancora il tasto , si torna indietro
di un titolo.
Per saltare su più titoli, tenere premuto il tasto
o .
6) Con il tasto , si può in qualsiasi momento
interrompere la riproduzione. Sul display si vede
il simbolo di pausa (p). I tasti e CUE (26)
lampeggiano. Per riprendere la riproduzione pre-
mere di nuovo il tasto .
7) Dopo l’accensione, l’apparecchio è sempre in
funzione di riproduzione di un singolo titolo, e il
display indica “SINGLE” (e). Al termine del titolo,
l’apparecchio si ferma in pausa all’inizio del titolo
successivo. Per riprodurre automaticamente il
titolo successivo, attivare la riproduzione di tutti i
titoli mediante il tasto CONT./SINGLE (11) [vedi
anche cap. 5.3.2].
8) Per inserire un altro CD, attivare dapprima la
pausa con il tasto , altrimenti, il cassetto CD
non si apre con il tasto .
9) Prima di spegnere l’apparecchio chiudere sem-
pre i cassetti CD con i tasti , per proteggere i
sistemi di scansione laser dallo sporco. Solo al-
lora spegnere l’apparecchio con l’interruttore
on/off POWER.
5.1.1 Selezionare la cartella con funzionamento
MP3
Se sul supporto audio (CD, disco rigido, USB stick)
sono presenti più cartelli con file di musica, questi si
possono selezionare procedendo come segue:
1) Per prima cosa premere il tasto MULTI (13) e
quindi il tasto numerico 9 – FOLDER (12). Sul
display, al posto dell’indicazione “TRACK” (q) si
vede ora “DIR” (r). In più è indicato (folder
select = scegliere cartella). Il nome della cartella
scelta appare ora nella riga di testo (s).
2) Con il tasto o (27) si seleziona la cartella.
Le cartelle si presentano nel seguente ordine e
con la seguente numerazione:
con titolo sul livello senza titolo sul livello
principale principale
Fig. 6 Numerazione delle cartelle
Il numero della cartella (a) è segnato sopra l’indi-
cazione “DIR” (r). Se al livello principale si tro-
vano dei titoli, sono assegnati alla cartella
“ROOT” con il n. 1.
3) Dopo la scelta della cartella, con il tasto MULTI e
con il tasto numerico 9 ritornare alla scelta del
titolo. È scelto il primo titolo della cartella. Per
selezionare altri titoli, azionare i tasti numerici
(12) o i tasti TRACK (27).
ROOT 1
234
5
6
7
8
910
11
Title A
Title B
Title C
…
123
4
5
6
7
89
10
11
12
13
19
I
F
B
CH

avec titre dans le sans titre dans le
répertoire principal répertoire principal
Schéma 6 numérotation des répertoires
Le numéro du répertoire (a) est indiqué au-des-
sus de l’affichage “DIR” (r ). Si des titres se trou-
vent dans le répertoire principal, ils sont attribués
au répertoire “ROOT” avec le numéro 1.
3) Après la sélection du répertoire, revenez à la
sélection de titres avec la touche MULTI et la tou-
che numérique 9. Le premier titre dans le réper-
toire est sélectionné. Pour sélectionner d’autres
titres, activez les touches numériques (12) ou les
touches TRACK (27).
5.2 Affichage du numéro des titres, de la
durée, du nombre de beats par minute et
du mode repos (veille)
Dans le réglage de base, une fois l’appareil allumé,
l’affichage indique les informations suivantes :
1. le nombre de titres (b) sur le CD ou dans le réper-
toire sélectionné
2. le numéro de titre sélectionné (a)
3. la durée restante du titre sélectionné numérique-
ment (t) et graphiquement (u) : les secondes sont
divisées en 75 “Frames” (F)
4. Pour des titres MP3, l’affichage MP3 (d) apparaît
dans l’affichage ainsi que le nom de fichier du
titre sélectionné dans la ligne de texte (s) [30 si-
gnes au plus].
Si pour un fichier MP3, des informations sur le
titre, interprète ou album sont mémorisées (ID3
Tags), elles peuvent être affichées sur la ligne de
texte. En appuyant sur la touche MULTI (13), puis
sur la touche numérique 8 – ID3 (12), on peut
commuter la ligne de texte dans l’ordre suivant :
[Title] : titre
[Album] : nom de l’album
[Artist] : interprète
[File] : nom du fichier
La durée de lecture (t + u) peut être commutée par
plusieurs pressions brèves sur la touche TIME/
STOP (10) [si la touche est maintenue enfoncée
plus longtemps, le lecteur passe sur Arrêt].
1. pression : la durée déjà lue du titre en cours :
affichage “ELAPSED” (f)
pression suivante : la durée restante de tout le CD :
affichage “TOTAL REMAIN” (h + i) – pas en mode
MP3
pression suivante : réglage de base (affichage de la
durée restante du titre en cours) : affichage
“REMAIN” (i)
5.2.1 Bargraphe
En plus de l’affichage numérique de la durée (t), le
bargraphe (u) indique par sa longueur la durée de
manière graphique. Il clignote dans toute sa lon-
gueur pour signaler les 30 dernières secondes d’un
titre, les 15 dernières secondes sont signalées par
un clignotement plus rapide.
5.2.2 Compteur de beats
Après le démarrage d’un titre, le compteur de beats
détermine automatiquement le nombre de beats par
minute. Peu de temps après, le nombre s’affiche en
bas à droite sur l’affichage dans la zone BPM (v). Si
le compteur de beats ne peut pas déterminer de
valeur correcte (par exemple pour des morceaux de
musique calmes), commutez en mode manuel :
1) Maintenez la touche BPM (29) enfoncée pendant
3 secondes environ jusqu’à ce que le symbole
(w) s’éteigne.
2) Appuyez plusieurs fois sur la touche BPM au
rythme de la musique de manière à afficher le
nombre de beats.
3) Pour revenir au mode automatique, maintenez à
nouveau la touche BPM enfoncée pendant
3 secondes jusqu’à ce que le symbole soit à
nouveau visible.
5.2.3 Mode repos (veille)
Si les deux lecteurs restent sur Pause plus de
30 minutes, l’appareil passe automatiquement en
mode repos. Les deux systèmes lasers sont ainsi
déconnectés, et donc préservés. L’affichage indique
(sommeil) et toutes les touches illuminées
ainsi que les LEDs sur l’unité de commande s’étei-
gnent. En activant une touche quelconque, vous
revenez au mode de fonctionnement précédent.
Remarque : Si un lecteur est sur Arrêt, l’appareil ne
passe pas en mode repos.
5.3 Sélection du mode de fonctionnement
5.3.1 Lecture titre par titre
Une fois le lecteur CD/MP3 allumé, le mode lecture
titre par titre est toujours activé ; ce mode est spé-
cialement conçu pour une utilisation DJ.
1. L’affichage indique “SINGLE” (e).
2. Après le placement d’une support audio (CD, clé
USB, disque dur) et la sélection d’un titre, le lec-
teur CD/MP3 se met exactement à l’endroit où la
musique commence (pas à l’index de temps
0:00:00).
Cet endroit est automatiquement mémorisé
comme point de départ ; l’affichage indique
brièvement . Après le démarrage du titre, il
est possible de revenir avec la touche BOP (25)
ou la touche CUE (26) à ce point de départ.
ROOT 1
234
5
6
7
8
910
11
Title A
Title B
Title C
…
123
4
5
6
7
89
10
11
12
13
5.2 Visualizzazione del numero del titolo,
della durata, del numero di battute al
minuto, della modalità sleep
Nell’impostazione base, il display offre dopo l’accen-
sione le seguenti informazioni:
1. il numero (b) dei titoli sul CD o nella cartella sele-
zionata
2. il numero del titolo selezionato (a)
3. il tempo restante del titolo attuale sotto forma
numerica (t) e grafica (u); i secondi sono suddi-
visi in 75 così detti frames (F)
4. per i titoli nel formato MP3, sul display si vede
l’indicazione MP3 (d) e nella riga di testo (s) il
nome del file del titolo scelto [max. 30 caratteri].
Se per un file MP3 sono memorizzate delle indi-
cazioni su titolo, interpreti e albo (tag ID3), pos-
sono essere visualizzate nella riga di testo. Pre-
mendo il tasto MULTI (13) e quindi il tasto
numerico 8 – ID3 (12), la riga di testo cambia con
il seguente ordine:
[Title] = titolo
[Album] = nome dell’albo
[Artist] = interprete
[File] = nome del file
Con una breve pressione ripetuta del tasto TIME/
STOP (10) è possibile cambiare l’indicazione della
durata (t + u) [se il tasto viene premuto per un tempo
prolungato, il lettore va su stop]:
prima pressione del tasto
il tempo già passato del titolo corrente; indica-
zione “ELAPSED” (f)
altra pressione del tasto
il tempo restante dell’intero CD; indicazione
“TOTAL REMAIN” (h + i) – non per il funzio-
namento MP3
altra pressione del tasto
ritorno all’impostazione base (indicazione del
tempo restante del titolo corrente); indicazione
“REMAIN” (i).
5.2.1 Diagramma a barre
Oltre all’indicazione numerica del tempo (t), il dia-
gramma a barre (u) offre, con la sua lunghezza, una
visualizzazione grafica del tempo. Gli ultimi 30 se-
condi di un titolo sono segnalati con il lampeggìo del
diagramma a barre in tutta la sua lunghezza, con
aumento della frequenza negli ultimi 15 secondi.
5.2.2 Beatcounter
Dopo l’avvio di un titolo, il beacounter determina
automaticamente il numero delle battute al minuto.
Dopo poco tempo, in basso a destra del display, nel
campo BPM (v) si vede tale numero. Se il beatcoun-
ter non riesce a rilevare una valore valido (p.es. con
titoli calmi), passare alla modalità manuale:
1) Tener premuto il tasto BPM (29) per 3 secondi ca.
finché il simbolo (w) si spegne.
2) Premere il tasto BPM alcune volte nel ritmo della
musica in modo che venga indicato il numero
delle battute.
3) Per ritornare al conteggio automatico, tenere pre-
muto il tasto BPMancora per 3 secondi finché il
simbolo appare di nuovo.
5.2.3 Modalità sleep
Se entrambi i lettori CD sono in pausa per oltre
30 minuti, l’apparecchio passa automaticamente
alla modalità sleep. I due sistemi di scansione laser
sono disattivati per non consumarsi inutilmente. Il
display indica (sonno), e tutti i tasti illuminati
nonché tutti i LED dell’unità di comando si spen-
gono. Azionando un qualsiasi tasto si ritorna alla
modalità normale di funzionamento.
N.B.: Se un lettore è su Stop, la modalità sleep non
viene attivata.
5.3 Selezionare il modo di funzionamento
5.3.1 Riproduzione di un singolo titolo
Dopo l’accensione è attivata sempre la riproduzione
di singoli titoli, prevista specialmente per l’uso in di-
scoteca:
1. Il display segna “SINGLE” (e).
2. Dopo la lettura del supporto audio (CD, USB
stick, disco rigido) o dopo la selezione di un titolo,
il lettore CD/MP3 si trova esattamente sul punto
dove inizia la musica (non sull’indice di tempo
0:00:00).
Questo punto viene memorizzato automatica-
mente come punto di avvio. Il display segnala
brevemente . Dopo l’avvio del titolo, con i
tasti BOP (25) o CUE (26) si può ritornare su tale
punto.
3. Dopo la riproduzione di un titolo, il lettore si mette
in pausa esattamente nel punto dove inizia la
musica del titolo successivo. Tale punto rimane
quindi memorizzato come nuovo punto di avvio.
5.3.2 Riproduzione di tutti i titoli e ripetizione
senza fine di tutti i titoli
1) Se si desidera riprodurre un titolo dopo l’altro
senza interruzione, attivare la riproduzione di tutti
i titoli con il tasto CONT./SINGLE (11). Il display
passa da “SINGLE” (e) a “CONT” (g). La riprodu-
zione termina alla fine dell’ultimo titolo del CD o
della cartella selezionata.
2) Per una ripetizione senza fine di tutti i titoli del CD
o della cartella, premere di nuovo il tasto CONT./
SINGLE. Su display si vede in più “TOTAL” (c).
3) Per ritornare alla riproduzione di un singolo titolo
premere di nuovo il tasto CONT./SINGLE.
20
I
F
B
CH
Strona się ładuje...
Strona się ładuje...
Strona się ładuje...
Strona się ładuje...
Strona się ładuje...
Strona się ładuje...
Strona się ładuje...
Strona się ładuje...
Strona się ładuje...
Strona się ładuje...
Strona się ładuje...
Strona się ładuje...
Strona się ładuje...
Strona się ładuje...
Strona się ładuje...
Strona się ładuje...
Strona się ładuje...
Strona się ładuje...
Strona się ładuje...
Strona się ładuje...
Strona się ładuje...
Strona się ładuje...
Strona się ładuje...
Strona się ładuje...
Strona się ładuje...
Strona się ładuje...
-
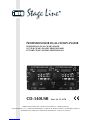 1
1
-
 2
2
-
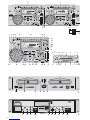 3
3
-
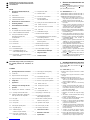 4
4
-
 5
5
-
 6
6
-
 7
7
-
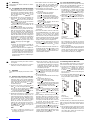 8
8
-
 9
9
-
 10
10
-
 11
11
-
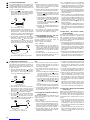 12
12
-
 13
13
-
 14
14
-
 15
15
-
 16
16
-
 17
17
-
 18
18
-
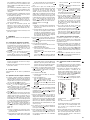 19
19
-
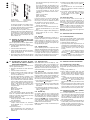 20
20
-
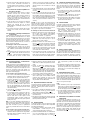 21
21
-
 22
22
-
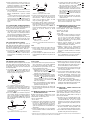 23
23
-
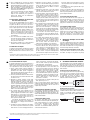 24
24
-
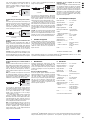 25
25
-
 26
26
-
 27
27
-
 28
28
-
 29
29
-
 30
30
-
 31
31
-
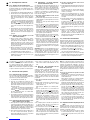 32
32
-
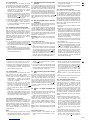 33
33
-
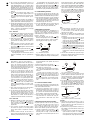 34
34
-
 35
35
-
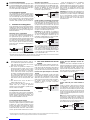 36
36
-
 37
37
-
 38
38
-
 39
39
-
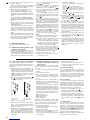 40
40
-
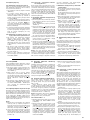 41
41
-
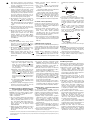 42
42
-
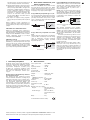 43
43
-
 44
44
-
 45
45
-
 46
46


IMG Stage Line CD-340USB Instrukcja obsługi
- Kategoria
- Odtwarzacze CD
- Typ
- Instrukcja obsługi
w innych językach
- español: IMG Stage Line CD-340USB Manual de usuario
- italiano: IMG Stage Line CD-340USB Manuale utente
- Deutsch: IMG Stage Line CD-340USB Benutzerhandbuch
- français: IMG Stage Line CD-340USB Manuel utilisateur
- Nederlands: IMG Stage Line CD-340USB Handleiding