Krups XP2240 10 Instrukcja obsługi
- Kategoria
- Ekspresy do kawy
- Typ
- Instrukcja obsługi


Français
1
English
Before turning your espresso machine on, read these instructions for use carefully.
Only use an earthed socket to plug the machine in. Check that the power voltage indicated on the
nameplate of the appliance corresponds to that of your mains installation.
Do not remove the filter holder containing the ground coffee while the water is going through,
because the appliance is under pressure at that time.
Do not use the appliance if the drip tray and the grid are not in place.
Remove the plug if a problem occurs as the coffee is passing through, or before you clean the
appliance.
Do not unplug the appliance by pulling on the cord, and do not run the cord over a sharp edge or
the corner of a piece of furniture.
Ensure that the cord and your hands do not touch the hot parts of the appliance (filter holder, steam
nozzle).
Never immerse your appliance in water.
Keep the appliance out of the reach of children and do not leave the power cord hanging.
Refer to the instructions for descaling your appliance.
SAFETY INSTRUCTIONS
ESPRESSO PART
a - Espresso and coffee maker water tank lid
b - Removable espresso water tank
c - Measuring spoon
d - Cup tray
e - Espresso on/off switch
f - Function switch
f1- Coffee position
f2-Off position
f3-Steam reheating position
f4-Steam position
g - Percolation head
h - Filter holder
i - Drip tray grid
j - Drip tray
k - Multidirectional steam nozzle
l - Cappuccino accessory
FILTER COFFEE MAKER PART
A - Filter holder cover
B - Lid opening button
C - Coffee maker water tank
D - Filter holder with locking handle
E - Graduated water level in coffee maker water
compartment
F - Graduated jug
G - Hotplate
H - Receptacle for “XS1000 Duo Filter” water fil-
ter (not supplied)
I - Filter coffee maker on/off button
DESCRIPTION
We appreciate your trust in and your loyalty to Krups products. Your machine is equipped with a filter
holder which boasts three exclusive systems:
- One for the gradual tamping of the espresso ground coffee as the filter holder is being positioned
(KTS "Krups Tamping System").
- Another is for ejecting the used grounds.
- The last is for using E.S.E. (Easy Serving Espresso) or soft pods.
It is also removable, and so can be frequently cleaned to be maintained in perfect working order. For your
safety, your filter holder is equipped with a locking system to keep it in place when the pressure rises.
Downloaded from www.Manualslib.com manuals search engine

English
2
Do not turn the appliance on if it is damaged or if the cord is in poor condition.
If the power cable is damaged, it must be replaced by the manufacturer, its after-sales service or any
person with similar qualifications, in order to avoid all danger.
Make sure the filter holder is tightly fitted before running the coffee through.
This appliance is not intended for use by persons (including children) with reduced physical, sensory
or mental capabilities, or lack of experience and knowledge, unless they have been given supervision
or instruction concerning use of the appliance by a person responsible for their safety.
Children must be supervised to ensure that they do not play with the appliance.
The accessories and the removable parts of the appliance are not dishwasher safe.
This appliance is intended to be used only in the household.
It is not intended to be used in the following applications, and the guarantee will not apply for:
- Staff kitchen areas in stores, offices and other working environments;
- Farm houses,
- By clients in hotels, motels and other residential type environments,
- Bed and breakfast type environments.
This product has been designed for domestic use only. Any commercial use, inappropriate use or
failure to comply with the instructions, the manufacturer accepts no responsibility and the guarantee will
not apply.
Pump: 15 bars
KTS: Krups Tamping System, for automatic and optimum tamping of the ground coffee.
Filter holder with grounds ejection system. Compatible with ground coffee and all types of pods, ESE
or flexible.
Steam function
Automatic shutoff after 30 minutes (protection of the environment).
Removable water compartment (capacity: 1.1 litres)
Power: 2450 W
Voltage: 220-240 V – 50/60Hz
Anti-overheating safety mechanisms
Dimensions: H. 320 mm, L. 345 mm, P. 290 mm
IMPORTANT!
Operating voltage: This appliance is designed to work only at alternating current
220-240 V.
Type of use: Your appliance is EXCLUSIVELY designed FOR USE IN THE HOME.
MAKING AN ESPRESSO
TIPS
For an espresso with intense flavour, we recommend using freshly ground special espresso coffee which
is ideal for the delicacy of this type of drink, along with cups with a capacity not exceeding 50 ml.
Keep the espresso ground coffee in the refrigerator, it retains its flavour longer.
Do not fill your filter holder to the brim, but use the measuring spoon (1 cup = 1 spoon - 2 cups =
2 spoons).
TECHNICAL CHARACTERISTICS:
Downloaded from www.Manualslib.com manuals search engine

Français
3
English
If you do not use the appliance for more than 5 days, rinse and drain the water tank.
Before removing the water tank to fill or empty it, always turn the appliance off.
Always place the unit on a flat, stable, heat-resistant surface.
To obtain an espresso at exactly the right temperature, we recommend that you preheat your cups.
To prolong the life of your appliance, we recommend you always use a Claris Aqua Filter System
cartridge (reference: F088) and that you descale the appliance at regular intervals.
IMPORTANT!
Before using for the first time, after a prolonged period of inactivity or after desca-
ling, the appliance must be cleaned as described in paragraph 1: "USING FOR THE
FIRST TIME".
Before using your espresso machine, clean all the accessories in soapy water and dry them.
If you do not use the Claris cartridge, refer directly to the section "RINSE YOUR APPLIANCE.
INSTALLATION OF THE CLARIS CARTRIDGE
If you use a Claris cartridge, please apply the following procedure to fill it with water.
Screw the Claris filter into the bottom of the water tank.
Fill it with water (fig. 2).
Replace the water tank by positioning it firmly, to ensure the water inlet is in place, and close the lid
(fig.3)
Turn the appliance on by pressing the "On / Off" button (fig.4).
Turn the switch to the “steam preheating” position. Once the light stops blinking, turn back the switch
to the "off" position. Repeat this operation 4 more times.
To make sure the Claris cartridge is full of water, place a container under the percolation head, turn the
switch to the "coffee" position and make sure some water is running through. If not, repeat the above
procedure.
IMPORTANT:
The Claris cartridge needs to be replaced every 2 months if it is used daily.
RINSING YOUR APPLIANCE
Then rinse the appliance. To do so:
Turn the machine on and fill the water tank
Insert the filter holder (without ground coffee) in the appliance (fig.7).
Place a container of sufficient volume under the filter holder.
As soon as the appliance reaches the required temperature, the "on/off" light stops flashing. Turn the
switch to the “coffee” position and let all the water run from the water compartment (fig.8).
If necessary, stop the operation by turning the switch to the "off" position (fig. 9) to empty the
container and then resume the operation.
Empty the container and unlock the filter holder: press the "OPEN" button on the filter holder and
turn it to the left (fig.10).
1.USING FOR THE FIRST TIME
Downloaded from www.Manualslib.com manuals search engine

English
4
In order to release all the aromas of the coffee and ensure your complete satisfaction, this machine
pre-infuses each coffee. The pump works 3 seconds, stops the following 3 seconds and then the cycle
continues until the end of the preparation.
PREHEATING THE ACCESSORIES
For the best results, we recommend that you preheat the accessories (filter holder and cups)
without ground coffee. To do so:
Fill the water tank and turn the machine on (fig. 1, 2, 3 and 4).
Put the filter holder in place, place the cups below.
As soon as the appliance reaches the required temperature, the light stops flashing.
Turn the switch to the “coffee” position (fig.8).
When the cups are filled with hot water, turn the switch to the "off" position (fig.9).
Remove the cups.
Unlock the filter holder: press “OPEN” while turning the filter holder to the left and remove it from the
machine (fig. 10).
Note: When the appliance is hot, the espresso cups can be preheated on the cup warming plate.
WITH ESPRESSO GROUND COFFEE
The type of coffee you choose will determine the strength and taste of your espresso.
Fill the water tank and turn the machine on (fig. 1, 2, 3 and 4). During the pre-heating phase, the
indicator lamp will flash.
Using the measuring spoon, place the espresso ground coffee in the filter holder: one spoon (full to
the brim) per cup (fig.5).
Remove the excess espresso ground coffee from the edge of the filter.
IMPORTANT:
Do not tamp the coffee down in the filter holder. The coffee is automatically tamped
using the KTS “Krups Tamping System”.
Only use Espresso Ground Coffee. Do not use any other coffee such as instant coffee.
Insert the filter holder in the appliance by turning it to the right as far as it will go, up to the stop
(fig.7).
Put one or two cups under the filter holder.
As soon as the appliance reaches the required temperature, the light stops flashing.
Turn the switch to the “coffee” position (fig.8).
When you have the desired amount of coffee, turn the switch to the "off" position (fig.9)
Unlock the filter holder: press “OPEN” while turning the filter holder to the left and remove it from the
machine (fig. 10).
Remove the grounds using the ejection system by pressing the "EJECT" button located between the
two coffee outlet nozzles (fig.11). Wash the filter under running water, pressing "EJECT" to eliminate
the remnants of grounds.
The filter holder now can be filled again to prepare other espressos.
WITH AN “E.S.E." ESPRESSO POD
“ESE” for “Easy Serving Espresso" is a packaged pod (44 mm diameter) of 7g of selected
coffee, ground and compacted between two paper filters, specially designed to make Italian
style ristretto (small and strong) espressos.
2. MAKING AN ESPRESSO
Downloaded from www.Manualslib.com manuals search engine

Français
5
English
This system allows immediate, simple, clean and comfortable use of your machine.
Fill the water tank and turn the machine on (fig. 1, 2, 3 and 4). During the pre-heating phase, the
indicator light will flash.
Tear the excess paper off the pod, put the E.S.E. pod in the filter holder with the red writing facing
down (fig.6).
Be sure to place all the paper inside the filter holder, otherwise there might be leaks.
If the pod is not placed correctly, the coffee you'll get in the cup will not be satisfactory.
Never use two pods together.
Follow the steps in figures 7 to 11 in the preparation of an espresso.
WITH A SOFT POD
Your machine is also compatible with soft pods (usually 60 mm in diameter). Given that this
kind of pod is not specifically designed for espresso machines, you will get a less full-bo-
died espresso than with an E.S.E. pod.
Fill the water tank and turn the machine on (fig. 1, 2, 3 and 4). During the pre-heating phase, the
indicator light will flash.
Place a soft pod in the filter holder. Never use two pods together. If the pod is not placed correctly,
the coffee you'll get in the cup will not be satisfactory.
Follow the steps in figures 7 to 11 in the preparation of an espresso.
The steam is used to foam up milk (for example to make a cappuccino or a cafe latte).
To produce steam, the pump works by emitting an intermittent noise.
After using the steam function, the appliance cools automatically by pumping cold water
through the heating system. During the pumping cycles, the excess steam in the heating system
is released with the hot water into the drip tray.
The steam and noise that accompany this phase are important for cooling the appliance.
NOTE:
during and after using the appliance, the metal parts of the steam nozzle can
be very hot.
USING THE STEAM NOZZLE TO FROTH MILK
Fill the water tank and turn the machine on (fig. 1, 2, 3 and 4).
Turn the switch to the “steam preheating” position. The indicator lamp flashes (fig.12).
Turn the steam nozzle towards the outside of the appliance.
Pour 60 to 100ml of very fresh, very cold milk into a small container of about 1/2 litre and which can
go under the steam nozzle. The milk and its container should be quite cold.
We recommend that you use pasteurised or UHT milk and that you avoid untreated milk.
As soon as the indicator lamp stops blinking, plunge the steam nozzle into the milk.
Turn the switch to the “steam” position (fig. 13).
For good results, hold the nozzle at the bottom of the container for about 25 seconds while the milk
heats (without however touching the bottom). Then bring the container down gradually so that the
nozzle moves up towards the surface (without ever coming out of the milk) (fig.14).
Once the froth has been formed, turn the switch to the “stop” position (fig.15).The appliance will
now automatically cool itself by launching 3 intermittent pumping cycles. Once this is automatic
operation is complete, you can make a coffee.
3. STEAM FUNCTION
Downloaded from www.Manualslib.com manuals search engine

English
6
IMPORTANT:
To avoid blocking the holes in the cappuccino accessory, the milk foam should
never reach the black plastic ring.
It is important to clean the cappuccino accessory after each use to prevent the milk from drying out on
the inside. To do so:
Place the cappuccino accessory in a container filled with water.
Turn the switch to the “steam preheating” position.
Once the light has stopped blinking, turn the switch to the "steam" position (to remove the remaining
milk) and run the steam for 30 seconds.
Turn the switch to the “stop” position.
Clean the cappuccino accessory with a damp cloth.
For thorough cleaning of the cappuccino accessory, see paragraph 4, "Cleaning and Maintenance".
ATTENTION!
The steam nozzle is still hot!
Do not wash your espresso machine accessories in the dishwasher.
OF THE APPLIANCE
Unplug the power supply before cleaning and let the appliance cool down.
Clean the outside of the appliance from time to time with a damp sponge. After use, the water tank
must be emptied.
Rinse the inside of the tank regularly.
When a thin white layer starts to form in the tank, carry out a descaling operation (see paragraph 5
"DESCALING").
OF THE DRIP TRAY
The drip tray must be emptied after each time the appliance is used. Lift up slightly and remove it
from the appliance.
If multiple espressos are prepared one after the other, it should be emptied from time to time (every
7 to 8 espressos approximately) (fig.19&20)
The presence of water is normal and is not the sign of a leak.
If necessary, clean the drip drawer and its grid with water and a little gentle washing-up liquid, rinse
and dry. When reassembling the components, make sure everything is in the right place.
OF THE PERCOLATION HEAD AND FILTER HOLDER
They must be cleaned after each use. Simply wipe a damp cloth over the percolation head (fig. 21)
and clean the filter holder under running water and a little gentle washing-up liquid.
Do not use alcohol or solvent-based cleaning products.
For best results, you can activate the "EJECT" button several times during rinsing.
We recommend that you shake the filter holder thoroughly in order to remove all the water.
4. CLEANING AND MAINTENANCE OF THE APPLIANCE
Downloaded from www.Manualslib.com manuals search engine

Français
7
English
Rinse and dry.
When not using your espresso coffee maker, do not leave the filter holder on it, in order to prevent
wear to the joint.
For more thorough cleaning, the filter holder can be dismantled:
You can remove the black plastic part where the coffee outlets and the "EJECT" button are to be
found: turn it to the left and pull sharply (fig. 22).
Clean the various components under running water and a little gentle washing-up liquid.
Rinse and dry.
Replace the black plastic part in the metal component, turn it to the right until the two arrows on each
component line up.
If the percolation head is very clogged, unscrew the grid using a Phillips screwdriver, clean it and
reassemble it, screwing tightly (fig.23).
OF THE CAPPUCCINO ACCESSORY
To clean it, unclip it from its articulated arm by pulling the black ring downwards (fig.16).
This accessory is composed of 3 parts: the inner tube, the outer tube and a stainless steel protection.
To clean this accessory, take it apart completely.
To remove the inner tube, unscrew the end of the steam nozzle.
You can then remove the stainless steel protection.
Clean the 3 components under running water and a little gentle washing-up liquid (fig. 17).Rinse and
dry.
Once the steam nozzle has been cleaned and reassembled, taking care to tighten it properly, replace
it on its articulated arm, ensuring that the mobile black plastic ring is held downwards.
Then make a circular movement upwards in order to click with the steam nozzle. Then clip the black
plastic part by moving it upwards (fig.18).
The guarantee does not cover appliances which become faulty because the descaling operations have
not been carried out regularly.
Descale your espresso maker regularly with white vinegar or a packet of citric or sulphamic acid which
you can buy in hardware stores.
We recommend that you use the Krups descaling accessory, reference F054, available in Krups
authorised service centres. In addition to two descaling doses, this accessory includes a water hard-
ness tape tester to assess the required frequency with which your appliance should be descaled, in nor-
mal use. The amount of scale depends on the hardness of the water but also the level of use.
The frequency of descaling given by the F054 accessory is therefore purely indicative. If in doubt, it is
recommended to descale every month.
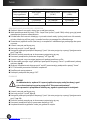
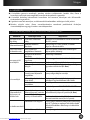
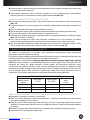
5.DESCALING
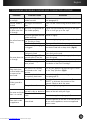
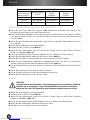
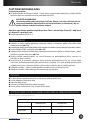
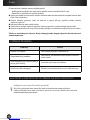
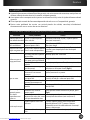
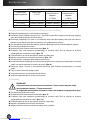
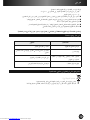
DESCALING FREQUENCY
Ave. number
coffees per week
Soft water
(<19°th)
Hard water
(19-30°th)
Very hard water
(>30°th)
Less than 7 Once a year Every 8 months Every 6 months
From 7 to 20 Every 4 months Every 3 months Every 2 months
Over 20 Every 3 months Every 2 months Every month
Downloaded from www.Manualslib.com manuals search engine

English
8
DESCALING THE STEAM CIRCUIT AND ESPRESSO
Empty the water compartment and put it back in place.
If your appliance is fitted with our Claris - Aqua Filter System F088 cartridge, please remove the
cartridge before the descaling operation.
Fill the tank with a mixture composed of three parts water for one part white vinegar or a mixture of
½ litre of water and a packet of citric or sulphamic acid available in hardware stores.
Insert the filter holder (without ground coffee) into the appliance and lock it by turning it to the right
as far as it will go.
Place a container underneath the steam nozzle.
Press the “on-off” button (fig.4).
Immediately turn the switch to the “steam” position (without stopping at the "steam preheating"
position) (fig.13).
Let the mixture run through the nozzle until steam appears.
Turn the switch back to the “stop” position (fig.15).
Place a container of sufficient volume under the filter holder.
Once the light stops blinking, turn the switch to the “coffee” position and let half of the mixture run
through (fig.8).
Turn the machine off using the "on off" button and leave the switch on the "coffee" position.
After 15 minutes, turn the machine back on.
Let the rest of the water run through.
Turn the switch to the “stop” position.
RINSING
IMPORTANT!
After descaling, perform 2-3 rinsing operations with clear water (without es-
presso ground coffee), as described in paragraph 1 "using for the first time".
Remember to rinse the steam circuit by following the instructions below:
Place a container underneath the steam nozzle.
Press the “on-off” button (fig.4).
Immediately turn the switch to the “steam” position (without stopping at the “steam preheating”
position). (fig.13).
Let the water run through the nozzle until steam appears.
Turn the switch back to the “stop” position.
The appliance is descaled and ready to be used again.
Your appliance is covered by guarantee but any connection or handling error or any use of the
appliance other than that described in these instructions renders the guarantee invalid.
This product has been designed for domestic use only. Any commercial use, inappropriate use or
failure to comply with the instructions, the manufacturer accepts no responsibility and the guarantee
will not apply.
No repair made because of a lack of descaling will be covered by the guarantee.
For any after-sales and spare parts problem, consult our Helpline or an authorised service dealer.
Helpline:
0845 602 1454 - UK
01 677 4003 - ROI
or consult our web site: www.krups.co.uk
6.GUARANTEE
Downloaded from www.Manualslib.com manuals search engine

Français
9
English
7. PROBLEMS, PROBABLE CAUSES AND CORRECTIVE ACTIONS
The water tank leaks
when it is carried.
The valve at the bottom of
the tank is dirty or defective.
The valve is blocked by
scale.
Wash the water tank and operate the valve at the
bottom of the tank with your finger.
Descale the appliance (paragraph 5).
Water leaks under
the appliance.
Internal leak.
Check the position of the tank. If the fault persists,
do not use the appliance, contact an approved
service centre.
Problems Possible causes Solutions
The espresso is not
hot enough.
The cups and the filter
holder are cold.
Preheat the accessories: cups and filter holder
(see paragraph 2).
The filter holder is
blocked
You forgot to unlock the
filter.
Press “OPEN” while turning the filter holder to the
left.
The grounds are not
dry after water has
run through.
You have not tightened the
filter holder properly.
Tighten the filter holder by turning it to the right
as far as it will go, up to the stop.
The coffee flows too
slowly.
You have tightened the filter
holder too much.
The ground coffee is too
fine, too fatty or floury.
The filter holder is dirty.
The water drip-through grid
is clogged.
Loosen it slightly.
Choose a slightly larger grained ground coffee.
Clean your filter holder (see paragraph 4).
When the appliance has cooled, clean the
percolation head with a damp cloth. (fig.21).
The water does not
run through.
No water in the tank.
Tank poorly fitted.
The filter is clogged. The
ground coffee is too fine.
Your appliance is scaled up.
The Claris cartridge has not
been primed.
Fill the tank.
Press firmly on the tank.
Clean the filter holder (see paragraph 4) and try
a less fine grind.
See paragraph 5
Refer to section 1 "Using for the first time" and
"installation of the Claris cartridge".
Water leaks from
the filter holder after
an espresso has
been made.
The switch has not been
positioned on the "stop"
position.
Formation of scale because
of especially hard water.
Turn off your appliance by positioning the switch
on the "stop" position. (fig.9).
Descale the appliance according to the manual
(see paragraph 5).
Coffee grounds in
the cup.
The filter holder is clogged.
The grind is too fine.
Clean the filter holder with hot water. Press
“EJECT” to eliminate the remnants of the
grounds. Shake to drain the water.
Choose a slightly larger grind.
Downloaded from www.Manualslib.com manuals search engine

English
10
The machine leaks
on the sides of the
filter holder.
The filter holder has not
been properly positioned.
The edge of the filter holder
is clogged by ground
coffee.
Pod poorly positioned in the
filter.
Put the filter holder in place and lock it (by
turning it to the right as far as it will go, up to the
stop).
Remove excess coffee.
Place all the paper inside the filter holder.
Your espresso
tastes bad.
After descaling, the rinsing
was not performed properly.
Rinse the appliance according to the manual
(see paragraph 5).
The appliance does
not work
The pump was unprimed
due to lack of water.
The detachable water tank
is not properly clicked in
place.
Fill the water tank and reprime the pump (see
paragraph 1). Avoid completely emptying the
tank.
Click the tank into place by pressing firmly.
The steam nozzle
does not froth the
milk.
The steam nozzle is blocked
or scaled up.
The milk is too hot.
The shape of the container
is not appropriate.
The milk is not fresh enough.
Descale the steam nozzle (see paragraph 5) or
unblock it with a needle.
Use cold milk.
Use a small pitcher.
Use very fresh, very cold milk. You may also
need to change your brand of milk.
Problems Possible causes Solutions
Crackling is heard....
This is normal. It is the filter
holder safety lock.
The pump is
unusually noisy.
No water in the tank.
Tank poorly fitted.
Stop the appliance, fill the water tank and turn
the machine back on.
Press down firmly on the tank.
The cups are not
filled equally.
The filter holder is clogged. See paragraph 4.
Downloaded from www.Manualslib.com manuals search engine

Français
11
English
FILTER COFFEE MAKER PART
Before using for the first time
Operate the coffee maker for the first time with 1 litre of water, without ground coffee, by filling the
water compartment and pressing the on/off button on the filter coffee maker side.
IMPORTANT
The quality of the water you use is crucial to the taste of your coffee. You must
make sure that the water has just come out of the tap (so that it has not had
time to become stagnant in contact with the air), that it has no smell of chlorine
and that it is relatively cold.
We recommend that the water be filtered with a Krups Duo Filter cartridge reference XS
1000 available in stores.
Use filter paper n° 4.
Fill the water compartment using the graduated jug, according to the desired number of cups
(fig.24).
Observe the maximum amount of water in the tank, using the water level.
Lift the lid by pressing the OPEN button (fig.25).
Place a paper filter in the filter holder and fill it with ground coffee using the measuring spoon, with
one spoon per cup of coffee (fig. 26).
Press the "on/off" button on the filter coffee maker part, the light comes on, the cycle starts.
The filter coffee maker is fitted with an anti-drip appliance which enables you to serve the coffee
before it has completely finished running through. If you serve yourself a coffee while the cycle is still
running, place the jug back in position quickly to prevent any spillage.
The jug and lid are compatible for reheating in microwave ovens.
Never leave your empty jug in the microwave oven.
To remove the coffee grinds, remove the filter holder from the appliance.
Unplug the appliance.
Do not clean when hot.
Clean with a damp cloth or sponge.
Never place it in water or under a running tap.
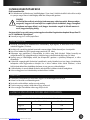
Descaling
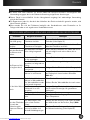
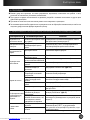
Number of cycles between 2 descaling operations
Without duo filter With duo filter
Soft water 60 120
Hard water 40 80
DESCALING THE FILTER COFFEE MAKER
CLEANING
MAKING COFFEE
Downloaded from www.Manualslib.com manuals search engine

English
12
To descale your coffee maker, you can use:
- either a sachet of descaler from the stores diluted in 250ml of water
- Or 250 ml of white vinegar available from hardware stores.
Pour the descaler or vinegar in the water compartment and turn the coffee maker on (without filter
and without ground coffee).
Let half of this mixture run through into the jug then turn the appliance off by pressing the "On / Off"
button.
Leave for one hour.
Turn the appliance back on by pressing the "On / Off" button and let the rest of the water run through.
Rinse the coffee maker by running two jugs of fresh water through.
The guarantee does not cover coffee makers that do not work properly or do not work at all
because they have not been descaled.
-
IN CASE OF PROBLEM:
Problems Solutions
The coffee maker does not come on: Check the connection
There seems to be a leak:
Make sure the water tank was not filled beyond the
limit
The water takes too long to run
through or the appliance makes exces-
sive noise:
Descale your appliance.
Your appliance still does not work? Contact a Krups approved service centre.
END OF LIFE ELECTRICAL AND ELECTRONIC PRODUCT
Environmental protection first!
Your appliance contains valuable materials which can be recovered or recycled.
Leave it at a local civic waste collection point.
If you have any product problems or queries, please contact our Customer Relations Team first for expert
help and advice:
Helpline:
0845 602 1454 - UK
(01) 677 4003 - ROI
web site: www.krups.co.uk
Downloaded from www.Manualslib.com manuals search engine

Français
13
Deutsch
TEIL ESPRESSOMASCHINE
a - Deckel der Wasserbehälter Espresso- und
Kaffeemaschine
b - Abnehmbarer Wasserbehälter der Espresso-
maschine
c - Messlöffel
d - Tassenvorwärmplatte
e - An/Aus Knopf Espresso
f - Funktionswähler
f1 - Position Kaffee
f2 - Position Stop
f3 - Position Vorheizen Dampf
f4 - Position Dampf
g - Perkolationsteil
h - Filterhalter
i - Abstellgitter
j - Tropfenauffangschale
k - orientierbare Dampfdüse
l -Cappuccino-Zubehörteil
TEIL KAFFEEMASCHINE ZUR ZUBEREI-
TUNG VON F ILTERKAFFEE
A - Filterhalter Deckel
B - Knopf zum Öffnen des Deckels
C - Wasserbehälter der Kaffeemaschine
D - Filterhalter mit Feststell-Griff
E - Wasserstandsanzeige mit Messeinteilung des
Wasserbehälters der Kaffeemaschine
F - Kanne mit Messeinteilung
G - Warmhalteplatte
H - Behälter für „Duo Filter XS1000“ Wasserfilter
(Filter wird nicht mitgeliefert)
I - An/Aus Knopf der Kaffeemaschine zur Zube-
reitung von Filterkaffee
Bitte lesen Sie diese Gebrauchsanweisung vor der Inbetriebnahme der Espressomaschine aufmerksam
durch. Bei unsachgemäßen Gebrauch, entgegen der Gebrauchsanweisung übernimmt Krups keine Haftung
und die Garantie erlischt.
Schließen Sie das Gerät unbedingt nur an geerdete Steckdosen an. Vergewissern Sie sich, dass die auf
dem Typenschild Ihres Geräts angegebene Betriebsspannung mit der Spannung Ihrer Elektroinstallation
übereinstimmt.
Entnehmen Sie den mit Kaffeemehl gefüllten Filterhalter nicht während des Wasserdurchlaufs, da das Gerät
zu diesem Zeitpunkt unter Druck steht.
Setzen Sie das Gerät nur mit eingesetzter Tropfenauffangschale und eingesetztem Gitter in Betrieb.
Bei Problemen beim Kaffeedurchlauf und vor der Reinigung des Geräts muss der Stecker gezogen werden.
Stecken Sie das Gerät nicht durch Ziehen am Stromkabel aus und lassen Sie das Stromkabel nicht mit
scharfen Kanten und Möbelecken in Berührung kommen.
Sorgen Sie dafür, dass das Stromkabel und Ihre Hände nicht mit den heißen Teilen des Geräts (Filterhalter,
Dampfdüse) in Kontakt gerät.
Tauchen Sie das Gerät , das Kabel und den Stecker nicht ins Wasser.
SICHERHEITSHINWEISE
Wir bedanken uns für Ihr Vertrauen und Ihre Treue zu den Produkten von Krups. Ihr Gerät ist mit einem Filter-
halter mit drei exklusiven Funktionen ausgestattet:
- Langsames Festdrücken des Kaffeemehls beim Einsetzen des Filterhalters (KTS System „Krups Tamping
System“).
- Auswurf des Kaffeesatzes.
- Und schließlich wahlweiser Einsatz von E.S.E. (Easy Serving Espresso) Kaffeepads oder weichen Kaf-
feepads.
Außerdem ist der Filterhalter abnehmbar, kann deshalb regelmäßig gereinigt werden und bleibt stets in opti-
malem Zustand. Aus Sicherheitsgründen ist der Filterhalter mit einem Verriegelungssystem ausgestattet, das
dafür sorgt, dass er beim Ansteigen des Drucks nicht verrutscht.
BESCHREIBUNG
Downloaded from www.Manualslib.com manuals search engine

Deutsch
14
Bewahren Sie das Gerät nicht in Reichweite von Kindern auf und lassen Sie das Stromkabel nicht
herunterhängen.
Halten Sie sich beim Entkalken an die Anweisungen der Gebrauchsanweisung.
Setzen Sie das Gerät nicht in Betrieb, wenn es beschädigt ist oder wenn sich das Stromkabel in schlechtem
Zustand befindet.
Wenn das Stromkabel beschädigt ist, darf es, um jedwede Gefahr zu vermeiden, nur vom Hersteller, dem
Kundendienst oder ähnlich qualifizierten Personen ausgetauscht werden.
Vergewissern Sie sich vor dem Durchlaufen des Kaffees, dass der Filterhalter fest sitzt.
Dieses Gerät darf nicht von Personen (inbegriffen Kindern) mit eingeschränkten körperlichen, sensorischen
oder geistigen Fähigkeiten benutzt werden. Das Gleiche gilt für Personen, die keine Erfahrung mit dem Gerät
besitzen oder sich mit ihm nicht auskennen, außer wenn sie von einer für ihre Sicherheit verantwortlichen
Person beaufsichtigt werden oder von dieser mit dem Gebrauch des Gerät vertraut gemacht wurden.
Kinder müssen beaufsichtigt werden, damit sie nicht mit dem Gerät spielen. Achtung:austretender Dampf
und Wasser sind sehr heiß
Das Zubehör und die abnehmbaren Teile des Geräts sind nicht spülmaschinengeeignet.
Dieses Gerät ist ausschließlich für den Haushaltsgebrauch bestimmt.
Die Garantie gilt nicht für die Benutzung des Geräts in folgenden Bereichen:
- In Kochecken für das Personal in Geschäften, Büros und sonstigen Arbeitsumfeldern,
- auf Bauernhöfen,
- für den Gebrauch durch Gäste von Hotels, Motels und sonstigen Umfeldern mit Beherbergungscharakter,
- in Umfeldern wie Gästezimmern.
Pumpe: 15 Bar
KTS: Krups Tamping System zum automatischen und optimalen Andrücken des Kaffeemehls
Filterhalter mit Funktion Auswurf des Kaffeesatzes. Geeignet für gemahlenen Kaffee sowie für alle Arten von
Kaffeepads, E.S.E. und weiche.
Dampffunktion
Automatische Abschaltung nach 30 Minuten (Umweltschutz).
Abnehmbarer Wasserbehälter (Kapazität: 1,1 Liter)
Leistung: 2450 W
Spannung: 220-240 V – 50/60Hz
Sicherheits-Überhitzungsschutz.
Abmessungen: H. 320 mm, B. 345 mm, T. 290 mm
WICHTIG!
Betriebsspannung: Dieses Gerät ist ausschließlich für den Betrieb mit Wechselstrom
angelegt (220-240 V).
Verwendungsart: Dieses Gerät ist AUSSCHLIEßLICH FÜR DEN HAUSGEBRAUCH
bestimmt.
TEIL ESPRESSOMASCHINE
HINWEISE
Um ein intensives Aroma Ihres Espressos zu gewährleisten, sollten Sie einen speziellen, frisch gemahlenen
Espresso-Kaffee verwenden, der für diese besonders anspruchsvolle Zubereitung geeignet ist. Außerdem
sollten die verwendeten Tassen nicht mehr als 50 ml Fassungsvermögen besitzen.
Bewahren Sie das Kaffeemehl im Kühlschrank auf, da es auf diese Weise sein Aroma länger behält.
TECHNISCHE EIGENSCHAFTEN:
Downloaded from www.Manualslib.com manuals search engine
Strona jest ładowana ...
Strona jest ładowana ...
Strona jest ładowana ...
Strona jest ładowana ...
Strona jest ładowana ...
Strona jest ładowana ...
Strona jest ładowana ...
Strona jest ładowana ...
Strona jest ładowana ...
Strona jest ładowana ...
Strona jest ładowana ...
Strona jest ładowana ...
Strona jest ładowana ...
Strona jest ładowana ...
Strona jest ładowana ...
Strona jest ładowana ...
Strona jest ładowana ...
Strona jest ładowana ...
Strona jest ładowana ...
Strona jest ładowana ...
Strona jest ładowana ...
Strona jest ładowana ...
Strona jest ładowana ...
Strona jest ładowana ...
Strona jest ładowana ...
Strona jest ładowana ...
Strona jest ładowana ...
Strona jest ładowana ...
Strona jest ładowana ...
Strona jest ładowana ...
Strona jest ładowana ...
Strona jest ładowana ...
Strona jest ładowana ...
Strona jest ładowana ...
Strona jest ładowana ...
Strona jest ładowana ...
Strona jest ładowana ...
Strona jest ładowana ...
Strona jest ładowana ...
Strona jest ładowana ...
Strona jest ładowana ...
Strona jest ładowana ...
Strona jest ładowana ...
Strona jest ładowana ...
Strona jest ładowana ...
Strona jest ładowana ...
Strona jest ładowana ...
Strona jest ładowana ...
Strona jest ładowana ...
Strona jest ładowana ...
Strona jest ładowana ...
Strona jest ładowana ...
Strona jest ładowana ...
Strona jest ładowana ...
Strona jest ładowana ...
Strona jest ładowana ...
Strona jest ładowana ...
Strona jest ładowana ...
Strona jest ładowana ...
Strona jest ładowana ...
Strona jest ładowana ...
Strona jest ładowana ...
Strona jest ładowana ...
Strona jest ładowana ...
Strona jest ładowana ...
Strona jest ładowana ...
Strona jest ładowana ...
Strona jest ładowana ...
Strona jest ładowana ...
Strona jest ładowana ...
Strona jest ładowana ...
Strona jest ładowana ...
Strona jest ładowana ...
Strona jest ładowana ...
Strona jest ładowana ...
Strona jest ładowana ...
Strona jest ładowana ...
Strona jest ładowana ...
Strona jest ładowana ...
Strona jest ładowana ...
Strona jest ładowana ...
Strona jest ładowana ...
Strona jest ładowana ...
Strona jest ładowana ...
Strona jest ładowana ...
Strona jest ładowana ...
Strona jest ładowana ...
Strona jest ładowana ...
Strona jest ładowana ...
Strona jest ładowana ...
Strona jest ładowana ...
Strona jest ładowana ...
Strona jest ładowana ...
Strona jest ładowana ...
Strona jest ładowana ...
Strona jest ładowana ...
Strona jest ładowana ...
Strona jest ładowana ...
Strona jest ładowana ...
Strona jest ładowana ...
Strona jest ładowana ...
Strona jest ładowana ...
Strona jest ładowana ...
Strona jest ładowana ...
Strona jest ładowana ...
Strona jest ładowana ...
Strona jest ładowana ...
Strona jest ładowana ...
Strona jest ładowana ...
Strona jest ładowana ...
Strona jest ładowana ...
Strona jest ładowana ...
Strona jest ładowana ...
Strona jest ładowana ...
Strona jest ładowana ...
Strona jest ładowana ...
Strona jest ładowana ...
Strona jest ładowana ...
Strona jest ładowana ...
Strona jest ładowana ...
Strona jest ładowana ...
Strona jest ładowana ...
-
 1
1
-
 2
2
-
 3
3
-
 4
4
-
 5
5
-
 6
6
-
 7
7
-
 8
8
-
 9
9
-
 10
10
-
 11
11
-
 12
12
-
 13
13
-
 14
14
-
 15
15
-
 16
16
-
 17
17
-
 18
18
-
 19
19
-
 20
20
-
 21
21
-
 22
22
-
 23
23
-
 24
24
-
 25
25
-
 26
26
-
 27
27
-
 28
28
-
 29
29
-
 30
30
-
 31
31
-
 32
32
-
 33
33
-
 34
34
-
 35
35
-
 36
36
-
 37
37
-
 38
38
-
 39
39
-
 40
40
-
 41
41
-
 42
42
-
 43
43
-
 44
44
-
 45
45
-
 46
46
-
 47
47
-
 48
48
-
 49
49
-
 50
50
-
 51
51
-
 52
52
-
 53
53
-
 54
54
-
 55
55
-
 56
56
-
 57
57
-
 58
58
-
 59
59
-
 60
60
-
 61
61
-
 62
62
-
 63
63
-
 64
64
-
 65
65
-
 66
66
-
 67
67
-
 68
68
-
 69
69
-
 70
70
-
 71
71
-
 72
72
-
 73
73
-
 74
74
-
 75
75
-
 76
76
-
 77
77
-
 78
78
-
 79
79
-
 80
80
-
 81
81
-
 82
82
-
 83
83
-
 84
84
-
 85
85
-
 86
86
-
 87
87
-
 88
88
-
 89
89
-
 90
90
-
 91
91
-
 92
92
-
 93
93
-
 94
94
-
 95
95
-
 96
96
-
 97
97
-
 98
98
-
 99
99
-
 100
100
-
 101
101
-
 102
102
-
 103
103
-
 104
104
-
 105
105
-
 106
106
-
 107
107
-
 108
108
-
 109
109
-
 110
110
-
 111
111
-
 112
112
-
 113
113
-
 114
114
-
 115
115
-
 116
116
-
 117
117
-
 118
118
-
 119
119
-
 120
120
-
 121
121
-
 122
122
-
 123
123
-
 124
124
-
 125
125
-
 126
126
-
 127
127
-
 128
128
-
 129
129
-
 130
130
-
 131
131
-
 132
132
-
 133
133
-
 134
134
-
 135
135
-
 136
136
-
 137
137
-
 138
138
-
 139
139
-
 140
140
-
 141
141
-
 142
142


Krups XP2240 10 Instrukcja obsługi
- Kategoria
- Ekspresy do kawy
- Typ
- Instrukcja obsługi
w innych językach
- Deutsch: Krups XP2240 10 Bedienungsanleitung
- slovenčina: Krups XP2240 10 Návod na obsluhu
- română: Krups XP2240 10 Manualul proprietarului
Powiązane dokumenty
-
Krups EA900050 Instrukcja obsługi
-
-
-
-
-
-
-
-
-
Inne dokumenty
-
Philips FC7070/11 Skrócona instrukcja obsługi
-
Kenwood ES020BK Instrukcja obsługi
-
Camry CR 4405 Instrukcja obsługi
-
KitchenAid XP2240 Instrukcja obsługi
-
Adler AD 4404 Instrukcja obsługi
-
-
Solac CE4551 Instrukcja obsługi
-
Rowenta ES0600 Instrukcja obsługi
-
Vitek VT-1510 SR Manual Instruction
-
Philips CP0712/01 Product Datasheet