5
BARBECUE VOORBEREIDEN VOOR GEBRUIK
WAT IS EEN CONTROLE OP
LEKKAGE?
Het brandstofsysteem van uw
barbecue bestaat uit een reeks
aansluitingen en koppelingen.
Een controle op lekkage is een
betrouwbare manier om te zorgen
dat er geen gas ontsnapt uit deze
aansluitingen of koppelingen.
Hoewel alle onderdelen die in de
fabriek zijn aangesloten, zorgvuldig
zijn gecontroleerd op gaslekkages,
is het belangrijk om een controle
op lekkage uit te voeren voordat
u de barbecue voor het eerst
gebruikt, evenals elke keer dat u een
aansluiting los- en vast maakt of
routineonderhoud uitvoert.
m GEVAAR
Gebruik geen vuur om te controleren
op gaslekkages. Let erop dat er geen
vonken of vuur in de buurt zijn wanneer
u controleert op lekkages. Vonken of
open vuur kunnen brand of een explosie
veroorzaken, met mogelijk ernstig of fataal
letsel en beschadiging van eigendommen
tot gevolg.
1
23
4
5
6
GEDEELTELIJKE DEMONTAGE VAN UW
BARBECUE VOOR CONTROLE OP LEKKAGE
Voor het uitvoeren van een controle op lekkage heeft u
toegang nodig tot de gaskraan. Daarvoor moeten enkele
delen van de barbecue worden gedemonteerd.
Controleren of de barbecue is uitgeschakeld
A) Controleer of de regelknop van de gasdrukregelaar
is dichtgedraaid door de knop in te drukken en deze
linksom naar OFF te draaien.
B) Controleer of de regelknop van de brander is
dichtgedraaid door de knop in te drukken en deze
rechtsom naar OFF te draaien (
).
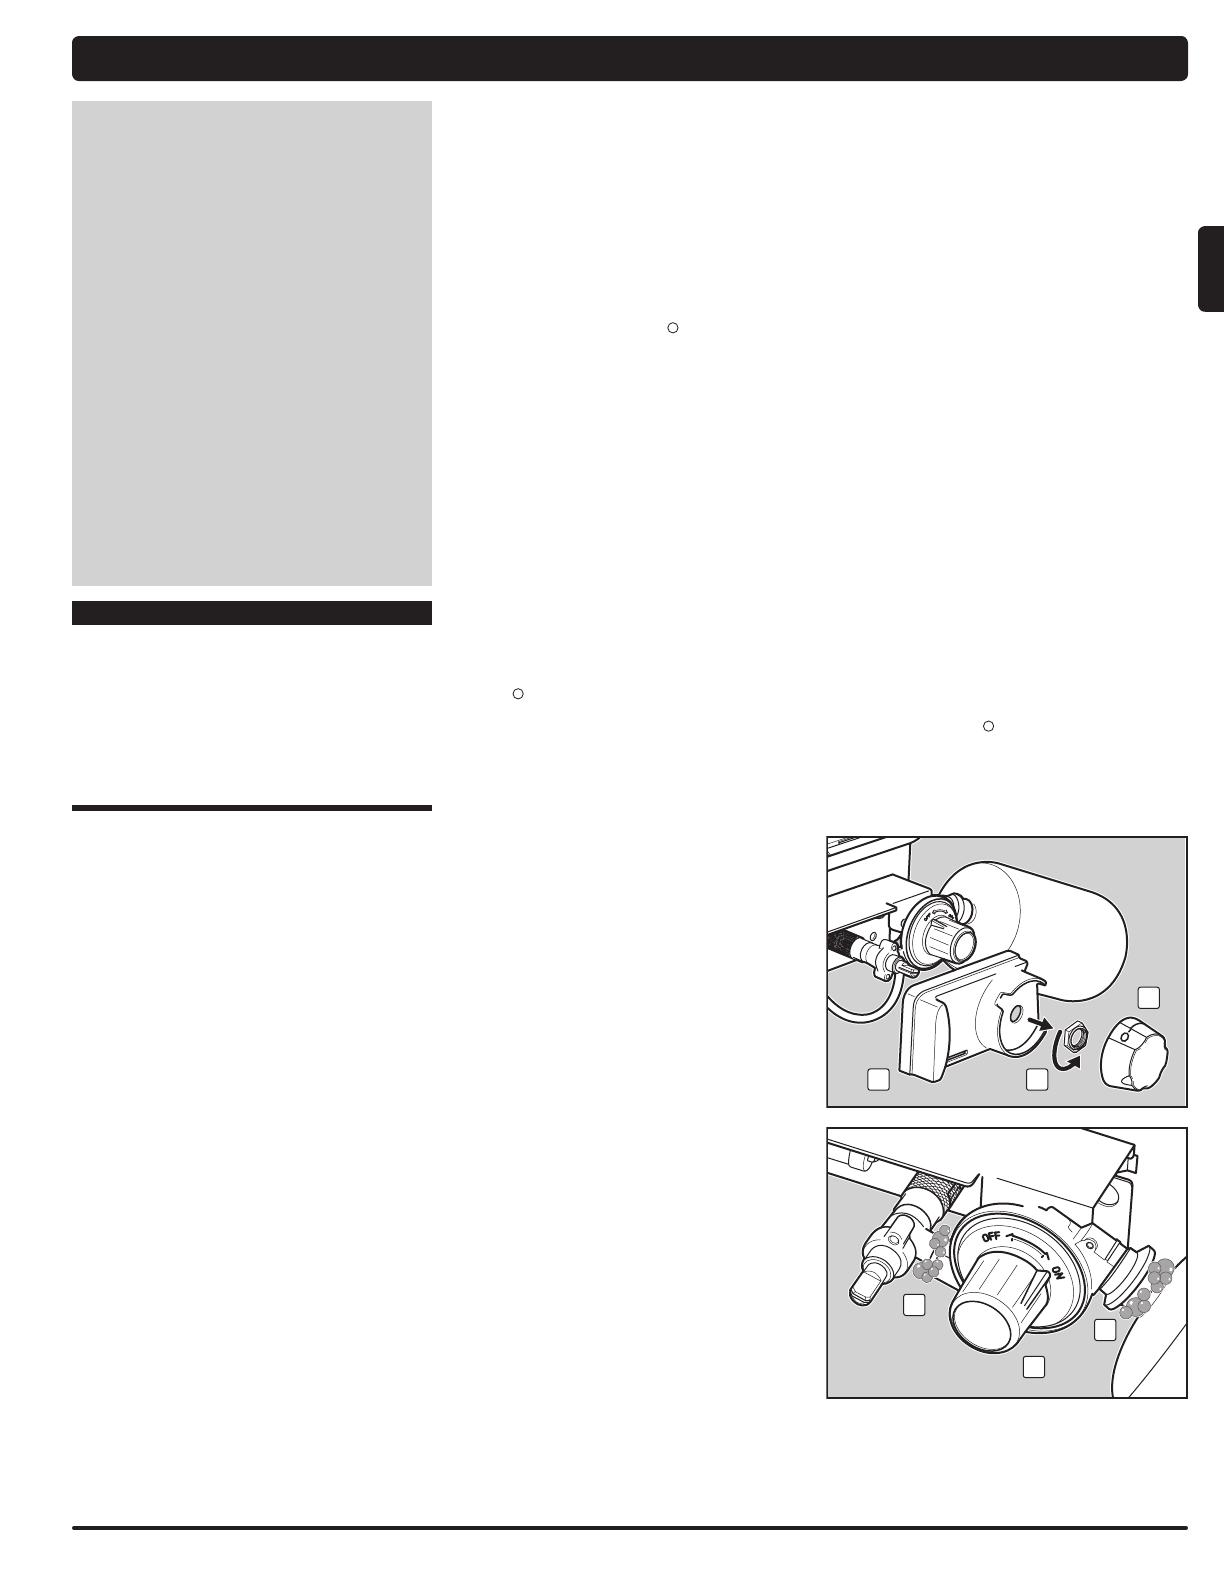
Afdekking voor de regelknop van de brander
verwijderen
U hebt het volgende nodig: een 11/16"-steeksleutel.
A) Verwijder de regelknop van de brander (1). Let op dat
de gasafsluiter op OFF blijft staan.
B) Verwijder de messing zeskantmoer van de klepsteel
met een 11/16"-steeksleutel (2).
C) Trek de afdekking voor de regelknop van de brander
weg van de barbecue (3).
Uw barbecue is nu gereed voor controle op lekkage.
CONTROLEREN OP GASLEKKAGE
U hebt het volgende nodig: een spuitfles, borstel of doek
en zeepwater. (U kunt uw eigen zeepwater maken door
20% vloeibare zeep te mengen met 80% water, of een
oplossing voor het controleren op lekkage kopen in een
doe-het-zelfwinkel.)
A) Controleer of de regelknop van de brander op OFF
staat (
).
B) Open de gastoevoer door de regelknop van de
gasdrukregelaar rechtsom te draaien(4).
m WAARSCHUWING: Steek de brander niet
aan terwijl u controleert op lekkages.
C) Maak de aansluitingen met een spuitfles, borstel
of doek nat met zeepwater om te controleren op
lekkages. Wanneer er zich zeepbellen vormen of
wanneer u zeepbellen groter ziet worden, is er sprake
van lekkage. Breng zeepwater aan op de volgende
aansluitingen:
a) De aansluiting tussen de gasdrukregelaar en het
busje (5).
m WAARSCHUWING: Als u een lekkage
constateert bij aansluiting (5), verwijdert
u het gasbusje. GEBRUIK DE BARBECUE
NIET. Sluit een ander gasbusje aan
en controleer de aansluiting opnieuw
met zeepsop op lekkages. Wanneer
de lekkage niet is verholpen na het
aansluiten van een ander gasbusje,
draait u het gas dicht (OFF). GEBRUIK
DE BARBECUE NIET. Neem contact
op met een vertegenwoordiger
van de klantenservice in uw regio.
Daarvoor kunt u gebruikmaken van de
contactgegevens op onze website.
Surf naar www.weber.com
®
.
b) De aansluiting tussen de gaskraan en de
gasdrukregelaar (6).
m WAARSCHUWING: Als u een lekkage
constateert bij aansluiting (6), draait
u de gastoevoer dicht (OFF). GEBRUIK
DE BARBECUE NIET. Neem contact
op met een vertegenwoordiger
van de klantenservice in uw regio.
Daarvoor kunt u gebruikmaken van de
contactgegevens op onze website.
Surf naar www.weber.com
®
.
D) Nadat u op lekkages hebt gecontroleerd, draait u
de gastoevoer dicht (OFF) bij de bron en spoelt u de
aansluitingen af met water.
OPMERKING: Omdat tijdens het controleren op gaslekkages
zeepsop wordt gebruikt, bestaat een risico op lichte
roestvorming. Spoel alle aansluitingen daarom na het
controleren op lekkages altijd af met water.
Afdekking voor de regelknop van de brander
terugplaatsen
U hebt het volgende nodig: een 11/16"-steeksleutel.
A) Plaats de afdekking voor de regelknop van de brander
op de barbecue.
B) Bevestig de messing zeskantmoer op de klepsteel
met een 11/16"-steeksleutel.
C) Bevestig de regelknop van de brander. Let op dat de
gasafsluiter op OFF blijft staan.
m WAARSCHUWING: Controleer of alle
onderdelen zijn gemonteerd en het
bevestigingsmateriaal volledig vast
is gedraaid voordat u de barbecue in
gebruik neemt. Bij het niet opvolgen
van deze productwaarschuwing kunnen
uw handelingen leiden tot brand of
explosie of het falen van de constructie
met mogelijk ernstig lichamelijk of
fataal letsel en beschadiging van
eigendommen tot gevolg.
Uw barbecue is nu klaar voor gebruik.
PROPAANGASBUSJE VERWIJDEREN
Ga als volgt te werk om het propaangasbusje te
verwijderen wanneer dit vervangen dient te worden.
A) Controleer of de regelknop van de brander is
dichtgedraaid door de knop in te drukken en rechtsom
naar OFF te draaien (
).
B) Controleer of de regelknop van de gasdrukregelaar is
dichtgedraaid door deze linksom te draaien.
C) Schroef het gasbusje voor eenmalig gebruik los
van de gasdrukregelaar door het busje linksom te
draaien.
m WAARSCHUWING: De gasaansluitingen
van uw gasbarbecue zijn in de fabriek
getest. Wij raden echter aan om alle
gasaansluitingen te controleren op
lekkage voordat u uw gasbarbecue in
gebruik neemt.
m WAARSCHUWING: Voer deze
lekkagecontroles zelfs uit als uw
barbecue door de dealer of verkoper is
gemonteerd.
m WAARSCHUWING: Controleer
gasaansluitingen telkens op lekkages
wanneer u deze ontkoppelt en opnieuw
aansluit.
OPMERKING: Alle in de fabriek uitgevoerde aansluitingen
zijn zorgvuldig gecontroleerd op gaslekkage en de branders
zijn getest. Als voorzorgsmaatregel dient u alle aansluitingen
opnieuw op lekkages te controleren voordat u uw Weber®-
gasbarbecue gebruikt. Tijdens het transport en de hantering
kunnen gasaansluitingen los of beschadigd raken.


 Naterial 3276000413660 Instrukcja obsługi