Philips HD5730/10 Instrukcja obsługi
- Kategoria
- Ekspresy do kawy
- Typ
- Instrukcja obsługi

HD5730

2
D
A
B
C
E
G
F
1

3
N
O
P
D
E
A
F
G
H
J
L
B
I
C
K
M
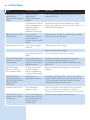
1 2 3 4 5 6 7
8
4321
2

4

HD5730
ENGLISH 6
32
60
85
113
137
163
189
216
242
270
297

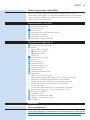
6
Introduction
Congratulations on your purchase and welcome to Philips! To fully benet
from the support that Philips offers, register your product at www.philips.
com/welcome.
With this appliance you can enjoy all kinds of great-tasting espresso
variations. For every cup, coffee beans are freshly ground and coffee is
brewed at high pressure, which ensures optimal aroma and taste. With this
appliance, you can easily make all kinds of variations according to your own
preference. In this user manual you nd all the information you need to
optimally enjoy your espresso maker.
Important
Read this user manual carefully before you use the appliance and save it for
future reference.
Danger
Never immerse the appliance in water or any other liquid.
Warning
Check if the voltage indicated on the appliance corresponds to the
local mains voltage before you connect the appliance.
If the mains cord is damaged, you must have it replaced by Philips, a
service centre authorised by Philips or similarly qualied persons in
order to avoid a hazard.
This appliance is not intended for use by persons (including children)
with reduced physical, sensory or mental capabilities, or lack of
experience and knowledge, unless they have been given supervision or
instruction concerning use of the appliance by a person responsible for
their safety.
Children should be supervised to ensure that they do not play with the
appliance.
Keep the packaging elements (plastic bags, cardboard buffers, etc.) out
of the reach of children, as they are not a toy.
Do not touch the hot surfaces of the appliance when it operates.
This appliance is designed to make espresso coffee and hot drinks. Use
it correctly and with care to avoid scalding by hot water and steam.
Do not use the appliance if the plug, the cord or the appliance itself is
damaged.
If a problem occurs that you cannot solve by means of this user manual,
contact the Customer Care Centre in your country. If the problem
cannot be solved, take the appliance to a service centre authorised
by Philips for examination or repair. Do not attempt to repair the
appliance yourself, otherwise your guarantee becomes invalid.
Caution
Do not place the appliance on a hot surface and prevent the mains
cord from coming into contact with hot surfaces.
Unplug the appliance if problems occur during brewing and before you
clean it.
This appliance is intended for household use only.
-
-
-
-
-
-
-
-
-
-
-
-
-
ENGLISH

After unpacking, make sure the appliance is complete and undamaged.
If in doubt, do not use the appliance but contact the Customer Care
Centre in your country.
This Philips appliance complies with all standards regarding electromagnetic
elds (EMF). If handled properly and according to the instructions in this
user manual, the appliance is safe to use based on scientic evidence
available today.
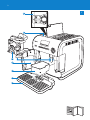
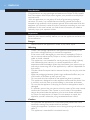
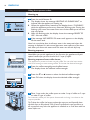
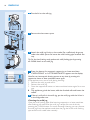
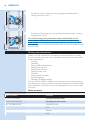
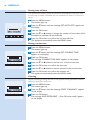
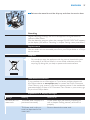
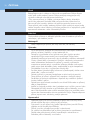
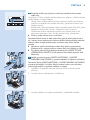
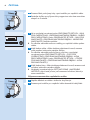
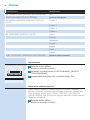
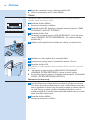
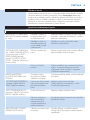
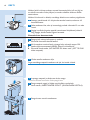
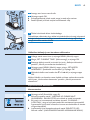
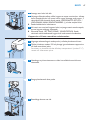
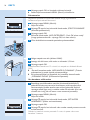
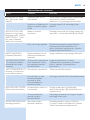
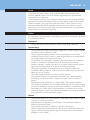
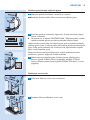
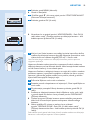
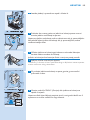
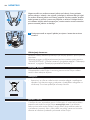
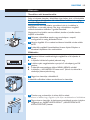
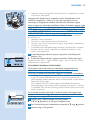
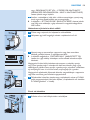
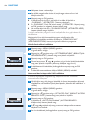
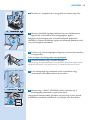
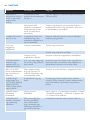
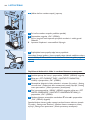
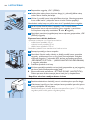
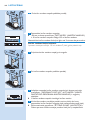
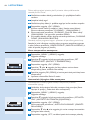
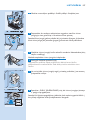
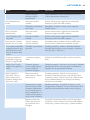
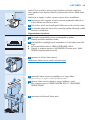
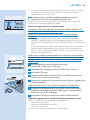
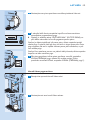
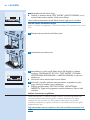
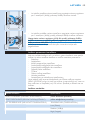
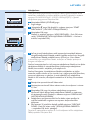
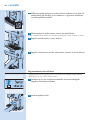
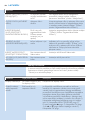
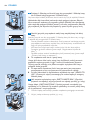
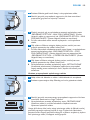
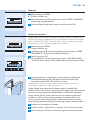
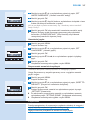
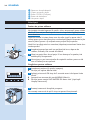
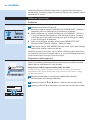
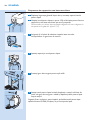
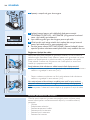
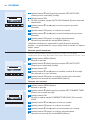
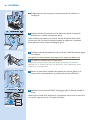
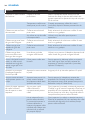
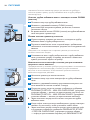
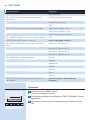
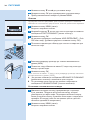
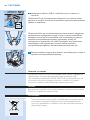
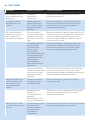
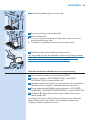
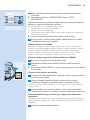
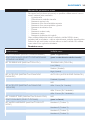
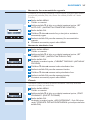
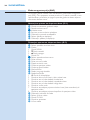
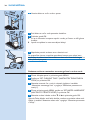
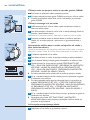
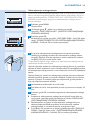
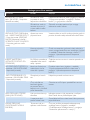
A Grinding coarseness knob
B Coffee bean container
C Brewing unit
D Service door with slide-out tray
E Removable waste bin
F Drip tray cover
G Removable drip tray
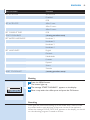
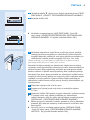
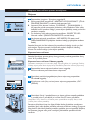
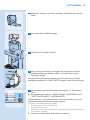
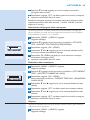
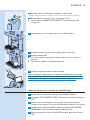
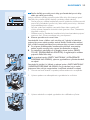
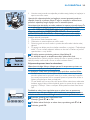
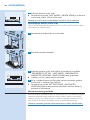
A Lid of ground coffee compartment
B Display
1 MENU button
2
^Button down
3
%Button up
4 OK button
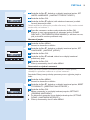
C Lid of coffee bean container
D Coffee spout
E Hot water spout
F Service door latch
G Milk frothing pipe
H Milk intake tube
I Measuring spoon
J Cup warmer tray
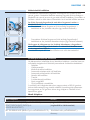
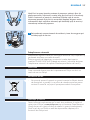
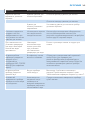
K Control panel
1
3 On/off button
2 Button to select coffee strength and to select ground coffee
3 Button for one or two cups of short coffee
4 Button for one or two cups of standard coffee
5 Button for one or two cups of long coffee
6 Button for hot water
7 Button for automatic latte macchiato or frothed milk
8 Button for automatic cappuccino or frothed milk
L Removable water tank
M Milk jug lid
N CLEAN button
O Release button
P Milk jug
-
ENGLISH 7

Never install the appliance in environments where the temperature
may drop to 0° or below. If the water inside the appliance freezes, the
appliance will be damaged.
Note: It is normal that there are some traces of coffee and water in the
appliance when you use it for the rst time. This is because the appliance has
been tested in the factory to make sure it is in perfect working order.
Note: If there is a sticker on the display, remove the sticker before you install
the appliance.
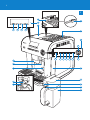
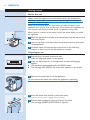
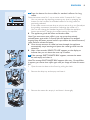
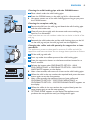
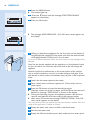
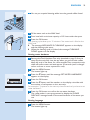
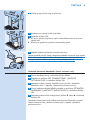
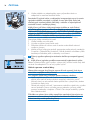
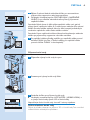
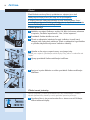
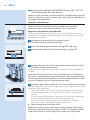
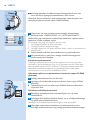
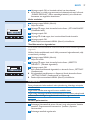
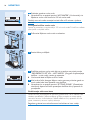
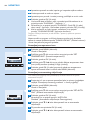
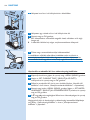
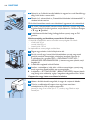
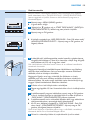
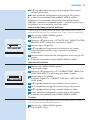
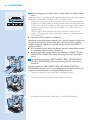
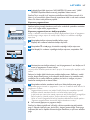
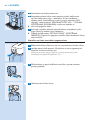
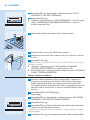
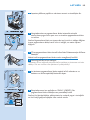
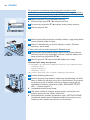
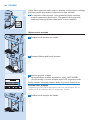
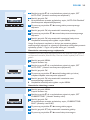
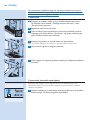
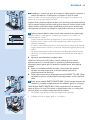
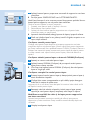
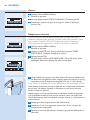
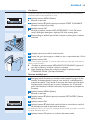
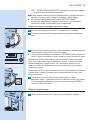
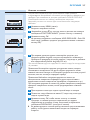
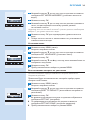
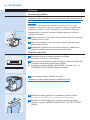
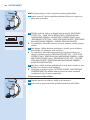
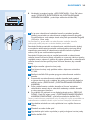
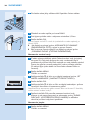
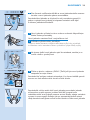
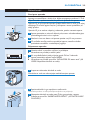
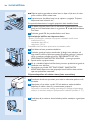
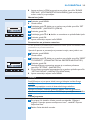
1 Place the appliance on a table or worktop away from the tap, the sink
and heat sources.
2 Leave a free space of at least 10cm above, behind and on both sides
of the appliance.
3 Carefully follow the step-by-step instructions in the following
chapter to learn how to use the appliance correctly.
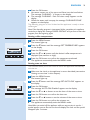
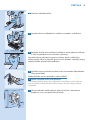
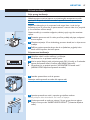
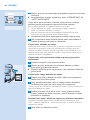
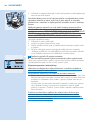
1 Put the plug in the wall socket and wait.
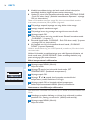
Different languages appear on the display.
2 Press the OK button for 3 seconds when the desired language
appears.
The appliance automatically exits the MENU mode.
The message ‘NO WATER! Fill water tank’ appears on the display.
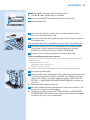
3 Remove the water tank from the appliance.
Do not remove the water tank while the appliance is operating.
4 Rinsethewatertankandllitwithfreshwater.
Remove the lid to create a bigger lling opening.
5 Putthewatertankbackandpushitrmlyintoplace.
The message ‘INSERT WATER SPOUT’ appears.
,
,
,
,
ENGLISH8

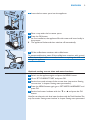
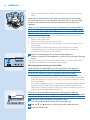
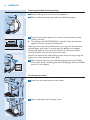
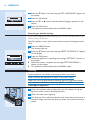
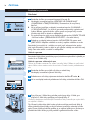
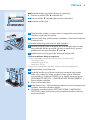
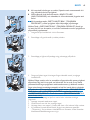
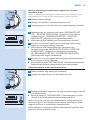
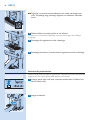
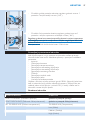
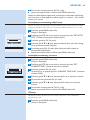
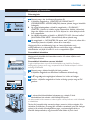
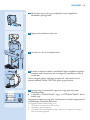
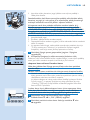
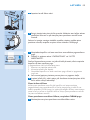
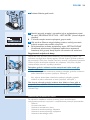
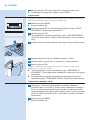
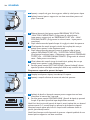
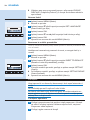
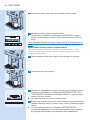
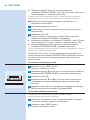
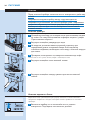
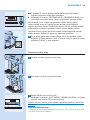
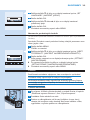
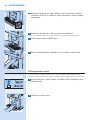
6 Insert the hot water spout into the appliance.
7 Place a cup under the hot water spout.
8 Press the OK button.
Atrstinstallation,theappliancellswithwaterandhumsloudlyin
the process.
Theapplianceushesandthenswitchesoffautomatically.
9 Fill the coffee bean container with coffee beans.
Topreventmalfunction,neverllthecoffeebeancontainerwithground
coffee, freeze-dried coffee, caramelised coffee or anything else that could
damage the appliance.
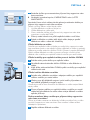
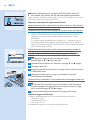
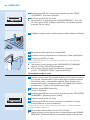
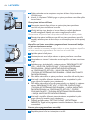
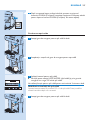
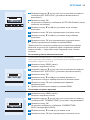
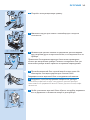
1 Switch on the appliance again and press the MENU button.
2 Go to ‘SET CURRENT TIME?’ and press OK.
3 Set the hours and minutes of the current time (see section ‘Setting
current time’ in chapter ‘Setting menu parameters’).
4 Press the MENU button again, go to ‘SET WATER HARDNESS?’ and
press OK.
5 Set the local water hardness with the ^ or % and press the OK
button.
Note: You can determine the local water hardness with the Total Hardness Test
strip. See section ‘Setting water hardness’ in chapter ‘Setting menu parameters’.
,
,
ENGLISH 9

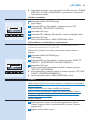
Heating up
1 Press the on/off button 3.
The display shows the message ‘HEATING UP...PLEASE WAIT’ to
indicate that the appliance is heating up.
When the appliance has heated up, the display shows ‘FLUSHING...’
whiletheapplianceperformsanautomaticushingcycle.Duringthe
ushingcycle,somehotwaterowsoutofthecoffeespoutintothe
drip tray below.
Aftertheushingcycle,thedisplayshowsthemessage‘READYTO
USE - Normal coffee’.
2 If the message ‘NO WATER! Fill water tank’ appears on the display,
llthewatertank.
Note: It is normal that there is still some water in the water tank when this
message is displayed. It is also normal that some water spills out of the water
tank when you remove the water tank. This water runs into the drip tray.
Note: When you use the appliance for the rst time, the appliance will yield
optimal results after you have brewed 4 to 5 cups of coffee.
The appliance is preset to brew normal coffee. You can also brew extra-
mild, mild, strong or extra-strong coffee. To choose the desired strength:
1 Press the coffee strength/ground coffee button.
The display shows the selected coffee strength.
2 Press the ^ or % button to select the desired coffee strength.
3 Press OK when the display shows the desired coffee strength.
4 Place 1 cup under the coffee spout to make 1 cup of coffee or 2 cups
to make 2 cups of coffee.
For creamier coffee, pull the spout downwards to bring it as close to the
cups as possible.
Tip: To keep the coffee hot longer, preheat the cups you use. Especially heat
up thick cups, as they absorb a lot of heat. To preheat the cups, put them on
the cup warmer tray when the appliance is switched on or rinse them with hot
water before use.
,
,
,
,
ENGLISH10

5 Press the button for short coffee, for standard coffee or for long
coffee.
Press the button once for 1 cup or twice within 2 seconds for 2 cups.
You can interrupt the brewing process at any time by pressing the
button for short coffee, for standard coffee or for long coffee, as
previously selected.
If the coffee comes out one drop at a time, not at all or too fast, adjust
the grinding coarseness (see section ‘Adjusting the coffee mill’).
You can also change the standard amount of coffee the appliance
brews, see section ‘Changing the coffee quantity for espresso’.
The appliance grinds the beans and brews coffee.
Note: If you want some extra coffee in your cup, press the previously
selected button again within 3 seconds after the appliance has stopped
brewing. Keep the button pressed until the cup contains the desired amount of
coffee and then release the button.
Once the set amount of coffee has been brewed, the appliance
automatically stops brewing and ejects the coffee grounds into the
waste bin.
Afterafewseconds,‘READYTOUSE’appearsonthedisplayto
indicate that you can brew the next cup of coffee.
6 Ifthemessage‘EMPTYWASTEBIN!’appears,removethewaste
bin and empty and clean it.
Note: The message ‘EMPTY WASTE BIN!’ appears after every 14 cups. When
it appears, you cannot brew coffee again until you empty and clean the waste
bin.
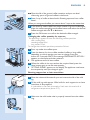
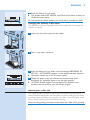
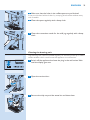
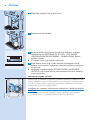
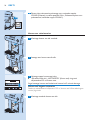
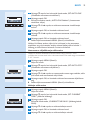
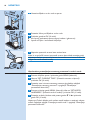
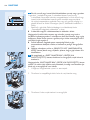
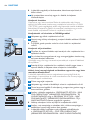
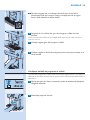
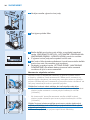
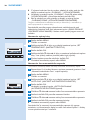
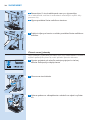
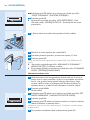
1 Open the service door at the front by pulling the latch.
2 Remove the drip tray and empty and clean it.
3 Remove the waste bin, empty it and clean it thoroughly.
-
-
-
,
,
,
ENGLISH 11

4 Reinsert the waste bin, reattach the drip tray and close the service
door.
Note: Keep in mind that when you remove the drip tray, you must empty
the waste bin, even if it is not completely full. If you don’t do this, the coffee
grounds in the waste bin will exceed the maximum level and block the
appliance.
Never remove the water tank when the appliance is brewing coffee. If
you do, the appliance stops brewing and the following messages appear
on the display: ‘GROUND TOO FINE! Adjust mill’ and ‘INSERT WATER
SPOUT! - Press hot water’.
Take the following steps if you have removed the water tank while the
appliance was brewing coffee:
1 Reinsert the water tank.
2 Remove and insert the hot water spout.
3 Press the hot water button and let water run out of the spout for a
few seconds.
4 If the appliance malfunctions, follow the instructions in chapter
‘Troubleshooting’. If you cannot solve the problem, contact the
Customer Care Centre in your country.
7 Press the on/off button 3 to switch off the appliance.
Whenyouswitchofftheappliance,itperformsanautomaticushing
cycle.
During the ushing cycle, some hot water ows out of the coffee spout
into the drip tray below to clean the whole system.
Only add ground coffee after you have switched on the appliance.
Otherwise the ground coffee will be dispersed inside the appliance.
Only use the measuring spoon supplied to add ground coffee.
Never add more than 1 level spoonful of ground coffee, otherwise
the appliance does not brew coffee or the ground coffee is dispersed
inside the appliance, soiling it or causing only drops of coffee to come
out of the spouts.
If you have added more than 1 level spoonful of ground coffee, remove
the brewing unit. Then clean the brewing unit and the appliance as
described in chapter ‘Cleaning’. After this, use the handle of a spoon to
push the ground coffee down the funnel.
Onlyllthegroundcoffeecompartmentwithgroundcoffeefor
espresso makers. Do not use unground coffee beans, freeze-dried coffee,
caramelised coffee or other substances that could damage the appliance.
1 Press the coffee strength/ground coffee button.
The
^ and % buttons and the OK button light up.
2 Use the ^ or % button to select the ground coffee function.
3 Press the OK button.
,
-
-
,
ENGLISH12

4 Open the lid of the ground coffee container and put one level
measuring spoon of ground coffee in the funnel.
5 Brew1cupofcoffeeasdescribedin‘Brewingespressofromcoffee
beans’.
When you use ground coffee, you cannot brew 2 cups at the same time.
6 If you want to make coffee from beans instead of ground coffee again,
press the coffee strength/ground coffee button and select the desired
coffee strength with the ^ or % button.
7 PresstheOKbuttontoconrmthedesiredcoffeestrength.
The appliance is preset to brew the following coffee quantities:
short coffee: 40ml
standard coffee: 80ml
long coffee: 120ml
To change the standard quantities, proceed as follows:
1 Put a cup under the coffee spout.
2 Press the button for short coffee, standard coffee or long coffee,
depending on which quantity you want to change. Press this
button for 5 seconds UNTIL the message ‘PROGRAM TO SET VOL...’
appears on the display and then release it.
The appliance starts to brew coffee.
3 When the coffee in the cup reaches the required level, press the
same button again to set the new quantity.
’SETTING DONE!’ appears on the display. The appliance now brews
the set quantity until you change it again.
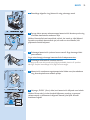
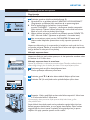
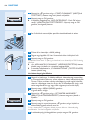
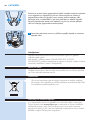
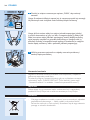
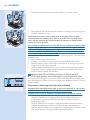
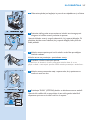
1 Move the release slide towards you and remove the lid of the milk
jug.
2 Fill the milk jug with approx. 150ml milk for each cappuccino or latte
macchiato to be prepared.
It is advisable to use fresh skimmed or fresh semi-skimmed milk at
refrigerator temperature (about 5°C).
3 Make sure the milk intake tube is properly inserted into the rubber
ring.
-
-
-
,
,
-
ENGLISH 13

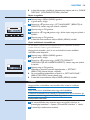
4 Put the lid on the milk jug.
5 Remove the hot water spout.
6 Attachthemilkjugrmlytothenozzle.Putasufcientlylargecup
under the coffee spout and move the milk frothing pipe towards the
cup.
Tip: For the best frothing result, preheat the milk frothing pipe by pressing
the CLEAN button on the milk jug.
7 Press the button for automatic cappuccino or latte macchiato.
‘CAPPUCCINO’ or ‘LATTE MACCHIATO’ appears on the display.
Note: You can interrupt the brewing process at any time by pressing the
cappuccino button or latte machiatto button again.
If the appliance runs out of milk during brewing:
1 Remove the milk jug and rell it.
2 Reinsert the milk jug.
3 Press the cappuccino button or latte macchiato button again for a new
cup.
The appliance grinds the beans, adds the frothed milk and brews the
coffee.
8 If there is still milk in the milk jug, put the milk jug with the lid on it
in the fridge after use.
Clean the milk frothing pipe after brewing cappuccino or latte macchiato,
after frothing milk and when the milk jug is empty. You can do this by
pressing the CLEAN button. For more thorough cleaning, you can remove
the milk jug from the appliance and clean the jug, the lid, the milk frothing
pipe and the milk intake tube manually.
,
,
ENGLISH14

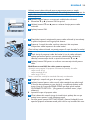
1 Place a bowl under the milk frothing pipe.
2 Press the CLEAN button on the milk jug lid for a few seconds.
Hot water comes out of the milk frothing pipe as long as you press
the CLEAN button.
1 Remove the lid from the milk jug and detach the milk frothing pipe
and the milk intake tube.
2 Clean all parts thoroughly with hot water and some washing-up
liquid or in a dishwasher.
Make sure there are no milk residues inside the two holes in the lid of the
milk jug.
3 Reattach the milk intake tube and the milk frothing pipe, put the lid
on the milk jug and put the milk jug back into the appliance.
The appliance is preset to dose specic amounts of coffee and milk for
cappuccino and latte macchiato. You can change these quantities as follows:
1 Fill the milk jug with milk.
2 Put a cup under the coffee spout and the milk frothing pipe.
3 Press the cappuccino button or the latte macchiato button for at
least 5 seconds.
4 Release the button when ‘PROGRAM TO SET VOL. - MILK
FOR CAPPUCCINO’ or ‘PROGRAM TO SET VOL. - MILK FOR
MACCHIATO’ appears on the display.
After a few seconds, milk starts to come out the milk frothing pipe.
5 When the milk in the cup reaches the required level, press the same
button again to set the new quantity.
After a few seconds, the appliance starts to brew coffee and
‘PROGRAM TO SET VOL. - COFF. FOR CAPPUCCINO.’ or
‘PROGRAM TO SET VOL. - COFFEE FOR MACCHIATO’ appears on
the display.
6 When the coffee in the cup reaches the required level, press the
same button again to set the new quantity.
’SETTING DONE’ appears on the display. The appliance now
produces the set quantities until you change them again.
,
,
,
,
ENGLISH 15

1 Fill the milk jug and insert it into the appliance.
2 Placeasufcientlylargecupunderthemilkfrothingpipe.
3 Press the automatic cappuccino or latte macchiato button twice
within 3 seconds.
The display reads ‘FROTHED MILK’ and after a few seconds the
appliance starts to produce frothed milk.
Note: If you want some extra frothed milk in your cup, press the previously
selected button again within 3 seconds after the appliance has stopped
frothing milk. Keep the button pressed until the cup contains the desired
amount of frothed milk and then release the button.
Note: You can interrupt the milk frothing process at any time by pressing the
cappuccino or latte macchiato button again.
4 After frothing milk, clean the milk frothing pipe with the CLEAN
button (see section ‘Cleaning the milk frothing pipe with the CLEAN
button’ in this chapter).
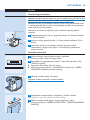
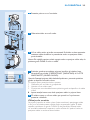
1 Attach the hot water spout to the nozzle.
2 Place a cup under the hot water spout.
,
ENGLISH16

3 Press the button for hot water.
The display reads ‘HOT WATER’ and 125ml of hot water comes out
of the hot water spout.
Do not use the hot water function for more than 2 minutes at a time.
The appliance is preset to produce 125ml hot water. You can change this
quantity as follows:
1 Attach the hot water spout to the nozzle.
2 Place a cup under the spout.
3 Press the button for hot water until the message ‘PROGRAM TO
SET VOL - HOT WATER’ appears on the display and then release it.
Hot water comes out of the hot water spout.
4 When the water in the cup reaches the required level, press
the button for hot water again to set the new quantity.
’SETTING DONE’ appears on the display. The appliance now
produces the set quantity until you change it again.
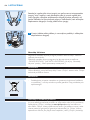
The coffee grinder is preset to the correct coarseness and should not
require frequent adjustment. You can select a coarser setting for less foam,
a normal aroma and faster brewing. You can select a ner setting for more
foam, a more intense aroma and slower brewing.
Only turn the grinding coarseness knob when the coffee mill is grinding.
,
,
,
ENGLISH 17

To select a coarser setting, turn the grinding coarseness knob 1
setting clockwise (‘click’).
To select a ner setting, turn the grinding coarseness knob 1 setting
anticlockwise (‘click’).
Do not turn the grinding coarseness knob anticlockwise too far,
otherwise the coffee may come out of the spout in drops when you
brew 2 cups.
The adjustment only becomes noticeable after you have brewed at least 2
cups of coffee.
When you have switched on the appliance and the appliance is ready
for use, you can access the menu to perform certain actions and modify
certain parameters.
Flushing
Descaling
Setting coffee temperature
Setting auto-on time
Setting auto-off time
Setting current time
Cleaning
Setting water hardness
Setting language
Resetting to default settings
You can press the MENU button at any time to exit the menu, except in
the descaling or cleaning modes. If you have selected one of these modes
and pressed OK, you have to switch off the appliance if you want to exit
the menu.
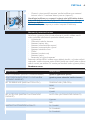
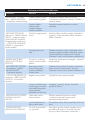
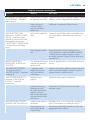
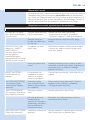
Menu structure Submenu
START FLUSHING? (ushing procedure starts)
START DESCALING? (descaling procedure starts)
SET TEMPERATURE? TEMPERATURE:
Low
Medium
High
-
-
-
-
-
-
-
-
-
-
-
-
ENGLISH18

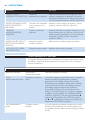
Menu structure Submenu
SET AUTO-ON? AUTO-ON:
Disabled
0:00
SET AUTO-OFF? After 1 hour
After 2 hours
After 3 hours
SET CURRENT TIME? 0:00
START CLEANING? (cleaning procedure starts)
SET WATER HARDNESS? Hardness 1
Hardness 2
Hardness 3
Hardness 4
SET LANGUAGE? English
Deutsch
Nederlands
Francais
Espanol
Suomi
Svenska
RESET TO DEFAULT? (resetting procedure starts)
1 Press the MENU button.
The button lights up.
2 The message ‘START FLUSHING?’ appears on the display.
3 Place a cup under the coffee spout and press the OK button.
Over time, the continuous heating up of the water that is used to make
the coffee leads to scale build-up in the inner circuits of the appliance.
When the message ‘PLEASE DESCALE!’ appears on the display, you should
run the descaling program. Proceed as follows:
,
ENGLISH 19

1 Press the MENU button.
The button lights up.
2 Press the ^ button until the message ‘START DESCALING?’
appears on the display.
3 Press the OK button.
The message ‘ADD DESCALER! - Push OK when ready’ appears on
the display.
4 Whenyoudescaletheapplianceforthersttime,usethebottleof
durgol® descaler supplied. Fill the water tank with the entire bottle
of durgol® descaler (125ml) and 1 litre of water.
If you use a different descaler, follow the instructions on the package of the
descaler.
Note: Use the descaler supplied with the appliance or a liquid descaler based
on citric acid. Never use a descaler with acetic acid, as this will damage the
appliance.
Note: Be careful not to spill descaler on the metal surfaces of the machine
and on surfaces sensitive to acid such as marble, limestone and glaze. If you
spill descaler on these surfaces, immediately wipe it off with a cloth to prevent
stains.
5 Attach the hot water spout to the nozzle.
6 Place a bowl with a minimum capacity of 1.5 litres under the hot
water spout.
7 Press the OK button to start the descaling program.
Descalercomesoutofthehotwaterspoutandowsintothebowl
below. The message ‘DESCALING’ is shown on the display.
During the descaling program, the appliance pauses a few times to
remove scale deposits from the inside of the espresso maker.
After about 35 minutes, the message ‘DESCALE DONE - Push OK
when ready’ appears on the display.
You now have to ush the appliance to remove descaler residues from the
inside of the appliance. Proceed as follows:
8 Emptythewatertank,rinseitandllitwithfreshwater.
9 Reinsert the water tank.
10 Empty the full bowl and then put it back under the hot water spout.
,
,
,
,
,
ENGLISH20
Strona się ładuje...
Strona się ładuje...
Strona się ładuje...
Strona się ładuje...
Strona się ładuje...
Strona się ładuje...
Strona się ładuje...
Strona się ładuje...
Strona się ładuje...
Strona się ładuje...
Strona się ładuje...
Strona się ładuje...
Strona się ładuje...
Strona się ładuje...
Strona się ładuje...
Strona się ładuje...
Strona się ładuje...
Strona się ładuje...
Strona się ładuje...
Strona się ładuje...
Strona się ładuje...
Strona się ładuje...
Strona się ładuje...
Strona się ładuje...
Strona się ładuje...
Strona się ładuje...
Strona się ładuje...
Strona się ładuje...
Strona się ładuje...
Strona się ładuje...
Strona się ładuje...
Strona się ładuje...
Strona się ładuje...
Strona się ładuje...
Strona się ładuje...
Strona się ładuje...
Strona się ładuje...
Strona się ładuje...
Strona się ładuje...
Strona się ładuje...
Strona się ładuje...
Strona się ładuje...
Strona się ładuje...
Strona się ładuje...
Strona się ładuje...
Strona się ładuje...
Strona się ładuje...
Strona się ładuje...
Strona się ładuje...
Strona się ładuje...
Strona się ładuje...
Strona się ładuje...
Strona się ładuje...
Strona się ładuje...
Strona się ładuje...
Strona się ładuje...
Strona się ładuje...
Strona się ładuje...
Strona się ładuje...
Strona się ładuje...
Strona się ładuje...
Strona się ładuje...
Strona się ładuje...
Strona się ładuje...
Strona się ładuje...
Strona się ładuje...
Strona się ładuje...
Strona się ładuje...
Strona się ładuje...
Strona się ładuje...
Strona się ładuje...
Strona się ładuje...
Strona się ładuje...
Strona się ładuje...
Strona się ładuje...
Strona się ładuje...
Strona się ładuje...
Strona się ładuje...
Strona się ładuje...
Strona się ładuje...
Strona się ładuje...
Strona się ładuje...
Strona się ładuje...
Strona się ładuje...
Strona się ładuje...
Strona się ładuje...
Strona się ładuje...
Strona się ładuje...
Strona się ładuje...
Strona się ładuje...
Strona się ładuje...
Strona się ładuje...
Strona się ładuje...
Strona się ładuje...
Strona się ładuje...
Strona się ładuje...
Strona się ładuje...
Strona się ładuje...
Strona się ładuje...
Strona się ładuje...
Strona się ładuje...
Strona się ładuje...
Strona się ładuje...
Strona się ładuje...
Strona się ładuje...
Strona się ładuje...
Strona się ładuje...
Strona się ładuje...
Strona się ładuje...
Strona się ładuje...
Strona się ładuje...
Strona się ładuje...
Strona się ładuje...
Strona się ładuje...
Strona się ładuje...
Strona się ładuje...
Strona się ładuje...
Strona się ładuje...
Strona się ładuje...
Strona się ładuje...
Strona się ładuje...
Strona się ładuje...
Strona się ładuje...
Strona się ładuje...
Strona się ładuje...
Strona się ładuje...
Strona się ładuje...
Strona się ładuje...
Strona się ładuje...
Strona się ładuje...
Strona się ładuje...
Strona się ładuje...
Strona się ładuje...
Strona się ładuje...
Strona się ładuje...
Strona się ładuje...
Strona się ładuje...
Strona się ładuje...
Strona się ładuje...
Strona się ładuje...
Strona się ładuje...
Strona się ładuje...
Strona się ładuje...
Strona się ładuje...
Strona się ładuje...
Strona się ładuje...
Strona się ładuje...
Strona się ładuje...
Strona się ładuje...
Strona się ładuje...
Strona się ładuje...
Strona się ładuje...
Strona się ładuje...
Strona się ładuje...
Strona się ładuje...
Strona się ładuje...
Strona się ładuje...
Strona się ładuje...
Strona się ładuje...
Strona się ładuje...
Strona się ładuje...
Strona się ładuje...
Strona się ładuje...
Strona się ładuje...
Strona się ładuje...
Strona się ładuje...
Strona się ładuje...
Strona się ładuje...
Strona się ładuje...
Strona się ładuje...
Strona się ładuje...
Strona się ładuje...
Strona się ładuje...
Strona się ładuje...
Strona się ładuje...
Strona się ładuje...
Strona się ładuje...
Strona się ładuje...
Strona się ładuje...
Strona się ładuje...
Strona się ładuje...
Strona się ładuje...
Strona się ładuje...
Strona się ładuje...
Strona się ładuje...
Strona się ładuje...
Strona się ładuje...
Strona się ładuje...
Strona się ładuje...
Strona się ładuje...
Strona się ładuje...
Strona się ładuje...
Strona się ładuje...
Strona się ładuje...
Strona się ładuje...
Strona się ładuje...
Strona się ładuje...
Strona się ładuje...
Strona się ładuje...
Strona się ładuje...
Strona się ładuje...
Strona się ładuje...
Strona się ładuje...
Strona się ładuje...
Strona się ładuje...
Strona się ładuje...
Strona się ładuje...
Strona się ładuje...
Strona się ładuje...
Strona się ładuje...
Strona się ładuje...
Strona się ładuje...
Strona się ładuje...
Strona się ładuje...
Strona się ładuje...
Strona się ładuje...
Strona się ładuje...
Strona się ładuje...
Strona się ładuje...
Strona się ładuje...
Strona się ładuje...
Strona się ładuje...
Strona się ładuje...
Strona się ładuje...
Strona się ładuje...
Strona się ładuje...
Strona się ładuje...
Strona się ładuje...
Strona się ładuje...
Strona się ładuje...
Strona się ładuje...
Strona się ładuje...
Strona się ładuje...
Strona się ładuje...
Strona się ładuje...
Strona się ładuje...
Strona się ładuje...
Strona się ładuje...
Strona się ładuje...
Strona się ładuje...
Strona się ładuje...
Strona się ładuje...
Strona się ładuje...
Strona się ładuje...
Strona się ładuje...
Strona się ładuje...
Strona się ładuje...
Strona się ładuje...
Strona się ładuje...
Strona się ładuje...
Strona się ładuje...
Strona się ładuje...
Strona się ładuje...
Strona się ładuje...
Strona się ładuje...
Strona się ładuje...
Strona się ładuje...
Strona się ładuje...
Strona się ładuje...
Strona się ładuje...
Strona się ładuje...
Strona się ładuje...
Strona się ładuje...
Strona się ładuje...
Strona się ładuje...
Strona się ładuje...
Strona się ładuje...
Strona się ładuje...
Strona się ładuje...
Strona się ładuje...
Strona się ładuje...
Strona się ładuje...
Strona się ładuje...
Strona się ładuje...
Strona się ładuje...
Strona się ładuje...
Strona się ładuje...
Strona się ładuje...
Strona się ładuje...
Strona się ładuje...
Strona się ładuje...
Strona się ładuje...
Strona się ładuje...
Strona się ładuje...
Strona się ładuje...
Strona się ładuje...
Strona się ładuje...
Strona się ładuje...
Strona się ładuje...
Strona się ładuje...
Strona się ładuje...
Strona się ładuje...
Strona się ładuje...
Strona się ładuje...
Strona się ładuje...
Strona się ładuje...
Strona się ładuje...
Strona się ładuje...
Strona się ładuje...
Strona się ładuje...
Strona się ładuje...
Strona się ładuje...
Strona się ładuje...
Strona się ładuje...
Strona się ładuje...
Strona się ładuje...
-
 1
1
-
 2
2
-
 3
3
-
 4
4
-
 5
5
-
 6
6
-
 7
7
-
 8
8
-
 9
9
-
 10
10
-
 11
11
-
 12
12
-
 13
13
-
 14
14
-
 15
15
-
 16
16
-
 17
17
-
 18
18
-
 19
19
-
 20
20
-
 21
21
-
 22
22
-
 23
23
-
 24
24
-
 25
25
-
 26
26
-
 27
27
-
 28
28
-
 29
29
-
 30
30
-
 31
31
-
 32
32
-
 33
33
-
 34
34
-
 35
35
-
 36
36
-
 37
37
-
 38
38
-
 39
39
-
 40
40
-
 41
41
-
 42
42
-
 43
43
-
 44
44
-
 45
45
-
 46
46
-
 47
47
-
 48
48
-
 49
49
-
 50
50
-
 51
51
-
 52
52
-
 53
53
-
 54
54
-
 55
55
-
 56
56
-
 57
57
-
 58
58
-
 59
59
-
 60
60
-
 61
61
-
 62
62
-
 63
63
-
 64
64
-
 65
65
-
 66
66
-
 67
67
-
 68
68
-
 69
69
-
 70
70
-
 71
71
-
 72
72
-
 73
73
-
 74
74
-
 75
75
-
 76
76
-
 77
77
-
 78
78
-
 79
79
-
 80
80
-
 81
81
-
 82
82
-
 83
83
-
 84
84
-
 85
85
-
 86
86
-
 87
87
-
 88
88
-
 89
89
-
 90
90
-
 91
91
-
 92
92
-
 93
93
-
 94
94
-
 95
95
-
 96
96
-
 97
97
-
 98
98
-
 99
99
-
 100
100
-
 101
101
-
 102
102
-
 103
103
-
 104
104
-
 105
105
-
 106
106
-
 107
107
-
 108
108
-
 109
109
-
 110
110
-
 111
111
-
 112
112
-
 113
113
-
 114
114
-
 115
115
-
 116
116
-
 117
117
-
 118
118
-
 119
119
-
 120
120
-
 121
121
-
 122
122
-
 123
123
-
 124
124
-
 125
125
-
 126
126
-
 127
127
-
 128
128
-
 129
129
-
 130
130
-
 131
131
-
 132
132
-
 133
133
-
 134
134
-
 135
135
-
 136
136
-
 137
137
-
 138
138
-
 139
139
-
 140
140
-
 141
141
-
 142
142
-
 143
143
-
 144
144
-
 145
145
-
 146
146
-
 147
147
-
 148
148
-
 149
149
-
 150
150
-
 151
151
-
 152
152
-
 153
153
-
 154
154
-
 155
155
-
 156
156
-
 157
157
-
 158
158
-
 159
159
-
 160
160
-
 161
161
-
 162
162
-
 163
163
-
 164
164
-
 165
165
-
 166
166
-
 167
167
-
 168
168
-
 169
169
-
 170
170
-
 171
171
-
 172
172
-
 173
173
-
 174
174
-
 175
175
-
 176
176
-
 177
177
-
 178
178
-
 179
179
-
 180
180
-
 181
181
-
 182
182
-
 183
183
-
 184
184
-
 185
185
-
 186
186
-
 187
187
-
 188
188
-
 189
189
-
 190
190
-
 191
191
-
 192
192
-
 193
193
-
 194
194
-
 195
195
-
 196
196
-
 197
197
-
 198
198
-
 199
199
-
 200
200
-
 201
201
-
 202
202
-
 203
203
-
 204
204
-
 205
205
-
 206
206
-
 207
207
-
 208
208
-
 209
209
-
 210
210
-
 211
211
-
 212
212
-
 213
213
-
 214
214
-
 215
215
-
 216
216
-
 217
217
-
 218
218
-
 219
219
-
 220
220
-
 221
221
-
 222
222
-
 223
223
-
 224
224
-
 225
225
-
 226
226
-
 227
227
-
 228
228
-
 229
229
-
 230
230
-
 231
231
-
 232
232
-
 233
233
-
 234
234
-
 235
235
-
 236
236
-
 237
237
-
 238
238
-
 239
239
-
 240
240
-
 241
241
-
 242
242
-
 243
243
-
 244
244
-
 245
245
-
 246
246
-
 247
247
-
 248
248
-
 249
249
-
 250
250
-
 251
251
-
 252
252
-
 253
253
-
 254
254
-
 255
255
-
 256
256
-
 257
257
-
 258
258
-
 259
259
-
 260
260
-
 261
261
-
 262
262
-
 263
263
-
 264
264
-
 265
265
-
 266
266
-
 267
267
-
 268
268
-
 269
269
-
 270
270
-
 271
271
-
 272
272
-
 273
273
-
 274
274
-
 275
275
-
 276
276
-
 277
277
-
 278
278
-
 279
279
-
 280
280
-
 281
281
-
 282
282
-
 283
283
-
 284
284
-
 285
285
-
 286
286
-
 287
287
-
 288
288
-
 289
289
-
 290
290
-
 291
291
-
 292
292
-
 293
293
-
 294
294
-
 295
295
-
 296
296
-
 297
297
-
 298
298
-
 299
299
-
 300
300
-
 301
301
-
 302
302
-
 303
303
-
 304
304
-
 305
305
-
 306
306
-
 307
307
-
 308
308
-
 309
309
-
 310
310
-
 311
311
-
 312
312
-
 313
313
-
 314
314
-
 315
315
-
 316
316
-
 317
317
-
 318
318
-
 319
319
-
 320
320
-
 321
321
-
 322
322
-
 323
323
-
 324
324
-
 325
325
-
 326
326


Philips HD5730/10 Instrukcja obsługi
- Kategoria
- Ekspresy do kawy
- Typ
- Instrukcja obsługi
w innych językach
- eesti: Philips HD5730/10 Kasutusjuhend
- slovenčina: Philips HD5730/10 Používateľská príručka
- română: Philips HD5730/10 Manual de utilizare
Powiązane artykuły
Inne dokumenty
-
Zelmer ZCM4821B (CM4821) Instrukcja obsługi
-
Gaggia MAGENTA PRESTIGE Instrukcja obsługi
-
-
-
-
-
-
Cafissimo HD8603/91 Instrukcja obsługi
-
-
Maestro MR410 Instrukcja obsługi