Gaggia Cadorna Prestige Instrukcja obsługi
- Kategoria
- Ekspresy do kawy
- Typ
- Instrukcja obsługi

ENGLISH
POLSKI
NEDERLANDS
RI9604 (SUP 049EU)
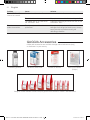
GAGGIA CADORNA
PRESTIGE
Operating instructions
Gebruiksaanwijzing
Instrukcja obsługi
4219-450-06541 MAN. GAG. CAD. PRESTIGE OTC EN-NL-PL Rev 02.indd 1 23/10/2020 12:33:32

ENGLISH
POLSKI
NEDERLANDS
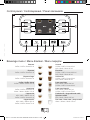
Control panel / Controlepaneel / Panel sterowania
Beverage menu / Menu dranken / Menu napojów
START/STOP
ON/OFF
my favourites
HOME
clean/setting
3 4 5 6 7
21
ESPRESSO
CAPPUCCINO LATTE MACCHIATO
COFFEE
Ristretto
Coffee / Koe / Kawa 30 ml
Cortado
Coffee / Koe / Kawa 40 ml
Milk / Melk / Mleko 30 ml
Espresso
Coffee / Koe / Kawa 40 ml
Flat white
Coffee / Koe / Kawa 40x2 ml
Milk / Melk / Mleko 80 ml
Espresso lungo
Coffee / Koe / Kawa 80 ml
Café au lait
Coffee / Koe / Kawa 90 ml
Milk / Melk / Mleko 90 ml
Coffee / Koe / Kawa
Coffee / Koe / Kawa 120 ml
Latte macchiato
Milk / Melk / Mleko 240 ml
Coffee / Koe / Kawa 40 ml
Americano
Coffee / Koe / Kawa 40 ml
Water / Water / Woda 110 ml
Latte macchiato XL
Milk / Melk / Mleko 300 ml
Coffee / Koe / Kawa 50 ml
Cappuccino
Milk / Melk / Mleko 120 ml
Coffee / Koe / Kawa 40 ml
Frothed milk / Opgeschuimde melk /
Spienione mleko
Milk / Melk / Mleko 180 ml
Cappuccino XL
Milk / Melk / Mleko 180 ml
Coffee / Koe / Kawa 70 ml
Hot water / Heet water / Gorąca woda
Water / Water / Woda 150 ml
01
4219-450-06541 MAN. GAG. CAD. PRESTIGE OTC EN-NL-PL Rev 02.indd 2 23/10/2020 12:33:36

1
23
4
14
15
1716
3
9
10
11
12
5
8
7
2
6
20 181921
13
22
02
4219-450-06541 MAN. GAG. CAD. PRESTIGE OTC EN-NL-PL Rev 02.indd 3 23/10/2020 12:33:37

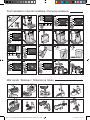
First installation / Eerste installatie / Pierwsza instalacja
Milk carafe / Melkkan / Dzbanek na mleko
1
2
START/STOP
ON/OFF
my favourites
HOME
clean/setting
FILLING WATER CIRUIT
to start press
START/STOP
ON/OFF
my favourites
HOME
clean/setting
Confermi di voler
cambiare la lingua
in Italiano?
START/STOP
ON/OFF
my favourites
HOME
clean/setting
WATER HARDNESS
2
3
4
1
START/STOP
ON/OFF
my favourites
HOME
clean/setting
In the next steps
we will set the correct
water hardness level
START/STOP
ON/OFF
my favourites
HOME
clean/setting
Are you sure you
want to select
2 zone red?
START/STOP
ON/OFF
my favourites
HOME
clean/setting
LANGUAGE
LIETUVOS
SLOVENIJA
ENGLISH
ITALIANO
DEUTSCH
FRANÇAIS
ESPAÑOL
PORTUGUÊS
START/STOP
ON/OFF
my favourites
HOME
clean/setting
WATER HARDNESS
1
2
3
4
START/STOP
ON/OFF
my favourites
HOME
clean/setting
Welcome
1 sec.
START/STOP
ON/OFF
my favourites
HOME
clean/setting
LANGUAGE
SLOVENIJA
CECO
LIETUVOS
ENGLISH
ITALIANO
DEUTSCH
FRANÇAIS
ESPAÑOL
1 min.
1
1
2
23 2724
29
25
3028 31
26
32
03
08
13
19 20 21 22
14 1615 17
18
09 10 11 12
04 05 06 07
4219-450-06541 MAN. GAG. CAD. PRESTIGE OTC EN-NL-PL Rev 02.indd 4 23/10/2020 12:33:43

Congratulations on purchasing the Gaggia Cadorna Prestige!
This easy-to-use machine guarantees excellent coffee drinks, every day. With its
intuitive interface, you can choose from among 14 beverages, customise them
and save them to the 4 available profiles, where they can be instantly brought up
whenever you want.
Before being packed, each of our high-quality machines undergoes rigorous testing
in our laboratories to ensure it works perfectly. Because real coffee is used during
testing, some residue may remain. This does not compromise the integrity of the
product: it is a brand new machine.
Please read the whole manual carefully before you instal, use or clean your
machine. Before using it for the first time, please read carefully the safety manual
provided separately and store it for future use.
ENGLISH
Van harte gelukgewenst met de aanschaf van een Gaggia Cadorna Prestige!
Met deze machine zal u op eenvoudige wijze steeds uitstekende resultaten
verkrijgen. Dankzij de intuïtieve interface kunt u kiezen uit 14 dranken, ze
aanpassen en opslaan in de 4 beschikbare profielen, om ze bij elk gebruik terug te
vinden.
Alvorens verpakt te worden, ondergaat elke machine strenge tests in onze
laboratoria om de hoge kwaliteit en correcte werking ervan te garanderen. Er
wordt ook tijden het testen koffie gebruikt, dus het is mogelijk dat er wat residu
achterblijft. Dit doet geen afbreuk aan de integriteit van het product: het is een
volledig nieuwe machine.
In deze handleiding zult u alle nodige informatie vinden om uw machine te
installeren, te gebruiken, schoon te maken en te ontkalken. Lees de aparte
veiligheidsbrochure zorgvuldig door voordat u ze voor het eerst gebruikt en bewaar
deze voor toekomstig gebruik.
NEDERLANS
Gratulujemy zakupu urządzenia Gaggia Cadorna Prestige!
Dzięki temu urządzeniu zawsze będziesz cieszyć się doskonałymi rezultatami,
o które w tym przypadku nie trudno. Za sprawą intuicyjnego interfejsu możesz
wybrać spośród 14 napojów, dostosować je do swoich potrzeb i zapisać je w
pamięci 4 dostępnych profili, aby odnaleźć je przy każdym użyciu urządzenia.
Przed zapakowaniem każde urządzenie przechodzi szereg rygorystycznych testów
w naszych laboratoriach, aby zapewnić ich wysoką jakość i prawidłowe działanie.
Podczas odbioru urządzenia testujemy je przy użyciu kawy, dlatego mogą
pozostać w nim jej pozostałości. Nie zakłóca to jednak integralności produktu: jest
to urządzenie całkowicie nowe.
W niniejszej instrukcji zawarto wszelkie informacje niezbędne do zainstalowania,
użytkowania, czyszczenia i odwapniania urządzenia. Przed jego pierwszym
użyciem zapoznaj się uważnie z dostarczoną osobno broszurą dotyczącą
bezpieczeństwa i zachowaj ją w razie potrzeby skorzystania z niej w przyszłości.
POLSKI
4219-450-06541 MAN. GAG. CAD. PRESTIGE OTC EN-NL-PL Rev 02.indd 5 23/10/2020 12:33:44

6
English
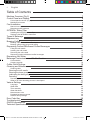
Table of Contents
Machine Overview (Fig.2) ....................................................................................................................................................................................................................................................................................................................................................................................................................................................................................................7
Control Panel and Display .................................................................................................................................................................................................................................................................................................................................................................................................................................................................................................8
Control panel overview (Fig. 1) ............................................................................................................................................................................................................................................................................................................................................................................................................................................................................8
Multifunction buttons ............................................................................................................................................................................................................................................................................................................................................................................................................................................................................................................................................8
First Installation ...................................................................................................................................................................................................................................................................................................................................................................................................................................................................................................................................................................................9
Manual rinse cycle .........................................................................................................................................................................................................................................................................................................................................................................................................................................................................................................................................................9
Measuring water hardness ..............................................................................................................................................................................................................................................................................................................................................................................................................................................................................................10
INTENZA+ Water Filter ..............................................................................................................................................................................................................................................................................................................................................................................................................................................................................................................10
Installing the INTENZA+ water lter ........................................................................................................................................................................................................................................................................................................................................................................................................................................11
Replacing the INTENZA+ water lter .................................................................................................................................................................................................................................................................................................................................................................................................................................11
Types of Beverage .................................................................................................................................................................................................................................................................................................................................................................................................................................................................................................................................................12
Espresso tray .........................................................................................................................................................................................................................................................................................................................................................................................................................................................................................................................................................................................13
Brewing Coee ............................................................................................................................................................................................................................................................................................................................................................................................................................................................................................................................................................................13
Brewing coee from whole coee beans ........................................................................................................................................................................................................................................................................................................................................................................................................13
Brewing coee using pre-ground coee .............................................................................................................................................................................................................................................................................................................................................................................................................14
Dispensing Frothed Milk-based Coee Beverages ..........................................................................................................................................................................................................................................................................................14
Filling the milk carafe .................................................................................................................................................................................................................................................................................................................................................................................................................................................................................................................................14
Inserting the milk carafe ...............................................................................................................................................................................................................................................................................................................................................................................................................................................................................................................15
Removing the milk carafe ......................................................................................................................................................................................................................................................................................................................................................................................................................................................................................................15
Dispensing frothed milk-based coee beverages ....................................................................................................................................................................................................................................................................................................................................................16
Dispensing Hot Water ........................................................................................................................................................................................................................................................................................................................................................................................................................................................................................................................16
Beverage Customisation and Prole Creation ...............................................................................................................................................................................................................................................................................................................................17
Customisation .............................................................................................................................................................................................................................................................................................................................................................................................................................................................................................................................................................................17
Creating a prole ..........................................................................................................................................................................................................................................................................................................................................................................................................................................................................................................................................................18
Coee Grind Settings ...........................................................................................................................................................................................................................................................................................................................................................................................................................................................................................................................19
Cleaning and Maintenance .................................................................................................................................................................................................................................................................................................................................................................................................................................................................................20
Cleaning table ............................................................................................................................................................................................................................................................................................................................................................................................................................................................................................................................................................................20
Cleaning the milk carafe ........................................................................................................................................................................................................................................................................................................................................................................................................................................................................................................21
Cleaning the brew group .....................................................................................................................................................................................................................................................................................................................................................................................................................................................................................................22
Lubricating the brew group .....................................................................................................................................................................................................................................................................................................................................................................................................................................................................................25
Descaling ..............................................................................................................................................................................................................................................................................................................................................................................................................................................................................................................................................................................................................26
Descaling procedure ....................................................................................................................................................................................................................................................................................................................................................................................................................................................................................................................................26
What to do if the descaling process is interrupted .................................................................................................................................................................................................................................................................................................................................................27
Various Settings .....................................................................................................................................................................................................................................................................................................................................................................................................................................................................................................................................................................27
Language ........................................................................................................................................................................................................................................................................................................................................................................................................................................................................................................................................................................................................27
Water lter ...................................................................................................................................................................................................................................................................................................................................................................................................................................................................................................................................................................................................28
Timer stand-by ........................................................................................................................................................................................................................................................................................................................................................................................................................................................................................................................................................................28
Water hardness ...................................................................................................................................................................................................................................................................................................................................................................................................................................................................................................................................................................28
Measurement units ..............................................................................................................................................................................................................................................................................................................................................................................................................................................................................................................................................28
Prepared beverages counter .................................................................................................................................................................................................................................................................................................................................................................................................................................................................................28
Restore factory settings .................................................................................................................................................................................................................................................................................................................................................................................................................................................................................................................28
Error Code Key ...........................................................................................................................................................................................................................................................................................................................................................................................................................................................................................................................................................................29
Troubleshooting ......................................................................................................................................................................................................................................................................................................................................................................................................................................................................................................................................................................30
GAGGIA Accessories ............................................................................................................................................................................................................................................................................................................................................................................................................................................................................................................................32
Technical Specications ........................................................................................................................................................................................................................................................................................................................................................................................................................................................................................................33
4219-450-06541 MAN. GAG. CAD. PRESTIGE OTC EN-NL-PL Rev 02.indd 6 23/10/2020 12:33:44

7
English
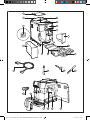
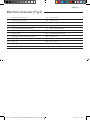
Machine Overview (Fig.2)
1 Coffee bean container lid 13 Espresso tray
2 Coffee bean container 14 Power cord
3 Power cord socket 15 Lubricant
4 Water tank 16 Pre-ground coffee measuring scoop
5 Pre-ground coffee compartment 17 Water hardness tester
6 Coffee grinder adjustment knob 18 Service door
7 Control panel 19 Coffee residues drawer
8 Adjustable coffee dispensing spout 20 Brew group
9 Coffee pucks container 21 Drip tray release buttons
10 Drip tray 22 Milk carafe
11 Drip tray grid 23 Water dispensing spout
12 “Full drip tray” indicator
4219-450-06541 MAN. GAG. CAD. PRESTIGE OTC EN-NL-PL Rev 02.indd 7 23/10/2020 12:33:45

8
English
Control Panel and Display
This coffee machine features an easy-to-use, intuitive display. Please see below for
an in-depth explanation of each button.
Multifunction buttons
Use the multifunction buttons at the sides of the display to select the feature or
beverage indicated on the screen.
Control panel overview (g. 1)
1/2 MULTIFUNCTION buttons
Selects the function shown on the display.
3
ON/OFF
ON/OFF
button
To switch the machine on or off.
4
MY FAVOURITES
my favourites
button
Opens the personal proles menu.
5
HOME
HOME
button
Opens the beverage menu.
6
CLEAN/SETTING
clean/setting
button
Opens the cleaning and settings menu.
7
START/STOP
START/STOP
button
Starts/stops the dispensing of the selected
beverage, or starts/stops the procedure
indicated on the display.
Note: the MY FAVOURITES
my favourites
, HOME
HOME
, CLEAN/SETTING
clean/setting
buttons are
also ESC buttons. You can exit any screen shown on the display at any time by
pressing one of these buttons, which will then bring you back to their initial menu.
Note: To make the reading of this manual easier, <<press the button " ">> means
<<press the button related to " ">>.
START/STOP
ON/OFF
my favourites
HOME
clean/setting
ESPRESSO
CAPPUCCINO LATTE MACCHIATO
COFFEE
4219-450-06541 MAN. GAG. CAD. PRESTIGE OTC EN-NL-PL Rev 02.indd 8 23/10/2020 12:33:46

9
English
First Installation
Before using the machine, it is essential to follow a few simple steps, clearly
described in the explanatory drawings found in the quick guide at the beginning of
this instruction manual.
Note: To make the best-tasting coffee, you should brew 5 coffees initially to allow
the machine to complete its self-adjustment.
START/STOP
ON/OFF
my favourites
HOME
clean/setting
30 ml
medium
ESPRESSO
C
OFFEE
TEMP
START/STOP
ON/OFF
my favourites
HOME
clean/setting
30 ml
medium
ESPRESSO
COFFEE
TEMP
START/STOP
ON/OFF
my favourites
HOME
clean/setting
ESPRESSO
CAPPUCCINO LATTE MACCHIATO
COFFEE
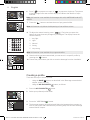
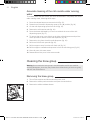
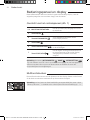
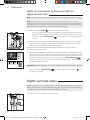
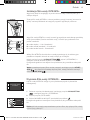
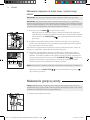
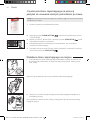
Manual rinse cycle
When rst installing the machine or after a long period of its inactivity, it is
necessary to prime the water circuit through the manual rinse cycle.
1 Place a container under the coffee dispensing spout, browse through the
pages and select "ESPRESSO LUNGO".
2 Press the " "button without adding pre-ground coffee.
3 Press the START/STOP
START/STOP
button to start dispensing, the machine will
dispense hot water.
4 Empty the container and make sure the water dispensing spout is installed.
5 Place the container under the water dispensing spout and select the " HOT
WATER " beverage.
6 Press the START/STOP
START/STOP
button to commence dispensing.
7 Empty the container and repeat steps 6 to 7, until the water tank is empty.
8 At the end of this operation, ll the water tank again up to the MAX level. The
machine is now ready for use.
4219-450-06541 MAN. GAG. CAD. PRESTIGE OTC EN-NL-PL Rev 02.indd 9 23/10/2020 12:33:48

10
English
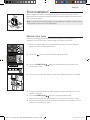
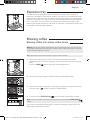
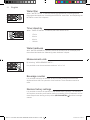
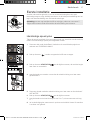
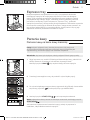
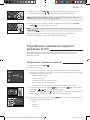
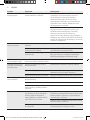
Measuring water hardness
You’ll need to set the water hardness when you install your machine.
Take the water hardness measuring strip that you nd in the box and follow the
steps shown on the display during installation. To adjust the water hardness
setting later, press the CLEAN/SETTING
clean/setting
button, select " SETTINGS ", and then
" WATER HARDNESS " from the settings menu.
1 Immerse the water hardness measuring strip in a glass of water for 1 second.
Remove the strip from the water and wait 1 minute.
2 Note how many squares turn red.
3 Use the green " " and " " buttons to select the water hardness according
to the table below. Conrm the setting by pressing " ".
Small red
squares
Value to set Water hardness INTENZA+
1 very soft water A
2 soft water A
3 hard water B
4 very hard water C
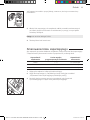
INTENZA+ Water Filter
We recommend using the INTENZA+ water lter to limit the formation of limescale.
This ensures the machine will last longer and the aroma of your coffee will be
better.
Water is an essential element in brewing coffee: it is therefore extremely important
to ensure it is always ltered adequately.
The INTENZA+ water lter prevents the formation of mineral deposits, improving
the quality of the water.
1 sec.
4219-450-06541 MAN. GAG. CAD. PRESTIGE OTC EN-NL-PL Rev 02.indd 10 23/10/2020 12:33:50

11
English
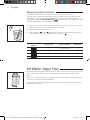
Installing the INTENZA+ water lter
Remove the small white lter from the water tank and store it in a dry place.
Immerse the INTENZA+ water lter vertically (with the opening pointing up) in cold
water and gently press its sides to let any air bubbles out.
Place the INTENZA+ lter in the water tank, ensuring it is correctly in place. Rell
the water tank and place it in its compartment.
Press the CLEAN/SETTING
clean/setting
button, select " SETTINGS ", and then " WATER
FILTER " from the settings menu.
Follow the instructions shown on the display to activate the lter.
Note: you can pause the lter activation procedure by pressing the START/STOP
START/STOP
button. To resume the procedure, press the START/STOP
START/STOP
button again.
Remove the INTENZA+ water lter from the water. Set the machine according to
the detected water hardness (see the "Measuring water hardness" chapter) and the
letters found on the lter base:
A = soft water – 1 or 2 small squares
B = hard water (standard) – 3 small squares
C = very hard water – 4 small squares
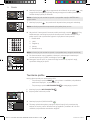
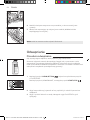
Replacing the INTENZA+ water lter
When the INTENZA+ water lter runs out, the display will show a warning
message.
1 Replace or disable by pressing the CLEAN/SETTING
clean/setting
button, and then the
" SETTINGS " button.
2 Select the " WATER
FILTER " button.
3 Select " REPLACE " to change the lter or " DISABLE " if you do not intend to
use the lter. Conrm with the " " button.
Follow the instructions shown on the display to activate the lter correctly.
Note: If you do not want to replace the lter, select "DISABLE" to disable it.
START/STOP
ON/OFF
my favourites
HOME
clean/setting
WATER FILTER
REPLACE
ACTIVATE
DISABLE
START/STOP
ON/OFF
my favourites
HOME
clean/setting
Filter expired, replace
or disable it
4219-450-06541 MAN. GAG. CAD. PRESTIGE OTC EN-NL-PL Rev 02.indd 11 23/10/2020 12:33:51

12
English
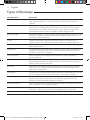
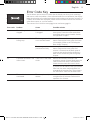
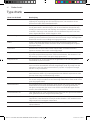
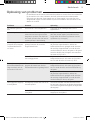
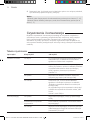
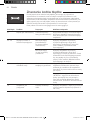
Types of Beverage
Beverage name Description
Ristretto A ristretto, served in a small cup, is an espresso whose brewing time is shorter
than a regular espresso. As such, a ristretto is a shorter shot and lower in
caffeine.
Espresso The espresso is known around the globe as true "Italian coffee". Served in
a small cup, its unmistakeable characteristics are a full and intense aroma
and a top layer of compact, natural crema. It is the result of the hot-water
pressurised extraction process invented by Achille Gaggia in 1938.
Espresso lungo An espresso lungo is an espresso shot with a longer extraction time. It is more
diluted, with a different aromatic intensity and a higher caffeine content. It is
served in a medium-sized cup.
Coffee Coffee is a beverage prepared with a greater quantity of water than an
espresso shot. It has a lighter aroma and is served in a medium-large cup.
Americano An Americano is a long, less intense coffee drink prepared by combining hot
water and espresso.
Cappuccino The cappuccino is an Italian classic, among the most loved in the world. It is
prepared with espresso, milk and a milk froth, which must be no less than 1
cm thick. It is served in a large cup.
XL Cappuccino An XL cappuccino is a cappuccino prepared with a greater quantity of
espresso and milk.
Cortado The cortado is an Argentinian beverage, consisting of an espresso shot with
a small quantity of milk. It is usually served in a small glass and is popular in
Spain, Portugal, and Latin America.
Flat white A at white is a beverage of Australian origin which has a strong, dominant
coffee avour. It is composed of a double espresso and milk, toped with a
light layer of velvety foam.
Café au lait A café au lait is a beverage composed of equal parts coffee and milk. This can
even be enriched by a thin layer of milk froth. It is served in a large cup.
Latte macchiato A latte macchiato is prepared with hot milk, one part milk froth and a small
quantity of espresso. It is served in a tall, transparent glass to allow the
separation of the three different layers to be seen.
XL latte macchiato An XL latte macchiato is a latte macchiato prepared with a greater quantity of
milk. It is served in a tall, transparent glass.
Frothed milk Frothed milk is used to make cappuccinos, latte macchiatos and several other
beverages. The result is a compact, homogeneous layer of milk froth.
Hot water Hot water can be used to prepare hot teas, infusions and instant beverages.
4219-450-06541 MAN. GAG. CAD. PRESTIGE OTC EN-NL-PL Rev 02.indd 12 23/10/2020 12:33:51

13
English
Espresso tray
This machine was designed to guarantee awless results, from a traditional
espresso to a number of different beverages. If you wish to try a traditional Italian
espresso, with a delicious layer of natural crema on the surface, we recommend
using the "Espresso Tray", which has been specically designed for and integrated
into the machine. This tray makes it possible to use traditional espresso cups,
ensuring the perfect height from the spout for compact, homogeneous crema and
dispensation without messy splashes.
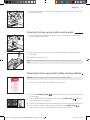
Brewing coee
Brewing coee from whole coee beans
Warning: always use whole coffee beans when making espresso. Do not put any
pre-ground, unroasted, freeze-dried or instant coffee in the coffee bean container,
as they may damage the machine.
Tip: Preheat the cups with hot water to enjoy a hotter coffee.
1 Remove the espresso tray, place an espresso cup beneath the coffee
dispensing spout, raising or lowering it according to the size of the cup being
used.
Press the HOME
HOME
button to bring up the beverage menu.
3 Once the beverage is selected, it is possible to prepare two cups at the same
time using the " " button, except the "AMERICANO".
2 Browse the various pages to nd and select the desired beverage.
4 Finally, press the START/STOP
START/STOP
button to begin dispensing the coffee.
Note: you can interrupt the brewing at any time by pressing the START/STOP
START/STOP
button.
If you wish to customise the settings of a specic beverage, please refer to the
"Beverage customisation" chapter.
START/STOP
ON/OFF
my favourites
HOME
clean/setting
ESPRESSO
CAPPUCCINO LATTE MACCHIATO
COFFEE
START/STOP
ON/OFF
my favourites
HOME
clean/setting
30 ml
medium
ESPRESSO
COFFEE
TEMP
START/STOP
ON/OFF
my favourites
HOME
clean/setting
30 ml
medium
ESPRESSO
COFFEE
TEMP
4219-450-06541 MAN. GAG. CAD. PRESTIGE OTC EN-NL-PL Rev 02.indd 13 23/10/2020 12:33:53

14
English
Brewing coee using pre-ground coee
Use the measuring scoop provided to insert the correct dose in the pre-ground
coffee compartment.
1 Lift the lid of the pre-ground coffee compartment and add one level measuring
scoop of pre-ground coffee.
Warning: do not insert anything other than pre-ground coffee in the pre-ground
coffee compartment, for not damage the machine.
2 Place a cup under the coffee dispensing spout and select the desired beverage.
3 Press the " " button.
Note: the "pre-ground coffee" function cannot dispense two cups of coffee at
the same time, and it disables the aroma setting, both of which are possible with
coffee beans only.
Note: this function is not available for FLAT WHITE
4 Press the START/STOP
START/STOP
button to start dispensing the coffee.
If you wish to customise the settings of a specic beverage, please refer to the
"Beverage customisation" chapter.
Note: you can interrupt the brewing at any time by pressing the START/STOP
START/STOP
button.
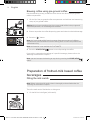
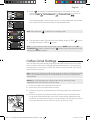
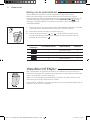
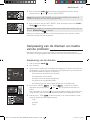
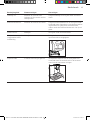
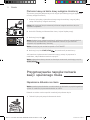
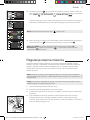
Preparation of frothed-milk based coee
beverages
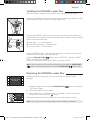
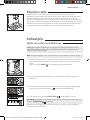
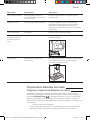
Filling the milk carafe
Note: Before using the milk carafe, clean it thoroughly as described under the
"Cleaning the milk carafe" chapter.
The milk carafe can be lled before or during use.
1 Lift the lid like in the gure (milk carafe).
START/STOP
ON/OFF
my favourites
HOME
clean/setting
30 ml
medium
ESPRESSO
C
OFFEE
TEMP
4219-450-06541 MAN. GAG. CAD. PRESTIGE OTC EN-NL-PL Rev 02.indd 14 23/10/2020 12:33:54

15
English
2 Pour the milk into the carafe. The milk level must be between the minimum
(MIN) and the maximum (MAX) notches on the carafe. Replace the lid.
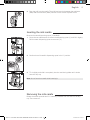
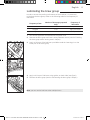
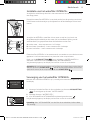
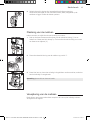
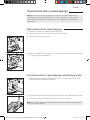
Inserting the milk carafe
Remove the water dispensing spout (if installed):
1 Press the two side buttons to unlock the dispensing spout (1) and lift it slightly.
Pull the water dispensing spout to remove it (2).
2 Position the milk carafe’s dispensing spout in the "I" position.
Removing the milk carafe
Rotate the carafe upwards until it is naturally released from the insert in the drip
tray. Then remove it.
3 Tilt it slightly and slide it completely into the machine’s guides until it hooks
onto the drip tray.
Note: do not force the carafe while inserting it.
4219-450-06541 MAN. GAG. CAD. PRESTIGE OTC EN-NL-PL Rev 02.indd 15 23/10/2020 12:33:56

16
English
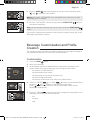
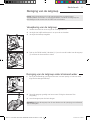
Dispensing frothed milk-based coee beverages
Tip: Preheat the cups with hot water to enjoy a hotter beverage.
Tip: use cold milk (at a temperature of around 5 °C) with a protein content of at
least 3% to ensure optimum results for the froth. You can use either whole milk or
semi-skimmed milk. You can also use skimmed milk, soy milk or lactose-free milk.
1 Press the HOME
HOME
button and choose the desired beverage from the menu.
- Press the button for the beverage desired and place a suitable cup or glass
beneath the coffee dispensing spout and the carafe dispensing spout.
- Press the START/STOP
START/STOP
button to start brewing the selected beverage.
2 The machine will dispense a predened amount of frothed milk into the cup or
glass. The coffee or the frothed milk may be dispensed rst, depending on the
beverage selected.
If you wish to customise the beverage before dispensing, refer to the “Beverage
customisation” chapter.
3 After dispensing your frothed milk-based coffee beverages, it is best to
complete the quick cleaning procedure of the carafe within 10 seconds.
However, the procedure can also be carried out at a later time by opening the
cleaning menu via the CLEAN/SETTING
clean/setting
button. Follow the instructions
shown on the display. The cleaning procedure can be carried out with milk in
the carafe.
Note: We recommend cleaning the machine via the quick clean procedure at least
once a day.
Press the START/STOP
START/STOP
button to conrm, or " " to carry out the
procedure at a later time.
Dispensing Hot Water
Warning: when the machine starts preparing hot water, the hot water dispensing
spout may spray steam and hot water. Wait until the end of the preparation before
removing the hot water dispensing spout.
1 Insert the hot water dispensing spout.
START/STOP
ON/OFF
my favourites
HOME
clean/setting
START QUICK MILK CLEAN?
5:00 min
to start press
4219-450-06541 MAN. GAG. CAD. PRESTIGE OTC EN-NL-PL Rev 02.indd 16 23/10/2020 12:33:58

17
English
2 Press the HOME
HOME
button and browse the various screens using the green
" " and " " and select "HOT WATER".
Warning: only select " HOT WATER " from the HOME screen when the hot water
dispensing spout is installed.
3 Press the " HOT WATER " button. Finally, press the START/STOP
START/STOP
button to
commence dispensing.
Note: you can interrupt the brewing at any time by pressing the START/STOP
START/STOP
button.
If you wish to customise the volume of water before you begin, please refer to the
"Beverage customisation" chapter.
Beverage Customisation and Prole
Creation
This machine makes it possible to modify the settings of a beverage according to
your preferences and save it to one of four available proles.
Customisation
1 Press the HOME
HOME
button.
2 Select your beverage.
3 All the settings that can be adjusted and/or selected are displayed on the
screen. Based on the type of beverage, you can adjust and/or select:
- the amount of coffee and milk;
- the temperature of the coffee;
- the dispensing of two cups at the same time;
- the use of pre-ground coffee;
- the intensity of the aroma (only when using coffee beans);
4 Once the " COFFEE " or " MILK " button has been pressed, use
the green " " and " " buttons to select the desired amount.
Press " " to conrm and return to the previous screen, where the new
quantity will be displayed.
5 Press the " TEMP " button several times to adjust the temperature of the
beverage from among the following options:
- low;
- medium;
- high;
START/STOP
ON/OFF
my favourites
HOME
clean/setting
ESPRESSO
CAPPUCCINO LATTE MACCHIATO
COFFEE
START/STOP
ON/OFF
my favourites
HOME
clean/setting
ESPRESSO LUNGO
CAFÈ AU LAIT ACQUA CALDA
AMERICANO
START/STOP
ON/OFF
my favourites
HOME
clean/setting
30 ml
medium
ESPRESSO
COFFEE
TEMP
START/STOP
ON/OFF
my favourites
HOME
clean/setting
ESPRESSO
COFFEE
30 ml
START/STOP
ON/OFF
my favourites
HOME
clean/setting
30 ml
medium
ESPRESSO
COFFEE
TEMP
4219-450-06541 MAN. GAG. CAD. PRESTIGE OTC EN-NL-PL Rev 02.indd 17 23/10/2020 12:34:01

18
English
6 Press " " to prepare two cups, or " " to prepare a single cup. The picture
of the beverage in the centre of the display will indicate the number of cups
selected.
Note: this function is not available for beverages with milk, AMERICANO and HOT
WATER.
7 Press the " " button to activate the use of pre-ground coffee.
Note: this function only allows the dispensing of one coffee at a time.
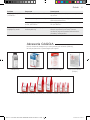
8 To adjust the aroma intensity, press " ". Each time you press the
button, the aroma intensity changes by one degree. The display shows the
chosen intensity.
1 Very light
2 Light
3 Normal
4 Strong
5 Very strong
Note: this function is not available for pre-ground coffee.
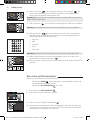
Creating a prole
There are two ways to create a prole:
- Using the HOME
HOME
button, as described in the "Beverage customisation"
chapter, points 9 and 10;
- Using the MY FAVOURITES
my favourites
button, as follows:
3 Press the " ADD DRINK " button.
4 The beverage screens will be displayed. Select the beverage that you want to
save to your prole and customise it by following steps 3 to 8 in the "Beverage
customisation" chapter.
9 Once the drink has been customised, you can save it in a specic prole by
pressing the " " button.
10 Choose the prole where you wish to save the beverage from the 4 available.
1 Press the MY FAVOURITES
my favourites
button.
2 Select your preferred prole colour.
START/STOP
ON/OFF
my favourites
HOME
clean/setting
30 ml
medium
ESPRESSO
COFFEE
TEMP
START/STOP
ON/OFF
my favourites
HOME
clean/setting
30 ml
medium
ESPRESSO
C
OFFEE
TEMP
1
2
3
4
5
START/STOP
ON/OFF
my favourites
HOME
clean/setting
30 ml
medium
ESPRESSO
COFFEE
TEMP
START/STOP
ON/OFF
my favourites
HOME
clean/setting
CHOOSE YOUR
PROFILE
START/STOP
ON/OFF
my favourites
HOME
clean/setting
ADD DRINK
4219-450-06541 MAN. GAG. CAD. PRESTIGE OTC EN-NL-PL Rev 02.indd 18 23/10/2020 12:34:04

19
English
5 Press " " to save the customised beverage to your prole. At this point,
you can dispense the beverage or exit the menu by pressing one of the ESC
buttons (HOME
HOME
, MY FAVOURITES
my favourites
, CLEAN/SETTING
clean/setting
).
The saved beverage is now present in the list of your preferences and marked
with a small heart in the same colour as the selected prole.
6 The beverage saved in the prole can be modied using the " EDIT " button,
or deleted using the " DELETE " button.
Note: It is not possible to save the beverage from the HOME menu via the MY
FAVOURITES
my favourites
button. Instead, use the " " button, otherwise you will lose the
settings you have just applied.
Note: Once used, the " " prole icon will change colour.
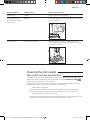
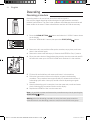
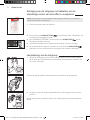
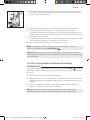
Coee Grind Settings
You can adjust the grind setting using the grinder adjustment knob on the coffee
bean container. The ceramic coffee grinder guarantees perfect, even grinding for
the preparation of every cup of coffee. The aroma is thus preserved, ensuring the
perfect avour every time.
Note: you can only adjust the grind setting while the machine is grinding the coffee
beans. The difference in avour will be noticeable after 2-3 cups of coffee have
been brewed.
Warning: to avoid damaging the coffee grinder, do not rotate the grinder
adjustment knob more than one notch at a time.
1 Place a cup under the coffee dispensing spout.
2 Remove the lid of the coffee bean container.
3 Prepare an espresso as described in the "Brewing coffee from coffee beans"
chapter.
4 While the machine is grinding the coffee, place the end of the handle of the
pre-ground coffee measuring scoop on the coffee grinder adjustment knob,
located in the coffee bean container. Use the handle of the measuring scoop to
press and rotate the knob to the left or right, one notch at a time.
START/STOP
ON/OFF
my favourites
HOME
clean/setting
30 ml
medium
ESPRESSO
COFFEE
TEMP
START/STOP
ON/OFF
my favourites
HOME
clean/setting
ESPRESSO ADD DRINK
START/STOP
ON/OFF
my favourites
HOME
clean/setting
DELETEDIT
START/STOP
ON/OFF
my favourites
HOME
clean/setting
CHOOSE YOUR
PROFILE
10
4219-450-06541 MAN. GAG. CAD. PRESTIGE OTC EN-NL-PL Rev 02.indd 19 23/10/2020 12:34:06

20
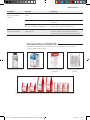
English
5 You can select from 10 grinding settings, from ne to course. The smaller the
notch, the stronger and richer the coffee.
Note:
- Coarse grind: lighter taste, for dark roasted coffee blends (5-10);
- Fine grind: stronger taste, for light roasted coffee blends (1-5);
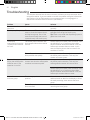
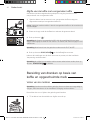
Cleaning and Maintenance
Regular cleaning and maintenance keep the machine in perfect condition and
ensure perfect coffee avour, a constant coffee ow and excellent milk froth.
Please refer to the following table to know when and how to clean the removable
parts of the machine. For more detailed information, please read the relevant
chapters.
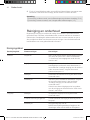
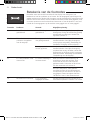
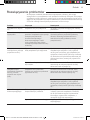
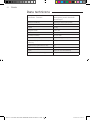
Cleaning table
Part description When to clean How to clean the cycle
Milk carafe After use After preparing a milk-based beverage, start the
" QUICK CLEAN " process as indicated on the
machine.
Daily Clean the milk container and the milk suction
tube as described in the "Cleaning the milk carafe
under running water" chapter, following the rst 4
points and point 11.
Weekly Disassemble the milk carafe and clean all its
parts under running water.
Monthly Start the " DEEP CLEANING " process as
indicated on the machine. For this cleaning cycle,
use the Philips "Milk circuit cleaner" to clean the
milk circuits.
Brew group Weekly Remove the brew group and clean it under
running water.
Depending on usage See the "Cleaning and lubricating the brew group"
chapter.
Monthly Clean the brew group with the Gaggia coffee oil
remover to remove any oily coffee residue
Drip tray full When the red indicator emerges
from the grid of the drip tray
Empty the drip tray and clean it under running
water.
Coffee pucks
container
Whenever the machine requires it Empty the coffee pucks container and clean it
under running water. Ensure that the machine is
switched on during this procedure, or the coffee
pucks container will not reset.
4219-450-06541 MAN. GAG. CAD. PRESTIGE OTC EN-NL-PL Rev 02.indd 20 23/10/2020 12:34:06
Strona się ładuje...
Strona się ładuje...
Strona się ładuje...
Strona się ładuje...
Strona się ładuje...
Strona się ładuje...
Strona się ładuje...
Strona się ładuje...
Strona się ładuje...
Strona się ładuje...
Strona się ładuje...
Strona się ładuje...
Strona się ładuje...
Strona się ładuje...
Strona się ładuje...
Strona się ładuje...
Strona się ładuje...
Strona się ładuje...
Strona się ładuje...
Strona się ładuje...
Strona się ładuje...
Strona się ładuje...
Strona się ładuje...
Strona się ładuje...
Strona się ładuje...
Strona się ładuje...
Strona się ładuje...
Strona się ładuje...
Strona się ładuje...
Strona się ładuje...
Strona się ładuje...
Strona się ładuje...
Strona się ładuje...
Strona się ładuje...
Strona się ładuje...
Strona się ładuje...
Strona się ładuje...
Strona się ładuje...
Strona się ładuje...
Strona się ładuje...
Strona się ładuje...
Strona się ładuje...
Strona się ładuje...
Strona się ładuje...
Strona się ładuje...
Strona się ładuje...
Strona się ładuje...
Strona się ładuje...
Strona się ładuje...
Strona się ładuje...
Strona się ładuje...
Strona się ładuje...
Strona się ładuje...
Strona się ładuje...
Strona się ładuje...
Strona się ładuje...
Strona się ładuje...
Strona się ładuje...
Strona się ładuje...
Strona się ładuje...
Strona się ładuje...
Strona się ładuje...
Strona się ładuje...
Strona się ładuje...
Strona się ładuje...
Strona się ładuje...
Strona się ładuje...
Strona się ładuje...
Strona się ładuje...
Strona się ładuje...
Strona się ładuje...
Strona się ładuje...
Strona się ładuje...
Strona się ładuje...
-
 1
1
-
 2
2
-
 3
3
-
 4
4
-
 5
5
-
 6
6
-
 7
7
-
 8
8
-
 9
9
-
 10
10
-
 11
11
-
 12
12
-
 13
13
-
 14
14
-
 15
15
-
 16
16
-
 17
17
-
 18
18
-
 19
19
-
 20
20
-
 21
21
-
 22
22
-
 23
23
-
 24
24
-
 25
25
-
 26
26
-
 27
27
-
 28
28
-
 29
29
-
 30
30
-
 31
31
-
 32
32
-
 33
33
-
 34
34
-
 35
35
-
 36
36
-
 37
37
-
 38
38
-
 39
39
-
 40
40
-
 41
41
-
 42
42
-
 43
43
-
 44
44
-
 45
45
-
 46
46
-
 47
47
-
 48
48
-
 49
49
-
 50
50
-
 51
51
-
 52
52
-
 53
53
-
 54
54
-
 55
55
-
 56
56
-
 57
57
-
 58
58
-
 59
59
-
 60
60
-
 61
61
-
 62
62
-
 63
63
-
 64
64
-
 65
65
-
 66
66
-
 67
67
-
 68
68
-
 69
69
-
 70
70
-
 71
71
-
 72
72
-
 73
73
-
 74
74
-
 75
75
-
 76
76
-
 77
77
-
 78
78
-
 79
79
-
 80
80
-
 81
81
-
 82
82
-
 83
83
-
 84
84
-
 85
85
-
 86
86
-
 87
87
-
 88
88
-
 89
89
-
 90
90
-
 91
91
-
 92
92
-
 93
93
-
 94
94


Gaggia Cadorna Prestige Instrukcja obsługi
- Kategoria
- Ekspresy do kawy
- Typ
- Instrukcja obsługi
w innych językach
- English: Gaggia Cadorna Prestige Owner's manual
- Nederlands: Gaggia Cadorna Prestige de handleiding
Powiązane artykuły
-
Gaggia Cadorna Plus Instrukcja obsługi
-
Gaggia RI9702/02 Instrukcja obsługi
-
-
-
-
-
-
-
Gaggia MAGENTA PLUS Instrukcja obsługi
-
Inne dokumenty
-
Elgento E13004 Karta katalogowa
-
Saeco HD8906/01 Instrukcja obsługi
-
Saeco HD8953/19 Instrukcja obsługi
-
Tristar KZ-1228 Instrukcja obsługi
-
Philips EP2230/10 Instrukcja obsługi
-
Philips HD5730/10 Instrukcja obsługi
-
-
Philips CP9948/01 Product Datasheet
-
Philips HD7769/00 Instrukcja obsługi
-