
1
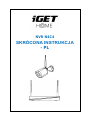
NVR N4C4
QUICK GUIDE - EN

2
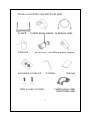
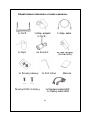
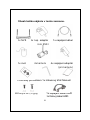
Please consult this checklist for all parts.
1x NVR 1x NVR power adapter 1x Network cable
1xMouse 4xCamera 4xCamera power adapter
1xCamera screws kit 1xImbus Manual
NVR screws (2 kinds) 1xHDD power cable
1xHDD data cable

3
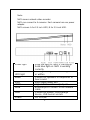
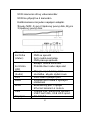
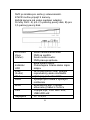
Note:
NVR means network video recorder.
NVR can connect to 4 cameras. Each camera has one power
adapter.
NVR screws: A for 2.5 inch HDD, B for 3.5 inch HDD.
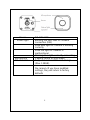
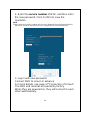
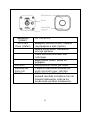
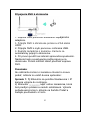
Status light
Solid red light on: NVR is starting up
Solid blue light on: NVR is working
correctly
HDD light
Blinking blue light: Data is being read
or written
Audio
Connect to speakers or earphones to
hear sound
VGA
VGA video output port
HDMI
High definition video output port
WAN
Ethernet port. Connect to the network
cable
USB
Connect to mouse, USB storage
device, USB burner and etc
Power
DC 12V/2A

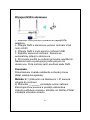
4

5
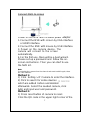
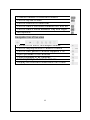
Power
DC 12V±10%
Status light
Blinking red light: wait for network
connection (fast)
Solid blue light on: camera is working
correctly
Solid red light on: network is
malfunctional
Blinking blue light: currently connecting
Microphone
Capture sound for your video
SD card slot
Support local microSD card storage
(Max. 128GB)
Reset
Press and hold for 5 seconds to reset
the camera (if you have modified
settings, they will return to factory
defaults

6
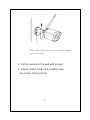
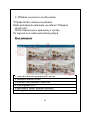
After adjusting your camera angle, please
lock the screw
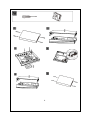
1 Fix the camera to the wall with screws
2 Adjust camera angle to a suitable view
(as shown in the picture)

7
Connect NVR to screen
Power on the NVR with included power adapter.
1. Connect the NVR with screen by VGA interface
or HDMI interface.
2. Connect the NVR with mouse by USB interface.
3. Power on the camera device. The
camera will connect to the screen
automatically.
4. For the first use, there will be a boot wizard.
Please set up a password and follow the on-
screen instructions. Then you can start to use
the NVR kit.
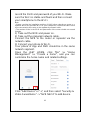
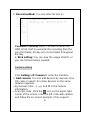
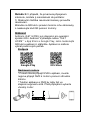
Note:
If you delete the camera from the channel and want to add it again, there
are two methods:
Method 1:
1) Click Setting > IP Camera to enter the interface.
2) Click to search for online devices
which are added before and deleted
afterwards. Select the needed camera, click
Add, and input user and password.
Method 2:
1) Press reset button of camera to reset.
Click the QR code in the upper right corner of the

8
screen and scan the QR code with the camera.
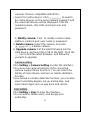
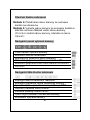
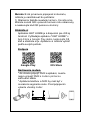
Download
App iGET HOME is available for both iOS and
Android OS. Search the name “iGET HOME” in
App Store or Google Play, or scan the QR code
to download the App. You can select the App
according to needs.
Support
Google Play IOS Store
Set up router
* If you want to connect NVR to App, you need
to connect the NVR to router with network cable
first.
* Your phone of App and NVR should be in the
same network segment. Please select suitable
router before connection.
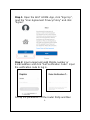
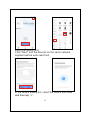
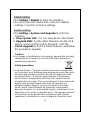
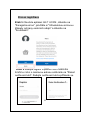
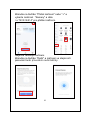
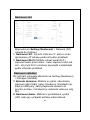
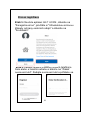
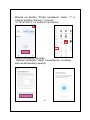
Registration process

9
Step 1: Open the iGET HOME App, click "Sign Up",
read the "User Agreement Privacy Policy" and click
"Agree".
Step 2: Input a legal and valid Mobile number or
Email address and click "Get Verification Code". Input
the verification code to log in.
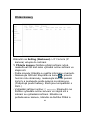
Set up the parameters of the router firstly and then

10
record the SSID and password of your Wi-Fi. Make
sure the Wi-Fi is stable and fluent and then connect
your smartphone to the Wi-Fi.
Note:
• Please consider the installation position of NVR before selecting a router or a
repeater which also provides Wi-Fi for your smartphone, because the NVR have
to be connected to the router or the repeater by network cable.
• The number of bits in the SSID and passwords of the router should not exceed
24 digits.
1) Take out the NVR and power on.
2) Take out the prepared network cable.
Connect the NVR to the router or repeater via the
network cable.
3) Connect your phone to Wi-Fi.
Your phone of App and NVR should be in the same
network segment.
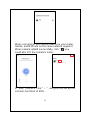
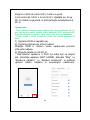
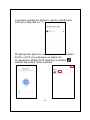
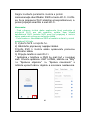
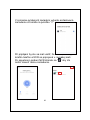
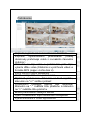
Open the iGET HOME, click "Me" >> "Home
Management" >> "Create a home", and you can
customize the home name and related settings.
Click "Add Device" or "+", and then select "Security &
Video Surveillance" -> "NVR N4C4" to add device.

11
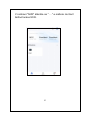
Reset the device first.
Click "Next" and the devices on the same network
segment will be auto searched.
In the device adding list, select the device you need
and then tap “+”.

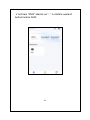
12
When connecting, you should make sure your router,
mobile, and NVR are on the same network segment.
When camera added successfully, click " " you
could also DIY the camera's name.
In "NVR" interface, click " ... " , and you can set up the
common functions of NVR.

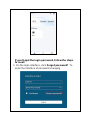
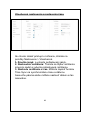
13
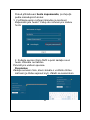
If you forget the login password, follow the steps
to reset:
1. On the login interface, click Forgot password? To
enter the interface of password changing

14
2. Enter the service number of NVR, and then enter
the new password. Click Confirm to save the
operation.
Note:
Please enter the service number which can be obtained from the internal label of
the device (need to remove the cover). It depends on the actual devices.
3. Log in with new password.
Connect NVR to screen in advance.
For more details, see page of "Connection of Screen".
The NVR and cameras are paired by factory.
When they are powered on, they will connect to each
other automatically.

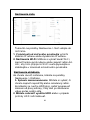
15
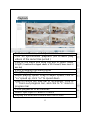
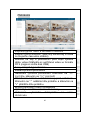
Live View
1 Channel list of connected cameras
2 Current date and time
3 Whether to record or not
4 Wi-Fi signal strength
5 Navigation bar of selected camera
6 Navigation bar of live view
Open live view
Method 1: Drag the camera name of channel list to
the display screen.
Method 2: Select one camera of channel list, and
click the Preview icon next to the camera name.
(Click Edit icon to change camera name.)
Navigation bar of selected camera

16
Channel number of selected camera
Click to flip the screen
Click to zoom in or zoom out
Click to switch resolution between HD and SD
Click to switch mode between Day and Night
Microphone
Navigation bar of live view
Turn on or off voice, and adjust volume
Click to display different camera screens
Click to start patrol if camera supports PTZ
Open previews of all cameras
Close previews of all cameras
Select split style of camera screens
Display the selected camera with full screen

17
Playback
Turn on or off voice, and adjust volume
Turn on synchronous playback (All screens play
videos of the same time period )
Click to clip video and drag clip box to select video
length (Download the clipped videos in MP4 format (Please insert U
disk first)
Icons of different recording types
Stop/Play playback
Adjust playing speed. Drag to adjust speed, click to
">>" speed up, click "<<" to speed down
Drag to control the time bar of recordings. Click to
"-" zoom out progress bar, and click to "+" zoom in
progress bar
Close playbacks of all cameras
Select split style of camera screens
Display the selected camera with full screen

18
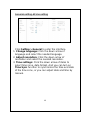
General setting &Time setting
Click Setting > General to enter the interface.
1. Change language: Click the down arrow of
language and select the needed language.
2. Adjust resolution: Click the down arrow of
resolution and select the needed resolution.
3. Time settings: Click the down arrow of items to
select time zone, date format. And you can turn on
Time Sync function to synchronize the time and date
of the time zone, or you can adjust date and time by
manual.

19
Network setting
Click Setting > Network to enter the interface.
1. Set up Network: Select static IP or Dynamic IP
according to network environment.
2. Set up Wi-Fi: You can select Wi-Fi channel, turn on
anti-jamming function , or turn on Ad-Hoc mode to
make Wi-Fi much more fluent and steady according
to network environment.
Storage setting
Click Setting > Storage to enter the interface.

20
1. Record method: You can select to turn on
Constant or All Day mode. Constant is when the
HDD is full, start to overwrite the recording from the
very first frame; All day is to record video throughout
the day.
2. Disk setting: You can view the usage of HDD, or
you can format it when needed.
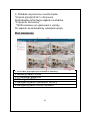
Camera adding
Click Setting > IP Camera to enter the interface.
1. Add camera: You can add devices by manual, scan
QR code or search for online devices on the same
network segment.
• By manual: Click and fill in the camera
information.
• Scan QR code: Click the icon on the upper right
corner of the screen, scan the QR code with camera
and follow the on-screen prompts. (Only support
Strona się ładuje...
Strona się ładuje...
Strona się ładuje...
Strona się ładuje...
Strona się ładuje...
Strona się ładuje...
Strona się ładuje...
Strona się ładuje...
Strona się ładuje...
Strona się ładuje...
Strona się ładuje...
Strona się ładuje...
Strona się ładuje...
Strona się ładuje...
Strona się ładuje...
Strona się ładuje...
Strona się ładuje...
Strona się ładuje...
Strona się ładuje...
Strona się ładuje...
Strona się ładuje...
Strona się ładuje...
Strona się ładuje...
Strona się ładuje...
Strona się ładuje...
Strona się ładuje...
Strona się ładuje...
Strona się ładuje...
Strona się ładuje...
Strona się ładuje...
Strona się ładuje...
Strona się ładuje...
Strona się ładuje...
Strona się ładuje...
Strona się ładuje...
Strona się ładuje...
Strona się ładuje...
Strona się ładuje...
Strona się ładuje...
Strona się ładuje...
Strona się ładuje...
Strona się ładuje...
Strona się ładuje...
Strona się ładuje...
Strona się ładuje...
Strona się ładuje...
Strona się ładuje...
Strona się ładuje...
Strona się ładuje...
Strona się ładuje...
Strona się ładuje...
Strona się ładuje...
Strona się ładuje...
Strona się ładuje...
Strona się ładuje...
Strona się ładuje...
Strona się ładuje...
Strona się ładuje...
Strona się ładuje...
Strona się ładuje...
Strona się ładuje...
Strona się ładuje...
Strona się ładuje...
Strona się ładuje...
Strona się ładuje...
-
 1
1
-
 2
2
-
 3
3
-
 4
4
-
 5
5
-
 6
6
-
 7
7
-
 8
8
-
 9
9
-
 10
10
-
 11
11
-
 12
12
-
 13
13
-
 14
14
-
 15
15
-
 16
16
-
 17
17
-
 18
18
-
 19
19
-
 20
20
-
 21
21
-
 22
22
-
 23
23
-
 24
24
-
 25
25
-
 26
26
-
 27
27
-
 28
28
-
 29
29
-
 30
30
-
 31
31
-
 32
32
-
 33
33
-
 34
34
-
 35
35
-
 36
36
-
 37
37
-
 38
38
-
 39
39
-
 40
40
-
 41
41
-
 42
42
-
 43
43
-
 44
44
-
 45
45
-
 46
46
-
 47
47
-
 48
48
-
 49
49
-
 50
50
-
 51
51
-
 52
52
-
 53
53
-
 54
54
-
 55
55
-
 56
56
-
 57
57
-
 58
58
-
 59
59
-
 60
60
-
 61
61
-
 62
62
-
 63
63
-
 64
64
-
 65
65
-
 66
66
-
 67
67
-
 68
68
-
 69
69
-
 70
70
-
 71
71
-
 72
72
-
 73
73
-
 74
74
-
 75
75
-
 76
76
-
 77
77
-
 78
78
-
 79
79
-
 80
80
-
 81
81
-
 82
82
-
 83
83
-
 84
84
-
 85
85


w innych językach
- slovenčina: iGET N4C4 Užívateľská príručka
Powiązane artykuły
Inne dokumenty
-
Tesla B200 Smart Baby Camera Instrukcja obsługi
-
Overmax Camspot Recorder 2.1 Instrukcja obsługi
-
Novus NVR-6332-H8/FR-II Instrukcja obsługi
-
-
Novus NVR-6332-H2/F Instrukcja obsługi
-
-
-
Abus TVVR33802 Instrukcja obsługi
-