Parkside PKS 1500 A2 Operating And Safety Instructions Manual
- Kategoria
- Piły ukośne
- Typ
- Operating And Safety Instructions Manual
Niniejsza instrukcja jest również odpowiednia dla

MITRE SAW PKS 1500 A2
PLSE LT
MITRE SAW PKS 1500 A2
Operating and Safety Instructions
Translation of Original Operating Manual
GB
CHAT
KAPP- UND GEHRUNGSSÄGE PKS 1500 A2
Bedienungs- und Sicherheitshinweise
Originalbetriebsanleitung
DE
KAP- OCH GERINGSSÅGEN PKS 1500 A2
Drift- och säkerhetsanvisningar
Översättning från originalmanualen
SE
PILARKA KĄTOWA PKS 1500 A2
Wskazówki dotyczące obsługi i bezpieczeństwa
Tłumaczenie oryginalnej instrukcji obsługi
PL
KAMPINIS NUOŽULNAUS PJOVIMO PJŪKLAS
PKS 1500 A2
Eksploatacijos ir saugos nurodymus
Vertimas originali naudojimo instrukcija
LT
IAN 304475

KAP- OCH GERINGSSÅGEN PKS 1500 A2
Drift- och säkerhetsanvisningar
Översättning från originalmanualen
GB Operating and Safety Instructions Page 01
SE Drift- och säkerhetsanvisningar Sida 12
PL Wskazówki dotyczące obsługi i bezpieczeństwa Strona 23
LT Eksploatacijos ir saugos nurodymus Puslapis 35
DE / AT / CH Bedienungs- und Sicherheitshinweise Seite 46
Before reading, unfold the page containing the illustrations and familiarise yourself with all functions of the device.
GB
Fyll på sidan med illustrationerna innan du läser och bekanta dig med alla funktioner på enheten.
SE
Przed przeczytaniem proszę rozłożyć stronę z ilustracjami, a następnie proszę zapoznać się z wszystkimi funkcjami urządzenia.
PL
Prieš skaitydami išlankstykite lapą su paveikslėliais ir susipažinkite su visomis prietaiso funkcijomis.
LT
Klappen Sie vor dem Lesen die Seite mit den Abbildungen aus und machen Sie sich anschließend mit allen Funktionen des Gerätes vertraut.
DE AT CH

GB
Read and follow the operating and safety instructions before you start working with this power tool!
SE
Läs och beakta bruksanvisningen och säkerhetsupplysningarna före idrifttagande!
PL
Przed uruchomieniem należy przeczytać niniejszą instrukcję obsługi i przestrzegać wskazówek
bezpieczeństwa!
LT
Prieš eksploatacijos pradžią perskaitykite naudojimo instrukciją ir saugos nurodymus bei jų laikykitės!
DE AT CH
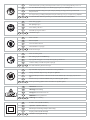
Vor Inbetriebnahme Bedienungsanleitung und Sicherheitshinweise lesen und beachten!
GB
Wear safety goggles!
SE
Bär skyddsglasögon!
PL
Nosić okulary ochronne!
LT
Užsidėkite apsauginius akinius!
DE AT CH
Schutzbrille tragen!
GB
Important! Risk of injury! Never reach into the running saw blade!
SE
Varning! Skaderisk! Grip inte tag i det löpande sågbladet!
PL
Uwaga! Niebezpieczeństwo odniesienia obrażeń! Nie wkładać rąk w obracający się brzeszczot
piły!
LT
Dėmesio! Pavojus susižaloti! Nekiškite rankų į besisukančią pjūklo geležtę!
DE AT CH
Achtung! Verletzungsgefahr! Nicht in das laufende Sägeblatt greifen!
GB
Attention! Laser beam
SE
Varning! Laserstrålning!
PL
Uwaga! Promieniowanie laserowe
LT
Dėmesio
! Lazerio spinduliuotė
DE AT CH
Achtung! Laserstrahlung
GB
Protection class II (double insulation)
SE
Skyddsklass II (dubbelt skärmad)
PL
Klasa bezpieczeństwa II (podwójnie ekranowany)
LT
II apsaugos klasė (double shielded)
DE AT CH
Schutzklasse II (Doppelisolierung)
GB
Wear ear-muffs!
SE
Bär hörselskydd!
PL
Nosić nauszniki ochronne!
LT
Naudokite klausos apsaugą!
DE AT CH
Gehörschutz tragen!
GB
Wear a breathing mask!
SE
Bär andningsskydd vid dammbildning!
PL
W przypadku emisji pyłu nosić maskę chroniącą drogi oddechowe!
LT
Susidarius dulkių, naudokite kvėpavimo apsaugą!
DE AT CH
Bei Staubentwicklung Atemschutz tragen!

10
17
14
15
16
1
3
2
4
5
6
7
8
9
10
11
12
13
Fig. 1
19
19
18
18
Fig. 1.2
Fig. 1.3
27a
27b
27
Fig. 1.3
Fig. 2
20
21
Fig. 2
Fig. 3
24
23
25
22
Fig. 3
Fig. 1.1

Fig. 5
28
29
6
2
3
27
26
1
34
Fig. 4
Fig. 5
Fig. 7
32
31
Fig. 7
Fig. 6
30
33
Fig. 6

1GB
Table of contents: Page:
1. Introduction 2
2. Proper use 3
3. Important information 3
4. Additional safety instructions 4
5. Residual risks 6
6. Commissioning 6
7. Assembly 7
8. Area of application 7
9. Settings 7
10. Working instructions 7
11. Electrical connection 9
12. Accessories 9
13. Maintenance 9
14. Disposal 10
15. Troubleshooting 10
16. Warranty certificate 11

2 GB
1. Introduction
MANUFACTURER:
scheppach
Fabrikation von Holzbearbeitungsmaschine GmbH
Günzburger Straße 69
D-89335 Ichenhausen
NOTE:
According to the applicable product liability laws, the manu-
facturer of the device does not assume liability for damages
to the product or damages caused by the product that occurs
due to:
• Improper handling,
• Non-compliance of the operating instructions,
• Repairs by third parties, not by authorized service techni-
cians,
• Installation and replacement of non-original spare parts,
• Application other than specified,
• A breakdown of the electrical system that occurs due to
the non-compliance of the electric regulations and VDE
regulations 0100, DIN 57113 / VDE0113.
WE RECOMMEND:
Read through the complete text in the operating instructions
before installing and commissioning the device. The operat-
ing instructions are intended to help the user to become
familiar with the machine and take advantage of its applica-
tion possibilities in accordance with the recommendations.
The operating instructions contain important information
on how to operate the machine safely, professionally and
economically, how to avoid danger, costly repairs, reduce
downtimes and how to increase reliability and service life of
the machine.
In addition to the safety regulations in the operating instruc-
tions, you have to meet the applicable regulations that apply
for the operation of the machine in your country. Keep the
operating instructions package with the machine at all times
and store it in a plastic cover to protect it from dirt and mois-
ture. Read the instruction manual each time before operating
the machine and carefully follow its information. The machine
can only be operated by persons who were instructed con-
cerning the operation of the machine and who are informed
about the associated dangers. The minimum age requirement
must be complied with.
In addition to the safety notes contained in the present oper-
ating instructions and the special regulations of your country,
the generally recognized technical rules for the operation of
machines must be observed.
We accept no liability for damage or accidents which arise
due to non-observance of these instructions and the safety
information.
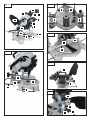
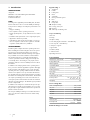
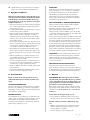
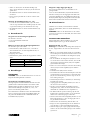
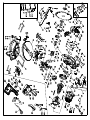
Legend of Fig. 1
1 Start button
2 Handle
3 Locking lever
4 Motor
5 Saw blade
6 Moving saw blade guard
7 Base
8 Table insert
9 Rotary table
10 Workpiece clamp
11 Housing / base joint
12 Dust bag
13 Stationary saw blade guard
Scope of delivery
Mitre saw
Dust bag
Workpiece clamp
Tool for changing the saw blade – 6mm Allen key
Tool for stop rail – 3mm Allen key
2 work piece supports
Support stand
2 batteries (AAA)
2 carbon brushes
Operating instructions
Technical Data
Dimensions L x W x H mm 690 x 550 x 440
Rotary table ø mm 385 x 150
Table height mm 55
Saw blade Ø mm 210/30/2,6 WZ 48
Speed rpm 5000
Cutting speed m/s 55
Pivot range 2 x 45°
Tilt angle 45°
Double mitre 45° x 45° left
Catch positions
45°, 30°, 22,5°, 15°, 0°,
15°, 22,5°, 30°, 4 5°
Weight kg 7,7
Cross-cutting data
Max. cut depth 90°/45° 60 / 35 mm
90°/90° 120 x 60 mm
9 0 °/4 5° 80 x 60 mm
4 5°/ 9 0° 120 x 35 mm
45°/45° 80 x 35 mm
Drive
Motor V
~
/Hz 220-240 / 50
Rated input W
S1 1200W
S6 25%* 1500W
Technical changes reserved!

3GB
*S6, continuous operation periodic duty.
Identical duty cycles with a period at load followed by a
period at no load. Running time 10 minutes; duty cycle is
25% of the running time.
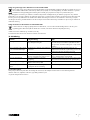
The work piece must have a minimum height of
3mm and a minimum width of 10 mm. Make sure
that the workpiece is always secured with the
clamping device.
Information about noise development
The noise levels of this machine during operation are as
follows:
L
pA
: 99.6dB(A) K=3dB(A)
L
wA
: 112.6dB(A) K=3dB(A)
Warning: Noise can have serious effects on your health. If
the machine noise exceeds 85 dB (A), please wear suitable
hearing protection. If the electrical connection is defective,
the power can fail when starting the machine. This could in-
fluence other machines (e.g. blinking lamps). If the electrical
power corresponds to Zmax < 0.27, such disruptions should
not occur. (However, if they do, inform your specialist dealer).
• The specified vibration emission value has been meas-
ured according to a standardised testing procedure and
can be used for comparison of one electric tool with
another;
• The specified vibration emission value can also be used
for an initial assessment of the load.
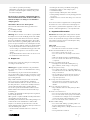
2. Proper use
The mitre saw is used for the cutting of wood and plastic,
according to the machine size.
Warning! The supplied saw blade is only intended for
the sawing of wood! Do not use this blade for the sawing
of plastic!
The machine may only be used in the intended manner.
Any use beyond this is improper. The user/operator, not the
manufacturer, is responsible for damages or injuries of any
type resulting from this.
Only suitable saw blades may be used for the machine.
The use of any type of cutting wheels is prohibited.
An element of the intended use is also the observance of
the safety instructions, as well as the assembly instructions
and operating information in the operating manual.
Persons who operate and maintain the machine must be
familiar with the manual and must be informed about po-
tential dangers.
In addition, the applicable accident prevention regulations
must be strictly observed.
Other general occupational health and safety-related rules
and regulations must be observed.
The liability of the manufacturer and resulting damages are
excluded in the event of modifications of the machine.
Despite use as intended, specific risk factors cannot be
entirely eliminated. Due to the design and layout of the ma-
chine, the following risks remain:
• Contact with the saw blade in the non-covered saw
area.
• Reaching into the running saw blade (cutting injury).
• Kick-back of workpieces and workpiece parts.
• Saw blade breakage.
• Ejection of faulty carbide parts of the saw blade.
• Hearing damage when the necessary hearing protection
is not used.
• Harmful emissions of wood dusts during use in enclosed
areas.
Please observe that our equipment was not designed with
the intention of use for commercial or industrial purposes.
We assume no guarantee if the equipment is used in com-
mercial or industrial applications, or for equivalent work.
3. Important information
Attention! The following basic safety measures must be
observed when using electric tools for protection against
electric shock, and the risk of injury and fire. Read all these
notices before using the electric tool and keep the safety
instructions for later reference.
Safe work
1 Keep the work area orderly
– Disorder in the work area can lead to accidents.
2 Take environmental influences into account
– Do not expose electric tools to rain.
– Do not use electric tools in a damp or wet environ-
ment.
– Make sure that the work area is well-illuminated.
– Do not use electric tools where there is a risk of fire
or explosion.
3 Protect yourself from electric shock
– Avoid physical contact with earthed parts (e.g.
pipes, radiators, electric ranges, cooling units).
4 Keep other persons away
– Do not allow other persons, especially children, to
touch the electric tool or the cable. Keep them away
from your work area.
– The operating person must be at least 18 years of
age; trainees must be at least 16 years, however
only under supervision.
5 Securely store unused electric tools
– Unused electric tools should be stored in a dry,
elevated or closed location out of the reach of
children.
6 Do not overload your electric tool
– They work better and more safely in the specified
output range.
7 Use the correct electric tool
– Do not use low-output electric tools for heavy work.
– Do not use the electric tool for purposes for which it
is not intended. For example, do not use handheld
circular saws for the cutting of branches or logs.
– Do not use the electric tool to cut firewood.
8 Wear suitable clothing
– Do not wear wide clothing or jewellery, which can
become entangled in moving parts.
– When working outdoors, anti-slip footwear is recom-
mended.
– Tie long hair back in a hair net.

4 GB
20 Check the electric tool for potential damage
– Protective devices and other parts must be carefully
inspected to ensure that they are fault-free and func-
tion as intended prior to continued use of the electric
tool.
– Check whether the moving parts function faultlessly
and do not jam or whether parts are damaged. All
parts must be correctly mounted and all conditions
must be fulfilled to ensure fault-free operation of the
electric tool.
– The moving protective hood may not be fixed in the
open position.
– Damaged protective devices and parts must be
properly repaired or replaced by a recognised
workshop, insofar as nothing different is specified in
the operating manual.
– Damaged switches must be replaced at a customer
service workshop.
– Do not use any faulty or damaged connection
cables.
– Do not use any electric tool on which the switch can-
not be switched on and off.
21 ATTENTION!
– Exercise elevated caution for double mitre cuts.
22 ATTENTION!
– The use of other insertion tools and other accessories
can entail a risk of injury.
23 Have your electric tool repaired by a qualified electri-
cian
– This electric tool conforms to the applicable safety
regulations. Repairs may only be performed by an
electrician using original spare parts. Otherwise ac-
cidents can occur.
4. Additional safety instructions
1 Safety precautions
– Warning! Do not use damaged or deformed saw
blades.
– Replace a worn table insert.
– Only use saw blades recommended by the manufac-
turer which conform to EN 847-1.
– Make sure that a suitable saw blade for the material
to be cut is selected.
– Wear suitable personal protective equipment. This
includes:
– Hearing protection to avoid the risk of becoming
hearing impaired,
– Respiratory protection to avoid the risk of inhaling
harmful dust,
– Wear gloves when handling saw blades and
rough materials. Carry saw blades in a container
whenever practical.
– Wear goggles. Sparks generated during work
or splinters, chippings and dust coming from the
device can lead to loss of eyesight.
– Connect a dust collecting device to the electric tool
when sawing wood. The emission of dust is influ-
enced, among other things, by the type of material
to be processed, the significance of local separation
(collection or source) and the correct setting of the
9 Use protective equipment
– Wear protective goggles.
– Wear a mask when carrying out dust-creating work.
10 Connect the dust extraction device
– If connections for dust extraction and a collecting de-
vice are present, make sure that they are connected
and used properly.
– Operation in enclosed areas is only permitted with a
suitable extraction system.
11 Do not use the cable for purposes for which it is not
intended
– Do not use the cable to pull the plug out of the outlet.
Protect the cable from heat, oil and sharp edges.
12 Secure the workpiece
– Use the clamping devices or a vice to hold the
workpiece in place. In this manner, it is held more
securely than with your hand.
– An additional support is necessary for long work-
pieces (table, trestle, etc.) in order to prevent the
machine from tipping over.
– Always press the workpiece firmly against the work-
ing plate and stop in order to prevent bouncing and
twisting of the workpiece.
13 Avoid abnormal posture
– Make sure that you have secure footing and always
maintain your balance.
– Avoid awkward hand positions in which a sudden
slip could cause one or both hands to come into
contact with the saw blade.
14 Take care of your tools
– Keep cutting tools sharp and clean in order to be
able to work better and more safely.
– Follow the instructions for lubrication and for tool
replacement.
– Check the connection cable of the electric tool regu-
larly and have it replaced by a recognised specialist
when damaged.
– Check extension cables regularly and replace them
when damaged.
– Keep the handle dry, clean and free of oil and
grease.
15 Pull the plug out of the outlet
– Never remove loose splinters, chips or jammed wood
pieces from the running saw blade.
– During non-use of the electric tool or prior to mainte-
nance and when replacing tools such as saw blades,
bits, milling heads.
16 Do not leave a tool key inserted
– Before switching on, make sure that keys and adjust-
ing tools are removed.
17 Avoid inadvertent starting
– Make sure that the switch is switched off when plug-
ging the plug into an outlet.
18 Use extension cables for outdoors
– Only use approved and appropriately identified
extension cables for use outdoors.
– Only use cable reels in the unrolled state.
19 Remain attentive
– Pay attention to what you are doing. Remain sensible
when working. Do not use the electric tool when you
are distracted.

5GB
Who may not use the device:
(1) Persons who are not familiar with the operating instruc-
tions, children under the age of 16 and persons who are
under the influence of alcohol, drugs, medical pills, are tired
or ill.
(2) persons with limited physical, sensory or mental capabili-
ties
SAFETY INSTRUCTIONS FOR THE HANDLING OF
SAW BLADES
1 Only use insertion tools if you have mastered their use.
2 Observe the maximum speed. The maximum speed
specified on the insertion tool may not be exceeded. If
specified, observe the speed range.
3 Observe the motor / saw blade direction of rotation.
4 Do not use any insertion tools with cracks. Sort out
cracked insertion tools. Repairs are not permitted.
5 Clean grease, oil and water off of the clamping sur-
faces.
6 Do not use any loose reducing rings or bushes for the
reducing of holes on saw blades.
7 Make sure that fixed reducer rings for securing the
insertion tool have the same diameter and have at least
1/3 of the cutting diameter.
8 Make sure that fixed reducer rings are parallel to each
other.
9 Handle insertion tool with caution. They are ideally
stored in the originally package or special containers.
Wear protective gloves in order to improve grip and to
further reduce the risk of injury.
10 Prior to the use of insertion tools, make sure that all
protective devices are properly fastened.
11 Prior to use, make sure that the insertion tool meets
the technical requirements of this electric tool and is
properly fastened.
12 Only use the supplied saw blade for cutting wood,
never for the processing of metals.
13 Warning! Never use the saw to cut other than the
determined materials.
14 Only use the saw if the protective devices are function-
al, in good condition and in the intended position.
15 Ensure that the workpiece is always clamped at the
saw table.
16 Before each sawing operation, make sure that the
machine is secure.
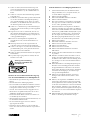
Attention: Laser radiation
Do not stare into the beam
Class 2 laser
Protect yourself and you environment from acci-
dents using suitable precautionary measures!
• Do not look directly into the laser beam with unprotected
eyes.
• Never look into the path of the beam.
hood/guide plates/guides.
– Do not use saw blades made of high-speed alloy
steel (HSS steel).
2 Maintenance and repair
– Pull out the mains plug for any adjustment or repair
tasks.
– The generation of noise is influenced by various
factors, including the characteristics of saw blades,
condition of saw blade and electric tool. Use saw
blades which were designed for reduced noise de-
velopment, insofar as possible. Maintain the electric
tool and tool attachments regularly and if necessary,
initiate repairs in order to reduce noise.
– Report faults on the electric tool, protective devices
or the tool attachment to the person responsible for
safety as soon as they are discovered.
3 Safe work
– Only use saw blades for which the maximum permis-
sible speed is not lower than the maximum spindle
speed of mitre saws and which are suitable for the
material to be cut.
– Make sure that the saw blade does not touch the
rotary table in any position by pulling out the mains
plug and rotating the saw blade by hand in the 45°
and 90° position. If necessary, readjust the saw
head.
– When transporting the electric tool, only use the
transport devices. Never use the protective devices
for handling or transport.
– Make sure that the lower part of the saw blade
is covered during transport, e.g. by the protective
device.
– Be sure to only use spacers and spindle rings speci-
fied by the manufacturer as suitable for the intended
purpose.
– The floor around the machine must be level, clean
and free of loose particles, such as chips and cutting
residues.
– Working position always sideway to the saw blade
– Do not remove any cutting residues or other parts of
workpieces from the cutting zone while the machine
is running with unprotected saw blade and the saw
unit is not at rest.
– Make sure that the machine is always secured on a
workbench or a table if at all possible.
– Support long workpieces (e.g. with a roller table) to
prevent them sagging at the end of a cut.
Warning! This electric tool generates an electromagnetic
field during operation. This field can impair active or passive
medical implants under certain conditions. In order to prevent
the risk of serious or deadly injuries, we recommend that per-
sons with medical implants consult with their physician and
the manufacturer of the medical implant prior to operating
the electric tool.

6 GB
5. Residual risks
The machine has been built according to the state
of the art and the recognised technical safety
requirements. However, individual residual risks
can arise during operation.
• Health hazard due to electrical power, with the use of
improper electrical connection cables.
• Furthermore, despite all precautions having been met,
some non-obvious residual risks may still remain.
• Residual risks can be minimised if the “Important informa-
tion”, „Additional safety instructions“ and the „Proper
use“ are observed along with the whole of the operating
instructions.
• Do not load the machine unnecessarily: excessive pres-
sure when sawing will quickly damage the saw blade,
which results in reduced output of the machine in the pro-
cessing and in cut precision.
• When cutting plastic material, please always use clamps:
the parts which should be cut must always be fixed be-
tween the clamps.
• Avoid accidental starting of the machine: the operating
button may not be pressed when inserting the plug in an
outlet.
• Use the tool that is recommended in this manual. In do-
ing so, your mitre saw provides optimal performance.
• Hands may never enter the processing zone when the
machine is in operation.
• Release the handle button and switch off the machine
prior to any operations.
6. Commissioning
Prior to commissioning, observe the safety in-
structions in the operating instructions.
REMOVAL FROM THE PACKAGING
Remove the machine from its package, which protects it dur-
ing transport, without damaging the package in order to be
able to use it later for transporting the mitre saw for long-term
storage.
MOVING
Since the mitre saw is relatively small and light, its location
can be easily changed, even by a single person. After lock-
ing the locking knob (26 - Fig. 4) in the bottom position, lift
the mitre saw by the handle (34 - Fig. 4).
TRANSPORT
If the machine must be transported, carry it by the handle
(34 - Fig. 4) and place it in the original packaging in which
it was supplied. In the process, make sure that it is correctly
positioned in the package (see arrows on the package).
If possible, the load should be fixed with ropes or securing
belts in order to prevent shifting during the transport or parts
of the load from falling down.
• Never point the laser beam towards reflecting surfaces
and persons or animals. Even a laser beam with a low
output can cause damage to the eyes.
• Caution - methods other than those specified here can
result in dangerous radiation exposure.
• Never open the laser module. Unexpected exposure to
the beam can occur.
• If the mitre saw is not used for an extended period of
time, the batteries should be removed.
• The laser may not be replaced with a different type of
laser.
• Repairs of the laser may only be carried out by the laser
manufacturer or an authorised representative.
Safety instructions for handling batteries
1 Always make sure that the batteries are inserted with
the correct polarity (+ and –), as indicated on the
battery.
2 Do not short-circuit batteries.
3 Do not charge non-rechargeable batteries.
4 Do not overcharge batteries!
5 Do not mix old and new batteries or batteries of dif-
ferent types or manufacturers! Replace an entire set of
batteries at the same time.
6 Immediately remove used batteries from the device
and dispose of them properly! Do not dispose batter-
ies with household waste. Defective or used batteries
must be recycled according to Directive 2006/66
/ EC. Give back batteries and / or the device has
been offered to the collective facilities. About disposal
facilities you can inform by your municipal or city
government.
7 Do not allow batteries to heat up!
8 Do not weld or solder directly on batteries!
9 Do not dismantle batteries!
10 Do not allow batteries to deform!
11 Do not throw batteries into fire!
12 Keep batteries out of the reach of children.
13 Do not allow children to replace batteries without
supervision!
14 Do not keep batteries near fire, ovens or other sources
of heat. Do not use batteries in direct sunlight or store
them in vehicles in hot weather.
15 Keep unused batteries in the original packaging
and keep them away from metal objects. Do not mix
unpacked batteries or toss them together! This can
lead to a short-circuit of the battery and thus damage,
burns or even the risk of fire.
16 Remove batteries from the equipment when it will not
be used for an extended period of time, unless it is for
emergencies!
17 NEVER handle batteries that have leaked without
appropriate protection. If the leaked fluid comes into
contact with your skin, the skin in this area should be
rinsed off under running water immediately. Always
prevent the fluid from coming into contact with the
eyes and mouth. In the event of contact, please seek
immediate medical attention.
18 Clean the battery contacts and corresponding con-
tacts in the device prior to inserting the batteries.

7GB
8. Area of application
Intended application possibilities
The machine cuts:
• Wood and materials similar to wood
• Plastic
Unintended application possibilities
The machine is not suitable for:
• Ferritic materials, steel and cast iron, as well as other ma-
terial types which are not listed, particularly food.
• Mitre saw without guard.
• Materials larger than the specified cutting data:
90°/90°
120 x 60 mm
9 0°/4 5°
80 x 60 mm
4 5°/9 0°
120 x 35 mm
45°/45°
80 x 35 mm
9. Settings
CROSS-CUTTING
ATTENTION: Before carrying out the following adjust-
ments, please check whether the motor of the machine is
switched off.
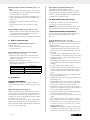
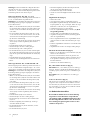
Pivoting the table plate (Fig. 2)
The mitre saw can be pivoted left and right with the rotary
table. Exact angle adjustment is possible on the basis of the
scale. The angle can be precisely and quickly adjusted from
0° to 45° with locking positions at 15°, 22.5° and 30°.
To pivot the rotary table, loosen the set screw (21) and
rotate the unit using the handle (20) until the desired angle is
reached. Then secure it with the set screw (21).
Tilt of the saw unit (Fig. 3)
The saw unit can be tilted at an angle of up to 45°.
Loosen the handle (23) on the rear side of the machine and
tilt the unit to the desired angle position according to the
scale. The angle can be set on the basis of the scale (24) us-
ing the pointer (25). Then the handle must be re-tightened.
10. Working instructions
After you have carried out all the tasks described above, you
can begin working.
ATTENTION: Always keep your hands away from the cut-
ting zone and never attempt to reach in while cutting.
FIXING A WORKPIECE
Clamp the work piece on the work table with the workpiece
clamp (10 - Fig 1) in order to fix it in place.
Cross-cutting (Fig. 1, 1.3, 4)
Attention! For 90° mitre cuts, the moveable stop rail
(27a) must be fixed in the inner position.
• Open the set screw (27b) on the moveable stop rail
(27a) with an Allen key and push the moveable stop rail
(27a) inwards.
POSITIONING/WORK STATION
Position the machine on a work bench or on a flat base so
that the machine is supported as stably as possible.
The equipment must be set up where it can stand secure, i.e.
it should be bolted to a workbench, a universal base frame
or similar. When working with the machine, ergonomic fac-
tors must be considered; the ideal height of the work table or
the base is reached when the base surface or the upper work
surface is 90 to 95 cm above the ground. The positioning of
the machine must provide for at least 80 cm of clearance in
all directions and in order to allow for cleaning and repair
work as well as necessary adjustments in observance of
safety conditions and with sufficient room to manoeuvre.
CAUTION: Position the machine in a zone which is suitable
in respect to the environmental conditions and lighting. Never
forget that the general environmental conditions play an
extremely important role in accident prevention.
CONNECTION TO THE POWER SUPPLY
Make sure that the socket is in a good condition. We would
like to remind you that the power supply must be connected
to a magnetic-thermal circuit breaker which protects all lines
from short-circuits and overloading.
7. Assembly
WARNING! For you own safety, only insert the
mains plug in an outlet when all assembly steps
have been completed and you have read and un-
derstood the safety and operating instructions.
Lift the saw out of the packaging and place it on your work
bench. (Positioning of the saw on the work bench - see the
next page under „POSITIONING / WORK STATION“)
Installation of the dust bag (fig. 2)
• Squeeze together the metal ring on the chip bag (12)
and attach it to the outlet opening in the motor area.
Assembling the work piece clamping device
(fig. 1.1)
• Loosen the locking screw (17) and attach the work piece
clamping device (10) to the left or right of the fixed saw
bench.
• Afterwards, retighten the locking screws (17).
Assembling the work piece supports (fig. 1.1 –
1.2)
• Loosen the cross-head screw (14) and guide the work
piece support through the specified hole on the side of
the fixed saw bench.
• Make sure that the work piece support (15) is also
guided through the two plates (19) on the underneath.
• Afterwards, retighten the cross-head screw (14).
• Repeat this process on the other side.
Assembling the support stand (fig. 1.1 – 1.2)
• Loosen the cross-head screws (18) on the underneath of
the saw and guide the support stand (16) through the
specified holes on the back of the saw.
• Afterwards, retighten the cross-head screws (18).

8 GB
Mitre cut 0°- 45° and turntable 0°- 45°
The crosscut saw can be used to make mitre cuts to the left
of 0°- 45° in relation to the work face and, at the same
time, 0° - 45° to the left or 0° - 45° to the right in relation
to the stop rail (double mitre cut).
Important! To make miter cuts (inclined saw head), the
adjustable stop rail (27a) must be fixed at the outer posi-
tion.
• Open the set screw (27b) for the adjustable stop rail
(27a) with an Allen key and push the adjustable stop rail
outwards.
• The adjustable stop rail (27a) must be fixed far enough in
front of the innermost position that the distance between
the stop rail (27a) and the saw blade (5) amounts to a
maximum of 8 mm.
• Before making a cut, check that the stop rail (27a) and
the saw blade (5) cannot collide.
• Secure the locking lever (27b) again.
• Move the machine head to its upper position.
• Release the rotary table (9) by loosening the set screw
(21).
• Using the handle (2), set the rotary table (9) to the de-
sired angle.
• Retighten the set screw (21) in order to secure the rotary
table.
• Undo the locking screw (23)
• Use the handle (2) to tilt the machine head to the left un-
til it coincides with the required angle value.
• Retighten the fixing screw (23).
• Cut as described in section “Cross-cutting”.
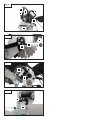
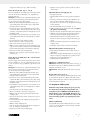
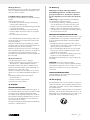
Saw blade replacement (Fig. 5)
• Pull out the mains plug.
• Place the saw unit in „cross-cutting“ position
• Unlock the moving saw blade guard (6) by pressing the
locking lever (3 - Fig. 1); in the process, raise the saw
blade guard so that the saw blade is free.
• Actuate the spindle lock (22 - Fig. 3).
• Loosen the saw blade fastening screw (28) - (Atten-
tion: left-handed thread).
• Remove the screw (28) and saw blade flange (29).
• Carefully remove the saw blade (risk of injury from the
saw blade teeth).
• Place a new saw blade on the inner saw blade flange. In
the process, observe the rotational direction of the saw
blade.
• Fit the outer saw blade flange and firmly tighten the
screw.
• Move the saw blade guard back to the correct position.
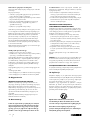
Replacing laser batteries (Fig. 6)
• Remove the laser battery cover (30). Remove the 2 bat-
teries.
• Replace both batteries with the same or an equivalent
type. Make sure that they are inserted with the same po-
larity as the used batteries.
• Close the battery cover.
• The moveable stop rail (27a) must be locked in a posi-
tion far enough from the inner position that the distance
between the stop rail (27a) and the saw blade (5) is no
more than 8 mm.
• Before making the cut, check that no collision could oc-
cur between the stop rail (27a) and the saw blade (5).
• Secure the locking lever (27b) again.
• Pressing the machine head lightly downwards and re-
moving the locking bolt (26) from the motor bracket at
the same time disengages the saw from the lowest posi-
tion.
• Swing the machine head up until the release lever (3)
latches into place.
• Lift the saw unit by the handle (2) until it locks in place in
the top position.
• Press the workpiece evenly on the stop strips (27); make
sure that you hand remains outside the cutting area of
the saw blade.
• Lock the material with the clamping device (10) on the
fixed saw table to prevent the material from moving dur-
ing the cutting operation.
• With your right hand on the handle (2), press the locking
lever (3) so that the unit can also be pivoted downward.
• The motor starts when the start button (1) is pressed.
• Slowly bring the saw blade down to the workpiece and
cut through it with moderate pressure.
• When the cutting operation is completed, move the ma-
chine head back to its upper (home) position and release
the ON/OFF button (1).
Attention! The machine executes an upward stroke
automatically due to the return spring, i.e. do not release
the handle (2) after completing the cut; instead allow the
machine head to move upwards slowly whilst applying light
counter pressure.
Mitre cut 0°- 45° (Fig. 1, 1.3, 3)
The crosscut saw can be used to make mitre cuts of 0° -
45° in relation to the work face.
Important! To make miter cuts (inclined saw head), the
adjustable stop rail (27a) must be fixed at the outer posi-
tion.
• Open the set screw (27b) for the adjustable stop rail
(27a) with an Allen key and push the adjustable stop rail
outwards.
• The adjustable stop rail (27a) must be fixed far enough in
front of the innermost position that the distance between
the stop rail (27a) and the saw blade (5) amounts to a
maximum of 8 mm.
• Before making a cut, check that the stop rail (27a) and
the saw blade (5) cannot collide.
• Secure the locking lever (27b) again.
• Move the machine head to the top position.
• Fix the rotary table (9) in the 0° position.
• Loosen the set screw (23) and use the handle (2) to an-
gle the machine head to the left, until the pointer (25)
indicates the desired angle measurement on the scale
(24).
• Re-tighten the fixing screw (23).
• Cut as described in section “Cross-cutting”.

9GB
Connections and repairs of electrical equipment may only
be carried out by an electrician.
Please provide the following information in the event of any
enquiries:
• Type of current for the motor
• Machine data - type plate
• Machine data - type plate
12. Accessories
SAW DUST EXTRACTION
The mitre saw is equipped with an extraction port to which
an extraction system can be connected. Alternatively, a dust
bag can also be attached.
The hose of the extraction system is fastened on the extrac-
tion port with a clamp. We recommend emptying the bag or
container from time to time and cleaning the filter.
The air speed of the suction system must be at least 30
metres per second.
13. Maintenance
If personnel qualified for unusual maintenance
tasks or repairs must be obtained during of after
the warranty period, please always contact a
service point recommended by us or contact the
manufacturer.
m Warning! Prior to any adjustment, maintenance or ser-
vice work disconnect the mains power plug!
• Only perform repair, maintenance and cleaning work
as well as the correction of malfunctions with the drive
switched off as a basic rule.
• All protective and safety equipment must be reassembled
immediately after repair, maintenance is completed.
NORMAL SERVICE TASKS
Normal service tasks can also be performed by untrained
personnel and are all described in the preceding sections
and in this chapter.
• The mitre saw must not be lubricated, because it always
cuts dry surfaces; all moving machine parts are self-
lubricating.
• In the event of service work, personal protective equip-
ment must always be work (protective goggles and
gloves).
• Remove saw dust and chips regularly by cleaning the
cutting zone and support surfaces.
We recommend using a suction tool or brush.
ATTENTION: Do not use compressed air!
Check the saw blade from time to time: If problems arise
with the blade, it must be ground by a specialist or re-
placed, depending on the condition.
DECOMMISSIONING OF THE MACHINE
After the machine is decommissioned it can be disposed of
with normal industrial waste.
Switch ON / switch OFF the laser (Fig. 6)
To switch on: Move the ON/OFF (33) switch of the la-
ser (34) to the “1” position. A laser line is projected onto
the material you wish to process, providing an exact guide
for the cut.
To switch off: Move the ON/OFF switch of the laser to
the “0” position.
Adjusting the laser (Fig. 7)
If the laser (31) ceases to indicate the correct cutting line, you
can readjust the laser. To do so, open the screws (32) and set
the laser by moving sideways to that the laser beam strikes
the teeth of the saw blade (5).
11. Electrical connection
The electrical motor installed is connected and
ready for operation. The connection complies
with the applicable VDE and DIN provisions.
The customer‘s mains connection as well as the
extension cable used must also comply with
these regulations.
Important information
In the event of an overloading the motor will switch itself
off. After a cool-down period (time varies) the motor can
be switched back on again.
Damaged electrical connection cable
The insulation on electrical connection cables is often dam-
aged.
This may have the following causes:
• Passage points, where connection cables are passed
through windows or doors.
• Kinks where the connection cable has been improperly
fastened or routed.
• Places where the connection cables have been cut due
to being driven over.
• Insulation damage due to being ripped out of the wall
outlet.
• Cracks due to the insulation ageing.
Such damaged electrical connection cables must not be
used and are life-threatening due to the insulation damage.
Check the electrical connection cables for damage regu-
larly. Make sure that the connection cable does not hang
on the power network during the inspection.
Electrical connection cables must comply with the applica-
ble VDE and DIN provisions. Only use connection cables
with the marking „H 07 RN“.
The printing of the type designation on the connection ca-
ble is mandatory.
AC motor
• The mains voltage must be 230 V
~
• Extension cables up to 25 m long must have a cross-sec-
tion of 1.5 mm
²
.
For single-phase AC motors, we recommend a fuse of C
16A or K 16A for machines with high starting current (from
3000 watts)!

10 GB
14. Disposal
The equipment is supplied in packaging to prevent it from being damaged in transit. The raw materials in this packaging can be reused or
recycled. The equipment and its accessories are made of various types of material, such as metal and plastic. Defective components must be
disposed of as special waste. Ask your dealer or your local council.
The packaging is wholly composed of environment ally-friendly materials that can be disposed of at a local
recycling centre.
Contact your local refuse disposal authority for more details of how to dispose of your worn out electrical devices.
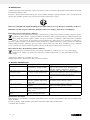
Old devices must not be disposed of with household waste!
This symbol indicates that this product must not be disposed of together with domestic waste in compliance with the Directive
(2012/19/EU) pertaining to waste electrical and electronic equipment (WEEE). This product must be disposed of at a designated
collection point. This can occur, for example, by handing it in at an authorised collecting point for the recycling of waste electrical
and electronic equipment. Improper handling of waste equipment may have negative consequences for the environment and human health
due to potentially hazardous substances that are often contained in electrical and electronic equipment. By properly disposing of this product,
you are also contributing to the effective use of natural resources. You can obtain information on collection points for waste equipment from
your municipal administration, public waste disposal authority, an authorised body for the disposal of waste electrical and electronic
equipment or your waste disposal company.
Batteries and rechargeable batteries do not belong in the household waste!
As the consumer you are required by law to bring all batteries and rechargeable batteries, regardless whether they contain harm-
ful substances* or not, to a collection point run by the local authority or to a retailer, so that they can be disposed of in an envi-
ronmentally friendly manner.
*labelled with: Cd = cadmium, Hg = mercury, Pb = lead
Remove the batteries from the laser before disposing of the machine and the batteries.
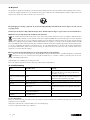
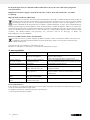
15. Troubleshooting
Fault Possible cause Remedy
Motor does not work. Motor, cable or plug defective, fuses burnt. Arrange for inspection of the machine by a specialist.
Never repair the motor yourself. Danger! Check fuses
and replace as necessary.
The motor starts up slowly
and does not reach operating
speed.
Voltage too low, coils damaged, capacitor
burnt.
Contact the utility provider to check the voltage. Arrange
for inspection of the motor by a specialist. Arrange for
replacement of the capacitor by a specialist.
Motor makes excessive noise. Coils damaged, motor defective. Arrange for inspection of the motor by a specialist.
The motor does not reach its
full power.
Circuits in the network are overloaded (lamps,
other motors, etc.).
Do not use any other equipment or motors on the same
circuit.
Motor overheats easily. Overloading of the motor, insufficient cooling
of the motor.
Avoid overloading the motor while cutting, remove dust
from the motor in order to ensure optimal cooling of the
motor.
Saw cut is rough or wavy. Saw blade dull, tooth shape not appropriate
for the material thickness.
Resharpen saw blade and/or use suitable saw blade.
Workpiece pulls away and/
or splinters.
Excessive cutting pressure and/or saw blade
not suitable for use.
Insert suitable saw blade.
Service information
Please note that the following parts of this product are subject to normal or natural wear and that the following parts are therefore also
required for use as consumables.
Wear parts*: carbon brushes, saw blade, table inserts, dust collecting bags
* Not necessarily included in the scope of delivery!

11GB
16. Warranty certificate
Dear Customer,
All of our products undergo strict quality checks to ensure that they reach you in perfect condition. In the unlikely event that your device
develops a fault, please contact our service department at the address shown on this guarantee card. Of course, if you would prefer to
call us then we are also happy to offer our assistance under the service number printed below. Please note the following terms under which
guarantee claims can be made:
• These guarantee terms cover additional guarantee rights and do not affect your statutory warranty rights. We do not charge you for
this guarantee.
• Our guarantee only covers problems caused by material or manufacturing defects, and it is restricted to the rectification of these
defects or replacement of the device. Please note that our devices have not been designed for use in commercial, trade or industrial
applications. Consequently, the guarantee is invalidated if the equipment is used in commercial, trade or industrial applications or
for other equivalent activities. The following are also excluded from our guarantee: compensation for transport damage, damage
caused by failure to comply with the installation/assembly instructions or damage caused by unprofessional installation, failure to
comply with the operating instructions (e.g. connection to the wrong mains voltage or current type), misuse or inappropriate use
(such as overloading of the device or use of non-approved tools or accessories), failure to comply with the maintenance and safety
regulations, ingress of foreign bodies into the device (e.g. sand, stones or dust), effects of force or external influences (e.g. damage
caused by the device being dropped) and normal wear resulting from proper operation of the device.
The guarantee is rendered null and void if any attempt is made to tamper with the device.
• The guarantee is valid for a period of 3 years starting from the purchase date of the device. Guarantee claims should be submitted
before the end of the guarantee period within two weeks of the defect being noticed. No guarantee claims will be accepted after
the end of the guarantee period. The original guarantee period remains applicable to the device even if repairs are carried out or
parts are replaced. In such cases, the work performed or parts fitted will not result in an extension of the guarantee period, and no
new guarantee will become active for the work performed or parts fitted. This also applies when an on-site service is used.
• In order to assert your guarantee claim, please send your defective device postage-free to the address shown below. Please enclose
either the original or a copy of your sales receipt or another dated proof of purchase. Please keep your sales receipt in a safe place,
as it is your proof of purchase. It would help us if you could describe the nature of the problem in as much detail as possible. If the
defect is covered by our guarantee then your device will either be repaired immediately and returned to you, or we will send you a
new device.
Of course, we are also happy offer a chargeable repair service for any defects which are not covered by the scope of this guarantee or for
units which are no longer covered. To take advantage of this service, please send the device to our service address.
Service-Hotline (GB):
+800 4003 4003
(0,00 EUR/Min.)
Service-Email (GB):
service.[email protected]
Service Address (GB):
GreatStar Europe
Unit 55 Romsey Industrial Estate, Romsey
Hampshire SO51 0HR

12 SE
Innehållsförteckning: Sida:
1. Inledning 13
2. Bestämmelseenlig användning 14
3. Viktiga upplysningar 14
4. Ytterligare säkerhetsupplysningar 15
5. Resterande risker 17
6. Uppstart 17
7. Montering 18
8. Lämplig användning 18
9. Justering 18
10. Drift 18
11. Elektrisk anslutning 19
12. Tillbehör 20
13. Underhåll 20
14. Kassering 20
15. Felsökning 21
16. Garantibevis 22

13SE
1. Inledning
TILLVERKARE:
scheppach
Tillverkad av Holzbearbeitungsmaschinen GmbH
Günzburger Straße 69
D-89335 Ichenhausen
ÄRADE KUND,
Vi önskar dig mycket glädje och framgång vid arbetet med
din nya apparat.
Upplysning: Tillverkaren av apparaten ansvarar, enligt
gällande produktansvarslag, inte för skador, som uppstår på
denna apparat eller genom apparaten vid:
• felaktig användning,
• ignorering av bruksanvisningen
• reparationer genom tredje person, icke auktoriserad
specialister,
• montering och byte av icke originalreservdelar,
• icke bestämmelseenlig användning,
• stopp i den elektriska anläggningen vid ignorering av
de elektriska föreskrifterna och VDE-bestämmelserna
(förbundet för tyska elektrotekniker) 0100, DIN 57113/
VDE 0113.
BEAKTA:
Läs igenom hela texten i bruksanvisningen före monteringen
och idrifttagandet:
Denna bruksanvisning ska underlätta det för dig att lära
känna ditt el-verktyg och att nyttja dess bestämmelseenliga
användningsmöjligheter.
Bruksanvisningen innehåller viktiga upplysningar, om hur du
arbetare säkert, fackmässigt och ekonomiskt med el-verkty-
get och hur du undviker faror, sparar reparationskostnader,
minskar ståtider och ökar el-verktygets tillförlitlighet och
livslängd.
Jämte säkerhetsbestämmelserna i denna bruksanvisning
måste du ovillkorligen beakta ditt lands gällande föreskrifter
för driften av el-verktyg.
Förvara bruksanvisningen, skyddad mot smuts och fukt i ett
plastfodral, jämte el-verktyget. Den måste läsas och beaktas
av all driftspersonal innan arbete påbörjas. Endast personer,
som är insatta i användningen av el-verktyget och är infor-
merade om farorna, som är förbundna med detta, får arbeta
med el-verktyget. Den krävda lägsta åldern måste iakttas.
Jämte säkerhetsupplysningarna i denna bruksanvisning och
ditt lands särskilda föreskrifter, ska man även beakta de
allmänna erkända reglerna för träbearbetningsmaskiner.
Vi övertar inget ansvar för olyckor eller skador, som uppstår
på grund av denna bruksanvisning och säkerhetsupplysning-
arna ignorerats.
Teckenförklaring ill. 1
1 Startkontakt
2 Handtag
3 Spärrhandtag
4 Motor
5 Sågblad
6 Sågklingaskydd, rörligt
7 Bas
8 Bordisättningsskiva
9 Roteringsbord
10 Fastspänningsklämma
11 Skarv för hölje/bas
12 Flispåse
13 Sågklingaskydd, fixerat
Leveransomfattning
Underskärande geringssåg
Flispåse
Fastspänningsklämma
Insexnyckel 6 mm för sågbladsbyte
Insexnyckel 3 mm för skjutbar stoppskena
2 Stöd för arbetsstycke
Stativfäste
2 kolborstar
2 Batterier (AAA)
Bruksanvisningar
Teknisk data
Mått L x W x H mm 690 x 550 x 440
ø Roteringsbord mm 385 x 150
Bordshöjd mm 55
Sågklinga ø mm 210/30/2,6 WZ 48
Hastighet 1/min 5000
Skärhastighet m/s 55
Svängradie 2 x 45°
Verktygets skärlutning 45°
Dubbelgering 45° x 45° left
Inställningar
45°, 30°, 22,5°, 15°, 0°, 15°,
22,5°, 30°, 45°
Vikt kg 7,7
Skärdata för längsgående skärning
max. kärdjup 90°/45° 60 / 35 mm
90°/90° 120 x 60 mm
9 0 °/4 5° 80 x 60 mm
4 5°/ 9 0° 120 x 35 mm
45°/45° 80 x 35 mm
Drift
Motor V
~
/Hz 220-240 / 50
Ingångseffekt W
S1 1200W
S6 25%* 1500W
Kan genomgå tekniska justeringar!

14 SE
* driftsätt S6, oavbruten periodisk drift. Driften samman-
sätts av en starttid, en tid med konstant belastning och
en tomgångstid. Varaktigheten uppgår till 10 min, den
relevanta påkopplingsvaraktigheten uppgår till 25% av
varaktigheten.
Arbetsstyckets höjd måste vara minst 3 mm, Ar-
betsstyckets bredd måste vara minst 10 mm. Se
till att arbetsstycket alltid är säkert fastspänd
med fastspänningsanordningen.
Information om buller
Maskinens bullernivåer följande:
L
pA
: 99.6dB(A) K=3dB(A)
L
wA
: 112.6dB(A) K=3dB(A)
Varning: Buller kan skada din hälsa allvarligt. Använd
lämpliga hörselskydd om ljudet från motorn överstiger 85 dB
(A). Om elanslutningen är otillräcklig kan spänningen sjunka
när maskinen startar. Detta kan påverka andra maskiner
(t.ex. kan lampor blinka). Om den elektriska uteffekten mot-
svarar Zmax <0.27, skall sådana störningar inte uppkomma.
(Underrätta din handlare om detta skulle ske).
• Vibrationsemissionsvärdet nedan är uppmätt i ett stan-
dardiserat test och kan användas för att jämföra olika
handverktyg med varandra;
• Vibrationsemissionsvärdet nedan kan också användas
för en första exponeringsbedömning.
2. Bestämmelseenlig användning
Kap- och geringssågen används till att kapa trä och plast i
enlighet med maskinstorleken.
Varning! Den medföljande sågklingan är endast avsett
för att såga trä! Använd inte klingan för att såga plast!
Maskinen får bara användas enligt dess bestämmelse. All
användning, som går utöver detta, är inte bestämmelseen-
lig. För skador, som orsakas av detta eller skador av alla
arter, har användaren/operatör ansvar och inte tillverka-
ren.
Endast sågblad, som är lämpliga för maskinen, får an-
vändas. Det är förbjudet att använda glasväggar av alla
sorter.
Beaktande av säkerhetsupplysningarna, är också en del
av den bestämmelseenliga användningen, såväl som mon-
teringsanvisningen och driftsupplysningarna i bruksanvis-
ningarna.
Personer, som manövrera och underhåller maskinen, måste
vara förtrogna med denna och vara informerade om möjli-
ga faror.
De gällande arbetarskyddsföreskrifterna ska följas så exakt
som möjligt.
Övriga allmänna regler inom arbetsmedicinska och säker-
hetstekniska områden ska beaktas.
Förändringar på maskinen undantar tillverkarens ansvar
samt för skador, som uppkommer av detta, fullständigt.
Trots bestämmelseenlig användning kan bestämda reste-
rande riskfaktorer inte undanröjas fullständigt. Beroende
på maskinens konstruktion och uppbyggnad kan följande
punkter inträffa:
• Vidröring av sågbladet i icke täckta sågområden.
• Gripa tag i det löpande sågbladet (skärskador).
• Rekyl från arbetsstycke och arbetsstyckesdelar.
• Sågbladsbrott.
• Utslungning av sågbladets felaktiga hårdmetalldelar
• Hörselskador om det nödvändiga hörselskyddet inte
används.
• Hälsoskadliga utsläpp av trämjöl vid användning i stäng-
da rum.
Beakta att våra apparater inte konstruerades bestämmelse-
enligt för yrkesmässig, hantverksmässig eller industriell an-
vändning. Vi övertar inget ansvar om apparaten används
i yrkesmässig, hantverksmässig eller industridrift såväl som
vid jämförbara aktiviteter.
3. Viktiga upplysningar
Varning! När el-verktyg används ska följande principi-
ella säkerhetsåtgärder beaktas för skydd mot elektriska
stötar, skade- och brandrisk. Läs alla dessa upplysningar,
innan du använder detta el-verktyg och bevara säkerhets-
upplysningarna ordentligt.
Säkert arbete
1 Håll god ordning i ditt arbetsområde.
– Oordning på arbetsplatsen kan leda till olyckor.
2 Ta hänsyn till omgivningspåverkan
– Ställ inte ut el-verktyget i regn.
– Använd inte el-verktyget i fuktig eller blöt omgivning.
– Se till att det finns god belysning på arbetsplatsen.
– Använd inte el-verktyget där det finns risk för brand
eller explosion.
3 Skydda dig mot elektriska stötar.
– Undvik kroppskontakt med jordade delar (t.ex. rör,
radiatorer, elspisar, kylapparater).
4 Håll andra personer på avstånd.
– Låt inte andra personer, i synnerhet barn, röra vid
el-verktyget eller kabeln. Håll de på avstånd från din
arbetsplats.
– Operatören måste vara minst 18 år, lärlingar måste
arbeta under uppsikt och vara minst 16 år.
5 Förvara el-verktyget på ett säkert ställe, när det inte
används.
– El-verktyg, som inte används, ska förvaras på en torr,
högt belägen eller avskild plats, utom räckhåll för
barn.
6 Överbelasta inte ditt el-verktyg
– Du arbetar bättre och säkrare i angivet effektområ-
de.
7 Använd rätt el-verktyg.
– Använd inga effektsvaga el-verktyg för tunga arbe-
ten.
– Använd inte el-verktyget, för sådana ändamål, som
det inte är avsett för. Använd till exempel inte hand-
cirkelsåg för att såga trädgrenar eller vedträ.
– Använd inte el-verktyget för vedsågning.
8 Bär lämpliga kläder
– Bär inga vida kläder eller smycken, eftersom de kan
fastna i rörliga delar.

15SE
19 Var alltid uppmärksam
– Beakta vad du gör. Var förnuftig i arbetet. Använd
inte el-verktyget när du är okoncentrerad.
20 Kontrollera om det finns eventuella skador på el-verk-
tyget.
– Innan el-verktyget används ytterligare måste
skyddsanordningar eller lätt skadade delar undersö-
kas noggrant för att funktionen är felfri och bestäm-
melseenlig.
– Kontrollera om de rörliga delarna fungerar felfritt
och inte kläms fast eller om delar är skadade.
Samtliga delar måste vara monterade korrekt och
uppfylla alla villkor, för att garantera en felfri drift av
el-verktyget.
– Den rörliga skyddshuven får inte klämmas fast i
öppet tillstånd.
– Skadade skyddsanordningar och delar måste
repareras eller bytas ut av en erkänd fackverkstad,
såvida inte annat anges i bruksanvisningen.
– Skadade brytare måste bytas ut på en kundtjänst-
verkstad.
– Använd inga felaktiga eller skadade anslutningsled-
ningar.
– Använd inga el-verktyg, om det inte går att koppla
på och från brytaren.
21 VARNING!
– Vid dubbelgeringsskärning krävs särskild försiktighet.
22 VARNING!
– Användningen av andra användningsverktyg och
andra tillbehör kan betyda en skaderisk för dig.
23 Låt en el-specialist reparera ditt el-verktyg
– Detta el-verktyg motsvarar tillämpliga säkerhetsbe-
stämmelser. Reparationer får bara genomföras av
el-specialister, när originalreservdelar används; i
annat fall kan det inträffa olyckor för manövreraren.
4. Ytterligare säkerhetsupplysningar
1 Säkerhetsåtgärder
– Varning! Använd inte skadade eller deformerade
sågblad.
– Byt ut en sliten bordsinsats.
– Använd endast sågblad, som rekommenderas av
tillverkaren och som motsvarar EN 847-1.
– Se till att använda ett sågblad, som är lämpligt för
materialet, som ska skäras.
– Bär lämplig personlig skyddsutrustning. Detta
omfattar:
– Hörselskydd för att undvika risken för dålig
hörsel,
– Andningsskydd för att undvika risken för farligt
damm.
– Bär handskar vid hantering av sågblad och råa
material. Bär alltid sågbladen i en behållare, om
det är praktiskt genomförbart.
– Bär skyddsglasögon Gnistor, som uppstår vid ar-
betet eller splitter, spån och damm, som kommer
ut från apparaten kan förorsaka synförlust.
– Anslut el-verktyget till en dammuppsamlingsan-
ordning vid sågning av trä. Dammutsläppandet
påverkas bland annat av sorten på materialen, som
– Om man arbetar utomhus rekommenderas att man
använder halksäkra skodon.
– Bär alltid hårnät om du har långt hår.
9 Använda skyddsutrustning
– Bär skyddsglasögon
– Använd andningsmask vid dammbildande arbeten.
10 Anslut dammsugningsanordningen
– Om det finns anslutningar till dammsugningen och
uppsamlingsanordningen, ska du säkerställa att
dessa är anslutna och används korrekt.
– Drift i slutna rum vid bearbetning av trä, träliknande
material och plaster, är endast tillåtet med en lämp-
lig uppsugningsanläggning.
11 Använd inte kabeln för ändamål, som den inte är
avsedd för.
– Använd inte kabeln för att dra ut stickproppen från
vägguttaget. Skydda kabeln mot hetta, olja och
skarpa kanter.
12 Säkra arbetsstycket
– Använd spännanordningarna eller ett skruvstäd, för
att hålla fast arbetsstycket. Det hålls därmed säkrare
än med din hand och möjliggör manövrering av
maskinen med båda händerna.
– Om långa arbetsstycken används krävs en ytterliga-
re uppläggning (bord, bockar etc.) för att undvika att
maskiner tippar.
– Tryck alltid fast arbetsstycket mot arbetsplattan och
anslaget, för att undvika att arbetsstycket vacklar
resp. vrids.
13 Undvik onormal kroppshållning.
– Se till att du står stabilt och håll alltid balansen.
– Undvik opraktiska handpositioner, vid vilka en eller
båda händerna kan röra vid sågbladet om man
plötsligt halkar med händerna.
14 Vårda ditt verktyg med omsorg.
– Håll ditt skärverktyg skarpt och rent för att kunna
arbeta bättre och säkrare.
– Följ upplysningarna för smörjning och för verktygs-
byte.
– Kontrollera el-verktygets anslutningsledning regel-
bundet och låt dessa förnyas av en erkänd specialist
om skador finns.
– Kontrollera förlängningssladdar regelbundet och
ersätt dessa, om de är skadade.
– Håll handtaget torrt, rent och fritt från olja och fett.
15 Dra ut stickproppen ur vägguttaget.
– Ta aldrig bort lösa skärvor, spån eller inklämda
trädelar om sågbladet körs.
– Om el-verktyget inte används, före underhåll och vid
byte av verktyg som t.ex. sågblad, borrhål, fräs.
16 Låt ingen verktygsnyckel sticka ut
– Kontrollera att nyckeln och inställningsverktyget är
borttagna före påkopplingen.
17 Undvik oavsiktlig start
– Förvissa dig om att brytaren är frånkopplad när
stickproppen sticks in i vägguttaget.
18 Använd förlängningskabeln för utomhusområdet
– Använd endast förlängningskabel utomhus, som är
tillåten för detta och markerad på motsvarande sätt.
– Använd endast kabeltrumma i utrullat tillstånd.
Strona się ładuje...
Strona się ładuje...
Strona się ładuje...
Strona się ładuje...
Strona się ładuje...
Strona się ładuje...
Strona się ładuje...
Strona się ładuje...
Strona się ładuje...
Strona się ładuje...
Strona się ładuje...
Strona się ładuje...
Strona się ładuje...
Strona się ładuje...
Strona się ładuje...
Strona się ładuje...
Strona się ładuje...
Strona się ładuje...
Strona się ładuje...
Strona się ładuje...
Strona się ładuje...
Strona się ładuje...
Strona się ładuje...
Strona się ładuje...
Strona się ładuje...
Strona się ładuje...
Strona się ładuje...
Strona się ładuje...
Strona się ładuje...
Strona się ładuje...
Strona się ładuje...
Strona się ładuje...
Strona się ładuje...
Strona się ładuje...
Strona się ładuje...
Strona się ładuje...
Strona się ładuje...
Strona się ładuje...
Strona się ładuje...
Strona się ładuje...
Strona się ładuje...
Strona się ładuje...
Strona się ładuje...
Strona się ładuje...
Strona się ładuje...
Strona się ładuje...
Strona się ładuje...
Strona się ładuje...
-
 1
1
-
 2
2
-
 3
3
-
 4
4
-
 5
5
-
 6
6
-
 7
7
-
 8
8
-
 9
9
-
 10
10
-
 11
11
-
 12
12
-
 13
13
-
 14
14
-
 15
15
-
 16
16
-
 17
17
-
 18
18
-
 19
19
-
 20
20
-
 21
21
-
 22
22
-
 23
23
-
 24
24
-
 25
25
-
 26
26
-
 27
27
-
 28
28
-
 29
29
-
 30
30
-
 31
31
-
 32
32
-
 33
33
-
 34
34
-
 35
35
-
 36
36
-
 37
37
-
 38
38
-
 39
39
-
 40
40
-
 41
41
-
 42
42
-
 43
43
-
 44
44
-
 45
45
-
 46
46
-
 47
47
-
 48
48
-
 49
49
-
 50
50
-
 51
51
-
 52
52
-
 53
53
-
 54
54
-
 55
55
-
 56
56
-
 57
57
-
 58
58
-
 59
59
-
 60
60
-
 61
61
-
 62
62
-
 63
63
-
 64
64
-
 65
65
-
 66
66
-
 67
67
-
 68
68


Parkside PKS 1500 A2 Operating And Safety Instructions Manual
- Kategoria
- Piły ukośne
- Typ
- Operating And Safety Instructions Manual
- Niniejsza instrukcja jest również odpowiednia dla
w innych językach
- Deutsch: Parkside PKS 1500 A2
- svenska: Parkside PKS 1500 A2
- English: Parkside PKS 1500 A2
Powiązane artykuły
-
Parkside PKS 1500 A1 Operating And Safety Instructions Manual
-
Parkside PKS 1500 A2 Operating And Safety Instructions Manual
-
Parkside PZKS 1500 B2 Operation and Safety Notes
-
-
-
Parkside PDKS 120 A2 Operation And Safety Notes Original Operating Instructions
-
Parkside PKS 1700 A1 Operation And Safety Notes Original Operating Instructions
-
Parkside PKS 1700 B2 Instrukcja obsługi
Inne dokumenty
-
Scheppach HM90SL Instrukcja obsługi
-
Metabo KGT 305 M Instrukcja obsługi
-
Defort DMS-1200 Instrukcja obsługi
-
Matrix 210.200.356 Operational Manual
-
Scheppach HM254 Translation Of Original Instruction Manual
-
Ferm MSM1021 Instrukcja obsługi
-
Ferm MSM1034 Instrukcja obsługi
-
-
Vonroc MS806AA Instrukcja obsługi
-